
MY-CS6037WPB - Other household appliances MIDEA - Free user manual and instructions
Find the device manual for free MY-CS6037WPB MIDEA in PDF.


| Product Type | Countertop Microwave Oven |
| Brand | Midea |
| Model | MY-CS6037WPB |
| Capacity | 0.7 cu ft |
| Power Output | 700 Watts |
| Power Source | 120V / 60Hz |
| Dimensions (W x D x H) | 17.5 x 10.2 x 12.8 inches |
| Weight | 20.5 lbs |
| Control Type | Keypad with digital display |
| Cooking Levels | 10 power levels |
| Timer | Up to 99 minutes 99 seconds |
| Defrost Function | Yes, by weight or time |
| Express Cook | Yes, quick start settings |
| Child Lock | Yes, for safety |
| Turntable | Glass, removable |
| Interior Light | Yes |
| Door Type | Push-button release |
| Cleaning | Wipe with damp cloth; avoid abrasive cleaners |
| Safety Certifications | ETL, FCC |
| Warranty | 1 year limited |
Frequently Asked Questions - MY-CS6037WPB MIDEA
User questions about MY-CS6037WPB MIDEA
0 question about this device. Answer the ones you know or ask your own.
Ask a new question about this device
Download the instructions for your Other household appliances in PDF format for free! Find your manual MY-CS6037WPB - MIDEA and take your electronic device back in hand. On this page are published all the documents necessary for the use of your device. MY-CS6037WPB by MIDEA.
USER MANUAL MY-CS6037WPB MIDEA
MY-CS6037WPB
MY-CS6037WPB

Periodic check


MY-CS6037WPB
IMPORTANT NOTE: Please read the manual carefully before operating your product. Retain it for future reference.
(Pictures are for reference only, actual product may differ from picture shown)
Caution
- Read all the instructions
- This appliance is for household use only. Do not use outdoors.
- This appliance is not intended for use by persons with reduced physical, sensory or mental capabilities, or lack of experience and knowledge, unless they have been given supervision or instruction concerning use of the appliance by a person responsible for their safety.
- This appliance shall not be used by children. Keep the appliance and its cord out of reach of children.
- Children should be supervised to ensure that they do not play with the appliance.
- This appliance is intended to be used in household and similar applications such as: -Staff kitchen areas in shops, offices and other working environments; -farm houses; -by clients in hotels, motels and other residential type environments; -bed and breakfast type environments.
- If the supply cord is damaged, it must be replaced by the manufacturer, its service agent or similarly qualified persons in order to avoid a hazard.
- Please turn off and unplug the appliance before cleaning, maintenance or relocation and whenever it is not in use.
- Do not immerse any part of the appliance in water or other liquid.
- The pressure regulator allowing the escape of steam should be checked regularly to ensure that it is not blocked.
- The container must not be opened until the pressure has decreased sufficiently.
Caution
- The heating element surface is subject to residual heat after use, do not touch.
- Warning: Avoid spillage on the connector.
- Warning: Misuse may cause potential injury.
- Warning: The appliance is not intended to be operated by means of an external timer or a separate remote-control system. Do not put the pressure cooker into a heated oven.
- Move the pressure cooker under pressure with the greatest care. Do not touch hot surfaces. Use the handles and knobs. If necessary, use protection. Do not let children near the pressure cooker when in use.
- Do not use the pressure cooker for a purpose other than the one for which it is intended.
- This appliance cooks under pressure. Scalds may result from inappropriate use of the pressure cooker. Make sure that the cooker is properly closed before applying heat, see "instructions for use".
- Never force open the pressure cooker. Do not open before making sure that its internal pressure has completely dropped. See the "instructions for use".
- Never use your pressure cooker without adding water or food, this would seriously damage it.
- Do not fill the cooker beyond 2/3 of its capacity. When cooking foodstuffs which expand during cooking, such as rice or dehydrated vegetables, do not fill the cooker to more than half of its capacity.
- Use the appropriate heat source(s) according to the instructions for use.
- After cooking meat with skin (e.g., ox tongue) which may swell under the effect of pressure, do not prick the meat while the skin is swollen; you might be scalded.
- When cooking doughy food, gently shake the cooker before opening the lid to avoid food ejection.
IMPORTANT PRECAUTIONS
Caution
- Before each use, check that the valves are not obstructed. See the instructions for use.
- Never use the pressure cooker in its pressurized mode for deep or shallow frying of food.
- Do not tamper with any of the safety systems beyond the maintenance instructions specified in the instructions for use.
- Only use manufacturer's spare parts in accordance with the relevant model. In particular, use a body and a lid from the same manufacturer indicated as being compatible.
- KEEP THESE INSTRUCTIONS.

The appliance must not be disposed of with regular household waste. At the end of its service life, the appliance must be properly delivered to a collection point for the recycling of electrical and electronic equipment. By collecting and recycling old appliances, you are making an important contribution to the conservation of our natural resources and provide for environmentally sound and healthy disposal.
Product Structure
Tips:
- Please move the product with the handle of the cooker body.
- Please remove the water from the housing cover with a cloth.

Note:
① Exhaust valve: Pull out the exhaust valve from the lid. Clean the internal side of the exhaust valve and the exhaust valve and float valve of the lid with a brush and cloth at least once a month. ② Sealing ring: Remove oil and dirt from the sealing ring with detergent and a brush. ③ Water box: After cooking, steam may condense in the water box of the external pot. Remove the water to avoid bad odor, and clean it with a clean cloth.
Disassemble and install the block proof cover and seal ring
Disassemble and install the block proof cover Disassemble: Pull it out upwards Install: Press it down to install
Block proof cover


Disassemble and install the seal ring Disassemble: Pull it out upwards Install: Press it down to install


- Check that the seal ring and block proof cover are correctly installed in the upper cover before each use.
- After use, clean the seal ring and the area around the block proof cover to prevent the cover from jamming, and keep it clean to avoid bad odor.
- Do not pull the seal ring, as a distorted seal ring may affect the sealing and pressure performance.
- Do not use a damaged seal ring; replace it at an authorized repair center.
Use and maintain the inner pot
1. Do not heat when empty
Heating the inner pot when empty for a long time may cause yellowing, spotting, or distortion of the bottom.
2. Do not store acidic, alkaline, or preserved foods for long periods
Although the inner pot has excellent anti-corrosion performance, it may still corrode to some degree. The recommended keep-warm time should not exceed 2 hours.
Use and maintain the inner pot
3. Keep it clean to prolong the service life
Do not immerse it in water for a long period.
Clean the inner pot with soap, mild detergent or warm water to remove dust, oil and dirt.
- Do not use a metal shovel or other hard tool, otherwise it will damage the inner surface of pot.
Prepare For Cooking
1 Opening the lid correctly
- Hold the handle of upper cover, turn it anticlockwise for about 30° till the lid at unlock state, and then lift the upper cover.
2 Check if the parts and accessories of lid are well installed
- Check if the floater valve and exhaust valve are jammed, confirm if the sealing ring and block proof cover are well installed.
3. Take out the inner pot, put the foods and water into the inner pot
- The total amount of foods and water shall not exceed the Max marked on the inner pot.
4 Put the inner pot into the cooker
- Wipe to clean the external surface of inner pot, foreign object and water are not allowed on the inner surface of electric pressure cooker;
- Turn the inner pot to left and right to ensure good contact with the heating plate.
5 Safely close the lid
- Before closing the lid, check if the sealing ring is well installed.
- Hold the handle of the upper cover, aim the lid as "unlock state", put the top cover horizontally on the cooker body, turn the upper cover clockwise for about 30° to the lock place as "Lock State".
6. Put the exhaust valve well.
- When working, please turn the exhaust valve to the sealing place, which means the electric pressure cooker keeps at sealing state;
- For manual exhaust, please turn the exhaust valve handle to the exhaust place, the electric pressure cooker keeps at the exhaust state;
![graph TD A["Unlock State"] --> B["Usable Capacity"] B --> C["Lock State"]](/content/2026/06/1365281/images/c2e55e16a080eef92e2f424be575754aa7355039ff86735d90fb7e1195d9d2c4.jpg)
(Pictures are for reference only, actual product may differ from picture shown)
Prepare For Cooking
When exhausting, do not keep the hands or face above the exhaust opening;
- Check if the floater valve drops down before working (before heating, the floater valve is down).
| Sealing schematic diagram | Exhaust schematic diagram |
 |  |
General Function
- Switch on. If the buttons are inactive when in use, please confirm if the lid is closed at the right place. The buttons are inactive if the lid is not closed correctly for product of this series.
- After cooking, the cooker may automatically enter into the keep warm state. After cooking, the cooker may automatically enter into the keep warm state (some functions), and the indicator displays "0H (0 hour), 1H (1 hour), 2H (2 hour)..." or "L0:00 (0 min), L0:01 (1 min)..."
Tips:
When the cooker is working, it is normal that it makes a "cluck" sound. Please set your heart at ease when using.
To cook a small amount of food, the inner pot may possibly be lifted when opening the lid. Please shake the lid to drop the inner pot into the cooker body and then remove the lid.
Safely open the lid
- Cut off power supply or remove the power plug
- Exhaust method
A. Quickly open the lid (For non-fluid foods)
Turn the exhaust valve to the exhaust place for exhausting, Some unit by pressing steam release button “💡” till the float valve drops down.
B. Generally open the lid
Keep the electric pressure cooker cool naturally till the float valve drops down.
- Open the lid
Turn the upper cover anticlockwise with the left hand, turn it to the cover open limit place, lift the upper cover with the right hand to open the lid.
Do not open the lid before the pressure in the pot has been completely released, do not open the lid fiercely if it is difficult to open.
Do not pull out the exhaust valve when turning the exhaust valve.
After cooking fluid foods (porridge and soup), do not turn the exhaust valve or press the steam release button please cut off power supply to make it cool naturally till the float drops before opening the lid.
Technical Data Of The Product
| Model Capacity | Power Supply | Rated Power | Size of Inner Pot | Working Pressure | Keep Warm Temperature | |
| MY-CS6037WPB | 220-240V~50/60Hz | 1000W 8.66" | 5.7L | 80kPa | 140°F~176°F | |
| Accessories | Spoon  | Soup Scoop  | User Manual  | Power Cord Components  | ||
Product Structure

| No. | Description |
| 1 | Exhaust valve handle |
| 2 | Upper cover handle |
| 3 | Seal ring |
| 4 | Control Box |
| 5 | Exhaust opening |
| 6 | Float valve |
| 7 | Sealing ring |
| 8 | Block proof cover |
| 9 | Inner pot |
| 10 | Cooker body handle |
| 11 | Cooker body |
Operation Part

Function Selection
Operation Guidelines
Function Operation Guidelines
| Cancel | Under any state, press “Cancel” button to cancel the current work state and return standby state. |
| Keep Warm | Under standby state, press “Keep Warm” button, the indicator light is on and the digital screen shows default working time. Press “Cooking Timer” button, then press “+” or “-” button to adjust the working time. Press “Start” button to enter into keep warm state. “Keep Warm” indicator light is on and the digital screen shows default working time. Press “+” or “-” button to adjust the working time. |
| Sauté | Under standby state, press “Menu” button, the indicator light is on and the digital screen shows default working time. Press “Cooking Timer” button ,then press “+” or “-” button to adjust the working time. Press “Start” button to enter into cooking state. Starts countdown and enters to standby state when it finishes working. |
| Bake | Under standby state, press “Menu” button, the indicator light is on and the digital screen shows default working time. Press “Cooking Timer” button ,then press “+” or “-” button to adjust the working time.Press “Start” button to enter into cooking state. The digital screen starts countdown as soon as the temperature rise to working temperature . Enters into keep warm when it finishes working. |
| Slow Cook/ Yogurt | Under standby state, press the function button, the indicator light is on and the digital screen shows default working time. Press “Cooking Timer” button, then press “+” or “-” button to adjust the working time. Press “Start” button to enter into cooking state. The digital screen starts countdown and the unit enters to keep warm (Slow Cook) or standby state (Yogurt) when it finishes working. |
Function Selection
| Function | Operation Guidelines |
| Stew/ Soup/Broth Steam/ Oatmeal/ Pressure Cook/ Egg Bean/Chili Rice/ DIY | Under standby state, press “Menu” button, the indicator light is on and the digital screen shows default working time. Press “Cooking Timer” button, then press “+” or “-” button to adjust the working time. Press “Start” button to enter into cooking state. The digital screen starts countdown as soon as the pressure rise to working pressure. Enters into keep warm when it finishes working. |
| Delay Timer | Delay cooking: Before the program start, press “Delay Timer” button.The screen shows the preset beginning time. Press “Cooking Timer” button, then press “+” or “-” button to adjust the delay time. Then press “Delay Timer” button to change Hour and minute. Press “Start” button, the unit starts delay time count-down. When it countdown to the end, the program starts working.Note: Yogurt、Sauté、Bake、Keep Warm function cannot set the delay timer. |
| Level | Before the program start, you can press “Level” button to change the food flavor for “Low” or “Medium” or “High”. |
Daily Check and Maintenance
To use the product safely and ensure a longer service life, please check and maintain it carefully.
If the following occur, take the corresponding actions:
- The power cord and plug are swollen, deformed, damaged, or have changed color.
- Parts of the power cord and plug are hot.
- The power cord is flexible and the power supply is intermittent.
- The electric pressure cooker heats abnormally and produces a bad odor.
- There is abnormal noise or vibration when the power is supplied.
- There is dust or dirt on the plug or socket. Remove the dust or dirt.
Stop using the product and have it repaired by an authorized repair center.
Safety Precautions
To avoid personal injury and property loss, be sure to observe the following safety precautions.
- Meanings of the marks:
 | Means“Forbidden” items |  | GeneralForbid |  | DisassembleForbidden |  | Wet handsForbidden |
 | ContactForbidden |  | Spray WaterForbidden | ||||
 | Means“Mandatory” items |  | Must beexecuted |  | Remove thepower plug |
- The danger caused by mistaken use if the following warnings are neglected includes two grades.

Warning
It may possibly cause death or serious injury if the warning items are disobeyed.

Caution
It may cause physical injury or property damage if the caution items are disobeyed.
Safety Precautions

Warning

Use correct power outlet (Refer to the label)
- Failure to use correct electricity can cause fire or electric shock.
- Danger of fire if the bad socket is adopted.

Safety Precautions

Warning

A socket shall be used alone
- A socket of more than 10A rated current with grounding wire shall be used alone;
- If shared with other electrical appliances, the socket may cause abnormal heat and result in fire.

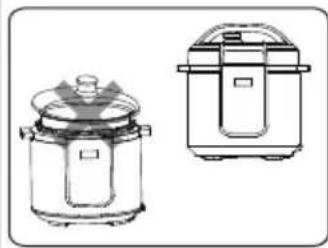
It is strictly prohibited to use other lid
- It is strictly prohibited to use other lid for heating, and in the (switching on) process, the use of non-original lid is not allowed. • As this may cause electric shock or safety hazards.


Stop using if the power cord is damaged
- Replace the damaged power cord with special soft cord or replace it with special assembly purchased from the manufacturer or authorized repair center.

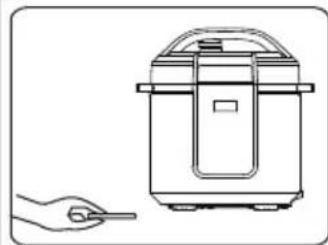
Do not put foreign objects
- It is prohibited to insert metal shavings, needles and other foreign matter in the gap.
- As this may cause electric shock or movement anomalies.


Place the appliance in a location out of reach of infants
- Place the appliance in a location out of reach of infants. • To avoid electric shock and scald.


Modification is prohibited
- Modification or repair by non-professionals is prohibited. • Violation may cause a fire or electric shock.
- Repair or replacement of parts shall be made in a designated service center.


Products may not be immersed or sprinkled in water
- Doing so could cause electric shock and electrical short circuits.

Safety Precautions

Warning
Warning on Opening the Lid
- When the electric pressure cooker is not working, there isn't pressure in the pot, the float valve is down;
- When the electric pressure cooker is working, pressure in the cooker rises, float valve ascends; do not fiercely open the lid before the pressure has been completely released;
- If it is difficult to open the lid, please do not open it fiercely, otherwise, it may cause scalding or physical injury.


Check periodically
- Be sure to check periodically the block proof cover and exhaust valve core to make sure that they are not be blocked;
- Do not cover the exhaust valve with heavy object or replace it with other object.


Caution

Never pull the plug with a wet hand
• To avoid electric shock.


When pulling the plug, you must pinch the plug
- When pulling the plug, you must pinch the plug;
- Do not pull the power cord, otherwise it will damage the cord, causing electric shock and short circuit.


Unplug when not in use.
- Otherwise, it may produce leakage, fire or failure.


While working, never move your hands close to the exhaust port.
- During cooking, never move your hands close to the exhaust port to avoid burns.
- During cooking, do not cover the vent with a cloth or other items.

Safety Precautions

Caution

When the cooker is working, please do not touch the lid.


- When the cooker is working, the lid has high temperature, do not touch it; - Otherwise, it may possibly cause scalding.

The total amount of food and water cannot exceed the Max scale.

- The total amount of food and water cannot exceed the Max scale, otherwise food may be undercooked or cause malfunction.

Do not use a pot other than the dedicated pot.

- When there is a foreign object on the bottom of the pot and heating plate surface, remove the foreign object before use.

- Otherwise, it may cause overheating and work abnormalities, etc.
Do not put the inner pot on other appliance for heating

• In order to avoid deformation or fault. - Please use the special inner pot.
When moving the product, please hold the handle of cooker body

- When moving the product, do not directly hold the handle of lid for avoiding lid dropping.
Do not use in the following locations
- Do not use in unstable locations;
- Do not use in locations near water and fire;
- Do not use near walls and furniture;
- Do not use in locations exposed to direct sunlight and oil splatter.
- Do not approach the stove for avoiding fire.
Environment For Storing The Product
• Periodically clean the cooker and remove oil and dirt if it is stored on the table. - Put the electric pressure cooker 30cm away from other kitchen appliances.
Clean After Use
- Clean after each use.
- Before cleaning and maintenance, please unplug the power cord until the product cools.
- Remove the lid and inner pot, clean with detergent first, then rinse well with water, and wipe dry with a soft cloth.
- Clean the internal side of the lid with water. The seal ring, block proof cover, exhaust valve core and float valve can be removed for washing. After washing, install them timely and correctly, then dry the internal side of the lid with a cloth.
- Wipe clean the cooker body with a rag. It is prohibited to soak the cooker body in water or spray water onto it.
Troubleshooting
When the following situations occur, it is not a cooker fault. Please carefully check before sending it for repair.
| S/N | Problem | Reason | Solution |
| 1 | Difficult to close the lid | Sealing ring not installed properly | Position the sealing ring well |
| The floater valve clamps the push rod | Lightly push the push rod | ||
| 2 | Difficult to open the lid | Float valve in the popped-up position | Press the float valve lightly with a chopstick. |
| Pressure exists inside the cooker | Open the lid after the pressure is completely released. | ||
| 3 | Steam leaks from the lid | Sealing ring installed improperly | Install the sealing ring as required |
| Food debris attached to the sealing ring | Clean the sealing ring | ||
| Sealing ring damaged | Replace the sealing ring | ||
| The lid is not closed correctly | Close the lid correctly | ||
| 4 | Steam leaks from float valve | Food debris on the float valve gasket | Clean the float valve gasket |
| Float valve gasket worn-out | Replace the float valve gasket | ||
| 5 | Float valve unable to rise | Too little food and water in inner pot | Add water and food according to the recipe |
| Steam leaks from the lid or exhaust valve | Send to the service center for repair |
Troubleshooting
| S/N | Problem | Reason | Solution | |
| 6 | Steam comes out from exhaust valve non-stop | Exhaust valve not in sealing position | Turn the exhaust valve to the sealing position | |
| Pressure control fails | Send to the service center for repair | |||
| 7 | Power indicator doesn't light on | Power socket bad contact | Please check the power socket | |
| 8 | All indicators flas | Display screen displays E1 | Bottom sensor fault | Send to the service center for repair |
| Display screen displays E2 | ||||
| Display screen displays C1 | High temperature since there isn't water in the inner pot | Add water according to the requirement | ||
| High temperature since there isn't water in the inner pot | Put the inner pot correctly | |||
| Display screen displays E8 | Pressure switch fault | Send to the service center for repair | ||
| 9 | Rice half cooked or too hard | Too little water | Add water accordingly | |
| Lid opened prematurely | After cooking cycle completes, leave the lid on for 5 more minutes. | |||
| 10 | Rice too soft | Too much water | Reduce water accordingly | |
If the fault is not resolved after the above checks, please contact our authorized service center for repair.
Midea
MY-CS6037WPB


- PERIODIC CHECK
- CAUTION
- IMPORTANT PRECAUTIONS
- PRODUCT STRUCTURE
- TIPS
- NOTE
- DISASSEMBLE AND INSTALL THE BLOCK PROOF COVER AND SEAL RING
- USE AND MAINTAIN THE INNER POT
- DO NOT HEAT WHEN EMPTY
- DO NOT STORE ACIDIC, ALKALINE, OR PRESERVED FOODS FOR LONG PERIODS
- KEEP IT CLEAN TO PROLONG THE SERVICE LIFE
- PREPARE FOR COOKING
- OPENING THE LID CORRECTLY
- CHECK IF THE PARTS AND ACCESSORIES OF LID ARE WELL INSTALLED
- TAKE OUT THE INNER POT, PUT THE FOODS AND WATER INTO THE INNER POT
- PUT THE INNER POT INTO THE COOKER
- SAFELY CLOSE THE LID
- PUT THE EXHAUST VALVE WELL
- GENERAL FUNCTION
- SAFELY OPEN THE LID
- TECHNICAL DATA OF THE PRODUCT
- OPERATION PART
- FUNCTION SELECTION
- OPERATION GUIDELINES
- DAILY CHECK AND MAINTENANCE
- IF THE FOLLOWING OCCUR, TAKE THE CORRESPONDING ACTIONS
- SAFETY PRECAUTIONS
- WARNING
- USE CORRECT POWER OUTLET (REFER TO THE LABEL)
- A SOCKET SHALL BE USED ALONE
- IT IS STRICTLY PROHIBITED TO USE OTHER LID
- STOP USING IF THE POWER CORD IS DAMAGED
- DO NOT PUT FOREIGN OBJECTS
- PLACE THE APPLIANCE IN A LOCATION OUT OF REACH OF INFANTS
- MODIFICATION IS PROHIBITED
- PRODUCTS MAY NOT BE IMMERSED OR SPRINKLED IN WATER
- WARNING ON OPENING THE LID
- CHECK PERIODICALLY
- NEVER PULL THE PLUG WITH A WET HAND
- WHEN PULLING THE PLUG, YOU MUST PINCH THE PLUG
- UNPLUG WHEN NOT IN USE
- WHILE WORKING, NEVER MOVE YOUR HANDS CLOSE TO THE EXHAUST PORT
- WHEN THE COOKER IS WORKING, PLEASE DO NOT TOUCH THE LID
- THE TOTAL AMOUNT OF FOOD AND WATER CANNOT EXCEED THE MAX SCALE
- DO NOT USE A POT OTHER THAN THE DEDICATED POT
- DO NOT PUT THE INNER POT ON OTHER APPLIANCE FOR HEATING
- WHEN MOVING THE PRODUCT, PLEASE HOLD THE HANDLE OF COOKER BODY
- DO NOT USE IN THE FOLLOWING LOCATIONS
- ENVIRONMENT FOR STORING THE PRODUCT
- CLEAN AFTER USE
- TROUBLESHOOTING
- MIDEA
Brand : MIDEA
Model : MY-CS6037WPB
Category : Other household appliances