
Expedition Explor - Hi-Fi System SAMSON - Free user manual and instructions
Find the device manual for free Expedition Explor SAMSON in PDF.


| Product Type | Portable PA System |
| Dimensions (W x H x D) | 330 mm x 450 mm x 280 mm |
| Weight | 8 kg |
| Power Supply | AC 100-240V, 50/60Hz; internal rechargeable battery (6 hours playtime) |
| Speaker Configuration | 10" woofer + 1" tweeter |
| RMS Power Output | 200W |
| Bluetooth Version | 5.0 |
| Channels / Mixer | 2-channel mixer with volume, reverb, and EQ controls |
| Microphone Input | 1/4" (6.35 mm) and XLR combo jacks |
| Included Accessories | Wireless handheld microphone, power cable, user manual |
| Battery Type | Lithium-ion, 12V / 5Ah |
| Charging Time | Approx. 4 hours |
| Audio Inputs | Bluetooth, 3.5 mm aux, USB (for media playback) |
| Audio Outputs | 1/4" headphone out, line out |
| Frequency Response | 50 Hz – 20 kHz |
| Maximum SPL | 118 dB |
| Maintenance & Cleaning | Wipe with a dry, lint-free cloth; avoid liquids and solvents |
| Safety Precautions | Do not expose to rain or moisture; use only with grounded outlet; avoid extreme temperatures |
| Spare Parts & Repairability | Contact Samson customer service for authorized replacement parts and repair options |
| General Information | Ideal for small to medium events, karaoke, and public speaking; includes built-in DSP effects |
Frequently Asked Questions - Expedition Explor SAMSON
User questions about Expedition Explor SAMSON
0 question about this device. Answer the ones you know or ask your own.
Ask a new question about this device
Download the instructions for your Hi-Fi System in PDF format for free! Find your manual Expedition Explor - SAMSON and take your electronic device back in hand. On this page are published all the documents necessary for the use of your device. Expedition Explor by SAMSON.
USER MANUAL Expedition Explor SAMSON
natural_image
Line drawing of a portable electronic device with a dotted pattern and 'SAMSON' logo on the cover (no text or symbols beyond branding)Owner's Manual
Important Safety Information

AVIS RISQUE DE CHOC ÉLECTRONIQUE - NE PAS OUVRIR
WARNING: TO REDUCE THE RISK OF ELECTRIC SHOCK, DO NOT REMOVE COVER (OR BACK) AS THERE ARE NO USER-SERVICEABLE PARTS INSIDE. REFER SERVICING TO QUALIFIED SERVICE PERSONNEL.

This lightning flash with arrowhead symbol within an equilateral triangle is intended to alert the user to the presence of non-insulated “dangerous voltage” within the product’s enclosure that may be of sufficient magnitude to constitute a risk of electric shock.

The exclamation point within an equilateral triangle is intended to alert the user to the presence of important operating and maintenance instructions in the literature accompanying the appliance.

If you want to dispose this product, do not mix it with general household waste. There is a separate collection system for used electronic products in accordance with legislation that requires proper treatment, recovery and recycling.
Private household in the 27 member states of the EU, in Switzerland and Norway
may return their used electronic products free of charge to designated collection facilities or to a retailer (if you purchase a similar new one).
For Countries not mentioned above, please contact your local authorities for a correct method of disposal.
By doing so you will ensure that your disposed product undergoes the necessary treatment, recovery and recycling and thus prevent potential negative effects on the environment and human health.
Copyright 2023
v1.1
Samson Technologies Corp.
278-B Duffy Ave
Hicksville, New York 11801
www.samsontech.com
The Bluetooth® word mark and logos are registered trademarks owned by Bluetooth SIG, Inc. and any use of such marks by Samson Technologies is under license. Other trademarks and trade names are those of their respective owners."
Important Safety Information
- Read these instructions.
- Keep these instructions.
- Heed all warnings.
- Follow all instructions.
- Do not use this apparatus near water.
- Clean only with dry cloth.
- Do not block any ventilation openings. Install in accordance with the manufacturer's instructions.
- Do not install near any heat sources such as radiators, heat registers, stoves, or other apparatus (including amplifiers) that produce heat.
- Do not defeat the safety purpose of the polarized or grounding type plug. A polarized plug has two blades with one wider than the other. A grounding type plug has two blades and a third grounding prong. The wide blade or the third prong are provided for your safety. If the provided plug does not fit into your outlet, consult an electrician for replacement of the obsolete outlet.
- Protect the power cord from being walked on or pinched particularly at the plugs, convenience receptacles, and at the point where they exit from the apparatus.
- Only use attachments/accessories specified by the manufacturer.
-
Use only with the cart, stand, tripod, bracket, or table specified by the manufacturer, or sold with the apparatus. When a cart is used, use caution when moving the cart/apparatus combination to avoid injury from tip-over.
-
Unplug the apparatus during lightening storms or when unused for long periods of time.
- Refer all servicing to qualified personnel. Service is required when the apparatus has been damaged in any way, such as power supply cord or plug is damaged, liquid has been spilled or objects have fallen into the apparatus has been exposed to rain or moisture, does not operate normally, or has been dropped.
- This appliance shall not be exposed to dripping or splashing water and that no object filled with liquid such as vases shall be placed on the apparatus.
- Caution-to prevent electrical shock, match wide blade plug wide slot fully insert.
- Please keep a good ventilation environment around the entire unit.
- To prevent injury, this apparatus must be securely attached to the stand in accordance with the installation instructions.
- WARNING: The battery (battery or batteries or battery pack) shall not be exposed to excessive heat such as sunshine, fire or the like.
- CAUTION: Danger of explosion if battery is incorrectly replaced. Replace only with the same or equivalent type.

natural_image
Symbolic illustration of a person climbing a ladder inside a circle (no text or symbols)Important Safety Information
FCC Notice
- This device complies with Part 15 of the FCC Rules. Operation is subject to the following two conditions:
(1) This device may not cause harmful interference.
(2) This device must accept any interference received, including interference that may cause undesired operation.
- Changes or modifications not expressly approved by the party responsible for compliance could void the user's authority to operate the equipment.
FCC Statement
This equipment has been tested and found to comply with the limits for a Class B digital device, pursuant to Part 15 of the FCC Rules. These limits are designed to provide reasonable protection against harmful interference in a residential installation.
This equipment generates uses and can radiate radio frequency energy and, if not installed and used in accordance with the instructions, may cause harmful interference to radio communications. However, there is no guarantee that interference will not occur in a particular installation. If this equipment does cause harmful interference to radio or television reception, which can be ` by turning the equipment off and on, the user is encouraged to try to correct the interference by one or more of the following measures:
- Reorient or relocate the receiving antenna.
- Increase the separation between the equipment and receiver.
- Connect the equipment into an outlet on a circuit different from that to which the receiver is connected.
- Consult the dealer or an experienced radio/TV technician for help.
RF Warning Statement
The device has been evaluated to meet general RF exposure requirement. The device can be used in portable exposure condition without restriction.
This device complies with RSS-310 of Industry Canada. Operation is subject to the condition that this device does not cause harmful interference.
Table of Contents
Introduction . . . . . . . . . . . . . . . . . . . . . . . . . . . . . . . . . . . . . . . . . . . . . . 7
Control Panel Features 8
Quick Start .9
Pairing with a Bluetooth® Device ..... 10
Charging the Battery 11
Speaker Placement. 12
Avoiding Feedback 12
Quick Start - XPD2 Wireless System . . . . . . . . . . . . . . 13
Quick Start - XPD2 Wireless System . . . . . . . . . . . . . 14
HXD1 Handheld Transmitter Controls ..... 15
RXD2 Receiver Controls 15
PXD1 Beltpack Transmitter Controls ..... 16
Making Connections 17
Explor Specifications ..... 18
XPD2 Wireless Specifications ..... 19
Introduction
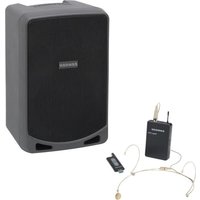
The Expedition Explor is a battery-powered loudspeaker that delivers big sound from a compact portable system. With up to 12 hours of battery life you can keep the music going all night long. This all-in-one speaker features a 3-channel mixer for microphones, line sources, instruments, and Bluetooth audio devices.. From playing your favorite songs in the backyard to giving a presentation in the boardroom, Expedition Explor provides superb sound in a highly portable design.
We recommend you keep the following records for reference, as well as a copy of your sales receipt.
Serial number: ____
Date of purchase: ____
With proper care and maintenance, your Explor will operate trouble-free for many years. Should your speaker ever require servicing, a Return Authorization (RA) number must be obtained before shipping your unit to Samson. Without this number, the unit will not be accepted. Please visit www.samsontech.com/ra for an RA number prior to shipping your unit. Please retain the original packing materials and, if possible, return the unit in its original carton. If your Expedition Explor was purchased outside of the United States, contact your local distributor for warranty details and service information.
Control Panel Features
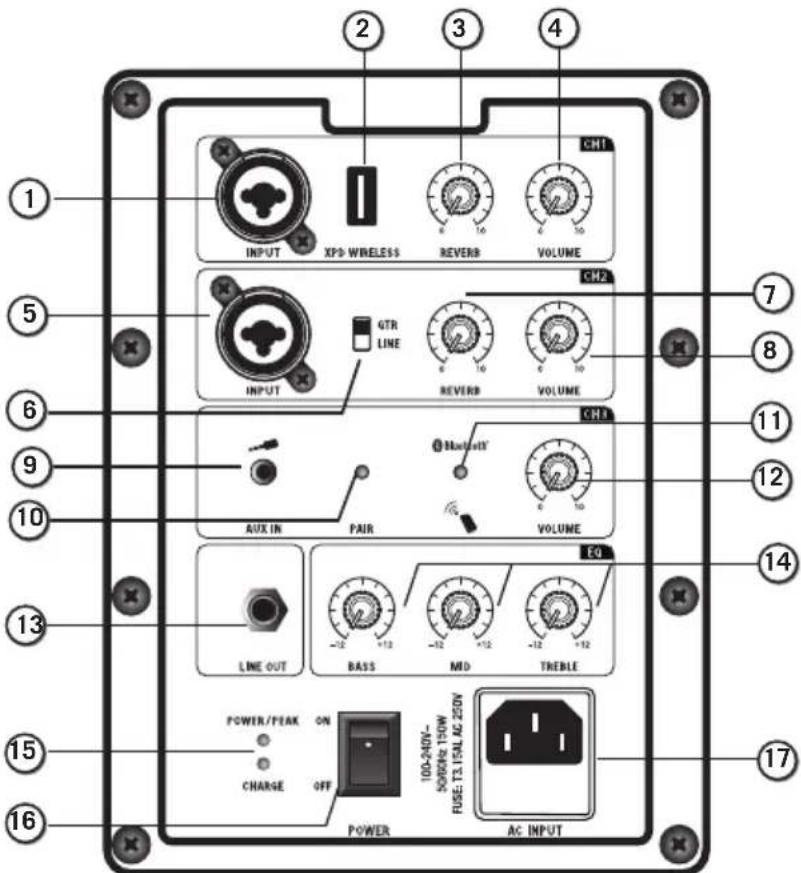
- COMBO INPUT - XLR-1/4" input for microphones, line signals, or instruments with active preamps.
- XPD WIRELESS* - Connect the Samson XPD digital wireless USB receiver to this input. The wireless receiver is powered by the Explor, so no additional power supply is needed.
- REVERB - Used to control the level of CHANNEL 1 reverb.
- VOLUME (CHANNEL 1) - Used to control the level of the CHANNEL 1 Mic/Line input.
- COMBO INPUT - XLR-1/4" input used to connect microphones, passive electric guitar or line level signals.
- GTR LINE SWITCH - Controls signal level of CHANNEL 2 input. NOTE; only changes level of 1/4" input jack. XLR is mic level only.
- REVERB - Used to control the level of CHANNEL 2 reverb.
- VOLUME (CHANNEL 2) - Used to control the level of the CHANNEL 2 Mic/Guitar/Line input.
- AUX IN - For connecting line-level devices using a 3.5mm audio cable.
- PAIRING BUTTON - Press this button to enable pairing mode in order to connect to a Bluetooth audio device.
- BLUETOOTH INDICATOR - The blue color LED displays the Bluetooth status of the Explor system.
- VOLUME (CHANNEL 3) - Used to control the level of the AUX/Bluetooth input.
- LINE OUT - 1/4" output connector to link multiple Explor systems together.
- BASS/MID/TREBLE CONTROL KNOBS - These knobs are used to adjust EQ settings to best suit your application.
- CHARGE & PEAK LED - Charge LED displays the status of the battery charge level. The Peak LED illuminates red at the level where limiting occurs.
- POWER - Switches on the main power.
- AC INLET - Connect the supplied power cable here.
Quick Start
Follow these steps below to quickly start using your Explor portable sound system.
- Set the Explor's power switch to the OFF position, and fully turn all of the VOLUME controls counterclockwise.
- If an outlet is available, connect the included power cable to the AC INLET of the speaker, and plug it into an AC socket (wall outlet).
- Connect a microphone using a standard XLR cable, line level equipment using a 1/4" instrument cable, or portable audio device using an 1/8" cable.
- Switch on the Explor power.
- While speaking into the microphone or playing music from a line level audio source, slowly raise the channel VOLUME until you have reached the desired level.

natural_image
Line drawing of a device with an attached microphone and internal components (no text or symbols visible)NOTE: If not using the channel 1 input, turn the VOLUME control all the way down to keep out any unwanted noise.
Setting a Good Level
Use the Channel VOLUME controls to set the individual volume of your microphone, line level and Bluetooth ^® devices.
The PEAK light illuminates when the signal sending to the internal amplifier begins to reach a level where limiting occurs to prevent the audio from distorting. If the PEAK light stays on, your mix is too hot and you need to lower the VOLUME controls. It is okay for the PEAK light to occasionally light, however, it should go off quickly and should not constantly stay on.
Pairing with a Bluetooth® device
Bluetooth is a wireless communication technology that allows for connectivity between a wide range of devices. The Explor uses Bluetooth to stream high quality audio from your Bluetooth enabled device without the need to connect any cables. In order for your device to work with the Explor, it must first be paired.
- Turn all channel volume controls down counterclockwise.
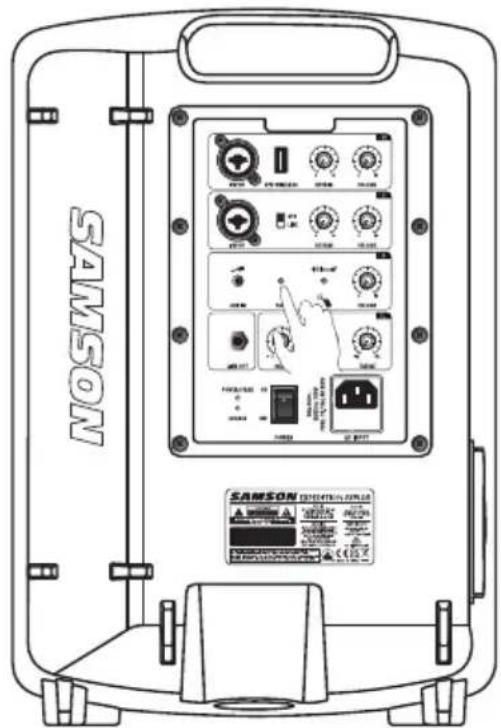
- With the Explor and your Bluetooth device powered on; press the PAIR button on the rear panel (CHANNEL 3) of the Explor speaker to make the speaker discoverable. The Bluetooth indicator will slowly flash blue.
- In the settings of your Bluetooth device, set it to "discover" available devices.
- From the Bluetooth device list, select the "Expedition Explor" device.
- If your device asks for a passkey, enter digits 0000 (four zeros) and press OK. Some devices may also ask you to accept the connection.
- As the Explor is connecting to your device, the Bluetooth indicator will quickly flash blue.
- The Explor speaker indicates that pairing is complete when the indicator turns steady blue. You can now stream audio from your device to the Explor.
- With the volume control on your Bluetooth device turned up, play some music, and slowly raise the Explor Bluetooth channel 3 volume control until you have reached the desired level.
Charging the Battery
The Explor has an internal, rechargeable battery capable of up to 12 hours of continuous audio on a full charge. Even though the system may have some charge when first taken out of the box, we recommend fully charging your Explor before first using the system.
To charge the battery:
- Set the power switch to the "OFF" position.
- Connect the Explor to an AC power outlet using the included power cord.
- Keep the system plugged in until the Battery indicator changes to green, indicating the battery is fully charged.
The Explor utilizes a Lithium Ion battery. When not in use, the battery will slowly self-discharge. If you are planning not to use the Explor for a long period of time, it is advised to fully charge the unit before storing. It is also important to charge the unit every six months when not used. This will ensure a healthy battery and extend its life.
If you find that the operation time of the Explor becomes noticeably decreased, even after fully charging, the battery should be replaced. Contact Samson customer service or your local distributor to order a replacement battery. NOTE: follow steps below to swap your battery.

natural_image
Technical diagram of a mechanical assembly with an inset showing a connector being inserted into a housing (no text or symbols present)Speaker Placement
The Explor provides three different placement options for your specific situation.
For maximum sound coverage the Explor can be used with a standard 1 ^3/8 " speaker stand. The speaker should be raised above the heads of the listening audience. Take care when placing the speaker on a stand, to ensure that it is on a level, steady surface and will not tip over.

natural_image
Silhouette of a person at a podium and a standing speaker on a tripod (no text or symbols visible)Take care when placing then Explor in direct sunlight for long periods of time, as this may discolor or damage the unit.
Do not place the speaker on wet surfaces, as it can cause malfunction. If you notice condensation on the unit, dry the speaker before using or storing.
Avoiding Feedback
Feedback is the annoying howling and squealing that can be heard when the microphone picks up sound from the speaker. The sound is then re-amplified back through the speaker again, creating a feedback loop. Follow these steps to minimize the likelihood of feedback:
- Avoid pointing the microphone directly at the speaker. In general, it is recommended to position the microphone behind the speaker enclosure. This uses the directional characteristics of the speaker and microphone to your advantage.
- Keep the microphone as far from the speaker as possible. This will help achieve isolation between the speaker and the microphone, and allow you to increase the output of the Explor.
- Position the microphone as close to the sound source as possible. This will enable the microphone to pick up more direct sound, and allow you to reduce the channel volume control.
- Reduce the volume of the speaker.
Quick Start - XPD2 Wireless System
- Plug the RXD2 USB receiver into the USB jack labeled XPD WIRELESS. There is a USB A female to USB A male extension cable included. This can be used to prevent damage to RXD2 receiver, if the Explor is knocked over or dropped.

- On the handheld transmitter, open the bottom section of the microphone. Place a fresh set of AA (LR6) batteries in the transmitter battery holder, taking care to observe the polarity markings, then screw the cover back on to the lower barrel.
- Turn the Channel 3 volume knob on the Explor completely counterclockwise, then turn the POWER switch on the Explor to the ON position.
- Turn on the power to the transmitter by pressing and holding Power switch; the indicator LED will light amber.


natural_image
Technical line drawing of an electronic device panel with control knobs and a hand holding a microphone (no text or symbols present)Quick Start - XPD2 Wireless System
- If the transmitter and receiver have not been previously paired, please plug it into your Explor and press and hold the button on the RXD2 receiver for >5 seconds, until it begins to flash.

- Press and hold the Power button on the handheld transmitter for >5 seconds. This will put both components into pairing modes. Once the receiver and transmitter communicate and sync, the LEDs on both units will turn steady amber and will be ready for operation.

natural_image
Hand pressing a button on a surface, no text or symbols visible- Speak or sing into the mic at a normal performance level and raise the CHANNEL 3 WIRELESS VOLUME control until the desired level is reached.
If you hear distortion check the rear panel PEAK LED. If it is lit red, turn down the channel 3 VOLUME on the Explor until it lights only occasionally during loud sounds. If you still hear distortion, open the battery compartment of the transmitter and use the supplied plastic screwdriver to turn the Gain control in the HXD1 transmitter slowly counterclockwise until the distortion disappears.
Conversely, if you hear a weak, noisy signal at the desired volume level (and with the channel 3 VOLUME control of the Explor turned fully clockwise), use the supplied plastic screwdriver to turn the Gain control in the HXD1 transmitter slowly clockwise until the signal reaches an acceptable level.
HXD1 Handheld Transmitter Controls
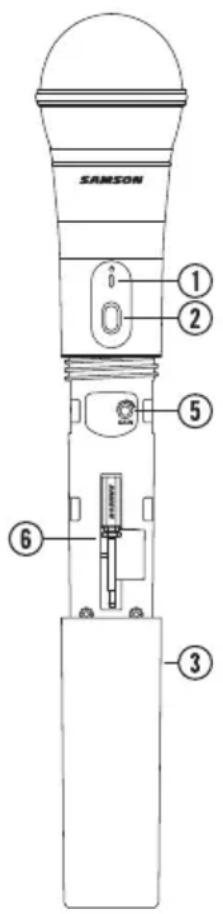
- Status Indicator - This LED displays the operation mode:
Amber: Normal Operation
Flashing Amber: Pairing/Low Battery
- Power/Pair Switch - Press <5 seconds to turn the unit on or off. Press >5 seconds to enter pairing mode.
- Input GAIN Control - This control adjusts the transmitter input sensitivity.
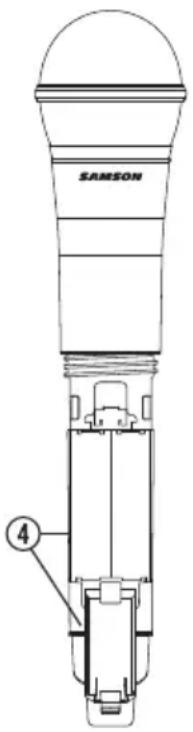
- Battery Holder - Insert two standard AA (LR6) batteries here, being sure to observe the plus and minus polarity markings shown. Although rechargeable Ni-Cad batteries can be used, they do not supply adequate current for more than four hours. WARNING: Do not insert the batteries backwards; doing so can cause severe damage to the HXD1 and will void your warranty.
- Plastic Screwdriver - Used to adjust the input GAIN control.
RXD2 Receiver Controls
- USB Connector - Plugs into the XPD WIRELESS jack on the rear panel of the Expedition Explor. The receiver can also plug directly into a computer USB port and will be recognized as a USB audio device. The unit passes audio to the device and receives power from the device through this connector.
- PAIR Switch - Press and hold for >5 seconds to enter pairing mode.
- STATUS Indicator - This LED displays the operation mode:
Amber: Normal Operation
Flashing Amber: Pairing
No Light: Not Paired; Transmitter out of range

- LINE / Headphone Output - Use this 3.5mm jack when connecting to an analog line input or headphones for monitoring.
PXD1 Beltpack Transmitter Controls

- Input Connector - Connect the input device via the mini-XLR connector. The PXD1 is supplied with either a lavalier or headset microphone.
- Status Indicator - This LED displays the operation mode:
Amber: Normal Operation
Flashing Amber: Pairing / Low Battery
- Power/Pair Switch - Press for <5 seconds to turn the unit on or off. Press for more than 5 seconds to enter pairing mode.
- Input GAIN Control - This control adjusts the transmitter input sensitivity.
- Battery Holder - Insert two standard AA (LR6) batteries here, being sure to observe the plus and minus polarity markings shown. WARNING: Do not insert the batteries backwards; doing so can cause severe damage to the PXD1 and will void your warranty.
- Screwdriver - Used to adjust the input GAIN control.
Making Connections


Explor Specifications
Frequency Response ..... 50 Hz \~ 20 kHz
Maximum SPL 105 dBSPL
Monitor Tilt Angle 45°
Vertical Tilt Angle 30^
Channel 1 Inputs
Input Impedance (Combo Input) ..... XLR Input (balanced) 3 kΩ
Input Impedance (Combo Input) ..... 1/4" TRS Input (balanced/unbalanced) 16 kΩ
Wireless Input . . . . . . . . . . . . USB 3.0 for Samson XPD Wireless
Channel 2 Inputs
Input Impedance (Combo Input) ..... XLR Input (balanced) 3 kΩ
Input Impedance (Combo Input) ..... 1/4" TRS Input 11 kΩ (line) 1 MΩ (GTR)
Channel 3 Inputs
1/8" Stereo Aux Input Impedance . . . . 14 kΩ
Bluetooth . . . . . . . . . . . . . . . . Bluetooth v5.0 Standard
Gain Controls 70 dB range
Equalizer . . . . . . . . . . . . . . . . -12/+12 dB Bass/Mid/Treble Active EQ
1/4" TRS Line Output Impedance . . . . 200 Ω
1/4" TRS Balanced Max Output Level . . +21 dBu at 1 % THD+N
Speakers. 8" Woofer + 3" Mid + 2x's 1" HF Tweeter
Built-in Battery. . . . . . . . . . . . . Removable Lithium Ion
Operation 12 hours typical
Battery Charging .... 5 hours
Construction . . . . . . . . . . . . . . . . . Polypropylene, internally ribbed
Grill . . . . . . . . . . . . . . . . . . . . . . . Perforated Steel Grill, powder coated
Mounting . . . . . . . . . . . . . . . . Integrated 1 3/8" Pole Mount Receptacle
Operating Temperature ..... -10°C \~ +40°C
Dimensions (LxDxH) ..... 11" x 9.64" x 16.33" (280 mm x 245 mm x 415 mm)
Weight. 16.22 lb / 7.36 kg
XPD2 Specifications
Simultaneous Systems 2
Working Range . . . . . . . . . . . . . . . . . . . 100' line of sight
Working Frequency . . . . . . . . . . . . . . . . . . 2.404\~2.476GHz
Modulation type . . . . . . . . . . . . . . . . . . . . . . . . . . . . GFSK
Audio Frequency Response ..... 20Hz - 16kHz
T.H.D <0.1% (at 1kHz, -10dBu)
Signal to Noise. . . . . . . . . . . . . . . . . . . . . . . . >85 dB
Operating Temperature . . . . . . . . . . . . . . . . -10°C \~ +40°C
PXD1 Transmitter
Input Connector . . . . . . . . . . . . . . . . . . . . . . . . . . . . . . . . . . . . . . Mini-XLR (P3)
RF Power .... <10 mW EIRP
Power Requirements . . . . . . . . . . . . . . . . Two AA (LR6) alkaline batteries
Battery Life 20 hours
Audio Sample Rate 32 kHz
Dimensions (HxLxD) 3.75" x 2.44" x 0.75"
(96 mm x 62 mm x 18.5 mm)
Weight. 0.2 lb / 93 g
HXD1 Transmitter
Microphone Element . . . . . . . . . . . . . . . . . . . Q6 Dynamic
RF Power .... <10 mW EIRP
Power Requirements . . . . . . . . . . . . . . . . Two AA (LR6) alkaline batteries
Battery Life 20 hours
Audio Sample Rate . . . . . . . . . . . . . . . . . . 32 kHz
Dimensions (HxLxD) 10.2" x ø2.1"/260 mm x ø54 mm
Weight. 0.5 lb / 218 g
RXD2 Receiver
Max Analog Output Level 0 dBu
Headphone Output . . . . . . . . . . . . . . . . . 22 mW into 16 Ω or 32 Ω
Operating Voltage 5V DC
Dimensions 3.5" x 0.9" x 31"
89 mm x 23 mm x 8 mm
Weight. 0.35 Oz / 10 g
Having Trouble with your Expedition Explor?
We can help!

CONTACT OUR SUPPORT TEAM: support@samsontech.com
Our experts can help you resolve any issues.
Follow us:

@samson

@samsontech

@samson_technologies
Samson Technologies Corp.
278-B Duffy Ave
Hicksville, New York 11801
www.samsontech.com
- Important Safety Information
- FCC Notice
- FCC Statement
- RF Warning Statement
- Table of Contents
- Introduction
- Control Panel Features
- Quick Start
- Setting a Good Level
- Pairing with a Bluetooth® device
- Charging the Battery
- Speaker Placement
- Avoiding Feedback
- Quick Start - XPD2 Wireless System
- HXD1 Handheld Transmitter Controls
- RXD2 Receiver Controls
- PXD1 Beltpack Transmitter Controls
- Making Connections
- Explor Specifications
- XPD2 Specifications
- PXD1 Transmitter
- HXD1 Transmitter
- RXD2 Receiver
Brand : SAMSON
Model : Expedition Explor
Category : Hi-Fi System