
OZ-590A - Personal digital assistant SHARP - Free user manual and instructions
Find the device manual for free OZ-590A SHARP in PDF.


| Product Type | Personal Digital Assistant (PDA) |
| Model | Sharp OZ-590A |
| Dimensions (W x H x D) | 130 mm x 80 mm x 15 mm (approx.) |
| Weight | 200 g (approx., with battery) |
| Power Source | Rechargeable Li-ion battery, 3.7V |
| Display | Monochrome LCD touchscreen, 320x240 pixels |
| Main Functions | Address book, calendar, scheduler, to-do list, memo, calculator, alarm, world time |
| Data Entry | Stylus-based touch input and on-screen keyboard |
| Memory | 2 MB internal storage |
| Connectivity | Infrared port (IrDA) for data transfer |
| Battery Life | Up to 40 hours standby, 10 hours continuous use |
| Charging | AC adapter (DC 5V, 1A) or USB charging via optional cable |
| Operating System | Proprietary Sharp Organizer OS |
| Languages Supported | English, Spanish, French, German, Italian, Dutch, Japanese (varies by region) |
| Maintenance & Cleaning | Wipe with a soft, dry cloth; avoid solvents; do not immerse in water |
| Safety Precautions | Do not disassemble; avoid extreme temperatures; use only specified charger |
| Spare Parts & Repairability | Replacement battery and stylus available; screen repair by authorized service |
| General Information | Manufactured by Sharp Corporation; designed for personal and business organization |
| Warranty | 1 year limited warranty (refer to manual for details) |
Frequently Asked Questions - OZ-590A SHARP
User questions about OZ-590A SHARP
0 question about this device. Answer the ones you know or ask your own.
Ask a new question about this device
Download the instructions for your Personal digital assistant in PDF format for free! Find your manual OZ-590A - SHARP and take your electronic device back in hand. On this page are published all the documents necessary for the use of your device. OZ-590A by SHARP.
USER MANUAL OZ-590A SHARP
Part Names and Tablet Key Assignments .... 1
Using the Organizer for the First Time 2
Display Symbols 4
Entering Characters 5
Built-in Calendar and Clock 6
Clock Mode 6
Alarm 8
Timer 8
Telephone Mode 9
Calendar Mode 10
Schedule Mode 12
Anniversary Mode 13
To Do Mode 15
Memo Mode 16
Expense Mode 17
Editing Entries 20
Deleting Entries 20
Word Translator Mode 21
Calculator Mode 22
Conversion Mode 23
Secret Function 25
Game Mode 26
Managing the Organizer's Memory 27
Using the Included PC Software 27
Battery Replacement 30
Specifications 31
Appendix 33
- SHARP strongly recommends that separate permanent written records be kept of all important data. Data may be lost or altered in virtually any electronic memory product under certain circumstances. Therefore, SHARP assumes no responsibility for data lost or otherwise rendered unusable whether as a result of improper use, repairs, defects, battery replacement, use after the specified battery life has expired, or any other cause.
- SHARP assumes no responsibility, directly or indirectly, for financial losses or claims from third persons resulting from the use of this product and any of its functions, such as stolen credit card numbers, the loss of or alteration of stored data, etc.
- Screen layouts illustrated in this manual may differ from those on the actual product. The information described in this manual is subject to change without notice.
CAUTIONS
- Do not carry the Organizer in the back pocket of slacks or trousers.
- Do not drop the Organizer or apply excessive force to it.
- Do not subject the Organizer to extreme temperatures.
- Since this product is not waterproof, do not use it or store it where fluids can splash onto it. Raindrops, water spray, juice, coffee, steam, perspiration, etc. will also cause malfunction.
- Clean only with a soft, dry cloth.
- Use only a SHARP approved service facility.
NOTES
• All company and/or product names are trademarks and/or registered trademarks of their respective manufacturers.
• In this manual, these mode keys are represented by icons in parentheses.
Using the Organizer for the First Time
Be sure to perform the following operations before using the Organizer for the first time.
- First, a battery will need to be installed. On the back of the Organizer, slide the Battery Replacement switch to the "REPLACE BATTERY" position.
- Slide out to remove the battery compartment cover.
- Insert a new battery, making sure to correctly orient the plus (+) and minus (-) terminals, as illustrated.
Note:
Inserting a battery with reversed polarity may damage the Organizer.
- Slide the battery compartment cover closed until it snaps into place.
- Slide the Battery Replacement switch back to the "NORMAL OPERATION" position, then press the RESET switch. The RESET switch is located on the back of the Organizer. Use the stylus (attached to the side) to carefully press down the switch.
Note:
- Do not use an object with a breakable or sharp tip.
- A dialog "System Reset Clear All Data? Yes No" appears on the screen. Use the stylus to tap "Yes" on the screen to proceed.


- Next, a dialog "WARNING! All Data will be LOST Are you sure? Yes No" appears. Again, tap "Yes" to proceed.
- "Memory Reset Please wait..." appears. After a moment, Home Clock will appear on the screen.
If a malfunction occurs under abnormal conditions
If the Organizer is subjected to strong extraneous electrical noise or shock during use, on rare occasions, all the functions will not work properly and data may be displayed incorrectly. In such cases, follow the procedures shown below.
- Press the RESET switch.
- A dialog "System Reset Clear All Data? Yes No" will be displayed. Tap "No". If the above procedure doesn't work, follow the next procedure to initialize the Organizer's memory. All stored data in the Organizer will be deleted.
- Press the RESET switch.
- When a dialog "System Reset Clear All Data? Yes No" is displayed, tap "Yes".
- When a dialog "WARNING! All Data will be LOST Are you sure? Yes No" appears, tap "Yes".
Auto Power Off Function
When none of the keys have been pressed or tapped for a specified time (default: 3 minutes), the Organizer will automatically turn off to save the battery.
To adjust the Auto Power Off time, do the following:
- Tap the MAIN once or twice to display the second page of the Main menu, then tap Set Up.
- In the list of Setup items, scroll down the list by tapping ▼, then tap to select "8. Auto Power Off".
- Tap to select a desired interval (1, 3, 5, 7, 10 or 15 minutes).
Backlight
The Backlight allows you to view the display and use the Organizer even in low-light conditions. Pressing Backlight once illuminates the display for as long as you continue to use the Organizer; if no key activities are detected within the specified interval, it will automatically be turned off.
To turn the Backlight off, press Backlight again.
Note:
- Excessive use of the Backlight will significantly reduce the life of your battery. • The Backlight may be turned off in less than the set interval.
- The Backlight may not light when the battery power is low. • The Backlight will be disabled while transferring data with the PC.
Setting up the Backlight
The Backlight can be set to turn off after a specified interval.
- Tap MAIN once or twice to display the second page of the Main menu, then tap Set Up.
- In the list of Setup items, tap to select "3. Backlight Time".
- Select a desired interval (10, 20, or 30 seconds) by using ▲ or ▼, then press ENTER.
Adjusting the LCD Contrast
- Tap MAIN once or twice to display the second page of the Main menu, then tap Set Up.
- In the list of Setup items, tap to select "5. LCD Contrast".
- Use ▲ or ▼ to increase/decrease the screen brightness.
Turning the Key Sound On and Off
- Tap MAIN once or twice to display the second page of the Main menu, then tap Set Up.
- In the list of Setup items, tap to select "6. Key Tone".
- The default is ON. Tap "OFF" to turn off the key sound.
Checking Available Memory
- Tap MAIN once or twice to display the second page of the Main menu, then tap Set Up.
- In the list of Setup items, tap to select "7. Check Memory". The memory check display will appear indicating the remaining memory space.
The following will be displayed:
Memory Free: available memory space. Reusable: amount of reusable memory space after running Memory Management (see page 27).
Entering User Information
- Tap MAIN once or twice, then tap to select Set Up.
- In the list of Setup items, tap to select "2. User Information".
- On the menubar, tap ☐, then enter your name, address, e-mail, and mobile phone information with the touch keyboard. Refer to page 5 "Entering Characters" for more information.
- At the completion of each field entry, tap Enter. To save entries, tap Enter at the Mobile entry field, or tap ☐ on the menubar. To edit the information, tap ☑, then select "Edit Entry". To delete the whole entry, select "Delete Entry" in the menu.
Display Symbols
Alarm icon: The Alarm is ON and will go off at the specified time.
Schedule icon: Appears when the Home clock time reaches the Reminder time or Start time of a schedule entry. Disappears when the time reaches the End time of the entry.
Anniversary sign: Appears prior to a special day programmed in the Anniversary Reminder.
CAPS Capitalized (uppercase) letters will be entered.
Beep sound: Key touch sound (beep) is ON.
((●)) Daily Alarm: The Daily Alarm is ON and is set to go off at the specified time every day.
BATT Low Battery sign: Indicates that the battery level is extremely low. (Replace the operating battery with a new one immediately.)
Secret sign: Secret function is in effect. (The password will be required to view/edit entries.)
- The display examples in this manual show only the symbols required for each explanation.


Entering Characters
Entering Characters
Entering letters and numbers
When the cursor enters a text entry field, a touch keyboard will pop up on the screen.
To enter characters, use the attached stylus to tap on the keys.
A list of frequently used keys is shown below:
Menubar


Shift keys: when tapped, it will rotate through lowercase, caps, and caps-lock mode, to enable uppercase and lowercase character entries.
When the ⚠ key appears on the keyboard, tap the key once; its appearance will change to ⚠.
indicating an uppercase character entry is enabled. Tap ☐ again to set "Caps Lock" (☐), to enter a series of uppercase characters.
Tap once again to return to the lowercase keyboard mode.

Backspace key: deletes a character to the left of the cursor.

Space key: enters a space at the cursor.

Return key: enters a carriage return at the cursor.

Extended character key: activates a set of extended character keys.

Go-back key: brings back the regular keyboard set.

Symbol key: activates a set of characters to enter symbols.

Displays the second page of the symbol keyboard.

Displays the first page of the symbol keyboard.
Moving the Cursor
Move the cursor by pressing/tapping ◀, ▶, ▲, or ▼.
Making Corrections
1. Inserting characters
Place the cursor at the desired insertion point, then enter characters.
2. Deleting characters
C·C□ is used for deletion of data in Calculator mode and the Rate figure in Conversion mode.
BS is used for deletion of characters.
Built-in Calendar and Clock
Precautions
- Calendar, Schedule, Expense, ToDo, Anniversary and Clock modes allow you to enter any desired date and time between Jan. 1, 1950 and Dec. 31, 2150.
- If an attempt is made to store an invalid time or date, you will not be able to move the cursor to date entering, or store the time and date by pressing ENTER. Enter the correct time/date and press ENTER again. • The Organizer has 98 names of cities (see Appendix).
Clock Mode
To enter the Home Clock or World Clock mode, tap the Clock or World icon on the Main menu.
Home Clock Mode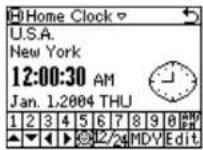
World Clock Mode
Navigating the Clock mode
Some icons and keys in the Clock modes can be tapped to activate functions:
Tap on this icon to display menu items. Home Clock, World Clock, Timer, and three Alarm modes can be accessed through here. Tap on this menubar item to go back to the Main menu. Tap to toggle Daylight Saving Time adjustment. Refer to page 7 for details.
12/24 Tap this icon (12/24, hereafter) to switch between 12-hour/24-hour display modes.
MDY Each time this key is tapped, the date format settings will be rotated. Refer to page 7 "Selecting the date format" for details.
Edit Tap this key (Edit, hereafter) to edit the time and date settings of the Home Clock (disabled in the World Clock mode).
Use these keys to set the Home Clock to the desired time and day.
Setting the Home Clock
- Enter the Home Clock mode; tap the Clock icon in the Main menu.
Note:
- During the period of Daylight Saving Time (summer time), set the DST ON beforehand as described in "Setting Daylight Saving Time ON/OFF" later on this page.
- Tap Edit to enter the clock setting mode. The "hour" field will be selected.
- While the cursor is in the field, enter the appropriate number by using the soft number key.
- The cursor moves to the "minute" field; set the appropriate minutes. When done, set AM/PM (if 12-hour time system is selected; tap ▶ to move the cursor to the Month field), as well as month, day and year, in the same manner. Then, tap ◀ several times to select the home country field.
- While the cursor is at the "country" field, use ▲ and/or ▼ key to browse through the list of country names. When done, move on to the "city" field by tapping the ▶ key once.
- Likewise, select the home city.
- When done, tap Save to activate the settings.
Selecting the date format (Default: Month-Day-Year)
- Tap MAIN, then tap to select Clock or World.
- The date format key (default: "MDY") should be found near the bottom of the screen.
Each time the date format key is tapped, the three date formats will be rotated as follows:
| Mode Month | Day-Year Day | Month-Year Year | Month-Day |
| ("MDY") | ("DMY") | ("YMD") | |
| Jan 24, 2004 | Jan. 24,2004 | Jan. 2004 | Jan. 24 |
Note:
The selected date format affects all modes in the Organizer. Entering dates in other modes will have to comply with the date format settings here; entering "24" for the month, for instance, will be rejected.
Selecting the 12- or 24-hour time system (Default: 12 hour)
In the Home Clock or World Clock mode, tap 12/24 the appropriate number of times to select the 12-hour or 24-hour system.
Setting Daylight Saving Time (DST: Summer time) ON/OFF
Tap to toggle the DST setting.
When DST is ON, a DST icon "Q" appears on the screen. The adjusted time will be displayed.
Alarm
The Organizer has 2 types of alarm:
- Daily Alarm..... Sounds every day at the specified time (for approx. 1 minute), when "☐☐" is displayed. Up to 3 alarms can be set separately (Alarm1, Alarm2, and Alarm3).
- Schedule Alarm... Sounds at the specified times set in the Schedule entries (see page 12).
Press any key or tap the screen to stop the Alarm sounding.
Setting the Alarm time
- TapClock, then tap the Home Clock menu on the menubar.
- In the list of menu, tap to select (or use ▲ or ▼ to select, then press ENTER) a desired Alarm: Alarm 1, Alarm 2, or Alarm 3.
- Tap the icon to edit the selected Alarm setup.
- Enter the Alarm time to go off. Each field value can be increased or decreased by using the ▲ or ▼ keys.
- When done, tap the "Note" field. Enter a reminder here, if desired.
- Tap ☐, or press ENTER to activate the Alarm settings. While the Alarm is activated, the * (0-0) * icon will appear on the screen.
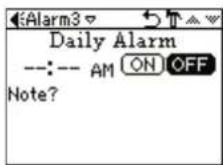
When the set time arrives, the Alarm will sound, and the reminder message will be displayed.
Note:
• Each Alarm can be set independently from other Alarms. - Once set, the Alarm can be activated or deactivated by tapping ON or OFF.
Timer
The Timer mode literally functions as a timer. When the specified time passes, the Organizer will remind you with the alarm sound.
Setting the Timer
- Tap|MAIN once or twice, then find and tap the |Timer| icon to enter the Timer mode.
- In the Timer mode, set the Timer activation time. Enter "000130", for example, to set the Timer to go off at a minute and a half later. When done entering, tap ENTER.
The Timer is now activated, and the clock starts ticking.
- The Timer alarm should sound after one minute and thirty seconds later.
Tap the screen, or press any key to stop the alarm sounding.
Note:
- Only one Timer can be set at a time. • The largest Timer interval to be set is 23:59:59. • The alarm will automatically stop sounding after 1 minute.



Telephone Mode
Four telephone entry categories are available: Business, Personal, Unfiled, and All. Selecting the Business category, for example, will display the entries categorized
as "Business", so that data can be browsed easily. Selecting "All", on the other hand, will list all entries.
To select a desired category, use the menu on the Telephone mode menubar.
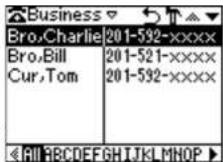
In each category, 11 entry fields are available as follows:
| Field Name alphanumeric characters | Maximum number of | |
| 1 Last name: 48 | ||
| 2 First name: 48 | ||
| 3 Company: 48 | ||
| 4 Home No.: 48 | ||
| 5 | W ork No.: 48 | |
| 6 Fax No.: 48 | ||
| 7 Mobile No.: 48 | ||
| 8 Page No.: 48 | ||
| 9 Address: 255 | ||
| 10 E-mail: 96 | ||
| 11 | Note: | 255 |
Entry
Enter the contact info. for a business partner, John Smith.
- Tap Tel in the Main menu to enter the Telephone mode, then tap the menu on the left side of the menubar to set the category for this new entry ("Business", for example).
- Tap ☐, then select "New Entry" in the menu.
- Enter data in the Last Name field: enter "Smith".
Note:
• Data must be entered in the Last Name, First Name or Company field to make the new entry valid.

- Tap ▼, then enter the First Name: enter "John".
Entry area can be selected by using ▼ or ▲, or simply by tapping the desired entry field.
- Set the cursor at the Company field, then enter "ABC International Co."
- Tap ▼ to move the cursor to the Home Number field, then enter "585-4280".
Note:
- Data must be entered in at least one of the four phone number fields (Home, Work, Mobile, and Fax) to make the new entry valid.
- Press ▼ and enter "619-542-7320" as the Work Number.
- Enter the rest of the fields, then tap ☐ to store the entry.
The overview of the new entry will be displayed. To verify entries, scroll down the display area by tapping ▼.
Search
- Tap the icon, then select the category in the menubar.
- Tap 1, then select "Search Entry" in the menu.
- Select the desired field by tapping the field name (e.g., "Last Name"), then enter a string to search for (e.g., "Smi").
Up to 10 characters can be entered in the Search entry field.

- Tap the lock icon on the menubar, or press ENTER.
If there is no matching data, "Not Found!" will appear, then the screen will return to the Search display.
See also
Entering Characters 5, Editing Entries 20, Deleting Entries 20
Calendar Mode
Use the Calendar mode to quickly view/add Schedule, To Do, and Anniversary entries.
Navigating the monthly calendar display
- In the Main menu, tap Calendar to enter the Calendar mode.
The monthly calendar of the current month will be displayed, with the current day highlighted.
To navigate the calendar, use the following keys:
◀: Displays the previous month. ▶: Displays the next month. ▲: Displays the next year in the monthly view. In the weekly view, it will scroll through the entry items of the day. ▼: Displays the previous year in the monthly view. In the weekly view, it will scroll through the entry items of the day.
◀▶: In the weekly view mode, rotate through previously entered To Do, Anniversary, and Schedule items.
W: Displays the weekly view.
T: Displays a set of menus. Refer to Schedule, To Do, and Anniversary mode sections of this manual for details.
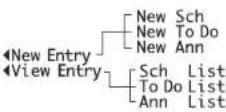
Verifying Schedule, To Do, and Anniversary mode entries
Schedule, To Do, or Anniversary entries will be indicated as dots on the right side of the day number.
In this example, one or more entries in all three modes exist on the 5th.

To verify entries, tap twice on the desired day.
Note
- "New Sch", "New ToDo", and/or "New Ann" will appear when no entries under the categories are found on the day.
- An empty entry cannot be viewed; if an Anniversary entry is present but nothing else, then a list of Anniversary entries will be displayed. New entries can be entered by selecting "New Sch", "New ToDo", or "New Ann". Refer to Schedule, To Do, and Anniversary mode sections of this manual for details.

Schedule Mode
Entry
A project meeting will be held from 10:00 AM to 11:00 AM on September 15, 2004.
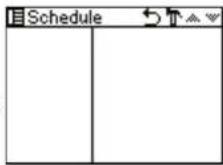
- In the Main menu, tap Schedule to enter the Schedule mode.
- Tap → to select "New Entry" in the menu.
A data entry screen appears, with the cursor set at the date of the entry to be set.
- Display the desired month by tapping ◀ and/or ▶. Use ▲ and/or ▼ to scroll the calendar vertically.
- Tap the desired day on the calendar, or set the date by using the number keys. Tap "09152004" to set the entry date on September 15, 2004.
- When done, tap Enter to set the cursor at the next field. A Time bar appears on the screen's center.
- At the "Time" field, tap "10", then "00" on the Time bar.

- Set the cursor at the end time of this event. Enter "11", then "00". When done, tap Enter to move the cursor at the Alarm Time field.
- To set an alarm for this event, tap "Yes", enter the Alarm Time ("9:30", for example), then tap Enter to move onto the Description field.
- If no alarm is desired, then tap "No" to skip the Alarm Time entry.
- Enter a description for this event ("Project meeting") using the alphabet keys.
The Description field can hold up to 485 characters.
- When done, tap 📄 icon to store and activate the entry.
Time bar


Direct Search
Direct search can be done by either the date or the description of an event.
- In the Main menu, tap Schedule to enter the Schedule mode.
- In the Schedule mode, tap ☑ to select "Search Entry" in the menu. The Search entry screen will appear.
- Tap to select the "Date" or "Description" checkbox. If "Date" is selected, an entry area for date will appear. Enter the date you wish to search. If "Description" is selected, then a search string can be entered in the field below.
- When done entering, tap 🔒 to execute the search.
See also
Entering Characters 5
Editing Entries 20
Deleting Entries 20
Anniversary Mode
The Anniversary mode is used to specify the month and day of special events such as wedding anniversaries and birthdays.
Once an Anniversary entry is made, a flag appears on the specified date in the monthly calendar (see page 11). The anniversary sign will then appear within the specified period.
Up to 491 alphanumeric characters can be entered in the Anniversary description field.
Entry
Nancy's birthday is on the 12th of February.
- In the Main menu, tap the Ann icon to enter the Anniversary mode.
- In the Anniversary mode, tap ☐, then select "New Entry".
- The event date will be set to the day's date by default.
Enter the desired date of the event ("02122004" for February
- Tap Enter, or tap the Description field to move on to the next entry.


- At the Description field, enter "Nancy's birthday".
To enter an apostrophe (*), tap the SWBI key first, then tap the character key.
- When done, tap ☐ to store and activate the entry.
The overview of the newly entered fields will be displayed.
Note
The anniversary sign ( ① ) will not appear until the day is set in the Reminder.
Direct Search
Direct search can be done by either the date or the description of an event.
- In the Main menu, tap Ann to enter the Anniversary mode.
- In the Anniversary mode, tap 📋 to select "Search Entry" in the menu.
The Search entry screen will appear.
- Tap to select the "Date" or "Description" checkbox.
If "Date" is selected, an entry area for date will appear. Enter the date you wish to search. If "Description" is selected, then a search string can be entered in the field below.
- When done entering, tap 🔒 to execute the search.
See also
Entering Characters 5
Editing Entries 20
Deleting Entries 20


To Do Mode
The To Do mode is used to store your important To Do items with a priority index.
Entry
You have to visit the NY Exhibition by December 10, 2004.
- In the Main menu, tap To Do to enter the To Do mode.
- In the To Do mode, tap to select "New Entry" in the menu. The To Do entry display will appear.
- Enter "12052004" at the date entry field. This will set up the Start date of the event. When done, tap Enter, or tap the next field.
- In this field, set the end date of this event. Enter "12102004" for December 10, 2004. When done, tap Enter to continue.
Note
The end date of the event must be later than the Start date. 5. Tap to set the priority number from 1 (High) to 5 (Low), then tap Enter.

- At the "To Do" description entry field, up to 482 alphanumeric characters can be entered. Enter "Visit NY Exhibition", then tap to set and activate the entry.
Direct Search
Direct search can be done by either the Start date or the description of an event.
- In the Main menu, tap To Do to enter the To Do mode.
- In the To Do mode, tap ☑ to select "Search Entry" in the menu. The Search entry screen will appear.
- Tap to select the "Date" or "To Do" checkbox. If "Date" is selected, an entry area for date will appear. Enter the date you wish to search. If "To Do" is selected, then a search string can be entered in the field below.
- When done entering, tap 🔒 to execute the search.
Setting Entry Status to Done/Pending
- In the Main menu, tap To Do to enter the To Do mode. A list of To Do entries appear.
- Tap to select and open the desired entry. The overview of the entry will show.
- Tap the Pending/Done checkbox, indicating either "Pending" or "Done".
The entry status dialog box will appear. Tap "Yes" or "No" to answer the "Is it Done?" or "Is it Pending?" dialog.
Entries for each status can be viewed by tapping "Pending" or "Done" in the To Do menu. Tap "All" to view all To Do entries.
See also
Entering Characters 5 Editing Entries 20 Deleting Entries 20
Memo Mode
You can store memos using the Memo mode. Up to 474 alphanumeric characters in the Memo entry field, and maximum of 20 characters for each title entry, can be entered per entry.
Entry
Enter your passport number: 12AB34567
- In the Main menu, tap the Memo icon to enter the Memo mode.
- Tap ☑, then select "New Entry" from the menu items.
- In the "Title" field, enter a title for this entry.
Up to 20 alphanumeric characters can be entered in this entry field. Enter "Passport No.". When done, tap the next entry field to move on.
- In the "Memo" field, up to 474 alphanumeric characters can be entered. Enter "12AB34567", then tap ☐ to store and activate the entry.

Direct Search
Direct search can be done by either the title or the Memo contents.
- In the Main menu, tap Memo to enter the Memo mode.
- In the Memo mode, tap ↗ to select "Search Entry" in the menu.
The Search entry screen will appear.
- Tap to select "Title" or "Memo" checkbox ("Title" in this example).
- Enter a string you wish to search for ("Pass", in this example).
When done, tap 🔒 to execute the search.

See also
Entering Characters 5 Editing Entries 20 Deleting Entries 20
Expense Mode
The Expense function is an easy-to-use tool for tracking personal and business expense information. The Expense Report allows you to see the total expense for a single day or for a specific period. 1 Expense: Item-by-item expense entry and view mode 2 Report: Display the total expenses for a single day or a certain period 3 Category: Assign a new category name (up to 8 characters for each)
Entry
The date is August 18, 2004.
You bought tickets for a business trip costing \$1200.
- Tap [Expense] in the Main menu to enter Expense mode.
- Tap "Business" on the menubar to set the new entry category ("Business", in this example).
- Tap ☐, then select "New Entry" from the menu items.
- In the first entry field, enter the date for this expense. Enter "08182004", then tap Enter.
- In the "Amount" field, up to 12 digits can be entered. Enter "1200", then tap Enter.
- Tap the next highlighted menu to enter method of payment; "Cash", "Check", "Card", or "Others" can be selected. Tap to select "Card".

- Next, select the expense category:
Meals → Hotel → Car → Phone → Fares → Entertainment → Tips → Misc. (Miscellaneous) → Free 1 → Free 2
Tap to select "Fares" in this example, then tap Enter.
- In the next "Description" entry field, up to 481 characters can be entered. Enter "Airline tickets for business", then tap ☐ to set and activate the entry.
Displaying Entries by Types/Categories
A list of Expense entries can be displayed either by payment types, or by expense categories.
- In the Expense mode, tap 🎨 on the menubar. A menu will appear.
- "Payment Type" is selected by default. Tap to select "Expense Category" to display a list of Expense entries.
Note:
- If the display format is changed, the display format of the Expense Report will also be affected.
Direct Search
Direct search can be done by either the date or the description of an event.
- In the Main menu, tap the Expense icon to enter the Expense mode.
- In the Expense mode, tap ☑ to select "Search Entry" in the menu. The Search entry screen will appear.
- Tap to select the "Date" or "Description" checkbox. If "Date" is selected, an entry area for date will appear. Enter the date you wish to search. If "Description" is selected, then a search string can be entered in the field below.
- When done entering, tap 🔒 to execute the search.
See also
Entering Characters 5
Editing Entries 20
Deleting Entries 20
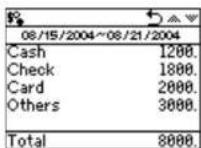
Expense Report
- Tap [Expense] to enter the Expense mode.
- Tap ▼ on the menubar to select the Expense menu, then select "Period Report".
- Enter the first date from which you wish to summarize the expenses (August 15, 2004), then tap Enter.
- Enter the last date to which you wish to summarize the expenses (August 21, 2004).
- Press ENTER. The total amount report for the period will be displayed.


Editing Expense Category Names
You can change the expense category names at your convenience.
- In the Main menu, tap Expense to enter the Expense mode.
- Tap ♥ on the menubar, then tap to select "Change Category" at the bottom of the list.
- Highlight the category you wish to change using the arrow keys, then tap the selection to edit. Select, for example, "2. Hotel".
- Type a new name for the category. Up to 8 characters can be entered in this field. Enter "Books", for example.
- When done, tap ☐ to store and activate the modification.

Note:
- Entries previously stored under the former category will appear under the new category after the revisions are made.
See also
Entering Characters 5 Editing Entries 20 Deleting Entries 20
Editing Entries
Edit
- Recall an entry in the desired mode.
- Tap 📋, then select "Edit Entry". The display will change to the edit mode.
- Edit the data. ◀ ▶ ▲ ▼: move the cursor to left, right, up or down, respectively (If the cursor is placed in a date entry field, tap Enter to place it on the next.) BS: can be used to delete characters
- Tap ☐ to store the modification.
Deleting Entries
Delete
- Recall an entry in the desired mode.
- Tap ↗, then select "Delete Entry". The confirmation display will appear.
Note:
• To delete all entries, select "Delete All" instead.
- Tap "Yes" to delete. Select "No" to cancel.
20


Word Translator Mode
Word Translator
English-Spanish bi-directional word translator function is available for download. Refer to "Download Dictionary Database" on page 29 for details.
- In the Main menu, tap Translate to enter the Word Translator mode.
- English → Spanish translation is set by default. To change the translation direction, tap the division arrow, or use ▼ and/or ▲.
- Enter the desired source word and press ENTER. The matching English displayed.
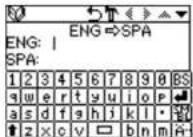
- When the icon "◀" or "▶" is activated, more letters exist. To view the remaining letters of long words that cannot be accommodated on the screen, use ◀ or ▶ to scroll.
- If there is no matching word, "NOT FOUND!" is displayed. The word next in alphabetical order will then be displayed.
- Press Next or Prev to scroll through the word list, or enter a new word using the keyboard, and press ENTER for another search.
Notes:
If you choose not to download the Dictionary Database for the English/Spanish Translator, then the extra memory space will be utilized by other applications.
In such case however, the Word Translator function will be disabled; tapping the Translate icon will display a message "NO DATA!".
To learn how to download the Dictionary Database, refer to the section "Download Dictionary Database" on page 29.
• Notations are used as follows:
(Am): American English
(Br): British English
(adj): Adjective
(adv): Adverb
(n): Noun
(pron): Pronoun
(v): Verb
(f.): Feminine form
(m.): Masculine form
• Two identical words may sometimes appear in the word list.
- Enter European characters and spaces correctly. Otherwise, the unit may not be able to complete the search.
Calculator Mode
The Organizer's built-in calculator can perform arithmetic calculations using up to 12 digits.
Tap [Calc] in the Main menu to enter Calculator mode.
Before performing any calculations, tap C•CE twice to clear the display.
- An error occurs if the integer section of the calculation result exceeds 12 digits, if the memory exceeds 12 digits, or a number is divided by zero. (*Error!) will be displayed.)
Tap C•CE to clear the error message.



| Example Operation Display | ||
| (-24+2)÷4= | Mixed calculation - 24+2+4 - | -5.5 |
| 34+57=3445+57=45 | Constant/repeat calculationThe second figure is a constant value(± addition, ⊖ subtraction, ± division) + 57 - - | 91.102. |
| 68×25=6868×40=40 | The first figure is a constant value(× multiplication) × 25 - - | 1700.2720. |
| 10% of 200 200Percentage 9 of 3610% mark-up 20020% discount 200 | Percentage × 10 - 9|:36 - + 10 - -|20 - | 20.25.220.160. |
| √25-925 | Root - 9 - - | 4. |
| 4a | A'4 |×|≡| | 64. |
| 1/88 | Unit division + ≡ | 0.125 |
| 25×5=-)84÷3=84+ )68+1768(Total)= | Memory function 25×|5|M-+|3|M-+|17|M+|RM| | 125.M28.M85.M182.M |
| 12345678909×145=12345678909817901234419210 | ×145 - 17.9012344192(17.9012344192×1012=17901234419200) | "Error""Error!"17.9012344192 |


Conversion Mode
Two Conversion modes - Metric, and Currency - can be accessed by tapping Metric or Currency in the Main menu.
Conversion Table
| Unit 1 Unit 2 | ||
| 5 currency conversions are available. | ||
| Metric Conversion Patterns | ||
| inch | ↔ | centimeter (cm) |
| yard | ↔ | meter (m) |
| yard | ↔ | feet |
| mile | ↔ | kilometer (km) |
| feet | ↔ | meter (m) |
| centimeter (cm) | ↔ | meter (m) |
| meter (m) | ↔ | kilometer (km) |
| gram (g) | ↔ | kilogram (kg) |
| ounce (oz) | ↔ | gram (g) |
| pound (lb) | ↔ | kilogram (kg) |
| ton | ↔ | kilogram (kg) |
| US.gallon (gal (US)) | ↔ | liter (l) |
| UK.gallon (gal (UK)) | ↔ | liter (l) |
| square meter ( m2 ) | ↔ | are (a) |
| are (a) | ↔ | hectare (ha) |
| hectare (ha) | ↔ | square kilometer ( km2 ) |
| cubic inch (cu inch) | ↔ | cubic centimeter (cu cm) |
| cubic feet (cu ft) | ↔ | cubic meter (cu m) |
| cubic yard (cu yard) | ↔ | cubic meter (cu m) |
| Fahrenheit (F) | ↔ | Celsius (C) |
Note:
- The conversion result may have a slight calculation error as a result of rounding off the number. Use as a reference only.
Currency Conversion Mode
Currency conversion has 5 stages of programmable conversion. Each stage is capable of 12-digit calculation.
Setting a new currency conversion rate
Set the following rate: £1 = \$1.45
- Tap Currency to enter the Currency Conversion mode.
- Press ▲ or ▼ to select the appropriate currency conversion stage.
- Tap
The setting mode will appear. The currency names can be renamed here.
- Rename the left currency if necessary, then press ▼
Note:
- Up to 3 characters can be entered for the name of the currency unit.
- Rename the right currency if necessary, then press ▼.

- Enter the rate; 1.45.
Up to 12 numeric characters can be entered for the rate. If you need to clear the rate number, tap ⒸCE.
- Tap ☐ to store the settings.

Currency conversion
Be sure to set the rate before starting a conversion.
\$>
- In the Main menu, tap Currency to enter the Currency Conversion mode.
- Tap ▲ or ▼ to select the appropriate currency conversion stage,
and use ◀ or ▶ to change the conversion direction.
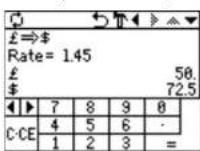
- Enter the amount. (e.g. £50)
- Press =
(£50=approx. \$72.5)
£>
- Use ◀ or ▶ to change the conversion direction
- Enter the amount. (e.g. \$120), then press ☐ (\$120=approx. £82.76)
Tap C•CE to clear the calculation result.


Metric Conversion Mode
Twelve digit metric conversion calculations are available.
Convert metric unit
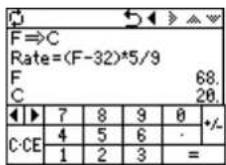
Convert 68°F to °C
- In the Main menu, tap Metric to enter the Metric Conversion mode.
- In the Metric Conversion mode, six conversion unit categories
appear: Length, Weight, Capacity, Surface, Cubic, and Temperature.
Select "Temperature" by tapping the checkbox in front of the category name.
- Enter the amount, "68", then tap ☐ to get the conversion result.
To clear the conversion result, tap C•CE.


Secret Function
The Secret function allows you to protect entries with a password,
so that no unauthorized person can access them.
You can use up to 8 characters as the password.
Registering a Password
As a failsafe measure, keep a written record of the password. Also, be aware that the password is case-sensitive.
- In the Main menu, tap [Sel Up], then tap to select "4. Password".
The password entry display will appear.

- Enter password, then press 📄.
The Secret function will be turned on.
Accessing entries
While the Secret function is on, the password verification display will appear upon accessing Tel, Schedule, Ann, To Do, Expense, and Memo.
- Enter the password, then press ENTER.
The password field is case-sensitive.
The screen of the target mode will be displayed.
Changing the Password
- In the Main menu, tap Sel Up, then select "4. Password" in the list. The password entry display will appear.
- Enter the current password.
- Press ENTER. The Secret function setting display will appear.
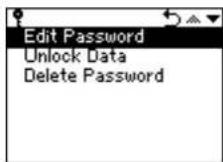
- Tap to select "Edit Password".
- Enter a new password, then press ENTER.
Turning the Secret Function Off
- In the Main menu, tap Set Up, then select "4. Password" in the list. The password entry display will appear.
- Enter the current password, then press ENTER.
- Tap to select "Unlock Data".
A message "Unlock Data!" will be displayed for 1 second, then you will be directed to the Setup menu.
To delete the password, go through steps 1 and 2. In the Password Setup menu, tap to select "Delete Password". When a dialog "Delete Password? Yes No" appears, tap "Yes" to confirm the deletion.
Game Mode
The Organizer comes equipped with two games: "Slots", and "Brick Attack".
To access one of these games, tap Game in the Main menu.
Slots
As its name suggests, Slots is an easy-to-access slot machine simulator.
- Tap Game in the Main menu, then tap Slots to enter the game.
- Place the desired bet by using ▲ or ▼ key. Tap ▲ to increase the bet; tap ▼ to decrease the amount.
- When the bet is set, tap "Spin" to spin the reels.
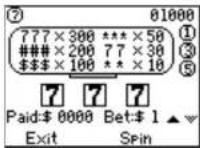
- Just like the real slot machine, you'll get the result after several seconds. Refer to the payout chart below:
*777* 300 times the bet
"###" 200 times the bet
"$$$" 100 times the bet
50 times the bet
"77", "77$", or "77#" 30 times the bet
"***#", "***$", "***7" 10 times the bet

- The highest pay possible is 99999. When this amount is reached, a cornucopia will appear on the screen, filled with gold.
A message "Congratulations! You have got $99999!" will appear.
If the total amount of money reaches 0, then the message "You
Lost!" will appear.
Brick Attack
Brick Attack is a simulation of a classic ball-bouncing game.
- Tap "Game" in the Main menu, then tap to select "Brick Attack".
- Tap "Start" to start.
A ball will be thrown into the arena.
Move the racket left and right using
◀ or ▶ keys to bounce back the
ball. You'll lose the game if you
cannot hit the ball with the racket.
Hit the brick pattern with the ball to
chip off the bricks one by one. When all bricks are gone, then
proceed to the next level.
- There are 5 levels total. To go up one level, tap ▲ before the game starts; likewise, tap ▼ to go down one level.
When you pass level 5, you win the game.


Managing the Organizer's Memory
Use the memory management function to utilize the Organizer's memory more efficiently.
Note:
- Before performing memory management, back up your data.
- While memory management is in progress, do not press the RESET switch. Doing so may result in losing all the data stored in the Organizer.
- Tap [Set Up] in the Main menu, then tap to select "9. Memory Management" in the list of Setup items.
- A dialog "It may take a long time. Do you want to continue?" appears.
Tap "Yes" to continue; tap "No" to go back to the list of Setup items.
- When "Yes" is tapped, a message "Performing memory management" appears, indicating that memory management is in progress.
When done, the display will return to the list of Setup items.
Note:
By performing memory management, the amount of reusable memory (indicated in "Check Memory" under [Set Up]) will be utilized.
Using the Included PC Software
The CD-ROM contains software to enable exchange of data with a PC.
The software consists of:
Synchronization Software:
Can be used to synchronize Microsoft® Outlook® data, such as Contacts, Calendar, Task, and Memo, with the Organizer.
Desktop Utilities:
Can be used to backup/restore data in the Organizer as well as to download dictionary database for the word translator, and export/import data to different file formats.
Minimum System Requirements:
• IBM PC or 100% compatible - Microsoft Windows 98/98SE/2000 Professional/Me/XP • Pentium 300MHz or higher - 50MB free hard disk space
- 64MB RAM for Microsoft Windows 98/98SE/2000 Professional/Me
• 128MB RAM for Microsoft Windows XP
• One available 9-pin serial port
- CD-ROM drive
- Mouse or compatible pointing device
Additional System Requirements:
- Microsoft Outlook ® 97/98/2000/2002 must be installed to utilize the Synchronization Software between the Organizer and your PC.
Connecting the Organizer to Your PC
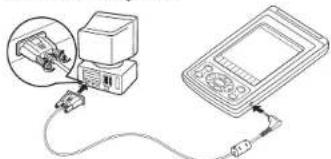
- Turn off your PC and the Organizer.
- Connect the standard 9-pin connector of the PC-Link cable to the PC's serial port. • Using a 25-pin connector will require an additional adapter. (Commercially available)
- Connect the other end of the PC-Link cable to the Organizer's option port.
- Turn on the PC and the Organizer.
Installing
- Insert the PC software CD-ROM into your CD-ROM drive. Installation process should automatically start. If the PC software screen does not appear, double-click "My Computer" to locate the CD-ROM drive directory, then double-click to launch "install.exe" found on the CD-ROM.
- Click the "Install" button.
- Follow the installation instructions that appear on the screen. Note:
- For Windows2000® Professional and Windows® XP, install/uninstall programs after logging on as an Administrator.
- When the installation is complete, click the "Finish" button to finish the installation process.
28

Serial Port Setup
The serial port setting dialog box appears after you have finished software installation.
Click "Auto Detect..." to allow the Synchroni-
zation to automatically detect the appropriate
serial port. Make sure that the unit is physically connected with the PC first, then click this button.
If the desired serial port is not found, manually select the serial port from the drop-down list.

Synchronization Software
After the Serial Port Setup is complete, the Settings window will appear.
To bring up the Settings window
manually, right-click on the
Synchronization icon on the
Windows® system tray, then select
"Settings..." in the menu.

General tab
This tab allows you to select the application that you want to synchronize with the PC.
- Click on the checkbox for each application to enable synchronization.
- Use the "Option..." button, or double-click the desired settings row to configure the communication method.
- Click the "Default" button to reset the Options settings.

Synchronization action:

Merges the data between the PC and the unit.

PC overwrites the data of the unit.

The unit overwrites the PC data.
The Conflict Resolution Tab
The Synchronization software's Conflict Resolution tab allows you to select the way data conflicts are resolved when data modifications are made and the "Synchronize" option is selected on the General tab.
- Add all conflicting items: Each modification on both the unit and the PC is reflected and saved respectively after synchronization.
- Unit overwrites PC data: The PC data will be overwritten. The modifications made on the unit are reflected on the PC after synchronization.
- PC overwrites unit data: The unit data will be overwritten. The modifications made on the PC are reflected on the unit after synchronization.
The PIM Tab
The PIM tab allows you to configure the download settings of the PIM data.
- Use Outlook HOME 'Address' and 'Fax number': Downloads or synchronizes only data of HOME addresses and FAX numbers.
- Use Outlook WORK 'Address' and 'Fax' number: Downloads or synchronizes only data of WORK addresses and FAX numbers.
- Today forward: Downloads or synchronizes only data of today and forward.
- All: Downloads or synchronizes all schedule data.

Desktop Utilities
Launch "Desktop Utilities" from the Start menu, or right-click on the Synchronization icon on the Windows® system tray, then select "Desktop Utilities..." in the menu. Utilize the Desktop Utilities via the following graphic interface:
Backup/Restore
The Backup/Restore menu of the
Desktop Utilities allows you to make a backup file of the unit data, or to restore it back to the internal memory of the unit. Note that the setup parameters won't be backed up.
- Backup: Select "Backup..." from the button, then enter the desired name of the file to be backed up.
- Restore: Select "Restore..." from the button, then select the desired name of the file to be restored.
Export/Import
The Export/Import menu of the Desktop Utilities allows you to import data created by each application to the unit, or export data created on the PC to the unit by application data.
- Export: Select the desired application name, then click "Export...", then enter the desired filename to which you wish to export data.
- Import: Select the desired application name, then click "Import...", then enter the desired filename from which you wish to import data.
Download Dictionary Database
The Download Dictionary Database allows you to download dictionary database for the word translator from the PC.
Insert the CD-ROM, then click "Download..." to select the desired file to download.
Battery Replacement
Battery used
| Type Size/Model Qty. | |
| Alkaline battery “AAA”:LR03 1 |
- Be sure to write down any important information stored in the memory before replacing the battery.
Precautions
Since improper use of the battery may cause leakage or explosion, strictly observe the following precautions:
• If fluid from a leaking battery accidentally gets into your eyes, it may result in serious injury. Should this occur, flush your eyes with clean water and consult a physician immediately. - Should fluid from a leaking battery come into contact with your skin or clothes, immediately wash with clean water. - If the Organizer will not be used for an extended period of time, to avoid damaging the Organizer remove the battery and store in a safe place. • Do not leave an exhausted battery inside the Organizer. - Do not use different types of battery or partially used battery. - Insert the battery with its positive side (+) correctly oriented. - Never throw batteries into a fire because they might explode. - Keep batteries out of reach of children. - When the battery is near exhaustion, remove it from the Organizer immediately to avoid battery leakage and corrosion inside the Organizer.
Battery Replacement
Battery replacement time
When "BATT" is displayed, immediately replace the battery with a new one. Follow the steps on page 31.
If the battery level is low, the alarm may not sound, or similarly the Backlight may not function or remain on for less than the set interval. Continued use of the Organizer with low battery can alter or clear the memory contents. Memory contents may be lost if the battery is improperly replaced or if the following instructions are disregarded.
Caution:
- Communication with PC may not be available when the battery level is low.
- Under the low battery condition, new data entry and editing of existing data may not be performed in some modes. Also, password setting may not be made.
Replacing the battery
- Make sure the power is turned off before replacing the battery.
- Do not press ON until the battery replacement procedure is complete.
- Turn off the Organizer.
- On the back of the Organizer, slide the Battery Replacement switch to the "REPLACE BATTERY" position, then slide out to remove the battery compartment cover.
- Remove the old battery.
- Insert the new battery, making sure to correctly orient the plus (+) and minus (-) terminals, as illustrated.
- Slide the battery compartment cover closed until it snaps into place, then slide the Battery Replacement switch back to the "NORMAL OPERATION" position, then press the RESET switch.
- A dialog "System Reset Clear All Data? Yes No" will be displayed. Tap "No".
- Check that the clock is set to the correct time.
Caution:
- Clock settings, entries, and/or other settings may be lost when the battery is removed for a long time. Replace the battery promptly.
- Make sure to confirm all settings after replacing the battery.


Calendar mode: From Jan., 1950 to Dec., 2150, Confirmation of Schedule, To Do, and Anniversary mode entries can be made by the indication marks seen on the right side of the date
Schedule mode: Entry and recall of schedule (year, month, day, hour and minute), schedule alarm and Description
Anniversary mode: Entry and recall of year, month, day and description of anniversaries
To Do mode: Entry and recall of To Do entries (Starting/ending date, Priority and To Do)
Memo mode: Entry and recall of memo entries
Expense mode: Entry and recall of Expense entries (Date, Category, Amount, Payment, and Description) and Report during a specified period to display the total amount spent in a preset category, Meals, Hotel, Car, Phone, Fares, Entert (Entertainment), Tips and Misc. (Miscellaneous), Free 1, Free 2 that can be changed with the selection of edit Category.
Word translator mode: English from/to Spanish, approx. 10000 words for each language
Calculator mode: 12 digits (with calculation status symbol). Addition, subtraction, multiplication, division, percentage, square root, memory calculation, etc.

Currency/Unit conversion mode:
12 digits, 25 combinations of currencies (5) and metric (20) conversions.
Game mode: 2 games.
Secret function: Protects entries with a password.
Power consumption: 0.3 W.
Operating temperature: 0°C \~ 40°C (32°F \~ 104°F).
Power supply:
Battery: 1.5V DC, alkaline battery (LR03 (size "AAA") x 1).
Battery life (at 25°C/77°F):
• Approx. 80 hours
When data is continuously displayed without backlight.
• Approx. 50 hours
When data is searched for 5 minutes and displayed for 55 minutes per hourly use and backlight is on for 2 minutes per hourly use.
• Approx. 1 year
When turned off and the clock is running.
Weight: Approx. 115 g (0.25 lb.) (Including battery)
Dimensions:
70.8 mm (W) × 118 mm (D) × 13.5 mm (H)
2-25/32" (W) × 4-21/32" (D) × 17/32" (H)
Accessories: Alkaline battery LR03 (size "AAA") x 1, CD-ROM
software, PC-Link cable, operation manual, stylus


Appendix
Names of the cities recognized by the clock
| # | COUNTRY CITY | # | COUNTRY CITY | # | COUNTRY CITY | # | COUNTRY CITY | |||
| 1 | Afghanistan Kabul | 26 | Chile Easter Island | 51 | Kenya | Nairobi | 76 | Madrid | ||
| 2 | A Igeria Algiers | 27 | Santiago | 52 | Mexico Acapulco | 77 | Sweden Stockholm | |||
| 3 | A rgentina Buenos Aires | 28 | China Beijing | 53 | Hermosillo | 78 | Switzerland Geneva | |||
| 4 | Australia Adelaide | 29 | Hong Kong | 54 | Mexico City | 79 | Zurich | |||
| 5 | Brisbane | 30 | Shanghai | 55 | Tijuana | 80 | Thailand Bangkok | |||
| 6 | Canberra | 31 | Colombia Bogota | 56 | Mid Atlantic | --- | 81 | U.A.EMIRATES Abu Dhabi | ||
| 7 | Darwin | 32 | Denmark | Copenhagen | 57 | Myanmar | Yangon | 82 | U.K. London | |
| 8 | Melbourne | 33 | Egypt | Cairo | 58 | Netherlands | Amsterdam | 83 | U.S.A. Anchorage | |
| 9 | Perth | 34 | Fiji | Suva | 59 | New Caledonia | Npurnea | 84 | Atlanta | |
| 10 | Sydney | 35 | Finland | Helsinki | 60 | New Zealand | Auckland | 85 | Boston | |
| 11 | Austria Vienna | 36 | Fr.Polynesia | Tahiti | 61 | Norway | Oslo | 86 | Chicago | |
| 12 | Bangladesh Dhaka | 37 | France | Paris | 62 | Pakistan | Karachi | 87 | Dallas | |
| 13 | Belgium Brussels | 38 | Germany F.R. | Berlin | 63 | Peru | Lima | 88 | Denver | |
| 14 | Brazil Brasilia | 39 | Frankfurt | 64 | Portugal | Azores | 89 | Detroit | ||
| 15 | Manaus | 40 | Munich | 65 | Lisbon | 90 | Honolulu | |||
| 16 | Rio De Janeiro | 41 | Greece | Athens | 66 | PuertoRico | San Juan | 91 | Los Angeles | |
| 17 | Sao Paulo | 42 | Guam | Agana | 67 | Russia | Khabarovsk | 92 | Miami | |
| 18 | Canada Calgary | 43 | India | New Delhi | 68 | Moscow | 93 | New York | ||
| 19 | Halifax | 44 | Iran | Tehran | 69 | St.Petersburg | 94 | Philadelphia | ||
| 20 | Montreal | 45 | Ireland | Dublin | 70 | Samoa Apia | 95 | Phoenix | ||
| 21 | Ottawa | 46 | Israel | Jerusalem | 71 | Saudi Arabia | Riyadh | 96 | Seattle | |
| 22 | St. John's | 47 | Italy | Milan | 72 | Singapore | Singapore | 97 | Washington | |
| 23 | Toronto | 48 | Rome | 73 | South Africa | Johannesburg | 98 | Venezuela Caracas | ||
| 24 | Vancouver | 49 | Japan | Tokyo | 74 | Spain | Barcelona | |||
| 25 | Winnipeg | 50 | Jordan | Amman | 75 | Canary Islands |

Declaration of Conformity
Electronic Organizer : OZ-590
This device complies with Part 15 of the FCC Rules. Operation is subject to the following two conditions: (1) This device may not cause harmful interference, and (2) this device must accept any interference received, including interference that may cause undesired operation.
Responsible Party:
SHARP ELECTRONICS CORPORATION
Sharp Plaza, Mahwah, New Jersey 07430-1163
TEL: 1-800-BE-SHARP
Tested To Comply With FCC Standards
FOR HOME OR OFFICE USE
WARNING – FCC Regulations state that any unauthorized changes or modifications to this equipment not expressly approved by the manufacturer could void the user's authority to operate this equipment.
Note: This equipment has been tested and found to comply with the limits for a Class B digital device, pursuant to Part 15 of the FCC Rules. These limits are designed to provide reasonable protection against harmful interference in a residential installation. This equipment generates, uses, and can radiate radio frequency energy and, if not installed and used in accordance with the instructions, may cause harmful interference to radio communications.
However, there is no guarantee that interference will not occur in a particular installation. If this equipment does cause harmful interference to radio or television reception, which can be determined by turning the equipment off and on, the user is encouraged to try to correct the interference by one or more of the following measures:
– Reorient or relocate the receiving antenna. – Increase the separation between the equipment and receiver. - Connect the equipment into an outlet on a circuit different from that to which the receiver is connected. - Consult the dealer or an experienced radio/TV technician for help.
Note: A shielded interface cable is required to ensure compliance with
FCC regulations for Class B certification.

PRODUCT SUPPORT
If you have read the ORGANIZER operation manual, but you still require product support, you can:
Call SHARP Customer Assistance Center
630-378-3590
(7am to 7pm CST M - F)
Visit our Web Site
www.sharpusa.com
Send an E-mail
pdasupport@sharpsec.com
Write to our Customer Assistance Center
SHARP Electronics Corp
Customer Assistance Center
Att: WIZARD HELP
1300 Naperville Drive
Romeoville, IL 60446


ESPAÑOL


LIMITED WARRANTY
SHARP ELECTRONICS CORPORATION warrants to the first consumer purchaser that this Sharp brand product (the "Product"), when shipped in its original container, will be free from defective workmanship and materials, and agrees that it will, at its option, either repair the defect or replace the defective Product or part thereof with a new or remanufactured equivalent at no charge to the purchaser for parts or labor for the period(s) set forth below.
This warranty does not apply to any appearance items of the Product nor to the additional excluded item(s) set forth below nor to any Product the exterior of which has been damaged or defaced, which has been subjected to improper voltage or other misuse, abnormal service or handling, or which has been altered or modified in design or construction. In order to enforce the rights under this limited warranty, the purchaser should follow the steps set forth below and provide proof of purchase to the servicer.
The limited warranty described herein is in addition to whatever implied warranties may be granted to purchasers by law. ALL IMPLIED WARRANTIES INCLUDING THE WARRANTIES OF MERCHANTABILITY AND FITNESS FOR USE ARE LIMITED TO THE PERIOD(S) FROM THE DATE OF PURCHASE SET FORTH BELOW. Some states do not allow limitations on how long an implied warranty lasts, so the above limitation may not apply to you.
Neither the sales personnel of the seller nor any other person is authorized to make any warranties other than those described herein, or to extend the duration of any warranties beyond the time period described herein on behalf of Sharp.
The warranties described herein shall be the sole and exclusive warranties granted by Sharp and shall be the sole and exclusive remedy available to the purchaser. Correction of defects, in the manner and for the period of time described herein, shall constitute complete fulfillment of all liabilities and responsibilities of Sharp to the purchaser with respect to the Product, and shall constitute full satisfaction of all claims, whether based on contract, negligence, strict liability or otherwise. In no event shall Sharp
be liable, or in any way responsible, for any damages or defects in the Product which were caused by repairs or attempted repairs performed by anyone other than an authorized servicer. Nor shall Sharp be liable or in any way responsible for any incidental or consequential economic or property damage. Some states do not allow the exclusion of incidental or consequential damages, so the above exclusion may not apply to you.
THIS WARRANTY GIVES YOU SPECIFIC LEGAL RIGHTS. YOU MAY ALSO HAVE OTHER RIGHTS WHICH VARY FROM STATE TO STATE.
Your Product : Electronic Organizer
Warranty Period for this Product: One (1) year parts and labor from date of purchase.
Additional Items Excluded from Warranty Coverage: Any consumable items such as paper, maintenance cartridge, ink cartridges supplied with the Product or to any equipment or any hardware, software, firmware, fluorescent lamp, power cords, covers, rubber parts, or peripherals other than the Product.
Where to Obtain Service: At a Sharp Authorized Servicer located in the United States. To find out the location of the nearest Sharp Authorized Servicer, call Sharp toll free at 1-800-BE-SHARP.
What to do to Obtain Service : Ship (prepaid) or carry in your Product to a Sharp Authorized Servicer. Be sure to have proof of purchase available. If you ship or mail the Product, be sure it is packaged carefully.
TO OBTAIN SUPPLY, ACCESSORY OR PRODUCT INFORMATION, CALL 1-800-BE-SHARP.

SHARP®
SHARP ELECTRONICS CORPORATION
Sharp Plaza, Mahwah, New Jersey 07430-1163
PRINTED IN CHINA/IMPRESO EN CHINA
02LGK (TINSE0588EHZZ)
OZ590 1119.pm65 cover02.12.6,828 RM

- CAUTIONS
- NOTES
- USING THE ORGANIZER FOR THE FIRST TIME
- NOTE
- IF A MALFUNCTION OCCURS UNDER ABNORMAL CONDITIONS
- AUTO POWER OFF FUNCTION
- BACKLIGHT
- SETTING UP THE BACKLIGHT
- ADJUSTING THE LCD CONTRAST
- TURNING THE KEY SOUND ON AND OFF
- CHECKING AVAILABLE MEMORY
- ENTERING USER INFORMATION
- DISPLAY SYMBOLS
- ENTERING CHARACTERS
- ENTERING LETTERS AND NUMBERS
- MOVING THE CURSOR
- MAKING CORRECTIONS
- INSERTING CHARACTERS
- DELETING CHARACTERS
- BUILT-IN CALENDAR AND CLOCK
- PRECAUTIONS
- CLOCK MODE
- NAVIGATING THE CLOCK MODE
- SETTING THE HOME CLOCK
- SELECTING THE DATE FORMAT (DEFAULT: MONTH-DAY-YEAR)
- SELECTING THE 12- OR 24-HOUR TIME SYSTEM (DEFAULT: 12 HOUR)
- SETTING DAYLIGHT SAVING TIME (DST: SUMMER TIME) ON/OFF
- ALARM
- SETTING THE ALARM TIME
- TIMER
- SETTING THE TIMER
- TELEPHONE MODE
- ENTRY
- SEARCH
- SEE ALSO
- CALENDAR MODE
- NAVIGATING THE MONTHLY CALENDAR DISPLAY
- VERIFYING SCHEDULE, TO DO, AND ANNIVERSARY MODE ENTRIES
- SCHEDULE MODE
- DIRECT SEARCH
- ANNIVERSARY MODE
- TO DO MODE
- SETTING ENTRY STATUS TO DONE/PENDING
- MEMO MODE
- EXPENSE MODE
- DISPLAYING ENTRIES BY TYPES/CATEGORIES
- EXPENSE REPORT
- EDITING EXPENSE CATEGORY NAMES
- EDITING ENTRIES
- EDIT
- DELETING ENTRIES
- DELETE
- WORD TRANSLATOR MODE
- WORD TRANSLATOR
- CALCULATOR MODE
- CONVERSION MODE
- CURRENCY CONVERSION MODE
- SETTING A NEW CURRENCY CONVERSION RATE
- CURRENCY CONVERSION
- METRIC CONVERSION MODE
- CONVERT METRIC UNIT
- SECRET FUNCTION
- REGISTERING A PASSWORD
- ACCESSING ENTRIES
- CHANGING THE PASSWORD
- TURNING THE SECRET FUNCTION OFF
- GAME MODE
- SLOTS
- BRICK ATTACK
- MANAGING THE ORGANIZER'S MEMORY
- USING THE INCLUDED PC SOFTWARE
- SYNCHRONIZATION SOFTWARE
- DESKTOP UTILITIES
- MINIMUM SYSTEM REQUIREMENTS
- CONNECTING THE ORGANIZER TO YOUR PC
- INSTALLING
- SERIAL PORT SETUP
- GENERAL TAB
- SYNCHRONIZATION ACTION
- THE CONFLICT RESOLUTION TAB
- THE PIM TAB
- BACKUP/RESTORE
- EXPORT/IMPORT
- DOWNLOAD DICTIONARY DATABASE
- BATTERY REPLACEMENT
- BATTERY REPLACEMENT TIME
- CAUTION
- REPLACING THE BATTERY
- APPENDIX
- DECLARATION OF CONFORMITY
- PRODUCT SUPPORT
- ESPAÑOL
- LIMITED WARRANTY
- SHARP®
- SHARP ELECTRONICS CORPORATION
Brand : SHARP
Model : OZ-590A
Category : Personal digital assistant