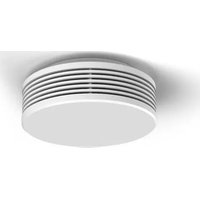
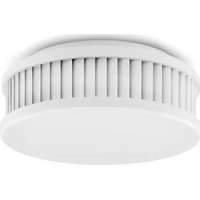
XSD100 - Smoke detector Pyrexx - Free user manual and instructions
Find the device manual for free XSD100 Pyrexx in PDF.


| Product Type | Smoke Detector |
| Brand | Pyrexx |
| Model | XSD100 |
| Dimensions (Diameter x Height) | Approx. 100 mm x 40 mm |
| Weight | Approx. 150 g |
| Power Source | 9V alkaline battery (included) |
| Battery Life | Approx. 1 year under normal use |
| Detection Principle | Photoelectric (optical) sensor |
| Alarm Sound Level | 85 dB at 3 meters |
| Test Button | Yes, for functional check |
| Low Battery Indicator | Chirping sound every 30-60 seconds |
| Hush/Silence Feature | Yes, temporarily silences false alarms |
| Mounting | Ceiling mount with included base and screws |
| Compliance Standards | CE, EN 14604 |
| Operating Temperature | 0°C to 40°C |
| Humidity Range | 10% to 95% non-condensing |
| Maintenance | Vacuum dust monthly; test weekly; replace battery annually |
| Spare Parts / Repairability | Replaceable battery; entire unit replacement recommended after 10 years |
| Warranty | 2 years against manufacturing defects |
Frequently Asked Questions - XSD100 Pyrexx
User questions about XSD100 Pyrexx
0 question about this device. Answer the ones you know or ask your own.
Ask a new question about this device
Download the instructions for your Smoke detector in PDF format for free! Find your manual XSD100 - Pyrexx and take your electronic device back in hand. On this page are published all the documents necessary for the use of your device. XSD100 by Pyrexx.
USER MANUAL XSD100 Pyrexx
XSD100
Betriebsanleitung
Rauchwarnmelder
Operating Manual
Smoke Alarm Device
The original version of this instruction has been prepared in German in accordance with DIN EN 82079-1.
1 Notes on the operating manual 32
2 Safety instructions 35
3 Overview 39
4 Location selection 42
5 Installation 47
6 Initial activation 51
7 Fault and error messages 52
8 Maintenance 54
9 Deactivation 56
10 Accessories, spare parts and product support 57
11 Technical specifications 58
12 Alarm and alert tones 60
EN
Abb. 1 Bedienelemente
1 Notes on the operating manual
We are glad that you have chosen our product and we would like to thank you for your trust!
This operating manual contains information and instructions for safe assembly, activation, installation and maintenance, as well as proper operation of the smoke alarm device.
The operating manual is intended to increase the reliability and life cycle, and to help avoid hazards and downtime, or a loss of warranty claims.
It is absolutely necessary that the operating manual is read and understood.
For a better readability, the XSD100 smoke alarm device is hereinafter referred to as "smoke alarm device" or "device".
1.1 Scope of the operating manual
The operating manual applies only to smoke detectors of the XSD100 type with or without "Q" label.
1.2 Name plate and identification
The name plate of the smoke alarm device is located below the testing/stop button (smoke alarm device cover).
Smoke detector
A smoke detector with "Q" label has a on the name plate.

1.3 Conformity
The XSD100 smoke alarm device with "Q" label is certified according to:
• Regulation (EU) No 305/2011 according to EN 14604:2005/AC:2008

CE 21 1772-CPR-210049 Variante: V3-Q
For more information about the "Q" label with "Q" label guideline, please visit our website at pyrexx.com.
Conformity in accordance with
EN 14604:
The smoke alarm device is certified as a construction product in accordance with Directive (EU) No. 305/2011 according to EN 14604:2005/AC:2008 (CE). The production is monitored for unchanged compliance with legal and normative requirements by periodic and independent checks.
The Declaration of Performance for smoke detectors without "Q" label is available at the following reference number at the manufacturer: k_89246
The Declaration of Performance for smoke detectors with "Q" label is available at the following reference number at the manufacturer; k_503411
1.4 Safekeeping of the operating manual
The operating manual is an important component of the smoke alarm device, and must always be kept at hand near the installation location.
1.5 Symbols used
Various markings and symbols are used in the text in the operating manual. These are explained below.

Warning symbol in warning labels

Additional information and guidelines
(1) Numbered action steps
▶ Symbol for an instruction or a required action
Result of an action
- Symbol for a list
1.6 Copyright
All rights are reserved, particularly the rights of duplication, distribution and translation. No part of these operating manual may be reproduced in any form, or processed, duplicated, or disseminated by using electronic systems without written permission of Pyrexx GmbH.
1.7 Guarantee and warranty
The Pyrexx guarantee conditions and the statutory warranty apply. The Pyrexx GmbH warrants a defect-free device only for the original purchaser of this product that was purchased either at Pyrexx GmbH directly, or through an authorized reseller, for a period of 12 years from the date of purchase, when used and serviced as intended.
You can find the Pyrexx guarantee conditions at pyrexx.com/en/support/downloads in the download area.
2 Safety instructions
2.1 Representation and structure of warning labels
The warning labels are action-oriented; they are structured and graded as follows:

DANGER
Type and source of the danger!
Explanation about the type and source.
▶ Measures to prevent the risk.

DANGER
Imminent mortal danger or serious injury.

CAUTION
Potential minor injuries, property or environmental damage.
2.2 Intended use
The device may only be used for the following purposes:
• Smoke detection and heat warning in private households and residential real estate
- Smoke alarm device indoors
- Use in leisure accommodation vehicles (e.g. caravans)
- Use in accordance with DIN 14676 and applicable construction ordinances, construction regulations and fire protection regulations
Note the following when using the smoke alarm device:
▶ Use the device only as intended and in a technically perfect condition.
▶ For special settings contact the manufacturer.
2.3 Unintended use
The device must not be used for the following purposes:
• Heat detection in terms of EN 54-5
• Any use that is not expressly described as permitted in this operating manual
2.4 Maximum useful life
The smoke alarm device will reach the end of its useful life at the latest after 12 years of usage according to the intended purpose.
▶ Replace the device at the end of this useful life.
2.5 Basic safety instructions
The basic safety instructions group all the safety measures by topic and apply at all times.
General information
Smoke alarm devices provide early warning of smoke or fire, so that the residents of the house and the apartment are able to react on time, in particular, to leave the premises immediately and to alert the fire brigade. Smoke alarm devices do not prevent fires, nor do they fight fires automatically. Smoke alarms do not directly alert the fire brigade or other emergency service. Smoke alarm devices are not used to prevent fire damage, particularly if no one is present when the fire breaks out. The smoke alarm devices are subject to strict quality controls during the manufacture. In addition, a functional test is performed before delivery. Nevertheless, unexpected malfunctions may occur.
What to do if there is a fire? External influences
(1) Keep calm.
(2) Warn all co-residents.
(3) Help children, disabled, elderly and sick people.
(4) Close all windows and doors behind you.
(5) Leave the house immediately.
(6) Do not use lifts.
(7) Alert the fire brigade. 112
Battery replacement
A battery change is not necessary and is technically impossible, as the device must not be opened.
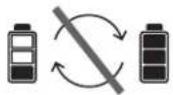
External influences can cause malfunction and damage to the device and the battery. Protect the device from:
- Moisture
• Cold - Direct sunlight or excessive heat (damage to the battery)
• Dust and particulate matter - Spiders and insect infestation
- Grease
• Nicotine and paint fumes
• Coatings (e.g., wall paint) - Adhesives
- Dirt of any kind
Immersion in water
Immersion in water will cause damage to the device.

▶ Do not immerse the device in water.
3 Overview
Opening the device
The device is a closed system. Any tampering with the device, in addition to the loss of the limited warranty and statutory warranties, also means that the device must not be used as intended.

▶ Do not open the device.
As an exception, you may remove the decoration cover (cover of the smoke alarm device) to identify the device or for decorating.
Sensitive components
The device consists of sensitive components (e.g. sensors).

▶ Do not throw the device.
▶ Do not drop the device.
▶ Do not apply pressure to the device.
Decorating
If the smoke intake lamellas are covered, the smoke detection and heat warning functions can be impaired or prevented. No reliable alarm can be triggered.
▶ Only decorate the decoration cover (cover of the smoke alarm device) and keep the smoke intake lamellas free.
Renovation work
During renovation, construction and sanding work, malfunction or damage to the device may occur due to the development of dust.
▶ Remove the device prior to renovations, or protect it with a suitable cover.

No reliable alarm can be triggered while the device is covered.
▶ Mount the device after completion of the renovation work on the original usage location, or remove the cover.
3.1 Function
The basic functions of the device are:
- Smoke detection based on the optical detection method
- Heat warning function
3.2 Components

Fig. 9 Components
1 Splint pin (activation backup)
2 Activation button
3 Magnet carrier
4 Smoke intake lamellas
5 Testing/stop button
(smoke alarm device cover)
Splint pin (actesting/stopbutton)
(smoke alarm d
The splint pin (activation backup) is used during the transport of the device to protect against accidental activation.
Activation button
The activation button is used to turn the device on and off.
The testing/stop button (smoke alarm device cover) is used for a self-test. The testing/stop button (smoke alarm device cover) can be pressed to interrupt or stop alarm and alert tones.
Magnet carrier
The magnet carrier is used for fastening the device.
Smoke intake lamellas
Smoke from the fire reaches the inside of the device through the smoke intake lamellas and can then be detected by sensors.
4 Location selection
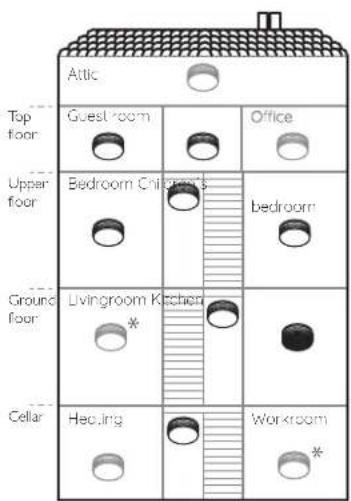
Fig. 10 Location selection
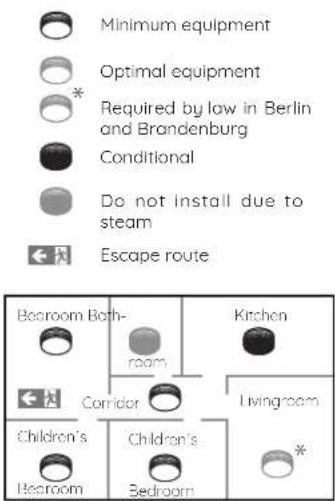
The use of smoke alarm devices is governed by DIN 14676.
Minimum equipment
- Bedrooms
• Children's bedroom - Guest room
• Hallways and all other rooms which serve as an escape route
• Stairwells of family houses
Optimal equipment
- All living and hobby rooms (except in Berlin and Brandenburg - here such equipment is also required by law)
• Heating and work spaces
• Office or workroom - Cellar
- Attic
Not recommended
- Bathrooms are excluded from the installation of smoke alarm devices due to the high development of steam
4.1 Area to be monitored
Use a device if at least one of the following applies:
• Monitoring area less than 60 m 2 , and ceiling height of less than 6 m
- Ceiling panels (height lower than 20 cm) with joists (ceiling surface less than 36 m 2 )
Use additional equipment if at least one of the following applies:
• Monitoring area greater than 60 m 2
- Ceiling height greater than 6 m
• High partial walls
• Separating pieces of furniture
Conditional equipment
• In kitchens, smoke alarm devices must only be installed when false alarms (e.g., caused by steam) are excluded
- Ceiling panels (height greater than 20 cm) with joists (ceiling surface more than 36 m²)
- Platform/gallery (area greater than 16 m2 , at least 2 m long and wide)

In rooms with beams (e.g., wooden beams), the number and arrangement of the devices depends on the height of the joists and the surface formed by the beams.
4.2 Requirements for the monitoring area
When selecting the appropriate monitoring area, observe the following:
▶ Position the device centrally on the ceiling.
▶ Observe the maximum installation height of 6 m.
▶ Keep a maximum distance of 6 m to a potential fire source.
- Keep a minimum distance of 0.5 m to surrounding walls, furniture and lamps.
For occurring smoke to be able to reach the smoke alarm device, there must not be any strong draught influences around the installation site (e.g. caused by air conditioner and ventilation intakes, fans). In rooms with forced ventilation, perforated ceilings that serve for ventilation must be closed off within a radius of 0.5 m around the alarm device.
Rooms with straight ceilings (slope angle < 20°)

Fig. 11 Rooms with straight ceilings

Allowed

Not allowed
Areas susceptible to broughts following for locations in rooms with straight ceilings:
▶ Select the highest mounting point on the ceilings.
▶ Mount the devices horizontally to the mounting surface.
In addition, observe the following for locations in narrow rooms or corridors that are 1-3 m wide:
▶ Keep the distance of less than 7.5 m between the front surface (end of the corridor) and the first device.
▶ Keep the distance of less than 15 m between two devices.
In addition, observe the following for locations in narrow rooms or corridors that are less than 1 m wide:
▶ Observe chapter "Rooms with straight ceilings (slope angle < 20°)" on page 44.
▶ Keep distance from surrounding
walls (exception: distance less than 0.5 m).
Rooms with slanted ceilings (slope angle > 20°)
In rooms with ceiling slope angles of more
Narrow spaces or corridors (1-3 m wide) can occur in the ceiling peak which stop smoke entering the smoke alarm device.

Fig. 12 Rooms with slanted ceilings

Allowed

Not allowed
Note the following for locations in rooms with slanted ceilings:
5 Installation
▶ Mount devices at least 0.5 m and at a maximum of 1 m away from the ceiling peak.
4.3 Rooms with slanted and horizontal ceilings

Fig. 13 Straight mounting surface at least 1 m long and 1 m wide

Allowed

Not allowed
Note the following for straight mounting surface less than 1 m long and 1 m wide:
▶ Observe chapter "Rooms with straight ceilings (slope angle < 20°)"
on page 44.

Fig. 14 Straight mounting surface less than 1 m long and 1 m wide

Allowed

Not allowed
Note the following for straight mounting surface less than 1 m long and 1 m wide:
▶ Observe chapter "Rooms with slanted ceilings (slope angle > 20°)" on page 45.
4.4 Rooms with a platform or gallery

Fig. 15 Rooms with a platform or gallery

Allowed

Not allowed
Note the following for rooms with platforms or galleries (area greater than 16 m², at least 2 m long and wide):
▶ Mount an additional device under the platform/gallery.
The device is held by a magnet carrier at the installation location. The magnet carrier can be mounted by gluing or drilling. To avoid injuries from improper installation, the instructions in this manual must be followed. The general safety regulations should also be observed.

CAUTION
Possible property damage!
Using other fastening material (not enclosed) or wrong conditions at the installation location can cause the device to fall down
▶ For adhesive mounting, use only the supplied mounting material (adhesive pad).
▶ For drill mounting, use screws and dowels that are suitable for the respective surface.
▶ Ensure that the installation location is strong enough, solid, dry, free from grease, dust and loose paint etc.
▶ Note that the magnet carrier magnetically attracts only from one side.
5.1 Adhesive mounting
The magnet carrier can be mounted using adhesive assembly as follows:
- Easy to maintain and
removable according to EN 14604:2005/AC:2008
• or maintenance-unfriendly but theft-proof according to EN 14604:2005/AC:2008 and vfdb 14/01 (Q)
Adhesive mounting according to
EN 14604:2005/AC:2008
When performing this type of installation, proceed as follows:
(1) Remove magnet carrier from the device. (Remove the splint from the activation button only after that)
▶ To do this, tilt the magnet carrier.

(2) Remove the protective film from the adhesive pad on the magnet carrier.

(3) Press firmly magnet carrier for about 10 seconds at the mounting position.
(4) Activate the device.
▶ Observe chapter 6 "Initial activation" on page 51.
(5) Position the device on the magnet carrier.
☑ The device is mounted on the magnet carrier.
The ultimate strength of the adhesive bond is achieved after about 72 hours.
Adhesive mounting according to EN 14604:2005/AC:2008 and vfdb 14/01 (Q)
To establish a permanent connection between the device and magnet carrier (e.g., as theft protection), you can additionally mount the device with the supplied adhesive film on the magnet carrier.

CAUTION
Possible property damage!
The mounting of the device according to vfdb 14/01 (Q) establishes a permanent connection between the magnet carrier and the device. Thus, a subsequent removal of the device is prevented. It is difficult to carry out maintenance. If the device is disassembled, it can cause damage to the device and the mounting surface.
▶ Use the additional adhesive film only to prevent theft.
▶ Activate the device before attaching the additional adhesive film.
When performing this type of installation, proceed as follows:
(1) Mount magnet carrier.
▶ Observe chapter "Adhesive mounting according to EN 14604:2005/AC:2008" on page 48.
(2) Activate the device.
6 Initial activation
▶ Observe chapter 6 "Initial activation" on page 51.
(3) Attach additional adhesive film to the magnet carrier sheet plate on the device.
▶ Remove the protective film from one side of the adhesive film.
▶ Place the adhesive sheet on the magnet carrier sheet plate on the device and press it on.
▶ Remove the protective film on the other side.
(4) Place the device on the magnet carrier and press it on.
☑ The device is mounted on the magnet carrier.
5.2 Drilling installation
As an alternative to adhesive mounting, you can also screw the magnet carrier on the mounting surface. Even with the drilling installation, the adhesive pad must remain on the magnet carrier and must not be removed.
When performing the drilling installation, proceed as follows;
(1) Remove magnet carrier from the device.
▶ To do this, tilt the magnet carrier.

(2) Drill a hole on the mounting position in the mounting surface.
(3) Insert the dowel into the drill hole.
(4) Tighten the screw in the magnet carrier.
(5) Position the magnet carrier above the dowel.
CAUTION
Possible property damage!
Over-tightening the screw may deform the magnet carrier.
▶ Tighten the screw only so deep that the magnet carrier is not deformed or bulged.
(6) To ensure a safe hold of the device,
tighten the screw deep into the dowel so that it closes flush with the magnet carrier.
Also in a drilling installation, you can create an adhesive compound using additional adhesive film, according to vfdb 14/01 (Q) (see chapter "Adhesive mounting according to EN 14604:2005/AC:2008 and vfdb 14/01 (Q)" on page 49).
(7) Activate the device.
▶ Observe chapter 6 "Initial activation" on page 51.
(8) Postion the device on the magnet carrier.
☑ The magnet carrier is attached and the device is placed.
Note the following when activating smoke alarm devices:
(1) Push the splint pin sideways off of activation button.
(2) Push activation button flush.

Short acoustic signal
☑ The device is activated.
Alarm stop
You can stop an alarm with or without fire.

If there is still a risk of fire after an alarm stop, the switched-off devices ring again after 10 minutes.
You can stop the alarm directly on the device:
▶ Press the testing/stop button on the device.
√ Alarm is stopped.
7 Fault and error messages
The device automatically checks its operational readiness once a minute. The device displays functional limitations in the form of error and alarm messages.
If the device detects environmental influences differing from the rule, it regulates the sensitivity of its detection electronics automatically.
7.1 Error messages
The following messages are considered error messages:
- Battery error message
- Contamination message
• Alarm without cause of fire
! DANGER
Danger from malfunction!
In the event of a battery error message/contamination message, the smoke alarm device may only continue to provide its reliable warning performance for max. 60 days.
It is necessary to replace the smoke alarm device before the remaining 60 days have passed.
Battery error message
A battery error message is triggered when the device starts using its energy reserve.
With the battery error message, a simple tone will sound every 90 seconds (see chapter 12 "Alarm and alert tones" on page 60). Proceed as follows:
(1) Press testing/stop button to turn off the battery error message for 24 hours.
(2) Replace the device.
Contamination message
A contamination message is triggered when the readjustment of the detection electronics is no longer possible due to heavy solling.
With the contamination message, a double tone will sound every 90 seconds (see chapter 12 "Alarm and alert tones" on page 60). Proceed as follows:
(1) Press testing/stop button to turn off the contamination message for
24 hours.
(2) Replace the device.
An alarm without fire is triggered under the following circumstances:
- Regular dust formation in living spaces with textiles prone to accumulate dust (e.g. carpets, clothing, blankets and pillows)
- Pollen, construction, sanding or fine dust
• Insects or micro-organisms that have overcome the insect barriers of the device
• Strong cooking, water and/or frying fumes and room, fragrance and insect repellent sprays
• Extreme temperature fluctuations or very strong electromagnetic radiation in close proximity influence the device

Cigarette smoke only triggers an alarm when it is in the immediate vicinity and in higher concentration.
Alarm without cause of fire in higher concentration.
You can take the following corrective measures:
▶ Stop alarm (see chapter "Alarm stop" on page 51).
▶ Ensure that there is adequate ventilation at the installation location.
▶ Carefully and regularly clean the device, e.g. using a vacuum cleaner.
▶ Inform neighbours about an alarm without a cause of fire, so that they do not falsely inform the fire brigade.
7.2 Troubleshooting
Problems can occur during activation, installation and operation under the following circumstances:
- Defective device
If there is an error or you cannot activate the device or you cannot trigger a test tone, you must replace the device. Proceed as follows:
8 Maintenance
▶ Replace the device.
▶ Activate the new device (see chapter 6 "Initial activation" on page 51).
☑ The device is replaced.
8.1 Maintenance
You must perform visual and functional tests at regular intervals.
Visual inspection
Perform a visual inspection once a year:
▶ Make sure that the smoke intake lamellas are not blocked (e.g., by dust, dirt, paint).
▶ When doing this, ensure that the device is not damaged and securely mounted in its location.
Functional check
As smoke alarm devices are electronic devices, trigger a test tone regularly, at least once a year:
▶ If no test tone sounds, you must replace the device.
Device test tone
Regularly trigger a test tone, at least once a year:
▶ Press and hold the testing/stop button for about 2 to 3 seconds.

Short test tone

If you repeat the test alarm within 10 minutes, certain device variants will sound a short, double test tone.
8.2 Cleaning
Perform the cleaning at least once a year. Observe the following when cleaning:
▶ Remove the device from the magnet carrier.
▶ Carefully clean, e.g. using a vacuum cleaner and damp cloth.
▶ Perform a functional check after cleaning, see section 8 maintenance, functional test.
8.3 Maintenance documentation
Pyrexx GmbH reserves the right, in the event of any warranty claims, to ask for evidence of the annual prescribed maintenance.
One way of documenting the maintenance in accordance with DIN 14676 is provided by the free Pyrexx web app. The Pyrexx web app can be found at pyrexx.com/app and enables you to record the annual testing and maintenance services of your smoke alarm devices.
9 Deactivation
9.1 Switching off the device
▶ To switch off the device, pull out the activation button.

Fig. 16 Pulling out the activation button
1 Activation button
9.2 Final deactivation
The smoke alarm device will reach the end of its useful life at the latest after 12 years of usage according to the intended purpose.
▶ Replace the device at the end of this useful life.
9.3 Disposal
According to the German Electrical and Electronic Devices Act (ElektroG), this product should never be placed in domestic waste.
▶ Return the device to be disposed to us as the manufacturer or hand it over to your local waste disposal company, or to the return facilities established. You can find a directory of the return facilities online at: ear-system.de/ear-verze.chnis/sammel-und-ruecknahmestellen.jsf
▶ Please note that the environment can be damaged by improper disposal.

10 Accessories, spare parts and product support
10.1 XSD100 accessories
- Pyrexx mounting rod with claw holder (for service providers)
• RWM MC (diagnostic device) for extended function test (for service providers)
10.2 XSD100 spare parts
- Smoke alarm device cover (decoration cover)
• Magnet carrier with adhesive pad - Adhesive film
- Splint pin (activation backup)
10.3 Product support
In the case of any guarantee or warranty claim, please send the device back to the vendor.
Product support can be reached via e-mail to support@pyrexx.com and via telephone to +49 30 74 74 74 75.
You can find explanatory videos about our products at pyrexx.com/en/support/media.
11 Technische Daten / Technical specifications
When using additional peripheral devices (e.g. PX-IP Gateway or RWM MC diagnostic device), note that the alert tones for error messages of the smoke alarm device must always be given priority in all cases.
You can temporarily disable the alarm sounds "smoke alarm" and "temperature alarm" for 10 minutes by pressing the testing/stop button.
You can temporarily disable the alarm sounds "battery alarm message" and "contamination message" for 24 hours by pressing the testing/stop button. It is necessary to replace the device.

10 Minuten / minutes

24 Stunden / hours
Impressum
Pyrexx GmbH
Siemensdamm 62 13627 Berlin
Deutschland, Germany
© Pyrexx GmbH
k_503109
Revision of the brochure 2021-01 Subject to change


- XSD100
- EN
- 1 NOTES ON THE OPERATING MANUAL
- 1.1 SCOPE OF THE OPERATING MANUAL
- 1.2 NAME PLATE AND IDENTIFICATION
- 1.3 CONFORMITY
- CONFORMITY IN ACCORDANCE WITH
- 1.4 SAFEKEEPING OF THE OPERATING MANUAL
- 1.5 SYMBOLS USED
- 1.6 COPYRIGHT
- 1.7 GUARANTEE AND WARRANTY
- 2 SAFETY INSTRUCTIONS
- 2.1 REPRESENTATION AND STRUCTURE OF WARNING LABELS
- DANGER
- CAUTION
- 2.2 INTENDED USE
- 2.3 UNINTENDED USE
- 2.4 MAXIMUM USEFUL LIFE
- 2.5 BASIC SAFETY INSTRUCTIONS
- GENERAL INFORMATION
- WHAT TO DO IF THERE IS A FIRE? EXTERNAL INFLUENCES
- BATTERY REPLACEMENT
- IMMERSION IN WATER
- 3 OVERVIEW
- OPENING THE DEVICE
- SENSITIVE COMPONENTS
- DECORATING
- RENOVATION WORK
- 3.1 FUNCTION
- 3.2 COMPONENTS
- FIG. 9 COMPONENTS
- SPLINT PIN (ACTESTING/STOPBUTTON)
- ACTIVATION BUTTON
- MAGNET CARRIER
- SMOKE INTAKE LAMELLAS
- 4 LOCATION SELECTION
- MINIMUM EQUIPMENT
- OPTIMAL EQUIPMENT
- NOT RECOMMENDED
- 4.1 AREA TO BE MONITORED
- CONDITIONAL EQUIPMENT
- 4.2 REQUIREMENTS FOR THE MONITORING AREA
- ROOMS WITH SLANTED CEILINGS (SLOPE ANGLE > 20°)
- 5 INSTALLATION
- POSSIBLE PROPERTY DAMAGE
- 5.1 ADHESIVE MOUNTING
- ADHESIVE MOUNTING ACCORDING TO
- EN 14604:2005/AC:2008
- ADHESIVE MOUNTING ACCORDING TO EN 14604:2005/AC:2008 AND VFDB 14/01 (Q)
- 6 INITIAL ACTIVATION
- 5.2 DRILLING INSTALLATION
- ALARM STOP
- 7 FAULT AND ERROR MESSAGES
- 7.1 ERROR MESSAGES
- DANGER FROM MALFUNCTION
- BATTERY ERROR MESSAGE
- CONTAMINATION MESSAGE
- ALARM WITHOUT CAUSE OF FIRE IN HIGHER CONCENTRATION
- 7.2 TROUBLESHOOTING
- 8 MAINTENANCE
- 8.1 MAINTENANCE
- VISUAL INSPECTION
- FUNCTIONAL CHECK
- DEVICE TEST TONE
- 8.2 CLEANING
- 8.3 MAINTENANCE DOCUMENTATION
- 9 DEACTIVATION
- 9.1 SWITCHING OFF THE DEVICE
- 9.2 FINAL DEACTIVATION
- 9.3 DISPOSAL
- 10 ACCESSORIES, SPARE PARTS AND PRODUCT SUPPORT
- 10.1 XSD100 ACCESSORIES
- 10.2 XSD100 SPARE PARTS
- 10.3 PRODUCT SUPPORT
- IMPRESSUM
- PYREXX GMBH
Brand : Pyrexx
Model : XSD100
Category : Smoke detector