
Tapo S200B - Smart Home TP-LINK - Free user manual and instructions
Find the device manual for free Tapo S200B TP-LINK in PDF.


| Product Type | Smart Button |
| Brand | TP-Link |
| Model | Tapo S200B |
| Wireless Standard | Wi-Fi 2.4 GHz |
| Power Source | 1x CR2032 Lithium Battery (included) |
| Battery Life | Up to 2 years (typical usage) |
| Dimensions (W x H x D) | 42 mm x 42 mm x 14 mm |
| Weight | 25 g (without battery) |
| Operating Temperature | 0 °C to 40 °C |
| Operating Humidity | 10% to 90% non-condensing |
| Main Functions | One-tap control of smart devices, trigger scenes and routines, custom actions via Tapo app |
| Compatibility | Works with all Tapo smart devices, compatible with Amazon Alexa and Google Home |
| Mounting | Adhesive sticker or magnetic plate (included) |
| Color Options | White |
| LED Indicator | Single LED for status (blue/red) |
| App Control | TP-Link Tapo app (iOS/Android) |
| Certifications | CE, FCC, RoHS |
| Cleaning Instructions | Wipe with a soft dry cloth; do not use liquid cleaners |
| Safety Precautions | Keep away from water and extreme heat; replace battery when low |
| Spare Parts & Repairability | Battery is user-replaceable; no other spare parts available; seek professional service for repairs |
| Package Contents | Tapo S200B button, CR2032 battery, mounting plate, adhesive sticker, quick start guide |
| Warranty | 2 years limited warranty |
Frequently Asked Questions - Tapo S200B TP-LINK
User questions about Tapo S200B TP-LINK
0 question about this device. Answer the ones you know or ask your own.
Ask a new question about this device
Download the instructions for your Smart Home in PDF format for free! Find your manual Tapo S200B - TP-LINK and take your electronic device back in hand. On this page are published all the documents necessary for the use of your device. Tapo S200B by TP-LINK.
USER MANUAL Tapo S200B TP-LINK
How to Create Smart Actions....10
How to Replace the Battery 12
How to Reset Your Smart Button 13
Authentication 14
About This Guide
This guide provides a brief introduction to the Smart Button and the Tapo app, as well as regulatory information.
Please note that features available in Tapo may vary by model and software version. Tapo availability may also vary by region. All images, steps, and descriptions in this guide are only examples and may not reflect your actual Tapo experience.
Conventions
In this guide, the following convention is used:
| Convention | Description |
| Blue | Key information appears in blue, including management page text such as menus, items, buttons and so on. |
| Underline | Hyperlinks are in blue and underlined. You can click to redirect to a website. |
| ■ Note: Ignoring this type of note might result in a malfunction or damage to the device. | |
More Info
- Specifications can be found on the product page at https://www.tapo.com. • Our Technical Support and troubleshooting information can be found at https://www.tapo.com/support/. • The setup videos can be found at https://www.tp-link.com/hk/support/setup-video/#home-smart-switches.
Introduction
Don't bother opening up an app or calling out to your voice assistant. Pair all your Tapo lights and devices with a single button for simple and handy control. Place two or more buttons in different locations, so your lighting control is always within reach.
- Smart Actions – Control and set multiple lights, electronics, and other Tapo smart devices with the button.
- Customized Actions – Single tap, double tap, and rotating options enable you to trigger multiple actions, from just one button.
- One-Click Alarm – Family members can use the device to get help in times of need.
- Control From Multiple Locations – Control electrical fixtures from multiple locations with Tapo smart buttons.
- Great Compatibility - Just one part of the integrated Tapo ecosystem.
- Long Battery Life – Battery-powered design with 1+ year battery life. (Based on the testing of 30 triggers a day.)
- Device Sharing – Easily share management permissions with each member of your family.
- Easy Setup and Use – Set up quickly and easily through the free Tapo app.

Single Tap / Double Tap Rotate

Tapo Smart Ecosystem
Tapo is the easy way to turn your home into a smart home. With the Tapo Hub as a bridge, Tapo Smart Button works with a wide range of Tapo accessories. So you can easily control and monitor your home from anywhere.

Automate Your Home
Create a Smart Action to automate your smart devices. Customize your own Smart Actions to group your Tapo products together any way you want.
Turn On/Off Devices![graph TD A["tapo"] --> B((Tape)) B --> C["Light bulb"] B --> D["Power outlet"] B --> E["Monitor with fan icon"] B --> F["Coffee cup with cup icon"]](/content/2026/06/1357371/images/03d83298dd2e2ffe172ff0e61c237725c0bc463465b425df02ef2fc1b219bf39.jpg)
Customize Tapo Lighting Build Smart Doorbell![graph TD A["tapo"] --> B["Speaker Icon"] B --> C["Lightbulb"]](/content/2026/06/1357371/images/b17e38585bfd63945a2ce32720248ca2aba49058a716054a9eb0d139c1922bd3.jpg)

Set Up Your Smart Button
Watch setup videos at https://www.tp-link.com/support/download/tapo-s200b/
Before You Start
A Tapo Hub is required. Make sure your Tapo Hub is successfully added via the Tapo app.

1. Set Up Your Button
Tap the ⊕ button in the Tapo app, tap Switches, and select your model. Follow the instructions in the Tapo app to complete the setup.

2. Check the LED & Set Up
Check if the LED blinks. Follow app instructions to complete the setup.
Note: If LED is not blinking, refer to How to Reset Your Smart Button for instructions.

3. Test Your Button
a. Press the button to test it in your preferred location. b. Refresh the home page on the Tapo app to confirm its status.

4. Secure Your Button (Optional)
a. Attach the non-slip pad to the button to keep it firmly in place.
b. Magnetically attach the button to metallic objects. Alternatively, you can attach the button to the provided bracket with either adhesive or screws.


Note: Installation height should not be higher than 6.56 ft (2 m).
Use Your Smart Button
After you successfully set up your hub and smart button, you will see your devices listed on the home page. With the Tapo app, you can view and manage your devices anytime, anywhere.
Home Page
This page lists all the devices you've added and you can view them directly and manage them easily. Tap the card to enter its Status page.

Home Page Settings
Long press on a card, then you can reorder cards, tap to remove your device from your account, share your device, favorite/unfavorite device, or relocate your device to other Home.

Status Page
You can check all events of you device. Slide the panel up to check more settings or tap the gear icon to enter the Settings page.

Featured Smart Actions
The smart button can work with other Tapo devices to automate your home. You can customize smart actions based on the templates.

Device Settings
Check/edit the basic info, view User Manual and Placement Guide, or remove your device from your account.

Double Tap Settings
Turn on Double Tap if you want to use "Double Tap" as a trigger for the smart action.
Explore Smart Actions
The smart button can work with other Tapo devices to automate your home. You can customize smart actions based on the templates. This makes your home safer and smarter.

| Smart Actions What can this | Smart Action do? Tapo Device Requirement | |
| Turn on/off your smart devices | Turn on/off the devices with one tap on your button | Hub + Bulb/Light Strip/Plug/Switch |
| Adjust light brightness | Rotate the button to adjust the brightness of the selected devices. | Hub + Bulb/Light Strip |
| Adjust light temperature | Rotate the button to change the feeling and ambiance of the room on the selected devices. | Hub with alarm feature |
| Customize lighting | Rotate the button to adjust color and brightness for your mood with the selected devices.*Only color light is supported. | Hub + Bulb/Light Strip |
| Build smart doorbell | When the button is pressed, the selected hubs will ring. | Hub with alarm feature |


How to Create Smart Actions
Choose a Smart Action template, choose devices, and customize the settings as needed.
- On the Status page, tap Explore Smart Actions.
- Choose a template and customize the smart action based on the template.
- Select devices you want to take action when you tap or rotate the button.


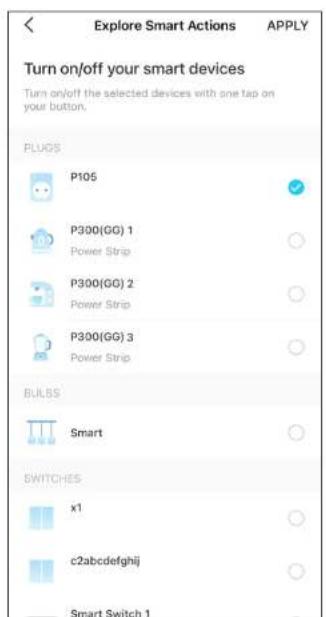
Turn on Delay Action if you want the action to take place some time after the button is tapped or rotated.
- Set the effective time for this smart action. 4. Customized user searching applications (Smart Actions) >
Automation to check the item. Toggle on/off to enable/disable the action, tap to edit, and swipe right to delete.

How to Replace the Battery
Watch videos at https://www.tp-link.com/support/download/tapo-s200b/
- Hold the main body to prevent free rotation. Then twist the lid anticlockwise and remove the lid.
Option 1: By Hand
Option 2: With a Shim
- Replace the battery into the battery compartment, making sure the battery is level and its positive side is facing up. Put the cover back on the device.

How to Reset Your Smart Button

Watch videos at https://www.tp-link.com/support/download/tapo-s200b/
Option 1. Via the Button
a. Press and hold the button for 5 seconds. The LED will become yellow-green for 10 seconds. b. Quickly press the button 3 times within that 10 seconds. c. The LED should start blinking.

Option 2. Via the Tapo App
Long press the card on the home page and tap 📋 or go to the Device Settings page and tap the Remove button to remove your device from your account.

OR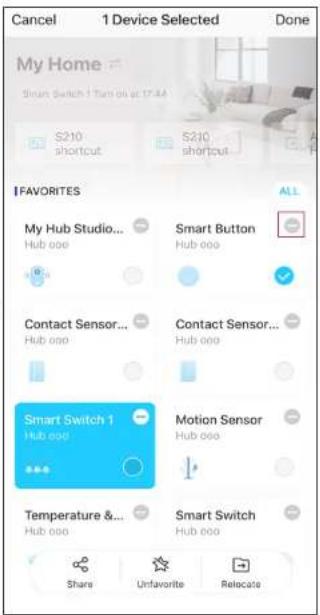
Authentication
FCC Compliance Information Statement

Product Name: Tapo Smart Button
Model Number: Tapo S200B
Responsible party:
TP-Link USA Corporation
Address: 10 Mauchly, Irvine, CA 92618
Website: http://www.tp-link.com/us/
Tel: +1 626 333 0234
This equipment has been tested and found to comply with the limits for a Class B digital device, pursuant to part 15 of the FCC Rules. These limits are designed to provide reasonable protection against harmful interference in a residential installation. This equipment generates, uses and can radiate radio frequency energy and, if not installed and used in accordance with the instructions, may cause harmful interference to radio communications. However, there is no guarantee that interference will not occur in a particular installation. If this equipment does cause harmful interference to radio or television reception, which can be determined by turning the equipment off and on, the user is encouraged to try to correct the interference by one or more of the following measures:
- Reorient or relocate the receiving antenna.
- Increase the separation between the equipment and receiver.
- Connect the equipment into an outlet on a circuit different from that to which the receiver is connected.
- Consult the dealer or an experienced radio/TV technician for help.
This device complies with part 15 of the FCC Rules. Operation is subject to the following two conditions:
- This device may not cause harmful interference.
- This device must accept any interference received, including interference that may cause undesired operation.
Any changes or modifications not expressly approved by the party responsible for compliance could void the user's authority to operate the equipment.
Note: The manufacturer is not responsible for any radio or TV interference caused by unauthorized modifications to this equipment. Such modifications could void the user's authority to operate the equipment.
FCC RF Radiation Exposure Statement
This equipment complies with FCC RF radiation exposure limits set forth for an uncontrolled environment. This device and its antenna must not be co-located or operating in conjunction with any other antenna or transmitter.
"To comply with FCC RF exposure compliance requirements, this grant is applicable to only Mobile Configurations. The antennas used for this transmitter must be installed to provide a separation distance of at least 20 cm from all persons and must not be co-located or operating in conjunction with any other antenna or transmitter."
We, TP-Link USA Corporation, have determined that the equipment shown above has been shown to comply with the applicable technical standards, FCC part 15. There is no unauthorized change made in the equipment and the equipment is properly maintained and operated.
Issue Date: 2022.10.31
CE Mark Warning
CE
This is a class B product. In a domestic environment, this product may cause radio interference, in which case the user may be required to take adequate measures.
Operating Frequency / Nominal Operating Frequency / Max Output Power:
863~865MHz / 863.35MHz / 25mW (e.r.p)
863~865MHz / 864.35MHz / 25mW (e.r.p)
868~868.6MHz / 868.35MHz / 25mW (e.r.p)
EU declaration of conformity
TP-Link hereby declares that the device is in compliance with the essential requirements and other relevant provisions of directives 2014/53/EU, 2009/125/EC, 2011/65/EU and (EU) 2015/863.
The original EU declaration of conformity may be found at https://www.tapo.com/en/support/ce/
RF Exposure Information
This device meets the EU requirements (2014/53/EU Article 3.1a) on the limitation of exposure of the general public to electromagnetic fields by way of health protection.
The device complies with RF specifications when the device is used at 20 cm from your body.
Restricted to indoor use.
UKCA Mark
UK CA
UK Declaration of Conformity
TP-Link hereby declares that the device is in compliance with the essential requirements and other relevant provisions of the Radio Equipment Regulations 2017.
The original UK declaration of conformity may be found at https://www.tapo.com/support/ukca/
Korea Warning Statements:
- Keep the device away from water, fire, humidity or hot environments.
- Do not attempt to disassemble, repair, or modify the device. If you need service, please contact us.
- Do not use the device where wireless devices are not allowed.
- Please read and follow the above safety information when operating the device. We cannot guarantee that no accidents or damage will occur due to improper use of the device. Please use this product with care and operate at your own risk.
- Do not ingest battery, Chemical Burn Hazard
CAUTION!
Risk of explosion if the battery is replaced by an incorrect type
CAUTION!
Avoid replacing a battery with an incorrect type that can defeat a safeguard.
Avoid disposing of a battery into fire or a hot oven, or mechanically crushing or cutting a battery, which can result in an explosion.
Do not leave a battery in an extremely high temperature surrounding environment, which can result in an explosion or the leakage of flammable liquid or gas. Do not leave a battery subjected to extremely low air pressure, which may result in an explosion or the leakage of flammable liquid or gas.
CAUTION: Do not ingest battery. Chemical Burn Hazard.
- This product contains a coin/button cell battery. If the coin/button cell battery is swallowed, it can cause severe internal burns in just 2 hours and can lead to death.
- Keep new and used batteries away from children.
- If the battery compartment does not close securely, stop using the product and keep it away from children.
- If you think batteries might have been swallowed or placed inside any part of the body, seek immediate medical attention.
Warnings
Operating Temperature: 0 °C–40 °C (32°F–104°F)
Operating Humidity: 10%-90%RH, Non-condensing
Handling Instructions for Lithium Ion Rechargeable Battery
Please read and follow the handling instructions for the battery before use. Improper use of the battery may cause heat, fire, explosion, damage, or capacity deterioration of the battery.
Do not place or leave the battery and equipment in the reach of infants so that they are not able to swallow or mistreat the battery by mistake.
In case of ingestion, consult with a doctor immediately.
- Do not let leaked electrolyte come into contact with eyes or skin.
In such a case, immediately wash the area of contact with clean water and seek help from a doctor.
If not treated soon, prolonged contact may cause serious injury.
- Do not put the battery into a fire. Do not use it or leave it in a place near fire, heaters, or high temperature sources.
In such a case, the insulator in the battery may be melted, the safety vent and structure may be damaged, or the electrolyte may catch fire, all of which may cause heat generation, explosion, or fire.
- Do not submerge the battery in water, or wet the battery.
If the protecting device assembled in the battery is damaged, the battery may be charged with an abnormal current and voltage and may cause a chemical reaction within the battery, which may result in the cause of heat generation, explosion, or fire of the battery.
- Do not use any battery charger not specified by the manufacture, also follow the charge conditions specified by the manufacture.
If the battery is charged under other conditions (a high temperature, a high voltage / current, or an altered charger) not specified by the manufacture, the battery may become over-charged with an excessive current and cause heat, explosion, or fire with abnormal chemical reactions.
- Do not use, charge, or leave the battery near fire or in a car under the blazing sun. Such a high temperature may cause damage of the protecting device in the battery, which may result in an abnormal reaction, and then heat generation, explosion, or fire.
- Do not connect the battery reversed in positive (+) and negative (-) terminals in the charger or equipment.
In case the battery is connected and charged reversely, it may cause heat generation, explosion, or fire due to an abnormal chemical reaction.
- Do not let the battery terminals (+ and -) contact a wire or any metal (like a metal necklace or a hairpin) with which it carried or stored together.
In such a case, the battery will be shorted and cause an excessive current, which may result in heat generation, explosion, or fire.
- Do not connect the battery directly to an electric outlet or cigarette heater socket in car.
With a high voltage applied, the battery may overheat, explode, or cause fire.
- Do not throw or drop the battery.
Strong impact may damage the protecting device, which may cause an abnormal chemical reaction during charging and result in heat generation, explosion, or fire of the battery.
- Do not drive a nail in, hit with a hammer, or stamp on the battery.
In such a case, the battery may be deformed and shorted, which may cause heat generation, explosion, or fire of the battery.
- Do not solder the battery directly.
Heat applied during soldering may damage the insulator of the safety vent and mechanism, which may result in heat generation, explosion, or fire of the battery.
- Do not disassemble or alter the battery.
The battery employs a safety mechanism and a protecting device in order to avoid any danger.
If these are damaged, heat, explosion or fire may be caused.
CAUTION
- Do not put the battery in a microwave or a pressure cooker.
Sudden heat may damage the seal of the battery and may cause heat generation, explosion, or fire of the battery.
- Do not use the battery with other maker's batteries, different types and / or models of batteries such as dry batteries, nickel-metal hydride batteries, or nickel-cadmium batteries, or new and old lithium ion batteries together.
In such a case, over-discharge during use, or over-charge during charge may occur abnormal chemical reactions and may cause heat generation, explosion, or fire of the battery.
- Do not leave the battery in a charger or equipment if it generates an odor and/or heat, changes color and/or shape, leaks electrolyte, or causes any other abnormality.
In such a case, immediately take the battery out of the charger or equipment and keep it away from fire; otherwise, the battery might overheat, explode, or cause fire.
- Discontinue charging after the specified charging time even if the charge is not complete; otherwise, the battery might cause heat generation, explosion, or fire.
- Do not use the battery in a place where static electricity (more than the limit of the manufacturer's guarantee) occurs. Otherwise, the protecting device in the battery might be damaged and cause heat generation, explosion, or fire.
- Do not use the battery in conditions other than the following; otherwise, the battery might cause heat generation, damage, or deterioration of its performance.
Operating environment:
When the battery is charged: 0°C to +45°C (Humidity < 80%)
When stored 1 month: -20°C to +50°C (Humidity < 80%)
When stored 3 months: -20°C to +45°C (Humidity < 80%)
When stored 1 year: -20°C to +20°C (Humidity < 80%)
Please read and follow the above safety information when operating the device. We cannot guarantee that no accidents or damage will occur due to improper use of the device. Please use this product with care and operate at your own risk.
Explanation of the symbols on the product label
| Symbol | Explanation |
| Direct current | |
| Indoor use only | |
| Caution | |
| Operator's manual | |
| RECYCLINGThis product bears the selective sorting symbol for Waste electrical and electronic equipment (WEEE). This means that this product must be handled pursuant to European directive 2012/19/EU in order to be recycled or dismantled to minimize its impact on the environment.User has the choice to give his product to a competent recycling organization or to the retailer when he buys a new electrical or electronic equipment. |


- ABOUT THIS GUIDE
- CONVENTIONS
- MORE INFO
- INTRODUCTION
- TAPO SMART ECOSYSTEM
- AUTOMATE YOUR HOME
- SET UP YOUR SMART BUTTON
- BEFORE YOU START
- SET UP YOUR BUTTON
- CHECK THE LED & SET UP
- TEST YOUR BUTTON
- SECURE YOUR BUTTON (OPTIONAL)
- USE YOUR SMART BUTTON
- HOME PAGE
- HOME PAGE SETTINGS
- STATUS PAGE
- FEATURED SMART ACTIONS
- DEVICE SETTINGS
- DOUBLE TAP SETTINGS
- EXPLORE SMART ACTIONS
- HOW TO CREATE SMART ACTIONS
- HOW TO REPLACE THE BATTERY
- HOW TO RESET YOUR SMART BUTTON
- OPTION 1. VIA THE BUTTON
- OPTION 2. VIA THE TAPO APP
- AUTHENTICATION
- FCC RF RADIATION EXPOSURE STATEMENT
- CE MARK WARNING
- CE
- OPERATING FREQUENCY / NOMINAL OPERATING FREQUENCY / MAX OUTPUT POWER
- EU DECLARATION OF CONFORMITY
- RF EXPOSURE INFORMATION
- UKCA MARK
- UK CA
- UK DECLARATION OF CONFORMITY
- KOREA WARNING STATEMENTS
- CAUTION
- CAUTION: DO NOT INGEST BATTERY. CHEMICAL BURN HAZARD
- WARNINGS
Brand : TP-LINK
Model : Tapo S200B
Category : Smart Home