
KS230 - Smart Home TP-LINK - Free user manual and instructions
Find the device manual for free KS230 TP-LINK in PDF.


| Product Type | 3-Way Smart Dimmer Switch Kit |
| Brand | TP-Link |
| Model | KS230 |
| Category | Smart Home |
| Dimensions (Width x Height x Depth) | 4.1 x 1.7 x 1.2 inches (104 x 43 x 30 mm) |
| Weight | 0.2 lbs (90 g) |
| Power Supply | 120 VAC, 60 Hz |
| Maximum Load | 300 W LED, 600 W Incandescent |
| Wireless Connectivity | Wi-Fi 2.4 GHz (802.11 b/g/n) |
| Main Functions | Dimming, scheduling, remote control via smartphone, voice control (Alexa, Google Assistant, SmartThings), away mode, group control |
| Installation | Requires neutral wire; replaces existing 3-way switch; includes two switches (master and companion) |
| App Compatibility | Kasa Smart app (iOS/Android) |
| Maintenance and Cleaning | Wipe with a soft, dry cloth; do not use liquid cleaners |
| Safety Certifications | UL Listed, FCC compliant |
| Spare Parts and Repairability | Includes wall plates; no user-serviceable parts; contact TP-Link support for repairs |
| Operating Temperature | 32°F to 104°F (0°C to 40°C) |
| Warranty | 2-year limited warranty |
Frequently Asked Questions - KS230 TP-LINK
User questions about KS230 TP-LINK
0 question about this device. Answer the ones you know or ask your own.
Ask a new question about this device
Download the instructions for your Smart Home in PDF format for free! Find your manual KS230 - TP-LINK and take your electronic device back in hand. On this page are published all the documents necessary for the use of your device. KS230 by TP-LINK.
USER MANUAL KS230 TP-LINK
User Guide
Kasa Smart Wi-Fi Light Switch, 3-Way Dimmer Kit KS230Kit
Contents
About This Guide 1
Introduction 2
Appearance 3
Set Up Your Smart 3-Way Dimmer Kit……6
Main Device Controls 7
Adjust Brightness 8
Set Preset Brightness 9
Set Schedules 11
Set Timer....14
Set Away Mode 15
Manage Device Settings 16
Reset Your Smart 3-Way Dimmer Kit……23
Create Groups 26
Create Scenes 30
Smart Actions 32
Voice Control & Third-Party Support……45
Authentication 49
About This Guide
This guide provides a brief introduction to Smart 3-Way Dimmer Kit and the Kasa Smart app, as well as regulatory information.
Features available in Kasa Smart may vary by model and software version. Kasa Smart and 3-Way Dimmer Kit availability may also vary by region. All images, steps, and descriptions in this guide are only examples and may not reflect your actual Kasa Smart experience.
Conventions
In this guide, the following convention is used:
| Convention | Description |
| Teal | Key information appears in teal, including management page text such as menus, items, buttons and so on. |
| Underline | Hyperlinks are in teal and underlined. You can click to redirect to a website. |
More Info
- Specifications can be found on the product page at https://www.tp-link.com. • Our Technical Support and troubleshooting information can be found at https://www.tp-link.com/support.
- A TP-Link Community is provided for you to discuss our products at https://community.tp-link.com. • Frequently Asked Questions (FAQs) can be found at https://www.tp-link.com/support/faq/.
Introduction
With the Smart 3-Way Dimmer Kit, you can control the ambiance of any space with the push of a button. Download the Kasa Smart app and control your dimmer remotely. The Kasa Smart app provides easy step-by-step installation instructions and convenient remote control from anywhere.
- Brightness Control - Control the brightness of your lights to set the perfect ambiance for any activity.
- Three-Way Control - Manually control your lights from two separate locations.
- Hands-free Experience - Control your lights by voice commands through support from Amazon Alexa and Google Assistant.
- Fade On/Off - Turn the lights on and off gradually, reduce the strain on your eyes.
- Set Schedules - Program lights to turn off and on or turn to a set brightness at set times throughout the day or night. • Smart Actions - Seamlessly control every Kasa device in a room with one touch of the smart switch.

Phone not included; Works with iOS and Android
Appearance
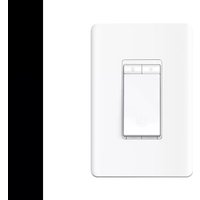
The Smart 3-Way Dimmer Kit is compatible with incandescent, LED, Halogen, and compact fluorescent light bulbs. It includes a main dimmer and a satellite dimmer.
See below for the main dimmer and check the next page for the satellite dimmer.

Main Switch Status LED
| Color Event | |
| Solid amber Starting up. | |
| Blinking amber & green Ready for setup. | |
| Blinking green Connecting to Wi-Fi. | |
| Solid green for 30s Connected to Wi-Fi. | |
| Solid red Disconnected from Wi-Fi. | |
| Blinking amber The dimmer is being reset to factory default settings. | |
| Solid white | The dimmer is off.LED is on to indicate the dimmer location in the dark. |
| Blinking red quickly The wires are incorrectly connected. |
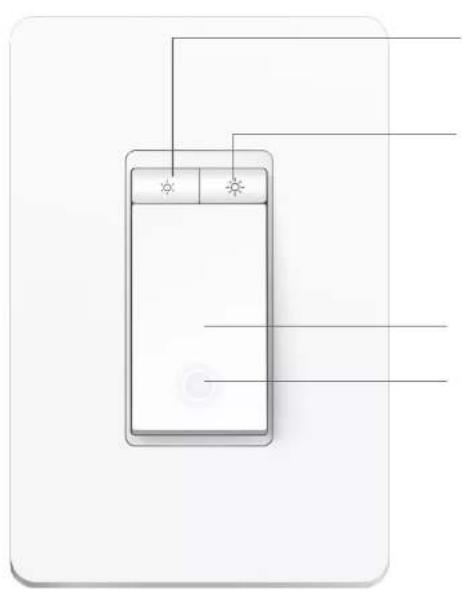

Press to decrease the lighting brightness.

Press to increase the lighting brightness.
On/Off Button
Status LED
Lit up when the light is switched OFF to show the Smart Dimmer location in the dark.
Satellite Dimmer
Set Up Your Smart 3-Way Dimmer Kit
Follow the steps below to set up your Smart 3-Way Dimmer Kit via Kasa Smart app.
1. Download Kasa Smart app
Go to Google Play or the App Store or scan the QR code below to download the Kasa Smart app on your Android or iOS smartphone or tablet.

2. Log in or sign up with TP-Link ID
Open the app. Use your TP-Link ID to log in. If you don't have a TP-Link ID, tap Create Account and the app will guide you through the rest.

4. Install and set up
Tap the @button in the app. Follow the app instructions to wire your Smart 3-Way Dimmer Kit and then complete the setup.

Main Device Controls
After you successfully set up your Smart 3-Way Dimmer Kit, you will see the home page of the Kasa Smart app. Here you can view and manage all devices that you've added to Kasa. Tap your 3-way dimmer to control and manage it.
Home Page
You can see all your Kasa devices listed in the Home page.

Turn on/off the 3-way dimme
Turn on/off your 3-way dimmer quickly by tapping the on/off switch in the home page. Tapping the device to enter its Status page, you can also check or change its status.


Adjust Brightness
Adjust the brightness of your light from 1% to 100% to have the perfect atmosphere for any activities.
Go to the status page and tap the Brightness tab. Your light will change brightness to the value you set.

Set Preset Brightness
Set preset brightness levels so you can switch to the desired brightness with just one tap. You can set up to 4 preset brightness levels.
Method 1- In the Status Page
- Go to the status page and tap the Brightness tab. Tap the circle on the top and choose a brightness. A preset brightness is set successfully.

- Change the preset brightness.
Tap a preset, then tap ☑ beside it. A pop up message will appear in the bottom. Choose another brightness level and tap Save.


Method 2- Through the Presets Tab
- Go to the status page and tap the Presets tab.
- Change the preset brightness.
Tap beside a Preset to customize its brightness. Or tap Gentle Off to fade your light off slowly when you turn off light..

Set Schedules
Schedule: Set schedules to automatically turn on/off the light at set times according to your daily routine.
- Tap your 3-way dimmer in the Home page, and then tap Schedule.
- Tap + on the top right corner.
- Choose an action for your light to do, for example, simply turn on/off at a certain time, or turn on at a preset brightness.


- Set fade rate, i.e., how long you would like your light to fade in or fade out after your schedule starts.
- Select the time and repeating frequency at which you want your schedule to run.


- The schedule you have created is listed in the Schedule Page. Now your light will be turned on to 80% brightness at 7:30 AM every weekday. You can add more schedules following the same steps.

Set Timer
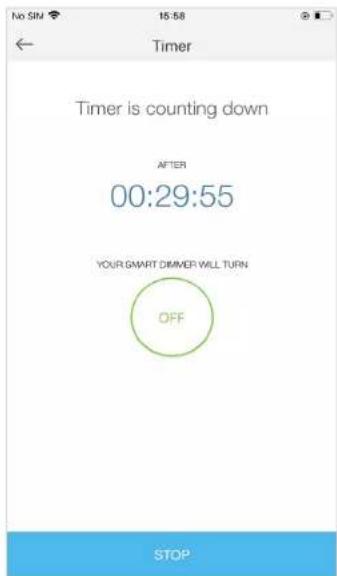
Timer: Set the timer for your light to automatically turn on/off after the time ends.
- Tap your 3-way dimmer in the Home page, and then tap Timer.

- Set the time after which the light will be automatically turned on/off.
E.g. When I turn on the light, I want it to be off after 30 minutes.
- Tap START and you'll see the timer is counting down. Tap STOP to stop the Timer at any time.
Set Away Mode
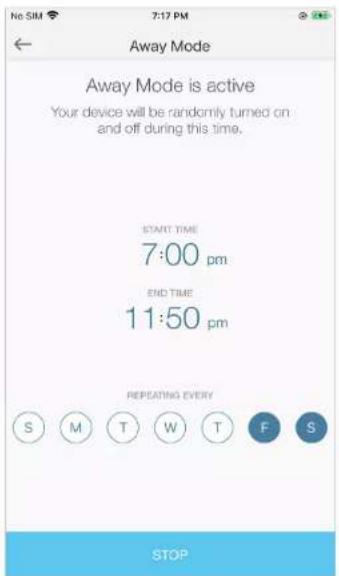
Away Mode: Set Away Mode for your light to turn on/off automatically at random intervals while you are away to make the appearance that someone is at home.
- Tap your 3-way dimmer in the Home page, and then tap 📄
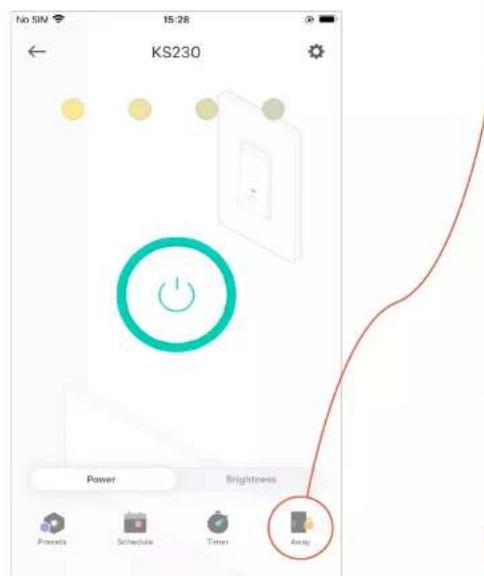
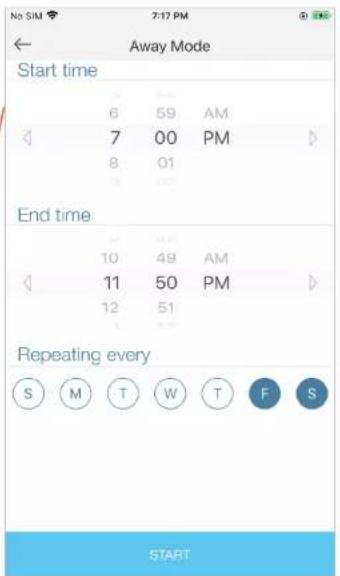
- Set the start and end time during which the light will be automatically turned on and off at random intervals, and the repeating frequency.
E.g. I want the light to turn on and off randomly between 7:00 PM to 11:50 PM every Friday and Saturday.
Manage Device Settings
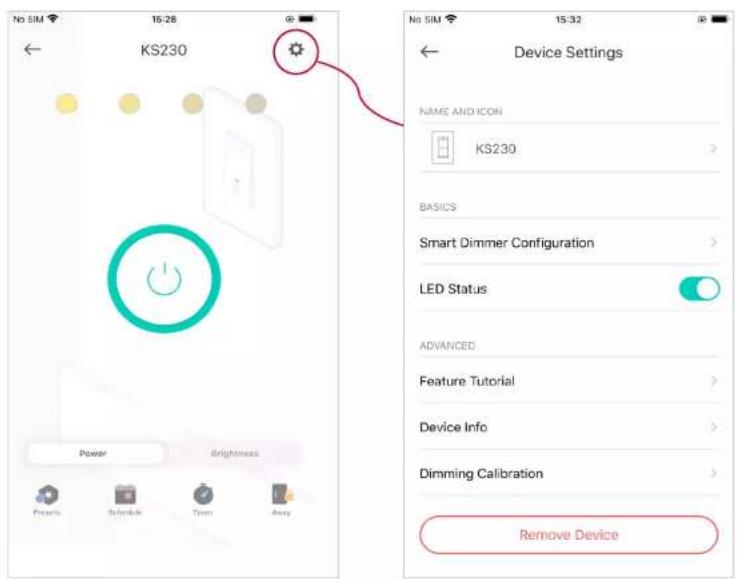
You can change the settings in the Device Settings page.
Tap your 3-way dimmer in the Home page and then tap enter the Device Settings page.
Change Device Name & Icon
Change the name and icon of the 3-way dimmer.

Customize Smart Dimmer Configuration Settings
Set how fast you want your light to turn on/off and the effects you want your light to show when you long press your 3-way dimmer.

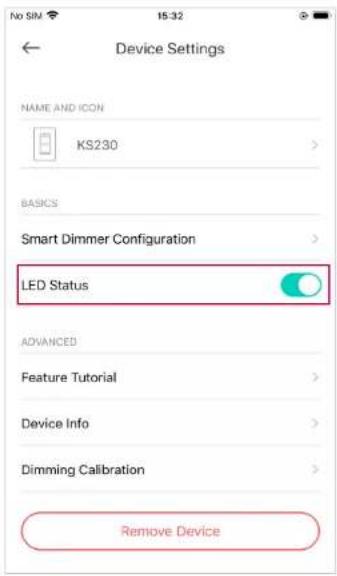
Turn On/Off LED
The LED is an indicator of the dimmer's position at night. When turned off, it won't illuminate when the light fixture is off.
Note: This only controls the on and off of the main dimmer switch LED.
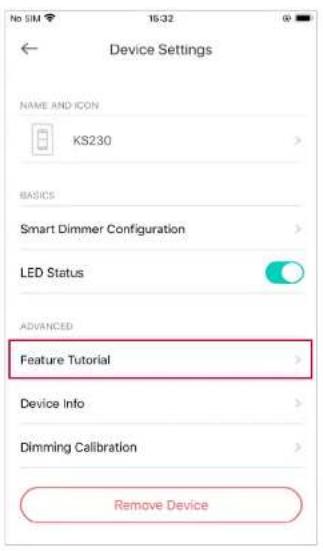
Check Feature Tutorial
Check the main advanced features of your 3-way dimmer.


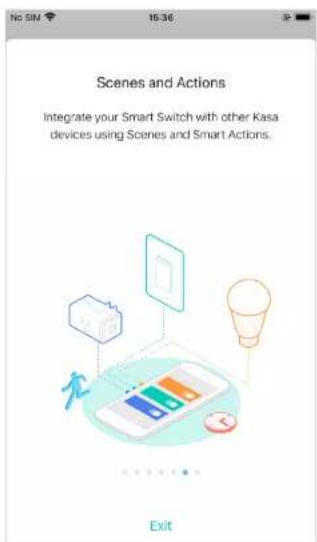

Dimming Calibration
Calibrate your light to avoid flickering.
Test the dimming range of your 3-way dimmer by slowly reducing the brightness of your light until you find the minimum level of brightness.

Reset Your Smart 3-Way Dimmer Kit
There are three methods to reset your Smart 3-Way Dimmer.
Method 1
Swipe left on your Smart 3-Way Dimmer and tap Delete. Then tap Remove Device. Your Smart 3-Way Dimmer will be removed from your Kasa account and restored to factory settings.

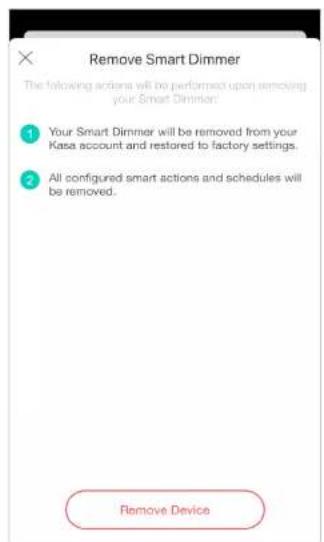
Method 2
Tap your Smart 3-Way Dimmer and go to the Devices Settings page. Then tap Remove Device at the bottom. Your Smart 3-Way Dimmer Switch will be removed from your Kasa account and restored to factory settings.


Method 3
Press and hold the Reset button on the panel of the main dimmer switch for 10 seconds to restore it to factory default settings. Press and hold the Reset button on the panel of the main dimmer switch for 5 seconds to reset Wi-Fi while keeping previous settings.

Create Groups
With groups, you can control multiple devices simultaneously. This page allows you to add your Smart 3-Way Dimmer and your other Kasa smart devices to a group for unified management.
1. Create groups
- Tap the button in the Home page of the Kasa Smart app, and select Group.
- Select your Smart 3-Way Dimmer and other Kasa smart devices and tap Save.
E.g. Group my Smart 3-Way Dimmer and Kasa smart plug (with a speaker plugged in) together.
- Name the group.


- The created group is listed in the Home page. You can tap ON or OFF to turn on or off the devices together in the group.

2. Manage the group
- Tap the group you want to manage. 2. Turn on or off the Group in the status page.
- Tap Brightness to adjust the brightness of your 3-way dimmer.


- Tap ⚙ in the top right corner to enter the settings page. You can change the group name or devices in the group as you like.
- Tap Remove Group if you want to remove the group from your device list. Then double confirm it. All devices in the group will remain accessible on the device list.

Create Scenes
A scene is a preset group of smart devices that can be programmed, customized and activated simultaneously at the touch of a button from your smartphone or tablet, allowing you to easily set your mood, activity or fit any special occasion. To create a scene with your Smart 3-Way Dimmer, you need other Kasa smart devices, a smart plug for example.
- Tap at the bottom, then tap + at the top right corner.
- Select a scene or create your own scene.
- Select devices for the scene to work on and set their status respectively.
E.g. Turn on 3-way dimmer and turn off study room lamp plugged in a Kasa smart plug with a tap.

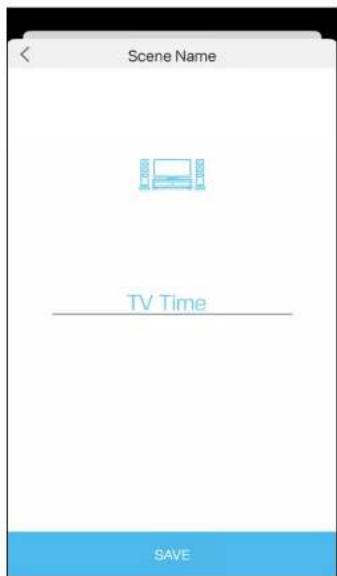
- Pick an icon for your scene. 5. Name your scene.
- Your scene is created successfully. Just tap the scene to activate it.


Smart Actions
Smart Actions is a function provided that enables device interconnections and home automations. With Smart Actions, your Kasa devices can work together to create a smarter smart home. From the moment you wake up to the moment you drift asleep, Smart Actions make your home safer and more comfortable.
- Tap at the bottom, then tap Add
- Select an automation type for your Smart Actions.
an Action.

- Configure Motion Sensing If you already have a Kasa Smart Camera
E.g. When my Kasa camera senses a motion, the light will be turned on.
- Tap Motion Sensing.
- Select your Kasa smart camera.

- Add your 3-way dimmer.

- Set the time when you want the action to run. You can choose Always or tap Custom to choose time according to your needs.
E.g. I want the motion to trigger the light on from 18:00 to 7:00 of next day every day.

- (Optional) Set an auto-off timer then tap Complete. Then your light will be turned off after the time you set.

- Name the action. 7. The Smart Action is created successfully and displayed in the Smart Actions list.


2. Configure Control With a Switch If you already have other Kasa smart devices
E.g. When I turn on/off my 3-way dimmer, also turn on/off the air conditioner (plugged in my Kasa smart plug).
- Tap Control With a Switch.
- Add your 3-way dimmer. Then select your Kasa smart plug which your air conditioner is plugged in.

- Name your action for easy identification.
- Now Your Smart Action is created successfully and is displayed in the smart actions list.


3. Configure Schedule a Scene
E.g. I want to turn on automatically the scene I have created at scheduled time.
- Tap Schedule a Scene.
- Select a scene that you have created.

- Set the time and frequency at which you want your scene to be activated.
- Name your action.
- The Smart Action is created successfully and displayed in the Smart Actions list.


4. Configure Auto-Off Timer
E.g. I want to turn off my Kasa Smart 3-Way Dimmer after 3 minutes whenever it turns on.
- Tap Auto-Off Timer.
- Select your 3-way dimmer.
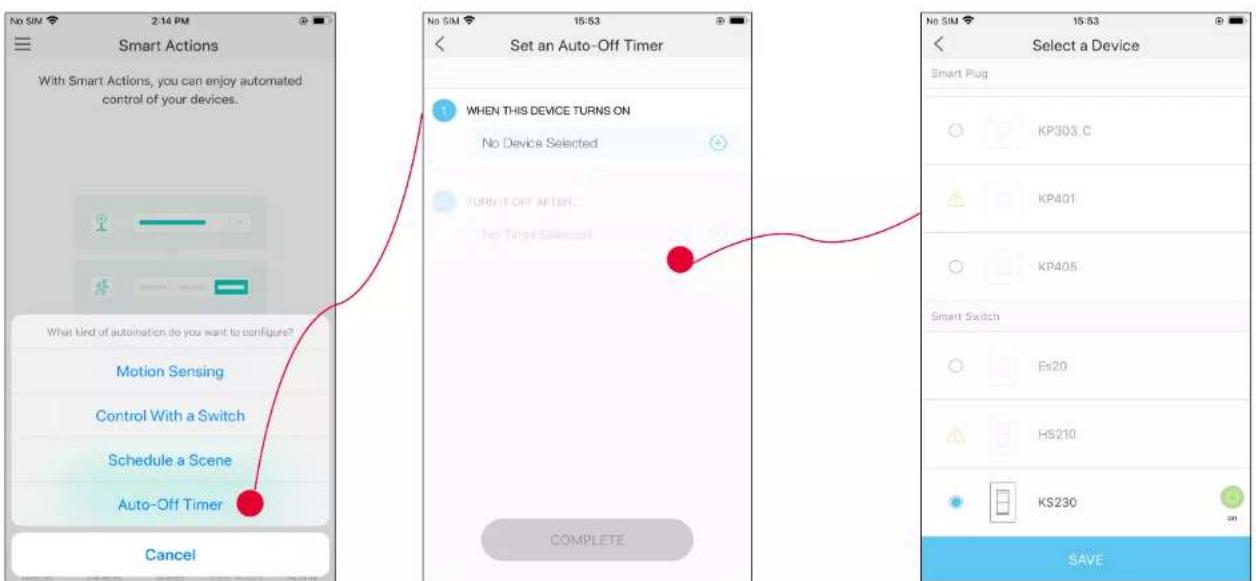
- Set the time after which your dimmer switch will be off.
- Tap COMPLETE.

- Name your action for easy identification. 6. The Smart Action is created successfully.


Voice Control & Third-Party Support
Use the Kasa Smart app to pair your Smart 3-Way Dimmer Kit with Amazon Alexa or Google Home Assistant, and enjoy a full hands-free experience. Kasa helps manage the rest of your smart home too, working with Samsung SmartThings to trigger changes when you arrive home or leave for the day. Launch the Kasa Smart app. Go to the sidebar and tap Works with Kasa. You can choose Amazon Alexa / Google Assistant / IFTTT / Samsung SmartThings for detailed instructions.

1. Set up Amazon Alexa
- Tap Amazon Alexa. 2. Tap Connect.
- Sign in with your amazon account.

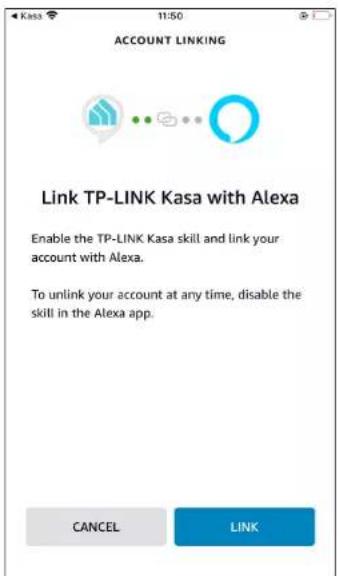
- After sign-in, tap LINK.
- Your TP-Link ID has been successfully linked with your amazon account. You can use Alexa voice commands to control your 3-way dimmer switch.

2. Set up Google Assistant
- Tap Google Assistant.
- Follow instructions to connect your device to your Google Home.
Or find the FAQ at https://www.tp-link.com/en/support/faq/1534/.

Authentication
FCC compliance information statement

Product Name: Kasa Smart Wi-Fi Light Switch, 3-Way Dimmer Kit
Model Number: KS230 KIT
Responsible party:
TP-Link USA Corporation
Address: 10 Mauchly, Irvine, CA 92618
Website: https://www.tp-link.com/us/
Tel: +1 626 333 0234
This equipment has been tested and found to comply with the limits for a Class B digital device, pursuant to part 15 of the FCC Rules. These limits are designed to provide reasonable protection against harmful interference in a residential installation. This equipment generates, uses and can radiate radio frequency energy and, if not installed and used in accordance with the instructions, may cause harmful interference to radio communications. However, there is no guarantee that interference will not occur in a particular installation. If this equipment does cause harmful interference to radio or television reception, which can be determined by turning the equipment off and on, the user is encouraged to try to correct the interference by one or more of the following measures:
- Increase the separation between the equipment and receiver.
- Connect the equipment into an outlet on a circuit different from that to which the receiver is connected.
- Consult the dealer or an experienced radio/TV technician for help.
This device complies with part 15 of the FCC Rules. Operation is subject to the following two conditions:
- This device may not cause harmful interference.
- This device must accept any interference received, including interference that may cause undesired operation.
Any changes or modifications not expressly approved by the party responsible for compliance could void the user's authority to operate the equipment.
Note: The manufacturer is not responsible for any radio or TV interference caused by unauthorized modifications to this equipment. Such modifications could void the user's authority to operate the equipment.
FCC RF Radiation Exposure Statement
This equipment complies with FCC RF radiation exposure limits set forth for an uncontrolled environment. This device and its antenna must not be co-located or operating in conjunction with any other antenna or transmitter.
To comply with FCC RF exposure compliance requirements, this grant is applicable to only Mobile Configurations. The antennas used for this transmitter must be installed to provide a separation distance of at least 20 cm from all persons and must not be co-located or operating in conjunction with any other antenna or transmitter.
We, TP-Link USA Corporation, have determined that the equipment shown above complies with the applicable technical standards, FCC Part 15. No unauthorized change is made to the equipment, and the equipment is properly maintained and operated.
Issue Date: 2023.10.26
Canadian Compliance Statement
This device complies with Industry Canada license-exempt RSSs. Operation is subject to the following two conditions:
- This device may not cause interference, and
- This device must accept any interference, including interference that may cause undesired operation of the device.
Radiation Exposure Statement:
This equipment complies with IC radiation exposure limits set forth for an uncontrolled environment. This equipment should be installed and operated with a minimum distance of 20 cm between the radiator and your body.
Industry Canada Statement
CAN ICES-3 (B)/NMB-3(B)
NCC & BSMI Notice
| 設備名稱: 型號(型式):Equipment name Type designation (Type)Kasa Smart Wi-Fi Light Switch, 3-Way Dimmer Kit KS230Kit | ||||||
| 單元Unit | 限用物質及其化學符號Restricted substances and its chemical symbols | |||||
| 鉛Lead(Pb) | 汞Mercury(Hg) | 鎘Cadmium(Cd) | 六價鉻Hexavalent chromium(Cr+6) | 多溴聯苯Polybrominated biphenyls(PBB) | 多溴二苯醚Polybrominated diphenyl ethers(PBDE) | |
| PCB ○○○ ○○○ | ||||||
| 外殼 ○○○ ○○○ | ||||||
| 電源供應板-○○○○○ | ||||||
| 其他及其配件-○○○○○ | ||||||
| 備考1. “超出0.1 wt %”及“超出0.01 wt %”係指限用物質之百分比含量超出百分比含量基準值Note 1: “Exceeding 0.1 wt %” and “exceeding 0.01 wt %” indicate that the percentage content of the restricted substance exceeds the reference percentage value of presence condition.備考2. “○”係指該項限用物質之百分比含量未超出百分比含量基準值。Note 2: “○” indicates that the percentage content of the restricted substance does not exceed the percentage of reference value of presence.備考3. “一”係指該項限用物質為排除項目。Note 3: The “一” indicates that the restricted substance corresponds to the exemption. | ||||||
Safety Information
- Keep the device away from water, fire, humidity or hot environments.
- Do not attempt to disassemble, repair, or modify the device.
- Do not use the device where wireless devices are not allowed.
- Alert to service person
CAUTION
DOUBLE POLE / NEUTRAL FUSING
Please read and follow the above safety information when operating the device. We cannot guarantee that no accidents or damage will occur due to improper use of the device. Please use this product with care and operate at your own risk.
Warnings
- Install only in a suitable UL Listed outlet box (suitable dimensions: W > 2.83 in./72 mm, H > 1.81 in./46 mm, D > 3.15 in./80 mm).
- CAUTION - Risk of Electric Shock - More than one disconnect switch may be required to de-energize the equipment before servicing.
- The manufacturer's assigned screw torque.
- Tighten terminal screws to 13 lbf-in
- Supported specified line number for the thread terminal copper wire: 12AWG, 14AWG, and 16AWG.
- Operating Temperature: 0°C - 40°C (32°F - 104°F)

CAUTION
Electrical switch integrated in this product is only intended for functional purposes. De-energize the product at the circuit breaker before servicing.
Explanation of the symbols on the product label
Symbols may vary from products
Symbol Explanation
Class II equipment
| SymbolExplanation | |
 | Class II equipment with functional earthing |
 | Alternating current |
 | DC voltage |
 | Polarity of output terminals |
| [200x1] | Indoor use only |
| [199x] | Dangerous voltage |
| [198x] | Caution, risk of electric shock |
| [640x1] | Energy efficiency Marking |
| [174x] | Protective earth |
 | Earth |
 | Frame or chassis |
[199x] | Functional earthingCaution, hot surface |
 | Caution |
 | Operator's manual |
 | Stand-by |
 | "ON"/"OFF" (push-push) |
 | Fuse |
 | Fuse is used in neutral N |
 | RECYCLINGThis product bears the selective sorting symbol for Waste electrical and electronic equipment (WEEE). This means that this product must be handled pursuant to European directive 2012/19/EU in order to be recycled or dismantled to minimize its impact on the environment.User has the choice to give his product to a competent recycling organization or to the retailer when he buys a new electrical or electronic equipment. |
 | Caution, avoid listening at high volume levels for long periods |
 | Disconnection, all power plugs |
| m Switch of mini-gap construction | |
| µ | Switch of micro-gap construction (for US version)Switch of micro-gap / micro-disconnection construction (for other versions except US) |
| Switch without contact gap (Semiconductor switching device) | |


- USER GUIDE
- CONTENTS
- ABOUT THIS GUIDE
- CONVENTIONS
- MORE INFO
- INTRODUCTION
- APPEARANCE
- MAIN SWITCH STATUS LED
- ON/OFF BUTTON
- STATUS LED
- SET UP YOUR SMART 3-WAY DIMMER KIT
- DOWNLOAD KASA SMART APP
- LOG IN OR SIGN UP WITH TP-LINK ID
- INSTALL AND SET UP
- MAIN DEVICE CONTROLS
- HOME PAGE
- TURN ON/OFF THE 3-WAY DIMME
- ADJUST BRIGHTNESS
- SET PRESET BRIGHTNESS
- METHOD 1- IN THE STATUS PAGE
- METHOD 2- THROUGH THE PRESETS TAB
- SET SCHEDULES
- SET TIMER
- SET AWAY MODE
- MANAGE DEVICE SETTINGS
- CUSTOMIZE SMART DIMMER CONFIGURATION SETTINGS
- TURN ON/OFF LED
- CHECK FEATURE TUTORIAL
- DIMMING CALIBRATION
- RESET YOUR SMART 3-WAY DIMMER KIT
- METHOD
- CREATE GROUPS
- MANAGE THE GROUP
- CREATE SCENES
- SMART ACTIONS
- CONFIGURE CONTROL WITH A SWITCH IF YOU ALREADY HAVE OTHER KASA SMART DEVICES
- CONFIGURE SCHEDULE A SCENE
- CONFIGURE AUTO-OFF TIMER
- VOICE CONTROL & THIRD-PARTY SUPPORT
- SET UP AMAZON ALEXA
- SET UP GOOGLE ASSISTANT
- AUTHENTICATION
- FCC RF RADIATION EXPOSURE STATEMENT
- CANADIAN COMPLIANCE STATEMENT
- RADIATION EXPOSURE STATEMENT
- INDUSTRY CANADA STATEMENT
- NCC & BSMI NOTICE
- SAFETY INFORMATION
- WARNINGS
- EXPLANATION OF THE SYMBOLS ON THE PRODUCT LABEL
Brand : TP-LINK
Model : KS230
Category : Smart Home