
Evaporative Cooler EV250WH - Air conditioner DELONGHI - Free user manual and instructions
Find the device manual for free Evaporative Cooler EV250WH DELONGHI in PDF.
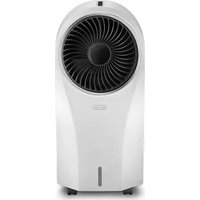


| Product Type | Evaporative Cooler / Air Conditioner |
| Model | EV250WH |
| Brand | DeLonghi |
| Airflow | 250 m³/h |
| Water Tank Capacity | 6 L |
| Fan Speeds | 3 (Low, Medium, High) |
| Oscillation | Yes, 90° |
| Timer | Up to 8 hours |
| Remote Control | Included |
| Ionizer | Yes |
| Ice Compartment | Yes (2 ice packs included) |
| Power Consumption | 60 W |
| Power Supply | 220-240 V, 50 Hz |
| Dimensions (W x H x D) | 30 x 70 x 30 cm |
| Weight | 7.5 kg |
| Casters | Yes (4 swivel) |
| Water Level Indicator | Yes |
| Filter Type | Honeycomb cooling pad |
| Noise Level | ≤ 55 dB(A) |
| Safety Features | Overheat protection, auto shut-off when empty |
| Maintenance | Clean water tank and cooling pad regularly |
| Spare Parts | Cooling pads, ice packs, remote control (available) |
Frequently Asked Questions - Evaporative Cooler EV250WH DELONGHI
User questions about Evaporative Cooler EV250WH DELONGHI
0 question about this device. Answer the ones you know or ask your own.
Ask a new question about this device
Download the instructions for your Air conditioner in PDF format for free! Find your manual Evaporative Cooler EV250WH - DELONGHI and take your electronic device back in hand. On this page are published all the documents necessary for the use of your device. Evaporative Cooler EV250WH by DELONGHI.
USER MANUAL Evaporative Cooler EV250WH DELONGHI
1. FUNDAMENTAL SAFETY WARNINGS
- The appliance is not intended for use by persons (including children) with reduced physical, sensory or mental capabilities, or with insufficient experience and knowledge, unless properly supervised or taught how to use the appliance safely by a person responsible for their safety.
- Children must be supervised to ensure they do not play with the appliance.
- If the plug or power cord is damaged, have it replaced exclusively by the Service Centre to avoid any risks.
FOR EUROPEAN MARKETS ONLY:
- This appliance can be used by children aged from 8 years and above and persons with reduced physical, sensory or mental capabilities or lack of experience and knowledge if they have been given supervision or instruction concerning use of the appliance in a safe way and understand the hazards involved. Children shall not play with the appliance. Cleaning and maintenance can also be performed by children 8 years and over, if supervised. Keep the appliance and power cord far from the reach of children under 8 years of age.
- The appliance may be used by persons with reduced physical, sensory or mental skills, or insufficient experience and knowledge, provided they are properly supervised or have received instructions concerning safe use of the appliance and understand the hazards involved. Children must not play with the appliance.
- Always disconnect the power supply to the appliance if left unattended and prior to maintenance or cleaning operations.
As the appliance is powered by electricity, the possibility of electrical shock cannot be excluded.
The following safety precautions must therefore be followed:
After removing the packaging, check the condition of the appliance. If in doubt, do not use the appliance and contact professionally qualified personnel. Before use, always check the condition of the power cord. It is dangerous to modify or alter the characteristics of the appliance in any way. The appliance must be installed in compliance with national standards regulating electrical systems. Do not install the appliance in environments where the air may contain gas, oil, sulphur or near sources of heat. Before connecting the appliance to the power outlet, check the compatibility of the appliance voltage with your electrical system.
- If the appliance is used outdoors, make sure the plug is connected to an outlet suitable for outdoor use.
- This appliance must be connected to an efficient "grounding" system. Have the electrical system checked by a qualified electrician.
- Before each cleaning or maintenance operation, always disconnect the plug from the power outlet.
- Never submerge the appliance in water.
- This appliance must be used exclusively for the intended purpose for which it was designed, specifically to cool domestic environments. All other uses are considered improper and therefore hazardous. The manufacturer shall not be held liable for any damage caused by improper, erroneous and irresponsible use, and/or due to repairs made by unqualified personnel.
- Never use the cooler without water. Use tap water only,
without any additives. Fill the tank only when the appliance is turned off.
- Do not move the appliance when the tank is full and when in use.
- Do not leave the appliance turned on when not in use as this may be a source of danger.
- Never place hands, the face or body directly above or near the grill when the appliance is in use.
- Place the appliance on a stable and flat surface.
Never place the appliance on carpet or rugs or on delicate furniture that may be damaged by contact with water.
- Do not place the appliance near sources of heat such as heaters, radiators, etc. Place your appliance near a power outlet.
- When the appliance is connected to the mains, keep the following safety rules in mind:
- do not touch the appliance with wet or damp hands;
- do not use the appliance with bare or wet feet;
- do not pull on the power cord or appliance to detach the plug from the power outlet;
- keep the appliance far from the reach of children;
- do not insert foreign bodies into the appliance;
- do not leave the appliance exposed to atmospheric agents;
- If you wish to permanently eliminate the appliance, after disconnecting the plug from the power outlet it is recommended to make it unusable by severing the power cord.
- In the event of a fault and/or malfunction, turn the appliance off without tampering with it. For all repairs, contact an authorised technical service centre only and request the use of original spare parts and accessories.
- Avoid the use of power cord extensions.
Important!
Store the packaging material (plastic bags, styrofoam) far from the reach of children.
CHOKING HAZARD. The appliance might contain small parts. Some of those small parts might be required to get disassembled during cleaning and maintenance operations. Handle with care and keep small parts out of reach of children.
2. DESCRIPTION
2.1 Description of appliance
A1. Rotating grill: can be manually oriented (make this adjustment with rotation disabled) A2. Tank water level indicator A3. Wheels A4. Cable reel A5. Handle A6. Power cord A7. Extractable water tank A8. Filter housing
A9. Dust filter A10. Cooling pad A11. Honeycomb cooling pad A12. Icebox
2.2 Description of control panel (B)
B1. ON/OFF: to turn the appliance on and off B2. Fan speed. Press to select one of 3 possible speeds:
MED, MAX, MIN
B3. Cooling/humidification. Press to activate or deactivate the function B4. Select the fan mode:
- Natural ≈: the device will run random fan cycles at different speeds, pausing every now and then for a few seconds.
- Sleep (night): the appliance will run at MAX speed for 30 minutes, then at MED speed for 30 minutes; it will then remain at minimum speed. B5. "Swing" mode (rotation): When selected, the grill rotates. B6. "AUTO OFF" (automatic shutdown): press to set a delayed shutdown (from 1 to 24 hours).
- When pressed, the symbol is shown on the display and the numeric value flashes for about 5 seconds: once they remain fixed, the automatic shutdown programme has been saved.
- To deactivate "AUTO OFF" (automatic shutdown): press the key until selecting "00", then wait for the symbol and numeric value to turn off.
2.3 Description of display (C)
C1. "AUTO OFF" (automatic shutdown) programming viewer C2. "Cooling/humidification" active C3. "loniser" active (always on as the function is included in every operating mode) C4. "Sleep" (night) fan mode active C5. "Natural" fan mode active C6. "AUTO-OFF" (automatic shutdown) programmed C7. "Swing" (rotation) mode selected C8. "MIN" fan speed C9. "MED" fan speed C10. "MAX" fan speed
2.4 Description of remote control
D1. ON/OFF: to turn the appliance on and off D2. "Swing" mode (rotation): When selected, the grill rotates. D3. "AUTO-OFF" (automatic shutdown) (see B6) D4. Fan speed (see B2) D5. Fan mode selection (see B4) D6. Cooling/humidification. Press to activate or deactivate the function
3. INSTRUCTIONS FOR USE
3.1 First use
- When used for the first time, a strange smell may be detected. This is part of the appliance's normal operation.
- USE OF REMOTE CONTROL: Before using the appliance for the first time, remove the plastic tab (fig. 1). Point the remote control toward the LED display. The maximum operating distance is approx. 6 metres from the receiver.
3.2 Turning the appliance on and off
- Connect the appliance to a power outlet: the appliance will make an audible signal. The machine is ready for use.
- Press the key (B1 or D1). The appliance will turn on with the "MED" fan speed and "ionisation" active (fig.2);
- To turn the appliance off, press the key (B1 or D1).
3.3 Selecting the fan speed
- Press the key (B2 or D4);
- Each time the key is pressed, the fan speed changes (MED, MAX, MIN) (fig. 3).

3.4 Cooling/humidification
Prepare the appliance by filling up the water tank.
- Extract the water tank (fig. 4) and fill it with fresh tap water (MAX 4.5L); take care not to exceed the MAX level visible through the level indicator (A2). The MAX level guarantees 6 hours of appliance use;
- Re-insert the water tank;
- Press the key (B3 or D6): the corresponding symbol will light up on the display (fig. 5). The air enters the cooling device and exits cooled, thus helping to reduce the air temperature;
Note:
When this function is used for the first time, the water in the tank may change colour: this is part of the appliance's normal operation.
To improve the performance of the appliance, use the "Ice box" (A11).
- Fill the "Ice box" with tap water (fig. 6);
- Place the "Ice box" in the freezer (fig. 7) and leave it there until it freezes;
- Extract the water tank and insert the "Ice box" inside, placing it in the rear left corner (fig. 8).
Note:
Make sure the "Ice box" is properly positioned in its housing (fig. 8).
- Re-insert the water tank, turn on the appliance and select the "Cooling/humidification" function: the air delivered by the appliance will be cooler (fig. 9).
3.5 Selecting the fan mode
The appliance can be set to work in 3 different fan modes:
- NORMAL - Press the key (B2 or D4) to select the fan speed;
- NATURAL- Press the MODE key once (B4 or D5). The device will run random fan cycles at different speeds, pausing every now and then for a few seconds (fig. 10);
- SLEEP- Press the MODE key twice (B4 or D5). The appliance will automatically work at MAX speed for 30 minutes, then MED speed for 30 minutes: it will then continue at MIN speed (fig. 11).
3.6 Swing
- Press the key (B5 or D2) to activate grill rotation (fig. 12): the corresponding symbol will light up on the display;
- To stop rotation, press the same key again.
Note:
The grill can be vertically tilted by manually adjusting it to direct the air flow (fig. 13): make this adjustment with the grill stopped, without forcing it.
3.7 AUTO-OFF
It is possible to delay shutdown by 1 to 24 hours by pressing the L key (B6 or D3).
- Press until selecting the number reflecting the desired hours of operation: the number is shown on the display (C1);
- The symbol and numeric value flash to indicate that automatic shutdown programming is in progress. When the symbol and numeric value remain fixed, programming has been saved (fig. 14).
Note:
To exit automatic shutdown, press the key (B6 or D3) until setting the numeric value "00": the symbol and "00" will flash. When they turn off, automatic shutdown is cancelled.
4. FILLING THE WATER TANK
Before activating the Cooling/humidification function, always make sure there is water in the tank. If the water finishes during use, the appliance makes an audible signal and the symbol flashes on the display (fig. 15): the device will nonetheless continue to ventilate.
- Extract the water tank (fig. 4) and fill it with MAX 4.5L of fresh tap water (always use tap water, never overfill the tank): check the water level indicator (A2);
- Re-insert the water tank.
5. CLEANING AND MAINTENANCE
• Always disconnect the appliance from the mains before carrying out cleaning operations. - Never submerge the appliance in water.
- Never pour water directly over the appliance (fig. 16).
- Never use petrol, alcohol or solvents.
- Never spray insecticides or similar substances: the plastic may be deformed.
- Clean the surfaces of the appliance using a soft cloth, never use abrasive sponges as these may scratch the surface.
5.1 Cleaning the dust filter and honeycomb cooling pad
Clean the dust filter regularly. The frequency of cleaning will depend on the frequency of use: if used daily, it is recommended to clean the filter every week.
- Extract the dust filter and cooling pad (fig. 17);
- Remove any dust from the filters using a vacuum cleaner (fig. 18);
- Wash the cooling pad thoroughly with water; then leave it to completely dry and re-insert the filters in their housing (fig. 19).
Note:
For the continued performance of the appliance, it is recommended to replace the honeycomb cooling pad (A11) every 3 years.
5.2 Cleaning the water tank
- Extract the water tank (fig. 4);
- Clean it thoroughly with a sanitising detergent, available in stores (fig. 20).
5.3 Replacing the remote control battery
- Extract the battery support on the back of the remote control (fig. 21);
- Insert a battery type 3V CR2025 into the support, making sure the poles are correctly matched (+ and -), then re-insert the support (fig. 22).
The remote control is ready for use.
Note:
If the remote control is disposed of or replaced, the battery must be removed and disposed of in accordance with laws in force, insofar as batteries are harmful to the environment.
Do not throw the battery into an open flame as it may explode or release hazardous liquids.
6. TROUBLESHOOTING
Below is a list of possible malfunctions.
If the problem cannot be resolved using the proposed solution, contact the Service Centre.
| PROBLEM POSSIBLE CAUSE SOLUTION | ||
| The appliance doesn't turn on | The power cord is not connected | Make sure the power cord is connected and that there is power |
| The appliance is not on | Turn on the appliance by pressing the (B1 on the control panel or D1 on the remote control) | |
| The appliance turns off | Automatic shutdown has been activated | Turn on the appliance and make sure the automatic shutdown symbol is off |
| Excessive humidity in the room W | When the Cooling/humidification function is used, the appliance produces humidity as a result of the evaporative cooling effect. This is normal. | The appliance cools most efficiently in dry climates. If the humidity level is high (60% and above) it is best not to use the cooling/humidification function |
| Make sure the windows/doors are open and that there is a sufficient flow of air in the room, so that the air can best circulate. It is nonetheless possible to use the appliance in fan mode | ||
| The X symbol flashes on the display (C2) and the appliance is not cooling very well | There is no water in the tank Fill the tank with cold water as indicated in par. 3.4 | |
| The appliance is not cooling very well | There is no water in the tank Fill the tank with cold water | |
| Dirty filters Clean the filters as indicated in par. 5.1 | ||
| The remote control doesn't work | The remote control battery isn't inserted properly | Check that the battery is inserted as per the polarity guide on the back of the remote control. |
| The battery is flat Replace with a new battery | ||
| The remote control is damaged If replacing the battery doesn't solve the problem, contact an authorised Service Centre | ||
| The appliance doesn't respond | The control panel on the appliance doesn't work | Use the remote control to activate the appliance. If the appliance responds, there may be a problem with the control panel: contact an authorised Service Centre |
| If neither the control panel nor the remote control work, contact an authorised Service Centre | ||
| The appliance has been wet by the rain | The appliance used outdoors was wet by heavy rainfall | A small amount of rain on the appliance is not a problem. However, make sure the appliance is connected to suitable water-resistant power outlets. Before turning on the appliance, always make sure the plug and power outlet are dry |
7. DISPOSING OF THE APPLIANCE

The appliance must not be disposed of with household waste, but taken to an authorised waste separation and recycling centre.

- FUNDAMENTAL SAFETY WARNINGS
- FOR EUROPEAN MARKETS ONLY
- IMPORTANT
- DESCRIPTION
- DESCRIPTION OF APPLIANCE
- DESCRIPTION OF CONTROL PANEL (B)
- DESCRIPTION OF DISPLAY (C)
- DESCRIPTION OF REMOTE CONTROL
- INSTRUCTIONS FOR USE
- FIRST USE
- TURNING THE APPLIANCE ON AND OFF
- SELECTING THE FAN SPEED
- COOLING/HUMIDIFICATION
- NOTE
- SELECTING THE FAN MODE
- SWING
- AUTO-OFF
- FILLING THE WATER TANK
- CLEANING AND MAINTENANCE
- CLEANING THE DUST FILTER AND HONEYCOMB COOLING PAD
- CLEANING THE WATER TANK
- REPLACING THE REMOTE CONTROL BATTERY
- TROUBLESHOOTING
- DISPOSING OF THE APPLIANCE
Brand : DELONGHI
Model : Evaporative Cooler EV250WH
Category : Air conditioner