
DCD-CX3 - CD Player DENON - Free user manual and instructions
Find the device manual for free DCD-CX3 DENON in PDF.
| Product type | CD player |
| Brand | DENON |
| Model | DCD-CX3 |
| Dimensions (W x H x D) | 434 x 107 x 279 mm |
| Weight | 4.5 kg |
| Power supply | 230 V, 50 Hz |
| Power consumption | 12 W |
| Main functions | CD, CD-R/RW playback, programming, repeat, random playback |
| Maintenance and cleaning | Clean the casing with a soft, dry cloth; do not use solvents or abrasive products. Clean the optical lens with an appropriate cleaning kit. |
| Safety | Do not expose to moisture, rain, or extreme temperatures. Unplug the device before cleaning. Use only the supplied power cord. |
| Spare parts and repairability | Spare parts are available from authorized DENON service centers. Repairability is ensured by qualified technicians. |
| General information | Device designed for indoor use. Operating temperature: 5 °C to 35 °C. Relative humidity: 5% to 85% without condensation. |
Frequently Asked Questions - DCD-CX3 DENON
User questions about DCD-CX3 DENON
0 question about this device. Answer the ones you know or ask your own.
Ask a new question about this device
Download the instructions for your CD Player in PDF format for free! Find your manual DCD-CX3 - DENON and take your electronic device back in hand. On this page are published all the documents necessary for the use of your device. DCD-CX3 by DENON.
USER MANUAL DCD-CX3 DENON
The lightning flash with arrowhead symbol, within an equilateral triangle, is intended to alert the user to the presence of uninsulated "dangerous voltage" within the product's enclosure that may be of sufficient magnitude to constitute a risk of electric shock to persons.

The exclamation point within an equilateral triangle is intended to alert the user to the presence of important operating and maintenance (servicing) instructions in the literature accompanying the appliance.
WARNING:
TO REDUCE THE RISK OF FIRE OR ELECTRIC SHOCK, DO NOT EXPOSE THIS APPLIANCE TO RAIN OR MOISTURE.
CAUTION-CLASS1M VISIBLE AND INVISIBLE LASER RADIATION WHEN OPEN. DO NOT VIEW DIRECTLY WITH OPTICAL INSTRUMENTS. VAROITUS-LUOKAN 1M NAKYVAA JA NAKYMATONTA LASESRSATEIYLAYAVATTUNA ALA KATSO SADETTA SUORANA OPTISILLA LAITEILLLA. VARNING-KLAS 1M SYNLIG OCH OSYNLIG LASERSTRALING VID ÖPPNING. BETRAKA EJ STRALEN DIREKT MED OPTISKA INSTRUMENT. ADVARSEL-KLASSE 1M USYNLIG OG SYNLIG LASERSTRALINGVED ABNING.MÄIKKE BETRAGTES DIREKTE MED OPTISKINSTRUMENTER.
CLASS 1 LASER PRODUCT
LUOKAN 1 LASERLAITE
KCLASS 1 LASERAPPARAT
CLASS 1
LASER PRODUCT
ADVARSEL: USYNLIG LASERSTRÁLING VED ÅBNING, NÁR SIKKERHEDSAFBRYDERE ER UDE AF FUNKTION. UNDGÅ UDSAETTELSE FOR STRÁLING.
VAROITUS! LAITTEEN KÄYTTÄMINEN MUULLA KUINTÄSSÄ KÄYTTÖOHJEESSA MAINITULLA TAVALLA SAATTAA ALTISTAA KÄYTTÄJÄNTURVALLISUUSLUOKAN 1 YLITTÄVALLE NAKYMÄMTTÖMÄLLE LASERSÄTEILYLLE.
VARNING: OM APPARATEN ANVÄNDS PÄ ANNAT SÄTT ÄN I DENNA BRUKSANVISNING SPECIFICERATS, KAN ANVÄNDAREN UTSÄTTAS FÜR OSYNLIG LASERSTRÄLNING SOM ÖVERSKRIDER GRÄNSEN FÜR LASERKLASS 1.
ATTENZIONE: QUESTO APPARECCHIO E' DOTATO DI DISPOSITIVO OTTICO CON Raggio LASER.
USE OF CONTROLS OR ADJUSTMENTS OR PERFORMANCE OF PROCEDURES OTHER THAN THOSE SPECIFIED HEREIN MAY RESULT IN HAZARDOUS RADIATION EXPOSURE.
THIS PRODUCT SHOULD NOT BE ADJUSTED OR REPAIRED BY ANYONE EXCEPT PROPERLY QUALIFIED SERVICE PERSONNEL.
- DECLARATION OF CONFORMITY
We declare under our sole responsibility that this product, to which this declaration relates, is in conformity with the following standards: EN60065, EN55013, EN55020, EN61000-3-2 and EN61000-3-3. Following the provisions of 73/23/EEC, 89/336/EEC and 93/68/EEC Directive.
Allow for sufficient heat dispersion when installed in a rack.
- Handle the power cord carefully.
Hold the plug when unplugging the cord.
- The ventilation should not be impeded by covering the ventilation openings with items, such as newspapers, tablecloths, curtains, etc.
- No naked flame sources, such as lighted candles, should be placed on the unit.
- Observe and follow local regulations regarding battery disposal.
- Do not expose the unit to dripping or splashing fluids.
- Do not place objects filled with liquids, such as vases, on the unit.
ACHTUNG:
To completely disconnect this product from the mains, disconnect the plug from the wall socket outlet.
The mains plug is used to completely interrupt the power supply to the unit and must be within easy access by the user.
VORSICHT:
A NOTE ABOUT RECYCLING:
This product's packaging materials are recyclable and can be reused. Please dispose of any materials in accordance with the local recycling regulations.
When discarding the unit, comply with local rules or regulations.
Batteries should never be thrown away or incinerated but disposed of in accordance with the local regulations concerning battery disposal.
This product and the supplied accessories, excluding the batteries, constitute the applicable product according to the WEEE directive.
HINWEIS ZUM RECYCLING:
Thank you for purchasing this DENON product. To ensure proper operation, please read these operating instructions carefully before using the product.
After reading them, be sure to keep them for future reference.
Contents
| Getting Started |
| Accessories 2 |
| Cautions on handling 2 |
| Cautions on installation 2 |
| About discs |
| Discs that can be played 2, 3 |
| Holding discs 3 |
| Loading discs 3 |
| Cautions on loading discs 3 |
| Cautions on handling 3 |
| Cautions on storing discs 3 |
| Cleaning discs 3 |
| About the remote control unit |
| Inserting the batteries 4 |
| Operating range of the remote control unit 4 |
| Part names and functions |
| Front panel 5 |
| Display 5 |
| Rear panel 5 |
| Remote control unit 6 |
| Connections | |
| Cable indications | 6 |
| Analog connections | 7 |
| Digital connections | 7 |
| Connecting the power supply cord | 7 |
| Operation | |
| Before playing | |
| Turning the power on | 8 |
| Setting the layer to be played with priority | 8 |
| Loading discs | 8 |
| Playing discs with even higher sound quality | |
| (Pure Direct mode) | 9 |
| Normal playback | 9 |
| Various types of playback | |
| Listening to specific tracks in a specific order | |
| (Programmed playback) | 9 |
| Listening in random order (Random playback) | 9 |
| Listening to tracks repeatedly (Repeat play) | 10 |
| Displaying text (Super Audio CDs only) | 10 |
| Displaying the track title | 10 |
| Displaying the album title | 10 |
| Displaying the album's artist name | 10 |
| Playing music files | |
| Before playing MP3 or WMA files | 11 |
| Creating MP3 and WMA files compatible with the DCD-CX3 | 11 |
| Playing MP3 or WMA files | 11 |
| Listening to MP3 or WMA files in random order | |
| (Random playback) | 12 |
| Listening to MP3 or WMA files repeatedly | |
| (Repeat folder/disc playback) | 12 |
| Using the timer play function | 13 |
| Troubleshooting | 13 |
| Specifications | 14 |
Getting Started
Accessories
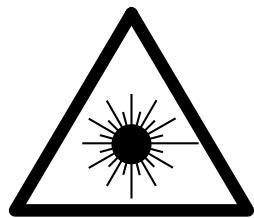
Check that the following parts are supplied with the product.
① Operating instructions 1
② Service station list. 1
③ Power supply cord (Cord length: Approx. 1.5 m)
④ Remote control unit (RC-1059)
⑤ Dry cell battery (R03/AAA) 2
⑥ Audio cord (Cable length: Approx. 1.0 m)
Cautions on handling
- Before turning the power switch on
Check once again that all connections are correct and that there are no problems with the connection cables.
- Power is supplied to some of the circuitry even when the unit is set to the standby mode. When traveling or leaving home for long periods of time, be sure to unplug the power supply cord from the power outlet.
- Sufficiently ventilate the place of installation
If the unit is left in a room full of the smoke from cigarettes, etc., for long periods of time, the surface of the optical pickup could get dirty, in which case it will not be able to read the signals properly.
- About condensation
If there is a major difference in temperature between the inside of the unit and the surroundings, condensation (dew) may form on the operating parts inside the unit, causing the unit not to operate properly.
If this happens, let the unit sit for an hour or two with the power turned off and wait until there is little difference in temperature before using the unit.
- Cautions on using mobile phones
Using a mobile phone near this unit may result in noise. If so, move the mobile phone away from this unit when it is in use.
- Moving the unit
First eject the disc, turn off the power, then unplug the power supply cord from the power outlet. Next, disconnect the connection cables to other system units before moving the unit.
- Note that the illustrations in these instructions may differ from the actual unit for explanation purposes.
NOTE:
- This product uses a semiconductor laser. To ensure stable operation, it is recommended to use the product indoors at a temperature of 5^ ( 41^ ) 35^ ( 95^ ).
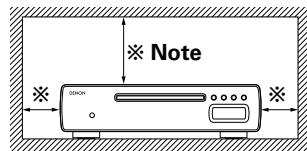
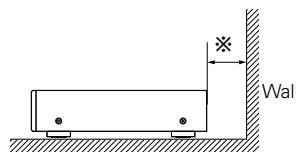
Cautions on installation
Note:
For proper heat dispersal, do not install this unit in a confined space, such as a bookcase or similar enclosure.
About discs
Discs that can be played
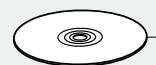
Super Audio CDs
Super Audio CDs marked with the logotypes indicated below can be played on this unit.

SUPER AUDIO CD

There are three types of Super Audio CDs:
① Single layer disc
Single layer Super Audio CD with only an HD layer.
② Dual layer disc
Super Audio CD with a double HD layer, offering extended playing time and high sound quality.
③ Hybrid disc
Two-layer Super Audio CD with an HD layer and a CD layer.
The signals on the CD layer can be played on a regular CD player.
Types of Super Audio CDs
Single layer disc
Dual layer disc
Hybrid disc
HD layer
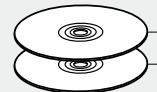
HD layer
CD layer HD layer
※ What is the HD layer?
The HD layer is a layer of high density signals for Super Audio CDs.
What is the CD layer?
The CD layer is the layer of signals that can be read on a regular CD player.

- This unit is not compatible with multi-channel playback.

Music CDs
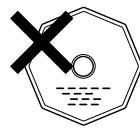
Discs marked with the logotype below can be played in this unit. Discs with special shapes (heart-shaped discs, octagonal discs, etc.) cannot be played. Do not attempt to play them, as doing so can damage the product.


CD-R/CD-RW
Some discs and some recording formats may not be playable.
Non-finalized discs cannot be played.
What is finalization?
Finalization is the process that makes recorded CD-R/CD-RW discs playable on compatible players.

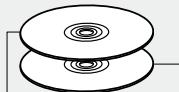
Holding discs
Do not touch the signal surface.
Loading discs
- Set the disc with the labeled side facing up.
- Make sure the disc tray is fully open when inserting the disc.
- Place the discs flatly, 12cm discs in the outer tray guide (Figure 1), 8cm discs in the inner tray guide (Figure 2).
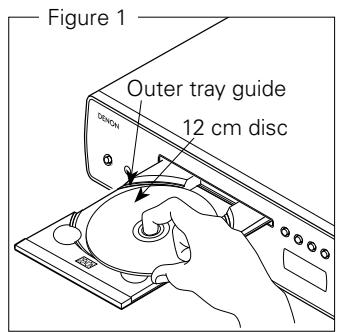
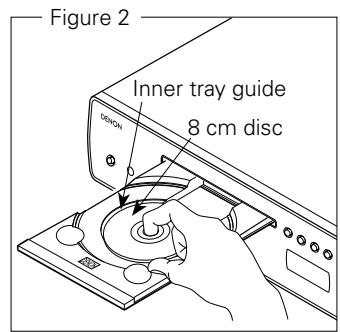
- Place 8 cm discs in the inner tray guide without using an adapter.

- "00:00" is displayed if a disc that cannot be played is loaded.
- "NO DISC" is displayed if the disc is loaded upside-down or if no disc is loaded.
Cautions on loading discs
- Only load one disc at a time. Loading two or more discs can damage the unit or scratch the discs.
- Do not use cracked or warped discs or discs that have been repaired with adhesive, etc.
- Do not use discs on which the sticky part of cellophane tape or labels is exposed or on which there are traces of where labels have been removed. Such discs can get caught inside the player and damage it.
Cautions on handling
- Do not get fingerprints, oil or dirt on discs.
- Take special care not to scratch discs when removing them from their cases.
- Do not bend or heat discs.
- Do not enlarge the hole at the center.
- Do not write on the labeled (printed) surface with ball-point pens, pencils, etc., or stick new labels on discs.
- Water droplets may form on discs if they are moved suddenly from a cold place (outdoors for example) to a warm place, but do not try to dry them off using a hairdryer, etc.
Cautions on storing discs
- Be sure to remove discs after using them.
- Be sure to store discs in their cases to protect them from dust, scratches, warping, etc.
-
Do not store discs in the following places:
-
Places exposed to direct sunlight for long periods of time
- Dusty or humid places
- Places exposed to heat from heating appliances, etc.
Cleaning discs
- If there are fingerprints or dirt on discs, wipe them off before using the disc. Fingerprints and dirt can impair sound quality and cause interruptions in playback.
- Use a commercially available disc cleaning set or a soft cloth to clean discs.
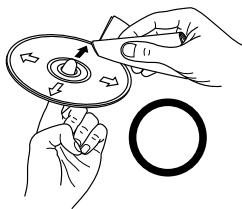
Gently wipe the disc from the inside towards the outside.
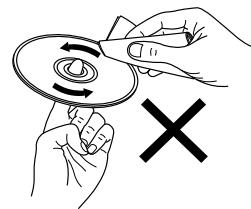
Do not wipe with a circular motion.
NOTE:
- Do not use record spray, antistatic agents, or benzene, thinner or other solvents.
About the remote control unit
Inserting the batteries
① Remove the remote control unit's rear cover.
② Set two R03/AAA batteries in the battery compartment in the indicated direction.
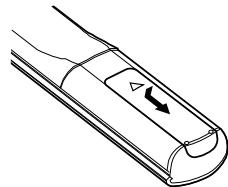
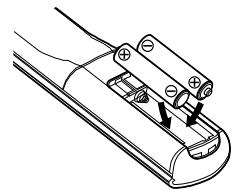
③ Put the rear cover back on.
Notes on batteries:
- Replace the batteries with new ones if the set does not operate even when the remote control unit is operated close to the unit. (The supplied batteries are only for verifying operation.)
- When inserting the batteries, be sure to do so in the proper direction, following the “ ” and “ ” marks in the battery compartment.
- To prevent damage or leakage of battery fluid:
- Do not use a new battery together with an old one.
- Do not use two different types of batteries.
- Do not attempt to charge dry batteries.
- Do not short-circuit, disassemble, heat or dispose of batteries in flames.
- If the battery fluid should leak, carefully wipe the fluid off the inside of the battery compartment and insert new batteries.
- Remove the batteries from the remote control unit if it will not be in use for long periods.
Operating range of the remote control unit
- Point the remote control unit at the remote sensor when operating it.
- The remote control unit can be used from a distance of up to about 8 meters, at a horizontal angle of up to 30^ with respect to the sensor.

NOTE:
- The set may function improperly or the remote control unit may not operate if the remote control sensor is exposed to direct sunlight, strong artificial light from an inverter type fluorescent lamp or infrared light.
Part names and functions
For buttons not explained here, see the page indicated in parentheses ( ).
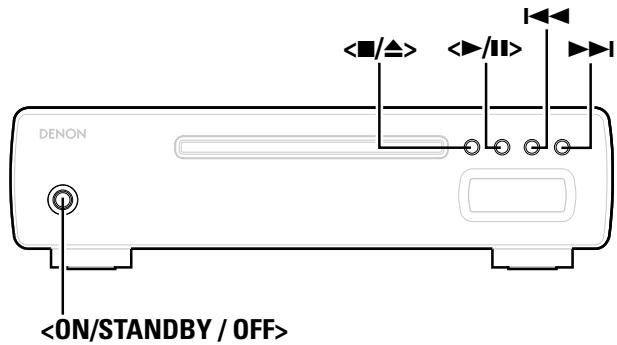
Front panel
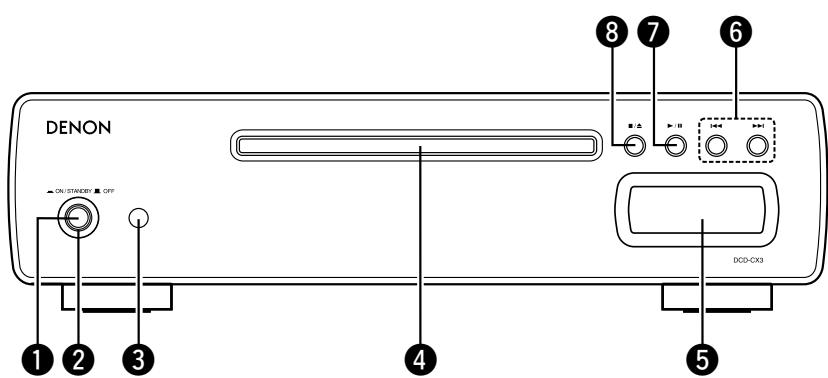
1 Power switch (ON/STANDBY OFF) (8)
2 Power indicator (8)
Remote control sensor (4)
4 Disc tray (3)
⑤ Display
⑥ Skip buttons (I▲, ▷▶I) ……………………(9, 11)
7 Play/Pause button ( /II) (9~12)
Stop / Disc tray open/close button (■/▲) …………………… (8 ~ 10)
Display
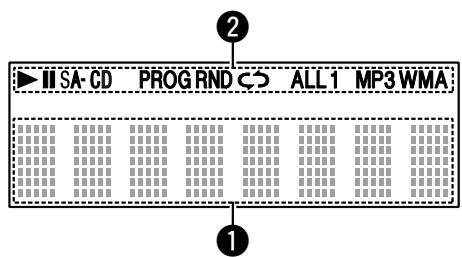
1 Information display (8 ~ 11) 2 Mode indicators (9 ~ 12)
Various information is displayed here,
depending on the operation mode.
Rear panel
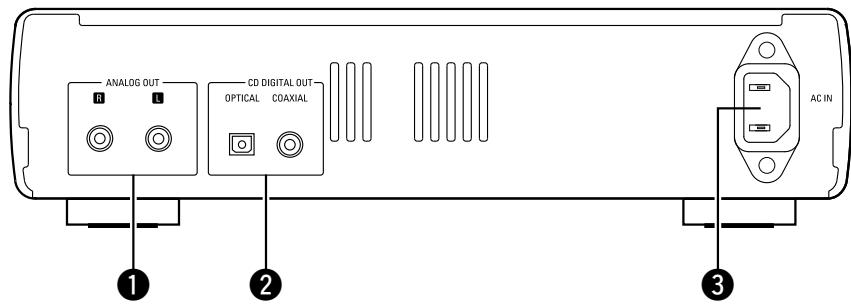
1 ANALOG OUT terminals (7) 3 AC inlet (7)
CD DIGITAL OUT terminals (OPTICAL/COAXIAL) (7)
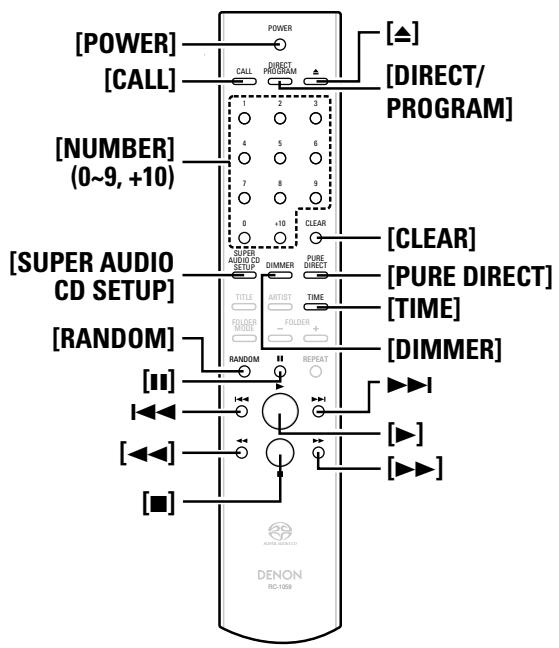
Remote control unit
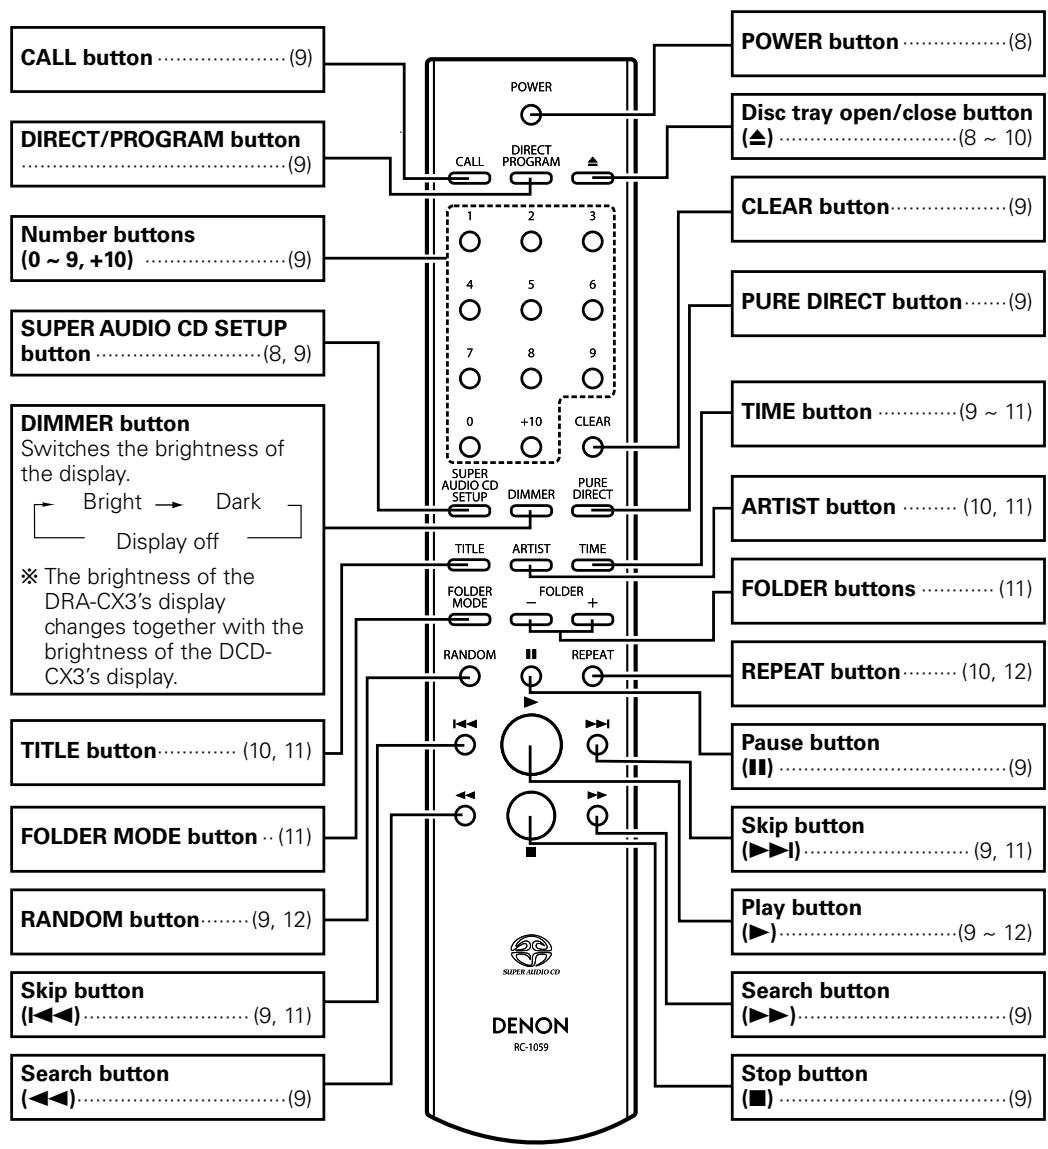

- The skip buttons (I▲ and ▷▶I) and +10 button operate continuously when held in.
- The POWER, PURE DIRECT and DIMMER buttons function for the DENON DRA-CX3 stereo receiver as well, so the DRA-CX3 can be operated simultaneously with the DCD-CX3. When the two units have different settings, press and hold in the button for at least 2 seconds to reset them both to the default setting, then make the desired setting.
- The default settings are "on" for the power, "bright" for the dimmer and "off" for the pure direct mode.
Connections
NOTE:
- Do not plug in the power supply cord until all connections have been completed.
- When making connections, also refer to the operating instructions of the other components.
- Be sure to connect the left and right channels properly (left with left, right with right).
- Do not bundle power supply cords together with connection cables. Doing so can result in humming or noise.
Cable indications
Connect using the connection cables shown below.
| Audio cable | Signal direction |
| A Analog connections RCA pin-plug cable B Digital connections (Coaxial) (Orange) Coaxial cable (75 Ω/ohms pin-plug cable) C Digital connections (Optical) Optical fiber cable | Audio signal OUT IN |
Analog connections
Digital connections
- Connect either the "COAXIAL" or the "OPTICAL" digital output terminal.
- There is a protective cap covering the optical digital output terminal.
After removing the protective cap, insert the plug firmly until it locks.

- No digital signals are output for Super Audio CDs.
When connecting the optical digital output connector with an optical transmission cable (commercially available)
Protective cap
shapes
Remove the protective cap, match the shapes, then insert firmly all the way in.

- Store the protective cap in a safe place so as not to lose it, and use it when not using the terminal.
Connecting the power supply cord
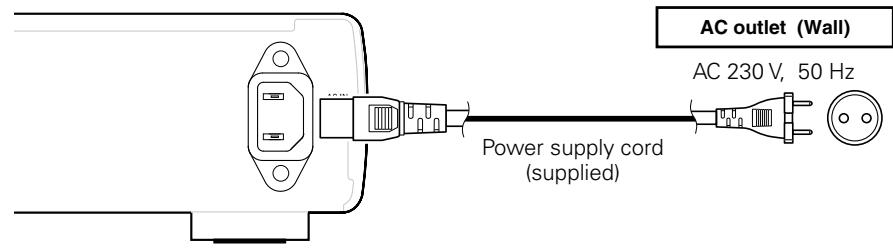
NOTE:
- Insert the plugs securely. Incomplete connections will result in the generation of noise.
- Do not unplug the power supply cord while the set is operating.
About the button names in these explanations
< > : Buttons on the main unit
[ ] : Buttons on the remote control unit
Button name only:
Buttons on the main unit and remote control unit
Operation
Before playing
Turning the power on
Press.
- When a disc is loaded, playback starts automatically.
- When no disc is loaded, "NO DISC" is displayed.
Setting the power to the standby mode:
Press [POWER].
Canceling the standby mode:
Press [POWER] again.
Turning the power off:
Press

- Power indicator
Power on Red
Standby Orange
NOTE:
- Be sure to stop playback before turning the power off.
Setting the layer to be played with priority
- The layer that is played with priority when the disc is loaded can be set.
- Upon purchase, the priority layer is set to the "SA-CD".
With "NO DISC" displayed, press [SUPER AUDIO CD SETUP] to switch the layer.
SA-CD CD
SA-CD:
The SA-CD layer mode for Super Audio CDs
CD:
The CD layer mode for Super Audio CDs

- This setting is stored in the DCD-CX3's memory and is not canceled even when the disc tray is opened or closed or the power is turned on or off. To change the setting, perform the above procedure again.
- The priority layer cannot be set when a disc is loaded or when "OPEN" is displayed.
Loading discs
In the stop mode, press </> or [] to open the disc tray.
To close the disc tray:
Press / again or press [A].
NOTE:
- The power must be on when opening and closing the disc tray.
- Do not push the disc tray in by hand when the power is off. Doing so can damage it.
- Do not insert foreign objects into the disc tray. Doing so will damage it.
Playing discs with even higher sound quality (Pure Direct mode)
Press [PURE DIRECT].
The digital output is turned off.
The display is turned off.
(Some indicators are displayed when nothing is being played and when no disc is loaded.)
![DENON DCD-CX3 - Press [PURE DIRECT]. - 1](/content/2025/01/135660/images/5b4f4434cc2fcc5964b78411eb4ca2a2ec4e731fb97297320c332e5ec535ec41.jpg)
- [DIMMER] does not function when in the pure direct mode.
Canceling the Pure Direct mode:
Press [PURE DIRECT] again.
Normal playback
1 For Super Audio CDs: If necessary, press [SUPER AUDIO CD SETUP] to switch the playback layer.
※ It is not possible to switch to a layer not recorded on the disc.
Press < / > or [ ]
The "▶" indicator lights and playback starts.
※ Once all the tracks on the disc have been played, the stop mode is set.
※ [TIME] can be used to switch the information displayed.
![DENON DCD-CX3 - Press < / > or [ ] - 1](/content/2025/01/135660/images/e8630fdd2b9c33e2217537cc20f41584e9f2570943aedc0d2fe5704b4aae0650.jpg)
※ In the stop mode, the display switches between the total number of tracks and the total time.
□ Stopping playback:
Press < / > or [].
- Stopping playback temporarily:
Press or [II].
※To resume playback,press (\langle \text{比} | \text{比} | \text{比} | \text{比} | \text{比} | \text{比} | \text{比} | \text{比} | \text{比} | \text{比} | \text{比} | \text{比} | \text{比} | \text{比} | \text{比} | \text{比} | \text{比} | \text{
Fast-forwarding and fast-reversing (searching):
During playback, press and hold in [▶▶] or [▲▲].

- Normal playback resumes when the button is released.
- The sound may be interrupted for a brief moment when resuming normal playback after searching.
□ Moving to the beginning of tracks (skipping):
Press or during playback.
※ The operation is as follows if the button is held in:
I : Repeated skipping to the beginning of subsequent tracks
: Repeated skipping to the beginning of previous tracks
Finding tracks directly:
Press [NUMBER] (0 9, + 10) to select the track.
※ For track numbers 1 to 9, press the corresponding button ([1] to [9]).
For track numbers 10 and on, first press [+10] then press buttons [0] to [9].
Example: Track 4 : [4]
Example: Track 12 : [+10] [2]
Example: Track 20: [+10] [+10] [0]
Various types of playback
Listening to specific tracks in a specific order (Programmed playback)
Up to 20 tracks can be programmed.
1 In the stop mode, press [DIRECT/PROGRAM]. The "PROG" indicator lights.
2 Press [NUMBER] (0 9, + 10) to select the tracks.
Example: To program tracks 3, 12, 7 to play in that order: [3] [+10] [2] [7]
Press < / > or [ ]
- The tracks are played in the programmed order.
□ Checking the order of the programmed tracks:
In the stop mode, press [CALL] repeatedly.
- The track numbers are displayed in the programmed order.
※ The total time of the tracks can be checked by pressing [TIME].
Clearing the last programmed track:
In the stop mode, press [CLEAR].
Clearing all the programmed tracks:
① In the stop mode, press [DIRECT/PROGRAM].
② Press / or [A] to open the disc tray.

- Direct searching is not possible during programmed playback.
- "---" is displayed if the total programmed time exceeds 99 minutes, 59 seconds.
- Programmed playback is not possible with MP3 and WMA files.
Listening in random order (Random playback)
1 In the stop mode, press [RANDOM].
- The "RND" indicator lights.
Press < / > or [ ]
- During normal playback:
Tracks are selected and played automatically in random order.
In the 1-track repeat mode:
A track is selected automatically and that track is played repeatedly.
- During the all-track repeat mode:
All the tracks are played once in random order, then played again repeatedly, each time in a different random order.
Canceling random playback:
In the stop mode, press [RANDOM].

- Direct searching is not possible during random playback.

Listening to tracks repeatedly (Repeat playback)
Listening to a specific track repeatedly (1-track repeat playback)
During playback, press [REPEAT] once.
- The "C 1" indicator lights and that track is played repeatedly.
Canceling 1-track repeat playback:
① Press [REPEAT] twice.
② Press 口 /口 or [A] to open the disc tray.

- In the stop mode, the 1-track repeat mode can be set by pressing [REPEAT] once. Press </> or [▲] to start playback.
Listening to all the tracks repeatedly (All-track repeat playback)
Press [REPEAT] twice.
- The "C ALL" indicator lights.
Press or []. During normal playback:
All the tracks are played repeatedly.
- In the random playback mode:
The tracks are played once each in random order, then played again in a different order.
Canceling all-track repeat playback:
① Press [REPEAT] again.
② Press 口 /口 or [A] to open the disc tray.
Displaying text (Super Audio CDs only)
When a Super Audio CD containing text is loaded, the text data recorded on the disc (album title, artist name and track title) can be displayed in the stop or play mode.
Displaying the track title
Press [TITLE] during playback.
※ If the track switches while the title is displayed, the title of the new track is displayed.
Displaying the album title
In the stop mode, press [TITLE].
Displaying the album's artist name
In the stop mode, press [ARTIST].
Switching the display to the total recorded time while text data is displayed:
Press [TIME].

- If a disc not containing text data is loaded, "NO TEXT" is displayed when [TITLE] or [ARTIST] is pressed.
About the button names in these explanations
< > : Buttons on the main unit
[ ] : Buttons on the remote control unit
Button name only:
Buttons on the main unit and remote control unit
Playing music files
Before playing MP3 or WMA files
There are many music distribution sites on the Internet allowing you to download music files in MP3 or WMA (Windows Media® Audio) format. The music (files) downloaded from such sites can be stored on CD-R or CD-RW discs and played on the DCD-CX3.
- "Windows Media" and "Windows" are registered trademarks or trademarks in the United States and other countries of Microsoft Corporation of the United States.
Creating MP3 and WMA files compatible with the DCD-CX3
- When writing MP3 or WMA files on a CD-R or CD-RW disc, set the writing software's format to "ISO9660 Level 1". The files may not play properly if they are recorded in other formats.
- The maximum number of files and folders that can be played is 1000 (total of the number of folders and files). The maximum number of folders is 255.
- The DCD-CX3 is not compatible with packet write software or playlists.
- Also refer to the instructions of the software used to create the MP3 or WMA files.
- Be sure to give the extension "MP3" or "WMA" to the MP3 or WMA files. Files with other extensions or with no extensions cannot be played.
※ According to copyright laws, recordings you have made should only be used for your personal enjoyment and must not be used in other ways without the consent of the copyright holder.
[Playable MP3 and WMA files]
| File format | Sampling frequency (kHz) | Bit rate (kbps) | Extension |
| MP3 | 32, 44.1, 48 | 32 ~ 320 | .MP3 |
| WMA | 32, 44.1, 48 | 64 ~ 160 | .WMA |
- The DCD-CX3 is compatible with the "MPEG-1 Audio Layer-3" standards. It is not compatible with the "MPEG-2 Audio Layer-3", "MPEG-2.5 Audio Layer-3", "MP1", "MP2" or "MP3 PRO" standards.
- The DCD-CX3 is not compatible with ID3-Tag or meta-tag technology.
- When playing MP3 and WMA files, the digital output is converted to PCM. The signals are output with the same sampling frequency as when they were written.
- With the DCD-CX3, the folder and file names can be displayed like titles. Up to 8 characters consisting of numbers, letters and the underscore can be displayed. Characters that cannot be displayed are replaced with asterisks.
- Copyright-protected files cannot be played. Note that depending on the software used for burning and other conditions, some files may not play or display correctly.
- The positions of the folders or files may have been changed by the writing software when burning the MP3/WMA files onto the CD-R/CD-RW disc, so the files may not play in the expected order.
- JPEG and DivX® files are handled as files but cannot be played.
Folder mode and disc mode settings:
Press [FOLDER MODE] to switch the range of the files to be played.
- Folder mode
The "WMA" or "MP3" indicator flashes.
The files in the selected folder are played.
- Disc mode
The "WMA" or "MP3" indicator lights.
All the files on the disc are played.
Playing MP3 or WMA files
1 Load a CD-R or CD-RW disc containing music files in the MP3 or WMA format into the disc tray ( page 3).
Press [FOLDER MODE] to select the folder mode or disc mode.
※ Refer to "Folder mode and disc mode settings".
Press or []. 3 Playback starts.
※ The file name or folder name can be displayed by pressing [TITLE] or [ARTIST].
![DENON DCD-CX3 - Press or []. 3 Playback starts. - 1](/content/2025/01/135660/images/a56d60eed0728c3f1a00bbace034a6e69476f857b75c4d8a1f54e0f3c04cffb8.jpg)
※ [TIME] can be used to switch the information displayed.
![DENON DCD-CX3 - Press or []. 3 Playback starts. - 2](/content/2025/01/135660/images/9e174a8c3f9f1fd633af420e1fd54c8d7fe7c779d8e2a573b556fc0714f02ab5.jpg)
※ In the stop mode, only the total number of tracks is displayed.
Changing the folder to be played:
Press [FOLDER] and select the desired folder.
Changing the file to be played:
Press 1 or 2 to select the desired file.

- When a folder is selected, playback switches to the first track of the selected folder.

About the button names in these explanations
< > : Buttons on the main unit
[ ] : Buttons on the remote control unit
Button name only:
Buttons on the main unit and remote control unit
Listening to MP3 or WMA files in random order (Random playback)
1 Press [FOLDER MODE] to select the disc mode.
※ Refer to "Folder mode and disc mode settings" (page 11).
Press [RANDOM].
- The "RND" indicator lights.
Press < / > or [ ]
- Tracks are selected and played automatically in random order.
Canceling random playback:
In the stop mode, press [RANDOM].
- The "RND" indicator turns off.

- Random playback is not possible in the folder mode.
Listening to MP3 or WMA files repeatedly (Repeat folder/disc playback)
1 Press [FOLDER MODE] to select the folder mode or disc mode.
※ Refer to "Folder mode and disc mode settings" (12 page 11).
Press [REPEAT] to select the repeat mode.
※ Using the folder mode:
![DENON DCD-CX3 - Press [REPEAT] to select the repeat mode. - 1](/content/2025/01/135660/images/f7fae8ab371419bb87a5489f849b80b7a3e66e05e7a3aaaf482b94a93d981a13.jpg)
※ Using the disc mode:
![DENON DCD-CX3 - Press [REPEAT] to select the repeat mode. - 2](/content/2025/01/135660/images/1f0f75bc1f5db78efb0559c172ace798c9aa17cfcae7f7745ffa35144d61300f.jpg)
Press < / > or [ ]
- Either the files in the selected folder or all the files on the disc are played repeatedly.
Canceling repeat folder/disc playback:
Press [REPEAT] until the "C " indicator turns off.
Using the timer play function
Also refer to the operating instructions of the audio timer.
1 Turn on the power of the connected components.
2 Switch the receiver's input function to the function to which the player is connected.
3 Load a disc in the player.
4 Set the audio timer for the desired times.
5 Turn the timer "ON". The power of the components connected to the timer turns off.
When the set time is reached, the power of the different components automatically turns on and playback starts from the first track.
Troubleshooting
If a problem should arise, first check the following:
- Are the connections correct?
-
Is the set being operated as described in the operating instructions?
-
Are the other components operating properly?
If this unit does not operate properly, check the items listed in the table below. Should the problem persist, there may be a malfunction. In this case, disconnect the power immediately and contact your store of purchase.
| Symptom | Cause | Measures | Page |
| Disc tray does not open. | ·The power is not on. | ·Turn on the power. | 8 |
| “NO DISC” is displayed even though a disc is loaded. | ·The disc is not properly loaded. | ·Reload the disc. | 3 |
| “00:00” is displayed even though a disc is loaded. | ·A disc other than a CD or Super Audio CD is loaded. | ·Load a CD or Super Audio CD. | 3 |
| Playback does not start even when the▶/■ button on the main unit or the▶ button on the remote control unit is pressed. | ·The disc is dirty or scratched. | ·Wipe the dirt off the disc or replace the disc. | 2,3 |
| No sound is produced or sound is distorted. | ·The output cables are not properly connected to the receiver. ·The receiver's function setting or adjustments are not right. | ·Check the connections. ·Check the receiver's function and controls and adjust as necessary. | 7 - |
| No digital signals are output. | ·For Super Audio CDs, no digital signals are output. ·Turn the pure direct mode on. | ·For Super Audio CDs, use the analog audio output signals. ·Turn the pure direct mode off. | 7 9 |
| A specific section of the disc cannot be played properly. | ·The disc is dirty or scratched. | ·Wipe the dirt off the disc or replace the disc. | 2,3 |
| Programmed playback is not possible. | ·The tracks have not been programmed properly. | ·Program properly. | 9 |
| A CD-R or CD-RW disc cannot be played. | ·The disc has not been finalized. ·The recording conditions are bad or the quality of the disc itself is poor. | ·Finalize the disc then play it. ·Use a properly recorded disc. | 2 2 |
| Files recorded in MP3 or WMA format cannot be played. | ·You have selected a copyright-protected WMA file or a file that cannot be played normally. | ·Press the ↓← or ▷ button to select a different file. | 11 |
| Set does not operate properly when remote control unit is operated. | ·The batteries are spent. ·The remote control unit is too far from the set. | ·Replace the batteries with new ones. ·Move the remote control unit closer to the set. | 4 4 |
Specifications
Audio performance
- Analog output
Channels:
Playable frequency range:
Playback frequency response:
S/N:
Dynamic range:
Harmonic distortion:
Wow & flutter:
Output level:
Signal type:
Sampling frequency:
Usable discs:
Digital output
Coaxial:
Optical:
Emission wavelength:
[Super Audio CD]
2 channels
2 Hz ~ 100 kHz
2 Hz ~ 50 kHz (-3 dB)
112 dB (Audible range)
109 dB (Audible range)
0.0007 % (1 kHz, Audible range)
Below measurable limits
2.0 V (10 kΩ/kohms)
1-bit DSD
2.822 MHz
Super Audio CD
General
Power supply:
Power consumption:
Maximum external dimensions:
Mass:
AC 230 V, 50 Hz
24W
Standby: 0.2 W or less
Remote control method:
Batteries:
Maximum external dimensions:
Mass:
Infrared pulse method
R03/AAA Type (two batteries)
44 (W) x 233 (H) x 22 (D) mm
165 g (including batteries)
- For purposes of improvement, specifications and design are subject to change without notice
[CD]
2 channels
2 Hz ~ 20 kHz
2 Hz ~ 20 kHz
118 dB
100 dB
0.0017% (1 kHz)
Below measurable limits
2.0 V (10 kΩ/kohms)
16-bit linear PCM
44.1 kHz
Compact Disc
0.5 Vp-p / 75 Ω/ohms
-15 ~ -21 dBm
660 nm


- WARNING:
- CLASS 1
- LASER PRODUCT
- - DECLARATION OF CONFORMITY
- ACHTUNG:
- VORSICHT:
- A NOTE ABOUT RECYCLING:
- HINWEIS ZUM RECYCLING:
- Contents
- Getting Started
- Accessories
- Cautions on handling
- - Before turning the power switch on
- - Sufficiently ventilate the place of installation
- - About condensation
- - Cautions on using mobile phones
- - Moving the unit
- NOTE:
- Cautions on installation
- About discs
- Discs that can be played
- Super Audio CDs
- Types of Super Audio CDs
- ※ What is the HD layer?
- What is the CD layer?
- Music CDs
- CD-R/CD-RW
- What is finalization?
- Loading discs
- Cautions on loading discs
- Cautions on storing discs
- Cleaning discs
- About the remote control unit
- Inserting the batteries
- Notes on batteries:
- Operating range of the remote control unit
- Part names and functions
- Front panel
- Display
- Rear panel
- Remote control unit
- Connections
- Cable indications
- Analog connections
- Digital connections
- When connecting the optical digital output connector with an optical transmission cable (commercially available)
- Connecting the power supply cord
- About the button names in these explanations
- Button name only:
- Operation
- Before playing
- Turning the power on
- Press.
- Setting the power to the standby mode:
- Canceling the standby mode:
- Turning the power off:
- Setting the layer to be played with priority
- With "NO DISC" displayed, press [SUPER AUDIO CD SETUP] to switch the layer.
- SA-CD:
- CD:
- To close the disc tray:
- Playing discs with even higher sound quality (Pure Direct mode)
- Press [PURE DIRECT].
- Canceling the Pure Direct mode:
- Normal playback
- Press < / > or [ ]
- □ Stopping playback:
- - Stopping playback temporarily:
- Fast-forwarding and fast-reversing (searching):
- □ Moving to the beginning of tracks (skipping):
- Finding tracks directly:
- Various types of playback
- Listening to specific tracks in a specific order (Programmed playback)
- In the stop mode, press [DIRECT/PROGRAM]. The "PROG" indicator lights.
- Press [NUMBER] (0 9, + 10) to select the tracks.
- Press < / > or [ ]
- □ Checking the order of the programmed tracks:
- Clearing the last programmed track:
- Clearing all the programmed tracks:
- Listening in random order (Random playback)
- In the stop mode, press [RANDOM].
- Canceling random playback:
- Listening to tracks repeatedly (Repeat playback)
- Listening to a specific track repeatedly (1-track repeat playback)
- During playback, press [REPEAT] once.
- Canceling 1-track repeat playback:
- Listening to all the tracks repeatedly (All-track repeat playback)
- Press [REPEAT] twice.
- Press or []. During normal playback:
- Canceling all-track repeat playback:
- Displaying text (Super Audio CDs only)
- Displaying the track title
- Press [TITLE] during playback.
- Displaying the album title
- Displaying the album's artist name
- Switching the display to the total recorded time while text data is displayed:
- Playing music files
- Before playing MP3 or WMA files
- Creating MP3 and WMA files compatible with the DCD-CX3
- Folder mode and disc mode settings:
- - Folder mode
- - Disc mode
- Playing MP3 or WMA files
- Press [FOLDER MODE] to select the folder mode or disc mode.
- Press or []. 3 Playback starts.
- Changing the folder to be played:
- Changing the file to be played:
- Listening to MP3 or WMA files in random order (Random playback)
- Press [FOLDER MODE] to select the disc mode.
- Press [RANDOM].
- Listening to MP3 or WMA files repeatedly (Repeat folder/disc playback)
- Press [FOLDER MODE] to select the folder mode or disc mode.
- Press [REPEAT] to select the repeat mode.
- Canceling repeat folder/disc playback:
- Using the timer play function
- Troubleshooting
- Specifications
- Audio performance
- [Super Audio CD]
- General
- [CD]
Brand : DENON
Model : DCD-CX3
Category : CD Player