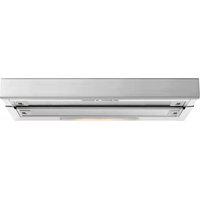
GEH9017 - Microwave Oven BAUMATIC - Free user manual and instructions
Find the device manual for free GEH9017 BAUMATIC in PDF.


| Product Type | Microwave Oven |
| Brand | Baumatic |
| Model | GEH9017 |
| Capacity | 20 Liters |
| Microwave Power | 800 Watts |
| Power Supply | 230V ~ 50Hz |
| Power Consumption | 1200 Watts |
| Dimensions (H x W x D) | 262 x 455 x 395 mm |
| Weight | 11.5 kg |
| Turntable Diameter | 255 mm |
| Control Type | Mechanical Knobs and Timer |
| Functions | Microwave cooking, Defrost, Clock, Timer |
| Defrost Function | Yes, by weight or time |
| Interior Light | Yes |
| Door Opening | Left hinged with handle |
| Child Safety Lock | Yes |
| Cleaning | Wipe interior with damp cloth; do not use abrasive cleaners |
| Warranty | 2 years |
| Spare Parts Availability | Contact Baumatic customer service or authorized retailers |
| Manual Format | PDF available for download |
Frequently Asked Questions - GEH9017 BAUMATIC
User questions about GEH9017 BAUMATIC
0 question about this device. Answer the ones you know or ask your own.
Ask a new question about this device
Download the instructions for your Microwave Oven in PDF format for free! Find your manual GEH9017 - BAUMATIC and take your electronic device back in hand. On this page are published all the documents necessary for the use of your device. GEH9017 by BAUMATIC.
USER MANUAL GEH9017 BAUMATIC
User Manual for your
GEH6017 & GEH9017
Cooker Hood
NOTE: This User Instruction Manual contains important information, including safety & installation points, which will enable you to get the most out of your appliance. Please keep it in a safe place so that it is easily available for future reference.
CONTENTS
YOUR COOKER HOOD'S SPECIFICATIONS ....2
IMPORTANT SAFETY INFORMATION....3-4
CARING FOR THE ENVIRONMENT......5
USING YOUR COOKER HOOD....6
MAINTAINING AND CLEANING YOUR COOKER HOOD ......7-9
INSTALLATION INSTRUCTIONS 10-11
ELECTRICAL CONNECTION....10
INSTALLING THE COOKER HOOD.....11
TROUBLESHOOTING 12
HT 09/03/12
Dear Customer,
Congratulations on purchasing your new product from Think Appliances.
To register your parts and labour warranty (some conditions apply please refer to your warranty card for more details) please contact out Customer Care team on:
1800 444 357
Our Customer Care centre is there to ensure you get the most out of your appliance. For example, should you want to learn more about recommended cooking temperatures, the various cooking functions available, how to set and program your LED clock, and importantly taking care of your appliance when cleaning, please call us because we are here to help you.
It is important that you read through the following use and care manual thoroughly to familiarize yourself with the installation and operation requirements of your appliance to ensure optimum performance.
We also carry a complete range of spare parts for all Think products. For all your spare parts enquiries please contact our team at Pronto Parts on:
1300 306 973
Again, thank you for choosing an appliance brought to you by Think Appliances and we look forward to being of service to you.
Kind regards
Management
Think Appliances
To fully enjoy using your appliance long into the future, please firstly familiarise yourself with its specifications, safety advice and operational instructions included in this manual. You will also need this manual to ensure that your Cooker Hood has been installed properly.
DIMENSIONS
Width: 600 mm
Depth: 450 mm (extended), 280 mm (encased)
Height: 175 mm
Your Cooker Hood is fitted with:
- Slider control operation
• 2 Metallic grease filters - 3 speeds
- 2 lights
Extraction capacity - 440 m³/hr
Optional Extra: 1 x Pair of ST1 Carbon filters for air recirculation.
NOTE: PLEASE NOTE THAT YOUR COOKER HOOD CAN BE USED EITHER IN RECIRCULATION MODE OR IN EXTRACTION MODE. TO USE THE HOOD IN RE-CIRCULATION MODE, YOU WILL NEED TO FIT THE CARBON FILTER.
IF YOU WANT TO USE YOUR COOKER HOOD IN EXTRACTOR MODE, YOU WILL NEED TO FIT DUCTING (DIAMETER OF 125MM) TO THE SPI GOT (SEE INSTALLATION DIAGRAM) AND WORK IT THROUGH A HOLE OF 130MM SO THAT IT IS EXPELLING FUMES THROUGH A DEDICATED FLUE SYSTEM THAT ISN'T COMBINED WITH OTHER EXHAUSTS.
Important Safety Information: Please read this before installing & using.
○ Any installation work must be carried out by a qualified electrician or competent person.
The hood must be installed in accordance with the installation instructions and all measurements followed.
○ If the cooker hood is installed for use above a gas appliance then the provision for ventilation must be in accordance with the Gas Safety Codes of Practice BS.6172, BS.5440 & BS.6891 (Natural Gas) and BS.5482 (LP Gas) 1994, the Gas Safety (Installation & Use) Regulations, the Building Regulations issued by the Department of the Environment, the Building Standards (Scotland) (Consolidated) Regulations issued by the Scottish Development Dptmt.
- It is dangerous to alter the specifications or to modify this product in any way. Do not tamper with it or attempt to alter it in the attempt to customise it further.
- When installing the hood, ensure that the following recommended distances are being observed between the cooker top and the bottom of the cooker hood:
√ Electric cookers: 600
√ Gas cookers : 600
mm
mm
* NOTE - DO NOT SET YOUR COOKER HOOD LESS THAN 600MM ABOVE YOUR COOKER!
- When installed between adjoining wall cabinets, the cabinets must not overhang the hob and their undersides must be at least 50 mm off from the hob edges.
- The edges of the cooker hood are sharp – be mindful of this as you handle your appliance, especially during installation and cleaning. DO NOT CLEAN IN BEHIND THE GREASE FILTERS!
○ If the room where the cooker hood is to be used contains a fuel burning appliance such as a central heating boiler then its flue must be of the sealed or balanced flue type.
○ If other types of flue or appliances are fitted, ensure that there is an adequate supply of air in the room.
When the hood is being used in its extractor function, ensure that the ducting is fire retardant and that there are no bends sharper than 90 degrees as this will reduce the efficiency of the hood.
Important Safety Information: Please read this before installing & using.
- Ensure the ducting for the extractor function has the same diameter as the outlet hole all the way through.
- Keep young children from using, playing with or tampering with the cooker hood. Older children and infirm persons should be supervised if they are using the cooker hood.
- Your cooker hood is for domestic use only.
-
Please dispose of the packing material carefully – children are especially vulnerable to it.
○ Dirty oil is an even greater fire risk.
○ Always put lids on pots and pans when cooking on a gas cooker.
The manufacturer refuses to accept any responsibility for damages arising to the hood or its catching on fire from failure to observe fire safety advice in these instructions.
Remember that when in extraction mode, your cooker hood is removing air from your room. -
Ensure that proper ventilation measures are being observed. Note that it removes odours from your room, not steam.
○ Warning - Always ensure that the cooker hood has been disconnected from the power supply before carrying out any work on the hood, including replacing light bulbs.
○ If the supply cord is damaged it must be replaced by the manufacturer or service agent in order to avoid hazard.
☒ Do not connect the ducting system of this appliance to any existing ventilation system which is being used for any other purpose.
☒ Do not install above a cooker with a high level grill.
☒ Never leave frying pans unattended during use as overheated fats and oils might catch fire.
☒ Do not leave naked flames under the cooker hood.
Do not attempt to use the cooker hood if it is
damaged in any way. Never attempt to use it without the grease filters fitted or if the filters are excessively greasy!
☒ Never flambé cook under this cooker hood.
here must be scrupulously added by so as to avoid the risk of fire. THE MANUFACTURER DECLINES ALL RESPONSIBILITY IN THE EVENT OF FAILURE TO OBSERVE THE INSTRUCTIONS GIVEN HERE FOR INSTALLATION, MAINTENANCE AND SUITABLE USE OF THE HOOD.

Environmental Note
Note: Before discarding an old appliance, switch off and disconnect it from the power supply. Cut off and render any plug useless. Cut the cable off directly behind the appliance to prevent misuse. This should be undertaken by a competent person.
CONFORMITY TO W.E.E.E. DIRECTIVE
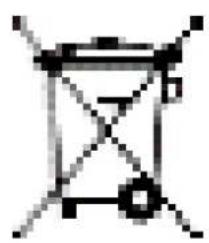
This appliance is marked according to the European directive 2002/96/EC on Waste electrical and Electronic Equipment (WEEE). By ensuring this product is disposed of correctly, you will help prevent potential negative consequences for the environment and human health, which could otherwise be caused by inappropriate waste handling of this product.
The symbol

on the product, or on the documents accompanying the product, indicates that this appliance may not be treated as household waste. Instead it shall be handed over to the applicable collection point for the recycling of electrical and electronic equipment.
Disposal must be carried out in accordance with local environmental regulations for waste disposal.
For more detailed information about treatment, recovery and recycling of this product, please contact your local city office, your household waste disposal service or the shop where you purchased the product.
natural_image
Simple line drawing of a trash bin with no text or symbolsTo use your cooker hood:
1) Make sure it has been properly installed.
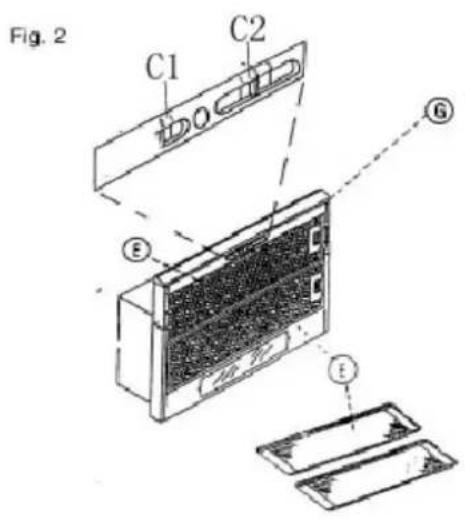
2) Find the CONTROL PANEL. It is located centrally on the hood's front surface, on the underside of the unit.
3) The CONTROL PANEL contains two rows of switches. These perform separate functions. You will need to understand what both switches do before you attempt to use your cooker hood.
* Note: The hood should be switched on at least as soon as you start cooking. It is a good idea to have had it running for 5 minutes prior to cooking and at least 15 minutes after you have finished cooking.
One switch controls the FAN SPEED
Slide the switch C-2 from '0' to position '1' for low speed.
Slide the switch C-2 from '1' to position '2' for mid speed.
Slide the switch C-2 from '2' to position '3' for high speed.
Switch off the fan by sliding the switch 'C-2' from position '1' to '0'.
YOU CAN CHANGE THE FAN SPEED AT ANY TIME DURING OPERATION.
The other is to control the light.
LIGHT ON/ OFF switch – Slide the 'C-1' switch in figure above from '0' to '1'.
Cleaning your Cooker Hood:
IMPORTANT: Before cleaning, always ensure that you have switched your cooker hood OFF at the omni-polar switch, set at the wall from the cable:
Cleaning
- Clean the external parts with mild liquid detergents on a damp cloth.
Never use abrasive powder, corrosive solvents or brushes.
Never insert pointed objects into the motor's protective grid. -
Only clean the control panel and filter grill with a damp cloth and delicate detergents.
-
Be sure to replace the carbon filters at the recommended intervals. Residue build up could cause a fire hazard.
Never take out the grease filters and attempt to clean the space above where they are set.
Anti-Grease Grille
- Your cooker hood includes an anti-grease grille which helps absorb vapour-suspended grease particles to protect your kitchen & furniture from greasy residues.
The metal grille may become inflammable if it becomes saturated with greasy residue.
√ To prevent this fire hazard, the grille should be cleaned regularly (depending on use) every 10-15 days and at least once a month in hot water with normal washing-up detergent. DO NOT USE A DISHWASHER TO ACHIEVE THIS.
Maintenance - Cleaning the Anti-grease Filters
natural_image
Black-and-white photo of a train track with a downward arrow indicating a drop or collision (no text or symbols visible)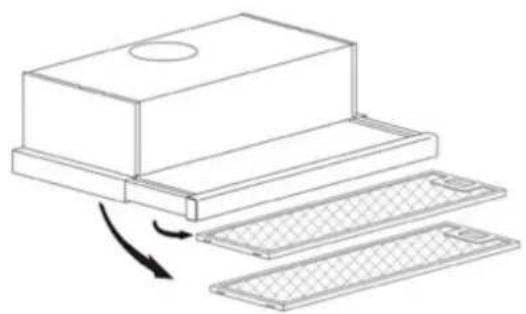
natural_image
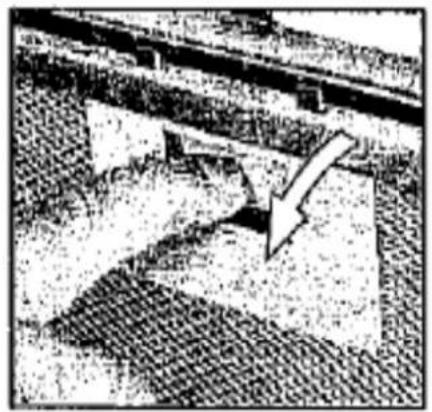
Diagram of a computer with a top box, showing a stack of three labeled components (no text or symbols present)First remove the grille by pulling down on it. Undo the side catches.
You can now clean the anti-grease filter grilles.
√ Soak them for about one hour in hot water with a grease-loosening detergent then rinse off thoroughly with hot water.
√ Repeat the process if needed. Refit the grease grille once it has dried.
√ Refit the grease grilles when dry.
Let the filter grilles dry thoroughly before refitting them.
Maintenance – Changing the Light Bulb and Carbon Filter
a) Changing the LIGHT BULB
√ Disconnect the hood from the power supply.
√ Access the lamp area. Please note that you will have to take off the grease grille at the back to access the lamp area.
√ Always replace burnt-out bulbs with olive-shaped 40 Watt bulbs.
√ After replacing the bulb, put the grease grille back.
b) Changing the CARBON FILTER
You will find that one filter will attach over the front of the fan motor (please see figure at bottom of page).
The active carbon filter must be replaced regularly, at least once every four months, to allow normal operation when in recirculation mode.
Before starting to fit the carbon filter, turn the omni-polar switch OFF
Changing the Carbon Filter – Note: carbon filters cannot be cleaned!
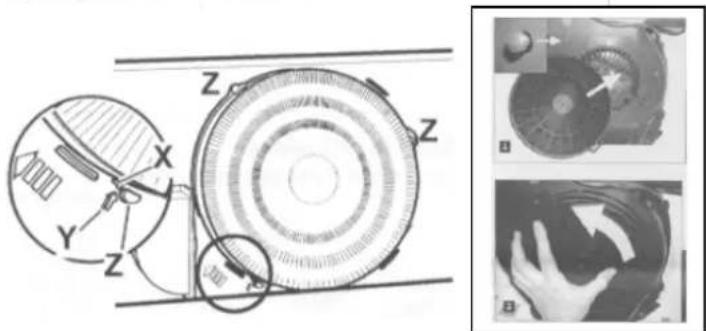
1) Remove the grease filter grilles.
2) Remove the old carbon filter by twisting it anticlockwise until it unlatches from the side of the fan motor.
3) Place the new carbon filter (which has two fixing tongues), turning clockwise so that the tongues latch onto the motor's sides. (Fig. 3 - left).
4) Replace the anti-grease metallic filter grilles.
NOTE
If your filter is different (i.e. is the Bayonet Circular-insert type,
Position the filter P in order to cover the motor protection grille, ensuring that the 'X' on the filter lines up with the 'Y' on the conveyor. Then turn clockwise. Reverse to dismount
INSTALLATION INSTRUCTIONS - Electrical
Before installation and usage, read all the instructions and make sure that the voltage (V) and the frequency (Hz) indicated on the identification plate (found inside your Cooker Hood) and all the data inside the appliance are exactly the same as the voltage and frequency in your home.
NOTE: The manufacturer declines all responsibility in the event of failure to observe all the accident-prevention regulations in force which are necessary for normal use and regular operation of the electric system.
ELECTRICAL CONNECTION
Your cooker hood is intended for fitted installation with a power cord & plug for connection to the power outlet.

- The power cable must be connected to the terminals marked L (live) and N (neutral) in the hood and fixed with a cable clamp.
- The cooker hood's power cable must be fitted upstream from the electrical connection using an omni-polar switch with a contact distance of at least 3mm.
NOTE: (UK only) WARNING – THIS APPLIANCE MUST NOT BE EARTHED. It should only be connected by a competent person using fixed wiring via a DOUBLE POLE SWITCHED FUSED SPUR OUTLET.
We recommend that the appliance is connected by a qualified electrician who is a member of the N.I.C.E.I.C. and who will comply with the I.E.E. and local regulations. The wires in the mains lead are coloured in accordance with the following U.K. code:
Blue= Neutral, Brown = Live, Green/ Yellow = Ground
If you can only find two wires in the cable (blue and brown), neither must be connected to the Earth terminal!
- As the colours of the wires in the appliance's mains lead may not correspond with the coloured markings identifying the terminals in your spur box, please proceed as follows:
1) The BLUE WIRE must be connected to the terminal marked 'N' (Neutral), or coloured Black.
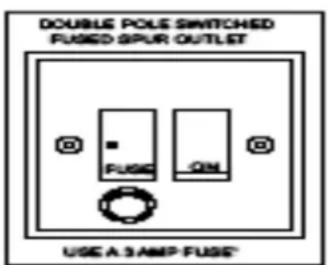
2) The BROWN WIRE must be connected to the terminal marked 'L' ('Live'), or coloured RED (Fig. 7 – at left)
INSTALLATION INSTRUCTIONS – Installing your Cooker Hood
PLEASE NOTE THAT YOU WILL HAVE TO DECIDE BEFORE INSTALLING YOUR COOKER HOOD THAT YOU CAN ADAPT IT AS AN EXTRACTION FAN. IF THIS IS THE CASE, YOU'LL NEED TO ATTACH A SPI GOT ('A' in figure at bottom of page) AND DUCTING. YOU'LL ALSO NEED TO HAVE PREPARED YOUR WALL EXHAUST SYSTEM PROPERLY
☒ The cooker hood must not be fitted above stoves with a radiant top plate.
☒ We recommend that at least two people install this hood.
Do not tile, grout or silicone this hood to the wall.
NOTE – YOUR COOKER HOOD COMES WITH THE FOLLOWING FIXING ACCESSORIES: - 1 SPACER - 4 SCREWS - RAWLPLUGS
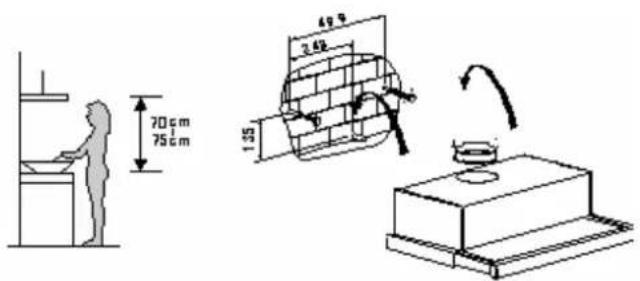
1) Your Cooker Hood should only be fitted into the underside of a dedicated cabinet / kitchen unit. DO NOT position it any less than 600 mm (60 cm) above the hob or let other cabinets overhang the hob.
2) Remove the metal anti-grease grille.
3) Drill where indicated. SEE DIAGRAMS BELOW. Using a drill with a diameter of 6mm, make holes to line up with the screw holes on the cooker hood's fixing surfaces (see Fig. below).
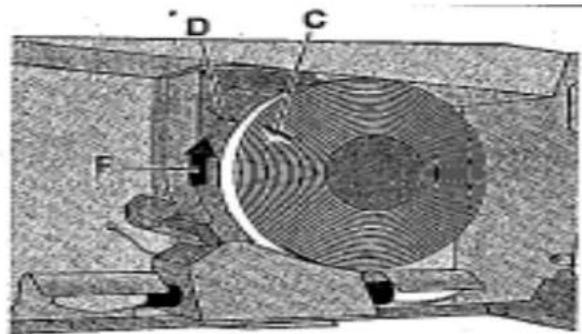
4) Insert rawlplugs into the holes and work screws in partway. Adjust your cooker hood so that it is straight using the spacer ('F' in figure below).
5) Once you have ensured the unit will be able to sit properly (& is connected to the ducting, if using as an extraction fan), tighten the screws to secure.
A).
B).

Air exhaust device
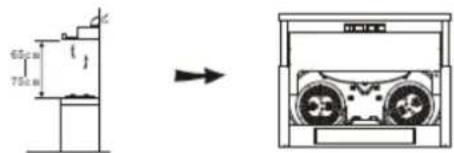
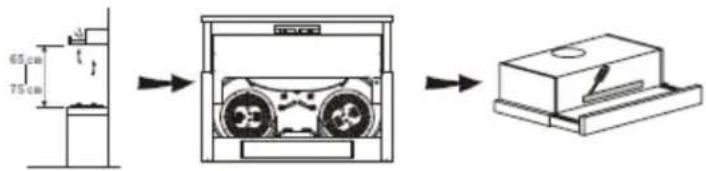
Outdoor discharge: Turn the hand shanks of air exhaust to outdoor, open cooker hood, then the odours will be removed from the air exhaust hole outdoor.
Indoor discharge: Turn the hand shanks of are exhaust to indoor, open cooker hood, then the odours will be removed from the air exhaust hole indoor.
A).
B).
Troubleshooting
If something has gone wrong with your Cooker Hood, checking against this chart might prevent you from having to call for service.
| Symptom | Solution |
| The cooker hood will not start! | Check that the hood is connected to the electricity supply.Check that the fan speed control is set properly. |
| The cooker hood is not working effectively! | The fan speed is not set high enough.The grease filter is dirty.The kitchen is not ventilated well enough.If the hood is set for recirculation, check that the carbon filters have not expired.If the hood is set for extraction, check that the ducting and outlets are not blocked. |
| The cooker hood has switched off during operation! | The safety cut-out device has been tripped.Turn off the hob and then wait for the device to reset.Note that if you have installed your cooker hood too low, this will happen. If it happens frequently, it will be damaged. |
Baumatic®
Think Appliances Pty Ltd.
416-424 Barry Rd
Coolaroo VIC 3048
Sales Telephone
1300 132 824
Service Telephone
1800 444 357
Website
www.thinkappliances.com
Applico Ltd.
P.O. 92900
Onehunga, Auckland,
New Zealand 1061
Website
www.applico.nz
United Kingdom
Baumatic Ltd.,
Baumatic Buildings,
6 Bennet Road,
Reading, Berkshire
RG2 0QX
United Kingdom
Sales Telephone
(0118) 933 6900
Website:
www.baumatic.co.uk


- User Manual for your
- GEH6017 & GEH9017
- Cooker Hood
- CONTENTS
- 444 357
- 306 973
- DIMENSIONS
- Your Cooker Hood is fitted with:
- Important Safety Information: Please read this before installing & using.
- Environmental Note
- CONFORMITY TO W.E.E.E. DIRECTIVE
- The symbol
- To use your cooker hood:
- One switch controls the FAN SPEED
- The other is to control the light.
- Cleaning your Cooker Hood:
- Cleaning
- Anti-Grease Grille
- Maintenance - Cleaning the Anti-grease Filters
- Maintenance – Changing the Light Bulb and Carbon Filter
- NOTE
- INSTALLATION INSTRUCTIONS - Electrical
- ELECTRICAL CONNECTION
- INSTALLATION INSTRUCTIONS – Installing your Cooker Hood
- Air exhaust device
- Troubleshooting
- Baumatic®
Brand : BAUMATIC
Model : GEH9017
Category : Microwave Oven