
BMGI250SS - Microwave Oven BAUMATIC - Free user manual and instructions
Find the device manual for free BMGI250SS BAUMATIC in PDF.


| Product Type | Built-in Microwave Oven |
| Model | BMGI250SS |
| Brand | Baumatic |
| Capacity | 25 liters |
| Microwave Power | 800 W |
| Grill Power | 1000 W |
| Power Supply | 230 V ~ 50 Hz |
| Dimensions (H x W x D) | 455 x 595 x 325 mm |
| Weight | 14.5 kg |
| Control Type | Touch Control with LCD Display |
| Functions | Microwave, Grill, Combination, Defrost, Auto Cook |
| Turntable Diameter | 270 mm |
| Interior Light | Yes |
| Child Lock | Yes |
| Energy Efficiency Class | A |
| Cleaning | Wipe with damp cloth, avoid abrasive cleaners |
| Spare Parts Availability | Glass tray, roller ring, filters available |
| Repairability Index | 7.5 / 10 |
Frequently Asked Questions - BMGI250SS BAUMATIC
User questions about BMGI250SS BAUMATIC
0 question about this device. Answer the ones you know or ask your own.
Ask a new question about this device
Download the instructions for your Microwave Oven in PDF format for free! Find your manual BMGI250SS - BAUMATIC and take your electronic device back in hand. On this page are published all the documents necessary for the use of your device. BMGI250SS by BAUMATIC.
USER MANUAL BMGI250SS BAUMATIC
Microwave Oven with grill
INSTRUCTION MANUAL

natural_image
Simple line drawing of a fish with fins and tail, no text or symbols presentMODEL: BMGI250SS
natural_image
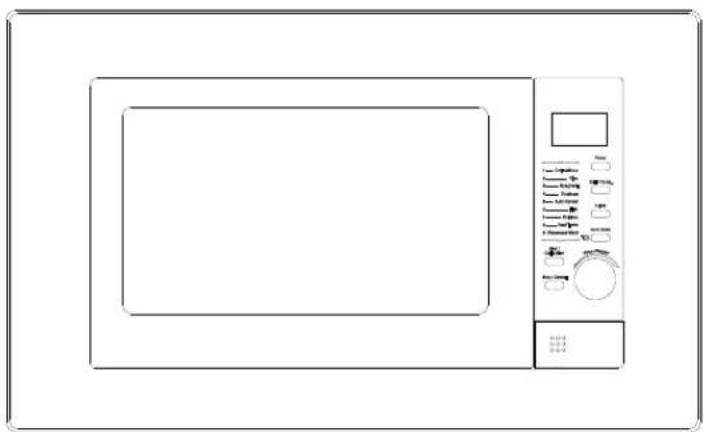
Line drawing of a microwave oven with control panel and door (no text or symbols)Microwave Oven
Owner's Manual
Please read these instructions carefully before installing and operating the oven.
Record in the space below the SERIAL NO. found on the nameplate on your oven and retain this information for future reference.
SERIAL NO.
PRECAUTIONS TO AVOID POSSIBLE EXPOSURE TO EXCESSIVE MICROWAVE ENERGY
- Do not attempt to operate this oven with the door open since open door operation can result in harmful exposure to microwave energy. It is important not to adjust or tamper with the safety interlocks.
- Do not place any object between the oven front face and the door or allow food or cleaner residue to accumulate on sealing surfaces.
- Do not operate the oven if it is damaged. It is particularly important that the oven door close properly and that there is no damage to the:
a. Door (bent),
b. Hinges and latches (broken or loosened),
c. Door seals and sealing surfaces. - The oven should not be adjusted or repaired by anyone except properly qualified service personnel.
CONTENTS
PRECAUTIONS TO AVOID POSSIBLE EXPOSURE TO EXCESSIVE MICROWAVE ENERGY...... 2
IMPORTANT SAFETY INSTRUCTIONS 2
SPECIFICATIONS 3
INSTALLATION 3
RADIO INTERFERENCE....3
GROUNDING INSTRUCTIONS....5
MICROWAVE COOKING PRINCIPLES 5
BEFORE YOU CALL FOR SERVICE 5
UTENSILS GUIDE 5
PART NAMES 6
CONTROL PANEL 7
HOW TO SET THE OVEN CONTROLS 8
Setting digital clock 8
Quick start....8
Microwave cooking 8
Grill/comb....9
Auto Cook....9
Auto Defrost....10
Child Lock 10
CLEANING AND CARE 11
IMPORTANT SAFETY INSTRUCTIONS
When using this electrical appliance, basic safety precautions should be followed, including the following:
WARNING: To reduce the risk of burns, electric shock, fire, injury to persons or exposure to excessive microwave energy:
- Read all instructions before using the appliance.
-
Use this appliance only for its intended use as described in this manual. Do not use corrosive chemicals or vapours in this appliance. This type of oven is specifically designed to heat, cook or dry food. It is not designed for industrial or laboratory use.
-
Do not operate the oven when empty.
-
Do not operate this appliance if it has a damaged cord or plug, if it is not working properly or if it has been damaged or dropped. If the supply cord is damaged, it must be replaced by the manufacturer or its service agent or a similarly qualified person in order to avoid a hazard
-
WARNING: Only allow children to use the oven without supervision when adequate instructions have been given so that the child is able to use the oven in a safe way and understands the hazards of improper use.
-
Warning: When the appliance is operated in the combination mode, children should only use the oven under adult supervision due to the temperatures generated.
-
To reduce the risk of fire in the oven cavity:
a. When heating food in plastic or paper container, check the oven frequently to the possibility of ignition.
b. Remove wire twist-ties from paper or plastic bags before placing bag in oven.
c. If smoke is observed, switch off or unplug the appliance and keep the door closed in order to stifle any flames.
d. Do not use the cavity for storage purposes. Do not leave paper products, cooking utensils or food in the cavity when not in use.
-
WARNING: Liquid or other food must not be heated in sealed containers since they are liable to explode.
-
Microwave heating of beverage can result in delayed eruptive boiling, therefore care has to be taken when handle the container.
-
Do not fry food in the oven. Hot oil can damage oven parts and utensils and even result in skin burns.
-
Eggs in their shell and whole hard-boiled eggs should not be heated in microwave ovens since they may explode even after microwave heating has ended.
-
Pierce foods with heavy skins such as potatoes, whole squashes, apples and chestnuts before cooking.
-
The contents of feeding bottles and baby jars should be stirred or shaken and the temperature should be checked before serving in order to avoid burns.
-
Cooking utensils may become hot because of heat transferred from the heated food. Potholders may be needed to handle the utensil.
-
Utensils should be checked to ensure that they are suitable for use in microwave oven.
-
WARNING: It is hazardous for anyone other than a trained person to carry out any service or repair operation which involves the removal of any cover which gives protection against exposure to microwave energy.
-
This product is a Group 2 Class B ISM equipment. The definition of Group 2 which contains all ISM (Industrial, Scientific and Medical) equipment in which radio-frequency energy is intentionally generated and/or used in the form of electromagnetic radiation for the treatment of material, and spark erosion equipment. For Class B equipment is equipment suitable for use in domestic establishments and in establishments directly connected to a low voltage power supply network which supplies buildings used for domestic purpose.
-
This appliance is not intended for use by persons (including children) with reduced physical, sensory or mental capabilities, or lack of experience and knowledge, unless they have been given supervision or instruction concerning use of the appliance by a person responsible for their safety.
-
Children should be supervised to ensure that they do not play with the appliance.
SPECIFICATIONS
| Power Consumption: | 230-240V~50Hz, 1400W (Microwave) |
| 1000W (Grill) | |
| Microwave Power Output: 90 | 0W |
| Operation Frequency: 2450MHz | |
| Outside Dimensions: 313mm(H)×483mm(W)×396mm(D) | |
| Oven Cavity Dimensions: 220mm(H)×340mm(W)×344mm(D) | |
| Oven Capacity: 25 Litres | |
| Cooking Uniformity: Turntable System | |
| Net Weight: Approx. 14.5kg | |
INSTALLATION
- Make sure that all the packing materials are removed from the inside of the door.
- WARNING: Check the oven for any damage, such as misaligned or bent door, damaged door seals and sealing surface, broken or loose door hinges and latches and dents inside the cavity or on the door. If there is any damage, do not operate the oven and contact qualified service personnel.
-
This microwave oven must be placed on a flat, stable surface to hold its weight and the heaviest food likely to be cooked in the oven.
-
Do not place the oven where heat, moisture, or high humidity are generated, or near combustible materials.
- Do not operate the oven without glass tray, roller support, and shaft in their proper positions.
- Make sure that the power supply cord is undamaged and does not run under the oven or over any hot or sharp surface.
- The socket must be readily accessible so that it can be easily unplugged in an emergency.
- Do not use the oven outdoors.
RADIO INTERFERENCE
Operation of the microwave oven can cause interference to your radio, TV, or similar equipment.
When there is interference, it may be reduced or eliminated by taking the following measures:
- Clean door and sealing surface of the oven.
- Reorient the receiving antenna of radio or television.
- Relocate the microwave oven with respect to the receiver.
- Move the microwave oven away from the receiver.
- Plug the microwave oven into a different outlet so that microwave oven and receiver are on different branch circuits.
GROUNDING INSTRUCTIONS
This appliance must be grounded. This oven is equipped with a cord having a grounding wire with a grounding plug. It must be plugged into a wall receptacle that is properly installed and grounded. In the event of an electrical short circuit, grounding reduces risk of electric shock by providing an escape wire for the electric current. It is recommended that a separate circuit serving only the oven be provided. Using a high voltage is dangerous and may result in a fire or other accident causing oven damage.
WARNING Improper use of the grounding plug can result in a risk of electric shock.
Note:
- If you have any questions about the grounding or electrical instructions, consult a qualified electrician or service person.
- Neither the manufacturer nor the dealer can accept any liability for damage to the oven or personal injury resulting from failure to observe the electrical connection procedures.
The wires in this cable main are coloured in accordance with the following code:
$$ \text { Green and Yellow } = \text { EARTH } $$
$$ \text { Blue } = \text { NEUTRAL } $$
$$ \text { Brown } = \text { LIVE } $$
MICROWAVE COOKING PRINCIPLES
- Arrange food carefully. Place thickest areas towards outside of dish.
- Watch cooking time. Cook for the shortest amount of time indicated and add more as needed. Food severely overcooked can smoke or ignite.
-
Cover foods while cooking. Covers prevent spattering and help foods to cook evenly.
-
Turn foods over once during microwaving to speed cooking of such foods as chicken and hamburgers. Large items like roasts must be turned over at least once.
- Rearrange foods such as meatballs halfway through cooking both from top to bottom and from the centre of the dish to the outside.
BEFORE YOU CALL FOR SERVICE
If the oven fails to operate:
- Check to ensure that the oven is plugged in securely. If it is not, remove the plug from the outlet, wait 10 seconds, and plug it in again securely.
- Check for a blown circuit fuse or a tripped main circuit breaker. If these seem to be operating properly, test the outlet with
another appliance.
- Check to ensure that the control panel is programmed correctly and the timer is set.
- Check to ensure that the door is securely closed engaging the door safety lock system. Otherwise, the microwave energy will not flow into the oven.
IF NONE OF THE ABOVE RECTIFIES THE SITUATION, THEN CONTACT A QUALIFIED TECHNICIAN. DO NOT TRY TO ADJUST OR REPAIR THE OVEN YOURSELF.
UTENSILS GUIDE
- The ideal material for a microwave utensil is transparent to microwave, it allows energy to pass through the container and heat the food.
- Microwave can not penetrate metal, so metal utensils or dishes with metallic trim should not be used.
- Do not use recycled paper products when microwave cooking, as they may contain small metal fragments which may cause
sparks and/or fires.
- Round / oval dishes rather than square/oblong ones are recommend, as food in corners tends to overcook.
- Narrow strips of aluminium foil may be used to prevent overcooking of exposed areas. But be careful don't use too much and keep a distance of 1 inch (2.54cm) between foil and cavity.
The list below is a general guide to help you select the correct utensils.
| COOKWARE MICROWAVE GRILL COMBINATION | |||
| Heat-Resistant Glass Yes Yes Yes | |||
| Non Heat-Resistant Glass No No | No | ||
| Heat-Resistant Ceramics Yes Yes | Yes | ||
| Microwave-Safe Plastic Dish Yes | No No | ||
| Kitchen Paper | Yes No No | ||
| Metal Tray | No Yes No | ||
| Metal Rack | No Yes No | ||
| Aluminium Foil & Foil Containers No | Yes No | ||
PART NAMES
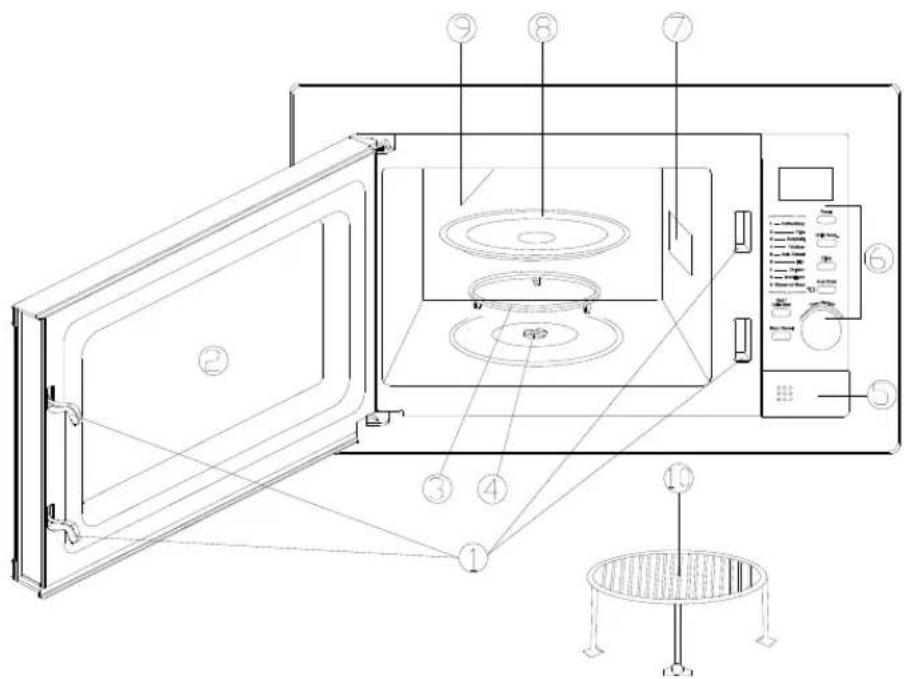
- Door Safety Lock System
- Oven Window
- Roller Ring
- Shaft
- Door Release Button
- Control Panel
- Wave Guide (Please do not remove the mica plate covering the wave guide)
- Glass Tray (Turn-Table)
- Grill Heater
- Metal Rack (For use with grill function only)
CONTROL PANEL

- LED DISPLAY SCREEN
- Cooking time, power, action indicators, and clock time are displayed.
• POWER
- Touch this button to set microwave cooking power level.
- GRILL/COMB.
- Press this button to set grill cooking mode or one of two combination cooking settings.
• CLOCK
* Touch this button to set the oven clock.
• AUTO COOK
- Press for instant settings to cook popular food,
• TIME/WEIGHT
- Turn the dial to enter the oven clock time or input cooking time.
- Rotate to specify food weight or number of servings
- START/QUICK START
- Touch to start a cooking program.
- Simply press it once to begin express cooking without setting power level and cooking time. Repeatedly press the button to increase the cooking time.
- STOP/CANCEL
- Press once to temporarily stop cooking, or twice to cancel cooking altogether.
- It is also used for setting child lock.
HOW TO SET THE OVEN CONTROLS
SETTING THE DIGITAL CLOCK
With the oven is ready (standby mode), touch the CLOCK button set the clock in 12 or 24 hours cycle. FOR EXAMPLE: Suppose you want to set the oven clock time to 8:30.
- Press CLOCK button once or twice to select 12 or 24 hour clock.
- Turn TIME/WEIGHT to indicate the hour digit "8"
- Press CLOCK button to confirm.
- Turn TIME/WEIGHT dial to indicate the minute digits until the screen shows ":30".
- Press CLOCK to confirm the setting.
NOTE: To check clock time during cooking, press the CLOCK button once, the time will be displayed.
QUICK START
Press the START/QUICK START button and the oven will start working immediately on full power. Press the START/QUICK START button repeatedly to increase the cooking time. The longest cooking time is 10 minutes. 30 seconds will be added each time you press this button.
MICROWAVE COOKING
To cook with microwave power alone, press the POWER button to select a cooking power level, and then use the TIME/WEIGHT dial to set a desired cooking time. The longest cooking time is 95 minutes. Select power level by pressing the POWER button:
| PRESS POWER BUTTON COOKING POWER | |
| Once | 100% |
| Twice | 80% |
| 3 times 60% | |
| 4 times 40% | |
| 5 times 20% | |
| 6 times 0% | |
For example, suppose you want to cook for 1 minute at 60% of microwave power.
- Press POWER button 3 times.
- Turn TIME/WEIGHT to 1:00.
- Press START/QUICK START button.
GRILL/COMB.
Grill/microwave combination cooking has three cooking mode: grill, combination 1, and combination 2. Press the GRILL/COMB button to select one of these options. The longest cooking time is 95 minutes.
Grill only.
Combination 1 (COMB1): 30% of time for microwave cooking, 70% for grill cooking.
Combination 2 (COMB2): 55% of time for microwave cooking, 45% for grill cooking.
FOR EXAMPLE: Suppose you want to set combination 1 cooking for 25 minutes.
- Press GRILL/COMB button twice.
- Turn TIME/WEIGHT to 25:00.
- Press START/QUICK START button.
Auto Cook
For the following cooking mode, it is not necessary to program the time and the cooking power. It is sufficient to indicate the type of food that you want to cook as well as the weight of this food. In order to do this, press the AUTO COOK button to select a category of food/cooking mode. Then turn the TIME/WEIGHT dial to indicate weight of food to be cooked. The oven begins cooking once the START/QUICK START button is engaged.
For some programmes, in the middle of cooking time, the cooking programmer pauses and beeps to remind you to open the door to check its progress and turn the food over; To resume cooking, just close the door, and press START/QUICK START the oven will cook for the remaining time.
For example: to cook 400g of fish.
- Press the AUTO COOK button 6 times.
- Turn TIME/WEIGHT dial to indicate a weight of 400g.
- Press START/QUICK START button.
Auto Cook Menu
| Code | Food/cooking mode |
| 01 | Coffee/Soup (200ml/cup) |
| 02 | Rice (g)* |
| 03 | Spaghetti (g)* |
| 04 | Potatoes (each 230g) |
| 05 | Auto Reheat (g) |
| 06 | Fish (g) |
| 07 | Chicken (g) |
| 08 | Beef/Lamb (g) |
| 09 | Skewered Meat (g) |
AUTO DEFROST
The oven can defrost meat, poultry, and seafood. The time and the defrosting power are adjusted automatically once the weight is programmed.
FOR EXAMPLE: Suppose you want to defrost food.
- Place the food to be defrosted into the oven.
- Rotate TIME/WEIGHT dial anticlockwise to choose weight (100g\~1800g).
- Press START/QUICK START button.
NOTE: During defrosting program, the system will pause and sound beeps to remind user to check the food and turn the food over, Press START/QUICK START to resume the defrosting programme.
CHILD LOCK
Use to prevent unsupervised operation of the oven by little children. The CHILD LOCK indicator will show up on display screen, and the oven can not be operated while the CHILD LOCK is set.
To set the CHILD LOCK: Press and hold the STOP/CANCEL button for 3 seconds, a beep sounds and the lock indicator lights.
To cancel the CHILD LOCK: Press and hold the STOP/CANCEL button for 3 seconds until lock indicator on display goes off.
CLEANING AND CARE
- Turn off the oven and remove the power plug from the wall socket before cleaning.
- Keep the inside of the oven clean. When food splatters or spilled liquids adhere to oven walls, wipe with a damp cloth. Mild detergent may be used if the oven gets very dirty. Avoid the use of spray and other harsh cleaners as they may stain, streak or dull the door surface.
- The outside surfaces should be cleaned with a damp cloth. To prevent damage to the operating parts inside the oven, water should not be allowed to seep into the ventilation openings.
- Wipe the both sides of the door and window, the door seals and adjacent parts frequently with a damp cloth to remove any spills or spatters. Do not use abrasive cleaner.
- Do not allow the control panel to become wet. Clean with a soft, damp cloth. When cleaning the control panel, leave oven door open to prevent oven from accidentally turning on.
- If steam accumulates inside or around the outside of the oven door, wipe with a soft cloth. This may occur when the microwave oven is operated under high humidity condition. And it is normal.
- It is occasionally necessary to remove the glass tray (turn table) for cleaning. Wash the tray in warm sudsy water or in a dishwasher.
-
The roller ring and oven floor should be cleaned regularly to avoid excessive noise. Simply wipe the bottom surface of the oven with mild detergent. The roller ring may be washed in mild sudsy water or dishwasher. When removing the roller ring from cavity floor for cleaning, be sure to replace in the proper position.
-
Remove odours from your oven by combining a cup of water with the juice and skin of one lemon in a deep microwaveable bowl, microwave for 5 minutes. Wipe thoroughly and dry with a soft cloth.
- When it becomes necessary to replace the oven light, please consult customer Care to have it replaced.
- The oven should be cleaned regularly and any food deposits removed. Failure to maintain the oven in a clean condition could lead to deterioration of the surface that could adversely affect the life of the appliance and possibly result in a hazardous situation.
-
When the microwave oven with grill function is first used, it may produce slight smoke and smell. This is a normal phenomenon because the oven is made of a steel plate coated with lubricating oil, and the new oven will produce fumes and odour generated by burning the lubricating oil. This phenomenon will disappear after a period of using.
-
The packaging materials that we use are environmentally friendly and can be recycled.
-
Please do not dispose this appliance in the domestic rubbish bin. It should be disposed to the particular disposal centre provided by the local waste authority. Disposal must be carried out in accordance with local environmental regulations for waste disposal.

Built-in installation instructions:
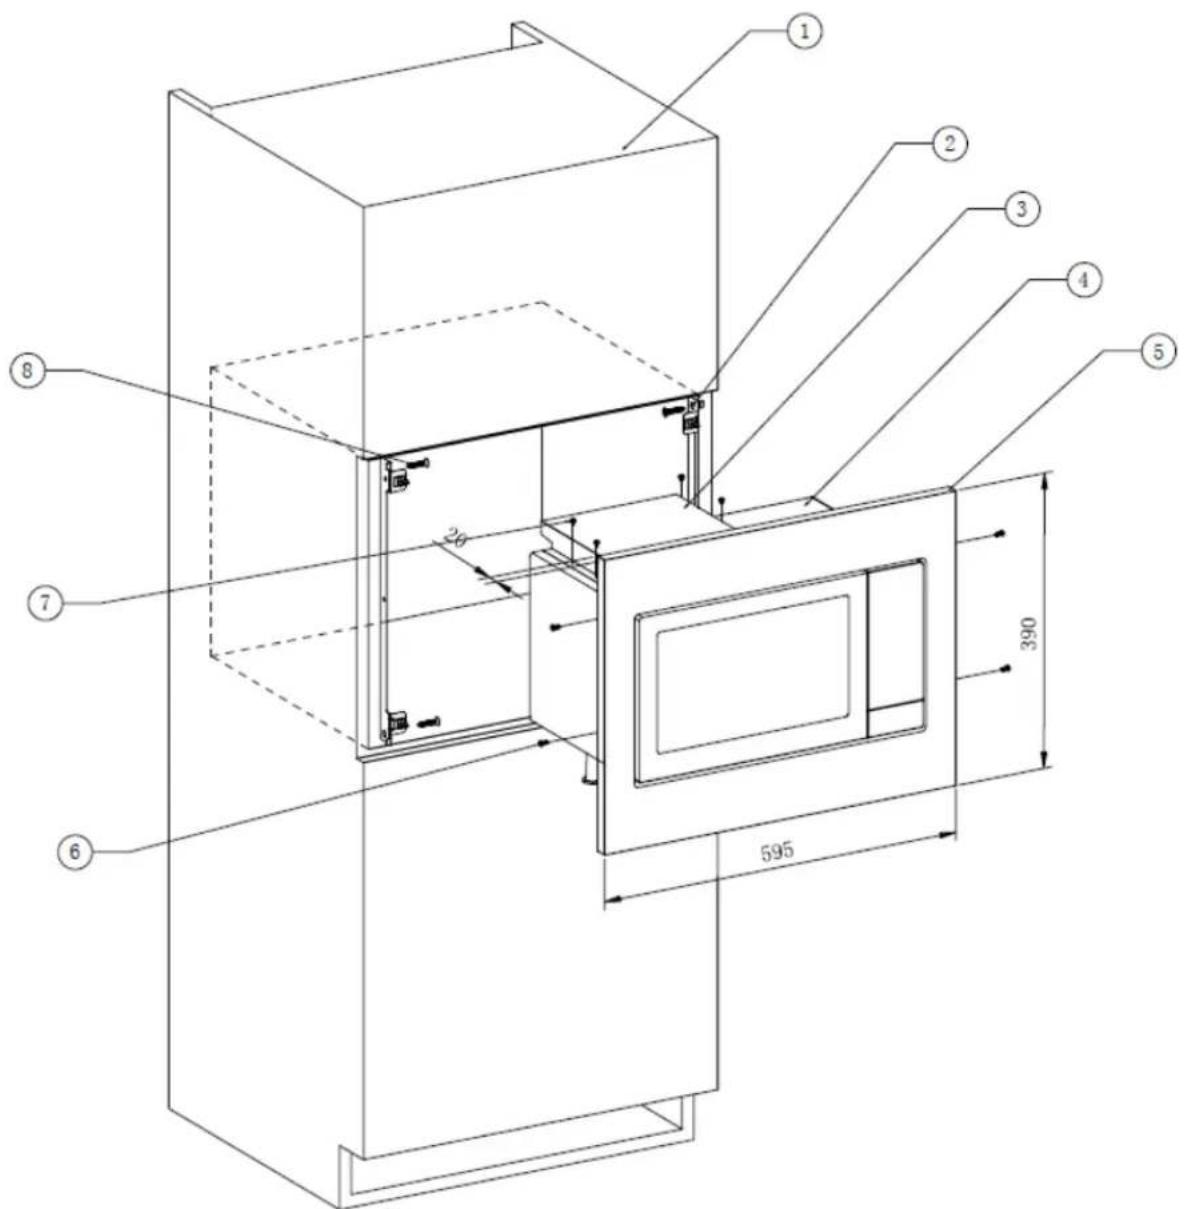
- Cabinet
- Frame fastener (x2)
- Heat channel
- Microwave oven
- Frame kit
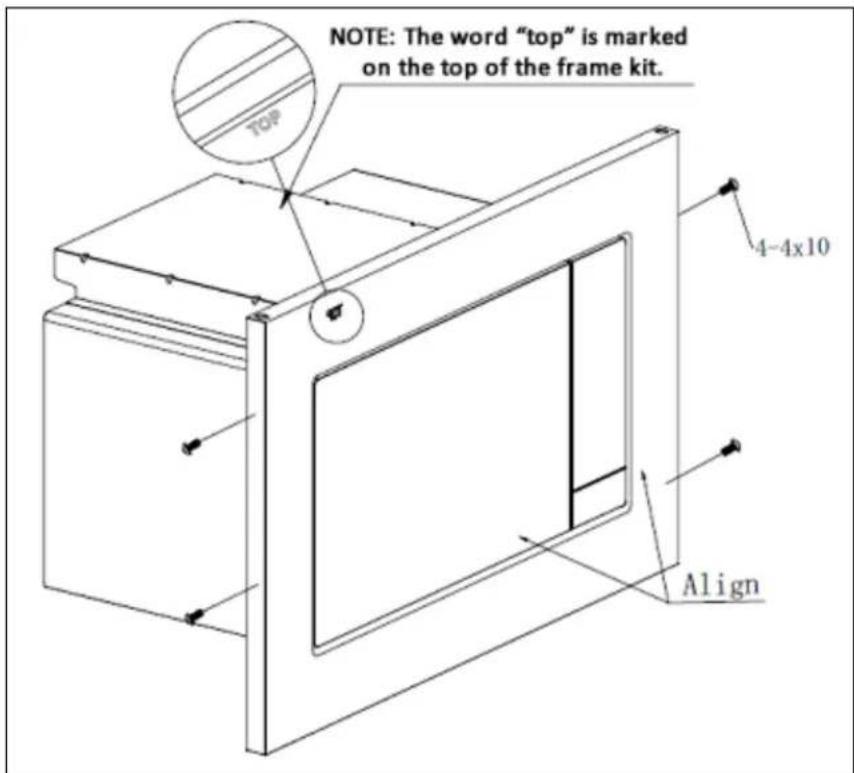
- Screw 4x10 (x4)
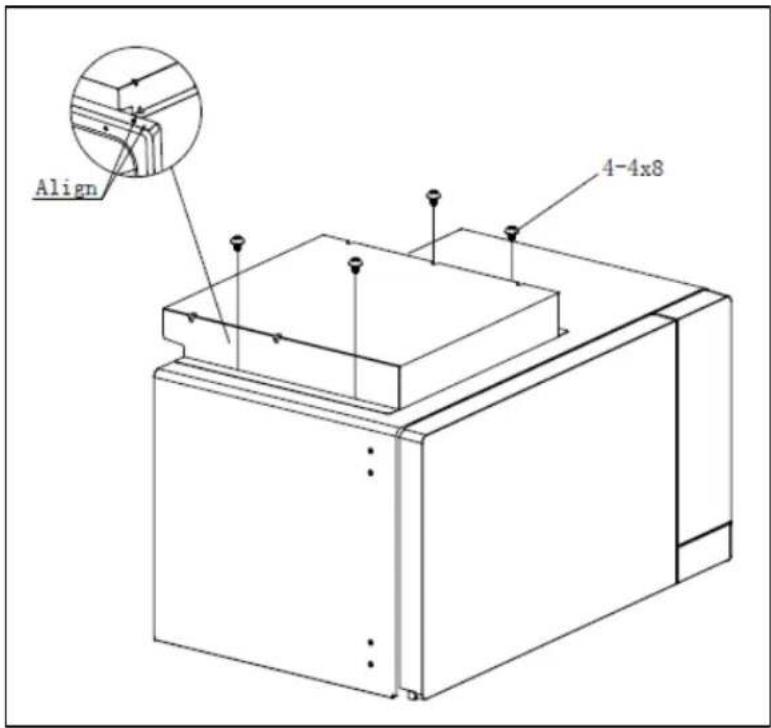
- Screw 4x8 (x4)
- Screw 4x16 (x4)
Make a cut out in the cabinet as per the below dimensions:
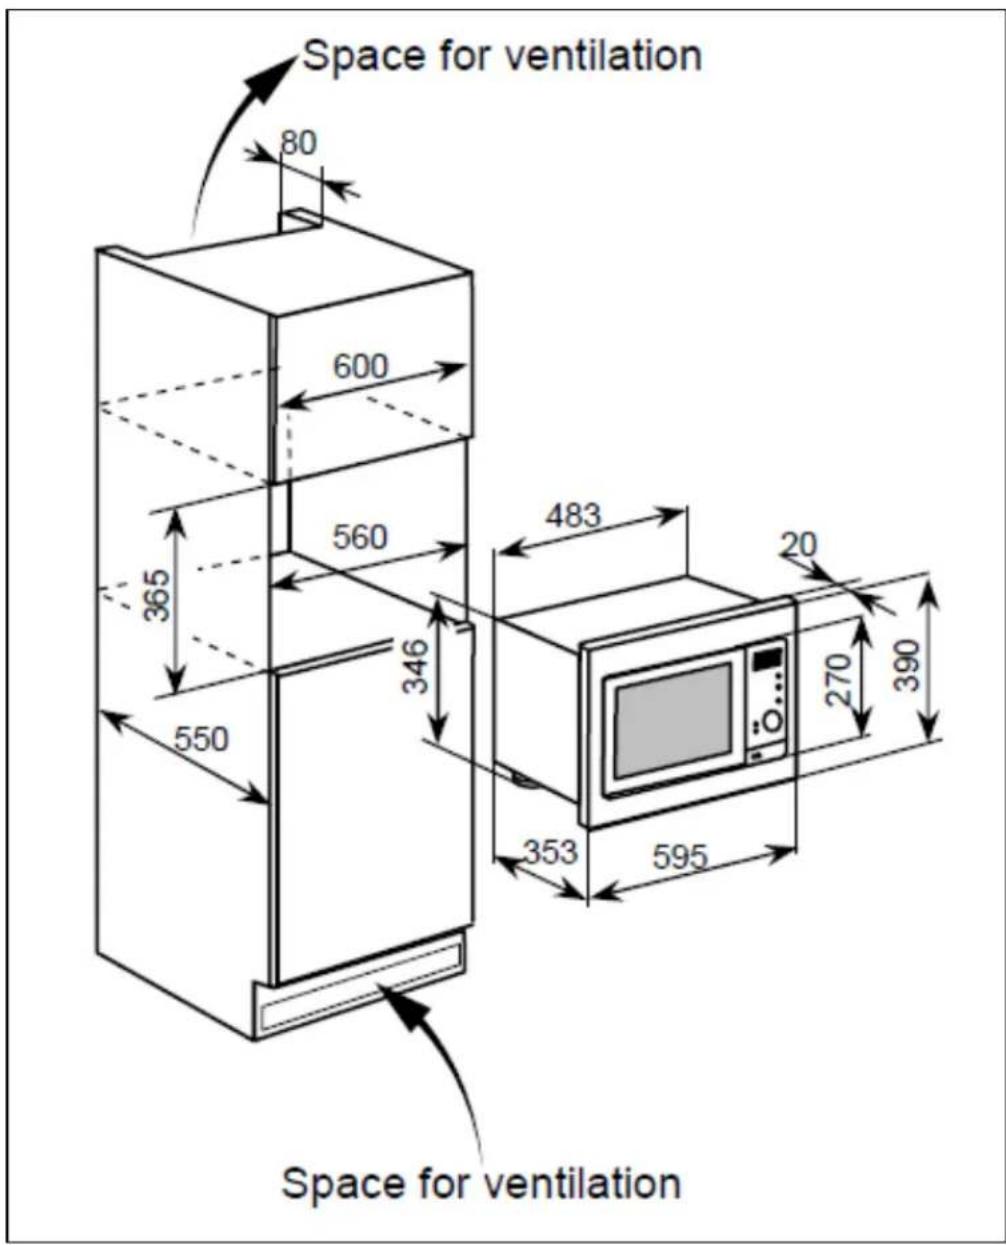
Turn the oven over and place on a cushioned surface. Then attach the feet

natural_image
Line drawing of a battery pack with multiple test tubes and a central casing (no text or symbols)Fasten the heat channel to the top of the microwave using the 4 screws (4x8).
Fasten the frame kit to the front of the microwave using the screws provided (4x10):
Attach the 2 frame fasteners to the cabinet using the screws provided (4 x 4x16)

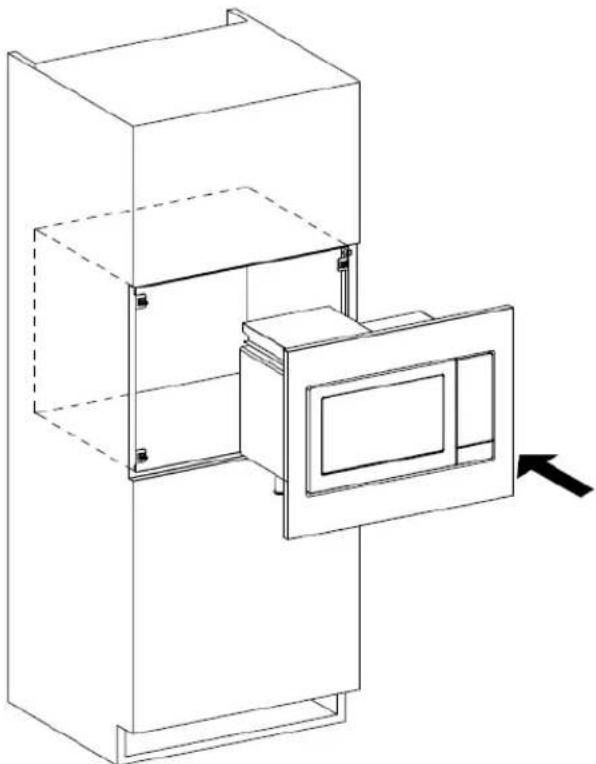
Install the microwave into the aperture, ensuring the clips on the frame kit secure to the frame fasteners. You can adjust the feet to aid in alignment.
natural_image
Line drawing of a cabinet with an open door and internal panel, showing no text or symbolsEnsure that the oven is central

Installation complete.

natural_image
Simple geometric diagram with a rectangle and two smaller rectangles inside, no text or symbols present.
natural_image
Line drawing of a microwave oven with open door and internal circular compartments (no text or symbols)
IMPORTANT: If your appliance appears not to be operating correctly, then you should disconnect it from your mains supply and then contact the Customer Care Department.
DO NOT ATTEMPT TO REPAIR THE APPLIANCE YOURSELF.
Please note that if an engineer is asked to attend whilst the product is under gu and finds that the problem is not the result of an appliance fault, then you may be liable for the cost of the call out charge.
The appliance must be accessible for the engineer to perform any necessary repair. If your appliance is installed in such a way that an engineer is concerned that damage will be caused to the appliance or your kitchen, then they will not complete a repair.
This includes situations where appliances have been tiled in, sealed in with sealant, have wooden obstructions placed in front of the appliance, like plinths. Or any installation other than the one specified by the manufacturer has been completed.
IMPORTANT: The manufacturer operates a policy of continuous improvement and reserves the right to adjust and modify its products without prior notification.
Baumatic®
atic Ltd., atic Buildings, Road, eading, Berkshire X
Advice Line Telephone (0118) 933 6933
E-mail: sales@baumatic.co.uk
spares@baumatic.co.uk technical@baumatic.co.uk
Website: www.baumatic.co.uk
Facebook:
Republic of Ireland
Service Telephone 1-890 812 724
Spares Telephone 091 756 771
United Kingdom
Czech Republic Baum Baumatic CR spol s.r.o. Baum Lípovà 665 6 Bennet 460 01 Liberec 4 R Czech Republic RG2 0Q United Kingdom +420 483 577 200 .baumatic.cz (0
Slovakia Sales Fax
Baumatic Slovakia, s.r.o. (0 anenská 34
811 03 Bratislava - Staré Mesto (0 vakia
(0 +421 255 640 618
www.baumatic.sk
Germany
+49 (0) 5223 99408 0 www.baumatic.de customercare@baumatic.co.uk
Italy
Baumatic Italia S.R.L. Via Galvani N.3
35011 Campodarsego (PD)
+3904 9920 2297 www.baumatic.it www.facebook.com/baumatic.uk
Holland
Baumatic Benelux B.V. Dukdalfweg 15d
1332 BH ALMERE
Nederland + 31(0)36 549 1553
www.baumatic.nl

bar
| Category | Value | |---|---| | Category 1 | 100 | | Category 2 | 100 | | Category 3 | 100 | | Category 4 | 100 | | Category 5 | 100 | | Category 6 | 100 | | Category 7 | 100 | | Category 8 | 100 | | Category 9 | 100 | | Category 10 | 100 | | Category 11 | 100 | | Category 12 | 100 | | Category 13 | 100 | | Category 14 | 100 | | Category 15 | 100 | | Category 16 | 100 | | Category 17 | 100 | | Category 18 | 100 | | Category 19 | 100 | | Category 20 | 100 | | Category 21 | 100 | | Category 22 | 100 | | Category 23 | 100 | | Category 24 | 100 | | Category 25 | 100 | | Category 26 | 100 | | Category 27 | 100 | | Category 28 | 100 | | Category 29 | 100 | | Category 30 | 100 | | Category 31 | 100 | | Category 32 | 100 | | Category 33 | 100 | | Category 34 | 100 | | Category 35 | 100 | | Category 36 | 100 | | Category 37 | 100 | | Category 38 | 100 | | Category 39 | 100 | | Category 40 | 100 | | Category 41 | 100 | | Category 42 | 100 | | Category 43 | 100 | | Category 44 | 100 | | Category 45 | 100 | | Category 46 | 100 | | Category 47 | 100 | | Category 48 | 100 | | Category 49 | 100 | | Category 50 | 100 | | Category 51 | 100 | | Category 52 | 100 | | Category 53 | 100 | | Category 54 | 100 | | Category 55 | 100 | | Category 56 | 100 | | Category 57 | 100 | | Category 58 | 100 | | Category 59 | 100 | | Category 60 | 100 | | Category 61 | 100 | | Category 62 | 100 | | Category 63 | 100 | | Category 64 | 100 | | Category 65 | 100 | | Category 66 | 100 | | Category 67 | 100 | | Category 68 | 100 | | Category 69 | 100 | | Category 70 | 100 | | Category 71 | 100 | | Category 72 | 100 | | Category 73 | 100 | | Category 74 | 100 | | Category 75 | 100 | | Category 76 | 100 | | Category 77 | 100 | | Category 78 | 100 | | Category 79 | 100 | | Category 80 | 100 | | Category 81 | 100 | | Category 82 | 100 | | Category 83 | 100 | | Category 84 | 100 | | Category 85 | 100 | | Category 86 | 100 | | Category 87 | 100 | | Category 88 | 100 | | Category 89 | 100 | | Category 90 | 100 | | Category 91 | 100 | | Category 92 | 100 | | Category 93 | 100 | | Category 94 | 100 | | Category 95 | 100 | | Category 96 | 100 | | Category 97 | 100 | | Category 98 | 100 | | Category 99 | 100 | | Total (Total) = [sum of bars] / [values] * sum of bars for each category. The values in the table represent the sum of bars for each category. There is no variation in the total value from the individual data. Values are estimated based on the provided data.


- INSTRUCTION MANUAL
- MODEL: BMGI250SS
- PRECAUTIONS TO AVOID POSSIBLE EXPOSURE TO EXCESSIVE MICROWAVE ENERGY
- CONTENTS
- IMPORTANT SAFETY INSTRUCTIONS
- INSTALLATION
- RADIO INTERFERENCE
- GROUNDING INSTRUCTIONS
- MICROWAVE COOKING PRINCIPLES
- BEFORE YOU CALL FOR SERVICE
- UTENSILS GUIDE
- CONTROL PANEL
- - LED DISPLAY SCREEN
- • POWER
- - GRILL/COMB.
- • CLOCK
- • AUTO COOK
- • TIME/WEIGHT
- - START/QUICK START
- - STOP/CANCEL
- HOW TO SET THE OVEN CONTROLS
- SETTING THE DIGITAL CLOCK
- QUICK START
- MICROWAVE COOKING
- GRILL/COMB.
- Auto Cook
- AUTO DEFROST
- CHILD LOCK
- CLEANING AND CARE
- Baumatic®
- United Kingdom
- Slovakia Sales Fax
- Germany
- Italy
- Holland
Brand : BAUMATIC
Model : BMGI250SS
Category : Microwave Oven