
Element-BT500D - Headset JPL - Free user manual and instructions
Find the device manual for free Element-BT500D JPL in PDF.


| Product Type | Helmet |
| Brand | JPL |
| Model | Element-BT500D |
| Intended Use | Cycling / Urban Commuting |
| Construction Material | In-mold polycarbonate shell with EPS foam liner |
| Weight | Approximately 320 grams (size M) |
| Dimensions (LxWxH) | 27 x 22 x 18 cm |
| Size Adjustment | Dial-fit system at the rear |
| Ventilation | 12 vents with internal channels |
| Visor | Fixed visor |
| Retention System | Quick-release buckle with chin strap |
| Certification | CE EN 1078 |
| Cleaning Instructions | Hand wash with mild soap and water; air dry |
| Storage | Store in a cool, dry place away from direct sunlight |
| Safety Warnings | Replace after any impact; do not modify; use only for intended purpose |
| Scratch Protection | Surface coating for enhanced durability |
| Included Accessories | User manual, helmet bag |
Frequently Asked Questions - Element-BT500D JPL
User questions about Element-BT500D JPL
0 question about this device. Answer the ones you know or ask your own.
Ask a new question about this device
Download the instructions for your Headset in PDF format for free! Find your manual Element-BT500D - JPL and take your electronic device back in hand. On this page are published all the documents necessary for the use of your device. Element-BT500D by JPL.
USER MANUAL Element-BT500D JPL
The Element-BT500D is a wireless Bluetooth headset for use with mobile phones and in the office. When mobile phones replace the ordinary phones in the office, you need a comfortable and ergonomic solution for those who spend long hours on the phone. The Element-BT500D is such a solution, a truly comfortable headset with good sound quality, built for comfortable all day wearing.
As an accessory, there is a USB Bluetooth dongle for the PC. With the dongle, you can connect your headset to a computer and use it as an audio device and a call control device for soft clients such as Microsoft Teams as well as for streaming audio.
Features:
- Bluetooth Version 5.0, with improved data transfer, security and connectivity.
- Designed for music and speech
- Up to 20 hours talk time.
- Up to 96 hours stand by time
- Up to 30 meters working range
• Voice prompts in 10 different languages
• A2DP for stereo music
• Volume control buttons - Answer/End a call button
• Dedicated microphone mute button - Last number re-dial
- Low battery / battery level indicator
• Supports two connections simultaneously - Adjustable headband with soft ear cushion for all day wearing comfort
- LED status indication
- Charging cable and Headset Hanging Hook included
• Headset can be charged during use - Charging cradle(Option)
Direct Charging from USB port of PC
If the headset has been out of use for some time, it may take up to 4 hours to charge fully. Normal charging time is 2-3 hours. Low battery is indicated by the flashing red LED on the headset.
What's Included
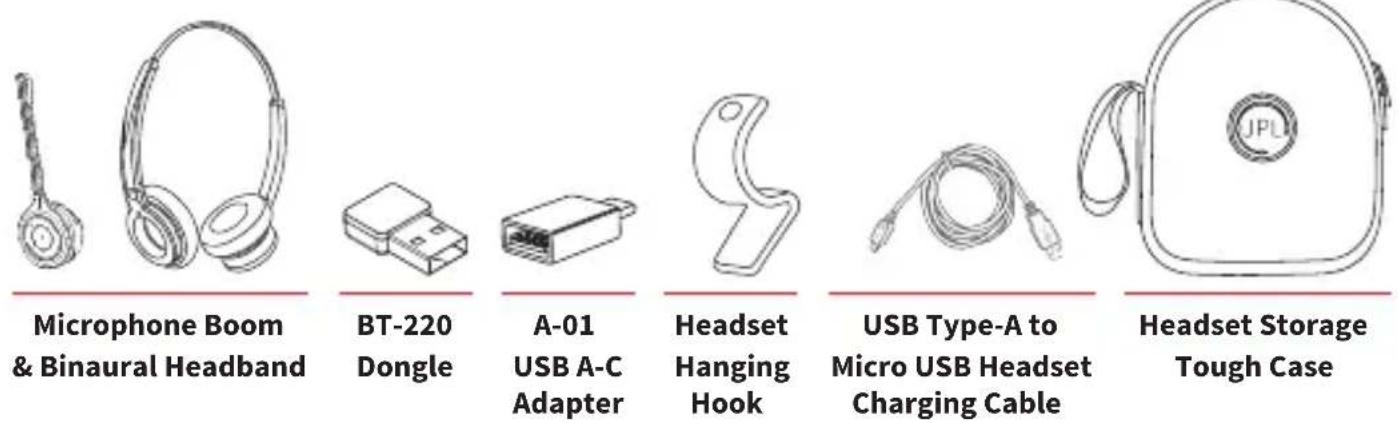
Set Voice Prompt Language
Voice prompt languages:
English, French, Spanish, German, Italian, Dutch, Russian, Danish, Swedish, Norwegian
To select your chosen language, the headset should not be connected to any Bluetooth devices.
- Nudge the "volume up/down" button towards the "+ or -" and the next available language will be heard. Stop nudging the button when you hear your chosen language announced.
Attaching the headband
To attach the microphone boom arm to the headband, align the triangle shape on the microphone boom arm with the triangle shape on the headband and push to click into place. The microphone boom arm will then rotate to your required position.

Detaching the headband
How to detach the microphone boom arm from the headband correctly:
Supporting the neck of the headband with your index and middle fingers, gently push the microphone speaker with your thumb from inside the ear cushion to detach the microphone boom arm from the headband.
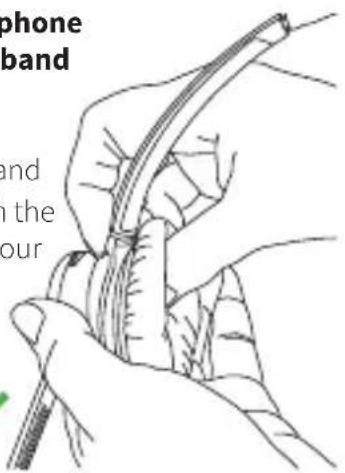
DO NOT push on the microphone boom arm through the ear cushion without supporting the neck of the headband to detach it the boom arm from the headband. Doing this may cause the ear cushion and gimbal mechanism to come away from the headband.

natural_image
Illustration of hands holding a rope with a red X mark, no text or symbols presentPositioning the Microphone
natural_image
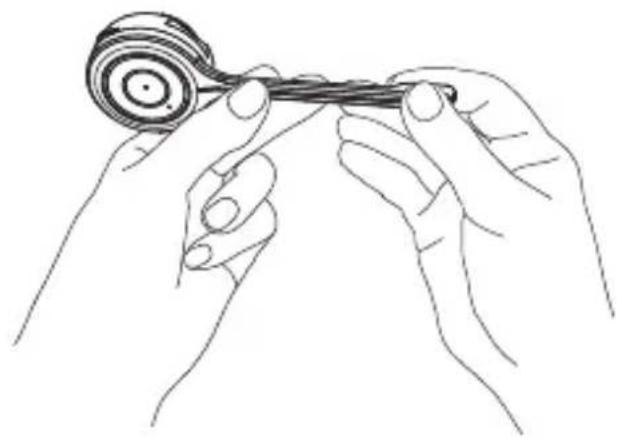
Line drawing of two hands holding a cylindrical object with a spiral pattern (no text or symbols)Holding the headset, rotate the headband to bring the boom close to your cheek.
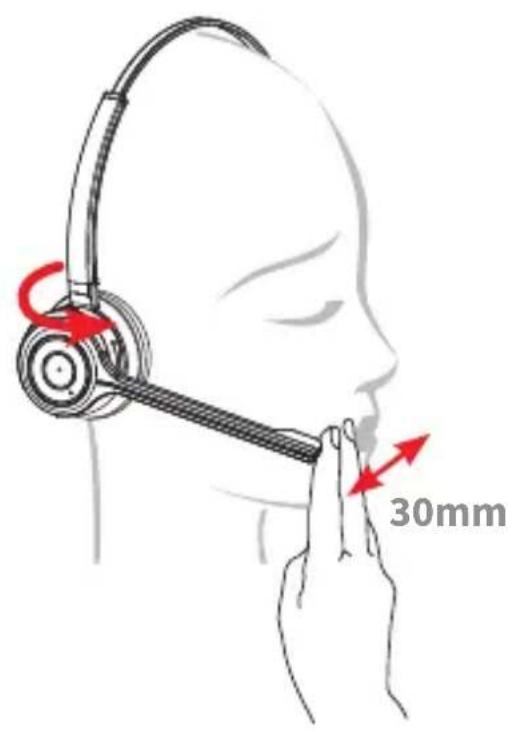
The ideal position for the microphone is at the corner of the mouth, not in front of it, but approximately 30mm (2 finger width) away from the mouth.
Ensure that the side of the microphone is pointed towards your mouth.
The microphone boom arm is flexible, so you can gently bend the boom and position it to suit the curve of your face.
Headset Charging


natural_image
Illustration of a coiled USB cable with two connectors (no text or symbols)The USB cable can be plugged into either a computer or a USB wall charger
If the headset has been out of use for some item, it may take up to 4 hours to charge it fully.
Normal charging time is 2-3 hours.
Low battery is indicated by the flashing red LED on the headset.
Microphone Boom Volume Control


Volume adjustment
- Nudge volume up/down button to the “+ or -” symbols to adjust the listening volume. There is a raised notch that makes it easy to find.
Note that high listening volume settings may cause echo or other noise on the line, for one or both parties on the line. Try to lower the listening volume if this is the case.
Important! – High listening volume settings may be harmful to your hearing.
Mute On/Off
- When on a call, press and release the mute button and "Mute On" is heard in the speaker.
- Press again to resume the call and "Mute Off" is heard in speaker.
IMPORTANT: Volume Settings
- Set the headset earphone volume on your PC to maximum.
- Set the microphone volume within your PC settings to a mid range volume.
- Make a test call to regulate the microphone sound on your PC settings and fine tune the speaker sound using the speaker volume switch on your headset.
- There is a small notch on each volume button that makes them easy to find.
Turn on the headset
Press and hold the answer button for 2 seconds. Release the button when the purple LED flashes 3 times and "Power on" voice notification is heard in the speaker.
Turn off the headset
Press and hold the answer button for 3 seconds. Release the button when the purple LED flashes once and "Power off" voice notification is heard in the speaker.

Pairing
Prior to using the headset, it must be paired and connected to another Bluetooth device, such as a mobile phone. For specific instructions, check the user guide of your phone.
General procedure
- Turn on the Bluetooth function on your phone.
- Put the headset in pairing mode (make sure the headset is switched on, press and hold the pairing button for 4 seconds until the blue LED flashes rapidly)
- Perform a search for Bluetooth devices on your phone.
- Connect to >>BT-500D<< when found.
- Blue LED is On and "Connected" voice notification is heard in the speaker when pairing is completed.
Different smart phones have different ways to handle Bluetooth devices. Read the user manual of your phone for more information. Some phones will connect to the headset automatically when it is within range, for example when you return to your office. For other phones, it may be necessary to reconnect manually when the connection has been broken.
The pairing mode is active for 3 minutes. After that, the headset will enter standby mode. If you want to cancel the pairing mode, press the answer button and then "Pairing Cancel" voice notification can be heard.

Answer a call
- Press 'Answer button' Button 1 briefly.
Reject a call
- Press Button 1 for 2 seconds while incoming call, and "Call rejected" is heard in the speaker.
Make a call
- Dial the number on the mobile phone and press Button 1 briefly.
End a call
- Press Button 1 briefly, or end the call on the mobile phone.
Last number redialing
- Press Button 1 briefly twice and you can hear "Redialling" voice notification in the speaker.
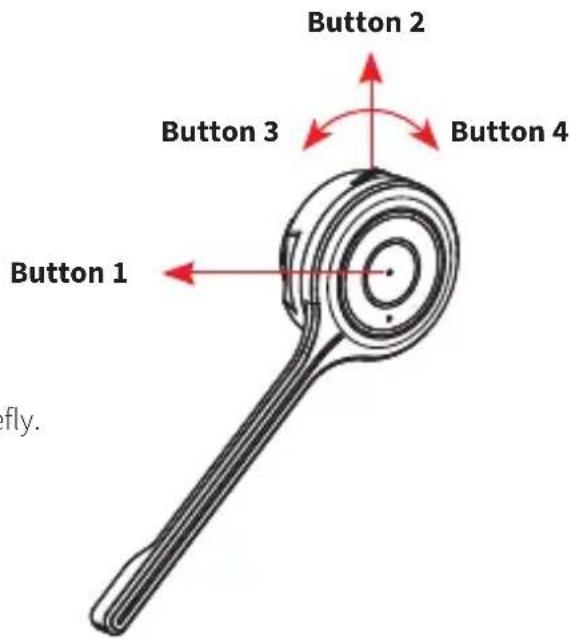
| Button Action Condition Function | |||
| Incoming Call Accept Call | |||
| Short Press On Talk Mode End Call | |||
| Idle Connection & Battery Status | |||
| 1 | Long PressPowered On Power Off | ||
| Power Off | Power On | ||
| Incoming CallCall Reject | |||
| Pairing ModePairing Cancel | |||
| Double Press Sync to BT Host Redial (Smartphone Only) | |||
| On Talk Mode | Mute On/Off | ||
| 2 | Short PressListen to Music | Pause On/Off | |
| Microsoft Teams Optimised | Teams Pop Up | ||
| Long Press No Condition Pairing Mode | |||
| 3 | Short PressOn Talk Mode Volume Up | ||
| Listen to Music | Volume Up | ||
| Long Press Listen to Music >>Fast Forward (SmartPhone Only) | |||
| Not Sync'd to BT Host Change Voice Prompt's Language | |||
| 4 | Short PressOn Talk Mode Volume Down | ||
| Listen to Music | Volume Down | ||
| Long Press Listen to Music | <<Fast Rewind (SmartPhone Only) | ||
| Not Sync'd to BT Host Change Voice Prompt's Language | |||
| 1+3 | Long Press (>3.5 sec) During Power Off Reset pairing info. | ||
Status LED Colour and Action
| Power On Red LED On (0.5 Sec) & Off (0.5 Sec) |
| Pairing Mode Red & Blue Toggle > 1 minute Time Out |
| Headset Connected Blue LED On |
| A2DP Mode (Music) Purple LED Flashes |
| A2DP Play (Music) Purple LED Flashes |
| HFP Mode (Call) Blue LED Flashes On & Off |
| Microsoft Teams Mode Purple LED On |
| Idle Blue LED On |
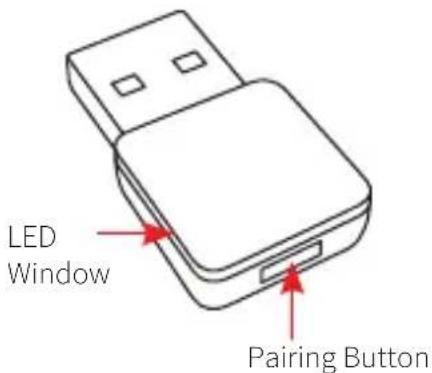
Optional Accessories
Element Monaural Headband
Order Code: Element Monaural Headband
SKU: 575-290-014
- Optional wearing style for those who prefer to confer with colleagues. The modular system of the Element-BT500D allows you to swap headbands from binaural to monaural and vica versa to suit the way you work.

natural_image
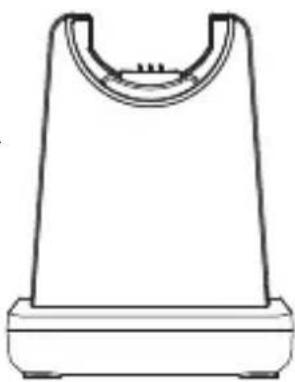
Line drawing of a curved, ear-shaped device with a clip and headband (no text or symbols)Element-BT500 Charging Base
Order Code: BT500 Charging Base
SKU: 575-290-012
- Optional charging solution for the BT500D headset.
- Connects to your PC via Type-A USB to Micro USB cable.
natural_image
Simple line drawing of a mechanical component with a U-shaped top and base (no text or symbols)Troubleshooting
If you have problems connecting the headset to your smartphone, do as follows:
- Check that the headset is charged, turned on and within 10 meters of the phone.
- Check that Bluetooth is switched on your phone.
- Check that the headset is listed as a headset device in your phone and also connected. You may need to re-connect to the headset
- Try removing the headset from the phone, then pair and connect again.
- If the headset stops functioning, even though it is fully charged: Reset the headset by switching it off, wait for 15 seconds and then turn it on again. You might try to reset the phone as well.
Some features are not possible to use with certain phone models:
- Check the user manual of your smartphone for missing settings or functions that needs to be activated.
- Different mobile phone manufacturers may implement Bluetooth functions in different ways. The unit should work with all phones that support the Headset and Hands-free Bluetooth profiles, but functionality may vary depending on the telephone model you use. You might also want to check for the latest firmware for your phone.
Maintenance
Your headset is a technically advanced device containing circuit boards and fine mechanics, made from top grade components. To increase reliability and life span, always treat your headset with care.
- Do not expose the headset to moisture, liquids, rain or dust.
- Store the product in a dry and dust-free location.
- Use a dry cloth to clean your headset.
- Do not store a fully charged headset on the charging stand for long periods of time.
- In the interest of hygiene, it is advisable to replace the ear cushions of your headset every 6 months. Ear cushions are available to purchase as spare parts.
Safe and efficient use
Do not expose your product to humidity, liquid or extreme temperature conditions. Such conditions, or other rough treatment such as dropping or bending the product may damage it. Do not use any accessories or chargers other than original intended for use with this product. Neither headset nor charger contain any user serviceable parts, and must not be opened.
A Bluetooth device uses radio signals to communicate with other devices. The power of this radio signal is low, maximum 0.001 Watts. Do not use the product where it is forbidden, for example in air planes, at hospitals, in blasting areas or in explosive atmospheres. Radio signals may interfere with other electronic devices, especially if these are not shielded.
Permanent hearing loss may occur if headsets are used at high listening volumes for longer periods of time. Set the volume to a safe level.
You can adapt to high listening volume over time, especially in a noisy environment where the level of sound may seem normal even if the volume is high. Reduce the time you use a headset with high listening volume.
Battery information
The device is equipped with a rechargeable Lithium-polymer battery. A new battery will need a few charging cycles before it can reach maximum capacity. A fully charged battery will lose its charge over time even if the headset is not used.
Battery capacity and life span may be reduced if the device is exposed to extreme high or low temperatures, for example if it is left in a car. A device with a cold or hot battery may stop working until it is back to normal (room) temperature. Battery capacity at temperatures below -0 °C is reduced.
Never dispose of batteries in an open fire as they may explode. Always dispose of used batteries and electronic devices according to your local recycling regulations.
FCC Information
This device complies with part 15 of the FCC Rules. Operation is subject to the following two conditions:
- This device may not cause harmful interference, and
- This device must accept any interference received, including interference that may cause undesired operation.
FCC Notification to users
This equipment has been tested and found to comply with the limits for a CLASS B digital device, in accordance to Part 15 of the FCC Rules. These limits are designed to provide reasonable protection against harmful interference when the equipment is operated in a commercial environment. This equipment generates, uses, and can radiate radio frequency energy and, if not installed and used in accordance with the instructions, may cause harmful interference
to radio communications. However, there is no guarantee that interference will not occur in a particular installation. If this equipment does cause harmful interference, the user is encouraged to try to correct the interference by consulting with a dealer or an experienced technician for technical assistance.
Any changes or modifications to the equipment not expressly approved by the party responsible for compliance could void user's authority to operate the equipment.
WARNING & SAFETY INFORMATION
The antenna(s) used for this device must be installed to provide a separation distance of at least 20cm from all persons and must not be co-located or operating in conjunction with any other antenna or transmitter.
Register for 24 Month Warranty on-line at https://www.jpltele.com/warranty-terms-conditions/#register-warranty.
Your JPL product has been carefully manufactured and 100% tested using high quality assured components. It is guaranteed against faulty workmanship and materials for a period of 24 months from the date of purchase. In the unlikely event that a failure should occur, please contact the JPL dealer from which you purchased this product or visit www.jpltele.com and follow our product returns procedure. You will be given a RMA number and instructions on how to return your headset.
Further help can be found on-line at www.jpltele.com on our FAQs page.
Note: Removing the factory-applied warranty code printed on the speaker housing will void the warranty. Specifically exempt from warranty are limited-life consumable components subject to normal wear and tear, such as microphone windscreens, ear cushions and other accessories. Your statutory rights under common law are in no way affected by this guarantee. The warranty does not cover cosmetic damage or damage due to misuse, abuse, negligence, acts of nature, accident, disassembling or modification of, or to any part of, the product. The warranty does not cover damage due to improper operation, maintenance or installation, or attempted repair by anyone other than JPL Telecom. Any unauthorised repairs will void this warranty.
LIMITED WARRANTY
Consequential and incidental damages, including without limitation, loss of property and those arising from breach of any express or implied warranty, are not the responsibility of JPL Telecom and to the extent permitted by law, are excluded.
In accordance with its policy of progressive product design, JPL Telecom reserves the right to change product specifications without prior notice.
* Repair or replacement is at the discretion of the manufacturer.
REGISTERED ADDRESS
UK Office: JPL Telecom Limited
Unit 1, Church Close Business Park, Church Close, Todber, Sturminster Newton, Dorset, DT10 1JH England
USA Office: JPL Telecom LLC
445 W Merritt Ave, Merritt Island, FL 32953, USA
Registered in England No. 5250754
(NB. For product returns, please follow instructions and returns department address provided on our website. Returned products received at the registered addresses are likely to be returned to sender).
- Features:
- Direct Charging from USB port of PC
- What's Included
- Set Voice Prompt Language
- Voice prompt languages:
- Attaching the headband
- Detaching the headband
- How to detach the microphone boom arm from the headband correctly:
- Positioning the Microphone
- Headset Charging
- Microphone Boom Volume Control
- Volume adjustment
- Mute On/Off
- IMPORTANT: Volume Settings
- Turn on the headset
- Turn off the headset
- Pairing
- General procedure
- Answer a call
- Reject a call
- Make a call
- End a call
- Last number redialing
- Optional Accessories
- Element Monaural Headband
- Element-BT500 Charging Base
- Troubleshooting
- Some features are not possible to use with certain phone models:
- Maintenance
- Safe and efficient use
- Permanent hearing loss may occur if headsets are used at high listening volumes for longer periods of time. Set the volume to a safe level.
- Battery information
- FCC Information
- FCC Notification to users
- WARNING & SAFETY INFORMATION
- Register for 24 Month Warranty on-line at https://www.jpltele.com/warranty-terms-conditions/#register-warranty.
- Further help can be found on-line at www.jpltele.com on our FAQs page.
- LIMITED WARRANTY
- REGISTERED ADDRESS
- UK Office: JPL Telecom Limited
- USA Office: JPL Telecom LLC
Brand : JPL
Model : Element-BT500D
Category : Headset