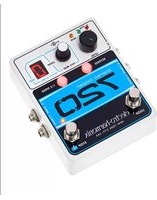
720 Stereo Looper - Audio effect pedal Electro Harmonix - Free user manual and instructions
Find the device manual for free 720 Stereo Looper Electro Harmonix in PDF.


| Product Type | Looper Pedal |
| Brand | Electro Harmonix |
| Model | 720 Stereo Looper |
| Maximum Loop Time | 720 seconds (12 minutes) |
| Number of Presets | 10 |
| Audio Channels | Stereo Input / Stereo Output |
| Input Connectors | 2 x 1/4" TS (Left/Mono, Right) |
| Output Connectors | 2 x 1/4" TS (Left, Right) |
| Controls | Footswitch (Record/Play/Overdub/Stop), Knob (Loop Volume, FX Level) |
| Power Supply | 9V DC center-negative, 100mA minimum |
| Dimensions | 4.5" x 2.75" x 1.5" (approx.) |
| Weight | 0.6 lbs (approx.) |
| Loop Functions | Record, Overdub, Undo/Redo, Stop, Delete, Reverse, Half-Speed (via external switch) |
| Additional Features | True bypass, 10 preset storage, selectable quantize |
| Cleaning Instructions | Wipe with dry cloth; avoid liquids and abrasives |
| Safety Precautions | Use only specified power supply; avoid moisture; do not disassemble |
| Spare Parts Availability | Contact Electro Harmonix for replacement footswitches, jacks |
| Warranty | 1 year limited warranty (check local regulations) |
Frequently Asked Questions - 720 Stereo Looper Electro Harmonix
User questions about 720 Stereo Looper Electro Harmonix
0 question about this device. Answer the ones you know or ask your own.
Ask a new question about this device
Download the instructions for your Audio effect pedal in PDF format for free! Find your manual 720 Stereo Looper - Electro Harmonix and take your electronic device back in hand. On this page are published all the documents necessary for the use of your device. 720 Stereo Looper by Electro Harmonix.
USER MANUAL 720 Stereo Looper Electro Harmonix
Congratulations on your purchase of the 720 looper! Enjoy 720 total seconds of high-quality, stereo recording time and the ability to store 10 different loops. The 720 looper is packed with features such as reverse and 12 speed effects, playback fadeout, real-time progress display, and a convenient programmable second footswitch.
WARNING: Your 720 comes equipped with an Electro-Harmonix 9.6DC-200 power supply (same as used by Boss® & Ibanez®: 9.6 Volts DC 200mA). The 720 requires 75mA at 9VDC with a center negative plug. Using the wrong adapter or a plug with the wrong polarity may damage your 720 and void the warranty.
- FEATURES -
- 12 minutes of loop recording time
- 10 selectable, independent Loops that remain in memory until you erase them
- High quality uncompressed audio: 24-bit A/D/A, 44.1kHz Sample Rate
- Undo-Redo function (also available via optional footswitch)
- Reverse and 1/2 speed effects at the touch of a button or a footswitch tap
- Footswitch selectable for Stop or Effects
- Handy playback progress mode with seek function
- Unlimited overdubbing
- Optional external footswitch control for selecting loops and Undo/Redo
- Adjustable fadeout (trails) time
- Programmable looping order: REC/PLAY/DUB or REC/DUB/PLAY
- AC adaptor included or may be battery powered
- CONTROLS and INDICATORS -
LEVEL Knob – Controls the output level of the Loop being played. Your dry signal remains at unity signal level from input to output. The dry signal also remains analog throughout the 720.
LOOP Footswitch – Use the LOOP footswitch to record, overdub, and playback loops. The LOOP footswitch can also be used to stop and undo-redo loops. See the QUICK START GUIDE on page 5 to learn how to use this footswitch to create loops.
STOP/FX Footswitch – The STOP/FX footswitch can be set to either STOP mode or FX mode. Select either mode by pressing and holding the PUSH: MODE button for 2-seconds. When in STOP mode, a DOT appears on the display next to the STOP label. When in FX mode, the DOT is off.
REC LED – Indicates when a loop is being recorded or overdubbed.
PLAY LED – Indicates when a loop is being played or overdubbed.
MEM LED – Indicates loop audio is in memory for the current loop bank.
LOOP Knob and PUSH: MODE Button – The LOOP knob has no pointer because it is attached to a rotary encoder that can be continuously rotated in either direction. This knob also has a PUSH: MODE button with two functions: 1) to cycle through one of three available modes, and 2) once a mode is selected, to adjust the value of that mode from 0-9. All modes and values are shown on the digit display.
SELECTING/ ADJUSTING MODES – The 3 selectable modes are toggled on and off by pressing the MODE button once. When mode-select is active, the digit display will flash the currently selected mode. Turn the LOOP knob to cycle through the three possible modes:
L = Loop Select
p = Loop Progress
F = Fadeout Time
When you arrive at the mode you would like to adjust, press the MODE button once to select the mode. The display will stop flashing and it will show the selected mode value from 0-9. The selected mode can now be adjusted with the LOOP knob from 0-9.
REVERSE Button – Press the REVERSE button to play the loop in reverse. The REVERSE button glows red when enabled. Reverse can be used at any time to playback or overdub a loop.
12 SPEED Button – Pressing the 12 SPEED button causes the pitch of the loop to go down one octave and the tempo is halved. If a loop is overdubbed during half-speed mode, returning to normal speed playback causes the pitch of the overdub to go up one octave and the tempo is doubled. The 12 SPEED button glows red when enabled. 12 SPEED can be used at any time during playback or while overdubbing a loop.
FX LED – Indicates when an effect is active. The FX LED automatically lights when the REVERSE or 12 SPEED buttons are used and the STOP/FX footswitch is programmed to operate in STOP mode. Alternatively, the FX LED will toggle on/off each time the STOP/FX footswitch is pressed and programmed to operate in FX mode.
MONO/L INPUT - 1/4" Left Instrument/Line Input Jack. Plug the output of your instrument or another effects pedal into this jack. If you use just one input we recommend you use the MONO/L input. The input impedance presented at this jack is 1MΩ. The maximum allowable signal level into this jack is +6 dBu. The input is unbalanced.
R INPUT - 1/4" Right Input Jack. Plug the output of your instrument or another effects pedal into this jack. Use this jack for stereo recording. The input impedance presented at this jack is 1MΩ. The maximum allowable signal level into this jack is +6 dBu; it is an unbalanced input.
MONO/L OUTPUT - 1/4" Left Output Jack. The Left output signal is sent through this jack. The dry signal present at the Left input will be output on the MONO/L Output jack. The source impedance of the MONO/L Output is approximately 330Ω.
Note: the MONO/L OUTPUT jack also functions as a power switch when powered from a battery. Disconnect the cable to save battery power when the 720 is not in use.
R Output - 1/4" Right Output Jack. The Right output signal is sent through this jack. The dry signal present at the Right input jack is output to the R Output jack. The source impedance of the R Output is 330Ω.
FC Jack - 14 " TRS Foot Controller Jack. Use this jack with popular three button foot controller units to control the 720 bank up, bank down, and instant undoredo.
The Digitech® FS3X 3-Button Footswitch [see: http://digitech.com/en-US/products/fs3x-3-button-footswitch] is recommended for this application. If using this product, the following switch labels on the FS3X control the following 720 functions: DOWN advances the 720 bank down; UP advances the 720 bank up; and, MODE will instantly undo or redo.
The circuit required for the foot controller is as follows:
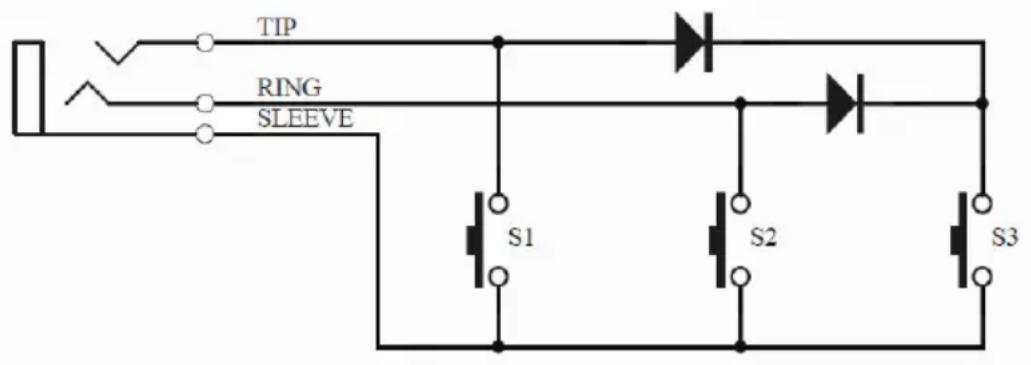
TIP / S1 = Instant Undo-Redo
RING / S2 = Bank Down
Diode-AND TIP+RING / S3 = Bank Up
9V Power Jack – Plug the output of the supplied AC adapter into the 9V power jack located at the top of the 720. The Stereo Looper 720 draws 60mA typ./75mA max. at 9VDC with a center-negative plug. The Stereo Looper 720 accepts Boss® and Ibanez® style AC adapters.
- QUICK START GUIDE -
RECORDING A LOOP
- To record a Loop: simply select an empty bank and press the LOOP footswitch once. The REC LED will light solid and recording begins immediately.
- To stop recording the loop, press the LOOP footswitch again once. The REC LED will turn off, the PLAY LED will turn on, and the loop will begin playing immediately. The MEM LED will also light solid, indicating the presence of recorded loop memory. Note: if the recording order is REC/DUB/PLAY, the REC LED remains on when the LOOP footswitch is pressed again once. Recording will stop and the 720 will continue immediately into overdub mode.
- All Loops play indefinitely. Each time the loop repeats, the PLAY LED will turn off briefly.
- After a loop is recorded, the length is subtracted from the total loop recording time of 720 seconds.
STOPPING & STARTING LOOP PLAYBACK
- To stop loop playback, press the LOOP footswitch two times quickly.
Alternatively, press the STOP footswitch once to immediately stop playback. - Note: if using the LOOP footswitch to stop, the REC LED will turn on together with the PLAY LED during the first press. Both LEDs turn off during the second press and playback stops immediately.
- While stopped, press and release the Footswitch once to start playback.
The PLAY LED will light to indicate that the loop is playing.
RECORDING AN OVERDUB
- To record an overdub, make sure a Loop is playing back. If a loop is not playing, press the LOOP footswitch once to begin playback. The PLAY LED will turn on and the loop will begin playing immediately.
- To start recording an overdub, press the LOOP footswitch once. The REC LED will turn on—together with the PLAY LED—and audio will be recorded on top of the original loop. No volume loss will occur to the previously recorded portion of the loop.
- To stop overdubbing the loop: press the LOOP footswitch again once. The REC LED will turn off, and the loop will continue playing along with the overdubbed audio.
- Overdubbing will never change the length of the loop.
- The 720 can overdub indefinitely, allowing you to continuously overdub new audio onto your loop.
- After finishing one or more overdubs, the UNDO-REDO function is enabled. You may undo, then redo the last overdub as many times as you like.
- REFERENCE GUIDE -
STOP FOOTSWITCH
- To use the second footswitch to stop loop playback, press and hold the MODE button for two seconds. A dot will appear on the digit display next to the STOP label.
- To immediately stop loop playback, press the STOP footswitch once. The loop is automatically reset to the beginning.
- To pause loop playback, double-tap the STOP footswitch. Playback will halt at the current position, and resume at the same place if the LOOP footswitch is pressed again.
Note: Fadeout must be set to '0' (disabled) in order to pause a loop. - When STOP mode is active, the REVERSE and 12 SPEED effects are only accessible through the REVERSE and 12 SPEED buttons.
FX FOOTSWITCH
- To use the STOP/FX footswitch to toggle loop effects, press and hold the MODE button for 2-seconds. The dot on the digit display next to the STOP label will disappear, indicating that FX mode is active.
- When FX mode is active, use the REVERSE and 12 SPEED buttons to enable each effect. The FX footswitch toggles the selected effect(s) on or off.
- The FX LED above the footswitch indicates whether the FX mode is active; when the FX LED is lit, the FX are activated.
UNDO-REDO FUNCTION
- To undo an overdub (remove the last take) during Loop playback; press and hold the LOOP footswitch for 2-seconds. The PLAY LED will blink twice and the previous overdub will be removed.
- To redo an overdub (restore the last take) during Loop playback: press and hold the LOOP footswitch for two seconds. The PLAY LED will blink twice and the previous overdub will be restored.
- The Undo-Redo function can only be initiated while a loop is playing back. Undo-Redo cannot be performed during overdub, record or stop modes.
- Note: once UNDO-REDO is enabled, this function is available until the loop is erased. The undo-redo layer is preserved regardless of bank changes and power cycles.
- Shortcut: pressing and holding the LOOP footswitch when stopping an overdub will cause an undo. This action gives you a convenient way to quickly undo overdubbing mistakes.
ERASING A LOOP
- To erase a loop, play-back must be stopped. If a loop is playing, press the LOOP footswitch two times quickly or press the STOP footswitch once to stop the loop.
- Press and hold the STOP (FX) footswitch for 2 seconds. The MEM LED will blink four times and then remain off, indicating the loop has been erased.
- Only the STOP (FX) footswitch can erase a loop, regardless of the footswitch mode.
- Shortcut: if a loop is playing, press the STOP footswitch two times quickly and hold for two seconds on the second press to erase the loop.
- Note: the erase function is only enabled when the loop has recorded memory, as indicated by the MEM LED remaining lit.
LOOP MEMORY
- Any recorded audio is stored automatically to the internal memory.
- All recorded loops will remain in memory until they are erased. Power cycling does not erase loops unless power is cut while recording the loop. Any loop or overdub that was being recorded at the time of power loss will not be saved by the 720.
- After a loop is recorded, the length is subtracted from the total loop recording time. For example, if a 20-second loop is recorded on Loop 9, there are 700 seconds still available for Loops 0-8. Overdubbing on top of any given loop does not subtract from total loop recording time.
- When the full 720 seconds of loop recording time is depleted, you will not be able to record a new loop. If an empty Loop is selected and recording is attempted, the MEM LED will blink twice. To free-up recording memory, select a loop with recorded memory and erase it.
- If the full 720 seconds of Loop Recording time is reached while recording a loop, recording will stop automatically. The REC LED will turn off, the PLAY LED will turn on, and the Loop will begin playing immediately. The MEM LED will also light solid, indicating the presence of recorded loop memory.
LOOP SELECT MODE
- Loop Select mode is entered when the letter L flashes in the display.
- When in Loop Select mode, turning the LOOP knob selects banks 0-9.
- If the LOOP knob is turned during record, playback, or overdub, the current operation is stopped and the next bank is selected. This same behavior applies to bank select via an external foot controller.
LOOP PROGRESS MODE
- Loop Progress mode is entered when the letter P flashes in the display.
- When in Loop Progress mode, the digit display will show a loop's progress as it plays back.
- If the playback mode is normal (e.g., not in REVERSE mode), the display will count up. If playback is in REVERSE mode, the display will count down.
- For loop lengths up to 10 seconds, loop progress is displayed from '0' up to '9' in seconds.
Note: if the loop is 4 seconds long, the display will count up to '3' and reset to '0'.
- For loop lengths greater than 10 seconds, loop progress is displayed from '0' up to '9' in tenths.
Note: all loops greater than 10 seconds will count 0-9.
- Loop Progress mode automatically tracks changes in effect modes. If the REVERSE function is toggled on, the Progress count will change direction. If 12 SPEED is toggled on, the Progress count will adjust for the halved tempo/doubled loop length.
- In addition to showing a loop's position, Loop Progress mode can also be used to modify a loop's position by turning the LOOP knob. This function is useful when practicing with very long loops, where the LOOP knob can be used to quickly fast-forward or rewind to a particular location within a loop.
- When selecting Loop Progress mode on an empty bank, the letter E is displayed. The display will show r when recording to the empty bank.
- When selecting Loop Progress mode on a bank with memory and playback is stopped: the current loop position will be displayed, and the digit display will flash briefly showing that Loop Progress mode is ready to advance when playback is started.
FADEOUT MODE
- Fadeout mode is entered when the display flashes F.
When in Fadeout mode, turn the LOOP knob to select fadeout times from between 0-9, where a value of '0' disables fadeout. The numerals in the range 0-9 do not represent actual seconds. Instead, each numeral identifies a specific Fadeout time as indicated in the following chart:
| Fadeout Value | Fadeout Time (sec) |
| 0 | 0 |
| 1 | 1 |
| 2 | 3 |
| 3 | 6 |
| 4 | 10 |
| 5 | 15 |
| 6 | 20 |
| 7 | 30 |
| 8 | 45 |
| 9 | 60 |
- A fadeout sequence is started by selecting a value from 1-9 and stopping loop playback via the LOOP or STOP/FX footswitch.
- The PLAY LED flashes quickly during the entire fadeout sequence. When the fadeout sequence is complete, the PLAY LED remains off and playback is stopped.
- An active fadeout sequence can be canceled at any time by pressing the LOOP footswitch to resume playback, or by pressing the STOP/FX footswitch to stop playback early.
LOOPING ORDER
Establish a Workflow – Think about the looping order that suits your workflow. Or, simply experiment with the two options for looping order that are set in the following manner:
To initialize REC/PLAY/DUB mode:
- Unplug the power jack.
- Simultaneously plug in the power jack while holding down the REVERSE button for three seconds.
- The digit display will show the sequence "o - o - 1 - 1"
- The power on cycle will continue as usual.
To initialize REC/DUB/PLAY mode:
- Unplug the power jack.
- Simultaneously plug in the power jack while holding down the 12 SPEED button for three seconds.
- The digit display will show the sequence "o - o - 2 - 2"
- The power on cycle will continue as usual.
FACTORY RESTORE
- Unplug the power jack.
- Simultaneously plug in the power jack while holding down the LOOP footswitch for three seconds until the REC, PLAY, and MEM LEDs begin to flash together.
- Once all three LEDs start blinking you can release the footswitch at any time. All three LEDs will continue to flash for about one second until the Factory Restore process is complete.
- After the process is complete, Loop-select mode is entered with LOOP 0 as the default bank, fadeout disabled, all effects off, and STOP mode enabled.
- Note: All Loop audio is erased during Factory Restore, and the process cannot be undone.
- CHANGING THE BATTERY -
To change your 9V battery, remove the four screws on the bottom of the 720. Take off the bottom plate and change the battery. Do not touch the circuit board while the bottom plate is off or you risk damaging a component.
Typical current draw from the Stereo Looper 720 is 60mA, which gives about 8 hours of operation on a single, high-quality alkaline battery.
- WARRANTY INFORMATION -
Please register online at http://www.ehx.com/product-registration or complete and return the enclosed warranty card within 10 days of purchase. Electro-Harmonix will repair or replace, at its discretion, a product that fails to operate due to defects in materials or workmanship for a period of one year from date of purchase. This applies only to original purchasers who have bought their product from an authorized Electro-Harmonix retailer. Repaired or replaced units will then be warranted for the unexpired portion of the original warranty term.
If you should need to return your unit for service within the warranty period, please contact the appropriate office listed below. Customers outside the regions listed below, please contact EHX Customer Service for information on warranty repairs at info@ehx.com or +1-718-937-8300. USA and Canadian customers: please obtain a Return Authorization Number (RA#) from EHX Customer Service before returning your product. Include—with your returned unit—a written description of the problem as well as your name, address, telephone number, e-mail address, RA#, and a copy of your receipt clearly showing the purchase date.
United States & Canada
EHX CUSTOMER SERVICE
ELECTRO-HARMONIX
c/o NEW SENSOR CORP.
55-01 2ND STREET
LONG ISLAND CITY, NY 11101
Tel: 718-937-8300
Email: info@ehx.com
Europe
JOHN WILLIAMS
ELECTRO-HARMONIX UK
13 CWMDONKIN TERRACE
SWANSEA SA2 0RQ
UNITED KINGDOM
Tel: +44 179 247 3258
Email: electroharmonixuk@virginmedia.com
To hear demos on all EHX pedals visit us on the web at www.ehx.com Email us at info@ehx.com
FCC COMPLIANCE
This device complies with part 15 of the FCC Rules. Operation is subject to the following two conditions: (1) This device may not cause harmful interference, and (2) this device must accept any interference received, including interference that may cause undesired operation. If the device is not installed and used in accordance with the instructions, it may cause harmful interference to radio communications and void the user's authority to guarantee the equipment.
Note: This equipment has been tested and found to comply with the limits for a Class B digital device, pursuant to part 15 of the FCC Rules. These limits are designed to provide reasonable protection against harmful interference in a residential installation. This equipment generates, uses and can radiate radio frequency energy and, if not installed and used in accordance with the instructions, may cause harmful interference to radio communications. However, there is no guarantee that interference will not occur in a particular installation. If this equipment does cause harmful interference to radio or television reception, which can be determined by turning the equipment off and on, the user is encouraged to try to correct the interference by one or more of the following measures:
• Reorient or relocate the receiving antenna.
- Increase the separation between the equipment and receiver.
- Connect the equipment into an outlet on a circuit different from that to which the receiver is connected.
- Consult the dealer or an experienced radio/TV technician for help.
Modifications not expressly approved by the manufacturer could void the user's authority to operate the equipment under FCC rules.



- - FEATURES -
- - CONTROLS and INDICATORS -
- - QUICK START GUIDE -
- RECORDING A LOOP
- STOPPING & STARTING LOOP PLAYBACK
- RECORDING AN OVERDUB
- - REFERENCE GUIDE -
- STOP FOOTSWITCH
- FX FOOTSWITCH
- UNDO-REDO FUNCTION
- ERASING A LOOP
- LOOP MEMORY
- LOOP SELECT MODE
- LOOP PROGRESS MODE
- FADEOUT MODE
- LOOPING ORDER
- FACTORY RESTORE
- - CHANGING THE BATTERY -
- - WARRANTY INFORMATION -
- United States & Canada
- Europe
- FCC COMPLIANCE
Brand : Electro Harmonix
Model : 720 Stereo Looper
Category : Audio effect pedal