
Photo Plus - Scanner EPSON - Free user manual and instructions
Find the device manual for free Photo Plus EPSON in PDF.


| Product Type | Photo Scanner |
| Brand | Epson |
| Model | Photo Plus |
| Scanning Element | CCD (Charge-Coupled Device) |
| Optical Resolution | 4800 x 9600 dpi |
| Hardware Resolution | 4800 dpi |
| Color Depth | 48-bit (input), 24-bit (output) |
| Scanning Area (Max) | 216 x 297 mm (A4) |
| Light Source | White LED |
| Connectivity | USB 2.0 High Speed |
| Power Supply | AC adapter, 100-240V, 50-60Hz |
| Power Consumption | 12W (operating), 5W (standby), 0.5W (off) |
| Dimensions (W x D x H) | 430 x 280 x 160 mm |
| Weight | 2.5 kg |
| Supported Media | Photo paper, documents, film, slides |
| Film Scanning | Up to 35mm film strips and slides |
| Included Software | Epson Scan, Adobe Photoshop Elements (trial) |
| Maintenance | Clean glass platen with soft lint-free cloth; avoid abrasive cleaners |
| Safety | Use only provided AC adapter; do not expose to liquids; unplug during storms |
| Spare Parts & Repairability | Replacement bulbs, rollers, and power adapters available; refer to manual for authorized service |
| General Information | Designed for high-quality photo and film scanning; compatible with Windows and macOS |
Frequently Asked Questions - Photo Plus EPSON
User questions about Photo Plus EPSON
0 question about this device. Answer the ones you know or ask your own.
Ask a new question about this device
Download the instructions for your Scanner in PDF format for free! Find your manual Photo Plus - EPSON and take your electronic device back in hand. On this page are published all the documents necessary for the use of your device. Photo Plus by EPSON.
USER MANUAL Photo Plus EPSON
This equipment has been tested and found to comply with the limits for a class B digital device, pursuant to Part 15 of the FCC Rules. These limits are designed to provide reasonable protection against harmful interference in a residential installation. This equipment generates, uses, and can radiate radio frequency energy and, if not installed and used in accordance with the instructions, may cause harmful interference to radio and television reception. However, there is no guarantee that interference will not occur in a particular installation. If this equipment does cause interference to radio and television reception, which can be determined by turning the equipment off and on, the user is encouraged to try to correct the interference by one or more of the following measures:
Reorient or relocate the receiving antenna. Increase the separation between the equipment and receiver. Connect the equipment into an outlet on a circuit different from that to which the receiver is connected. Consult an experienced radio/TV technician for help.
WARNING
The connection of a non-shielded equipment interface cable to this equipment will invalidate the FCC Certification of this device and may cause interference levels that exceed the limits established by the FCC for this equipment. It is the responsibility of the user to obtain and use a shielded equipment interface cable with this device. If this equipment has more than one interface connector, do not leave cables connected to unused interfaces.
Changes or modifications not expressly approved by the manufacturer could void the user's authority to operate the equipment.
This digital apparatus does not exceed the Class B limits for radio noise emissions from digital apparatus as set out in the radio interference regulations of the Canadian Department of Communications.
Epson America makes no representations or warranties, either express or implied, by or with respect to anything in this manual, and shall not be liable for any implied warranties of merchantability and fitness for a particular purpose or for any indirect, special, or consequential damages. Some states do not allow the exclusion of incidental or consequential damages, so this exclusion may not apply to you.
COPYRIGHT NOTICE
All rights reserved. No part of this publication may be reproduced, stored in a retrieval system, or transmitted, in any form or by any means, electronic, mechanical, photocopying, recording, or otherwise, without the prior written permission of Epson America, Inc. No patent liability is assumed with respect to the use of information contained herein. Nor is any liability assumed for damages resulting from the use of the information contained herein. Further, this publication and features described herein are subject to change without notice.
TRADEMARKS
EPSON is a registered trademark of Seiko Epson Corporation.
PhotoPlus is a trademark of Epson America, Inc.
General notice: Other product names used herein are for identification purposes only and may be trademarks of their respective owners. EPSON disclaims any and all rights in those marks.
A NOTE CONCERNING RESPONSIBLE USE OF COPYRIGHTED MATERIALS
Like photocopiers, scanners can be misused by improper scanning of copyrighted material. Although Section 107 of the U.S. Copyright Act of 1976 (Title 17, United States Code), the "fair use" doctrine permits limited copying in certain circumstances, those circumstances may not be as broad as some people assume. Unless you have the advice of a knowledgeable attorney, be responsible and respectful by not scanning published material without the permission of the copyright holder.
Copyright © 1996 by Epson America, Inc. CPD 3650 Torrance, California, USA 7/96

Table of Contents
Introduction
PhotoPlus Features 2
System Requirements 2
About This Guide 3
Where to Get Help 4
Software Support 4
Electronic Support Services 4
Registration
Safety Instructions 6


1. Getting Started
Getting to Know Your PhotoPlus Scanner 1-1
Setting Up Your PhotoPlus Scanner 1-2
Installing Your Fun Pak Software Suite 1-4


2. Scanning and Other Basic Stuff
Starting Your Scan
Scanning Your Picture
Enhancing Your Photo
Adjusting Settings


Printing an Image
Saving an Image File
Using Photo Albums
Placing Your Picture in an Album
Working with Your Album


3. Editing: Transforming Your Images
Opening Image Files
Opening an Image in an Album
Opening an Image with the Open Button
Viewing Images and Image Information
Zooming In and Out
Using the Zoom Commands
Viewing Your Image at Full Screen
Viewing Image Information
Hiding the Tools Bar and Status Bar
Selecting Part of Your Image
Cutting, Copying, and Pasting
Cropping


| Resizing | 3-9 |
| Resizing a Selection 3-9 | |
| Resizing an Image 3-10 | |
| Rotating | 3-11 |
| Rotating a Selection 3-11 | |
| Rotating an Entire Image 3-12 | |
| Flipping an Image or Selection 3-12 | |
| Converting Image Types 3-13 |
4. Enhancing: Playing with Your Images
| Adjusting Brightness and Contrast 4-2 |
| Adjusting Hue and Saturation 4-3 |
| Setting Tone Adjustment 4-4 |
| Sharpening |
| Blurring |
| Using Special Effects 4-7 |
5. Projects: Fun Things You Can Do
| Making a Slide Show | 5-2 |
| Making a Screen Saver 5-2 | |
| Using the Matte Template | 5-3 |
| Adding Background | 5-4 |
| Adding Text | 5-6 |
| Printing Your Matted Picture | 5-8 |
| Using the Calendar Template | 5-8 |
| Adding Background and Designing the Dates | 5-9 |
| Adding Text and Printing the Calendar | 5-10 |
6. Print Artist: Designing with Style
| Getting Started with Print Artist | 6-2 |
| Creating a Greeting Card | 6-4 |
| Adding a Photo | 6-6 |
| Importing an Image | 6-6 |
| Scanning Pictures in Print Artist | 6-7 |
| Adding Text | 6-8 |
| Adding a Graphic | 6-9 |
| Saving Your Card | 6-11 |
| Printing Your Card and Exiting | 6-11 |
7. PrintPaks Magnet Kit: Family Stuff
| Getting Ready to Use the Magnet Kit | 7-2 |
| Creating the Magnets | 7-3 |
| Getting Ready to Print Your Magnets | 7-5 |
| Printing Your Magnets | 7-6 |
| Putting Your Magnets Together 7-7 |
8. CardScan: Instant Address Book
| Starting CardScan | 8-1 |
| Scanning Your Cards | 8-3 |
| Editing the Information | 8-6 |
| Saving and Exiting | 8-7 |
| Working with Your Address List | 8-7 |
| Printing | 8-8 |
| Designing the Layout | 8-9 |
| Previewing and Printing | 8-9 |
9. Pro Scanning: More Things You Can Do
Setting the Software for Hand Scanning 9-1
Capturing the Image by Hand Scanning 9-2
Stitching Two Images Together 9-4

10. Maintenance and Troubleshooting
Caring for PhotoPlus 10-1
Solving Scanner and System Problems 10-2
Solving Image Problems 10-4

A. Specifications
Physical
Power
Technical
Environmental
Glossary
Index

Introduction

Your new EPSON® PhotoPlus™ lets you add the excitement of color photos to anything you print.
All you have to do is drop your photo in the scanner and press the start button. In less than a minute, your picture appears on the screen.
The PhotoPlus Fun Pak includes all the software and other stuff you need to work and play with your pictures. You can edit and enhance the images and use them to create greeting cards, calendars, magnets, and lots more. Or scan business cards directly into a card file.
Setting up PhotoPlus is a snap. Just plug it into your computer's parallel port and install the software. You don't have to open up your computer case. The special pass-through parallel connector lets you attach both your printer and PhotoPlus to the same computer port.
PhotoPlus Features
Here's what PhotoPlus can do for you:
Automatically handles photographs, business cards, or other small images. Automatically switches between a printer and scanner connected to the same port. Scans and recognizes up to 16.7 million colors, along with grayscale and black and white line art. Supports maximum enhanced resolutions of 1200 dpi. Allows you to add color images to almost any standard Windows application. Lets you print on any color or black and white printer.
The PhotoPlus Create Cool Stuff Fun Pak comes with the following easy-to-use software:
EPSON PhotoPlus 2.0 image editing software for scanning, enhancing, organizing, and transforming your pictures with special effects.
Sierra Print Artist 3.0 for creating photo greeting cards, banners, calendars, and much more. PrintPaks Magnet Kit: everything your kids need to make nifty magnets with their own pictures, including interactive multimedia instructions, magnets, and special EPSON paper. Corex CardScan SE for scanning business cards and storing the information in an electronic address book.
System Requirements
IBM-compatible PC with 486 or higher processor. VGA monitor with at least 256-color display (16- or 24-bit video display adapter with 16.7 million colors recommended). 8MB RAM. Hard disk drive with 50MB available. Mouse or other pointing device. Standard parallel printer port. Double-speed or faster CD-ROM drive.
Sound card and speakers (for the Magnet Kit only).
Microsoft ® Windows 3.1 or Windows 95.
About This Guide
Chapter 1 identifies the parts of your PhotoPlus scanner, and shows you how to set it up and install the software.
Chapter 2 shows you how to scan pictures with your PhotoPlus scanner, and how to use your software to organize, print, and save your images.
PhotoPlus scanner, and how to use your software to organize, print, and save your images.
Chapter 3 covers the editing features of your PhotoPlus software, including cropping, rotating, and converting image types.
Chapter 4 shows you how to enhance your images by adjusting brightness, contrast, and colors, and using special effects.
Chapter 6 introduces Print Artist and gets you started designing your own photo projects for work or play.
Chapter 7 shows you how to use the multimedia Magnet Kit to design, print, and assemble 8 photo magnets.
Chapter 8 tells you how to scan business cards and organize them into electronic card files.
Chapter 9 covers these advanced features: scanning by hand and stitching two images together.
Chapter 10 provides maintenance and troubleshooting tips.
Appendix A lists the specifications of your PhotoPlus.
The Glossary explains scanning and image-editing words that may be new to you.
The Index helps you locate specific information.
Chapter 5 explains how to display your photos in slide
shows and screen savers, and print them in framed pictures and calendars.
Where to Get Help
If you purchased your PhotoPlus color photo scanner in the United States or Canada, EPSON provides customer support and service through a network of Authorized EPSON Customer Care Centers. EPSON also provides the following services when you dial (800) 922-8911:
| EPSON technical information library fax service | Product literature on current and new products | Assistance in locating your nearest Authorized EPSON Reseller or Customer Care Center | Technical information on the installation, configuration, and operation of EPSON products | Customer relations.
You can purchase accessories for EPSON products from EPSON Accessories at (800) 873-7766 (U.S. sales only). In Canada, call (800) 922-8911.
You can obtain additional magnet supplies from PrintPaks by calling (800) 774-6860.
If you purchased your PhotoPlus color photo scanner outside the United States or Canada, contact your EPSON dealer or the marketing location nearest you for customer support and service.
Software Support
If you've tried the on-screen help and you still have questions, call the number for the application you need help with:
PhotoPlus software (800) 922-8911 | Print Artist (206) 644-4343 | PrintPaks Magnet Kit (503) 295-6182 | CardScan (617) 492-4200.
See the inside back cover for information about additional support services for your software.
Electronic Support Services
If you have a modem, the fastest way to access helpful tips, specifications, drivers, application notes, and bulletins for EPSON products is through the online services described below.
World Wide Web
If you are connected to the Internet and have a Web browser, you can access EPSON's World Wide Web site at http://www.epson.com. EPSON's home page links users to What's New, EPSON Products, EPSON Connection, Corporate Info, and EPSON Contacts. Link to the EPSON Connection for the latest drivers and FAQs (Frequently Asked Questions) and the EPSON Chat area. To get in touch with EPSON around the world, EPSON Contacts includes information about local EPSON subsidiaries.
If you have access to the Internet and an FTP client, you can download drivers, FAQs, and sample files from EPSON's FTP site. Use your FTP client or Web browser to log onto ftp.epson.com with the user name anonymous and your e-mail address as the password.
You can access EPSON's technical information library by calling (800) 922-8911 or (800) 442-2110 and providing a return fax number.
You can call the EPSON Download Service (BBS) at (800) 442-2007. No membership is required. Make sure your communications software is set to 8 data bits with 1 stop bit, no parity bit, and a modem speed up to 28.8 Kbps. See the documentation that came with your communications software for more information.
EPSON Forum on CompuServe
CompuServe members can call the Epson America Forum on CompuServe. If you are already a member, simply type GO EPSON at the menu prompt to reach the Forum.
If you are not currently a member of CompuServe, you are eligible for a free introductory membership as an owner of an EPSON product. This membership entitles you to:
An introductory credit on CompuServe, your own user ID and password, and a complimentary subscription to CompuServe Magazine, CompuServe's monthly publication.
To take advantage of this offer, call (800) 848-8199 in the United States and Canada and ask for representative #529. In other countries, call the following U.S. telephone number: (614) 529-1611, or your local CompuServe access number.
Please take a minute to fill out the registration card included with PhotoPlus color photo scanner and mail it back to us. This enables you to receive special information on software upgrades, accessories, and new products. You'll get immediate attention if you have a problem with your PhotoPlus.
Read all of these instructions and save them for later reference. Also follow all warnings and instructions marked on the scanner.
Do not drop the scanner, bang it against a hard surface, or let it hang from its cable.
Unplug the scanner before cleaning. Clean with a damp cloth only. Do not spill liquid on the scanner.
Do not place the scanner on an unstable surface or near a radiator or heat register. Do not store it in direct sunlight.
Use only the type of power source indicated on the scanner's label.
Connect all equipment to properly grounded power outlets. Avoid using outlets on the same circuit as photocopiers or air control systems that regularly switch on and off.
Do not let the adapter's power cord become damaged or frayed.
If you use an extension cord with the scanner, make sure the total ampere rating of the devices plugged into the extension cord does not exceed the cord's ampere rating. Also, make sure the total of all devices plugged into the wall outlet does not exceed 15 amperes.
Except as specifically explained in this User's Guide, do not attempt to service the scanner yourself.
Unplug the scanner and refer servicing to qualified service personnel under the following conditions: If the power cord or plug is damaged; if liquid has entered the scanner; if the scanner has been dropped or the cabinet damaged; if the scanner does not operate normally or exhibits a distinct change in performance. Adjust only those controls that are covered by the operating instructions.
1 Getting Started
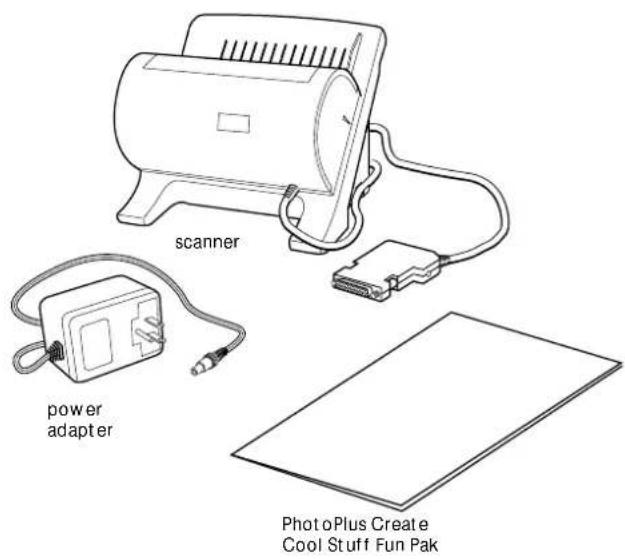
This chapter helps you get ready to use your PhotoPlus color photo scanner. It covers the following:
| Getting to know your PhotoPlus scanner | Setting up your PhotoPlus scanner Installing your PhotoPlus Fun Pak software.
Before you start, make sure you have everything shown at the left.
Getting to Know Your PhotoPlus Scanner
After you unpack your PhotoPlus color photo scanner, take a few minutes to learn about its features, as shown on the following page.
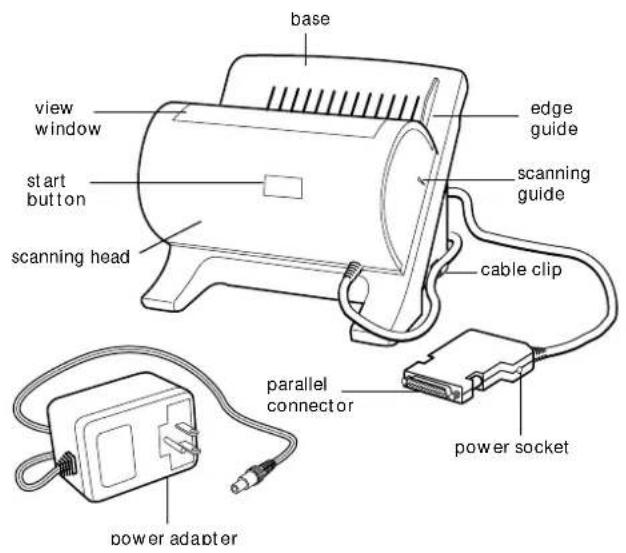
The view window lets you watch your photograph being scanned. You can see the scanner light turn on when you start scanning.
The start button starts and pauses the scanning process.
The edge guide helps you align your photo for scanning.
The scanning guides show you how to position the scanner for hand scanning.
The parallel connector lets you connect your printer and PhotoPlus scanner to the same computer port.
The power adapter lets you plug your PhotoPlus into an electric outlet.
The power socket lets you plug the power adapter into the parallel connector.
Setting Up Your PhotoPlus Scanner
Setting up your PhotoPlus scanner is simple. Before you start, make sure your computer, printer, and any other equipment connected to your computer are turned off. Then follow the steps on page 1-3.
NOTE
If you connect your printer and PhotoPlus scanner to the same computer port, make sure the printer is turned on when you scan.
1. If you have a printer connected to your computer's parallel port, unplug it. 2. Plug the PhotoPlus parallel connector into your computer's parallel port as shown to the right, and tighten the screws.
NOTE
If you have a low-profile computer, the parallel connector may not fit in your port. You may need to use an extender connector, which you can purchase at any computer store.

3 Plug the power adapter into the power socket on the PhotoPlus parallel connector. On some computer models, you may need to arrange the adapter plug to fit around your monitor cable.
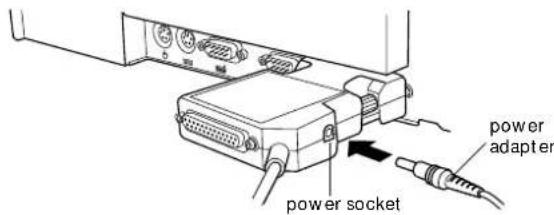
4 If you want to connect your printer and PhotoPlus scanner to the same port, plug the printer cable into the PhotoPlus parallel connector as shown and tighten the screws.
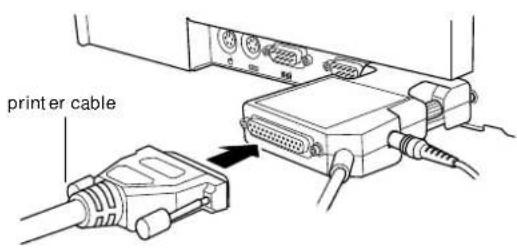
5 Plug the PhotoPlus power adapter into a grounded electrical outlet. To protect the scanner from interference, it's best to use a surge protector.
NOTE
The scanning head on your PhotoPlus may loosen during shipping. Before you scan, push down to make sure it's firmly seated on the base. For information on removing and replacing the scanning head, see pages 9-2 to 9-4.
Installing Your Fun Pak Software Suite
The PhotoPlus Fun Pak provides everything you need to get creative with scanned images. A single CD-ROM includes these four software applications: EPSON PhotoPlus 2.0 software, Sierra Print Artist 3.0, PrintPaks Magnet Kit, and Corex CardScan SE.
Follow these steps to install the software from your CD-ROM:
1 Insert the PhotoPlus Fun Pak CD in your CD-ROM drive.
2 From the Windows 3.1 Program Manager screen, choose Run from the File menu.
In Windows 95, click the Start button, and then click Run.
3 In the box, type: D:\INSTALL. If your CD-ROM drive is not drive D, substitute the correct letter.
4 Click OK. You see the main installation screen.
5 Make sure PhotoPlus is checked, along with the other applications you want to install. 6 Click Install. 7 Follow the instructions on the screen to complete the installation. Make sure you wait while each program is installed and respond to the prompts as they appear.
NOTE
Don't restart Windows until all the software programs have been installed.
You now have the following new program groups (or folders):
| PhotoPlus Sierra (Print Artist) | PrintPaks (Magnet Kit) CardScan
Now you can turn to Chapter 2 and start scanning.

Scanning and Other Basic Stuff
HELP!
I miss Jake! I lost my best friend and buddy!!

If you have any information on the whereabouts of Jake please let me know.
Cal (Tommy at (310) 555-2 287
Before you can scan with PhotoPlus, you need to start your software and choose a project. Then just scan, transfer, and print your image. This chapter covers the basics, including:
| Starting your scan | Scanning a picture Enhancing your photo | Adjusting settings | Printing | Saving your file | Using photo albums.
Starting Your ScanStarting Your Scan
If your printer and PhotoPlus scanner are plugged into the same computer port, make sure your printer is turned on.
Follow these steps to get started:
1 From the Windows 3.1 Program Manager, double-click the PhotoPlus icon.
In Windows 95, click Start, point to Programs, and then point to PhotoPlus. Click the PhotoPlus icon.
You see the PhotoPlus opening screen:
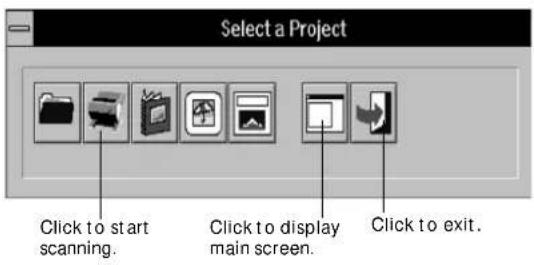
2 Click the scan button.

The Select Source dialog box appears:
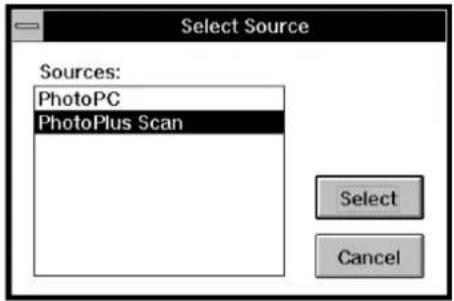
3 Click PhotoPlus Scan, and then click the Select button.
2-2 Scanning and Other Basic Stuff
The PhotoPlus Scan window appears: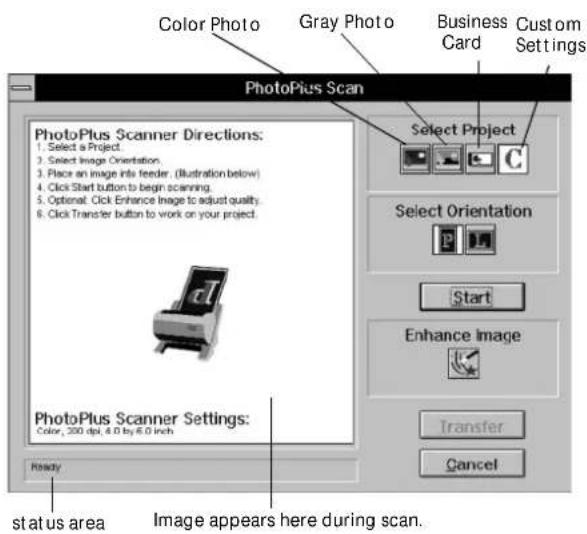
NOTE
When the scan window appears, a message tells you the scanner is warming up. If you're in a hurry, you can click Cancel and start scanning without waiting, but you may not get the best image quality.
Scanning Your Picture
Follow these steps:
1 Select one of the following scanning projects:
| Color Photo | Gray Photo (or color photo that you want to scan in black and white) | Business Card | Custom Settings. (If you choose Custom, you see a Scanner Setting dialog box. See page 2-6 for more information.)
2 Choose the orientation of the picture: P for portrait (vertical) or L for landscape (horizontal).

3 Place your picture on the scanner as shown below and on the screen, either "head first" (for portrait pictures) or with the top facing left (for landscape pictures):
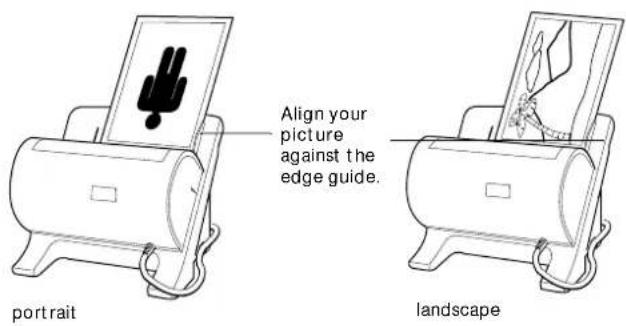
4 Make sure the scanner has warmed up; then click Start or press the pink start button. Your image gradually appears in the scan window.
If your image appears sideways, click P or L to choose the correct orientation.
5 If you want to quickly adjust the brightness and contrast of your scanned image, click Enhance Photo and follow the instructions on page 2-5.
2-4 Scanning and Other Basic Stuff
6 Click Transfer to complete the scanning process. The PhotoPlus main screen displays your image, as shown below:
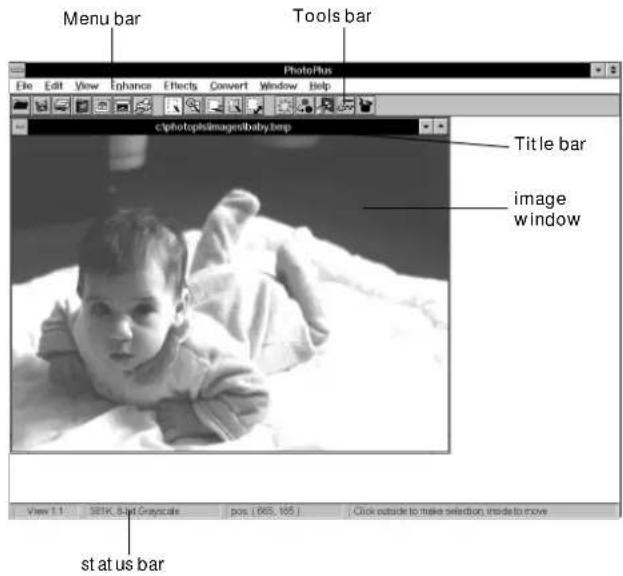
For information about using all the PhotoPlus features available from the main work area, see Chapters 3, 4, and 5.
7 When you're finished working with PhotoPlus, choose Exit from the File menu. PhotoPlus prompts you to save any new or changed images.
See page 2-8 for more information about saving your image.
Enhancing Your Photo
When you scan with PhotoPlus, you can make some basic enhancements even before you transfer your picture. This is especially helpful when you're using an application like Print Artist.
After scanning an image, click Enhance Photo on the PhotoPlus Scan screen to display the Enhance dialog box, as shown to the right.

1 Slide the Brightness control right to make the picture brighter, or left to make it darker. 2 Slide the Color Saturation control right for more saturation, or left for less. 3 Click OK when you're finished. Then you can click Transfer to complete the scan.

Adjusting Settings
Click Custom on the PhotoPlus Scan screen to display the Scanner Setting dialog box:
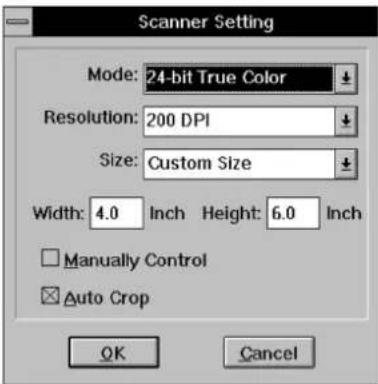
1 Choose the scanning mode as follows:
Choose 24-bit True Color for scanning most snapshots and color photos. Choose 8-bit Grayscale for scanning black-and-white photos, or if you want to print your image in black and white.
Choose 1-bit Lineart for scanning line drawings (with no shades of gray).
Choose the resolution. Selecting a higher resolution produces a larger file that is slow to process and takes up more space on your hard disk drive. If your printer isn't capable of high-resolution printing, you won't see any difference between high and low resolution in the printed image.
Choose 400 DPI for black-and-white drawings. (This option is available only for scanning in the 1-bit lineart mode.) Choose 200 DPI for high-quality printing of images. This applies to both grayscale and color images that will be printed on an inkjet printer or color laser printer, or professionally produced on a printing press. Choose 150 DPI for grayscale images that will be printed on a 600 DPI laser printer. Choose 100 DPI for grayscale images that will be printed on a 300 DPI laser printer.
If you plan to enlarge or crop an image, select a higher resolution; if you plan to reduce it, you can select a lower resolution. For images that will be displayed only on the screen (in e-mail messages, for example, or on the World Wide Web), choose 100 to 200 DPI.
Select the size of the original image. If your picture isn't one of the standard sizes, choose Custom and enter the width and height in the boxes on the screen.
In most cases, even if you enter the wrong size, Auto Crop detects the size of your photo and trims it accordingly.
Click Auto Crop to turn off this feature if your picture has a very dark background. Auto Crop normally eliminates the area around an image when you scan a picture smaller than 4 x 6 inches. However, Auto Crop can't always detect the edge of the picture if it has a dark background.
Click Manually Control only if you're using PhotoPlus as a hand scanner. See Chapter 9 for instructions on scanning by hand. Click OK when you're finished.
Printing an Image
After you scan your picture and transfer it to the PhotoPlus work area, you can print it. Follow these steps:
Click the Print button or choose Print from the File menu. The Print dialog box appears:
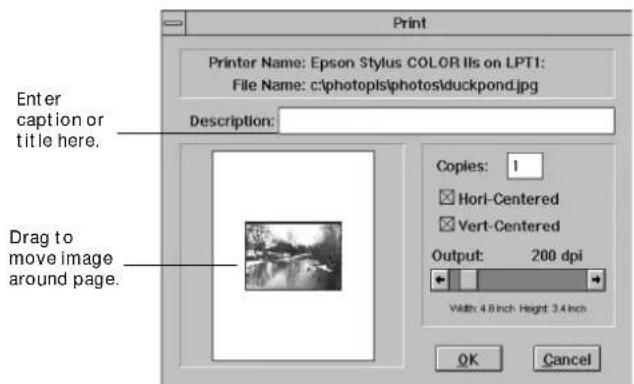

If you want to print a title or caption below the picture, type it in the Description box. Enter the number of copies you want to print. (This option is available only if your printer supports it.) If you want to change the position of your image on the page, move the picture to the position you want in the window. Use the Hori-Centered and Vert-Centered checkboxes to indicate if you want to center your image on the page horizontally, vertically, or both. Drag the slider if you want the printed image to be larger or smaller than the original image. The resolution automatically increases if you reduce the size, and decreases if you enlarge it. Click OK when you're ready to print.
Saving an Image File
To save an image you scanned, follow these steps:
1. Click the Save button or choose Save As from the File menu. The first time you save your image file, the Save As dialog box appears:
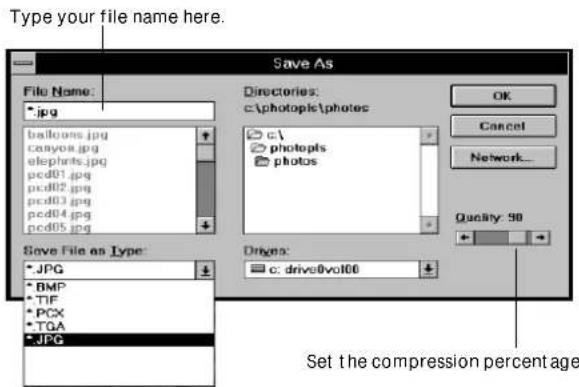
2. Choose the drive and directory where you want to save the file, or leave it in the default location (C:\PHOTOPLS\PHOTOS). 3. Choose the file type. PhotoPlus lets you save in five file formats. Each format has a different internal structure and use:
| JPG
JPEG is the default format and produces small, compressed files. When you save in this format, the screen displays a slider that allows you to choose the degree of compression. For best quality, choose from 75 to 90 percent.
| BMP
This is the "native" format for Windows bitmap files.
TIF
TIFF files can be used on many types of systems.
PCX
The PCX format lets you use your pictures in many Windows and DOS programs.
TGA
Targa files were originally designed for specialized hardware and software.
4. Type a name for the file and click OK.
Using Photo Albums Using Photo Albums
After you scan and save your picture, you should put it in an album.
PhotoPlus albums store and display your images, just like the photo albums you use for your printed snapshots. You can organize your pictures by subject matter or date, or in any way you want. Albums let you view miniature "thumbnail" versions of your images, along with image information.
Placing Your Picture in an Album Follow these steps to put your picture in an album:
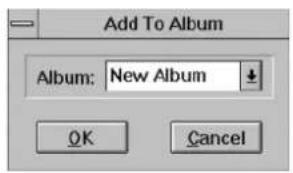
1. With your picture displayed in the PhotoPlus work area, choose Add to Album from the File menu. The Add to Album dialog box appears, as shown on the next page.

2. Select New Album and click OK. The Save New Album dialog box appears:

3. Type a name for the album and click OK.
Working with Your Album
After you start an album, you can use it any time you want to open one of your pictures or add more pictures.
1. To open your album, click the Album button or choose Open Album from the File menu. 2. The Open Album window appears, with your image or images, as shown to the right.
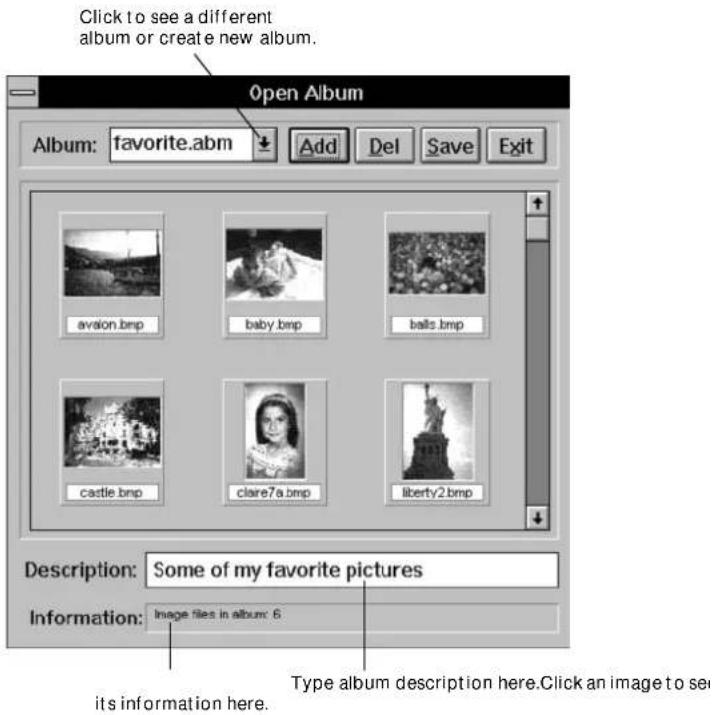
Click an image to select it. The Information box displays image file information. Double-click a thumbnail to open the image. To add pictures, click the Add button and choose the image or images you want. Click the down arrow at the top of the screen to see a different album or create a new album. Click and drag a thumbnail to rearrange the images in the album. Click an image and click Del to remove it from the album. The image file itself is not affected.
3. Enter a description for the album (up to 36 characters) in the Description box, if you want.
4. Click Exit when you're finished working with albums.

3 Editing: Transforming Your Images
When I traveled to Italy during summer vacation, I had the great opportunity to view the daily activities of a vegetable grocer. The grocers wake up early in the morning to get the best selection of vegetables and fruits. You can see that there are a lot of vegetables to choose from; however, it is very important to be first because there aren't many other vegetable boats. The owner of this boat appears to be good friends with the vegetable stand owner.
After the groom selects his vegetables and fruits, he walks around the corner with his goods and has to set up his store. Here is a picture of the store of the man that bought his goods from the first boat. This grocer does a really good job of displaying his grocery items. When I bought some stuff from both of the stores, the fresher, cleanest vegetables came from this store. The grocer was really nice too.
By selecting the freshest vegetables, having contacts, and nicely displaying product, a grocer will be very successful.
Once you've scanned in your picture, the fun begins with PhotoPlus. You can use cropping to change a group photo into an individual portrait, cut and paste from one image to another, or rotate your picture at any angle you want. This chapter covers the following:
Opening image files | Selecting part of your image | Cutting, copying, and pasting | Cropping | Resizing | Rotating | Flipping | Converting image types.
| Viewing images and image information
Opening Image Files Opening Image Files
In PhotoPlus, you can have several images open at the same time (depending on your computer's memory), each in its own window. The window's title bar is highlighted if it contains the active image (the one you're currently working on). You can even open the same image in two windows; this lets you experiment while you keep the original picture in view.
You can open an image in two different ways: using the Album button or using the Open button.
Opening an Image in an Album
When you use albums, you see small "thumbnail" versions of your pictures. You can easily choose the image you want, even if you don't remember the file name. Follow these steps:
1 Click the Album button or choose Open AlbumAlbum from the File menu. The Album window appears, as shown to the right.
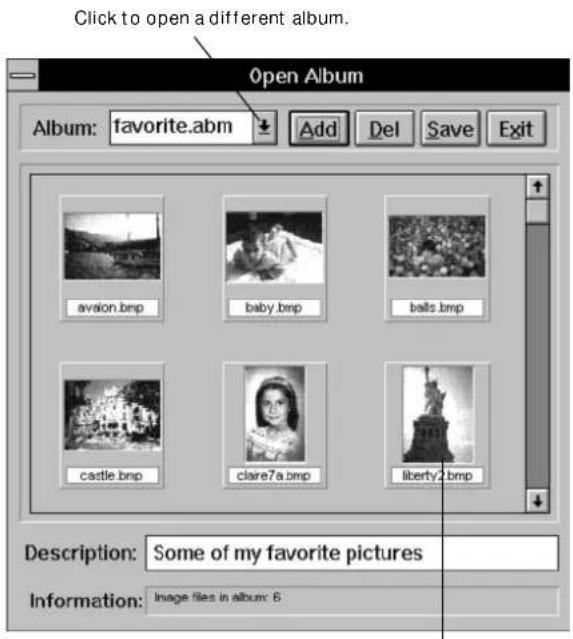
Double-click thumbnail to open the picture.
2 If the picture you want to open is in a different album, click the down arrow at the top of the screen and choose a different album. 3 Double-click the thumbnail to open the image you want.
Opening an Image with the Open Button
If you want to open an image that's not in an album (a picture on a diskette or CD, for example), you can use the Open button. Follow these steps:

1 Click the Open button. appears.
The Open dialog box
2 Choose the image file you want to open. PhotoPlus lets you open the following types of image files:
| | BMP (bitmap) | TGA (Targa) |
| | TIF (TIFF) | JPG (JPEG) |
| | PCX | PCD (PhotoCD) |
| | GIF |
Viewing Images and Image InformationViewing
To get a close-up look at part of your image, you can use the Zoom tool or select the Zoom In command on the View menu. You can also use the View menu to display information about your image and to hide the Tools Bar and Status Bar on your PhotoPlus screen.
NOTE
You're not actually changing the image size when you zoom in.
If you want to change the size, use the Resize tool or the Image Image
Size command on the Edit menu. See page 3-9 for instructions.

Zooming In and Out
Follow these steps to get a close-up look at your image and then return to your original view:

1 Click the Zoom tool.
2 Click the left mouse button on the part of your image that you want to see in detail.
The image is magnified 2.
![PhotoPlus File Edit View Enhance Effects Convert Window Help clphotopisimagesbaby.bmp Zoom tool View 2.1 381K, 8-bit Grayscale pos: [407, 213] Click left button to zoom in right to zoom out Level of magnification](/content/2026/06/1351661/images/4fb4bf8ac4617cbb23121e193b072181a60796ac1658c925a03a702b773ae7ce.jpg)
3 Continue clicking to increase the magnification. You can increase it up to 16.
4 To decrease the magnification, click the right mouse button on the image. Continue clicking the right button to zoom out even more.
Using the Zoom Commands Follow these steps to zoom from the menu:
1 Choose Zoom In or Zoom Out from the View menu. You see a list of magnification ratios:

2 Choose the degree of magnification or reduction you want.
3-4 Editing: Transforming Your Images
Viewing Your Image at Full Screen
Choose Full Screen from the View menu to hide the desktop and display your image in the center of the screen against a black background.
Click the left mouse button to magnify the image or the right button to reduce it. Press Enter to display another open image. Press Esc to return to the normal view.
Viewing Image Information
Choose Image Information from the View menu to display an information box like the one below:
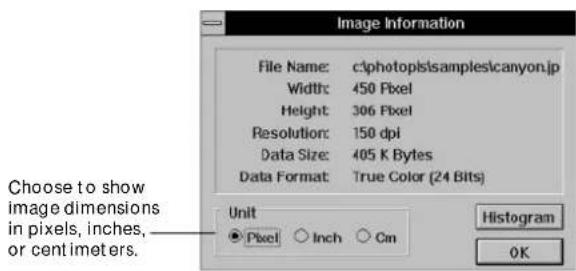
Click Histogram to display a graph like the one below:
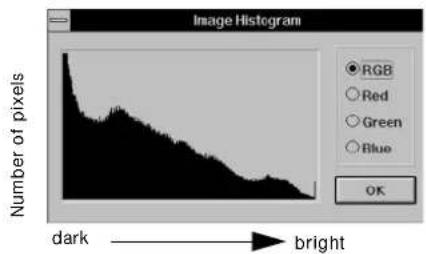
The histogram shows the brightness of the overall image and each of the three color channels (red, green, and blue) that make up the image. The vertical axis of the graph represents the number of pixels; the horizontal axis represents the brightness level, from the darkest pixels at the left to the brightest pixels at the right.
Click OK when you're finished with each information box.
NOTE
When you enhance an image, change its size, or convert it to another file type, PhotoPlus shows your changes in the Image Information box. The histogram reflects changes in brightness and contrast, hue and saturation, tone, and sharpening or blurring.
Selecting or masking a portion of your image allows you to make changes that affect only that portion. The rest of the image isn't affected.
When using a selection mask, you can choose the
Discard command on the Edit menu to cancel all changes made to the selected area. This lets you
To create more space for displaying images on your PhotoPlus screen, you can hide the Tools bar or Status bar. Follow these steps:
1. From the View menu, choose Show Tools Bar or Show Status Bar. The checkmark disappears from the menu. 2. To bring back the original PhotoPlus screen, choose Show Tools Bar or Show Status Bar again. The checkmark reappears.
Bar and Status: Bar knowing you can undo a series of changes quickly and easily.
Follow these steps to select part of your image:
1. Click the Select tool.

2. Click and drag (move the mouse while holding down the button) to select the part of the image you want.
When you release the mouse button, an "animated" rectangle surrounds the selected area:
![PhotoPlus File Edit View Enhance Effects Convert Window Help c:\photopy\images\balloon1.bmp View 1.1 SIGK, 8-bit Graycale pos: [523, 616] Click outside to make selection, inside to move Select an area to work on. Press Shift and select to add to the area.](/content/2026/06/1351661/images/3d930fb8ea09cd08d84a28a4ac9a34f96bcf3d880c810f557350cd0cada9c2a5.jpg)
NOTE
After you select an area, you can use many of the PhotoPlus menu commands and tools to work on the area. For example, you can use the Crop, Resize, and Rotate tools. See pages 3-8 to 3-12 for more information about cropping, resizing, and rotating.
To remove the selection mask, click anywhere outside of it, or press Del. If the entire image is selected, click the Crop tool and then click the image to remove the selection mask. To move the selected area, click and drag inside the area. The selection "floats" on top of the original image. To increase the size of a selection, press Shift while you select an additional area next to the original area. To decrease the size of a selection, press Ctrl while you select part of the already selected area.
To cancel all changes made to the selected area and remove the selection mask, choose Discard from the Edit menu. But be careful! This works only while the selection is "active."
Choose Paste from the Edit menu to paste an image from the Clipboard into the active image. You can drag the pasted area with your mouse if you want to move it.
Cutting, Copying, and Pasting
You can use the Cut, Copy, and Paste commands on the Edit menu with a selected area of an image or an entire image. The Paste As New command lets you create a new image file from an image on the Clipboard.
Choose Paste As New to create a new file from an image on the Clipboard. PhotoPlus displays the new image file in its own window, and you can save it or add it to an album.
Choose Cut from the Edit menu to remove the selected area (or the entire image if there is no selection). A white "hole" appears where you made the cut. PhotoPlus places the cut-out area on the Windows Clipboard.
Choose Copy from the Edit menu to place a copy of the selected area (or the entire image if there is no selection) on the Windows Clipboard. The original image is not affected.
Cropping
Cropping an image is the opposite of cutting; instead of removing the selected area, cropping removes everything outside of the area. Follow these steps:
1. Click the Crop tool. 2. Click and drag to select the part of the image you want to keep. When you release the mouse button, an animated rectangle surrounds the selected area.

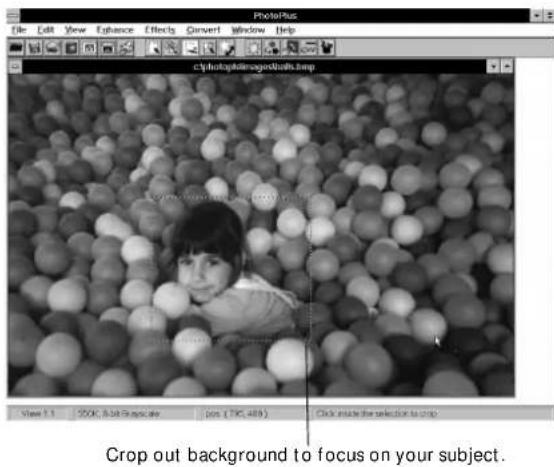
3. Click outside the selected area if you change your mind or want to start over. When you move the mouse pointer inside the selection, it turns into a pair of scissors. Click inside the selection to "cut away" the rest of the picture.
Resizing
You can use the Resize tool to enlarge or reduce a selected part of an image. Then you can use the resized area like any other selection—by cutting, copying, or pasting it, and so on. Resizing opens up lots of creative possibilities. To change the size of an entire image, use the Image Size command on the Edit menu.
Resizing a Selection
Follow these steps:
1 Click the Resize tool.

2 Click and drag on the part of the image you want to resize. When you release the mouse button, an "animated" rectangle surrounds the selected area. 3 Click and drag a corner of the selection to change its size. The selected area "floats" on top of the original image; you can move it by clicking inside the selection and dragging with your mouse. 4 To remove the selection mask, click the Crop tool and then click the image outside of the selection.
Resizing an Image
When you change the size of an image, you have several choices to make:
You can keep the aspect ratio (height-to-width proportion) of the original or change it. You can set an exact size for the image's height or width (or both) in pixels. Or, you can set a percentage of enlargement or reduction. You can change the image's resolution (up to 1200 dpi or more, depending on your computer's memory).
Follow these steps to resize an image:
1 Choose Image Size from the Edit menu. A dialog box like the one to the right appears. 2 Click to uncheck Keep Aspect Ratio if you want to change the height-to-width proportion. Leave it checked if you want to keep the proportion.
3 Enter new values for the size (in pixels) or percentage of enlargement or reduction. For example, you would enter 300 to make the picture three times larger.
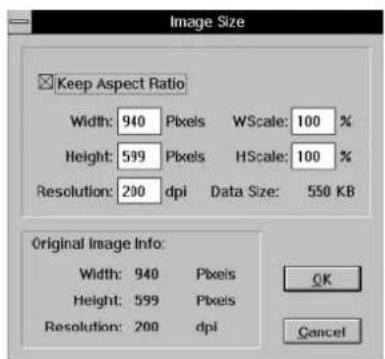
4 Enter a value for the image's resolution (dots per inch). Increasing resolution allows you to print high resolution images at any size. 5 Click OK to apply the changes to your image.
NOTE
To maintain image quality when printing, you should always increase the resolution when you enlarge an image. For example, if you scale a picture by 600 percent (make it six times larger), you should increase the resolution from 200 to 1200.
Rotating
You can use the Rotate tool to tilt or turn a selected part of an image. To rotate an entire image to the exact degree you want, use the Rotate command on the Edit menu.
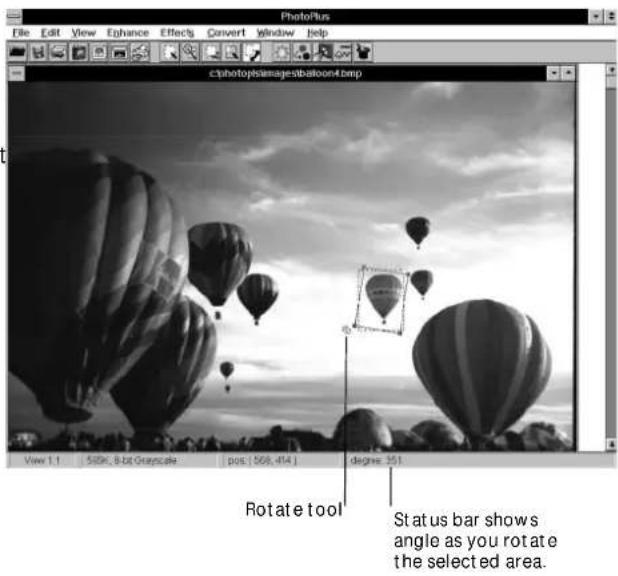
Rotating a Selection
Follow these steps:
1 Click the Rotate tool.

2 Click and drag on the part of the image you want to rotate. When you release the mouse button, an "animated" rectangle surrounds the selected area.
3 Click and drag a corner of the selection to rotate it.
The selected area "floats" on top of the original image; you can move it by clicking inside the selection and dragging with your mouse.
4 To remove the selection mask, click the Crop tool and then click the image outside of the selection.
Rotating an Entire Image
You can use the Rotate command on the Edit menu to rotate either a selected area or an entire image. With this command, you can even set the exact degree of rotation. Follow these steps:
1 Choose Rotate from the Edit menu. The following list of choices appears:
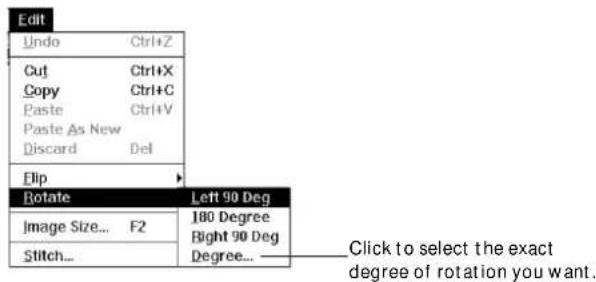
2 Choose the angle you want, or choose Degree to display the Rotate dialog box, shown to the right.
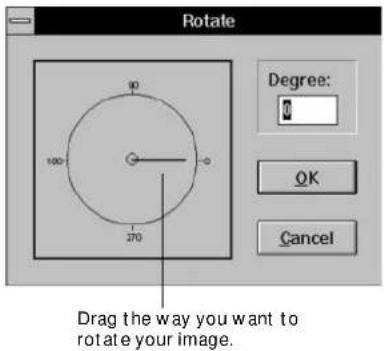
3 Enter the exact degree of rotation in the box or drag the dial. 4 Click OK to rotate the image.
Flipping an Image or Selection
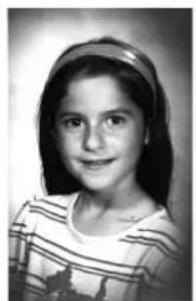
You can use the Flip command on the Edit menu to reverse or "turn over" a selected area or an entire image. Horizontal flipping is a great technique to use when you're printing a T-shirt transfer. Then the image is flipped back the right way on the T-shirt.
Follow these steps:
1 Select the area you want to flip, or make sure no area is selected if you want to flip the entire image. 2 Choose Flip from the Edit menu, and then select Horizontally or Vertically. Your image or selection is flipped. 3 If you flipped a selected area, click the Crop tool and then click the image outside of the selection to remove the mask.

Converting Image Types
Converting images gives you the maximum flexibility for editing, displaying, and printing your pictures. Keep in mind that changing an image's data type is permanent and sometimes loses information; you should always keep the original image file and use the Save As command to create the converted file.
Five image data types are available on the Convert menu:
Convert
To 1-bit Black-White
To 8-bit Grayscale
To 4-bit Index 16 Color
To 8-bit Index 256 Color
To 24-bit RGB True Color
1-bit black-and-white
This type of image is like a drawing with no shades of gray. You must convert black-and-white images
Image flipped horizontallyOriginal image to grayscale if you want to use PhotoPlus enhancements or special effects.
8-bit grayscale
This type of image contains 256 shades of gray, like a black-and-white photograph. You can use most PhotoPlus tools and commands with grayscale images. If you're planning to print a color image with a black-and-white printer, you should convert it to grayscale. This makes the image file smaller (in bytes) and faster to process.
4-bit indexed 16-color
Some older VGA monitors and software applications can display only 16 colors. Use this data type for images that may be viewed on low-resolution systems or used with older software.
8-bit indexed 256-color
Some Super VGA monitors and software can display only 256 colors. Use this data type for the best image quality on low-resolution systems or with some software applications.
PhotoPlus special effects and some other features don't work on indexed color images.
24-bit RGB True Color (over 16 million colors)
This type of image provides the most accurate color and gives you the most options for editing and enhancing in PhotoPlus. You can convert an indexed color image to this type for editing purposes. The image won't look different, but you'll be able to use all of the PhotoPlus features to edit and enhance it.
NOTE
When you're finished editing, you can print your images by clicking the Print button. See page 2-7 for more information.
4| Enhancing: Playing with Your Images
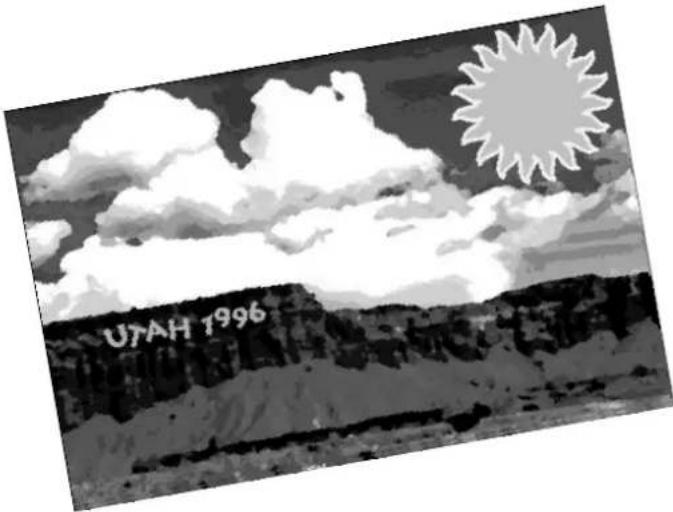
Have you ever looked at a dark picture and wished you could "turn the lights up" a bit? Or fix the off-color skin tones you sometimes get when you take pictures indoors? With PhotoPlus software you can! And that's just a start. Using your imagination and PhotoPlus special effects, you can turn an ordinary snapshot into an original work of art.
Here's what this chapter covers:
| Adjusting brightness and contrast | Adjusting hue and saturation Setting tone adjustment | Sharpening | Blurring | Using special effects.
NOTE
All the enhancement tools and menu options work in a similar way. After you choose the tool or option you want to use, you see a dialog box that shows you small samples of your image before and after the enhancement. You can use the Pan Mode to display a small portion of your image enlarged in the Before and After windows. You can then drag your mouse over the windows to pan the image area.
If you change your mind and want to cancel any enhancement, you can choose Undo from the Edit menu at any time, even after you click OK.
Adjusting Brightness and Contrast
You can adjust the brightness and contrast of an entire image or a selected part of an image. Follow these steps:
1. Select the area you want to change, or make sure no area is selected if you want to change the entire image.
2. Click the Brightness button

or choose
Brightness and Contrast from the Enhance menu. The Brightness and Contrast dialog box appears:
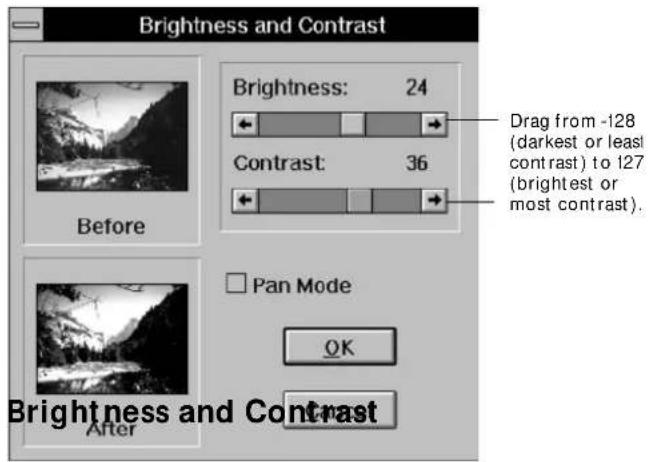
3. If you want to see a small area of your image enlarged in the Before and After windows, click the Pan Mode box.
4-2 Enhancing: Playing with Your Images
4. Slide the Brightness control right to lighten the image, or left to darken it. 5. Slide the Contrast control right to increase contrast, or left to decrease it. 6. Click OK when you're finished.
NOTE
You can make similar enhancements, with finer control, by choosing Tone Adjustment from the Enhance menu. See page 4-4 for more information.
Adjusting Hue and Saturation
Hue and saturation describe the color values and intensity of an image. Picture a color wheel like the one you used in art class, with all the colors of a rainbow arranged in a circle. When you change the hue of an image, all the colors are shifted by the same degree around the circle.
You can adjust the hue and saturation of a selected area or an entire image. Follow these steps:
1. Select the area you want to change, or make sure no area is selected if you want to change the entire image. 2. Click the Hue tool or choose Hue and Saturation from the Enhance menu. The Hue and Saturation dialog box appears:
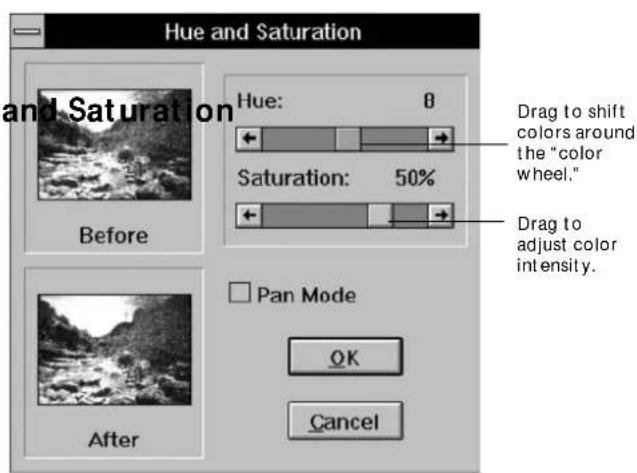
3 Slide the Hue control right or left to modify colors. Sliding it all the way to either side shifts the colors 180 degrees around the color wheel. 4 Slide the Saturation control right to increase intensity, or left to decrease it. 5 Click OK when you're finished.
Setting Tone Adjustment
The Tone Adjustment option works like Brightness and Contrast, but it gives you more control. You can adjust the brightness of three tone ranges in your image or selection: the highlights, the midtones, and the shadow areas.
Follow these steps to set tone adjustment:
1 Select the area you want to change, or make sure no area is selected if you want to change the entire image. 2 Choose Tone Adjustment from the Enhance menu. The Tone Adjustment dialog box appears:
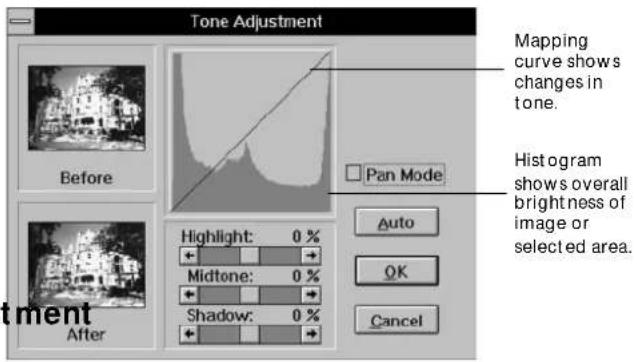
The mapping curve, which initially looks like a straight line, shows the tone adjustments you make. The horizontal axis represents the original brightness level (from dark on the left to light on the right), and the vertical axis represents the new brightness level. The histogram represents the brightness of the image or selected area. The horizontal axis represents the brightness level (from dark on the left to light on the right), and the vertical axis represents the number of pixels.
3 If you want to see a small area of your image enlarged in the Before and After windows, click the Pan Mode box. 4 Click Auto to have PhotoPlus make the tone adjustment automatically. You see the mapping curve change to reflect the modified image. 5 Slide the Highlight control to the right to expand the highlight area. This also increases contrast in the midtones. Slide the control to the left to reduce the highlight area and darken the image. 6 Slide the Midtone control to the right to lighten the midtones or to the left to darken these areas. Adjusting the midtones (also known as gamma value) does not affect the highlights or shadows. 7 Slide the Shadow control to the right to reduce the shadow area and lighten the image. Slide it to the left to expand the shadow area and darken the image. This also increases contrast in the midtones. 8 Click OK when you're finished.
Sharpening
You can use the Sharpen tool to give your image a more focused look, with harder edges. Follow these steps:
1 Select the area you want to change, or make sure no area is selected to change the entire image.
2 Click the Sharpen button or choose Sharpen from the Enhance menu. The Sharpen dialog box appears:
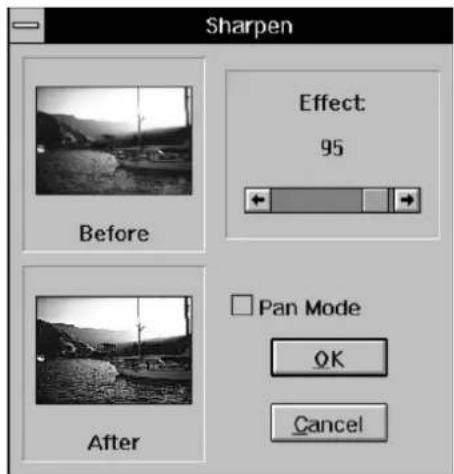
3 If you want to see a small area of your image enlarged in the Before and After windows, click the Pan Mode box. 4 Slide the control to increase or decrease the sharpening effect. 5 Click OK when you're finished.
Blurring
You can use the Blur tool to give your image a softer, less focused effect. Follow these steps:
1 Select the area you want to change, or make sure no area is selected if you want to change the entire image. 2 Click the Blur button or choose Blur from the Enhance menu. The Blur dialog box appears, as shown on the right. 3 If you want to see a small area of your image enlarged in the Before and After windows, click the Pan Mode box.
4-6 Enhancing: Playing with Your Images
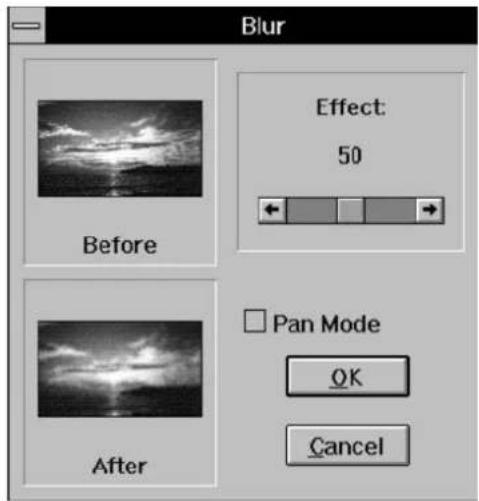
4 Slide the control to increase or decrease the softening effect. 5 Click OK when you're finished.
Using Special Effects
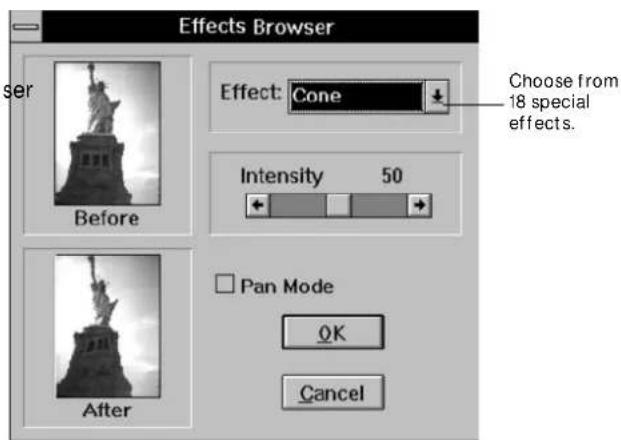
PhotoPlus special effects let you transform your images. You can create abstract or surrealistic art, design wild and colorful patterns, or turn portraits into zany caricatures. Go ahead and experiment—that's the best way to learn about special effects.
Follow these steps:
1 Select the area you want to transform, or make sure no area is selected if you want to change the entire image. 2 Click the Effects Browser button or choose Browser from the Effects menu. The Effects Browser dialog box appears, as shown on the right. 3 If you want to see a small area of your image enlarged in the Before and After windows, click the Pan Mode box. 4 Choose the effect you want. 5 Slide the Intensity control to increase or decrease the intensity of the special effect.
6 Click OK when you're finished.
For even more unusual results, try combining two or more of the effects listed below.
| Painting | Wrinkle | Cone |
| Sketch | 3D Grid | Sphere |
| Film Grain | Mosaic | Whirlpool |
| Splash | Emboss | Spiral |
| Melting | Motion Blur | Cylinder |
| Ripple | Fisheye | Ribbon |
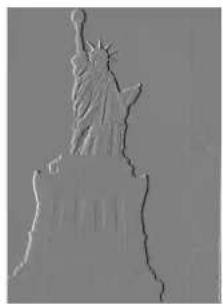
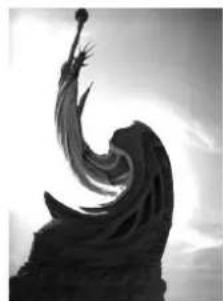
Here's what some of the special effects look like:
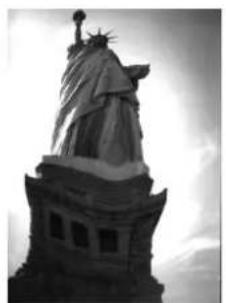
Fisheye Emboss

Ribbon
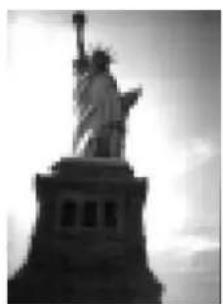
Mosaic
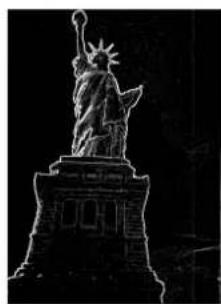
Sketch Whirlpool
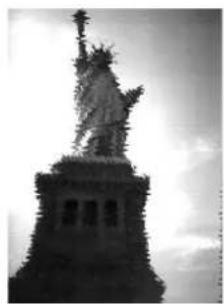
Ripple

Wrinkle

Projects: Fun Things You Can Do
My Baseball Players
August 1996
| Sun | Mon | Tue | Wed | Thu | Fri | Sat |
| 1 | 2 | 3 | ||||
| 4 | 5 | 6 | 7 | 8 | 9 | 10 |
| 11 | 12 | 13 | 14 | 15 | 16 | 17 |
| 18 | 19 | 20 | 21 | 22 | 23 | 24 |
| 25 | 26 | 27 | 28 | 29 | 30 | 31 |
PhotoPlus projects give you lots of ways to enjoy your scanned images. You can turn them into a slide show on your screen, with animated fades and dissolves between the pictures. Or install them as your Windows screen saver.
You can use the PhotoPlus templates to create a customized calendar, with a picture and caption for each month, or "matted" pictures with text and professionally-designed borders.
This chapter covers the following:
Making a slide show, Making a screen saver, Using the matte template, Using the calendar template.
Making a Slide Show
You can turn any album into a slide show that you can share with friends and family. For instructions on how to create an album, see page 2-9.
Follow these steps to turn your album into a slide show:
1. Click the Slide Show button. The Slide Show dialog box appears:
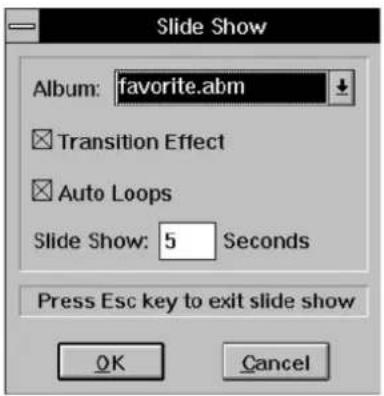
2. Click the down arrow and choose the album you want to use. 3. When you leave the Transition Effect box checked, PhotoPlus displays various fades and dissolves between images. If you don't want these effects, click the Transition Effect box to remove the check. 4. When you leave the Auto Loops box checked, PhotoPlus plays the slide show continuously (until you press Esc). To play the slide show only once, click the Auto Loops box to remove the checkmark. 5. Enter the number of seconds you want to see each image. 6. Click OK to start the show. You can press Esc to exit the show at any time.
Making a Screen Saver
A screen saver is like a slide show that plays whenever your computer is idle for more than a minute. You use the Windows Control Panel to turn an album into a screen saver.
5-2 Projects: Fun Things You Can Do
NOTE
If you need help creating a screen saver, see your Windows documentation.
Follow these steps:
1. Open the Windows Control Panel. 2. If you're using Windows 3.1, double-click Desktop. You see the Screen Saver box. If you're using Windows 95, double-click Display, and then click the Screen Saver tab. 3. Click the Screen Saver Namedown-arrow to display the list, and choose PhotoPlus Slide Show. 4. Click Setup or Settings. 5. Choose the album you want to use, and set the other options if you want. Click OK when you're finished. 6. Set the Delay or Wait time.
7. Click Test or Preview if you want to see a sample of your screen saver. 8. Click OK when the screen saver is set up the way you want.
Using the Matte Template
You can use the Template feature to create a framed picture with personalized text. Choose from 8 attractive backgrounds to design your printout.
NOTE
Before you use the Template feature, make sure your printer is set up correctly. (You must have a printer driver installed to use a Template.) Choose Printer Setup from the File menu to check the settings. The Paper option for EPSON Stylus® printers should be set to 8 1/2 · 11, centered. See your printer documentation if you need more information.
Follow these steps to get started:
1. Click the Template button.


The Template dialog box appears:
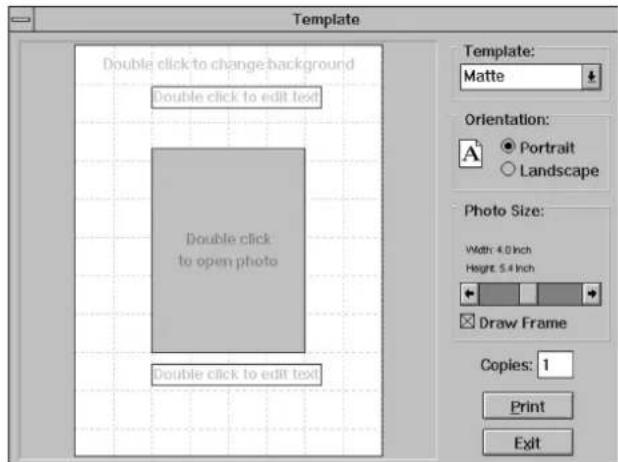
If you have an image open, it appears in the dialog box window.
2. Click the down arrow to select Matte, if it's not already selected.
3 If your screen doesn't display the image you want to use, double-click the gray rectangle or existing picture. A file selection dialog box appears. 4 Select your picture file and click OK. The image appears in the center of the page. 5 Choose the Portrait or Landscape page orientation. 6 Drag the slider if you want to change the size of the image. 7 When you leave the Draw Frame box checked, PhotoPlus draws a line around your picture. If you don't want a line around the picture, click Draw Frame to remove the checkmark. 8 Click and drag your image to place it where you want.
Adding Background
You can add a custom color background to your picture or choose from 9 patterned backgrounds.
NOTE
Your picture takes longer to print with a colored or patterned background. You'll print faster and use less ink without a background.
Follow these steps to add a background:
1 Double-click the background. The Template Background dialog box appears:

2 Click the down arrow to choose a color or pattern.
If you click one of the pattern names (such as Birthday Party or Sports), the pattern appears in the window, behind your picture.
3 To choose a color, select Color on the list of pattern names, and then click the Change Color button. The Color dialog box appears:
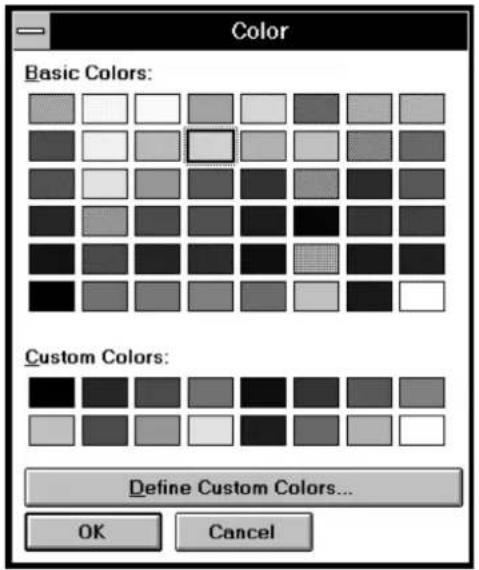
4 Click one of the basic or custom colors, or click Define Custom Colors. (See your Windows documentation for information about defining a custom color.) 5 Click OK twice. The color you chose appears in the Template window, behind your picture.
Now you can add some text, or just print your framed picture. See page 5-8 for printing instructions.
NOTE
PhotoPlus creates your matted picture with opaque layers. The background is the bottom layer, your picture is the middle layer, and any text you add is the top layer. You can even have the text print on top of your picture. Feel free to experiment to get the effect you want.
Adding Text
You can add one or two blocks of text to your matted picture, designed any way you want. Follow these steps:
1. Double-click one of the text boxes. The Edit Text dialog box appears:
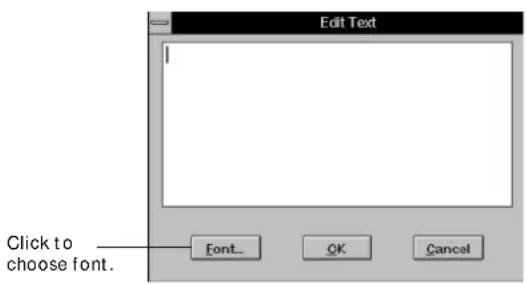
2. Type your text. If you have more than one line of text, press Enter to start a new line. (Although text appears to wrap automatically as you type, it wraps on your printout only if you press Enter.) 3. Click Font.
The Select Font dialog box appears:
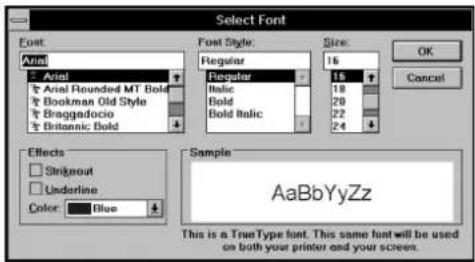
4. Choose your font, style, size, color, and any effects you want. The Sample box shows you how your printed text will look. Remember that the text prints over the background you select. If the background is dark, you should choose a light color for the text. 5. Click OK when you're finished. 6. Click OK again on the Edit Text box when you're finished typing your text.
7. If you want two blocks of text on your page, repeat steps 1 to 6 for the other block of text. You can drag the text blocks around the screen to place them where you want. You can even have text printed over part of your picture if you like.
Here's what a finished matte template might look like on your screen:
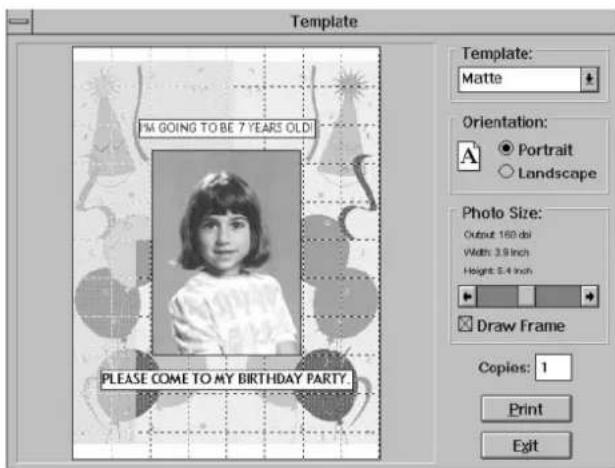
Printing Your Matted Picture
When you finish designing your matted picture, you can print it. Follow these steps:
1. Enter the number of copies you want to print. (This option is available only if your printer supports it.) 2. Click Print. 3. When you're finished, click Exit.
While PhotoPlus is open, you can reuse the template with another image and background, and different text. Just click the Template button and start creating. You might want to change some elements and reuse others.
Using the Calendar Template
You can create a personalized calendar using a different picture for each month. Then you can add a colored or patterned background, a title or caption, and design the dates in any size, color, and style you want.
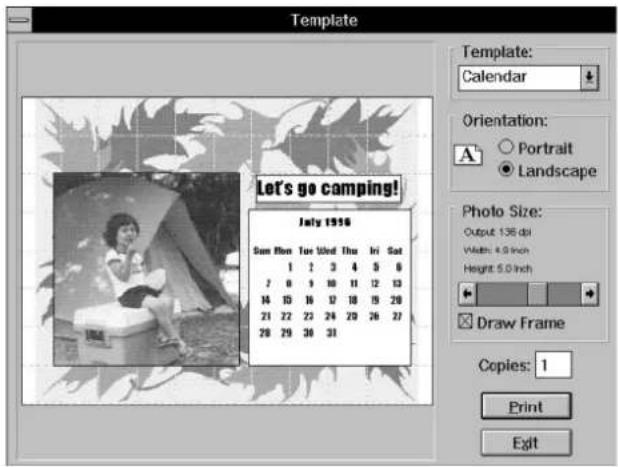
1. Click the Template button. The Template dialog box appears, as shown below. If you have an image open, it appears in the window. 2. Click the down arrow to select Calendar, if it's not already selected.
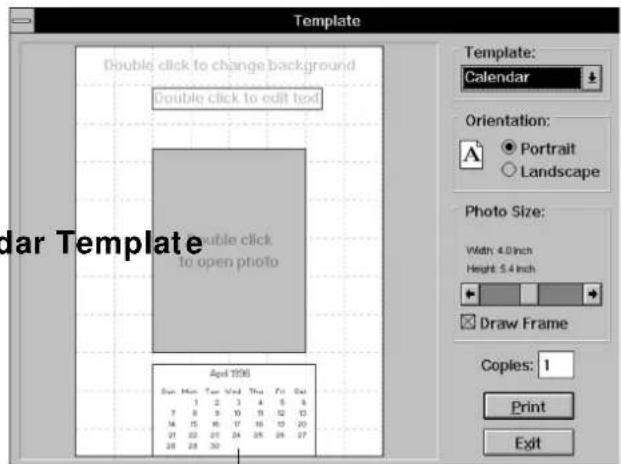
Double-click to edit dates. Click and drag to change position on page.
3 If the screen doesn't display the image you want, double-click the gray rectangle or existing picture. A file selection dialog box appears. 4 Select your picture file and click OK. The image appears in the center of the page. 5 Choose the Portrait or Landscape page orientation. 6 Drag the slider if you want to change the size of the image. 7 When you leave the Draw Frame box checked, PhotoPlus draws a line around your picture. If you don't want a line around the picture, click Draw Frame to remove the checkmark. 8 Drag your image if you want to change its position on the page.
NOTE
PhotoPlus creates your calendar with opaque layers. The background is the bottom layer, your picture is the middle layer, and the dates are the top layer. If you add text, it appears on top of all the other layers. You can experiment with these elements to get the effect you want.
Follow these steps:
1 Follow the steps on page 5-5 to add a colored or patterned background. 2 Double-click the calendar month displayed on the Template screen. The Edit Calendar dialog box appears:
Adding Background and Designing the Dates
You can add a custom-color background to your calendar or choose from 9 patterned backgrounds. Then you select the month and year, and design the date portion of the calendar.

3 Click the down arrows and select the month and year you want. 4 Click Font. The Select Font dialog box appears, as shown on page 5-7.
Choose your font, style, size, color, and any effects you want. The larger the font, the more space the dates occupy on the page. The Sample box shows you how your printed dates will look.
Remember that the dates are printed over the background you select (or over your picture, if you want). If the background is dark, you should choose a light color for the dates.
5 Click OK when you're finished. 6 Click OK again on the Edit Calendar box. The dates appear on the page with your image. 7 Drag the date box to position it the way you want.
Adding Text and Printing the Calendar
When you finish designing the picture and dates, you can add a title or caption, and then print your calendar page. Follow these steps:
1 Follow the steps under "Adding Text" on page 5-6 to add a title or caption. (The calendar has only one text box.) When you're finished with the text, you'll see something like the following on your screen:
You're ready to print.
2 Enter the number of copies you want to print. (This option is available only if your printer supports it.) 3 Click Print. 4 Click Exit when you're finished.
After you complete the first calendar page, you can continue with the next month and make a calendar for the whole year. Or you can create a new calendar page each month.
When you're ready for another creative project, you may want to try Print Artist (Chapter 6) or the PrintPaks Magnet Kit (Chapter 7).
TIP
Try creating a full-page photo calendar with an enlarged, lightly colored picture. Use the Image Size option on the Edit menu to increase the size of your picture up to 300% and the resolution up to 600 dpi. Then drag the slider on the calendar template so the picture just fills the page and becomes the background for dates and text.

Print Artist: Designing with Style

Print Artist lets you combine pictures and text to create anything from a banner to a business card. The program comes with hundreds of ready-to-use documents, "clip art" illustrations, and fonts that you can combine with your PhotoPlus images. You can customize graphic elements and lettering styles and even scan photos directly into Print Artist.
This chapter describes the following:
Getting started with Print Artist | Creating a greeting card | Adding a photo | Finishing the card design | Saving the card | Printing the card and exiting.

Getting Started with Print Artist
Print Artist is easy and fun to use. With a little practice, you may even discover some new talents in graphic design. Follow these steps to get started:
1 From the Windows 3.1 Program Manager, double-click the Print Artist icon in the Sierra group.
In Windows 95, click Start, point to Programs, and then point to Sierra. Click the Print Artist icon.
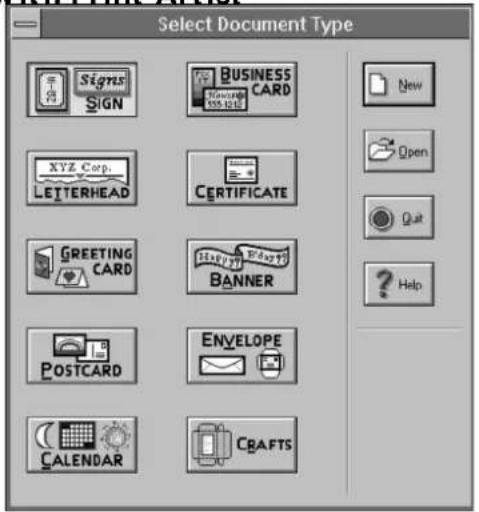
You see the Select Document Type screen, as shown to the right.
2 Click the type of document you want to create, and then click New.
6-2 Print Artist: Designing with Style
You see a screen like the following:
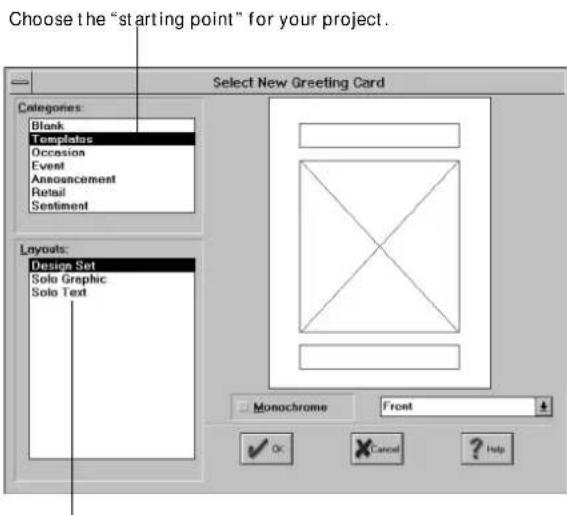
Different layouts are available for each category.
(If you choose greeting card or calendar, you first see a preliminary dialog box. For more information about creating a card, see page 6-4.)
3 Choose your category from the list.
The three main categories give you three different starting points:
Choose one of the descriptive categories if you want to start with a predesigned layout. This is a great way to start if you've never designed a document before. Most document types have lots of attractive layouts to choose from.
Choose Templates if you want to start with defined areas for text and graphics. For most documents, you can choose from several templates.
Choose Blank if you want to start from scratch. Depending on the type of document, you can choose from several layout sizes.
4 Choose your layout and click OK. The Print Artist main screen displays the starting layout.
From here, you can click the various objects in your document to select them, and use all the tools, palettes, and menus to design your project. You can move the objects around, add photos, and modify
the text and graphics to create your own personalized document. If you need more information while working with Print Artist, you can use the Help menu or press the F1 key.
The rest of this chapter shows you how to create a greeting card with your scanned photos. But this is just a start. Feel free to experiment with Print Artist and explore the creative possibilities.
Creating a Greeting Card
It's easy to create a professional-looking card using one of the predesigned layouts. You can add your own picture to the front, and then decide whether to write your own message or use Print Artist's wording on the inside. When you finish this quick lesson, you'll have a personalized valentine.
Follow these steps to choose a colorful layout and get ready to add one of your scanned images:
1 Start Print Artist as described on page 6-2.
2 Click Greeting Card, and then click New. The Greeting Card Fold dialog box appears:
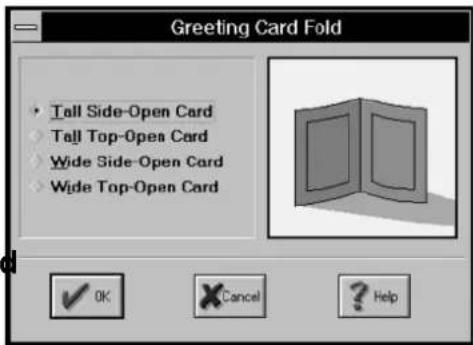
3 Click Tall Side-Open Card and click OK.
4 Choose the Category and Layout you want to use. To make a personalized valentine, choose Occasion and Valentine, Cupids. The layout appears in the window, as shown on page 6-5.
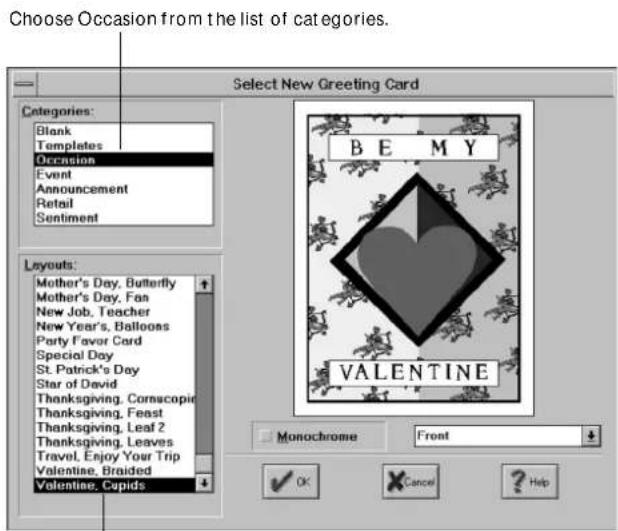
You can choose from dozens of predesigned layouts for holidays, events, and so on.
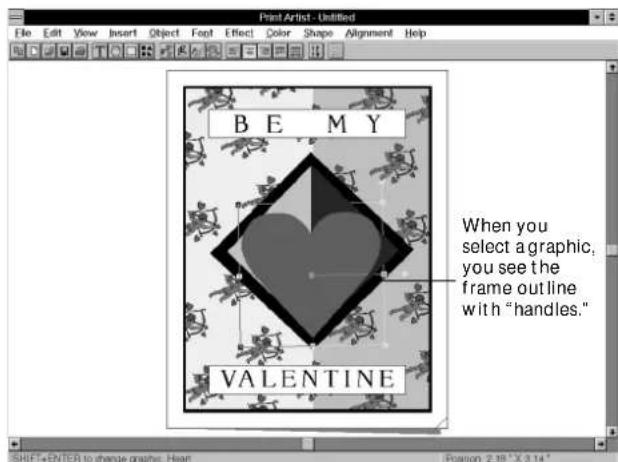
As you select each one, press Del to delete it. Now you have just the cupid background and text.
5 Click OK. The front of the card appears on the main screen, as shown to the right. 6 Click each graphic element to select it (the heart, triangle, and two squares).
Adding a Photo
Print Artist offers several ways to add photos. If you want to use an image that you've edited or enhanced, you can import it. To add a photo without modifying it, you can scan it directly into Print Artist.
Importing an Image
When you import an image, Print Artist copies the image file into the directory or folder where other image and art files are located. Then the picture is available to use with other Print Artist projects. Follow these steps to import a picture:
1 Choose Import from the File menu. The Import dialog box appears, as shown to the right. 2 Make sure JPEG is selected under List Files of Type. (Or select a different file type if the picture you want to use is not saved in the JPEG format.)
![Import. Document Name: narlyn.jpg, avalon.jpg, balloons.jpg, balls.jpg, baseball.jpg, bruce.jpg, cake2.jpg, camping.jpg, conyon.jpg, clane11.jpg. Directories: c:\photopls\photos [.]. Drives: [c-]. Preview window. List Files of Type: JPEG (*jpg). Preview Graphic >>. OK Cancel ?Help](/content/2026/06/1351661/images/49dc0f9aa153e7ee2360ed14eb28fcf18331f058026396e1e081abeb33dc400d.jpg)
Click to display image in preview window.
3 Double-click the Directories box to display the directory list. Then double-click the directory or folder containing your PhotoPlus images. (The default is CA PHOTOPLS PHOTOS.) 4 Locate the picture you want. You can click the Preview Graphic button to check if you have the right picture. 5 Double-click the image file you want to use. The picture appears on the front of your valentine.
Scanning Pictures in Print Artist You can add a picture by scanning it directly into Print Artist. Follow these steps: Enter a name for the picture (up to 8 characters) and click OK. Print Artist saves the image in the BMP format and stores it in the C:\SIERRA\PA directory.
1. With the front of your valentine displayed on the Print Artist screen, choose Select Source from the File menu. You see the Select Source dialog box, as shown on page 2-2. 2. Click PhotoPlus Scan, and then click Select. 3. Choose Acquire from the File menu. You see the PhotoPlus Scan screen, as shown on page 2-3. 4. Follow the instructions on page 2-3 to scan your picture. Then click Transfer to complete the scan. You see the following dialog box:
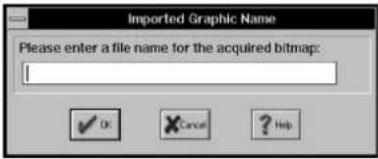
and click OK. Print Artist saves the image in the BMP format and stores it in the C:\SIERRA\PA directory or folder. Your picture appears on the front of the valentine, as shown below:

Adding Text
After you add your picture and are satisfied with the front of your card, you can add text on the inside. Follow these steps:
1. Click the gray shadow to "open" the card or choose Inside Right from the View menu. You see the inside right panel:
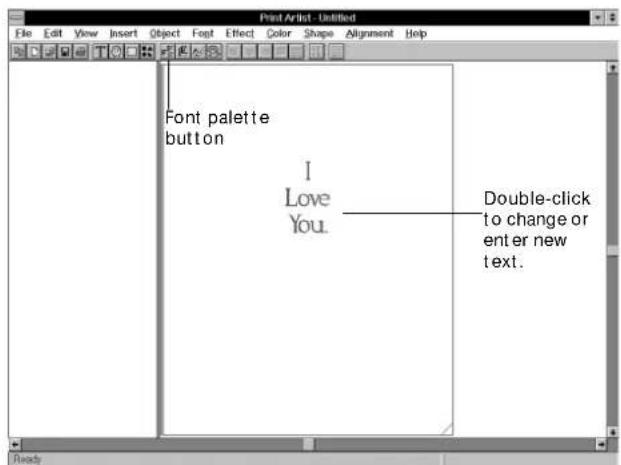
2. Double-click the text. The Change Text window appears, as shown below:
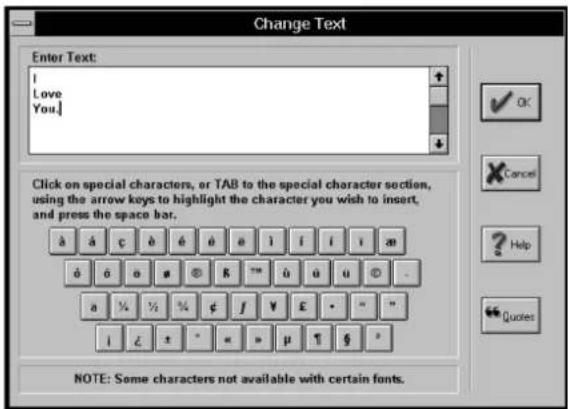
3. Type new text if you want (or click Quotes to choose from some famous quotations) and click OK to return to the main screen.
4. With your text selected, click the Font palette button.
The Font palette appears:
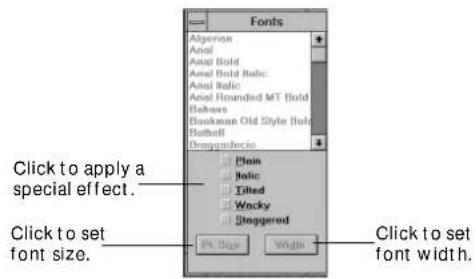
5. Click the font you want to use. Your text changes as you browse through the fonts. You can move the Font palette if you can't see your text. 6. Choose the style, size, and width of the font. Here's an example of text with several special effects:

Adding a Graphic
After you finish working with the text, you can add a colorful graphic to the inside left panel of the card. Follow these steps:
1. Click the gray shadow on the left side of the card or choose Inside Left from the View menu. You see the inside left panel. 2. Click the yellow Insert Fill button. A square block of yellow color appears on the left panel, as shown on the next page. This is the background for the graphic. 3. Click and drag one of the corner handles to enlarge the color block. 4. Click the Color palette button.
The Color palette appears: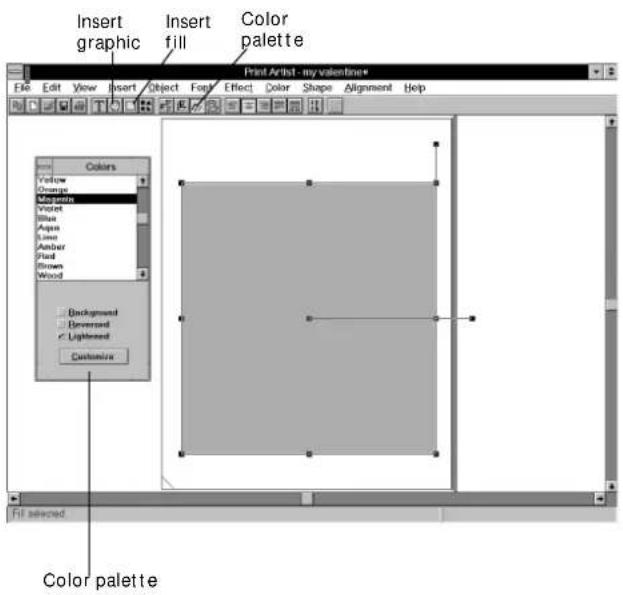
5 Click the color you want to use. Then click the Color palette button again and select Lightened. Click Customize if you want to experiment with color. 6 Click the Insert graphic button.
6-10 Print Artist: Designing with Style
The Graphics Grabber dialog box appears: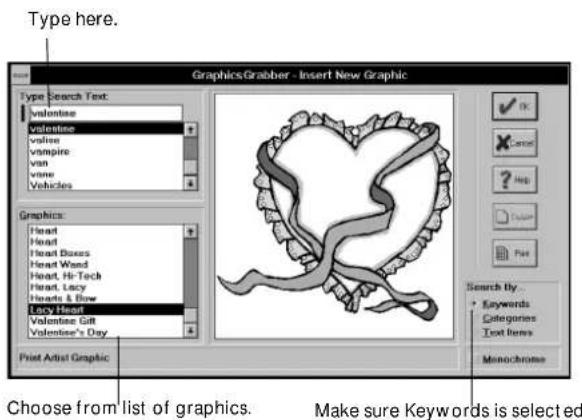
7 Type valentine in the Type Search Text box. The Graphics box lists the available valentine pictures. When you select a picture, it appears in the window. 8 Select the Lacy Heart graphic and click OK. The inside left panel of the card displays the graphic on top of the color block.
Now you can save and print your card.
Saving Your Card
When you're finished designing the card, follow these steps to save it:
1 Click the Save button. The first time you save your card, the Save As dialog box appears:
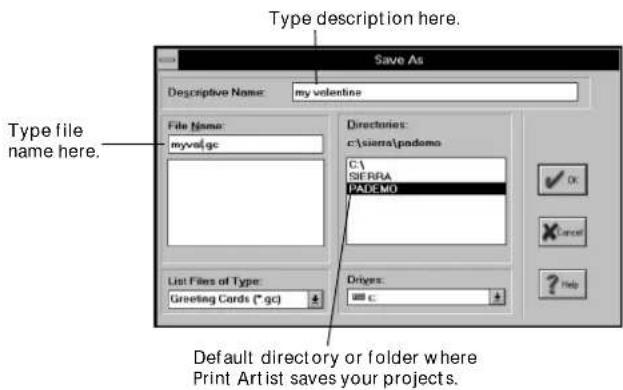
2 Type a descriptive name (up to 32 characters) for your project.
3 Type a file name up to 8 characters long. Print Artist automatically adds the .GC extension (for greeting cards). 4 Click OK when you're finished.
Printing Your Card and Exiting
After you save the card, you're ready to print it. Follow these steps:
1 Click the Print button. The Print Control Panel/Preview window appears:
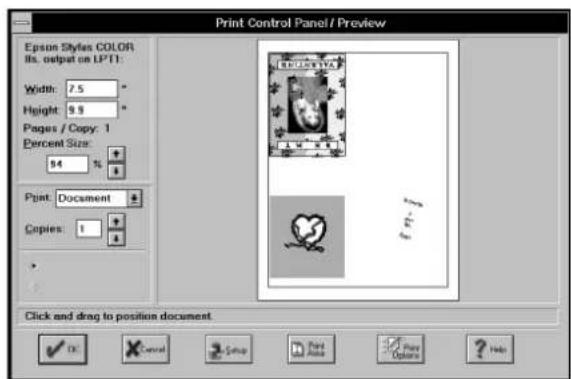
2 Adjust printing options if you want and click OK to print your card. 3 Fold the printed greeting card, and it's ready to deliver. 4 When you're finished using Print Artist, choose Exit from the File menu.
If you liked making the card, you can try making a personalized envelope to go with it. Or use your scanned pictures to make personalized business cards, signs, banners—even party hats and other folded paper craft items. For Print Artist technical support, call (206) 644-4343.
When you're ready for some family fun with the PrintPak Magnet Kit, turn to Chapter 7.
TIP
The calendar on page 1 of the Introduction was created using some special Print Artist techniques, as described below:
- Start with any of the calendar layouts.
- Select one of the date graphics.
- Open the Edit menu and choose Select all Symbols.
- Then choose Change Graphic and select the shell graphic.
- Open the Edit menu again and choose Select All, and then Copy.
Create a new, blank letterhead document and choose Paste from the Edit menu.
Choose Shrink to Fit from the Object menu to fit the calendar on the page.
Then add your photo.

PrintPaks Magnet Kit: Family Stuff

The PrintPaks Magnet Kit lets you create 8 personalized magnets using your own pictures. The kit comes with special EPSON paper for inkjet printers and adhesive-backed magnet sheets. You can always order refills if you want to make more magnets.
Your whole family will have fun with the following activities:
Getting ready to use the magnet kit, designing the magnets, printing the designs, and putting the magnets together.

The CD-ROM software includes a cute animated guide dog named Max, who tells you exactly what to do.
NOTE
You need to have a sound card installed in your computer and a mouse and speakers connected in order to use the magnet kit. Make sure you turn on the speakers to hear Max's voice.
Before you use your scanned pictures with the Magnet Kit, you may need to enhance and crop them so they'll look their best on the magnets. You also need to save or copy them to the C:\PRINTPAK\PHOTOS folder or directory.
NOTE
Before you start, make sure your system is set to the highest color display mode (24-bit color or millions of colors). The Magnet Kit works best in this mode. (Other software programs may work best in other modes.) See your Windows documentation if you need instructions for changing video display modes.
Getting Ready to Use the Magnet Kit
You first need to scan in the pictures you want to use and crop and enhance them if necessary. Then save or copy the files to the PHOTOS folder on your hard disk, and start the program. Follow these steps:
1 Scan your pictures as described in Chapter 2.
2 If necessary, crop the pictures to center the subject both vertically and horizontally. Be sure to leave some space around the subject for the magnet border. (See page 3-8 for instructions on cropping.) You may also want to edit and enhance the pictures for better color, lighting, or special effects. See Chapters 3 and 4 for instructions.
3 Save the pictures as TIFF- or BMP-type files in the \PHOTOS folder (or subdirectory) in the C:\PRINTPAK folder (or directory). For information about saving files in different formats, see page 2-8.
4 Put the PhotoPlus CD in your CD-ROM drive. (The Magnet Kit runs from the CD.) Now you're ready to run the multimedia Magnet Kit software program. 5 From the Windows 3.1 Program Manager, double-click the Magnet Kit icon in the PrintPaks group.
In Windows 95, click Start, point to Programs, and then point to PrintPaks. Click the Magnet Kit icon.
The multimedia introduction welcomes you. At this point, all the instructions you need are presented on your screen. If you're not sure what to do, click Max's nose and he'll tell you. Make sure your speakers are turned on so you can hear Max's voice and other sound effects.
You see the Menu Page:
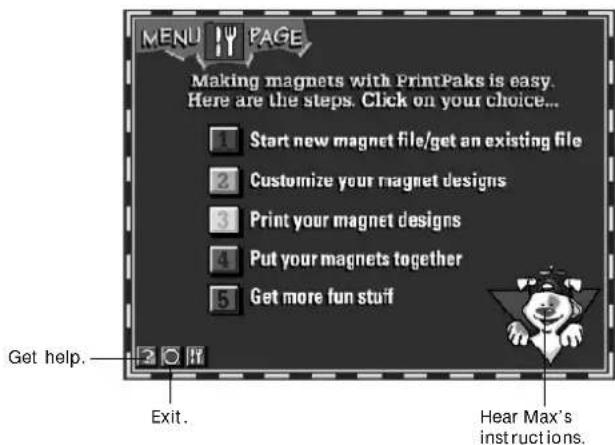
Creating the Magnets
Even young children can follow Max's instructions and the cartoon animation on the screen. Here are the steps:
1. Click the red button to continue from the introduction.
2. Click the Number 1 button. 3. Type a name in the yellow text box for the set of magnets you'll create and click the red button.
You see a screen like the one below:

You'll make four magnets, one in each of the following shapes:


You can customize each magnet by doing the following:
Add your own photo. (You can also add pictures from the treasure chest or your own clip art or scanned art.) Choose a border. | Add a name or short message.
4. Click the first tab to start designing the first magnet. The polygon shape appears in the magnet window, as shown at the left. 5. Click the camera. You see a list of pictures you can choose from, as shown on the right. These are the picture files you copied to the PHOTOS folder. 6. Click the picture you want to use. You see it in the center of the magnet design, as shown on the right. 7. Choose the border design and add a name or message if you want. 8. After you finish customizing a magnet, click another tab.
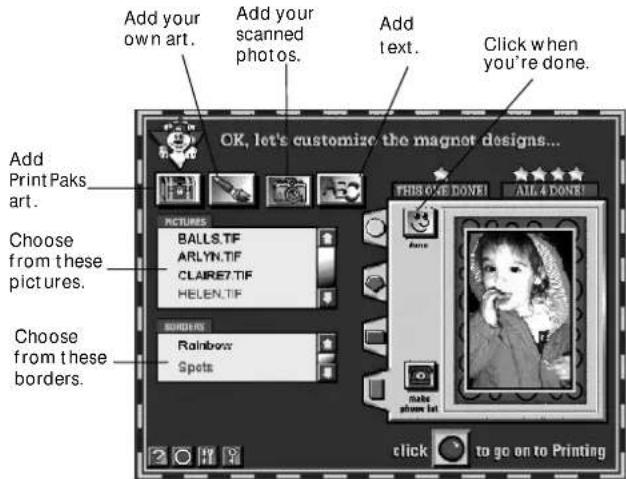
9. When you finish designing all four magnet shapes, click the done button, then click the red button to continue. You see a screen telling you how to print.
Getting Ready to Print Your Magnets
When your four magnet designs are complete, you can print them. You need to set up your printer first. Follow these steps:
1. Click the red button on the printing instruction screen. You see a printer selection screen like the following:

2. Click the name of your printer from the list on the left. (Your printer may be the only one listed.)
3. Check your printer to see which way the paper is loaded. Click Front Load or Top Load and then click the red button. You see printer set-up instructions.
4 Click the blue button to check your settings. You see a Windows Print Setup dialog box like this one:
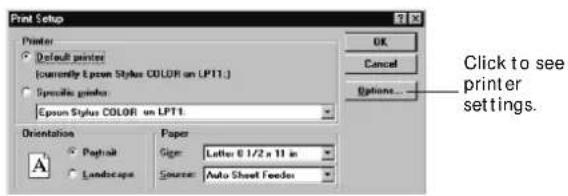
5 Click Options. You see a printer options dialog box. Different printers offer different settings.
6 Make sure your printer is set for the following:
| Best quality (720 DPI, photo quality on EPSON Stylus printers)
| Coated paper
| Portrait (tall) orientation
| Letter size (8 1/2 x 11).
7-6 PrintPaks Magnet Kit: Family Stuff
Click OK when you're finished setting options on each of the printer setup screens, and click the red button when you're ready to go on. You see a screen like the following:
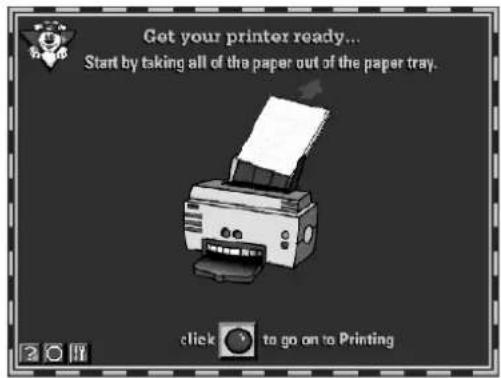
Printing Your Magnets
It's a good idea to print your magnet designs on a plain sheet of paper before you use the special Magnet Kit paper. You can check your images and make sure your printer is working correctly.
Follow these steps:
1 To test your magnet designs, make sure you have regular paper in your printer's tray. Don't take out the paper or load the special coated paper. Just click the red button to go on to the next screen:
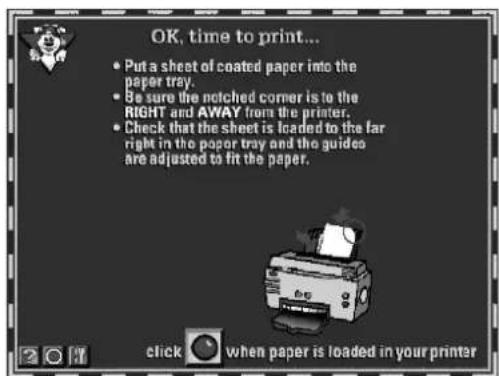
2 Click the red button to print your test sheet. 3 If you want to print another test, click the blue button and repeat steps 1 and 2.
4 When you're satisfied with your test print, remove the regular paper and load a sheet of the special Magnet Kit paper, following the instructions on the screen. 5 Click the blue button to print. You may need to gently guide the special paper into the printer by hand. 6 When you're finished printing, click the red button to go on.
After your designs are printed, you need to trim the paper, attach it to the adhesive magnet sheet, and cut out the magnets. Colorful animation on the screen shows you exactly what to do.

Here's where you start:
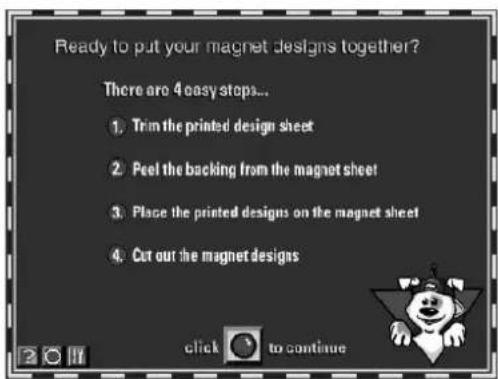
1 Click the red button to see what to do next. 2 Trim the bottom of the sheet as shown on the screen, then click the red button. 3 Peel the backing from the magnet sheet as shown, then click the red button. 4 Place the printed sheet on the magnet and position it carefully before you press it down. Then click the red button again.
7-8 PrintPaks Magnet Kit: Family Stuff
You see the final screen of instructions:
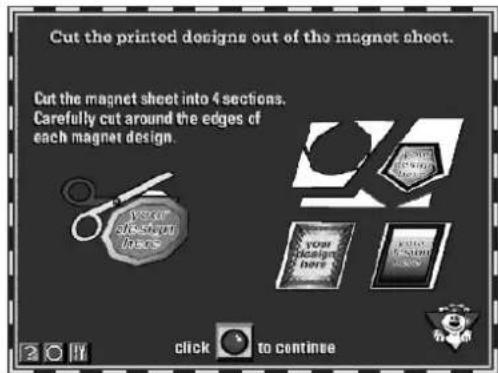
5 Cut out each of your magnets and click the red button. You're finished!
From here, you can start over again to make a new set of magnets, find out more about refills and other kits, or close the Magnet Kit software.
For Magnet Kit technical support, call (503) 295-6182.

CardScan: Instant Address Book
PhotoPlus does more than just scan photos. You can scan business cards too. The CardScan SE software lets you capture the data on the cards and organize it into an electronic address book.
You can sort the information and use it as a handy reference for all your everyday communication. You can even use the data to print mailing labels, rotary cards, envelopes, and customized lists.
This chapter covers the following:
| Starting CardScan | Scanning your cards | Verifying the information | Working with your address list | Printing.
NOTE
Your CardScan SE software is a special edition of the product. Some features of the full version, such as exporting data and dialing phone numbers through your modem, are not available in the special edition. Click Upgrade in the Help menu for information about purchasing the full version of CardScan.
Starting CardScan
Before you scan your cards, you need to start the program and set it up to work with your PhotoPlus scanner.
Follow these steps:
1 From the Windows 3.1 Program Manager, double-click the CardScan icon in the CardScan group. In Windows 95, click Start, point to Programs, and then point to CardScan. Click the CardScan icon. The first time you use CardScan, you see a registration screen. 2 You can choose to register immediately or at a later time. The first time you use CardScan, the Select Source dialog box appears. 3 Select PhotoPlus Scan and click OK. You see the CardScan opening screen, as shown on the right.
From this screen you can scan in your cards, edit the information, view your address list, and use all the CardScan features. If you need more information, click the Help button or choose Contents from the Help menu.
Click to start scanning.
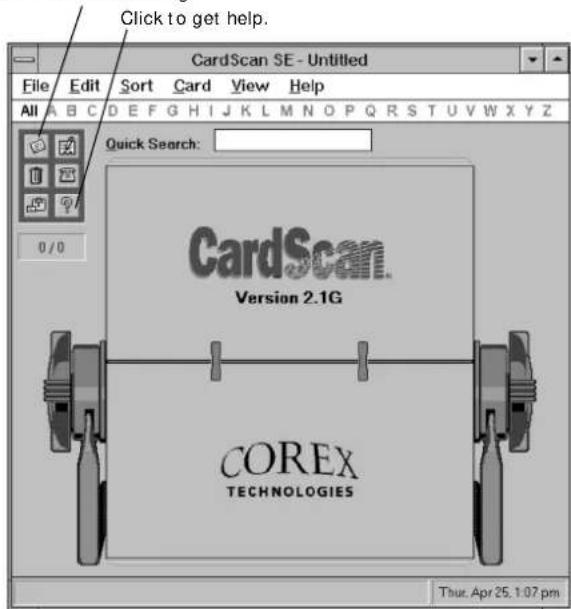
8-2 CardScan: Instant Address Book
Scanning Your Cards
Scanning business cards is a lot like scanning photos, but the end result is more than just an image. The CardScan software uses OCR (optical character recognition) technology to read the card and sort the information into data fields like Name, Company, Address, and so on.
You can scan a batch of cards and then process them all together, or process each card after you scan it.
NOTE
Scanning works best with cards printed in dark ink on a light background. You may not be able to scan cards printed on dark, glossy, or metallic paper. The software may not be able to recognize text printed at an angle or in a very small, stylized, or light font. (You can add a card manually following the instructions on page 8-7.)
Follow these steps to scan your cards:
1 Place the card in the scanner as shown:
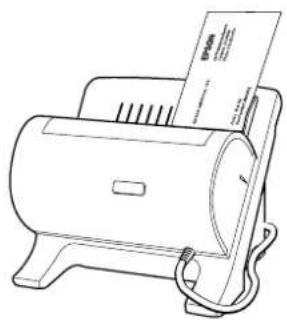
normal "landscape" business card
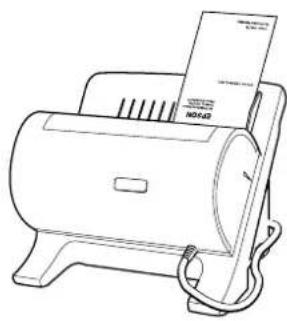
"portrait" business card
2 Click the Scan button on the screen.

The PhotoPlus Scan window appears (with the warm-up message).
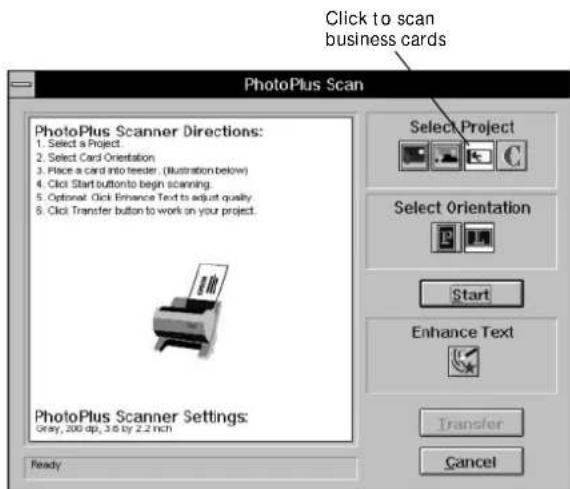
3 Click the business card icon. This sets the best PhotoPlus scanning mode (200 dpi grayscale) for most business cards.
NOTE
If you don't get the results you expect, you can experiment with the scanning mode. Click the Custom icon and try the 400 dpi 1-bit lineart setting. This mode may work better for simple cards printed in black on white.
4 Click Start or press the start button. Your card gradually appears in the scan window. 5 If it looks too light, click Enhance Text. You see the Enhance dialog box:
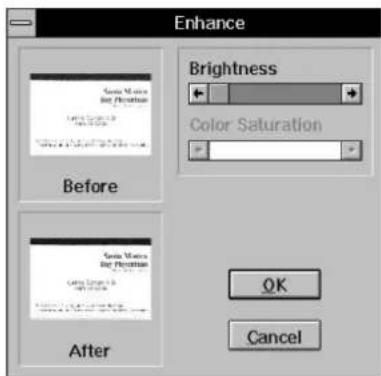
6 Slide the Brightness control left to darken the image, and click OK. 7 Click Transfer. CardScan saves the card image and asks if you want to scan another card.
You can scan a series of cards, and then process them all together, or scan and process each card individually.
NOTE
To avoid overloading your system, don't try to scan and process more than 20 cards in one batch.
8 Click No to process the card you just scanned.
CardScan displays its progress as it processes the card. When processing is complete, text appears in the various fields on the screen, as shown to the right.
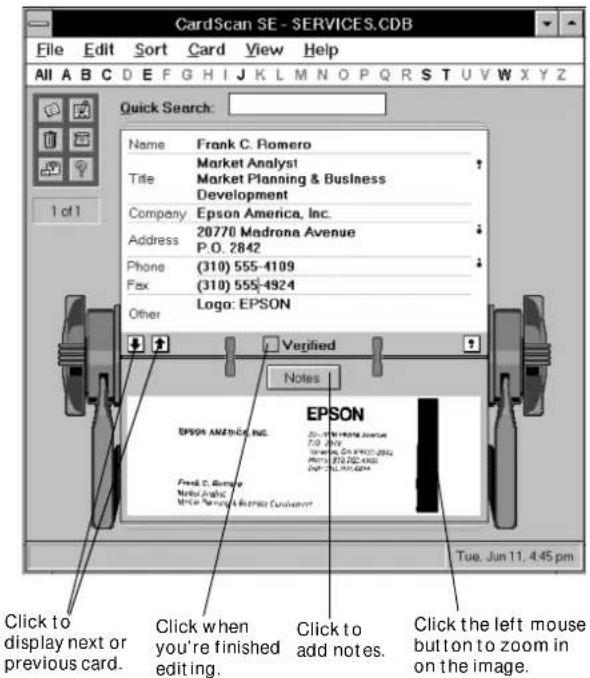
Editing the Information
Most of the time, you need to "touch up" the information after you scan it. CardScan may not be able to recognize all of the text or sort it into the correct fields. Unrecognized items appear in the Other area.
Here are some ways to edit card information:
Click any field to correct the text in it. CardScan automatically enlarges the corresponding part of the business card image. Highlight text with the mouse and choose Cut or Copy from the Edit menu. Choose Paste from the Edit menu to place the text in a different location. Use "drag and drop" to move text from one field to another. Click the arrows to display the next or previous card. | Click the left mouse button on the business card image to zoom in (enlarge it), and click the right button to zoom out (reduce it).
Click the Notes button to open a text box where you can type in any notes you want. Click the Image button to return to the business card image view.
Choose Delete Image from the Card menu when you no longer need the scanned image of the card. This makes more disk space available for additional cards. Click the Verified box when you're finished touching up the information for a card.
NOTE
You can choose Preferences from the Edit menu to customize some of CardScan's features. However, you must leave on the Show source dialog option (under Scan) in order for CardScan to work with PhotoPlus.
You can continue scanning, processing, and editing cards. When you're finished, you need to save your address list before you exit.
Saving and Exiting
You only need to save your address list once. After that, any cards you scan are added to the same list, and automatically saved.
Follow these steps to save your address list and exit:
1. Choose Exit from the File menu. A message asks if you want to save your changes. 2. Click Save. The Save As dialog box appears. 3. Type a name in the File name box. CardScan adds the CDB extension to your file name and saves your file in the CA CARDSCAN directory or folder. 4. Click OK.
You can create more than one address list, for example if you want to separate business contacts from personal contacts. Choose New from the File menu to create a new address list. Then scan in your cards, and when you're ready to exit, save the list with a new name. See the next section to learn about working with your list or lists.
Working with Your Address List
Click All on the CardScan window to view a list of all your cards, as shown on page 8-8.
Here are some of the things you can do:
Search.
Type in the Quick Search box to locate all cards that contain the search text. As you type, the address list changes to show only those cards that match.
Sort.
Choose By Name, By Company, or By Verified from the Sort menu to indicate how you want the list displayed. CardScan can show the list in alphabetical order by last name or company. If you choose By Verified, the cards are sorted by date, and any unverified cards appear at the top.
Display a card.
Double-click the card you want to see.
Add a card manually.
Click the New Card button. CardScan displays a blank screen where you can enter the information.

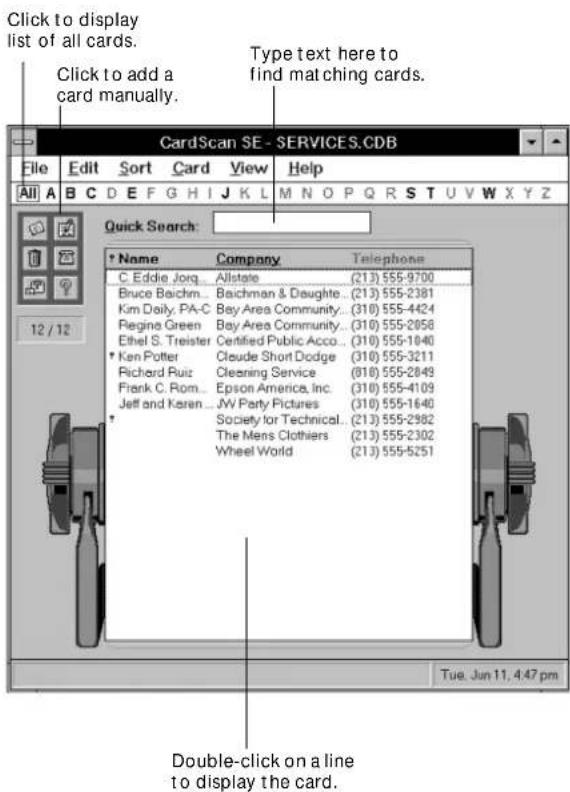
Delete a card or cards. Click and drag to select the cards you want to delete. Then click the Delete button and click Yes.
NOTE
For more information about any of these features, click the Help button or choose Contents from the Help menu.
Printing
You can select the information you want to print for each card, and choose the way you want it to look. CardScan lets you print in the following formats:
Address list | Phone list | Labels | Rotary cards | Photo (card) album | Envelopes.
Designing the Layout
Before you print, you need to choose the format and layout. Select a predesigned layout or modify a layout to suit your needs. Follow these steps:
1. Click All to display your address list.
2. If you don't want to print the whole list, enter selection text in the Quick Search box. You can select a single card, for example, by entering a name. Make sure the list shows only the card or cards you want to print.
3. Choose Page Setup from the File menu.
You see the following dialog box:
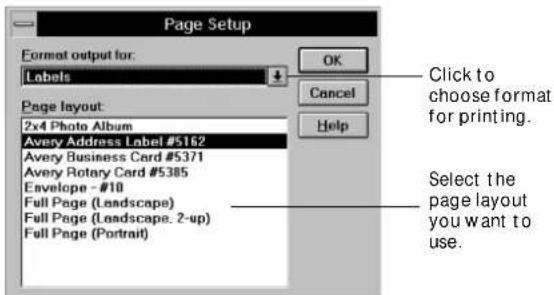
4. Click the down arrow and select one of the formats. This determines what information to print for each card. 5. Select the page layout you want to use. This determines how the information will be printed. 6. Click OK.
Previewing and Printing
Before you print, it's a good idea to check your format and layout to make sure it looks the way you want. Then you can either change it or just go ahead and print. Follow these steps:
1. Choose Preview from the File menu to check the format and layout you have chosen.
If you want to change the format or layout before you print, click the Close button, choose Page Setup from the File menu again, and make different selections.

2. When you're ready to print, click the Print button on the Preview screen or choose Print from the File menu.
3. Change print options if you want, and then click OK to start printing.
For CardScan technical support, call (617) 492-4200.

Pro Scanning: More Things You Can Do
Do you have some drawings or other images that are too big to fit in the scanner? Or already pasted into a scrapbook? You can still scan them in with PhotoPlus, using the hand-scanning feature. If a picture is too big, you can scan it in sections and then use your software to "stitch" the sections together.
Once you get the hang of it, you'll probably find lots more ways to use hand scanning. Try capturing one of your kids' drawings for a calendar or greeting card, or scanning a page of text to send by fax modem.
This chapter covers the following:
Setting the software for hand scanning, Capturing the image by hand scanning, Stitching two images together.
NOTE
The maximum width you can scan by hand is 4.1 inches. The maximum length is 10 inches. If the image you want to scan is too wide or too long, you can scan it in several passes and stitch the images together.
Setting the Software for Hand Scanning
Follow these steps to prepare for scanning by hand:

1. Start PhotoPlus and click the scan button. The Select Source dialog box appears.
2. Click PhotoPlus Scan, and then click Select. The PhotoPlus Scan window appears, as shown on page 2-3.
3. Click the Custom button.

The Scanner Setting dialog box appears:
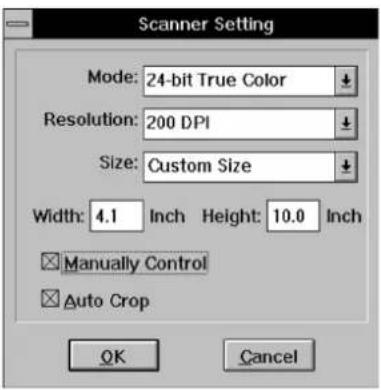
4. Set the mode and resolution, following the instructions on pages 2-6 to 2-7. 5. Choose Custom Size and enter the width and height of the image. For large images, enter the maximum width (4.1 inches) and height (10 inches). 6. Click Manually Control. 7. Click OK.
9-2 Pro Scanning: More Things You Can Do
8. Click P (portrait) or L (landscape), depending on the orientation of the image.
Capturing the Image by Hand Scanning
After you set up your software, follow these steps to scan the image:
1. Remove the cable from the cable clip on the scanner base. Then remove the scanning head from the base by pushing it up as shown below:
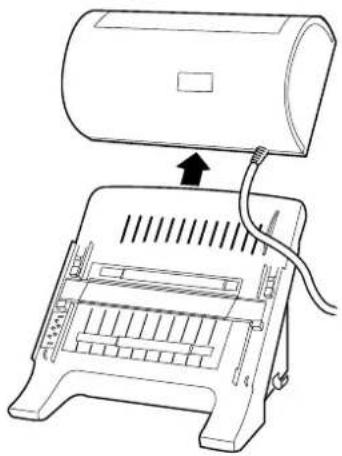
2. Place the picture or image you want to scan on a flat surface.
3. Place the scanning head on the picture, aligning the front-left scanning guide with the left edge of the image, as shown below:

4. Click Start or press the button on the scanner.
5. Move the scanner very slowly down the picture, making sure you keep it straight. Holding a ruler next to the scanner helps keep it straight. Your image gradually appears in the scan window.
If the scanner beeps, you need to slow down.
Scanning stops when you reach the set height or length. If you want to stop before this point, press Esc. Press the pink button on the scanner to pause. Then press it again to continue scanning.
6. Click Transfer to complete the scanning process. The PhotoPlus screen displays your image.
7. Click Save and type a name for the new image.
NOTE
If the original image is too wide, repeat steps 3 through 7 to scan the section(s) that didn't fit in the first scanning pass. Make sure each scanning pass slightly overlaps the previous pass. Then follow the instructions below to stitch the scanning passes together. For the best results, use a straight edge when scanning and move the scanner slowly.
8. When you're finished, replace the scanning head on the scanner. Align the tabs in the base with the holes in the scanning head as shown below, and then lock it into position.

Stitching Two Images Together
When you scan a large picture by hand, you have to do it in sections. Then you can use the stitch feature to combine the parts into one seamless image. You can also create some interesting special effects by stitching individual photos together.
Follow these steps to combine two images:
1 Make sure both images are open in PhotoPlus. 2 Choose Stitch from the Edit menu. The Stitch dialog box appears as shown:
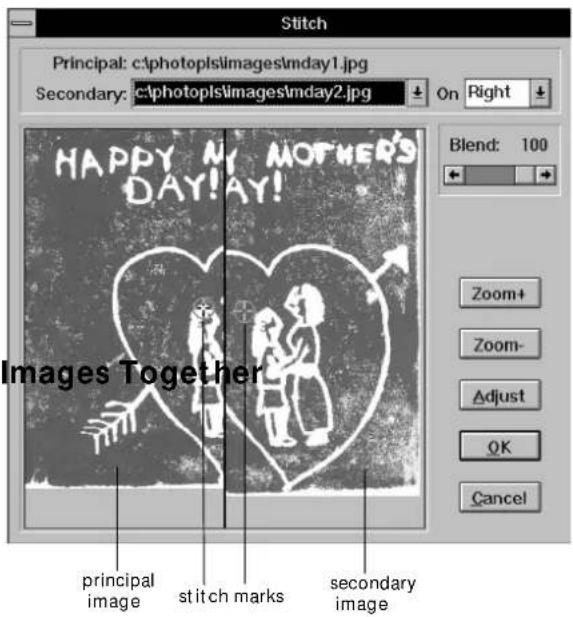
3 Choose the secondary image from the drop-down list, if necessary. The image appears in the second image window. 4 Choose the position of the secondary image in relation to the primary image: Right, Left, Top, or Bottom. The image windows may change positions to reflect the location you choose. 5 Use the slider to set the amount of blending you want between the two images. Setting the Blend to 100 gives you the smoothest transition between the two images. 6 To indicate where you want the two images to overlap, click in the image windows to move the stitch marks.
It's best to locate the marks in areas that have similar colors and brightness. Use the Zoom buttons to magnify the images if necessary.
7 Click Adjust to refine the stitch mark positions automatically.
8 Click OK to stitch the two images together.
Here's an example of the resulting combined image:
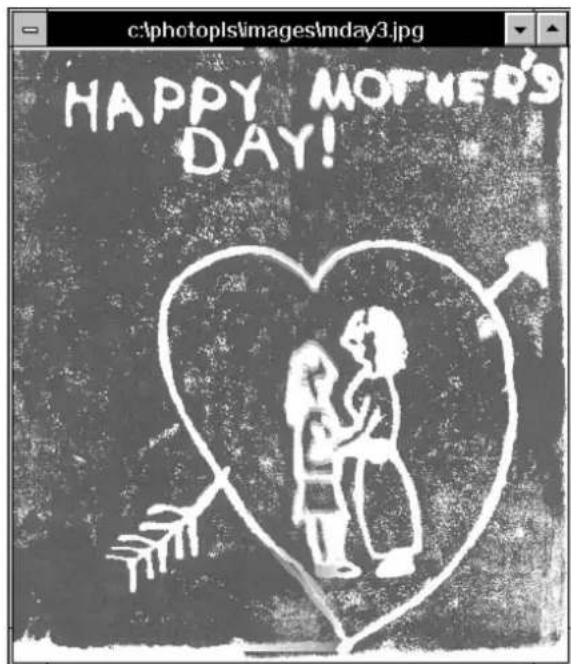

Maintenance and Troubleshooting
Your PhotoPlus needs only routine care to continue working at its best, and any problems you might run into are easy to solve. This chapter covers the following: | Caring for PhotoPlus Solving Scanner Problems Solving Image Problems.
Caring for PhotoPlus
Your PhotoPlus scanner contains delicate parts that can be damaged by shock, excessive heat, or liquid. Be sure to read the Safety Instructions in the Introduction before you clean the scanner.
Then follow these guidelines for cleaning and maintaining the scanner:
Unplug the power adapter and the parallel connector before you clean the scanner. Use a clean, dry cloth to wipe off any dust. | Don't use harsh or abrasive cleaners. Always operate PhotoPlus with clean hands, and scan clean surfaces only. If you notice a line in your scanned image, you need to clean the scan window. Remove the scanning head from the base and blow off any loose dust or dirt. Wipe the clear plastic surface with a soft, dry cloth. See pages 9-2 to 9-4 for instructions on removing and replacing the scanning head.
Do not spray cleaning fluid or water on the scan window.
Make sure the power cable is attached to the parallel connector and plugged into an electrical outlet.
Solving Scanner and System Problems
Before you call for help, check this list of problems and possible solutions:
connector, make sure the printer is turned on.
You can't plug the scanner's connector into your computer's parallel port. Your computer's parallel port. Your PhotoPlus software is correctly installed.
If you don't see the PhotoPlus Scan screen, make
Your computer's case may be too small for the connector. Use an extender connector, available at any computer store.
The scanning light doesn't come on.
Check the connection between PhotoPlus and your computer. See page 1-2 for set-up instructions.
The scanning light comes on when you plug the power adapter into an electrical outlet. Adapter into an electrical outlet connector, make sure the printer is turned on.
Unplug the adapter and plug it in again.
The scanner doesn't fully eject your picture.
Start a scan in PhotoPlus, and click Cancel when the PhotoPlus Scan window appears.
Remove the scanning head and then remove the picture. See pages 9-2 to 9-4 for instructions on
You get an error message when you try to scan. You get an error message and replacing the scanning head.
Check the connection between PhotoPlus and your computer. See page 1-2 for set-up instructions.
The scanning light comes on, but your picture doesn't. The scanning digbar while printing and picture doesn't try to scan the feed into the scanner. feed into the scanner. feed into the scanner. message. message.
The scanning head on your PhotoPlus may have loosened during shipping. Push down on the scanning head to make sure it's firmly seated on the base. You may need to remove the scanning head and snap it back into place. For instructions, see pages 9-2 to 9-4.
Press Esc to cancel the scan. Then scan again when you're finished printing. Press the pink button on the scanner to pause the scan. After you're finished printing, press the pink button again to finish scanning.

Your picture gets caught on the cable as it comes out. Your picture gets a paper jam message when you try to scan.
Remove the scanning head and snap it back into place, following the instructions on pages 9-2 to 9-4.
Make sure the cable is secured in the cable clip on the side of the scanner. If the cable comes out of the
The scanner continues to run after it has scanned your picture. The scanner continues to run after it has scanned your picture.
Remove the scanning head and snap it back into place, following the instructions on pages 9-2 to 9-4.
You can't get a picture to appear on the PhotoPlus Template screen. You can't get a picture to appear on the Template screen.
Press the pink button on the scanner. Then click Transfer to complete the scan.
Make sure you have a printer driver installed on your system, and try the Template again.
You get an error message when you try to run the image. A mesh pattern appears in a short time that can be made.
Magnet Kit. Magnet Kit.
Insert your PhotoPlus CD and click OK. Then restart the Magnet Kit program.
This happens when you scan a printed picture, because of the dot pattern used in printing. You'll get better results when you scan photographs or artwork.
You can correct many problems with scanned images using your PhotoPlus software. Other problems require different solutions. Check these suggestions and give them a try:
Your image is too large or too small.
Check the size and resolution settings in PhotoPlus and use the Image Size command on the Edit menu to change these settings if you want. Note that your file size changes when you change the image size.
You see a horizontal or vertical line in your scanned image. For more information about resizing, see pages 3-9 to 3-10.
Remove the scanning head from the base and blow off any loose dust or dirt. Wipe the clear plastic surface with a soft, dry cloth. See pages 9-2 to 9-4 for instructions on removing and replacing the scanning head.
Use the Zoom tool if you want to change the size of your image on the screen only.
Your image's colors on the screen or printed out don't match the original picture.
Make sure you let the scanner warm up before you press the Start button; then scan your image again.
Your scanned image seems too light or too dark.
Use your PhotoPlus software to adjust and enhance the image. See Chapter 4 for instructions.
Use the Brightness and Contrast, Hue and Saturation, or Tone Adjustment settings in your PhotoPlus software. Exact reproduction of colors is very difficult, but you can experiment to get as close as possible. See Chapter 4 for instructions.
Your images do not display the best quality if your monitor or your computer's video controller doesn't support 24-bit color. You may need to upgrade your system to achieve the best on-screen resolution.
Your images don't look as good printed out as they do
Your scanned image looks "posterized," with obvious steps between colors rather than blends, or it displays poor image quality on the screen. You may need to upgrade your printer. A color ink jet printer, for example, provides excellent results.
PhotoPlus scans pictures in 24-bit color (16.7 million colors). Make sure your Windows display palette (video driver) is set to high color or true color, or at least 256 colors. See your Windows documentation and the manuals for your computer or video card for more information.
Image quality also depends on the software you're using. If your application doesn't support 24-bit color, try converting your image to 8-bit color. See pages 3-13 to 3-14 for information about converting image types.
Your scanned image looks distorted or doesn't have the quality you expect.
To prevent electrical interference, plug the AC adapter into a surge protector. If you have an air conditioner, vacuum cleaner, or other power-intensive appliance operating on the same outlet as the scanner, it doesn't scan correctly. Move the scanner to another outlet and try again. Make sure you don't touch the parallel connector during the scanning process. Discharge yourself by touching a metal object before you scan.

Part of your picture is missing.
If your picture has a dark background, the Auto Crop feature may not work correctly. Scan the picture again, using the Custom option. In the Scanner Setting dialog box, turn off Auto Crop. See page 2-7 for more information.

Specifications
Physical
Width 6.13 in.
Height 4.75 in.
Depth 5.5 in.
Weight (including 1.5 lb (675 g))
parallel connector)
Power
AC adapter 14 VDC 730 mA
Scanner power 5.5 W maximum (feeder mode)
consumption 5 W maximum (hand-held mode)

Technical Technical Environmental Environmental
Scan modes 24-bit True Color (16.7 M colors)
8-bit grayscale (256 gray shades)
1-bit lineart (black and white)
Resolution settings 400 dpi (1-bit lineart only)
200 dpi
150 dpi
100 dpi
50 dpi
Maximum scan width 4.1 in. (105 mm)
Maximum scan length 10 in. (254 mm)
(for hand scanning)
Scan speed 1.73 in. (44 mm)/sec at 100 dpi
.87 in. (22 mm)/sec at 200 dpi
.58 in. (14.7 mm)/sec at 300 dpi
.43 in. (11 mm)/sec at 400 dpi
Interface Parallel port, 6-foot cable
Light source Cold cathode fluorescent tube
| Condition | Operating range | Storage range |
| Temperature | 41° to 104°F(5° to 40°C) | -4° to 140°F(-20° to 60°C) |
| Humidity | 35% to 80% at 104°F(40°C) | 20% to 90% at 104°F(40°C) |
A-2 Specifications

Glossary
Active imageActive image
The image you are currently working on. The title bar of the active image is highlighted.
Aspect ratioAspect ratio
The proportion of height to width in an image.
BMP (bitmap) BMP (bitmap)
A standard Windows file format for color and grayscale images.
BrightnessBrightness
The amount of light in an image or the amount of white in a color.
Channel
One component of a color model. Channels in the RGB model are red, green, and blue; in the HSV model, hue, saturation, and brightness; in the CMYK model, cyan, magenta, yellow, and black.
Contrast
The amount of difference between bright and dark colors in the image. Adding contrast increases the difference; bright colors become brighter and dark colors become darker.
Crop
The process of eliminating all but the selected area.
Dpi
Dots per inch. An image with a higher dpi has more dots and shows more detail.
File type
The format in which a file is stored. PhotoPlus recognizes the following file types for graphics: BMP (bitmap), GIF, JPG (JPEG), PCX, TGA (Targa), TIF (TIFF), and PCD (PhotoCD).
Floating selection
A selected area that can be deleted or moved without affecting the underlying image. Like a sticky note, it can be moved around without changing the image.
GIF
Graphics Interchange Format. A standard file format for color and grayscale images, originally designed by CompuServe.
Grayscale
An image with 256 gray shades.
Halftone
An image composed of evenly spaced color or gray dots, of varying size. Halftone images are prepared—usually through a photographic process—for printing purposes.
Highlights
The brightest parts of an image.
Histogram
A special type of line chart that shows the color distribution of images by representing the number of pixels with given brightness values.
HSV
A color model that defines these color elements: hue, saturation, and brightness. Also called HSB.
Hue
The color characteristic that determines what part of the spectrum a color belongs to.
Image data type
Describes the pixel and color information of an image. Usually in two parts: bit depth ("24-bit") and color model type ("RGB").
Indexed color image
An image that is converted to 16 or 256 colors.
JPG (JPEG)
Joint Photographic Experts Group. A file format that encodes color or grayscale images into compressed form.
Line art
Black and white image with no gray.
A line graph showing the brightness of the original image on the horizontal axis in relation to the modified image on the vertical axis.
Mask
The area you create using the select tool. The mask isolates the editing area and prevents the underlying image from being altered.
PCD (PhotoCD)
The proprietary format originally designed by Eastman Kodak Corporation for the PhotoCD system.
PCX
A format originally designed by Z Soft Corporation for their PC-based paint program.
Pixel
A term used to describe the smallest element of a digital
OCR (optical character recognition) pixel is a contraction of the term
Technology used by CardScan software to translate scanned text into information that can be used on the computer.
Pan mode
An option available in PhotoPlus editing that allows you to view a moveable before and after close-up of the image.
Paste
To place a duplicate of the clipboard contents in a floating selection on the image window.
Posterize
To decrease the quantity of an image's color or gray values. This creates obvious differences between shades of color or gray in the image, rather than smooth blends.
RGB
A color model based on the following three color characteristics: red, green, and blue.
RGB True Color
An image type that uses 24-bit color depth (16.7 million colors) and the RGB color model to reproduce as accurately as possible the color of the original subject.
Resize
To change the size of a selected area or an entire image.
Resolution
The pixel density (number of pixels per inch) in an image. High-resolution images have greater density and are better in appearance.
Saturation
One of the channels in the HSV color model. Saturation is a measure of how pure a color is. At lower saturation values, a color approaches gray; at the maximum saturation, a color contains no gray.
Scanner
A hardware device that copies photos and documents like a photocopier, but instead of creating paper output, it makes digital image copies of the originals.
Selected area
The part of an image that lies within a mask. If there is no current mask, there is no currently selected area.
Selection
The part of an image that lies within a mask. See Mask.
Shadows
The darkest areas of an image.
TGA (Targa)
A file format for color and grayscale images originally developed by Truevision, Inc. for its image capture hardware.
Thumbnail
A small version of an image that appears in a photo album screen.
TIF (TIFF)
A file format that stores color and grayscale images, and is often used to transfer images between different applications and different types of computers.
Transition effect
Gradual change from one image to another, like the dissolves and fades used in movies.
TWAIN
A standard for image input from equipment such as scanners, digital cameras, and video frame grabbers. A program that supports TWAIN (like PhotoPlus and PrintArtist) can receive image input from any TWAIN-compatible hardware device.
Undo
To reverse the last change made to your image as if you had never made it. Undoing twice has no effect, because the second undo reverses the first.
VGA (Video Graphics Array)
A type of high-resolution display adapter that provides a variety of video modes.
Video controller
The electronic components required to generate a video display through a cable. Also called video display adapter.
Video display adapter
See Video controller.
Video driver
A file that tells the computer how to display the graphics and text on the monitor.
ZoomZoom
To enlarge (zoom in) or reduce (zoom out) the size of the current image view.

Index
A
Accessories
EPSON, Intro-4
PrintPaks, Intro-4
Adapter, power, 1-3
Albums, photo, see Photo albums
Aspect ratio, 3-10
Auto Crop feature, 2-7
Auto loops in slide show 5-2
B
Background
adding to template, 5-4-6
changing color, 5-5
BBS Download Service (EPSON), Intro-5
Before and after windows, see Pan Mode
Blurring images, 4-6
BMP file type, 2-9, 3-3
Brightness, adjusting, 4-2
C
Calendar
adding background, 5-9
adding text, 5-10
designing dates, 5-9
printing, 5-11
Calendar (continued)
using template, 5-8
Caption for image, 2-8
CardScan
customer support, Intro-4. Inside back cover
deleting cards, 8-8
deleting image, 8-6
editing information, 8-6
exiting, 8-7
formats for printing, 8-9–10
multiple lists, 8-7
OCR (optical character recognition), 8-3
printing, 8-9, 8-10
processing, 8-5
Quick Search, 8-7
registering, 8-2
saving list, 8-7
scanning, 8-3-5
searching list, 8-7
setting up, 8-1-2
settings 8-4
sorting list 8-7
starting, 8-1
transferring 8-5
verifying information, 8-6
Centering image.2-8
Cleaning PhotoPlus, 10-1
Color of image color wheel, 4-4 converting types, 3-13-14 different from original, 10-3 enhancing 4-3 setting scan mode, 2-6 Color of template background, changing, 5-5 Combining images, 9-4 CompuServe, EPSON America Forum, Intro-5 Computer requirements Intro-2 Contrast, adjusting, 4-2 Copying, 8-8 Cropping, 8-8 Customer support, Intro-4-6, inside back cover Cutting, 3-8
D Dark background, scanning, 2-7 Data type, image, 3-13-14 Description box, 2-8 Description, photo album, 2-11 Discard command, 3-6 Download Service (BBS), Intro-5
E Editing photos, see Images, editing Effects for images, 4-7-8 Electronic support, Intro-4 Enhancing photos, see Images, enhancing EPSON support, Intro-4-6
Error message, 10-2 Extender connector, 1-3, 10-2
F
File type: 2-9, 3-3
Files
printing your scanned image, 2-7–8 saving scanned image, 2-8–9
Flipping, 3-12–13
Font of template text, 5-6-7
Frame, creating, 5-3
FTP Site, EPSON, Intro-5
Fun Pak
description, Intro-2 installing software, 1-4–5
G
GIF file type, 3-3
H
Hand scanning blending stitched images, 9-5 capturing images, 9-2 large image 9-4 removing the scanner from the base, 9-2 setting the software, 9-1-2 stitching images, 9-4-5 Help EPSON Intro-4-6 software Intro-4 inside back cover troubleshooting, 10-2-6
Hiding
Status bar.3-6
Tools bar, 3-6
Histogram
image information, 3-5
tone adjustment, 4-4
Hue and saturation, adjusting, 4-3

Image data type, 3-13–14
Images
adding to albums, 2-9–10
calendars, creating 5-8
editing
converting, 3-13
copying, 3-8
cropping, 3-8
cutting 3-8
discarding changes, 3-6
flipping, 3-12–13
masking, 3-6-7
pasting as new 3-8
pasting, 3-8
resizing, 3-9
rotating, 3-11–12
selecting parts, 3-6
selection mask, 3-7
enhancing
blurring, 4-6
brightness, 4-2
contrast, 4-2
Images, enhancing (continued)
hue and saturation, 4-3
sharpening, 4-5
special effects, 4-7–8
tone adjustment, 4-4
in photo albums, 2-9
matte template, 5-3
opening files, 3-2–3
poor quality, 10-5
printing
calendars, 5-10–11
matted pictures, 5-8
scanned images, 2-7–8
problems, 10-2
saving, 2-8
stitching together, 9-4-5
text, adding, 2-8, 5-6-7
types, converting, 3-13
viewing
image information, 3-5
pan mode, 4-2
with Zoom, 3-3-4
see also Photo albums
wrong size, 10-4
Installing software, 1-4–5
Internet FTP Site Intro-5

JPG file type, 2-9, 3-3
L
Landscape photos, 2-4
M
Magnet Kit, see PrintPaks Magnet Kit
Magnification, 3-3-5
Maintaining PhotoPlus, 10-1
Manually control, 2-7, 9-2
Mapping curve, 4-4
Mask, selection, 3-6
Matte template
adding background, 5-4-6
adding text, 5-6-7
setting color, 5-5
using, 5-3-8
Mode, scanning, 2-6-7
P
Pan mode, 4-2, 4-5
Parallel connector, 1-3, 10-2
Pasting, 3-8
PCD (Photo CD) file type, 3-3
PCX file type, 2-9 3-3
Photo albums
adding descriptions, 2-11
adding images, 2-9–10
as screen savers, 5-2-3
as slide shows 5-2
creating, 2-9–10
opening, 2-10
Photo albums (continued)
opening images, 3-2
PhotoPlus
caring for scanner, 10-1
components, 1-1-2
customer support, Intro-4
features, Intro-2
Fun Pak, Intro-2
installing software, 1-4-5
problems and solutions, 10-2–6
registration Intro-6
scanning, 2-2
setting up, 1-2-5
settings, 2-6–7
Photos, editing: see Images, editing
Pictures: see Images
Portrait photos, 2-4
Positioning image on page, 2-8
Power adapter, connecting, 1-3
Print Artist
adding photos to projects
importing, 6-6
scanning, 6-7
blank document, 6-3
customer support, Intro-4. Inside back cover
document type, selecting, 6-2
exiting, 6-11–12
fonts, changing, 6-8-9
getting started, 6-2
graphic elements, selecting, 6-5
greeting card, 6-4-12
Print Artist (continued)
layout for documents, 6-4–5
printing projects, 6-11–12
quotes, adding, 6-8
saving projects, 6-11
templates for documents, 6-3
text, adding, 6-8-9
Printer, using parallel port, 1-3-4
Printing
calendars. 5-10–11
matted pictures, 5-8
scanned images. 2-7–8
PrintPaks Magnet Kit
adding photos, 7-4
assembling magnets, 7-7-8
BMP file type. 7-2
creating magnets, 7-3-5
customer support, Intro-4, inside back cover
customizing magnets, 7-4
getting ready to use, 7-2-3
help from Max, 7-3
printing, 7-5-7
TIF (TIFF) file type. 7-2
Problems, 10-2-4
Proportion, image, 3-10
R
Reduction of image, 3-4
Registering PhotoPlus, Intro-6
Requirements, system Intro-2
Resizing images, 3-10
Resolution settings, 2-6-7, 3-10, A-2
Rotating
entire image. 3-12
selected area, 3-11
S
Safety instructions. Intro-6-7
Saving images, 2-8–9, 3-13
Scanner, see PhotoPlus
Scanning
business card, see CardScan, scanning
by hand, see Hand scanning
2-3 2-6
dark backgrounds, 2-7
mode, 2-6 A-2
photos, 2-3-7
resolution setting, 2-6-7
starting scan, 2-2
Scanning head, removing from base 9-2
Screen saver, 5-2-3
Select tool, 3-6
Selection mask, 3-6-7
Setting up
PhotoPlus, 1-2–5
software, 1-4-5
Settings, scanner, 2-6–7
Sharpening images, 4-5
Size of image
changing, 3-9–10
choosing during printing, 2-8
choosing during scan, 2-7
Size of image (continued)
incorrect, 10-3
Slide show, 5-2
Softening images, 4-6
Software
CardScan, Intro-2 8-1-10
installing, 1-4-5
PhotoPlus, Intro-2, 2-1–12, 3-1–14, 4-1–8, 5-1–12
PrintPaks Magnet Kit, Intro-2 7-1-8
Sierra Print Artist. Intro-2. 6-1-12
support, Intro-4, inside back cover
Source, selecting for scan, 2-2
Special effects, 4-7-8
Specifications, A-1–2
Starting scan, 2-2
Status bar, hiding and showing. 3-6
Stitching images, 9-4–5
Supplies: Intro-4
Support, Intro-4-6
System requirements, Intro-2
T
Template
calendar, 5-8–11
matte, 5-3-8
Text on template
adding, 5-6-7
font, 5-6-7
TGA (Targa) file type, 2-9, 3-3
Thumbnail images, 2-9
TIF (TIFF) file type, 2-9, 3-3
Tone, adjusting, 4-4
Tools
blur, 4-6
brightness, 4-2
crop, 3-8
effects browser, 4-7
hue, 4-3
open button, 3-3
resize, 3-9
rotate, 3-11
scan button, 2-2, 9-1
select, 3-6
sharpen, 4-5
slide show button, 5-2
template button, 5-3, 5-8
zoom, 3-3
Tools bar, hiding and showing, 3-6
Transition effect, in slide show, 5-2
Troubleshooting, 10-2-6
Types of images, converting, 3-13–14
V
Viewing images, 3-3-5
W
Warming up scanner, 2-3
World Wide Web Intro-5
Z
Zoom. 3-3-5
Technical Support Options
| Type of Support | EPSON PhotoPlus 2.0 | Sierra Print Artist 3.0 | PrintPaks Magnet Kit | Corex CardScan SE |
| Online help | Help menu | Help menu | Help button | Help button |
| Telephone | (800) 922-8911 | (206) 644-4343 | (503) 295-6182 | (617) 492-4200 |
| Fax-on-demand | (800) 442-2110 | (206) 644-7697 | (503) 295-6182 | (617) 492-6659 |
| BBS | (800) 442-2007 | (206) 644-0112 | ||
| CompuServe | GO EPSON | GO SIERRA | ||
| America Online | Keyword: SIERRA | |||
| World Wide Web | http://www.epson.com | http://www.sierra.com | ||
| support@sierra.com | ||||
| FTP site | ftp.epson.com | |||
| Additional support | (800) 757-7707 (to order a printed manual) | (800) 774-6860 (to order magnet supplies) |

- WARNING
- COPYRIGHT NOTICE
- TRADEMARKS
- A NOTE CONCERNING RESPONSIBLE USE OF COPYRIGHTED MATERIALS
- TABLE OF CONTENTS
- INTRODUCTION
- GETTING STARTED
- SCANNING AND OTHER BASIC STUFF
- EDITING: TRANSFORMING YOUR IMAGES
- ENHANCING: PLAYING WITH YOUR IMAGES
- PROJECTS: FUN THINGS YOU CAN DO
- PRINT ARTIST: DESIGNING WITH STYLE
- PRINTPAKS MAGNET KIT: FAMILY STUFF
- CARDSCAN: INSTANT ADDRESS BOOK
- PRO SCANNING: MORE THINGS YOU CAN DO
- MAINTENANCE AND TROUBLESHOOTING
- SPECIFICATIONS
- GLOSSARY
- INDEX
- PHOTOPLUS FEATURES
- SYSTEM REQUIREMENTS
- ABOUT THIS GUIDE
- WHERE TO GET HELP
- SOFTWARE SUPPORT
- ELECTRONIC SUPPORT SERVICES
- WORLD WIDE WEB
- EPSON FORUM ON COMPUSERVE
- GETTING TO KNOW YOUR PHOTOPLUS SCANNER
- SETTING UP YOUR PHOTOPLUS SCANNER
- NOTE
- INSTALLING YOUR FUN PAK SOFTWARE SUITE
- HELP
- STARTING YOUR SCANSTARTING YOUR SCAN
- SCANNING YOUR PICTURE
- ENHANCING YOUR PHOTO
- ADJUSTING SETTINGS
- PRINTING AN IMAGE
- SAVING AN IMAGE FILE
- USING PHOTO ALBUMS USING PHOTO ALBUMS
- WORKING WITH YOUR ALBUM
- OPENING IMAGE FILES OPENING IMAGE FILES
- OPENING AN IMAGE IN AN ALBUM
- OPENING AN IMAGE WITH THE OPEN BUTTON
- VIEWING IMAGES AND IMAGE INFORMATIONVIEWING
- ZOOMING IN AND OUT
- USING THE ZOOM COMMANDS FOLLOW THESE STEPS TO ZOOM FROM THE MENU
- VIEWING YOUR IMAGE AT FULL SCREEN
- VIEWING IMAGE INFORMATION
- CUTTING, COPYING, AND PASTING
- CROPPING
- RESIZING
- RESIZING A SELECTION
- RESIZING AN IMAGE
- ROTATING
- ROTATING A SELECTION
- ROTATING AN ENTIRE IMAGE
- FLIPPING AN IMAGE OR SELECTION
- CONVERTING IMAGE TYPES
- CONVERT
- TO 1-BIT BLACK-WHITE
- BIT BLACK-AND-WHITE
- BIT GRAYSCALE
- BIT INDEXED 16-COLOR
- BIT INDEXED 256-COLOR
- BIT RGB TRUE COLOR (OVER 16 MILLION COLORS)
- ADJUSTING BRIGHTNESS AND CONTRAST
- ADJUSTING HUE AND SATURATION
- SETTING TONE ADJUSTMENT
- SHARPENING
- BLURRING
- USING SPECIAL EFFECTS
- MAKING A SLIDE SHOW
- MAKING A SCREEN SAVER
- USING THE MATTE TEMPLATE
- ADDING BACKGROUND
- ADDING TEXT
- USING THE CALENDAR TEMPLATE
- ADDING BACKGROUND AND DESIGNING THE DATES
- ADDING TEXT AND PRINTING THE CALENDAR
- GETTING STARTED WITH PRINT ARTIST
- CREATING A GREETING CARD
- ADDING A PHOTO
- IMPORTING AN IMAGE
- ADDING A GRAPHIC
- SAVING YOUR CARD
- PRINTING YOUR CARD AND EXITING
- TIP
- GETTING READY TO USE THE MAGNET KIT
- CREATING THE MAGNETS
- GETTING READY TO PRINT YOUR MAGNETS
- PRINTING YOUR MAGNETS
- STARTING CARDSCAN
- SCANNING YOUR CARDS
- EDITING THE INFORMATION
- SAVING AND EXITING
- WORKING WITH YOUR ADDRESS LIST
- PRINTING
- DESIGNING THE LAYOUT
- PREVIEWING AND PRINTING
- SETTING THE SOFTWARE FOR HAND SCANNING
- CAPTURING THE IMAGE BY HAND SCANNING
- STITCHING TWO IMAGES TOGETHER
- CARING FOR PHOTOPLUS
- SOLVING SCANNER AND SYSTEM PROBLEMS
- PART OF YOUR PICTURE IS MISSING
- PHYSICAL
- POWER
- TECHNICAL TECHNICAL ENVIRONMENTAL ENVIRONMENTAL
- ACTIVE IMAGEACTIVE IMAGE
- ASPECT RATIOASPECT RATIO
- BMP (BITMAP) BMP (BITMAP)
- BRIGHTNESSBRIGHTNESS
- CHANNEL
- CONTRAST
- CROP
- DPI
- FILE TYPE
- FLOATING SELECTION
- GIF
- GRAYSCALE
- HALFTONE
- HIGHLIGHTS
- HISTOGRAM
- HSV
- HUE
- IMAGE DATA TYPE
- INDEXED COLOR IMAGE
- JPG (JPEG)
- LINE ART
- MASK
- PCD (PHOTOCD)
- PCX
- PIXEL
- PAN MODE
- PASTE
- POSTERIZE
- RGB
- RGB TRUE COLOR
- RESIZE
- RESOLUTION
- SATURATION
- SCANNER
- SELECTED AREA
- SELECTION
- SHADOWS
- TGA (TARGA)
- THUMBNAIL
- TIF (TIFF)
- TRANSITION EFFECT
- TWAIN
- UNDO
- VGA (VIDEO GRAPHICS ARRAY)
- VIDEO CONTROLLER
- VIDEO DISPLAY ADAPTER
- VIDEO DRIVER
- ZOOMZOOM
- A
- B
- C
- F
- G
- H
- L
- M
- P
- R
- S
- T
- V
- W
- Z
Brand : EPSON
Model : Photo Plus
Category : Scanner