
Perfection 600 - Scanner EPSON - Free user manual and instructions
Find the device manual for free Perfection 600 EPSON in PDF.


| Brand | Epson |
| Model | Perfection 600 |
| Product Type | Flatbed Color Scanner |
| Dimensions (W x D x H) | 419 x 300 x 109 mm |
| Weight | 4.5 kg |
| Optical Resolution | 600 x 1200 dpi |
| Color Depth | 30-bit |
| Max Document Size | 8.5 x 11.7 inches (216 x 297 mm) |
| Interface | SCSI |
| Power Supply | AC adapter (100-240V) |
| Functions | Scan documents, photos, film, OCR |
| Maintenance | Clean glass surface with soft, lint-free cloth |
| Safety | Do not expose to liquids; use only authorized power adapter |
| Repairability | Limited; contact Epson support for service |
Frequently Asked Questions - Perfection 600 EPSON
User questions about Perfection 600 EPSON
0 question about this device. Answer the ones you know or ask your own.
Ask a new question about this device
Download the instructions for your Scanner in PDF format for free! Find your manual Perfection 600 - EPSON and take your electronic device back in hand. On this page are published all the documents necessary for the use of your device. Perfection 600 by EPSON.
USER MANUAL Perfection 600 EPSON
IMPORTANT! The software included with this scanner is licensed only on the condition that the licensee ("you") agree to the terms and conditions set forth in the following legal agreement. READ THIS SOFTWARE LICENSE AGREEMENT CAREFULLY. YOU WILL BE BOUND BY THE TERMS OF THIS AGREEMENT IF YOU OPEN THE DISK PACKAGE OR USE THE SOFTWARE. If you do not agree to the terms contained in this Agreement, please return the disk package UNOPENED to your dealer and your license fee will be refunded.
EPSON AMERICA, INC. ("EPSON") will grant you a nontransferable, non-exclusive license to use the software (the "Licensed Software") and the accompanying documentation (the Licensed Software, the media embodying the Licensed Software, and the documentation are referred to in this Agreement as the "Licensed Materials"), if you agree to the following terms and conditions:
1. TERM; TERMINATION
This Agreement is effective from the date on which you first use the Licensed Materials. This Agreement may be terminated by you at any time by destroying the Licensed Materials, together with all copies. It will also terminate automatically and without notice if you fail to comply with any term or condition of this Agreement.
2. LICENSE GRANT
EPSON grants to you the right to use the Licensed Software in conjunction with a single personal computer as noted herein. YOU MAY NOT USE, COPY, MODIFY, OR TRANSFER THE LICENSED MATERIALS, IN WHOLE OR IN PART, EXCEPT AS PROVIDED IN THIS AGREEMENT.
3. OWNERSHIP
The Licensed Materials are the sole and exclusive property of EPSON and its licensors.
4. COPY RESTRICTIONS
You may make one (1) copy of the Licensed Software for backup purposes.
You may not decompile, disassemble, or electronically transfer the Licensed Software, or translate the Licensed Software into another computer language. You may not copy the documentation.
You agree to include the copyright notice set forth on the label of the media and embodied in the Licensed Software on any copy of the Licensed Software in any form, in whole or in part.
5. PROTECTION AND SECURITY
You agree to use your best efforts and take all reasonable steps to safeguard the Licensed Materials to ensure that no unauthorized person shall have access thereto and that no unauthorized copy, publication, disclosure or distribution, in whole or in part, in any form shall be made. You acknowledge that the Licensed materials contain valuable, confidential information and trade secrets and that unauthorized use and/or copying are harmful to EPSON and its licensors.
6. LIMITED WARRANTY
The only warranty EPSON makes to you in connection with the Licensed Materials is that the media on which the Licensed Software is recorded will be replaced without charge, if EPSON, in good faith, determines that it was defective and not subject to misuse, and if the media and proof of purchase are returned to EPSON or the dealer from whom the Licensed Materials were obtained within ninety (90) days of the date of purchase.
Because EPSON cannot know the purposes for which you acquired the Licensed Software, you assume full responsibility for the selection of the Licensed Software and for their installation and use and the results of that use.
7. WARRANTY DISCLAIMERS; LIABILITY LIMITATIONS
EXCEPT FOR THE LIMITED WARRANTY IN SECTION 6, EPSON MAKES NO WARRANTY OR REPRESENTATION WITH RESPECT TO THE LICENSED SOFTWARE AND IT IS LICENSED "AS IS." THE WARRANTY AND REMEDY PROVIDED ABOVE ARE EXCLUSIVE AND IN LIEU OF ALL OTHER WARRANTIES, EXPRESS OR IMPLIED, INCLUDING, BUT NOT LIMITED TO, THE IMPLIED WARRANTIES OF MERCHANTABILITY AND FITNESS FOR A PARTICULAR PURPOSE, AND ANY STATEMENTS OR REPRESENTATIONS MADE BY ANY OTHER PERSON OR FIRM ARE VOID.
YOU AGREE NOT TO USE THE LICENSED SOFTWARE IN ANY SITUATION WHERE SIGNIFICANT DAMAGE OR INJURY TO PERSONS, PROPERTY OR BUSINESS COULD OCCUR FROM A SOFTWARE ERROR.
YOU ASSUME ALL RISK AS TO THE SELECTION, USE, PERFORMANCE AND QUALITY OF THE LICENSED MATERIALS. IN NO EVENT WILL EPSON OR ANY OTHER PARTY WHO HAS BEEN INVOLVED IN THE CREATION, PRODUCTION OR DELIVERY OF THE LICENSED MATERIALS BE LIABLE FOR SPECIAL, INDIRECT, INCIDENTAL OR CONSEQUENTIAL DAMAGES, INCLUDING LOSS OF PROFITS OR INABILITY TO USE THE LICENSED MATERIALS, EVEN IF EPSON OR SUCH OTHER PARTY HAS BEEN ADVISED OF THE POSSIBILITY OF SUCH DAMAGES. IN NO EVENT SHALL EPSON'S OR SUCH OTHER PARTY'S LIABILITY FOR ANY DAMAGES OR LOSS TO YOU OR ANY OTHER PARTY EXCEED THE PURCHASE PRICE PAID FOR THE SCANNER.
Some states and/or countries do not allow limitations on how long an implied warranty lasts and some states and/or countries do not allow the exclusion or limitation of incidental or consequential damages, so the above limitation and exclusion may not apply to you. This warranty gives you specific legal rights, and you may also have other rights which vary from state to state and/or country to country.
8. GENERAL
If any provision or portion of a provision of this Agreement is determined to be invalid or unenforceable, it shall be deemed omitted and the remaining provisions of this Agreement shall remain in full force and effect.
This Agreement is governed by and construed in accordance with the laws of the State of California. Any suit brought with respect to this Agreement may be brought ONLY in Los Angeles, California and must be filed no later than one (1) year after the date acquisition of the Licensed Software.
This Agreement constitutes the entire agreement between the parties with respect to the subject matter hereof, and all prior agreements, representations, statements and undertakings are hereby expressly cancelled.
Should you have any questions regarding this Agreement, you may contact EPSON.
9. GOVERNMENT RESTRICTED RIGHTS
The Licensed Materials are provided with RESTRICTED RIGHTS. The use, duplication, or disclosure by the Government is subject to restrictions as set forth in subdivision (c)(1)(ii) of The Rights in Technical Data and Computer Software clause at 52.227-7013. The contractor/manufacturer of this Software is EPSON AMERICA, INC., 20770 Madrona Avenue, Torrance, California 90503 USA.
Copyright Notice
All rights reserved. No part of this publication may be reproduced, stored in a retrieval system or transmitted in any form or by any means, electronic, mechanical, photocopying, recording, or otherwise, without the prior written permission of SEIKO EPSON CORPORATION. The information contained herein is designed only for use with this EPSON scanner. EPSON is not responsible for any use of this information as applied to other scanners.
Neither SEIKO EPSON CORPORATION nor its affiliates shall be liable to the purchaser of this product or third parties for damages, losses, costs or expenses incurred by purchaser or third parties as a result of: accident, misuse, or abuse of this product or unauthorized modifications, repairs, or alterations to this product, or (excluding the U.S.) failure to strictly comply with SEIKO EPSON CORPORATION's operating and maintenance instructions.
SEIKO EPSON CORPORATION shall not be liable for any damages or problems arising from the use of any options or any consumable products other than those designated as Original EPSON Products or EPSON Approved Products by SEIKO EPSON CORPORATION.
EPSON is a registered trademark of SEIKO EPSON CORPORATION. EPSON Perfection is a trademark of Epson America, Inc.
General Notice: Other product names used herein are for identification purposes only and may be trademarks of their respective owners. EPSON disclaims any and all rights in those marks.
Copyright © 1997 by Epson America, Inc., Torrance, California, USA L0997-00
Table of Contents
Introduction
About TWAIN Drivers and Your EPSON Scanner 1
How To Use This Guide 3
Using the Online Cross-references 4
Cautions, Notes, and Tips 5
Where To Get Help 6
The EPSON Perfection 600 Main Window
Accessing the EPSON Perfection 600 Main Window 10
Windows 95 or NT 10
Macintosh 11
About the EPSON Perfection 600 Main Window 13
Table of Contents
Basic Scanning
Overview 15
Basic Steps to Scanning 16
Changing the Default Settings 18
Zooming 21
Zooming 21
Advanced Scanning
Working with Originals 23
Changing Image Orientation 23
Batch Scanning–Working with Multiple Originals 24
Scanning Negatives 27
Sizing the Scanned Image 28
Factors that Affect Image Storage Requirements 28
Changing the Size of the Scanned Image 30
Table of Contents
Adjusting Image Quality 35
Using AutoExposure 36
Using the Densitometer Monitor 38
Manually Adjusting Image Contrast 40
Adjusting Image Appearance Using Tone Curves 41
Adjusting Color Balance 48
Applying Scanning Filters 50
Changing Image Resolution 52
Keyboard Shortcuts
Windows 95 and Windows NT 56
Macintosh
OS
Glossary
60
Index
63
Introduction
Congratulations on the purchase of your new EPSON Perfection 600 scanner. This guide explains how to use the EPSON Perfection scanner driver software with your scanner.
About TWAIN Drivers and Your EPSON Scanner
When working with graphics, a software interface is needed to transfer images from a device, such as a scanner, into a format that a graphics software application can use. This interface is called a driver.
Your EPSON Perfection 600 software follows an image transfer standard known as TWAIN. This software lets you use your EPSON scanner with any
Introduction

Note: The scanner driver operates as a plug-in for Apple® Macintosh® or Power Macintosh™ computers.
host application that also supports the TWAIN standard, such as Visioneer PaperPort LE® and Adobe® PhotoDeluxe™.
However, EPSON Perfection 600 does more than simply transfer images from the scanner—it also lets you:
▶ Preview the image before saving it ▶ Adjust the orientation of the image (such as flip it horizontally or vertically or rotate it) ▶ Make corrections to the image (such as adjust brightness, contrast, tone quality) ▶ Crop a limited area for scanning ▶ Scan multiple frames at one time ▶ Scan different types of originals (color, grayscale, or black and white) at the same time
Introduction
How To Use This Guide
The information you need to use your EPSON Perfection 600 driver can be found in the following sections of this guide:
The EPSON Perfection 600 Main Window
This section gives you an overview of the EPSON Perfection 600 main window and instructions on how to access it.
Basic Scanning
This section provides information about the basic steps needed to scan an image.
Advanced Scanning
This section presents more advanced scanning techniques, such as how to adjust an image's color or contrast.
Introduction
Keyboard Shortcuts
This section lists keyboard shortcuts you can use with your EPSON Perfection 600 software.
Glossary
Terms you may not be familiar with are defined in the glossary.
Using the Online Cross-references
Blue text that is also underlined indicates that the text is a cross-reference to other parts of this guide. Click on the text with the mouse pointer to view the referenced information. For example, click here to view the introduction to your EPSON Perfection 600 software.
Introduction
Cautions, Notes, and Tips
You'll find this information throughout your guide:
Cautions must be observed to avoid loss of data or damage to your equipment.

Notes contain important information about your scanner software.

Tips contain additional hints for improved scanning.
Introduction
Where To Get Help
EPSON provides customer support through the following services:
Electronic Support Services
| Service Access | |
| World Wide Web From the | Internet, you can reach EPSON'sHome Page athttp://www.epson.com. |
| EPSON Internet FTP Site | If you have Internet FTP capability, use your web browser (or other software for FTP downloading) to log ontoftp.epson.comwith the user nameanonymousand your e-mail address as the password. |
| EPSON Download Service | You can call the EPSON Download Service at (800) 442-2007.Set your communications software to 8 data bits, 1 stop bit, no parity.Modem speed can be up to 28.8 Kbps. |
| EPSON Forum on CompuServe® | Members of CompuServe can typeGO EPSONat the menu prompt to reach the Epson America Forum. For a free introductory CompuServe membership, call (800) 848-8199 and ask for representative #529. |
Introduction
Automated Telephone Services
| Service Access | |
| EPSON SoundAdviceTM | For pre-recorded answers to commonly asked questions about EPSON products 24 hours a day, seven days a week, call (800) 442-2110. |
| EPSON FaxAdviceTM | Access EPSON's technical information library by calling (800) 442-2110. You must provide a return fax number to use this service. |
| EPSON Referral Service | For the location of your nearest Authorized EPSON Reseller or Customer Care Center, call (800) 442-2110. |
Introduction

Note: If you need help using third-party software that came with an EPSON product, see the documentation for that program for technical support information.
Telephone Support
EPSON also provides technical support and information on the installation, configuration, and operation of EPSON products. Dial (800) 922-8911, (310) 782-2600 (U.S.), or (905) 709-9475 (Canada), 6 A.M. to 6 P.M., Pacific Time, Monday through Friday.
Before you call, please have the following information ready:
Product name ▶ Product serial number ▶ Computer configuration ▶ Description of the problem
You can purchase manuals, accessories, and parts for your scanner, and ink cartridges and paper for other EPSON products from EPSON Accessories. In the U.S., please call (800) 873-7766.
In Canada, please call (800) 873-7766 for dealer referral.
The EPSON Perfection 600 Main Window
You can perform all scanning activities from within the EPSON Perfection 600 main window.
The following topics are presented in this section:
- Accessing the EPSON Perfection 600 Main Window About the EPSON Perfection 600 Main Window

Note: The scanner driver operates as a plug-in for Apple Macintosh or Power Macintosh computers.
Accessing the EPSON Perfection 600 Main Window
The EPSON Perfection 600 software is compatible with any TWAIN-compliant program, such as Visioneer PaperPort or Adobe PhotoDeluxe.
To access the scanner software, first open the host application into which you plan to import the scanned image or document. Then select EPSON Perfection 600 as your TWAIN source.
Windows 95 or NT
To access the main EPSON scanner software window using Windows 95 or Windows NT, follow these basic steps:
- Start the application into which your scanned image will be imported.
The EPSON Perfection 600 Main Window

Note:
You usually need to select the scanner only once, the first time you use the scanner with your software. The procedures may vary depending on your host application; see your application user's guide for details.
- Choose your EPSON scanner as the image source.
For example, in PaperPort choose Select Source from the File menu. Highlight Perfection 600 (32 Bit) from the Select Source list, then click Select.
- Open the scanner software.
For example, from PaperPort choose Acquire from the File menu or click the scanner icon on the tool bar. The EPSON Perfection 600 main window appears.
You're now ready to scan.
Macintosh
To access the main EPSON scanner software window, first copy the Perfection 600 plug-in module from the EPSON Perfection 600 folder on your hard drive to the plug-ins folder for your application.
Once that is done, follow these basic steps:
The EPSON Perfection 600 Main Window

Note: You usually need to select the scanner only once, the first time you use the scanner with your software. The procedures may vary depending on your host application; see your application user's guide for details.
- Start the application into which your scanned image will be imported.
- Choose your EPSON scanner as the image source. For example, from PaperPort choose Select Source from the File menu. Highlight Perfection 600 from the Select Source list and click Select.
- Open the scanner software.
For example, from PaperPort choose Acquire from the File menu or click the scanner icon on the tool bar. The main window appears.
You're now ready to scan.
The EPSON Perfection 600 Main Window
About the EPSON Perfection 600 Main Window
When you access the EPSON Perfection 600 software, the main window appears:
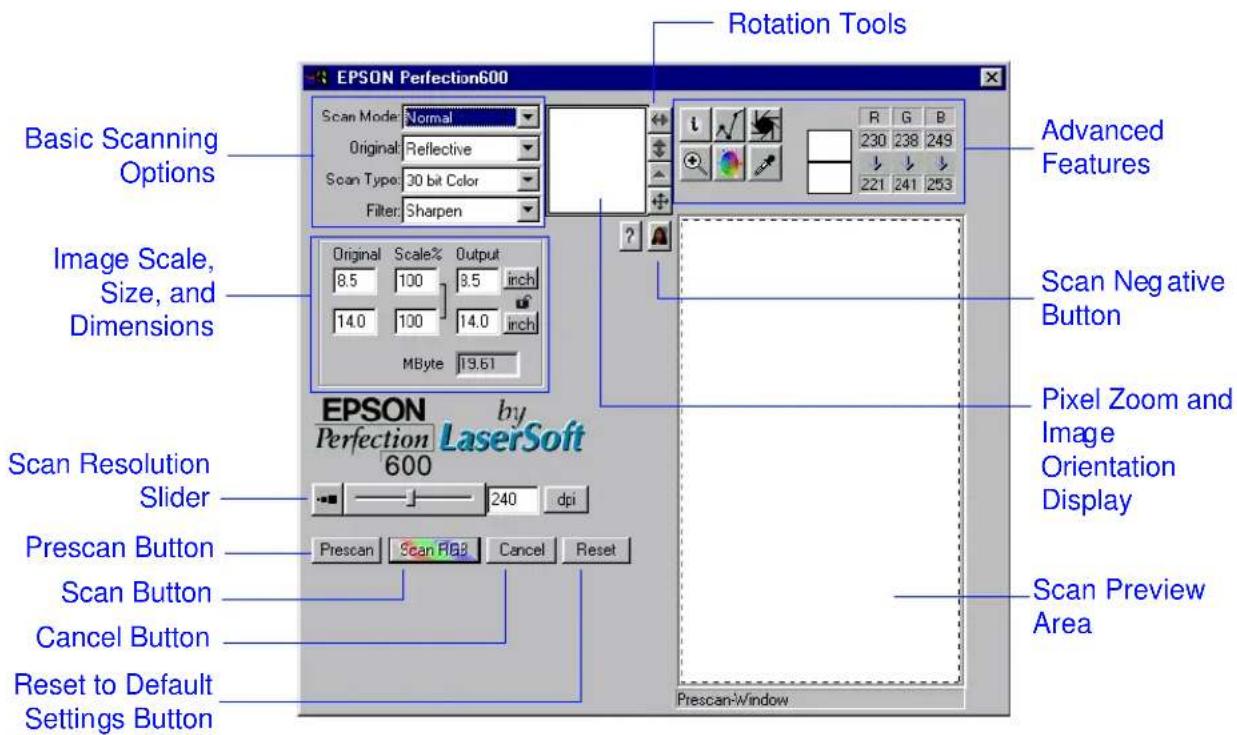
The EPSON Perfection 600 Main Window
The features in the EPSON Perfection 600 main window are basically the same for both the Mac and PC platforms. Any differences in the two platforms are identified in this guide, where appropriate.
Keystroke commands for each platform are listed in Keyboard Shortcuts.
Basic Scanning
Overview
The EPSON Perfection 600 scanner software must be accessed from the host application into which you plan to import the scanned image.
Once you have accessed the EPSON Perfection 600 software, you can preview and manipulate images prior to scanning them into your application.
The following topics are presented in this section:
Basic Steps to Scanning Changing the Default Settings Zooming
Basic Scanning

Note:
When you access the main window, the last frame scanned displays. Click the Prescan button to clear the old image and preview a new one.

Cropping an image makes the image take up less storage space on your hard drive.
Basic Steps to Scanning
Perform the following steps to scan an image from your EPSON scanner into a host application.
- Access the EPSON Perfection 600 main window.
- Place the original to be scanned on the scanner document table.
- Select the appropriate Scan Type and Scanning Filters for the original you are scanning.
- Preview the image by clicking the Prescan button.
The prescan function displays the image as it will be scanned. The remainder of this guide covers how to make adjustments to an image before scanning, but for now, continue to the next step.
- Select the portion of the image to be scanned.
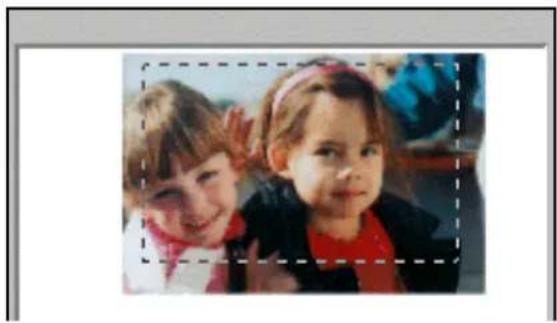
If you are going to scan only a part of the original, use the frame to crop (define) the part of the image
Basic Scanning

Note for Macintosh Users: The EPSON Perfection 600 main window closes automatically after the image has been scanned.
to be scanned. The scanner driver scans only the area within the frame.
To scan the entire original (up to 8.5 x 14 inches), click and drag the frame border to each edge of the previewed image.
To automatically adjust the overall brightness and contrast of the selected image, click the Auto Exposure button
- Click the Scan button to scan and import the image to your host application.
- After the image has been scanned, click Cancel to close the EPSON Perfection 600 main window.
The following is an example of a framed image:
Basic Scanning

Note:
You can restore the default scan settings by clicking the Reset button.
Changing the Default Settings
The prescan feature lets you preview the image to see how it will look when scanned. If any adjustments are needed, change one or more of the following settings to obtain better results.
Scan Mode
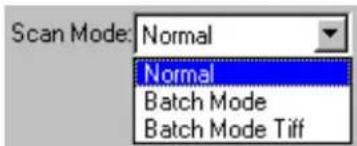
The scan mode indicates how an image should be scanned. Select one of the following:
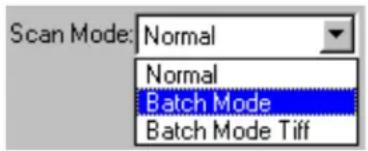
Normal Sends a single scanned image to the host application. This is the default mode.
Batch Mode Scans several individual images at the same time and sends them all to the host application.
Batch Mode Tiff Is similar to Batch Mode, except that scanned images are saved directly to a TIFF file instead of imported into your host application.
Basic Scanning

Note for Macintosh
Users:
The Batch Mode option may appear active, even if the host application doesn't support batch scanning.
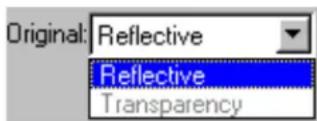
The Batch Mode option is available only if your host application can open more than one image at a time. For example, Batch Mode is “grayed out” (not available) when scanning from Adobe PhotoDeluxe, since it cannot open multiple images at one time.
The Batch Mode TIFF option, on the other hand, works with any compatible host application because the scanned images are saved as TIFF files on your hard drive.
Original Document Type
To get the best results from your EPSON Perfection 600 scanner software, the type of media you are scanning must be identified. Choose one of the following:
Reflective A reflective original (the default option), means that the image is captured when light reflects off the original back into the scanner. Most originals require reflective scanning.
Basic Scanning

Note:
The Transparency option is only available if the optional EPSON Transparency Unit (Perfection 600 TPU) is attached to your scanner. This option scans an image up to 8.5 x 11 inches.
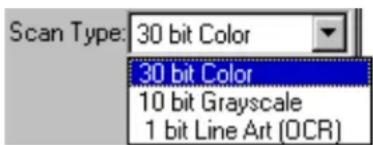
Transparency When you're scanning transparent originals, such as film negatives, the light must shine through the original instead of reflecting off it.
If your original is a negative, see Scanning Negatives for more information.
Scan Type
If you are scanning a black and white or grayscale image, you get improved performance by selecting the corresponding original type.
Specify your type of original before scanning:
30 bit Color 30 bit Color (the default option) saves the scanned object as a color image.
10 bit Grayscale saves the scanned object as a black and white image with shades of gray.
1 bit Line Art (OCR) saves the scanned object as a black and white line art image, with no gray tones.
Basic Scanning

Note: Not all features are available for all scan types. For example, filter options (see Applying Scanning Filters) are only active when you scan color or grayscale; when you scan line art, this feature is turned off.

Note: Zooming only changes the way the image appears in the preview area of the EPSON Perfection 600 main window—it does not change the size of the scanned image.
Saving a scanned image as a color image requires 24 times as many bits (individual cells of computer memory or disk storage) as saving an image as a black and white line art image. For best results, match your selection of scan type with the type of original.
For information on how to scan different types of originals simultaneously, see Batch Scanning–Working with Multiple Originals.
Zooming
The EPSON Perfection 600 driver lets you enlarge or reduce an image in the preview area for easier viewing. This is called zooming. You can zoom in (make the image larger) or zoom out (make the image smaller).
To zoom in on a portion of the image, click the Zoom button. The selected area expands to fill the preview area. To zoom out, click the zoom button a second time.
Advanced Scanning
The EPSON Perfection 600 scanner software provides advanced tools that let you modify an image's contrast, brightness, color, and tone before scanning.
The following topics are described in this section:
▶ Working with Originals ▶ Sizing the Scanned Image ▶ Adjusting Image Quality
Advanced Scanning
Working with Originals
Changing Image Orientation
If you placed an image on the scanner document table incorrectly, you can rotate the image in the EPSON Perfection 600 software rather than moving the original on the scanner.
You can also flip an image to be scanned, either horizontally or vertically.
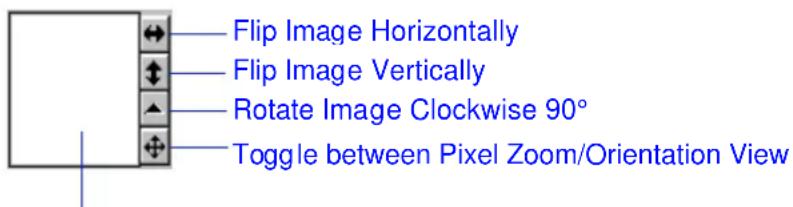
When Pixel Zoom is selected, this area displays a magnified view of the previewed image wherever the mouse pointer is positioned. The magnification is four times that of the previewed image.
When Orientation View is selected, it shows the orientation of the active frame.
Advanced Scanning

Note:
Changes in image orientation are shown in the orientation display, not in the main window preview area.
Image Orientation Display

For best results, use originals that are all reflective or all transparent. Do not mix original types when using batch scanning.
To change the image orientation, do the following:
▶ Click the toggle button to display the image orientation. ▶ To rotate the image, click the rotate button until the desired rotation is displayed. ▶ To flip the image, click the horizontal or vertical buttons.
Batch Scanning - Working with Multiple Originals
Batch scanning enables you to automatically scan multiple originals, using different customized settings for each framed image.
For example, with batch scanning you can scan a color postcard, a black and white photograph (with halftones or shades of gray), and a black and white line art drawing at the same time.
Advanced Scanning
With batch scanning, you can also create multiple frames for a single original so that only the framed areas are scanned.
The EPSON Perfection 600 scanner software offers two batch options:
Batch Mode Imports the images scanned into your graphic application.
Batch Mode Tiff Saves the images scanned directly to your hard disk in a widely used graphic format known as TIFF (Tagged Image File Format).
Scanning Multiple Images
To scan multiple images:

Note: Batch mode can only be used if your host application supports multiple open windows.
- Place the originals to be scanned on the scanner document table.
- Select the scan mode: Batch Mode to import images into the host application, or Batch Mode Tiff to scan images directly into files on your hard drive.
Advanced Scanning

Note: You cannot switch between frames if you have zoomed in on a frame. Zoom out from the selected frame before creating or changing frames.
If you select Batch Mode Tiff, you will be prompted to enter the path and the file name to save to. Enter the name and click Save.
- Click and drag the mouse to create a frame. Repeat this step to create multiple frames.
- If needed, change the default settings for each of the frames and adjust image quality. The active frame is highlighted by a dotted line.
- Click the Scan Batch or Scan Tiff button to scan all of the framed images.
If you selected Batch Mode as the scan mode, each frame will automatically be scanned into the host application and assigned a temporary window name (sequentially numbered).
If you selected Batch Mode Tiff as the scan mode, each frame will automatically be scanned into a temporary file on your hard disk. (The file names are sequentially numbered based on the name you entered in step 2.)
Advanced Scanning
Deleting a Frame from a Batch
To delete a frame, click on the frame to select it, then press the Delete key.
Stopping a Batch Scan
To stop a batch scan in progress, click Cancel.
Scanning Negatives
If you have installed an optional transparency unit on your scanner, perform the following steps to scan a negative and turn it into a positive image:
- Return all settings to their defaults by clicking the Reset button, then click the Prescan button.
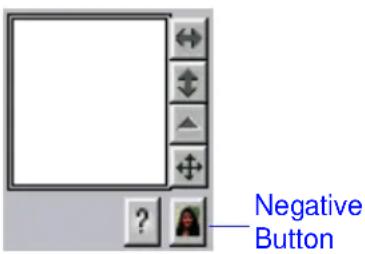
- Frame the negative to be scanned, then click the Negative button. The image will display as a positive image.
- Click the Scan button to scan the positive image.
Advanced Scanning
Sizing the Scanned Image
How much computer memory or disk space will be required to store an image depends on several factors. This section describes these factors, the relationship between physical size of an image and the image's storage requirements, and how to adjust both of these values.
Factors that Affect Image Storage Requirements
There are several factors that affect how much computer memory or disk space will be required to store a scanned image:
Type of Original The size of a scanned image
depends on the type of original.
Color images require 24 bits of computer memory or disk space for each pixel or dot in the image.
In comparison, grayscale images require only 8 bits per pixel, and
Advanced Scanning
black and white line art requires only 1 bit per pixel.
Scanning an original as a color image requires three times the storage as scanning it as a grayscale image, and 24 times the storage requirement of a black and white line art image.
Size What are the dimensions of the original? Scanning a 2" x 2" original creates a smaller file than scanning an 8" x 10" original.
Scaling Scaling (enlarging or reducing) an image changes the file size accordingly. For example, scanning an image you scaled to 150% of its original size requires 50% more storage than if you had scanned it at 100% (no scaling).
Resolution Resolution is the amount of detail that shows in an image, measured by the number of dots per inch (dpi).
Advanced Scanning

Note: Scaling changes the actual output size. Zooming changes only the view on your screen.

Note: You can scan originals up to 8.5 x 14 inches.
Keep the above in mind when resizing or scaling an image if the file size of the scanned image is a concern.
Changing the Size of the Scanned Image
When you scan an image using the default settings, the output image is scanned at the same size and proportion as the original image.
However, the Perfection 600 software lets you change the size of the output image, either by changing the scale (magnification) of the original or by setting the size of the final image.
The relationship between the size of the framed original, the scale, and the output size is:
Frame Size x Scale = Output Size
For example, if you frame a photograph that is 2 x 3 inches, and enter a scale of 200%, the output size of the scanned image would be 4 x 6 inches.
Advanced Scanning
The Output box in the main window displays the size of the framed original (input size), the scale percentage, and size of the scanned image (output size):
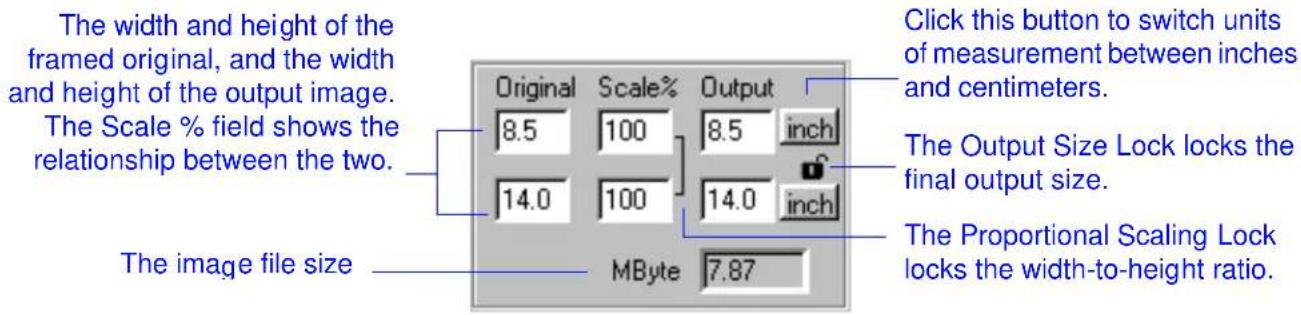
Note: Proportional scaling applies to changes made to either the input frame size or the output size.
Maintaining Size Ratio (Proportional Scaling)
If you were to scale the width on an image differently from the height, the scanned image would look stretched or distorted. Proportional scaling keeps the proportions of an image (width and height) the same when enlarging or shrinking the image.
Advanced Scanning

When proportional scaling is used and you change the width or height of an image, the Perfection 600 software automatically adjusts the other dimension to maintain the same width-to-height ratio.
For example, if the original image frame size is 3 inches wide and 4 inches high, and you increase the output width to 4.5 inches (increase it by half), the height is automatically increased by half to 6 inches.
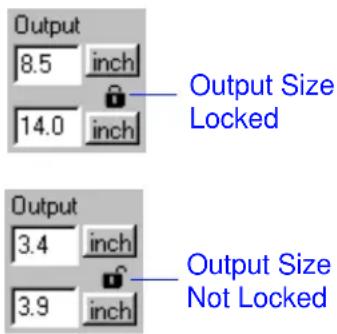
Proportional scaling is locked as the default setting. To unlock it, click on the proportional scaling icon.
Maintaining Output Size
When you need to scan an image to fit in a certain size, you can lock the output size so no matter how you adjust the input frame size or scaling, the output size stays the same.
For example, if you need to scan a photograph so that it fits a 2 x 3 inch space in a newsletter, enter an output size of 2 x 3 inches then lock the output size. If you
Advanced Scanning

To scan an image to a specific size, enter and lock the output size, then use the mouse to frame the subject. The Perfection 600 software will adjust the scale percentage to maintain the output size.
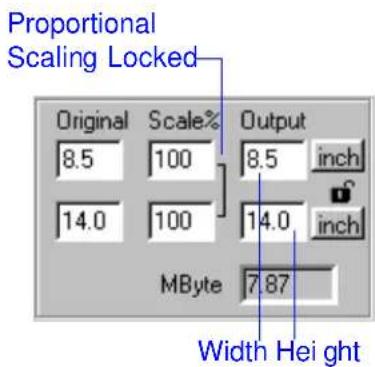
resize the frame in the preview area, the Perfection 600 software will automatically adjust the scale percentage to maintain the output size.
Resize an Image with the Mouse
To resize using the mouse:
- Click on a frame if there's more than one displayed.
- Click and drag the edge of the frame until the output size is the desired size.
Resize an Image by Manually Entering Output Dimensions
To resize an image by typing in the dimension values:
- Click on a frame if there's more than one displayed.
- Make sure that the proportional scaling icon is locked to automatically maintain the image's width-to-height ratio. (If it's not, click on it to lock it.)
Advanced Scanning
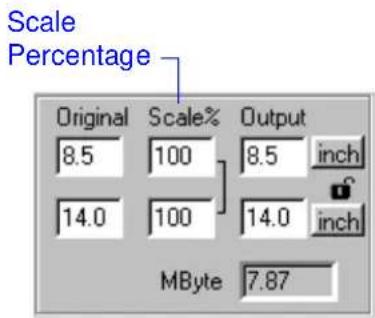
- Type new height and/or width measurements in the main window Output box.
Resize an Image by Manually Entering Scale Percentage
To resize an image by typing in a scale (magnification) percentage:
- Click on a frame if there's more than one displayed.
- Make sure that the proportional scaling icon is locked to automatically maintain the image's height-to-width ratio. (If it's not, click on it to lock it.)
- Type a new height and/or width scale factor.
A number greater than 100% increases the image output from the original. A number less than 100% decreases the image output from the original.
Advanced Scanning
Adjusting Image Quality
The EPSON Perfection 600 software provides advanced tools that let you modify an image's contrast, brightness, color, and tone prior to scanning:

AutoExposure
Automatically adjusts the image for the best contrast possible between highlights and shadows by accurately setting the white, black, and middle gray values.

Manual Contrast
Allows the manual selection of the black and white values in an image.

Tone Curves
Changes an image's brightness, contrast, and midtones (those shades or tones between the highlights and shadows).

Color Balance
Adjusts the overall color balance on a color image.
Advanced Scanning
Other advanced scanning features include:
Scanning Filters
Automatically adjusts image quality based on the type of original scanned.
Resolution
Changing resolution can also affect the clarity of an image.
Using AutoExposure
The AutoExposure tool checks the scan image for the brightest and darkest points, and sets the highlight and shadow points according to a preset formula. It also adjusts the midtones (tones between extreme bright and dark) to align with the extreme points for an overall brighter image.
AutoExposure can be used for color or grayscale images. It is not needed for line art (1-bit scan mode).
To activate AutoExposure, click the AutoExposure button.
Advanced Scanning
To reset the AutoExposure feature to its default values:
On a PC, press the Alt key and click the AutoExposure button. On a Mac, press the Option key and click the AutoExposure button.
Applying AutoExposure Without Removing an Image's Color Cast
Sometimes an image has a distinctive overall color, or color cast. AutoExposure automatically looks for and balances any color cast in the image.
Although you will usually want to remove a color cast from your scanned images, sometimes a color cast may be desirable. For example, a photograph of a sunset might have red color cast. In this case, you probably would not want to remove the color cast.
To activate AutoExposure without correcting an image's color cast, hold down the Shift key and click the AutoExposure button.

The AutoExposure adjustments are only made to the part of an image inside the crop frame. Try adjusting the frame size before applying the AutoExposure feature to create various effects.
Advanced Scanning

Note:
The densitometer window is informational only.
Values cannot be changed from the densitometer.
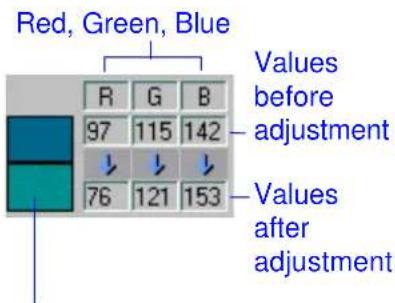
Shows pixel density before and after image adjustments
Using the Densitometer Monitor
The EPSON Perfection 600 densitometer displays the density of an image—how many pixels are in a given area.
Densitometer readings are useful when you:
Adjust contrast Change the tone curve Balance color Change resolution
The top row of the densitometer shows the red, green, and blue values of the original image. The values in the lower row show the values that result from changes you make.
The pixel display area reflects pixel density (and color saturation) at the exact point where the mouse pointer is positioned on the prescan image area. As you move the pointer to different positions on the image, you'll see the values shift.
Advanced Scanning

Note: Before using the densitometer, make sure you are in pixel view.
Setting the Densitometer Measuring Point
In addition to having the densitometer display values based on the mouse position, you can also fix the measurement point to a specific location on an image. This is useful when you want to set a value for a specific area on an image, such as adjusting the highlights in an image.
To set the densitometer measuring point:
- Move the mouse pointer to the point on the image where you want to measure image density.
- Press the Shift key while clicking the image.
A red cross appears at the reading point on the image. This point remains the stable reading point until you again press the Shift key while clicking the image.
Advanced Scanning

Note:
You can compare the original contrast values with the new values you set at any time by viewing the densitometer.
Manually Adjusting Image Contrast
The EPSON Perfection 600 AutoExposure feature automatically adjusts the contrast of the selected image. However, if you are not satisfied with the result, you can manually adjust the image's contrast.
To manually adjust contrast:
- Click the Contrast button. The mouse pointer displays as a white triangle in the preview area.
- Click in the lightest area of the image. The EPSON Perfection 600 software will adjust the image highlights by making your selection white and correcting darker tones accordingly.
- Click the Contrast button again, then while holding down the Alt key (on a PC) or the Option key (on a Macintosh), click the darkest area of the image.
Advanced Scanning
(The mouse pointer displays as a black triangle when the Alt or Option key is pressed.) The software makes your selection black and adjusts all lighter tones accordingly.
Adjusting Image Appearance Using Tone Curves
When an image needs adjustment, it is usually because the image is too dark or too light. However, it's not unusual that only parts of an image need adjustment. In such cases, you can use a tone curve to adjust only those tones in an image that are too dark or too light.
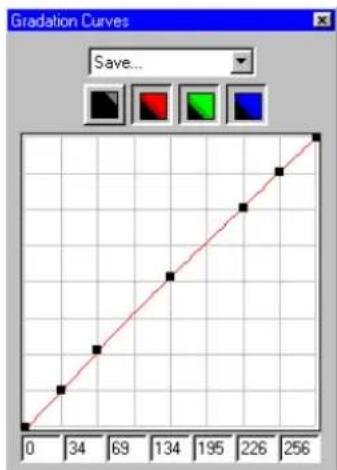
A tone curve displays the richness of the various tones in an image, from light tones to darker tones. These tones refer to shades of gray between black and white, or the saturation (intensity) of a color. You can adjust the gray (or color) tones in the middle range (midtones) as well as the highlights and shadows, by changing the shape of the curve.
Advanced Scanning
Caution: Changes made to a tone curve affect the image, so use caution when adjusting tone curves.
While the contrast control affects the extreme ends of the curve, the Gradation Curve dialog box provides an assortment of tools to control the entire range of tones.
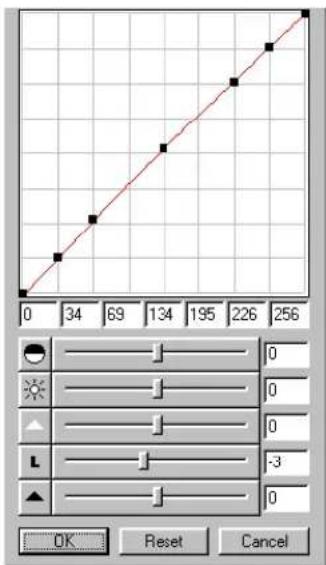
To display an image's tone curves, click the tone curve button. The Gradation Curves dialog box appears.
How To Use the Tone Curve
There are several ways to change the shape of a tone curve:
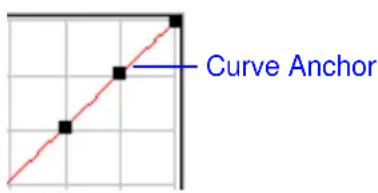
Click & Drag: As you move a curve anchor with your mouse, the curve follows the movement of the anchor.
To change a single anchor in the curve without affecting the adjacent anchors on the curve, "deactivate" the adjacent anchors.
To deactivate an anchor, press and hold the Alt key (on a PC) or the Option key (on a Macintosh), then click on the anchor.
Advanced Scanning

Note: Only the black curve can be adjusted for grayscale images.
The anchor turns white, retaining its current setting. Click it again to reactivate it (it will turn to black).
Numeric Values: Type a numeric value (+ or −) to adjust the curve. Each field adjusts an anchor point on the curve.
Sliders: Adjust the sliding controls below the curve. See How To Use the Tone Curve Sliders for information on adjusting the image with these sliders.
Apply Tone Curves To Individual Colors
With color images, there are four basic color channels that make up the full spectrum of color: red, green, blue, and black. All gradation tone curve adjustments can be made to the overall image, or to individual color channels.
When you first access the Gradation Curves dialog box for a color image, all of the color channels are active.
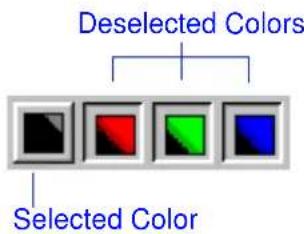
To modify a color channel:
- Select the color channel to modify by clicking on it.
- Make your modifications.
How To Use the Tone Curve Sliders
The sliders at the bottom of the dialog box provide an easy way to adjust the tone curve.
Each slider has a value of 0 at the middle setting. Moving to the right increases the value positively; moving to the left gives a minus value (-1, -2, etc.).
You can also adjust the value by typing in a number or negative number in the numeric value field next to each slider.
Adjust one or more of the following sliders until the desired result is achieved:

Contrast: Controls the extreme ranges of the gradation curve without affecting the middle tones.

Brightness: Adjusts the overall lightness or darkness of the image.
Move the slider bar to the right to increase brightness (raise every point along the gradation curve). Move the slider bar to the left to decrease brightness (lower every point along the gradation curve).

Highlights: Controls only the points to the far right on the gradation curve. Adjust these anchors with the slider when you want to adjust white areas without affecting shadows.

Midtones Adjusts the three anchor points in the middle of the curve without affecting the values of the highlight or shadow points. When the midtone slider is used, all three of these points are adjusted in relation to each other.
Advanced Scanning
There are two ways you can use this tool:
N (Linear) moves all three points in a literal relationship.
L (Logarithmic) moves the points based on a preset mathematical formula for a more gentle and subtle curve.
You can toggle between these modes by clicking on the icon to the left of the slider.

Shadows Controls only the point to the far left on the gradation curve. This can be used when you want to adjust the shadows without affecting the highlights.
It may take some practice to find the best ways of applying these tools to your images for optimum results. For example, suppose you want to scan a group photo where everyone in the group is well-lit except one person in the foreground who was too close to the flash and looks washed out. Since the
Advanced Scanning
other subjects in the photo look fine (they are in the midtone ranges), you can adjust the washed-out area (the highlight range) by decreasing the highlight value of the image.
As another example, suppose you have a photo where some objects are too dark and others are too light (which can happen easily when shooting outside on a bright, sunny day). Darkening the highlights and lightening the shadows helps to balance the curve.
Saving and Loading Tone Curve Settings
When you develop a group of settings that are especially useful for a specific type of scan, you have the option of saving them so you can apply them later to other images.
To save a setting:
- Click the Gradation Curves drop-down list.
- Select Save.
Advanced Scanning
- When prompted, enter a file name for the saved settings.
To load a previously saved setting:
- Click the Gradation Curves drop-down list.
- Select the name of the setting you want to apply to the image.
To delete a previously saved setting:
- Click the Gradation Curves drop-down list.
- Press the Shift key (on a PC) or the Option key (on a Mac) while clicking the name of the setting you want to delete. The file will be deleted.
Adjusting Color Balance
The Global Color Correction tool enables you to adjust the colors in an image's midtones either generally or selectively.
Advanced Scanning
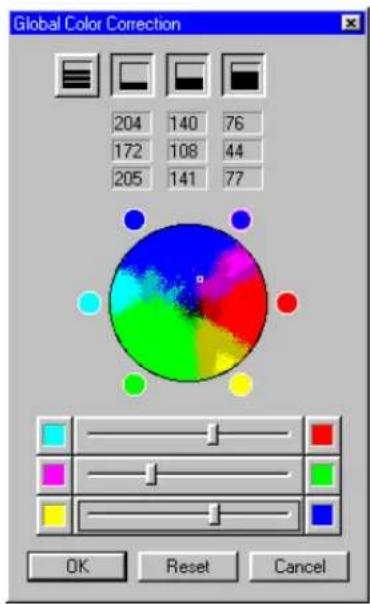

To access the Global Color Correction dialog box, click the color balance button.
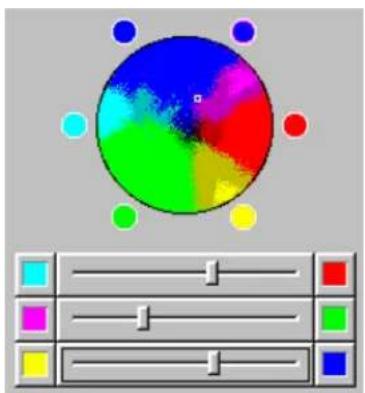
A range of colors can be represented in a color wheel. The color wheel in this dialog box is composed of the three primary colors, red, green, and blue (RGB), and their complementary colors, cyan, magenta, and yellow (CMY).
To adjust a color, increase or decrease the amount of its complementary color. For example, if you have an image with too much green, you can reduce the green by increasing its complementary color, magenta. (Magenta is opposite green on the color wheel and color sliders.)
Select Tone Ranges
Across the top of this dialog box is a series of buttons that enable you to specify the midtone range you want to edit on your image.
You can select all ranges, or you can choose one or more midtone ranges.
Advanced Scanning
Modify Color Values
There are two ways to adjust color values in this dialog box:
Color wheel: Click and drag to move the white point to a different color orientation on the wheel. The image's color balance will shift accordingly.
Color slider: Slide the color sliders back and forth between the complementary colors.
With either of these methods, you can see the numerical values above the color wheel shift as you make the changes. Only active color ranges will be affected by these changes.
Applying Scanning Filters
Your EPSON Perfection 600 software can automatically adjust an image based on the type of original scanned. These automatic adjustments are called filters.
Advanced Scanning

Note: Filters are only available when you select a color or grayscale scan type.

Note: Scanning runs slower when the Descreen filter is used because of the intensive computations required to process the image.
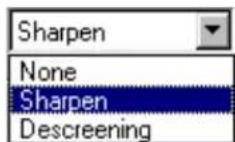
From the Filter drop-down list, choose one of the following:
Sharpen The scanner software has a sophisticated sharpening feature that automatically sharpens an image (makes it less blurry) by increasing the contrast (distinction between dark and light tones) between adjacent pixels.
This is the default filter and is useful primarily on photographs and grayscale images.
Descreen When photographs and illustrations are printed in newspapers or magazines, they are “screened”—a process that turns images into tiny dots. (If you look at a photograph in a newspaper with a magnifying glass, you’ll see that the image is actually composed of many small dots.)
If you are scanning an image that has been previously screened, you can sometimes get undesirable results,
Advanced Scanning
such as losing resolution or sharpness. To counter the effect of the screen process and turn the dots back into a smoother image, set the filter option to Descreen.
If you use the descreening filter, don't enlarge the image as this could cause a moiré effect—strange patterns that appear in an image due to the spacing between bands of dots in the image.
You may need to sharpen the image after descreening, but you will need to do so in your graphics application.
None Select this option if you don't want to use any filter.
Changing Image Resolution
Resolution refers to how many dots per inch (dpi) or dots per centimeter (dpcm) a device can print or scan.
Advanced Scanning

Note:
Resolution in professional printing is measured in lines per inch (lpi), rather than dots per inch (dpi).
The best resolution for a scanned image depends on the type of image you are scanning and your final output device. The following table shows the best scanning resolutions for the most common applications:
| Output device | Recommended Resolution |
| Inkjet printer 240 dpi | |
| Monochrome laser printer 150 dpi | |
| Computer screen 72 dpi | |
| Four-color printing press with 150 lpi 250 dpi | |
| Four-color printing press with 175 lpi 300 dpi | |
| B&W printing press with 85 lpi 150 dpi | |
| B&W printing press with 100 lpi 170 dpi | |
| B&W printing press with 133 lpi 225 dpi | |
| Line art logo 600 dpi | |
| Optical Character Recognition (OCR) 300 dpi |
The higher a resolution you select, the larger the resulting image file. For example, an 8.5 x 11 inch original scanned at 300 dpi can produce a 24 MB file.
Advanced Scanning
The same original scanned at 72 dpi creates only a 1.3 MB file.
Large files take longer to process and print, so consider the practical limitations of your computer system and hard disk drive when selecting a resolution. To keep file size manageable, select the lowest possible resolution that gives acceptable quality.
For Home or Office Output
As a rule of thumb for any image except line art, use scanning resolutions that are approximately one third of your output resolution.
For example, use a scanning resolution of up to 110 dpi with a 300 dpi laser printer, and up to 170 dpi with a 600 dpi laser printer.
For inkjet printers, such as for a 1440 dpi EPSON Stylus® COLOR series printer, use a scanning resolution of up to 240 dpi.
Advanced Scanning

Note: Your Perfection 600 scanner software supports up to 2400 dpi scanning resolution, although you probably won't need resolution that high.
For Professional Output
For commercial printer output, multiply the lines per inch (lpi) that the press prints (your printer can provide you with this information) by 2 to determine your scanning resolution.
For example, if the lpi is 150, try scanning at 300 dpi. (If the resulting file size is too large, multiply the lpi by 1.5 x instead of 2 and try again.)
How To Change Image Resolution
To change the image resolution, move the resolution slider to the left to decrease resolution or right to increase resolution.

The dpi display shifts as you do so.
Keyboard Shortcuts
Windows 95 and Windows NT
Dialog Windows
| Function Shortcut | |
| Activate zoom Ctrl + Alt + 2 | |
| Access Global Color Correction dialog box Ctrl | + Alt + 3 |
| Access Gradation Tones dialog box Ctrl + Alt + 5 | |
| Use AutoExposure Ctrl + Alt + 7 | |
| Highlight tool Ctrl + Alt + 8 | |
| Leave dialog Esc | |
| Start scan Enter key | |
| Undo/redo last operation Ctrl + z | |
| Show scan resolution Ctrl |
Keyboard Shortcuts
Highlight/Shadow Tools
| Function Shortcut | |
| Set highlight |  + mouse click + mouse click |
| Set shadow |  + Alt + mouse click + Alt + mouse click |
| Display brightest point Ctrl + Shift | |
| Display darkest point Ctrl |
PreScan/Scan
| Function Shortcut | |
| stop prescan Ctrl + . (period) | |
| stop scan Ctrl + . (period) |
Frames
| Function Shortcut | |
| Numbers Numbers visible | Right mouse button |
| Duplicate frame Alt + click frame | |
| Delete frame Delete key |
Keyboard Shortcuts
Macintosh OS
Dialog Windows
| Function Shortcut | |
| Activate zoom + 2 | ⌘ |
| Access Global Color Correction dialog box + 3 | ⌘ |
| Access Gradation Tones dialog box + 5 | ⌘ |
| Use AutoExposure + 7 | ⌘ |
| Use Highlight/shadow (Contrast) tool + 8 | ⌘ |
| Leave dialog Esc | |
| Start scan Return key | |
| Undo/redo last operation + z | ⌘ |
| Show scan resolution Control |
Keyboard Shortcuts
Highlight/Shadow Tools
| Function Shortcut | |
| Set highlight |  + click pixel + click pixel |
| Set shadow |  + OPTION + click pixel + OPTION + click pixel |
| Display brightest point + SHIFT | ⌘ |
| Display darkest point + CONTROL | ⌘ |
Prescan / Scan
| Function Shortcut | |
| Stop prescan + . (period) | ⌘ |
| Stop scan + . (period) | ⌘ |
Frames
| Function Shortcut | |
| Frame numbers visible CONTROL | |
| Duplicate frame | OPTION + click frame |
| Delete frame (extended keyboard) Remove key | |
| Delete frame (normal keyboard) | OPTION + DELETE |
Brightness: The overall range, from light to dark, of an image. The brighter an image, the lighter it appears. See also Contrast.
Contrast: The difference between the dark and light tones in an image. The higher the contrast, the darker the darks and the lighter the lights. The lower the contrast, the closer in tones between darks and lights.
dpi (dpcm): Dots per inch (or dots per centimeter) refers to how many dots per square inch (or square centimeter) a printer can print or a monitor can display. This is the primary factor controlling resolution.
Document Table: The area of the scanner on which an item to be scanned is placed.
Frame: The dotted line that surrounds a selected area on the prescan area.
Grayscale: An image composed of varying shades of gray. The EPSON scanner driver supports 256 shades of gray.
lpi: Lines per inch is a measure of resolution used by service bureaus and professional printers.
Midtones: The middle range of tones in an image, lighter than the shadows and darker than the highlights.
Pixel: A small point of light (on a monitor) or ink (on a printed image) that makes up the basic unit of the image.
Prescan Area: The area in the EPSON Perfection 600 main window where the item to be scanned can be previewed.
Resolution: The amount of detail in an image, as measured in dots per inch (dpi) or dots per centimeter (dpcm).
RGB: Refers to red, green, and blue, the basic colors used to create all other colors on a monitor.
Saturation The strength or intensity of a color based on the degree to which it lacks its complementary color. For example, a strongly saturated blue would have little or no yellow (its complementary color). A red with little saturation would have a lot of cyan (its complementary color) mixed in, and as a result, would look muddy or dark.
Sharpening Removes the blurred edges of an image by increasing the contrast (distinction between dark and light tones) between adjacent pixels.
TWAIN An industry standard for transferring information from an image capture device (such as a scanner) to your computer.
Index
Index
Numerics
1 bit line art, 20
10 bit grayscale, 20
30 bit color, 20
A
Access scanner driver, 10
AutoExposure, 35, 36
B
Batch mode, 18, 19, 25
Batch scan, stopping, 27
Batch scanning, 24
Brightness, 45, 60
C
CMY, 49
Color, 36
Color balance, 35, 48
Color cast, 37
Color channels, 43
Color originals, 20
Color wheel, 49
CompuServe, 6
Contrast, 40, 45, 60
Cropping an image, 16
Customized settings, 24
D
Defaults, resetting, 18
Deleting a frame, 27
Densitometer, 38
Descreening, 51
dpi, 52, 60
E
EPSON
Customer Care Centers, 6
Electronic support services, 6, 7
help, 6
World Wide Web site, 6
F
Features, 14
File size
cropping and, 16
displayed in main window, 31
factors affecting, 28
resolution and, 29, 54
scan type and, 21
Filters, 36, 50
Index
Flipping an image, 23
Frame, definition of, 60
Frame, deleting, 27
Framing an image, 16, 25
FTP, 6
G
Global color correction, 48
Gradation Curves dialog box, 42
Grayscale, 36, 61
Grayscale originals, 20
H
Help, 6
Highlights, 45
Host application, 16
1
Images
color originals, 20
cropping, 16
flipping, 23
framing, 16
grayscale originals, 20
line art originals, 20
manually sizing, 33
negative original, 27
orientation, 23
rotating, 23
scanning multiple, 24
sizing with a mouse, 33
Internet, 6
K
Keyboard shortcuts
Macintosh OS, 58
Windows 95 and Windows NT, 56
Keystroke commands, 14
L
Line art, 36
Line art originals, 20
Linear, 46
Logarithmic, 46
lpi, 61
M
Main window, 10, 13
Manually sizing an image, 33
Midtones, 41, 45, 49, 61
Multiple originals, 24
N
Negatives, working with, 27
Index
O
Orientation view, 23
Output box, 31
P
Pixel zoom, 23
Pixels, 38, 51, 61
Prescanning, 18
R
Resetting defaults, 18, 21
Resolution
clarity and, 36
defined, 52, 61
file size and, 29, 54
how to change, 55
table of recommended, 53
RGB, 49, 61
Rotating the image, 23
S
Saturation, 38, 41, 62
Save image to disk, 25
Scaling, 29
Scan mode, 18
Scanning multiple originals, 24, 25
Selecting the TWAIN source, 11
Service, 6
Shadows, 46
Sharpening, 51, 52, 62
Sizing frame with the mouse, 33
Sizing manually, 33
Stopping a batch scan, 27
Support, 6
T
TIFF, 18, 19, 25
Tone curve
individual colors and, 43
settings, saving and reusing, 47
tool, 35, 41
using, 42
Transparencies, working with, 20, 24
TWAIN source, selecting, 11
TWAIN, definition, 1, 62
W
World Wide Web, 6
Z
Zooming, 21
EPSON®
Perfection™
600
EPSON Perfection™ 600
Driver
User's Guide
For Microsoft ® Windows ® 3.1
License Agreement
IMPORTANT! The software included with this scanner is licensed only on the condition that the licensee ("you") agree to the terms and conditions set forth in the following legal agreement. READ THIS SOFTWARE LICENSE AGREEMENT CAREFULLY. YOU WILL BE BOUND BY THE TERMS OF THIS AGREEMENT IF YOU OPEN THE DISK PACKAGE OR USE THE SOFTWARE. If you do not agree to the terms contained in this Agreement, please return the disk package UNOPENED to your dealer and your license fee will be refunded.
EPSON AMERICA, INC. ("EPSON") will grant you a nontransferable, non-exclusive license to use the software (the "Licensed Software") and the accompanying documentation (the Licensed Software, the media embodying the Licensed Software, and the documentation are referred to in this Agreement as the "Licensed Materials"), if you agree to the following terms and conditions:
1. TERM; TERMINATION
This Agreement is effective from the date on which you first use the Licensed Materials. This Agreement may be terminated by you at any time by destroying the Licensed Materials, together with all copies. It will also terminate automatically and without notice if you fail to comply with any term or condition of this Agreement.
2. LICENSE GRANT
EPSON grants to you the right to use the Licensed Software in conjunction with a single personal computer as noted herein. YOU MAY NOT USE, COPY, MODIFY, OR TRANSFER THE LICENSED MATERIALS, IN WHOLE OR IN PART, EXCEPT AS PROVIDED IN THIS AGREEMENT.
3. OWNERSHIP
The Licensed Materials are the sole and exclusive property of EPSON and its licensors.
4. COPY RESTRICTIONS
You may make one (1) copy of the Licensed Software for backup purposes.
You may not decompile, disassemble, or electronically transfer the Licensed Software, or translate the Licensed Software into another computer language. You may not copy the documentation.
You agree to include the copyright notice set forth on the label of the media and embodied in the Licensed Software on any copy of the Licensed Software in any form, in whole or in part.
5. PROTECTION AND SECURITY
You agree to use your best efforts and take all reasonable steps to safeguard the Licensed Materials to ensure that no unauthorized person shall have access thereto and that no unauthorized copy, publication, disclosure or distribution, in whole or in part, in any form shall be made. You acknowledge that the Licensed materials contain valuable, confidential information and trade secrets and that unauthorized use and/or copying are harmful to EPSON and its licensors.
6. LIMITED WARRANTY
The only warranty EPSON makes to you in connection with the Licensed Materials is that the media on which the Licensed Software is recorded will be replaced without charge, if EPSON, in good faith, determines that it was defective and not subject to misuse, and if the media and proof of purchase are returned to EPSON or the dealer from whom the Licensed Materials were obtained within ninety (90) days of the date of purchase.
Because EPSON cannot know the purposes for which you acquired the Licensed Software, you assume full responsibility for the selection of the Licensed Software and for their installation and use and the results of that use.
7. WARRANTY DISCLAIMERS; LIABILITY LIMITATIONS
EXCEPT FOR THE LIMITED WARRANTY IN SECTION 6, EPSON MAKES NO WARRANTY OR REPRESENTATION WITH RESPECT TO THE LICENSED SOFTWARE AND IT IS LICENSED "AS IS." THE WARRANTY AND REMEDY PROVIDED ABOVE ARE EXCLUSIVE AND IN LIEU OF ALL OTHER WARRANTIES, EXPRESS OR IMPLIED, INCLUDING, BUT NOT LIMITED TO, THE IMPLIED WARRANTIES OF MERCHANTABILITY AND FITNESS FOR A PARTICULAR PURPOSE, AND ANY STATEMENTS OR REPRESENTATIONS MADE BY ANY OTHER PERSON OR FIRM ARE VOID.
YOU AGREE NOT TO USE THE LICENSED SOFTWARE IN ANY SITUATION WHERE SIGNIFICANT DAMAGE OR INJURY TO PERSONS, PROPERTY OR BUSINESS COULD OCCUR FROM A SOFTWARE ERROR.
YOU ASSUME ALL RISK AS TO THE SELECTION, USE, PERFORMANCE AND QUALITY OF THE LICENSED MATERIALS. IN NO EVENT WILL EPSON OR ANY OTHER PARTY WHO HAS BEEN INVOLVED IN THE CREATION, PRODUCTION OR DELIVERY OF THE LICENSED MATERIALS BE LIABLE FOR SPECIAL, INDIRECT, INCIDENTAL OR CONSEQUENTIAL DAMAGES, INCLUDING LOSS OF PROFITS OR INABILITY TO USE THE LICENSED MATERIALS, EVEN IF EPSON OR SUCH OTHER PARTY HAS BEEN ADVISED OF THE POSSIBILITY OF SUCH DAMAGES. IN NO EVENT SHALL EPSON'S OR SUCH OTHER PARTY'S LIABILITY FOR ANY DAMAGES OR LOSS TO YOU OR ANY OTHER PARTY EXCEED THE PURCHASE PRICE PAID FOR THE SCANNER.
Some states and/or countries do not allow limitations on how long an implied warranty lasts and some states and/or countries do not allow the exclusion or limitation of incidental or consequential damages, so the above limitation and exclusion may not apply to you. This warranty gives you specific legal rights, and you may also have other rights which vary from state to state and/or country to country.
8. GENERAL
If any provision or portion of a provision of this Agreement is determined to be invalid or unenforceable, it shall be deemed omitted and the remaining provisions of this Agreement shall remain in full force and effect.
This Agreement is governed by and construed in accordance with the laws of the State of California. Any suit brought with respect to this Agreement may be brought ONLY in Los Angeles, California and must be filed no later than one (1) year after the date acquisition of the Licensed Software.
This Agreement constitutes the entire agreement between the parties with respect to the subject matter hereof, and all prior agreements, representations, statements and undertakings are hereby expressly cancelled.
Should you have any questions regarding this Agreement, you may contact EPSON.
9. GOVERNMENT RESTRICTED RIGHTS
The Licensed Materials are provided with RESTRICTED RIGHTS. The use, duplication, or disclosure by the Government is subject to restrictions as set forth in subdivision (c)(1)(ii) of The Rights in Technical Data and Computer Software clause at 52.227-7013. The contractor/manufacturer of this Software is EPSON AMERICA, INC., 20770 Madrona Avenue, Torrance, California 90503 USA.
Copyright Notice
All rights reserved. No part of this publication may be reproduced, stored in a retrieval system or transmitted in any form or by any means, electronic, mechanical, photocopying, recording, or otherwise, without the prior written permission of SEIKO EPSON CORPORATION. The information contained herein is designed only for use with this EPSON scanner. EPSON is not responsible for any use of this information as applied to other scanners.
Neither SEIKO EPSON CORPORATION nor its affiliates shall be liable to the purchaser of this product or third parties for damages, losses, costs or expenses incurred by purchaser or third parties as a result of: accident, misuse, or abuse of this product or unauthorized modifications, repairs, or alterations to this product, or (excluding the U.S.) failure to strictly comply with SEIKO EPSON CORPORATION's operating and maintenance instructions.
SEIKO EPSON CORPORATION shall not be liable for any damages or problems arising from the use of any options or any consumable products other than those designated as Original EPSON Products or EPSON Approved Products by SEIKO EPSON CORPORATION.
EPSON is a registered trademark of SEIKO EPSON CORPORATION. EPSON Perfection is a trademark of Epson America, Inc.
General Notice: Other product names used herein are for identification purposes only and may be trademarks of their respective owners. EPSON disclaims any and all rights in those marks.
Copyright © 1997 by Epson America, Inc. E0997-00
Table of Contents
Introduction
About TWAIN Software Drivers and Your EPSON Scanner 1
How To Use This Guide 3 Using the Online Cross-References 4 Cautions, Notes, and Tips 5 Where To Get Help 6
The EPSON Perfection 600 Main Window
Accessing the EPSON Perfection 600 Main Window 10
About the EPSON Perfection 600 Main Window 12
Table of Contents
Basic Scanning
Basic Steps to Scanning 15
Changing the Default Settings 16
Zooming
Sizing the Scanned Image 24
Changing the Image Scale 25
Changing the Image Dimensions 26
22
Advanced Scanning
Automatic Image Correction 31
Auto Adjustment Tool 32
Descreen Filters 32
Table of Contents
Manual Image Correction 34
Contrast and Brightness Tools 36
Gamma Tool
Histogram Tool 40
Tone Curves Tool 43
Re-use Tone Curve Settings 47
Adjusting Image Sharpness 48
Saving and Re-using Scanning Settings 49
Glossary 51
Index 54
Index 54
Introduction
Congratulations on the purchase of your new EPSON Perfection 600 scanner. This guide explains how to use the EPSON Perfection scanner driver software with your scanner.
About TWAIN Software Drivers and Your EPSON Scanner
When working with graphics, a software interface is needed to transfer images from a device, such as a scanner, into a format that a graphics software application can use. This interface is called a driver.
Your EPSON Perfection 600 scanner driver software follows an image transfer standard known as TWAIN. This software lets you use your EPSON scanner with any
Introduction
host application that also supports the TWAIN standard, such as Visioneer PaperPort® and Adobe PhotoDeluxe™.
However, EPSON scanner software does more than simply transfer images from the scanner—it also lets you:
▶ Preview the image before saving it ▶ Make corrections to the image (such as adjust brightness, contrast, and tone quality) ▶ Crop a limited area for scanning
Introduction
How To Use This Guide
The information you need to use your EPSON Perfection 600 driver can be found in the following sections of this guide:
The EPSON Perfection 600 Main Window
This section gives you an overview of the EPSON Perfection 600 main window and instructions on how to access it.
Basic Scanning
This section provides information about the basic steps needed to scan an image.
Advanced Scanning
This section presents more advanced techniques, such as how to adjust an image's color or contrast.
Introduction
Glossary
Terms you may not be familiar with are listed in the glossary.
Using the Online Cross-References
Blue text that is also underlined indicates that the text is a cross-reference to other parts of this guide. Click on the text with the mouse pointer to view the referenced information. For example, click here to view the introduction to your EPSON Perfection 600 software.
Introduction
Cautions, Notes, and Tips
You'll find this information throughout your guide:
Cautions must be observed to avoid loss of data or damage to your equipment.

Notes contain important information about your scanner software.

Tips contain additional hints for improved scanning.
Introduction
Where To Get Help
EPSON provides customer support through the following services:
Electronic Support Services
| Service Access | |
| World Wide Web From the | Internet, you can reach EPSON's Home Page at http://www.epson.com. |
| EPSON Internet FTP Site | If you have Internet FTP capability, use your Web browser (or other software for FTP downloading) to log onto ftp.epson.com with the user name anonymous and your e-mail address as the password. |
| EPSON Download Service | You can call the EPSON Download Service at (800) 442-2007. Set your communications software to 8 data bits, 1 stop bit, no parity. Modem speed can be up to 28.8 Kbps. |
| EPSON Forum on CompuServe® | Members of CompuServe can type GO EPSON at the menu prompt to reach the Epson America Forum. For a free introductory CompuServe membership, call (800) 848-8199 and ask for representative #529. |
Introduction
Automated Telephone Services
Service Access
EPSON SoundAdvice™
For prerecorded answers to commonly asked questions about EPSON products 24 hours a day, seven days a week, call (800) 442-2110.
EPSON FaxAdvice™
Access EPSON's technical information library by calling (800) 442-2110. You must provide a return fax number to use this service.
EPSON Referral Service
For the location of your nearest Authorized EPSON Reseller or Customer Care Center, call (800) 442-2110.
Introduction

Note: If you need help using third-party software that came with an EPSON product, see the documentation for that program for technical support information.
Telephone Support
EPSON also provides technical support and information on the installation, configuration, and operation of EPSON products. Dial (800) 922-8911, (310) 782-2600 (U.S.), or (905) 709-9475 (Canada), 6 A.M. to 6 P.M., Pacific Time, Monday through Friday.
Before you call, please have the following information ready:
Product name ▶ Product serial number ▶ Computer configuration ▶ Description of the problem
You can purchase manuals, accessories, and parts for your scanner, and ink cartridges and paper for other EPSON products, from EPSON Accessories. In the U.S., call (800) 873-7766. In Canada, please call (800) 873-7766 for dealer referral.
The EPSON Perfection 600 Main Window
You can perform all scanning activities from within the EPSON Perfection 600 main window.
The following topics are presented in this section:
- Accessing the EPSON Perfection 600 Main Window About the EPSON Perfection 600 Main Window
Accessing the EPSON Perfection 600 Main Window
The EPSON Perfection 600 driver is compatible with any TWAIN-compliant program, such as Visioneer PaperPort or Adobe PhotoDeluxe. To access the scanner software, first open the host application into which you plan to import the scanned image or document. Then select EPSON Perfection 600 as your TWAIN source.

Note: You usually need to select the TWAIN source only once, when you use the scanner with your host application for the first time. The procedures to select a TWAIN source vary from host application to host application; see your application user's guide for details.
To access the EPSON Perfection 600 main window:
- Launch the application into which your scanned image will be imported. (See your application user documentation for instructions.)
- Select the EPSON Perfection 600 driver for your EPSON scanner.
Although the steps vary from program to program, most applications have an option on the File menu that lets you select the TWAIN source.
The EPSON Perfection 600 Main Window
For example, in PaperPort, choose Select Source from the File menu. Highlight EPSON Perfection 600 from the Select Source list, and click Select.
3. Open the scanner software.
Most applications have an option on the File menu that launches the TWAIN interface.
For example, in PaperPort, choose Acquire from the File menu, or click the scanner icon on the PaperPort tool bar. You see the EPSON Perfection 600 main window.
Procedures for launching the scan interface may vary, depending on the host application. See your application user's guide for specific instructions.
The EPSON Perfection 600 Main Window
About the EPSON Perfection 600 Main Window
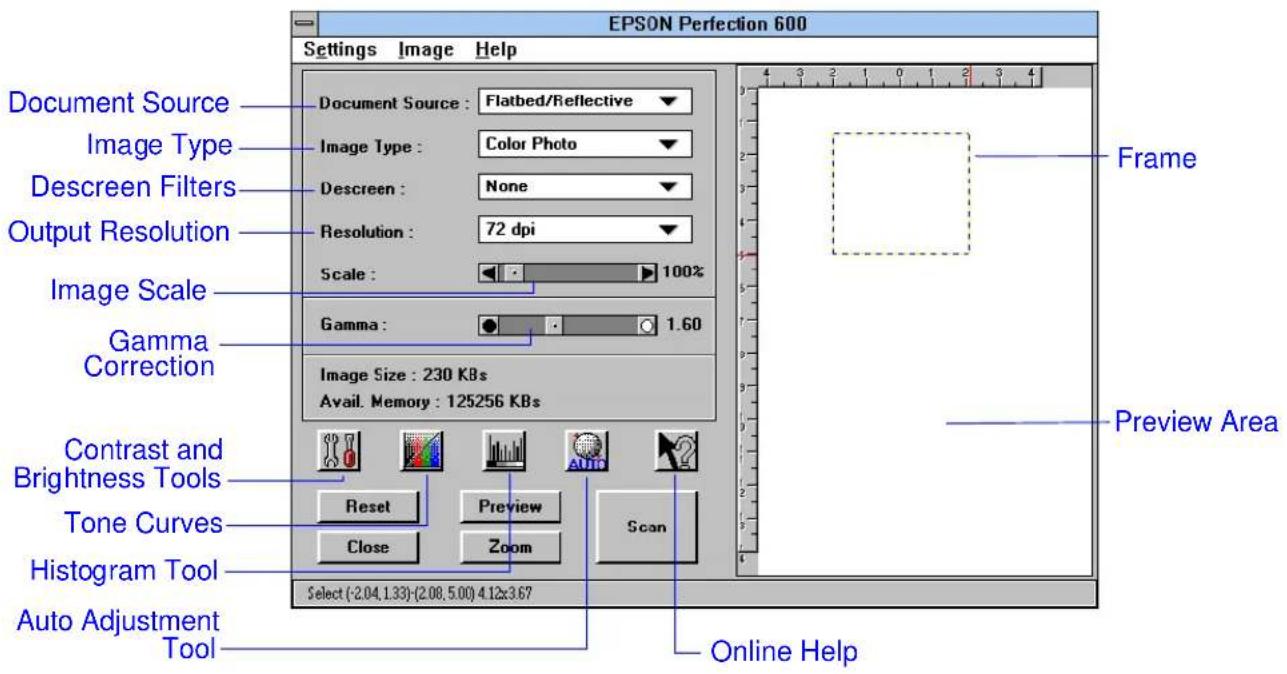
When you access the EPSON Perfection 600 scanner driver, the main window appears.
The EPSON Perfection 600 Main Window
See Basic Steps to Scanning for information on how to use the EPSON Perfection 600 main window to acquire images from your scanner.
For information on a specific field or button in the EPSON Perfection 600 main window, click on the online help icon when you click on the feature.
Basic Scanning
Once you've launched the EPSON Perfection 600 main window from the host application into which you plan to import the scanned image, you can perform a scan.
The following topics are presented in this section:
Basic Steps to Scanning Changing the Default Settings Zooming ▶ Sizing the Scanned Image
Basic Scanning

Note:
When you first access the EPSON Perfection 600 main window, the last frame scanned displays. Click the Preview button to clear the old image and preview a new one.
Basic Steps to Scanning
Perform the following steps to scan an image from your EPSON scanner into a host application.
- Access the EPSON Perfection 600 main window.
- Place the original to be scanned on the scanner document table.
- Preview the image by clicking the Preview button.
The Preview function displays the image as it will be scanned. The remainder of this guide covers how to make adjustments to an image before scanning, but for now, continue to the next step.
- Select the portion of the image to be scanned.
If you are going to scan only a part of the original, use the frame to crop (define) the part of the image to be scanned. The scanner driver scans only the area within the frame.
Basic Scanning
To scan the entire area (8.5 x 14 inches), click and drag the frame border to each edge of the prescan area.
- Click the Scan button to scan and import the image to your host application.
- Close the EPSON Perfection 600 main window.
Changing the Default Settings

Note:
You can restore the default scan settings at any time by clicking the Reset button.
You can change scanning settings before or after you prescan the image. (This is also true for all advanced scanning tools and procedures.)
You can change the following settings:
Document Source
To get the best results from your EPSON scanner, you must specify the type of media you're scanning.
Basic Scanning

Note: The Transparency option is only available if an optional EPSON Transparency Unit is attached to your scanner. This option scans an image up to 8.5 x 11 inches.
From the EPSON Perfection 600 main window, select one of the following Document Source options:
▶ Reflective—When you scan a reflective original, the image is captured when light reflects off the original on the scanner flatbed. Because most originals require reflective scanning, this is the default option. ▶ Transparency—When you scan a transparent original, the image is captured when light shines through the original instead of reflecting off it. Select Transparency when scanning a transparency.
Image Type
You will get the best quality and image file size by matching the type of original to be scanned with the corresponding scanning method.
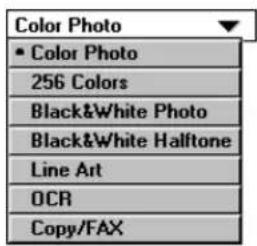
▶ From the following options, select the Image Type that best matches the original being scanned: - Color Photo—This option saves the scanned object as a 24-bit color image, which enables the computer to save up to 16 million colors. While this
Basic Scanning
gives the best image quality, it also takes up the most storage space when the image is finally saved to disk.
256 Colors—Saves the scanned object as an 8-bit color image. Although an image scanned with this option requires only a quarter of the file size it would if it were scanned with the Color Photo option, only 256 colors can be represented. This option is best for a color image that doesn't have as many tones as a color photograph would, such as a color drawing.
Black & White Photo — Saves the scanned original as an 8-bit grayscale image (256 shades).
Black & White Halftone—Saves the scanned object as a 1-bit halftone image.
A halftone image is composed of small black and white dots that give the image the appearance of having shades of gray. Most black and white images in a newspaper or magazine are printed as halftones.
Basic Scanning

Since a line art or halftone image requires only 1 bit of computer memory for each pixel (dot), using either the Line Art or Black & White Halftone option will produce an image that takes up the least amount of space when saved to disk.
▶ Line Art—Similar to Black & White Halftone, this option saves the image in black and white. Line Art, however, does not use shades of gray. Choose this option if you are scanning a black and white drawing or illustration. ▶ OCR—Use this option when you are scanning text to be used with an Optical Character Recognition (OCR) program. ▶ Copy/FAX—Use this option to scan an image that has been faxed or photocopied.
Resolution
In scanning, the term resolution refers to how detailed an image is, usually expressed in dots per inch (dpi). When you scan an image, you can adjust the resolution to improve the image, based on how you plan to output the image.
The best resolution setting for your image depends on the type of image you're scanning and your final output device.
Basic Scanning

Note: A resolution of 240 to 360 dpi is an optimum range when scanning color images for printing on a color printer.
For example, if you're scanning an image to go on a web site, a resolution of 72 dpi is usually sufficient since this is the resolution of most computer monitors, and anything more detailed generally won't show on the screen.
However, an EPSON Stylus Color 600 printer can print up to 1440 dpi, so if you are scanning an image to be printed, you should scan the image at a higher resolution, such as 240 dpi.
Basic Scanning
| 72 dpi |
| 72 dpi |
| 75 dpi |
| 100 dpi |
| 120 dpi |
| 150 dpi |
| 170 dpi |
| 180 dpi |
| 200 dpi |
| 240 dpi |
| 300 dpi |
| 360 dpi |
| 400 dpi |
| 600 dpi |
| 720 dpi |
| 900 dpi |
| 1200 dpi |
| 1800 dpi |
| 2400 dpi |
| 3600 dpi |
| 4800 dpi |
| Custom ... |
| 50 dpi |
| 125 dpi |
| 250 dpi |
The following table shows the best scanning resolutions for most needs:
| Output Device | Recommended resolution |
| Inkjet printer 240 dpi | |
| Monochrome laser printer 150 dpi | |
| Computer screen 72 dpi | |
| Four-color printing press with 150 lpi * | 250 dpi |
| Four-color printing press with 175 lpi 300 dpi | |
| B&W printing press with 85 lpi 150 dpi | |
| B&W printing press with 100 lpi 170 dpi | |
| B&W printing press with 133 lpi 225 dpi | |
| Line art logo 600 dpi | |
| OCR 300 dpi |
* Resolution is measured on professional quality printing presses in lpi, or lines per inch.
From the main window, select a resolution option that best matches how you'll be using the scanned image. If you need a resolution that is not on the list, select Custom, then enter a custom resolution value. You can enter and save up to three custom resolution values.
Basic Scanning
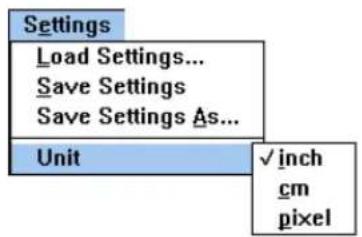

Note: Clicking on the Reset button does not reset the unit of measurement to the default (inches).
Units of Measurement
The default unit of measurement for the preview area and other dialog boxes is inches.
To change the unit of measurement, select Unit from the Settings menu and then choose one of the following:
inch ▶ cm (centimeters) pixel
Zooming
The EPSON Perfection 600 driver lets you enlarge or reduce an image in the preview area for easier viewing. This is called zooming. You can zoom in (make the image larger) or zoom out (make the image smaller).
Basic Scanning

Note:
Zooming only changes the way the image appears in the preview area of the main window—it does not change the size of the scanned image.
For information about how to resize an image, see Sizing the Scanned Image.

Caution:
Do not click Reset to cancel a zoom. Clicking Reset cancels all pending changes to the image.
Perform the following steps to zoom in or out of an image:
- Click the Zoom button. The mouse cursor will turn into a magnifying glass with a plus (+) symbol.
- To zoom in, click on an area of the image with the left mouse button. That area is enlarged.
- To zoom out, either hold down the Shift key and click on the area, or click on the image with the right mouse button. (The magnifying glass mouse cursor displays a minus (−) symbol when the Shift key is pressed, indicating zooming out is activated.)
- To turn off the zoom feature, click the Zoom button again.
To reset the image to its normal size, zoom out (or in) until the image displays as normal.
Basic Scanning

Note:
Do not use the zoom feature to resize an image. The zoom feature only affects the way the previewed image is displayed in the main window.
Sizing the Scanned Image
Your scanner can scan images up to 8.5 x 14 inches. When you scan an image without scaling it (changing its size or dimensions), the image is scanned at the same size and proportions as the original.
However, you can change the size of the scanned image by setting the size of the final image as a percentage of the original (for example, reducing the image by 50 percent), or by entering the desired size of the final image.
There are two ways to change the output size:
Changing the Image Scale Changing the Image Dimensions
Basic Scanning
Changing the Image Scale
The scale bar on the EPSON Perfection 600 main window enables you to set the size of an image as a percentage of the original image:

To change the scale of the scanned image, click on the Scale bar and drag the slider to the new value. An image can be scaled between 50 percent and 1000 percent. However, be aware that the file size of an image (in bytes) changes based on the scale factor used.
For example, the file size of an image scaled to 200 percent will be larger than file size of the same image scaled at 100 percent (the default scale percentage).
Basic Scanning
Changing the Image Dimensions
In addition to scaling an image as a percentage of the original, you can specify the exact size you want.
To specify output dimensions, perform the following steps:
- Select Size from the Image menu. The following dialog box appears:
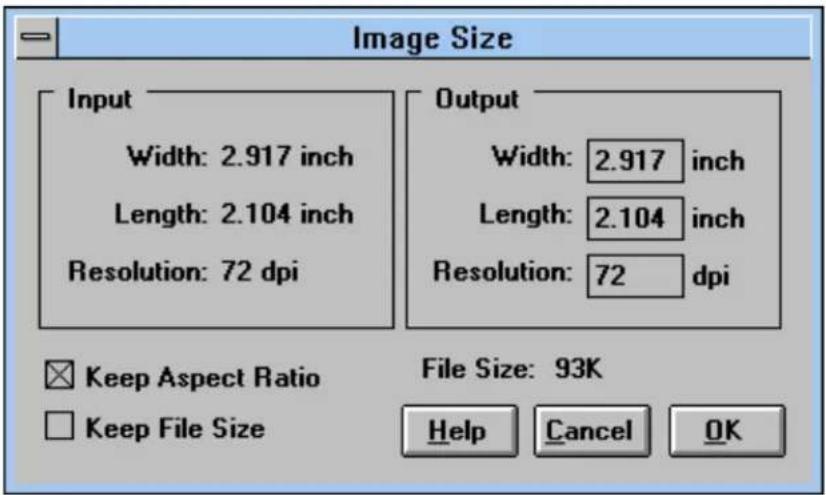
Basic Scanning

Keep Aspect Ratio

Keep File Size
- Specify whether to maintain the aspect ratio of the original image.
When specifying a size for the scanned image, you'll probably want the final image to have the same width-to-length (height) proportion (the aspect ratio) of the original image.
When Keep Aspect Ratio is checked, the EPSON Perfection 600 software automatically adjusts the other value when you change the height or width so the scanned image has the same proportions as the original.
For example, if the original image is 2 inches high and 3 inches wide (a 2 x 3 aspect ratio) and you change the height to 4 inches, the scanner software automatically changes the width to 6 inches to maintain the 2 x 3 aspect ratio.
- Specify whether to maintain the file size of the scanned image.
Basic Scanning

Caution:
Changing the size of the scanned image without keeping the aspect ratio can distort or stretch the image or produce other unexpected results.

Specifying the exact size of the scanned image is useful when you are scanning an image that needs to fit into defined dimensions, such as a column width in a newsletter.
If you need to change the size of the scanned image without changing the image file size, check the Keep File Size option. When you change the size of the scanned image, the software automatically adjusts the resolution of the image to maintain the current file size.
- Enter a new value for the image width, length (height), or both (if you are not keeping the aspect ratio).
- Change the image resolution, if needed.
The file size of the scanned image is displayed in kilobytes, or KB (one kilobyte = 1024 bytes), for the current settings, and is updated when you change the size of the scanned image. If the file is too large with the dimensions you've set, you can reduce the image file size by reducing the image resolution.
Conversely, if you reduce the image size, you may want to take advantage of the lower storage requirements by increasing image resolution.
Basic Scanning
For more information about image resolution, see the Resolution section in Changing the Default Settings.
Advanced Scanning
The EPSON Perfection 600 scanner driver provides advanced tools that let you modify an image's contrast, brightness, color, and tone before scanning.
This section describes the following:
▶ Automatic Image Correction ▶ Manual Image Correction Saving and Re-using Scanning Settings
Advanced Scanning
Automatic Image Correction
Your software has several automatic image adjustment options:
▶ Auto Adjustment Tool ▶ Descreen Filters
A third option for automatically adjusting scanned images based on shadow, midtone, and highlight tone distribution is found in the dialog box for the Histogram Tool and is described later in this chapter.
Advanced Scanning
Auto Adjustment Tool
To automatically adjust the image for optimal contrast and color balance, click the Auto Adjustment Tool icon on the EPSON Perfection 600 main window.
Corrections are automatically applied to the previewed image.
Descreen Filters
Your EPSON Perfection 600 software uses filters to automatically adjust an image as it's scanned to compensate for limitations in the original image.
For example, when a photograph is printed in a newspaper or magazine, a process called screening is used to convert the image into a series of tiny dots.
While screening an image may make the image look good on paper, scanning a screened image may produce very undesirable results.
Advanced Scanning


Note: Resolution in professional printing is measured in lines per inch (lpi) rather than dots per inch (dpi).
Your EPSON scanner software provides several descreening filters that undo the effects of the screening process.
From the Descreen drop-down list, choose the descreening filter that best matches the type of image being scanned:
None Does not apply a descreening filter to the image.
Art Print Smooths the fine dot pattern found in high quality art prints (175 lpi).
Magazine Smooths the fine dot pattern found in glossy magazines (133 lpi).
Newspaper Smooths the coarse grain pattern commonly found in newspaper images (85 lpi).
Advanced Scanning
Manual Image Correction
You can use the Auto Adjustment Tool to automatically adjust the quality of an image. However, if you're not fully satisfied with the result, you can adjust the image manually.
Use one or more of the following scanning software tools to manually adjust image quality:
Contrast and Brightness Tools, Gamma Tool, Histogram Tool, Tone Curves Tool
Advanced Scanning
Use the following table to decide which tool to use to correct a scanned image:
Use the... When...
Contrast and Brightness Tool: The overall image is too dark or too light (too many highlights or too many shadows).
Gamma Tool: The ima
ge has good highlights and shadows, but all the midtones run together (little contrast between midtones).
Tone Curve Tool: There is too much red, green, or blue in the image.
Histogram Tool: There is too much red, green, or blue in the image.
Advanced Scanning
Contrast and Brightness Tools
When the overall image is too dark or too light (too many highlights or too many shadows), select the Contrast and Brightness tool icon on the EPSON Perfection 600 main window.
The following dialog box appears:

Advanced Scanning
Adjust one or more of the following:
Highlights and Shadows Contrast Brightness
Highlights and Shadows
If an image is mostly dark (shadows) or mostly light (highlights), you can use the highlight and shadow tools to give the image better contrast.
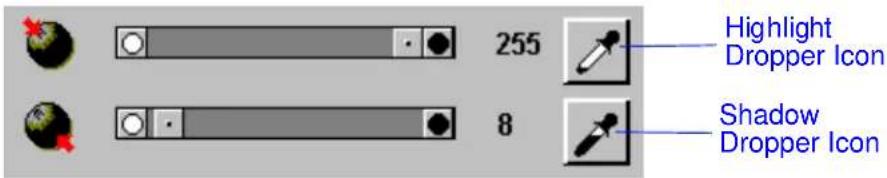

Note:
You can also use the sliders to set Highlight and Shadow values.
To use the Highlight and Shadow tools:
- Click the Highlight dropper icon, then click the brightest point in the image.
- Click the Shadow dropper icon, then click the darkest point in the image.
Advanced Scanning
The EPSON scanning software adjusts the image by "spreading out" the tones in the image between the two points you selected, producing a more balanced image.
Contrast
Use the Contrast tool to adjust the contrast between dark and light tones in the image.

To increase the contrast in the image, move the Contrast slider to the right.
To decrease the contrast, move the slider to the left.
Advanced Scanning
Brightness
Use the Brightness tool to adjust the brightness of the tones in the image.

To increase the brightness in the image, move the Contrast slider to the right.
To decrease the brightness, move the slider to the left.
Gamma Tool
If an image has midtones that run together, use the Gamma tool.

When you decrease the gamma value, you increase contrast, so light colors are lighter and dark colors are darker.
Advanced Scanning
For example, if you're scanning a photograph of a child standing in shadow, decreasing the gamma value would increase the contrast between the child's skin tone and the shaded area, thus making it easier to see the subject.
Histogram Tool
A histogram is a graph that represents values as horizontal or vertical lines.
The histogram tool uses vertical lines to show the intensity of the various tones in an image. The height of a line indicates the intensity of the tone.
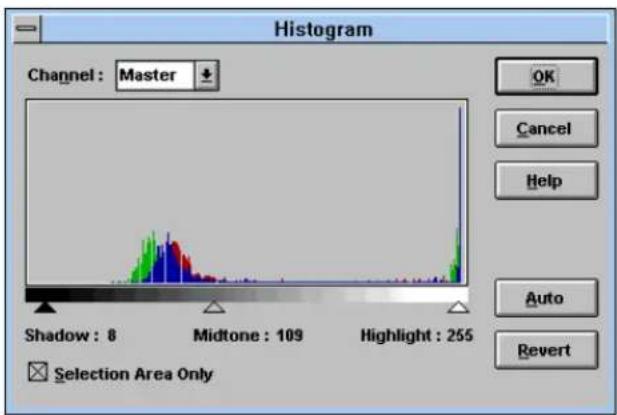
Advanced Scanning
Adjusting the Histogram Automatically
Follow these steps to adjust the tones in an image using the Histogram tool:
- Preview the image.
- Click on the Histogram tool icon on the EPSON Perfection 600 main window. The histogram dialog box appears.
- Check the Selection Area Only box. Any changes you make affect only the selected area.
- Click Auto, then click OK to close the histogram window.
Advanced Scanning
Adjusting the Histogram Manually
Follow these steps to make manual adjustments to the tones in an image:
- Preview the image.
- Click on the Histogram tool icon on the EPSON Perfection 600 main window. The histogram dialog box appears.
- Check the Selection Area Only box. Any changes you make affect only the selected area.
- Select a color to adjust.
There are three color channels that make up the full spectrum of color: red, green, and blue. If there is too much of a particular color in an image, select that color from the Channel drop-down list. Otherwise, leave the Channel set to Master (all).
- Adjust the tones by selecting and dragging the triangles at the bottom of the histogram until the desired effect is achieved.

Advanced Scanning
- Click OK to accept changes.
To cancel changes to the histogram and revert to the previous histogram setting, click Revert.
Tone Curves Tool
The Tone Curves tool gives you precise control over the tones in an image. A tone curve is a line plotted on a graph that shows the richness of tones in an image.

Advanced Scanning
The height of the curve indicates the intensity of the tone, from darker tones on the left to lighter tones on the right.
You can adjust any shadow, midtone, or highlight in an image by changing the shape of its tone curve.
For example, suppose you want to scan a photograph of a group of people where most of the faces look fine, but one person was too close to the flash and so looks washed out.
Since most of the subjects in the photo look fine (indicating that the midtone ranges are good), you can adjust only the washed-out area (the highlights) by decreasing the highlight value of the curve (the right side).
As another example, suppose you have a photograph where some objects are too dark and others are too light (which can happen easily when shooting outside on a bright, sunny day).
Advanced Scanning
By lightening the shadows and darkening the highlights (raising the left side of the curve and lowering the right) you can balance the tones in the image.
Follow these steps to adjust an image using tone curves:
- Preview the image.
- Click the Tone Curve icon on the EPSON Perfection 600 main window. The Tone Correction dialog box appears.
- Select the color to adjust.
There are three color channels that make up the full spectrum of color: red, green, and blue.
If there's too much of a particular color in an image, select that color from the Channel drop-down list.
Otherwise, leave the Channel set to Master (all).
- Change the curve by clicking the curve, then dragging it to a new position.
Advanced Scanning
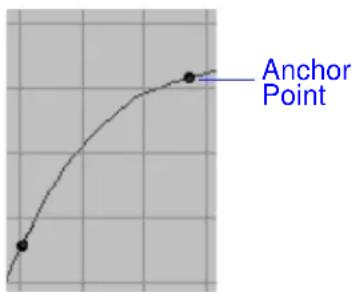
Clicking the curve creates an anchor point, a point on which the shape of the curve depends. Do one or more of the following until you achieve the desired result:
▶ To increase tones, drag the anchor point up. ▶ To decrease tones, drag the anchor point down. ▶ To shift tones, drag the anchor point to the left or right. ▶ To delete an anchor point, drag it off the graph.
- Click OK to accept the changes and close the dialog box.
To cancel changes made to a tone curve, click Revert.
It may take some practice to find the best ways of applying these tools to your images for optimum results.
Advanced Scanning

Note: For procedures on saving settings other than tone curve settings, refer to Saving and Re-using Scanning Settings.
Re-use Tone Curve Settings
If you have developed a curve that you find works well for a particular type of scanned image, you can save the curve and apply it to additional scans.
Do one or more of the following:
To save a curve, click the Save button in the custom curves dialog box. When prompted, enter a file name for the saved settings. To use a previously saved curve, select the Load button in the custom curves dialog box and select the name of the curve to apply. To delete a previously saved setting, delete the file name of the saved setting from the Windows File Manager.
Advanced Scanning
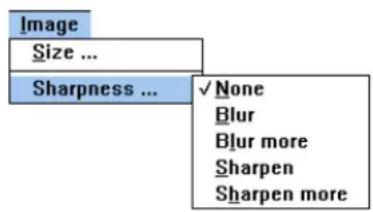
Adjusting Image Sharpness
You can use the EPSON Perfection 600 Sharpness feature to enhance an image or apply special effects.
For example, if you scan a photograph that is out of focus, you can sharpen the image. To give a photograph a “softer” look, you can blur the scanned image.
From the Image menu, click Sharpness, then select one of the following:
None, Blur, Blur more, Sharpen, Sharpen more
Advanced Scanning

Note:
This procedure does not save custom tone curve settings. Refer to Re-use Tone Curve Settings for the procedures on saving tone curve settings.
Saving and Re-using Scanning Settings
You can save your scan settings in a special settings file with a .TWN extension. You can either overwrite the existing settings file, or you can save your settings as a new file and keep the existing settings file. When you want to use a particular group of settings again, you can load the appropriate file.
To save a new settings file that overwrites the old settings file, do the following: From the Settings menu, click Save Settings. The new file overwrites the old settings file.
To save a settings file under a new name and keep the old settings file, do the following:
- From the Settings menu, click Save Settings As. The Save As dialog box appears.
- Enter a new file name and path.
Advanced Scanning
- Click OK to save the file and close the Save As dialog box.
To load a previously saved settings file, do the following:
- From the Settings menu, click Load Settings.
- Select the file that contains the settings you want.
- Click OK to load the file and close the dialog box.
Glossary
Brightness The overall range from light to dark of an image. The brighter an image, the lighter it appears. See also Contrast.
Contrast The difference between the dark and light tones in an image. The higher the contrast, the darker the darks and the lighter the lights. The lower the contrast, the closer in tones between darks and lights. See also Brightness.
dpi (dpcm) Dots per inch (or dots per centimeter) refers to how many dots per square inch (or square centimeter) a printer can print or a monitor can display. This is the primary factor controlling resolution.
Document Table The area of the scanner on which an item to be scanned is placed.
Frame The dotted line that surrounds a selected area on the prescan area.
Glossary
Grayscale An image composed of varying shades of gray. The EPSON scanner driver supports 256 shades of gray.
Host Application The application from which you launch the EPSON Perfection 600 software. When you click the Scan button in the EPSON Perfection 600 main window, the image is scanned and imported into the host application.
Midtones The middle range of tones in an image, lighter than the shadows and darker than the highlights.
Pixel A small point of light (on a monitor) or ink (on a printed image) that makes up the basic unit of the image.
Prescan Area The area in the EPSON Perfection 600 main window where the item to be scanned can be previewed.
Resolution The amount of detail that can be clearly seen on an image.
RGB Refers to red, green and blue, the basic colors used to create all other colors on a monitor.
Glossary
Saturation The strength or intensity of a color based on the degree to which it lacks its complementary color. For example, a strongly saturated blue would have little or no yellow (its complementary color) in it. A red with little saturation would have a lot of cyan (its complementary color) mixed in, and as a result, would look muddy or dark.
Sharpening To take out the blurred edges on images by increasing the contrast (distinction between dark and light tones) between adjacent pixels.
TWAIN An industry standard for transferring information from an image capturing device (such as a scanner) to your computer.
Index
A
Access scanner driver, 10
Anchor points, 46
Aspect ratio, 27
Auto adjustment tool, 32
B
Balancing colors, 35
Black and white images, 18
Brightness, 35, 36
C
Changing dimensions, 26
Color channels, 42, 45
Color images, 17, 18
Contrast, 35, 36, 38
Copies, 19
Correcting washed-out images, 44
D
Default settings, reset, 16
Deleting tone curve settings, 47
Descreening, 32
dpi, 19
E
Enlarging an image, 24
F
Faxes, 19
File size, 19, 27
Filters, descreen, 32, 33
Frame, definition of, 51
G
Gamma, 35, 39
H
Halftones, 18
Help
electronic, 6
online, 13
phone, 7
Highlights, 35, 37, 43, 44
Histograms, 31, 35, 40
Host application, 10
Index
1
Image, importing an, 10
Image sharpness, adjusting, 48
Image type, 17
Images,
art print, 33
automatically adjusting, 31
black and white, 18
changing dimensions of, 26
color, 17, 42
copies, 19
correcting, 32
correcting washed-out, 44
faxes, 19
halftone, 18
importing, 14
line art, 19
magazine, 33
manually adjusting, 34
OCR, 19
photographic, 18
proportion, 27
resolution, 19
screening, 33
sharpness, 48
types of, 17
Importing an image, 10, 14
Intensity, 40
L
Line art, 19
M
Magazine images, 33
Main window, 12
Manual adjustments, table of, 35
Manually adjusting an image, 34
Media types, 17
Midtones, 35, 43
N
Newspaper images, 33
0
OCR, 19
Online help, 13
P
Photographs, 17, 18
Pixels, 19
Proportion, 27
Index
R
Reducing an image, 24
Reflective originals, working with, 17
Reset default settings, 16
Resolution
defined, 19
dpi and, 19
recommended, 21
saving custom, 49
S
Saving scan settings, 49
Saving space on the disk, 19
Saving tone curve settings, 47
Scaling, 24, 25
Scanner driver, 1
Selecting the TWAIN source, 10
Settings, changing, 16
Shadows, 35, 37, 44
Sharpness, adjusting, 48
Sizing an image, 25, 26
T
Telephone support, 8
Tone curves, 35, 43, 46
Transparencies, working with, 17
TWAIN, definition 1, 53
TWAIN, selecting the source for, 10
U
Units of measurement, 22
Using saved tone curve settings, 47
Zooming, 22

- TERM; TERMINATION
- LICENSE GRANT
- OWNERSHIP
- COPY RESTRICTIONS
- PROTECTION AND SECURITY
- LIMITED WARRANTY
- WARRANTY DISCLAIMERS; LIABILITY LIMITATIONS
- GENERAL
- GOVERNMENT RESTRICTED RIGHTS
- COPYRIGHT NOTICE
- TABLE OF CONTENTS
- INTRODUCTION
- THE EPSON PERFECTION 600 MAIN WINDOW
- BASIC SCANNING
- OVERVIEW
- ADVANCED SCANNING
- KEYBOARD SHORTCUTS
- ABOUT TWAIN DRIVERS AND YOUR EPSON SCANNER
- HOW TO USE THIS GUIDE
- GLOSSARY
- USING THE ONLINE CROSS-REFERENCES
- CAUTIONS, NOTES, AND TIPS
- WHERE TO GET HELP
- TELEPHONE SUPPORT
- ACCESSING THE EPSON PERFECTION 600 MAIN WINDOW
- WINDOWS 95 OR NT
- MACINTOSH
- ABOUT THE EPSON PERFECTION 600 MAIN WINDOW
- NOTE
- BASIC STEPS TO SCANNING
- CHANGING THE DEFAULT SETTINGS
- SCAN MODE
- ORIGINAL DOCUMENT TYPE
- SCAN TYPE
- ZOOMING
- WORKING WITH ORIGINALS
- CHANGING IMAGE ORIENTATION
- BATCH SCANNING - WORKING WITH MULTIPLE ORIGINALS
- SCANNING MULTIPLE IMAGES
- DELETING A FRAME FROM A BATCH
- STOPPING A BATCH SCAN
- SCANNING NEGATIVES
- SIZING THE SCANNED IMAGE
- FACTORS THAT AFFECT IMAGE STORAGE REQUIREMENTS
- CHANGING THE SIZE OF THE SCANNED IMAGE
- MAINTAINING SIZE RATIO (PROPORTIONAL SCALING)
- MAINTAINING OUTPUT SIZE
- RESIZE AN IMAGE WITH THE MOUSE
- RESIZE AN IMAGE BY MANUALLY ENTERING OUTPUT DIMENSIONS
- RESIZE AN IMAGE BY MANUALLY ENTERING SCALE PERCENTAGE
- ADJUSTING IMAGE QUALITY
- AUTOEXPOSURE
- MANUAL CONTRAST
- TONE CURVES
- COLOR BALANCE
- SCANNING FILTERS
- RESOLUTION
- USING AUTOEXPOSURE
- APPLYING AUTOEXPOSURE WITHOUT REMOVING AN IMAGE'S COLOR CAST
- USING THE DENSITOMETER MONITOR
- SETTING THE DENSITOMETER MEASURING POINT
- MANUALLY ADJUSTING IMAGE CONTRAST
- ADJUSTING IMAGE APPEARANCE USING TONE CURVES
- HOW TO USE THE TONE CURVE
- APPLY TONE CURVES TO INDIVIDUAL COLORS
- HOW TO USE THE TONE CURVE SLIDERS
- SAVING AND LOADING TONE CURVE SETTINGS
- TO SAVE A SETTING
- ADJUSTING COLOR BALANCE
- SELECT TONE RANGES
- MODIFY COLOR VALUES
- APPLYING SCANNING FILTERS
- CHANGING IMAGE RESOLUTION
- FOR HOME OR OFFICE OUTPUT
- FOR PROFESSIONAL OUTPUT
- HOW TO CHANGE IMAGE RESOLUTION
- WINDOWS 95 AND WINDOWS NT
- MACINTOSH OS
- INDEX
- NUMERICS
- A
- B
- C
- D
- E
- F
- G
- H
- K
- L
- M
- N
- O
- P
- R
- S
- T
- W
- Z
- EPSON®
- PERFECTION™
- EPSON PERFECTION™
- DRIVER
- USER'S GUIDE
- LICENSE AGREEMENT
- ABOUT TWAIN SOFTWARE DRIVERS AND YOUR EPSON SCANNER
- AUTOMATED TELEPHONE SERVICES
- SERVICE ACCESS
- OPEN THE SCANNER SOFTWARE
- DOCUMENT SOURCE
- IMAGE TYPE
- UNITS OF MEASUREMENT
- CHANGING THE IMAGE SCALE
- CHANGING THE IMAGE DIMENSIONS
- AUTOMATIC IMAGE CORRECTION
- AUTO ADJUSTMENT TOOL
- DESCREEN FILTERS
- MANUAL IMAGE CORRECTION
- USE THE... WHEN
- CONTRAST AND BRIGHTNESS TOOLS
- HIGHLIGHTS AND SHADOWS
- CONTRAST
- BRIGHTNESS
- GAMMA TOOL
- HISTOGRAM TOOL
- ADJUSTING THE HISTOGRAM AUTOMATICALLY
- ADJUSTING THE HISTOGRAM MANUALLY
- TONE CURVES TOOL
- RE-USE TONE CURVE SETTINGS
- ADJUSTING IMAGE SHARPNESS
- SAVING AND RE-USING SCANNING SETTINGS
- U
Brand : EPSON
Model : Perfection 600
Category : Scanner