
Perfection 1250 Photo - Scanner EPSON - Free user manual and instructions
Find the device manual for free Perfection 1250 Photo EPSON in PDF.


| Type | Flatbed scanner |
| Brand | Epson |
| Model | Perfection 1250 Photo |
| Category | Photo scanner |
| Optical resolution | 1200 x 2400 dpi |
| Color depth | 48-bit (281 trillion colors) |
| Maximum document size | 8.5 x 11.7 in (A4) |
| Scan element | Color CCD line sensor |
| Light source | Cold cathode fluorescent lamp |
| Interface | USB 1.1 (compatible with USB 2.0) |
| Dimensions (W x D x H) | 25.0 x 45.6 x 9.5 cm |
| Weight | 2.7 kg |
| Power supply | AC adapter (DC 12V, 1.0A) |
| Power consumption | 15 W (max) |
| Operating systems | Windows 98/ME/2000/XP, Mac OS 9.x or later |
| Software included | Epson Scan, Adobe Photoshop Elements (limited edition) |
| Features | Photo restoration, color restoration, dust removal |
| Maintenance | Clean with soft, dry cloth; avoid liquids |
| Safety | Keep away from water; do not disassemble |
| Spare parts & repairability | Contact Epson service centers for parts and repairs |
Frequently Asked Questions - Perfection 1250 Photo EPSON
User questions about Perfection 1250 Photo EPSON
0 question about this device. Answer the ones you know or ask your own.
Ask a new question about this device
Download the instructions for your Scanner in PDF format for free! Find your manual Perfection 1250 Photo - EPSON and take your electronic device back in hand. On this page are published all the documents necessary for the use of your device. Perfection 1250 Photo by EPSON.
USER MANUAL Perfection 1250 Photo EPSON
EPSON Perfection® 1250/1650 Series
Scanner Basics
Copyright Notice
All rights reserved. No part of this publication may be reproduced, stored in a retrieval system, or transmitted in any form or by any means, electronic, mechanical, photocopying, recording, or otherwise, without the prior written permission of SEIKO EPSON CORPORATION. The information contained herein is designed only for use with this EPSON scanner. EPSON is not responsible for any use of this information as applied to other scanners.
Neither SEIKO EPSON CORPORATION nor its affiliates shall be liable to the purchaser of this product or third parties for damages, losses, costs, or expenses incurred by purchaser or third parties as a result of: accident, misuse, or abuse of this product or unauthorized modifications, repairs, or alterations to this product, or (excluding the U.S.) failure to strictly comply with SEIKO EPSON CORPORATION's operating and maintenance instructions.
SEIKO EPSON CORPORATION shall not be liable for any damages or problems arising from the use of any options or any consumable products other than those designated as Original EPSON Products or EPSON Approved Products by SEIKO EPSON CORPORATION.
A Note Concerning Responsible Use of Copyrighted Materials
Digital cameras and scanners, like photocopiers and conventional cameras, can be misused by improper copying of copyrighted material. While some countries' laws permit limited copying of copyrighted material in certain circumstances, those circumstances may not be as broad as some people assume. EPSON encourages each user to be responsible and respectful of the copyright laws when using digital cameras and scanners.
Trademarks
EPSON and EPSON Stylus are registered trademarks and EPSON Smart Panel is a trademark of SEIKO EPSON CORPORATION.
EPSON Perfection is a registered trademark, EPSON Software is a trademark, and EPSON PhotoCenter, EPSON Store, and SoundAdvice are service marks, of Epson America, Inc.
General Notice: Other product names used herein are for identification purposes only and may be trademarks of their respective owners. EPSON disclaims any and all rights in those marks.
The ENERGY STAR emblem does not represent EPA endorsement of any product or service.

Printed on recycled paper
Contents
Scanning from Start to Finish
1
Placing Your Document 1
Using the Scanner Buttons 2
Using EPSON Smart Panel 2
Scanning and Printing with Photo Print 4
Scanning to E-mail 5
Scanning a Photo to a File 7
Scanning to the EPSON PhotoCenter 11
Selecting TWAIN Settings 16
Recommended Settings 18
Scanning Transparencies 19
Using Film Holders 19
Scanning with the EPSON Perfection 1650 PHOTO 20
Scanning with the EPSON Perfection 1250 PHOTO 22
Scanning Reflective Documents or Photographs 23
Problem Solving
25
Scanner Light
25
Problems and Solutions
26
Setup Problems 26
Scanner Problems 28
Software Problems 29
Image Problems 29
Where To Get Help
32
For More Information 32
EPSON Technical Support 33
Software Technical Support 34
Requirements and Notices 35
System Requirements 35
Windows 35
Macintosh 36
Important Safety Instructions 37
ENERGY STAR Compliance 38
FCC Compliance Statement 39
Declaration of Conformity 40
Warranty 40
Index 43
Scanning from Start to Finish
Your EPSON Perfection® scanner lets you turn pictures and documents into digital files on your computer with the press of a button. You can use the buttons in conjunction with the EPSON Smart Panel™ software or you can use EPSON Smart Panel by itself. Instructions for using EPSON Smart Panel and each of the buttons are included in this chapter.
If you're experienced with scanning, you can use EPSON® TWAIN to scan with applications like Adobe® Photoshop® Elements or any other TWAIN-compliant program. See “Selecting TWAIN Settings” on page 16 for instructions.
Instructions for setting up your scanner can be found on the Start Here poster.
Placing Your Document
Place your document face down on the document table glass, as shown below.
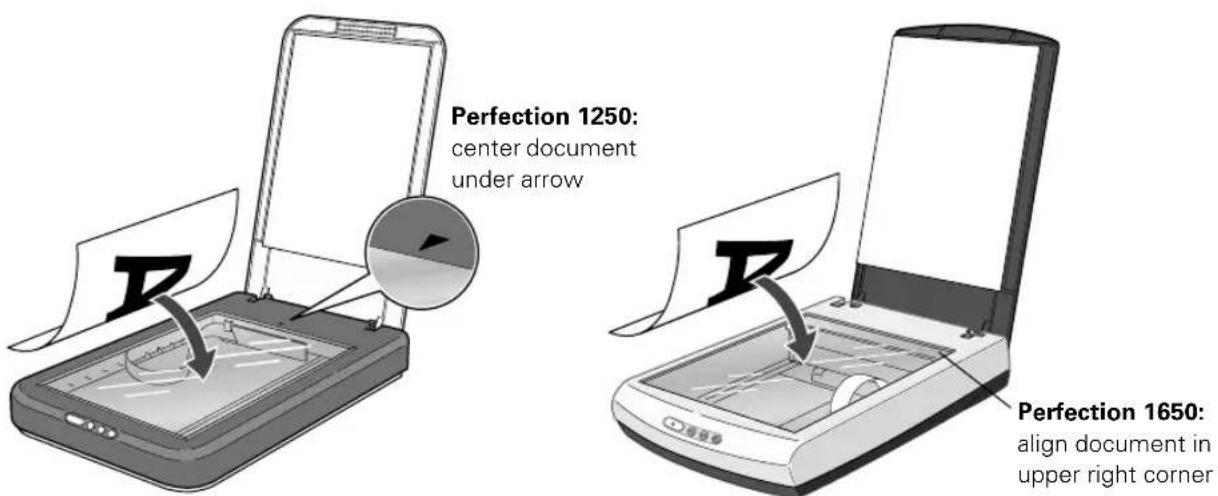

The self-adjusting cover allows you to place thick documents on the document table glass without removing it.
Using the Scanner Buttons
The scanner's Start, Photo Print, E-Mail, and Scan to Web buttons let you perform one-touch scanning with EPSON Smart Panel, as described below:
| Start Press the | Start button on the scanner to open EPSON Smart Panel (default). For details, see the section below. |
| Photo Print Press the | Photo Print button to automatically scan and print a photo. For details, see page 4. |
| E-Mail Press the | E-Mail button to scan your image and send it as an e-mail attachment. For details, see page 5. |
| Scan to Web Press the | Scan to Web button to scan an image and upload it to the EPSON photo-sharing site, PhotoCenterSM For details, see page 11. |
Using EPSON Smart Panel
You can use EPSON Smart Panel with the scanner's buttons, or you can use it by itself. Follow these steps to use EPSON Smart Panel to scan your document or photo.

The Start button is set to open the Smart Panel by default. However, you can assign the Start button to automatically open any of the Smart Panel applications. See the next page for instructions.
For Windows users:
In addition to the Smart Panel applications, you can assign other applications that support "Scanner events" (for example, Microsoft Imaging for Windows) to the Start button. See your electronic Reference Guide for instructions.
- Place your photo(s) face down on the document table glass; then close the scanner cover. (If you place multiple photos, make sure that their edges do not touch.)
- Do one of the following to open EPSON Smart Panel:
Press the Start button on your scanner. - Click the Smart Panel icon on the desktop. - On a Macintosh, you can also open the Apple menu and select EPSON SMART PANEL.
2 Scanning from Start to Finish
EPSON Smart Panel opens:
If you want the Start button to open a Smart Panel application instead of Smart Panel, select the application here. The icon appears next to the selected application.
![EPSON Smart Panel: Copy, Scan to E-mail, Scan to OCR, Scan to Application, Scan for Creativity, Scan to Web, Scan to File, Photo Print. To launch application, click on the icon. Press [Ctrl] to fix this topic in the Smart Guide. Device: EPSON TWAIN 5. Help.](/content/2026/06/1349727/images/9805bc9b1290343f445adc06b8f9ed1c685fda9abf7dfba5145e85ae9b476d0d.jpg)
- Click the icon for your desired Smart Panel scanning application. The window for that application appears and lets you adjust settings for your scan. Follow the on-screen steps for each application.
For instructions on using each of the Smart Panel applications, see your electronic EPSON Smart Panel User's Guide as described on page 32.

If you select Copy or Photo Print, make sure your printer is turned on and the correct paper type and size is loaded in your printer.
Scanning and Printing with Photo Print
The Photo Print button allows you to scan and print your photographs in one easy step.

Make sure your printer is turned on and the correct paper type and size is loaded in your printer.
- Make sure the paper you want to print on is loaded in your printer.
- Place your photo face down on the document table; then close the scanner cover.
- Press the Photo Print button on the scanner's control panel.
- EPSON Smart Panel opens and confirms you have a printer installed on your system. Then EPSON TWAIN automatically scans your image.
- When the scan completes, the EPSON Photo Print screen appears and your scanned image automatically prints.
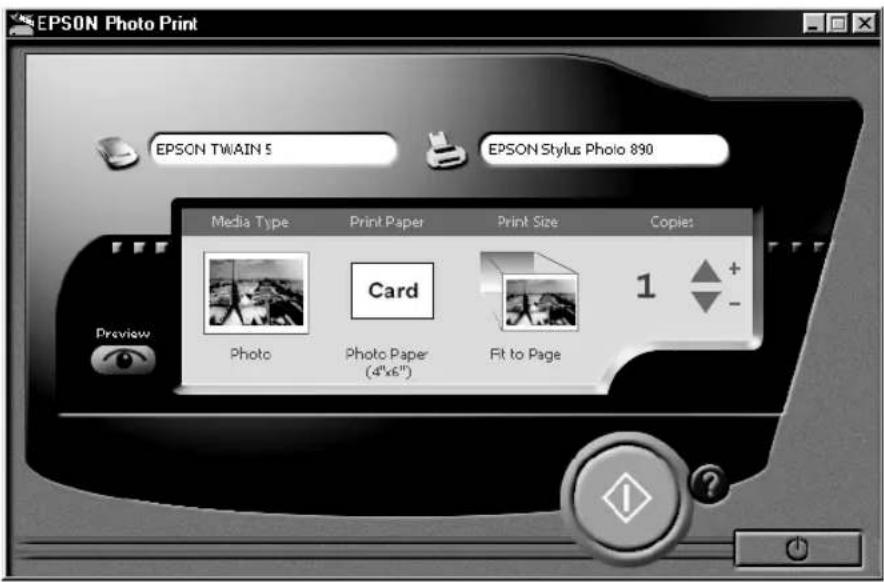

If you want to verify or change the paper and print size settings, cancel the scan; then select your paper and print size. Press the Photo Print button on the scanner or the green button on the screen to scan and print with the new settings.
4 Scanning from Start to Finish
Scanning to E-mail
The E-Mail button works with the Scan to E-mail application in Smart Panel to automatically scan your document and attach it to an e-mail.

If you access Scan to E-mail from Smart Panel instead of using the E-Mail button, your steps are slightly different. See your electronic Smart Panel manual for details.
Your e-mail program must be MAPI-compliant—for example Microsoft Exchange or Outlook. See your e-mail documentation for details. AOL® is not a MAPI-compliant e-mail program.
To send a photo using AOL, scan it and save it as a file as described on page 7, then attach it to an e-mail and send it.
Follow these steps to scan with the E-Mail button and Smart Panel:
- Make sure you are connected to the Internet.
- Place your photo(s) face down on the document table glass; then close the scanner cover.

If you place more than one photo on the document table, make sure that their edges do not touch.
- Press the E-Mail button. EPSON Smart Panel opens, then EPSON TWAIN automatically scans your image.
If you'd rather scan in Manual mode so you can adjust your scan settings, click Cancel. (See page 16 for instructions on selecting TWAIN settings.) After adjusting your settings, close EPSON TWAIN and continue with step 4.
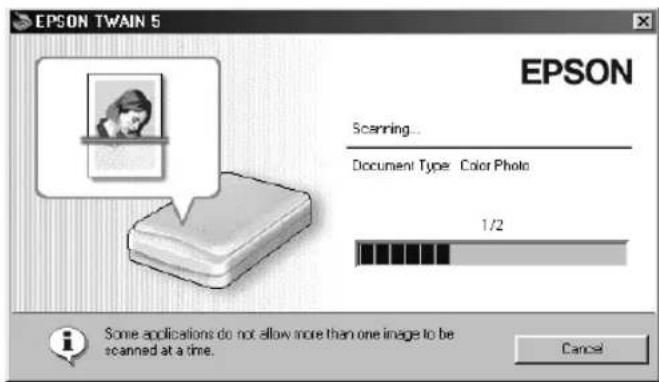
- When the scan completes, the Scan to E-mail dialog box opens. Select your e-mail program and then click Launch. (You only need to select your e-mail program the first time you use EPSON Smart Panel. For subsequent scans, it is automatically selected.)

- An e-mail dialog box opens with your photo(s) attached. Enter the recipient's e-mail address, type in a message, and then click Send.
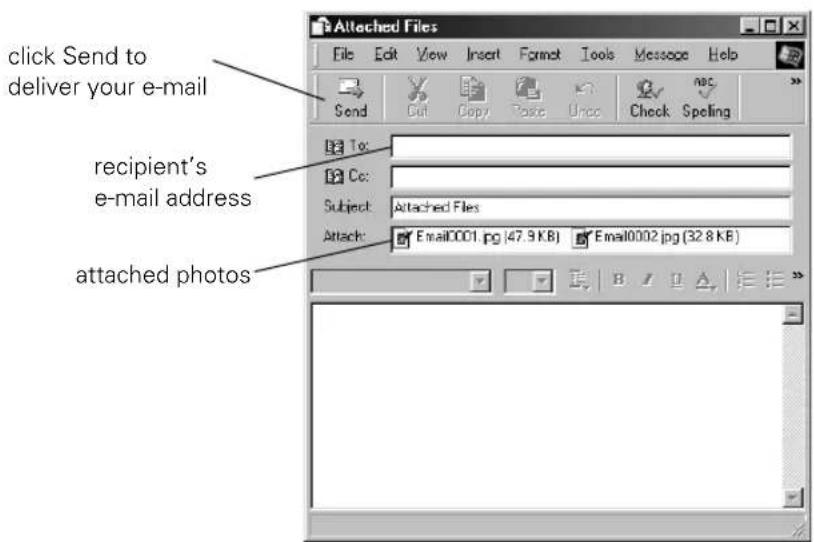

Some e-mail programs, such as Outlook Express, do not immediately send the e-mail, but instead place it in an “outbox.” To send the e-mail, you must launch the e-mail program and then click Send/Recv. See your e-mail program’s documentation for more information.

Scanning a Photo to a File
You can scan a photo directly to a file. This is useful for:
■ creating files to attach to an e-mail ■ archiving your photos as digital files ■ distributing your photos to friends and family.
Follow these steps to scan a photo to a file:
- Place your photo(s) face down on the document table glass; then close the cover.

If you place more than one photo on the document table, make sure that their edges do not touch.
- Do one of the following to open EPSON Smart Panel:
■ Double-click the EPSON Smart Panel icon on the desktop. ■ On a Macintosh, you can also open the Apple menu and select EPSON SMART PANEL.
- EPSON Smart Panel opens. Click Scan to File.
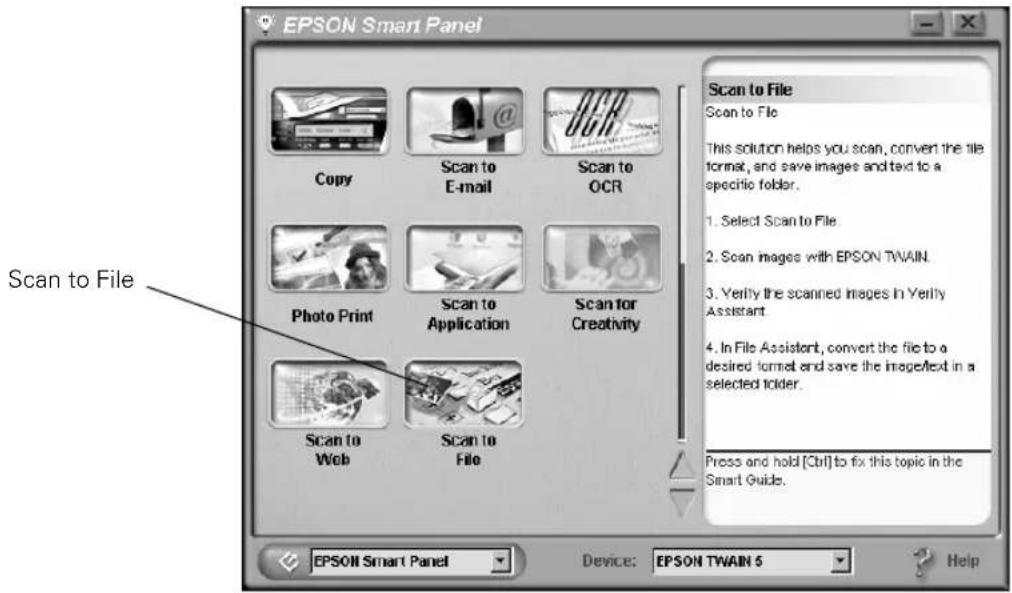
EPSON TWAIN automatically scans your image. If you'd rather scan in Manual mode so you can adjust your scan settings, click Cancel. (See page 16 for instructions on selecting TWAIN settings.) After adjusting your settings, close EPSON TWAIN and continue with step 4.
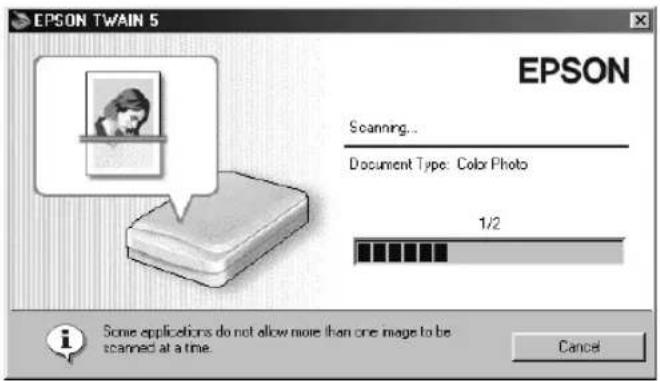
- When the scan completes, the Scan to File dialog box opens. If you want to scan more photos, place them on the document table glass, close the scanner cover, and then click Scan More. When you're finished scanning, click Finish.
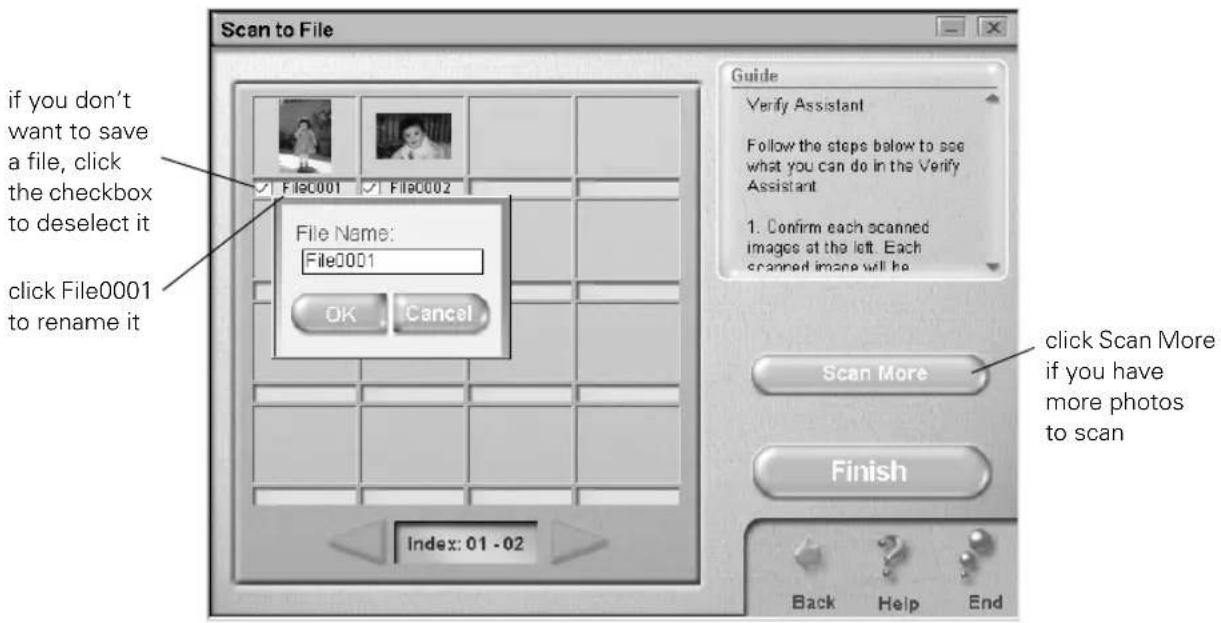

You can see a larger version of an image by double-clicking it.
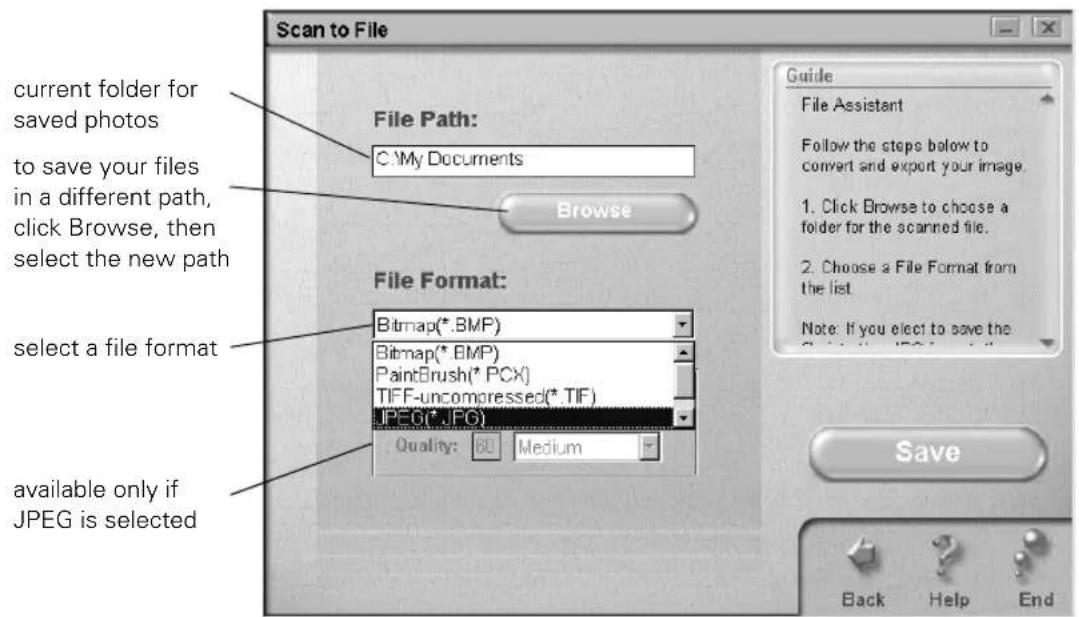
- At the next dialog box, you may specify a file path and file format. When you're finished, click Save. The photo is saved in your selected folder.

The file path is the location where the file is saved. If you are not going to use the default path (My Documents), be sure to use a path that is easy to remember.
Bitmap is the default file format in Windows. JPEG is the default file format on Macintosh. Bitmap files are high quality, but have a large file size. To send a photo through the Web or by e-mail, try the JPEG file format instead. JPEG format allows you to select different levels of image quality (remember that higher quality results in a larger file size).
Scanning to the EPSON PhotoCenter
With the Scan to Web button, you can scan photos and upload them to the EPSON PhotoCenter at http://photo.epson.com. The EPSON PhotoCenter is a free photo-sharing site that allows you to:
■ store, organize, and share your photos ■ print high-resolution photos straight from the Web ■ order prints and custom photo gifts.

If you are using AOL, first log on to AOL, then follow the steps below.
If you access Scan to Web from Smart Panel instead of using the Scan to Web button, your steps are slightly different. See your electronic Smart Panel manual for details.
Follow these steps to scan photos to the EPSON PhotoCenter:
- Make sure you are connected to the Internet.
- Go to http://photo.epson.com and register your e-mail address and password.
- Place your photo(s) face down on the document table glass; then close the cover.

If you place more than one photo on the document table, make sure that their edges do not touch.
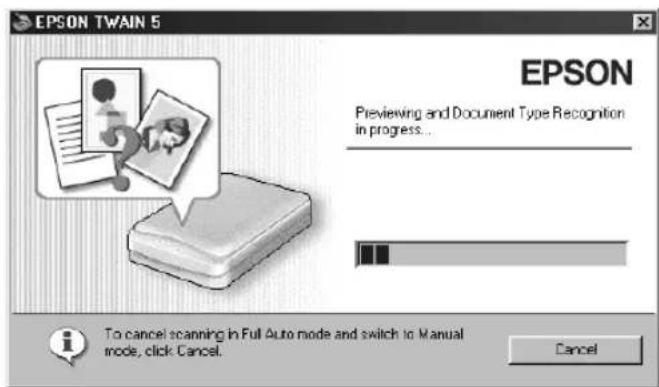
- Press the Scan to Web button. EPSON Smart Panel opens, then EPSON TWAIN automatically scans your image.
If you'd rather scan in Manual mode so you can adjust your scan settings, click Cancel. (See page 16 for instructions on selecting TWAIN settings.) After adjusting your settings, close EPSON TWAIN and continue with step 5.
- When the scan completes, the Scan to Web dialog box opens.
Select USA under Site Name, and enter the same User ID (e-mail address) and Connection Password you used when you registered at the EPSON PhotoCenter. (You only need to do this once. For subsequent scans, these are automatically selected.)
Click Upload. The photos upload to the EPSON PhotoCenter.
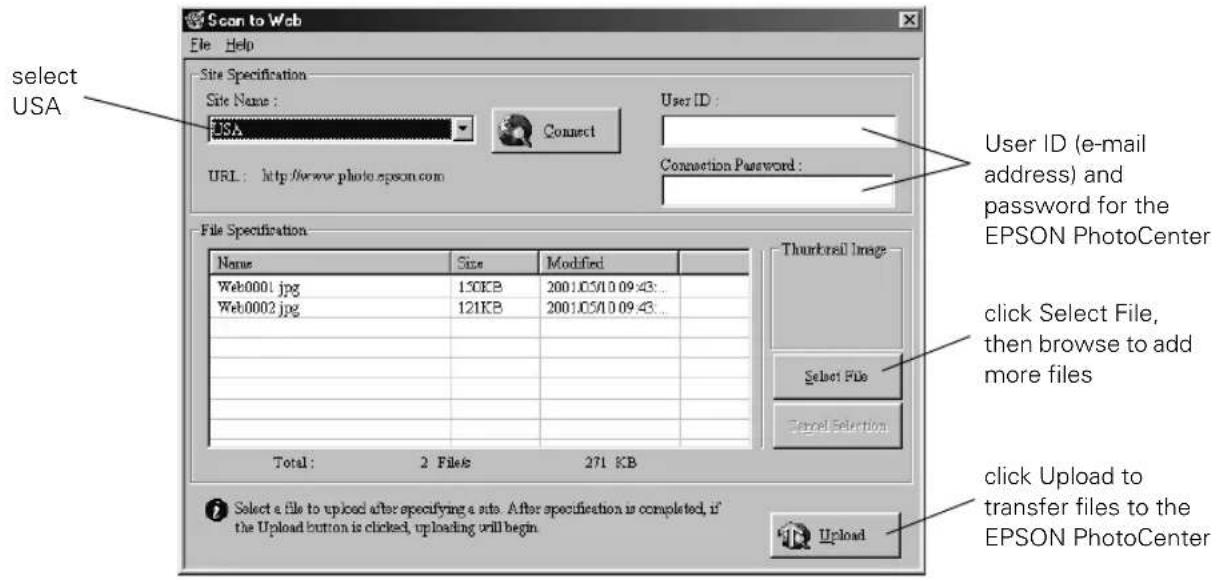

If you have other digital images on your hard drive that you want to upload, click Select File, browse to the location of the files, and add them to the File Specification list before you click Upload.
- When the upload completes, a message prompts you to confirm your upload. Click OK to connect to the EPSON PhotoCenter. Under Member Sign In, enter your e-mail address and password, and then click go.
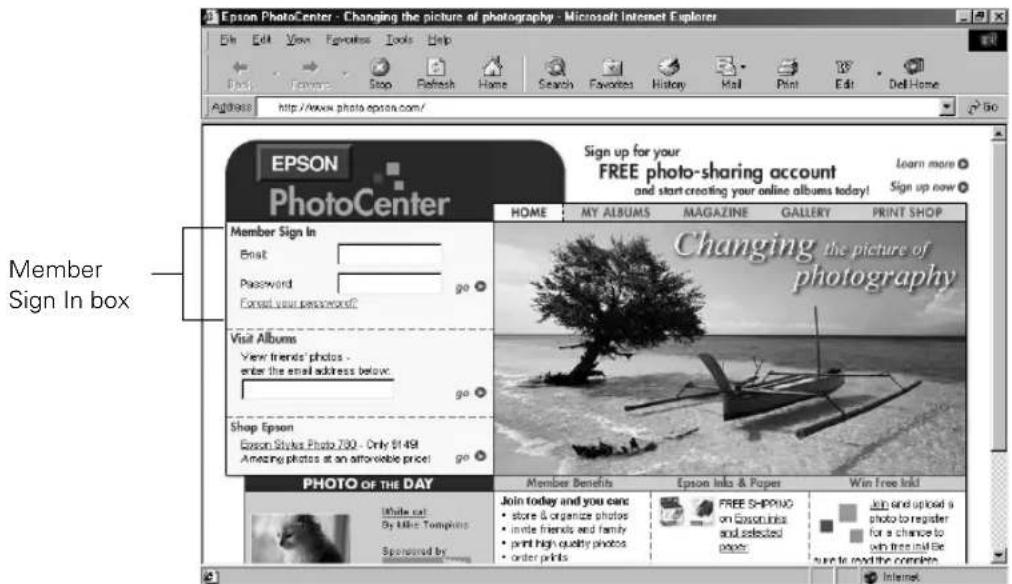
- You are automatically logged into the EPSON PhotoCenter and receive a message stating that you have new photos in your Photo Inbox. Click Photo Inbox to view your photos.
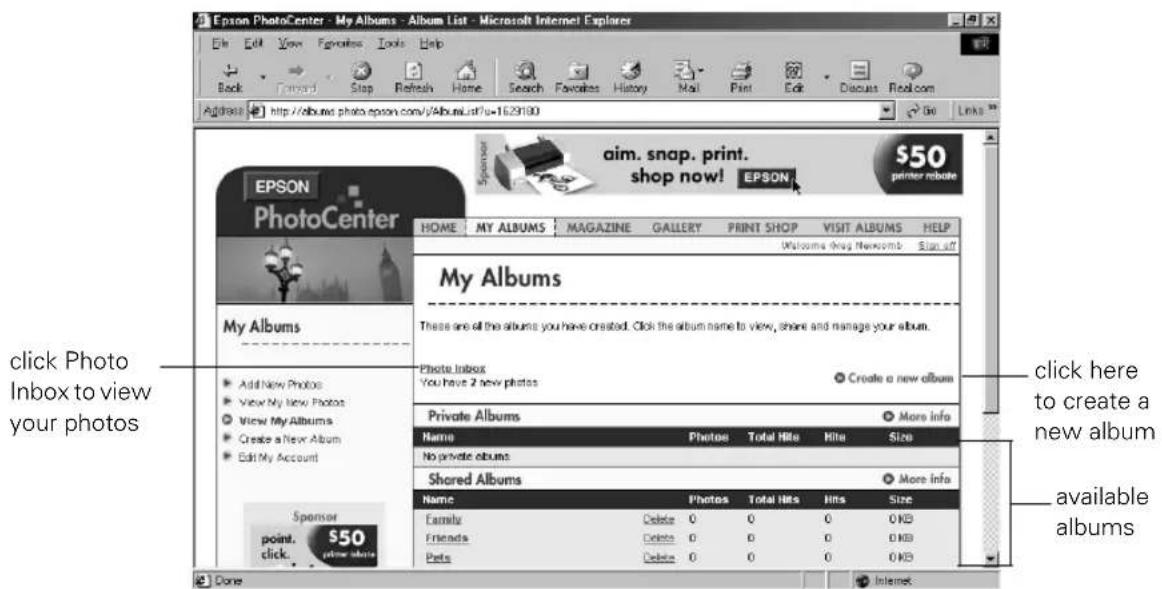

If you don't see your photos, increase the size of your browser window or use the scroll bar to scroll down until you see your photos.
- If you want others to see your photos, you must move them to an album. Select the photos you want to share. Either select them individually by clicking Select photo for each picture or click Select All to select them all.
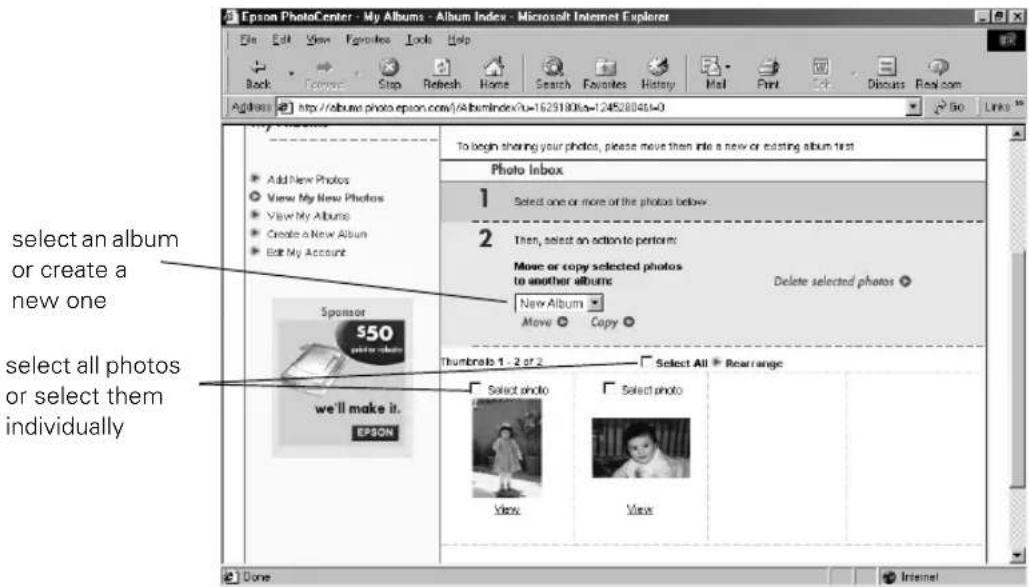
- Select the album you want to move your photos to. Then click Move or Copy to move the photos to the album. (If you want to create a new album, select New Album from the album selection box. After you click Move or Copy, you will see another window where you can name the album and add a password.)
Now that your photos are in an album, you can view them at any time and share them with your friends and family.
Sharing Your Photos
Now your friends and family can view the photos you've uploaded to the EPSON PhotoCenter. Have them visit http://photo.epson.com, enter your e-mail address under Visit Albums, then click go.
your friends and family enter your e-mail address here
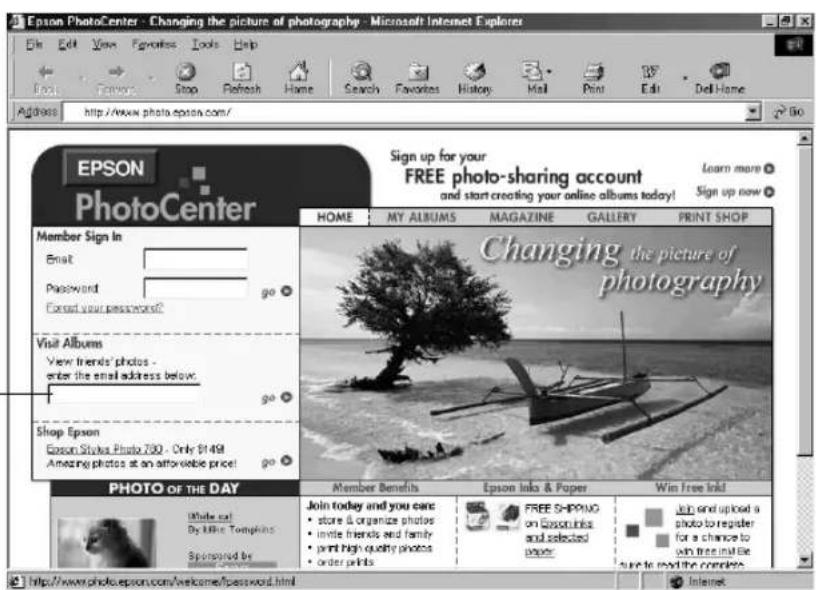
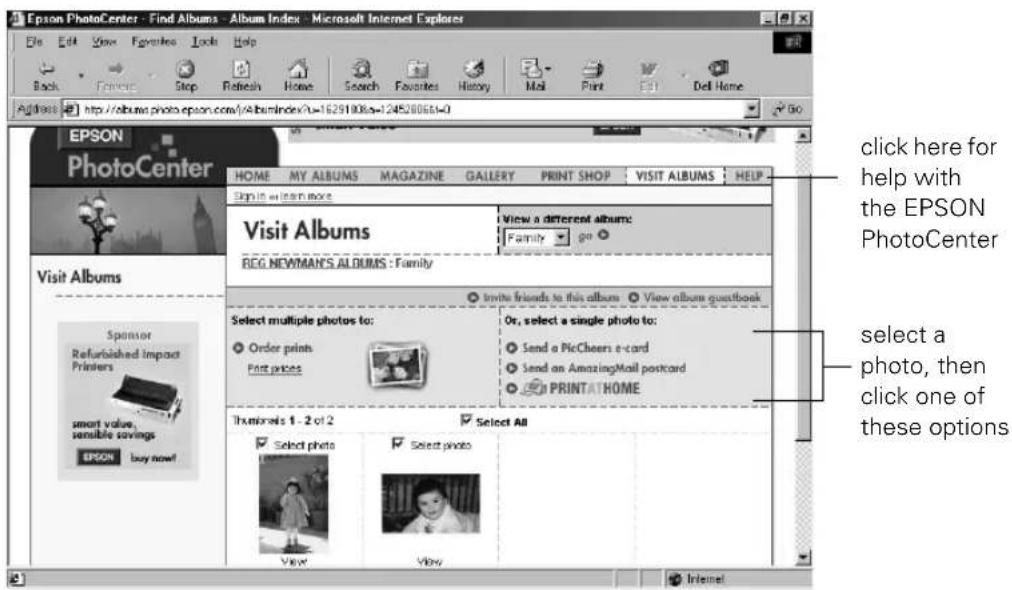
Your friends and family can view the photos in the shared albums you've created. After viewing your photos, they can print the photos at home, order reprints, or use the photos in an e-mail postcard.
Selecting TWAIN Settings
Before you scan, you need to open a host application—the program into which you plan to import the scanned image or document, such as EPSON Smart Panel, ArcSoft™ PhotoImpression, or other TWAIN-compliant program. You have to start this application before you can access EPSON TWAIN. (The scanner buttons automatically open EPSON Smart Panel or a Smart Panel application.)
The first time you open your application, you need to select the scanner “source” you want to scan with. Your EPSON Perfection scanner comes with the EPSON TWAIN driver. Select it as the source in your application (EPSON Smart Panel automatically selects EPSON TWAIN).
When you scan with EPSON Smart Panel, the default TWAIN mode is Full Auto and the software automatically selects the settings for your scan. If you want to use Manual mode and select the settings yourself, follow these steps:
- Start your scan. This can be done with the scanner buttons, from Smart Panel, or from within your application.
- Click Cancel when you see this screen:
- Click Manual mode when you see this screen:
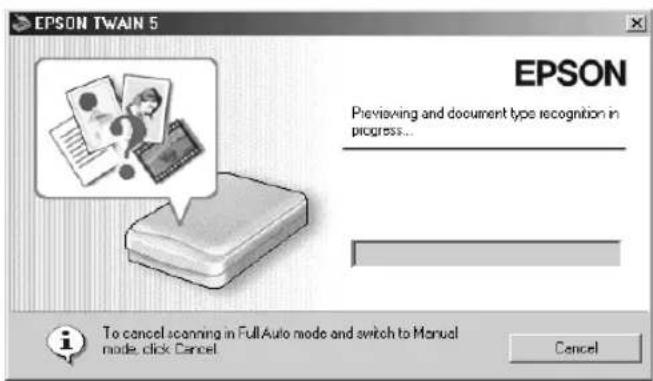
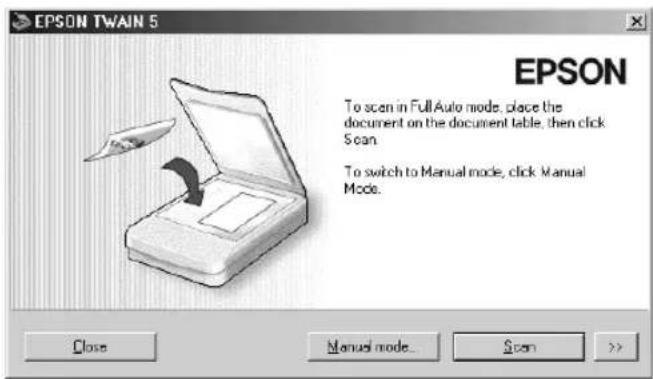
- Manually adjust settings in the EPSON TWAIN window in the following order:
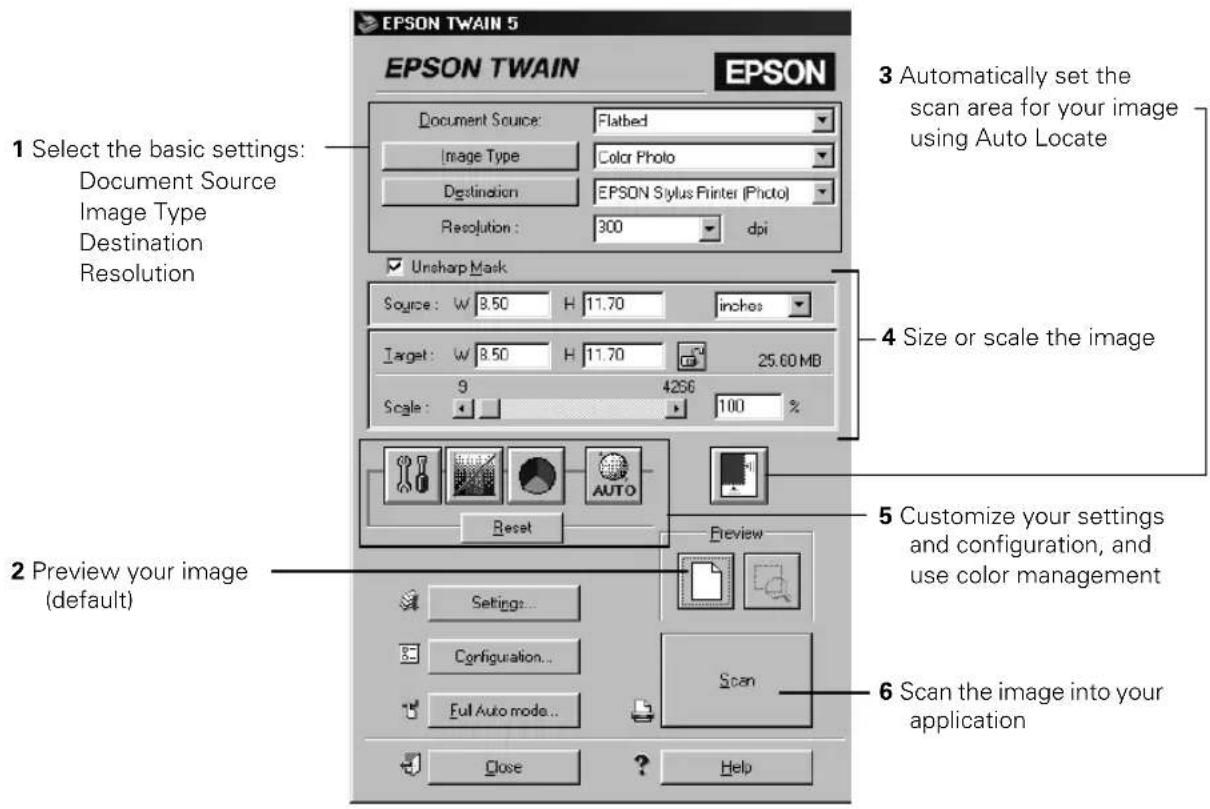
- After you scan your image, close EPSON TWAIN to return to your application.

The most important thing to remember when scanning is to select the correct image type and best resolution for your scan. For tips on selecting the best resolution and image type, see “Recommended Settings” on page 18. For detailed information on making settings in EPSON TWAIN, see your electronic Reference Guide, as described on page 32.

To switch back to automatic mode, click Full Auto mode in the EPSON TWAIN windows.
Recommended Settings
Getting the best scan possible depends on several factors, including the quality of your original and the resolution you select. The better your original is, the better your scan will be. You can make many corrections in your scanning software (EPSON TWAIN), however, major photo retouching will need to be done in programs such as Adobe Photoshop Elements or ArcSoft PhotoImpression.
If you are manually adjusting the settings in the TWAIN window, try the following settings for optimal scans:
■ Viewing on screen or the Web: 72 to 96 dpi ■ Sending and viewing on e-mail: 96 to 150 dpi ■ Printing:
| Type of image Recommended Image Type | Resolution for printing | |
| Photograph Color Photo 300 dpi | ||
| Small photograph to be enlarged Color | Photo 300 to 3200 dpi | |
| Magazine Color Photo 300 dpi | ||
| Newspaper (text only) Text 400 dpi | ||
| Text for OCR Text 400 dpi | ||
| Text with images Color Document 400 dpi | ||
| Line art Line Art 300 to 3200 dpi | ||
| 35 mm film (negative) TPU: Color Neg. | FilmTPU: Monochrome Neg. Film | 300 to 3200 dpi |
| 35 mm slide TPU: Pos. Film 300 to 3200 dpi | ||

Higher dpi settings create larger files. Don't select a higher resolution than necessary for your final output (web, e-mail, or print).
Scanning Transparencies
This section gives basic information on using the transparency unit (TPU) for your scanner. The transparency unit, also referred to as a film adapter, lets you scan slides and negative or positive film strips with your scanner.
If you don't have the PHOTO version of your scanner, you can purchase a transparency unit from the EPSON Store SM at (800) 873-7766 or visit our web site at www.epsonstore.com (U.S. sales only). In Canada, please call (800) 873-7766 for dealer referral.
Use the following part numbers when ordering your TPU:
■ EPSON Perfection 1250 TPU: B12B813321 ■ EPSON Perfection 1650 TPU: B813172

The EPSON Perfection 1650 PHOTO TPU is built into the scanner lid. The optional TPU for the EPSON Perfection 1650 is a separate piece; it is not built into the lid. For instructions on using this TPU, see your electronic Reference Guide.
Using Film Holders
Be sure to use the film holders that came with your scanner. They ensure correct placement of your transparencies and make it easier to scan them.
Film has two sides, a shiny base side and a dull emulsion side. The base side of the film has the film maker's name and film ID numbers printed on it. Always place the shiny base side down.

Hold the film by the edges or use gloves. Touching the film surface with bare hands can leave fingerprints or other marks on the film.
Scanning with the EPSON Perfection 1650 PHOTO
If you have an EPSON Perfection 1650 PHOTO scanner, the transparency unit is built into the scanner lid. Follow these steps to use the transparency unit:
- Unplug the AC adapter.
- Remove the reflective document mat. To do this, grasp the top of the mat and then slide it up gently.
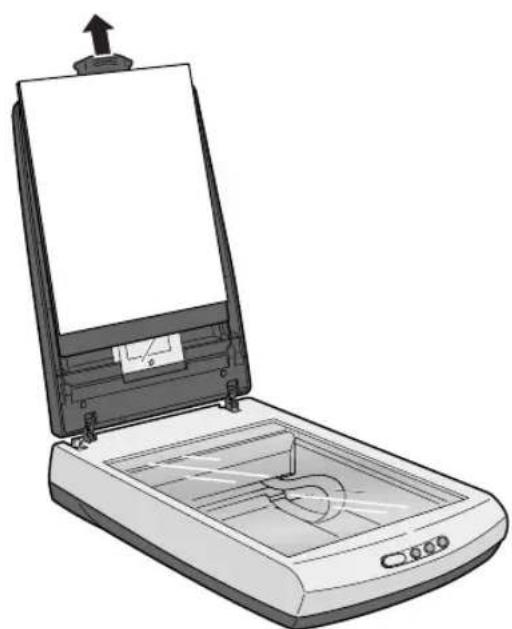
- Make sure the TPU cable is plugged into the scanner's transparency unit connector.
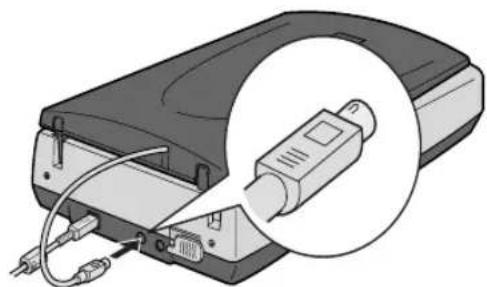
- Plug in the AC adapter.
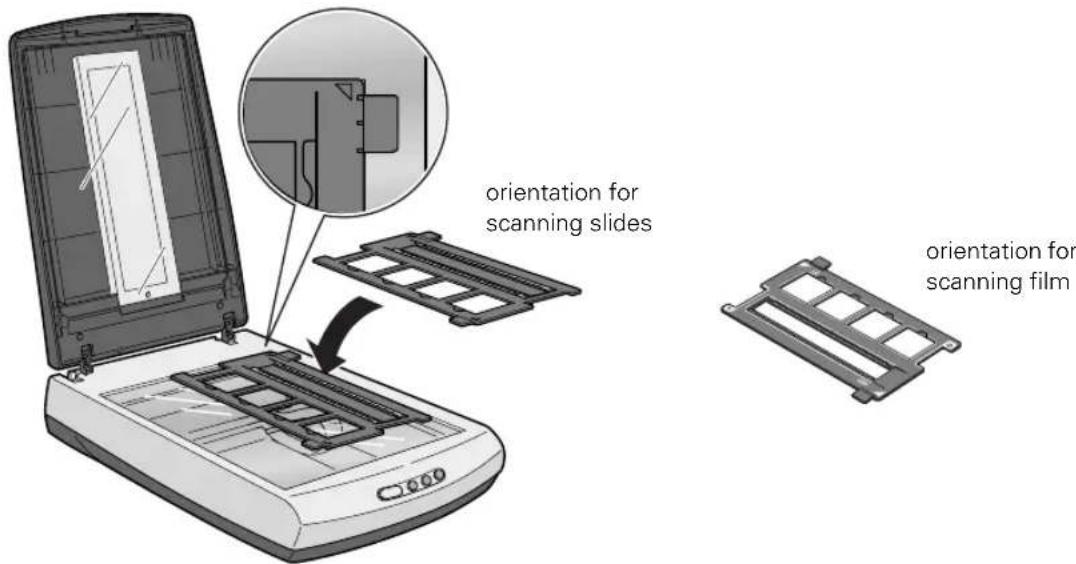
- The orientation of the film holder is different for scanning slides and film. For slides, place the film holder in the upper-right corner of the document table, then place your slides in the square openings.
For film, insert your film into the film holder, then place it in the upper-right corner of the document table.
- Close the document cover.
- In EPSON TWAIN, select TPU: Color Neg. Film, TPU: Monochrome Neg. Film, or TPU: Pos. Film as your image type (see page 18 for recommended settings).
For more information on using the transparency unit, see your electronic Reference Guide.
Scanning with the EPSON Perfection 1250 PHOTO
If you have an EPSON Perfection 1250 PHOTO scanner, the transparency unit is included as a separate part. Follow these steps to use the transparency unit:
- Unplug the AC adapter.
- Connect the TPU cable to the scanner's transparency unit connector.
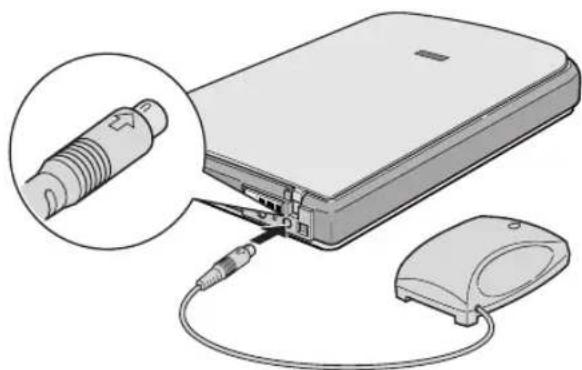
- Plug in the AC adapter.
- Open the document cover.
- Slide your film into the film holder, then place it in the upper-right corner of the document table, as shown.
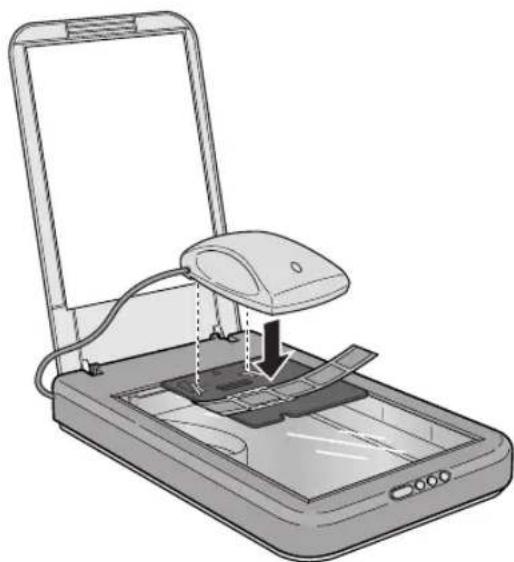
- Place the TPU on the film holder. Be sure to align the notches on the TPU with the holes in the film holder.
- In EPSON TWAIN, select TPU: Color Neg. Film, TPU: Monochrome Neg. Film, or TPU: Pos. Film as your image type (see page 18 for recommended settings).
For more information on using the transparency unit, see your electronic Reference Guide.
Scanning Reflective Documents or Photographs
When you return to scanning normal reflective documents (non-transparent documents such as memos or photographs), be sure to:
■ Unplug the AC adapter, then unplug the transparency unit from the option connector. When you are ready to scan again, plug in the AC adapter.
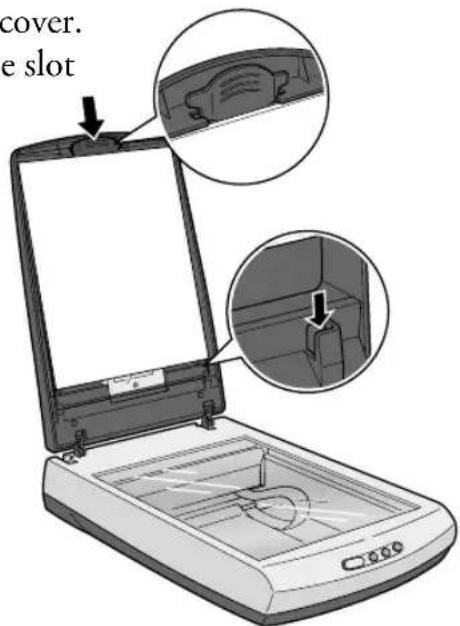
■ EPSON Perfection 1650 PHOTO users only: Replace the reflective document mat, as shown below.
- Open the document cover.
- Hold the reflective document mat with the white side facing away from the cover.
- Slide the bottom corners of the reflective document mat into the slots at the bottom of the document cover. Make sure the top of the mat is inserted in the slot at the top of the cover.
Problem Solving
This chapter gives you the basics for diagnosing and solving scanner problems. For more troubleshooting tips, see the “Troubleshooting” section of your electronic Reference Guide.
Scanner Light
The ◊ light indicates the status of the scanner, as described in the tables below.
EPSON Perfection 1250/1250 PHOTO
| Light Color Status | ||
| Flashing G | Green The scanner is initializing (warming up) or is busy scanning. | |
| On Green | The scanner is ready to scan images. | |
| On Red The scanner | may not be properly connected to the computer.Unplug the scanner from its power source, remove the USB cable, and then plug them back in.If this does not eliminate the error, one of the following may be the problem and you need to consult your dealer or EPSON:■The fluorescent lamp needs to be replaced.■The scanner is malfunctioning. | |
| Off — The scanner or AC adapter is unplugged. | ||
EPSON Perfection 1650/1650 PHOTO
| Light Color Status | |
| Flashing G | Green The scanner is initializing (warming up) or is busy scanning. |
| On Green | The scanner is ready to scan images. |
| Flashing R | Red If you are scanning transparencies with the EPSON Perfection 1650 PHOTO, make sure you’ve removed the reflective document mat.The scanner may not be properly connected to the computer. Unplug the scanner from its power source, remove the USB cable, and then plug them back in.If this does not eliminate the error, one of the following may be the problem and you need to consult your dealer or EPSON:■The fluorescent lamp needs to be replaced.■The scanner is malfunctioning. |
| Off — The scanner or AC adapter is unplugged. | |
Problems and Solutions
If you're having problems, this section answers some of the most common questions.
Setup Problems
Your system doesn't recognize the scanner or the indicator light doesn't come on.
Make sure your scanner is connected to your computer and plugged into a power source.
The New Hardware Wizard appears.
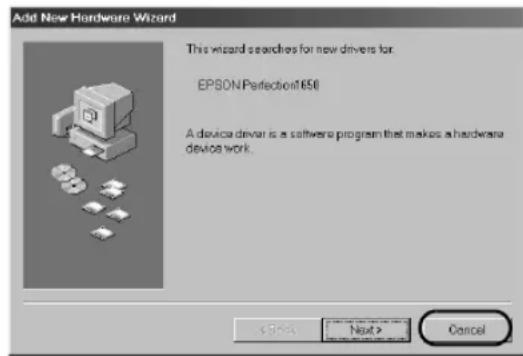
Click Cancel and follow the steps on the Start Here poster. Do not click Next.
You are unable to install EPSON TWAIN in Windows 2000.
In Windows 2000, don't select Block under Control Panel, System, Hardware, Driver Signing; select Ignore or Warn instead. If you see an error message or the software doesn't install correctly on Windows 2000, you may not have software installation privileges. See your system administrator.
You cancelled the scanner software installation before it was complete, or you connected the scanner before installing the software (Windows).
EPSON TWAIN may be incorrectly installed. See the section below for your operating system.
For Windows Me or 98 users:
Disconnect the AC adapter and the USB cable from the scanner, then follow the installation steps on the Start Here poster.
For Windows 2000 users:
- Make sure your scanner is plugged in and connected to your computer.
- Right-click the My Computer icon on your desktop, and then click Properties.
- In the System Properties dialog box, select the Hardware tab, then click Device Manager.
- Click the plus (+) sign next to Other devices or Imaging devices. If a question (?) mark or an exclamation (!) mark appears next to your scanner name, right-click your scanner name, and then select Uninstall.
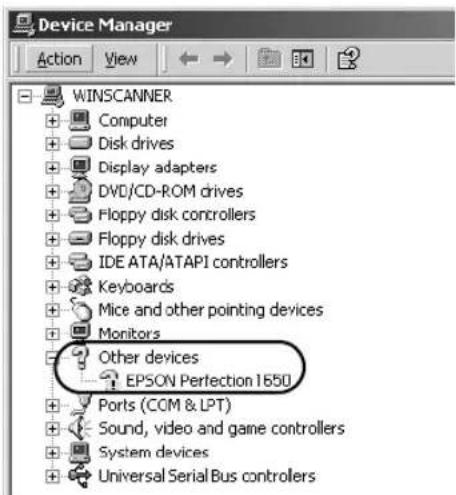
- Follow the installation steps on the Start Here poster.
Scanner Problems
The fluorescent lamp isn't on.
■ The scanner has a power saving function (sleep mode); press the ◆ Start button to “wake” the scanner. Or unplug the USB cable or power cable, then plug it back in. ■ Make sure the power cord is connected to the scanner and plugged into a power outlet.
The scanner doesn't scan.
■ Wait until the fluorescent lamp stays on (ready for scanning). You may need to preview your scan to make the lamp come on. If you are using a USB hub, try connecting the scanner directly to the computer's USB port. Use only the USB cable that came with your scanner. If you see your scanner in the Windows Control Panel, but you can't scan, uninstall and reinstall your scanner software.
The scanner buttons don't work after plugging in the USB cable or AC adapter (Macintosh).
If you unplug your USB cable or AC adapter, then plug it back in, wait until the scanner has initialized
before using the scanner buttons. If you press a scanner button and nothing happens, initialize the scanner by scanning an image from Smart Panel. Then you can use the buttons.
You're having trouble scanning while using the transparency unit.
Make sure the transparency unit is correctly installed and connected to the scanner's option interface. Make sure you select the correct Document Source setting for the option and your image: TPU: Color Neg. Film, TPU: Monochrome Neg. Film, or TPU: Pos. Film (see page 18). If you're scanning in Manual Mode on a Macintosh, the watch icon may not change back to a pointer after scanning is complete. The pointer returns to normal after you close EPSON TWAIN. If you're using the EPSON Perfection 1650 PHOTO, make sure you've removed the reflective document mat and positioned the film holder correctly (see page 20). If the edges of your image aren't scanned, see page 30.
Software Problems
The scanner software doesn't work properly.
Make sure your computer meets the system requirements listed on page 35 or page 36 and supports the software applications you're using.
Check if your computer has enough memory for your software. If you're running other software at the same time, the computer may not have enough memory. (See your software and computer manuals.) Try closing any open applications, including screen savers and virus protection programs.
If you are scanning a large image or scanning at a high resolution, your computer may not have enough memory to process the image.
Check your software installation. If all else fails, uninstall your software, then reinstall it.
Image Problems

Your scanned image is blurred or distorted.
Check the position and condition of your document. Make sure the document is placed flat against the scanner's document table glass. If only part of the image is blurred, part of your document may be wrinkled or warped.
Try scanning at a higher resolution. See page 18 for recommended settings.
Make sure the document table glass is clean. See your electronic Reference Guide for details.
Make sure the scanner is not tilted or placed on an unstable or uneven surface.

Your image is too dark.
Try adjusting the brightness with your application software. Also check the brightness and contrast values of your display screen. The dark area around film, such as the frame of the film holder, is perceived as white—altering the exposure of the scanning area and causing your scans to appear darker. Set the correct color by adjusting the marquee (frame border) so none of the film holder is selected. See your electronic Reference Guide for details.

The edges of the document are not scanned.
■ If you are using a film holder, the edges of your film may not be scanned. If this happens, turn off Automatic Thumbnail Preview for Film:
- In EPSON TWAIN, click Configuration.
- On the Preview tab, make sure the checkbox for Automatic Thumbnail Preview for Film is unchecked.
When you preview your image, manually select the area to be scanned.
■ The document table has non-readable areas around the edges. If your document extends beyond the limits marked on the document table edge guides, reposition your document so it is within the readable area.
- Check the position of your source document. Adjust your document’s position so that the image is within the glass area.
- Check the position of your source document. Adjust your document’s position so that the image is within the glass area.
The scanner doesn't recognize your image type when scanning in Full Auto mode.
Try scanning the image again. If that doesn't work, scan in Manual mode (see page 16 for instructions).
- Your software settings are not correct for your document type. Try different combinations of image settings using your scanner software.
- Your software settings are not correct for your document type. Try different combinations of image settings using your scanner software.
Because your monitor and printer use different technologies to represent colors, your printed colors cannot exactly match the colors you see on your screen. If you increase your monitor's color palette, you can view a greater range of colors on screen.
Adjust your scan settings. Try selecting a lower resolution (dpi), saving the file in a different format, or scan only part of the image.
Adjust your scan settings. Try selecting a lower resolution (dpi), saving the file in a different format, or scan only part of the image.
The printed image is larger or smaller than the original size.
You have changed the resolution or scaled your image. The image size settings in your software determine the size of the printed image.
A dotted line appears in the image.
If this happens on both your screen and printout, clean the document table glass as described in your electronic Reference Guide.
If the line is just on your printout, you may need to clean your printer.
Where To Get Help
For More Information
There are several sources of information for your scanner, including printed materials, help utilities, and electronic manuals. Here's where to look for help:
Scanner Basics
This manual contains scanning instructions, troubleshooting information, system requirements, safety instructions, and your warranty.
■ On-screen Help
Whenever you're working with EPSON Smart Panel or any of the other software that came with your scanner, you can click the Help button or Help menu.
■ EPSON Perfection 1250/1650 Reference Guide
This electronic manual has detailed information about your scanner, including how to use EPSON TWAIN, scan transparencies, assign Smart Panel applications to the ◊Start button, troubleshooting, and specifications. If you copied the Reference Guide to your hard drive during the software installation, you can access it as follows:
Windows: Click Start, select Programs, EPSON, then click PF1250/1650 Guide.
Macintosh: Open the Perfection folder, then double-click View Reference Guide.
■ EPSON Smart Panel User's Guide
EPSON Smart Panel includes an electronic manual, which is automatically copied to your hard drive when you install the software. You can access it by opening EPSON Smart Panel, then clicking the ? in the lower right corner.

The Reference Guide and EPSON Smart Panel User's Guide are in HTML format, so you need a browser—such as Internet Explorer 3.0 or Netscape Navigator, version 3.0 or later—to view it. (A browser is not included on the CD-ROM.)

Your other software may also include electronic manuals or online help. After installing the software, check its program folder to see if an electronic manual is available.
EPSON Technical Support
EPSON provides technical assistance 24 hours a day through the electronic support services and automated telephone services listed in the following table:
| Service Access | |
| World Wide Web | From the Internet, you can reach EPSON Support at http://support.epson.com. At this site, you can download drivers and other files, look at product documentation, access troubleshooting information, and receive technical advice through e-mail. |
| Automated Telephone Services | A variety of automated help services are available 24 hours a day, seven days a week. To use these services, you must have a touch tone telephone and call (800) 922-8911. Your SoundAdvice SM Express Code is 70060. Use this code to quickly select your scanner in SoundAdvice. |
To speak to a technical support representative, dial (562) 276-4382 (U.S.) or (905) 709-3839 (Canada), 6 AM to 6 PM, Pacific Time, Monday through Friday. Toll or long distance charges may apply.
Before you call, please have the following information ready:
■ Product name (EPSON Perfection 1250, 1250 PHOTO, 1650, or 1650 PHOTO) ■ Product serial number (located on the back of the scanner) ■ Proof of purchase (such as a store receipt) and date of purchase ■ Computer configuration ■ Description of the problem
You can purchase supplies and accessories from the EPSON Store at (800) 873-7766 or visit our web site at www.epsonstore.com (U.S. sales only). In Canada, please call (800) 873-7766 for dealer referral.

If you need help using another manufacturer's software with an EPSON product, see the documentation for that software for technical support information.
Software Technical Support
| Software Telephone | Fax Online and E-mail | ||
| EPSON TWAIN driverEPSON SoftwareTM Film FactoryTM | U.S.(562) 276-4382Canada(905) 709-3839 | (800) 922-8911fax-on-demand system | http://support.epson.com |
| EPSON Smart Panel (510) 445-8616 (510) 445-8601 | tech@newsoftinc.com | ||
| ArcSoft Photolmpression | (510) 440-99018:30 AM to 5:30 PM, PST, Monday through Friday | (510) 440-1270 | www.arcsoft.comsupport@arcsoft.com |
| Adobe Photoshop Elements | (206) 675-61266:00 AM to 5:00 PM, PST, Monday through Friday (pay support) | — www.adobe.com/supporttechdocs@adobe.com | |
Requirements and Notices
This chapter includes system requirements, safety instructions, and other important information about your EPSON Perfection scanner.
System Requirements
The minimum system requirements for Windows and Macintosh are listed below. For optimum performance, a faster processor and more memory are recommended. If you are scanning high-resolution images, you need more than the minimum available hard disk space and memory listed.
Windows
■ An IBM®-compatible PC with a Pentium® or faster processor ■ Microsoft Windows 98 Second Edition, Windows Millennium Edition (Me), or Windows 2000 Professional, preinstalled ■ 64MB RAM (128MB RAM recommended) ■ 50MB available hard disk space ■ CD-ROM or DVD drive ■ Built-in USB port or self-powered, first-tier hub connection ■ Mouse or pointing device ■ VGA color monitor with 640 × 480 or higher resolution (a color monitor with a resolution of 800 × 600 or higher recommended) ■ 8-bit, 256-color display adapter (24-bit display adapter with millions of colors recommended).

On-screen color and tone reproduction are subject to the display capability of your computer system, including the video adapter, monitor, and software. See the documentation for these products for details.
Macintosh
You cannot use a serial interface to connect the scanner.
■ Apple Macintosh computer (G3, G4, or iMac™) with built-in USB port, running Mac® OS 8.5 to 9.X

Check the Apple website for any updates to your operating system.
■ Available built-in USB port or self-powered, first-tier hub connection ■ 64MB RAM (128MB recommended) ■ 50MB available hard disk space ■ CD-ROM or DVD drive ■ Mouse or pointing device ■ VGA color monitor with 640 × 480 screen resolution (or higher recommended) and 256 colors (millions of colors recommended)

On-screen color and tone reproduction are subject to the display capability of your computer system, including the video adapter, monitor, and software. See the documentation for these products for details.
EPSON TWAIN supports the Apple ColorSync™ 2.X color management system and QuickTime™. These extensions are automatically installed during EPSON TWAIN installation.
Important Safety Instructions
Read all of these instructions and save them for later reference. Follow all warnings and instructions marked on the scanner.
- Place the scanner close enough to the computer for the interface cable to reach it easily. ■ Place the scanner and AC adapter near an electrical outlet where the power cord can be easily unplugged. Note for French-speaking users: Installez le scanner et l'adapteur près d'une prise électrique permettant de débrancher facilement le cordon d'alimentation.
- Allow space behind the scanner for the cables, and space above the scanner so that you can raise the document cover fully.
- Keep the scanner and AC adapter away from high temperatures and humidity, and excessive dirt or dust. Also avoid using or storing the scanner in places subject to rapid changes of temperature and humidity.
- Keep the scanner and AC adapter away from direct sunlight and strong light sources. ■ Unplug the scanner and AC adapter before cleaning. Clean with a damp cloth only. Do not use liquid or aerosol cleaners. ■ Do not place the scanner or AC adapter on an unstable surface, near a radiator, or near a heat source. If you are not going to use the scanner, be sure to unplug the AC adapter from the electrical outlet.
- Do not use the scanner or AC adapter near water, outdoors, or handle either device with wet hands. Never insert or disconnect the power plug with wet hands.
- Keep out of reach of children. ■ Use only the AC adapter that comes with your scanner. Using any other adapter could cause fire, electrical shock, or injury. The AC adapter is designed for use with the scanner with which it was included. Do not attempt to use it with other electronic devices unless specified. Use only the type of power source indicated on the AC adapter's label, and always supply power directly from a standard domestic electrical outlet with the AC power cord that meets the relevant local safety standards. ■ Power-supply cords should be protected from abrasion, cuts, crimping and kinking. Be sure to place your cords to avoid any damage. Do not place objects on top of the power cord and the AC adapter or allow the power cord to be stepped on or run over. You should take special care to try to keep the power cord straight at the ends and the points where it enters and leaves the transformer. ■ Beware of electrical shock hazards. ■ Connect all equipment to properly grounded power outlets. Avoid using outlets on the same circuit as photocopiers or air control systems that regularly switch on and off.
■ Do not let the power cord become damaged or frayed. If you use an extension cord with the scanner, make sure the total ampere rating of the devices plugged into the extension cord does not exceed the cord's ampere rating. Also, make sure the total ampere rating of all devices plugged into the wall outlet does not exceed the wall outlet's ampere rating. Do not place multiple loads on the electrical outlet. ■ Never disassemble, modify, or attempt to repair the scanner, AC adapter, power cord, or optional equipment. ■ Avoid places subject to shocks and vibrations. - Do not block or cover the openings in the scanner's cabinet. Do not insert objects into any openings as they may touch dangerous voltage points or short out parts. ■ Unplug the scanner and refer servicing to qualified service personnel under the following conditions:
If the power cord or plug is damaged; if liquid has entered the scanner or AC adapter; if the scanner or AC adapter has been dropped or the case damaged; if the scanner or AC adapter does not operate normally or exhibits a distinct change in performance. (Do not adjust controls that are not covered by the operating instructions.)
For US and Canadian users:
Use only the included power cord or a 6 to 10 foot long UL-approved type SPT-2, 2 x 18 AWG cord with a 125 V, 10 A polarized plug and 125 V, 7 A connector.
The AC adapter is equipped with a polarized alternating-current line plug (a plug having one blade wider than the other) and polarized power inlet. These plugs only fit into a power outlet in one way. This is a safety feature. If you are unable to insert the plug properly, try reversing the plug. If the plug still fails to fit, contact an electrician to replace your outlet. Be sure to use only the polarized AC cord that comes with the scanner.
ENERGY STAR Compliance
As an ENERGY STAR Partner, EPSON has determined that this product meets the ENERGY STAR guidelines for energy efficiency. The EPA ENERGY STAR office equipment program is a voluntary partnership with the computer and office equipment industry to promote the introduction of energy-efficient personal computers, monitors, printers, fax machines, and copiers in an effort to reduce air pollution caused by power generation.

FCC Compliance Statement
For United States Users
This equipment has been tested and found to comply with the limits for a Class B digital device, pursuant to Part 15 of the FCC Rules. These limits are designed to provide reasonable protection against harmful interference in a residential installation. This equipment generates, uses, and can radiate radio frequency energy and, if not installed and used in accordance with the instructions, may cause harmful interference to radio or television reception. However, there is no guarantee that interference will not occur in a particular installation. If this equipment does cause interference to radio and television reception, which can be determined by turning the equipment off and on, the user is encouraged to try to correct the interference by one or more of the following measures:
Reorient or relocate the receiving antenna. Increase the separation between the equipment and receiver. Connect the equipment into an outlet on a circuit different from that to which the receiver is connected. Consult the dealer or an experienced radio/TV technician for help.
WARNING: The connection of a non-shielded equipment interface cable to this equipment will invalidate the FCC Certification of this device and may cause interference levels which exceed the limits established by the FCC for this equipment. It is the responsibility of the user to obtain and use a shielded equipment interface cable with this device. If this equipment has more than one interface connector, do not leave cables connected to unused interfaces. Changes or modifications not expressly approved by the manufacturer could void the user's authority to operate the equipment.
For Canadian Users
This Class B digital apparatus meets all requirements of the Canadian Interference-Causing Equipment Regulations.
Declaration of Conformity
According to 47CFR, Part 2 and 15 for Class B Personal Computers and Peripherals; and/or CPU Boards and Power Supplies used with Class B Personal Computers:
We: Epson America, Inc.
Located at: MS 3-13
3840 Kilroy Airport Way
Long Beach, CA 90806-2469
Telephone: (562) 290-5254
Declare under sole responsibility that the product identified herein, complies with 47CFR Part 2 and 15 of the FCC rules as a Class B digital device. Each product marketed, is identical to the representative unit tested and found to be compliant with the standards. Records maintained continue to reflect the equipment being produced can be expected to be within the variation accepted, due to quantity production and testing on a statistical basis as required by 47CFR §2.909. Operation is subject to the following two conditions: (1) this device may not cause harmful interference, and (2) this device must accept any interference received, including interference that may cause undesired operation.
Trade Name: EPSON
Type of Product: Color Image Scanner
Model: EPSON Perfection 1250/1250 PHOTO: G820A
EPSON Perfection 1650/1650 PHOTO: G850A
Warranty
Epson America, Inc. Limited Warranty
What Is Covered: Epson America, Inc. (“EPSON”) warrants to the first end user customer of the EPSON product enclosed with this limited warranty statement, that the product if purchased and used in the United States or Canada, conforms to the manufacturer’s specifications and will be free from defects in workmanship and materials for a period of one year from the date of original purchase. For warranty service, you must provide proof of the date of original purchase.
What EPSON Will Do To Correct Problems: Should your EPSON product prove defective during the warranty period, please bring the product securely packaged in its original container or an equivalent, along with proof of the date of original purchase, to your EPSON Dealer or EPSON Customer Care Center. You are responsible for all costs (shipping, insurance, travel time) in getting the product to the service location. EPSON will, at its option, repair or replace on an exchange basis the defective unit, without charge for parts or labor. When warranty service involves the exchange of the product or of a part, the item replaced becomes EPSON property. The replacement unit may be new or refurbished to
the Epson standard of quality, and at Epson's option, the replacement may be another model of like kind and quality. Epson's liability for replacement of the covered product will not exceed the original retail selling price of the covered product. Exchange or replacement products or parts assume the remaining warranty period of the product covered by this limited warranty.
What This Warranty Does Not Cover: This warranty covers only normal use in the United States and Canada. This warranty does not cover damage to the EPSON product caused by parts or supplies not manufactured, distributed or certified by EPSON. This warranty is not transferable and will not apply to products purchased from an end user. This warranty does not cover third party parts, components or peripheral devices added to the EPSON product after its shipment from EPSON, e.g., dealer-added boards, chips or drives. EPSON is not responsible for warranty service should the EPSON label or logo or the rating label or serial number be removed or should the product fail to be properly maintained or fail to function properly as a result of misuse, abuse, improper installation, neglect, improper shipping, damage caused by disasters such as fire, flood, and lightning, improper electrical current, software problems, interaction with non-EPSON products, or service other than by an EPSON Authorized Servicer. If a claimed defect cannot be identified or reproduced in service, you will be held responsible for costs incurred.
THE WARRANTY AND REMEDY PROVIDED ABOVE ARE EXCLUSIVE AND IN LIEU OF ALL OTHER EXPRESS OR IMPLIED WARRANTIES INCLUDING, BUT NOT LIMITED TO, THE IMPLIED WARRANTIES OF MERCHANTABILITY OR FITNESS FOR A PARTICULAR PURPOSE. SOME LAWS DO NOT ALLOW THE EXCLUSION OF IMPLIED WARRANTIES. IF THESE LAWS APPLY, THEN ALL EXPRESS AND IMPLIED WARRANTIES ARE LIMITED TO THE WARRANTY PERIOD IDENTIFIED ABOVE. UNLESS STATED HEREIN, ANY STATEMENTS OR REPRESENTATIONS MADE BY ANY OTHER PERSON OR FIRM ARE VOID. IN THE EVENT THE REMEDIES ABOVE FAIL, EPSON'S ENTIRE LIABILITY SHALL BE LIMITED TO A REFUND OF THE PRICE PAID FOR THE EPSON PRODUCT COVERED BY THIS LIMITED WARRANTY. EXCEPT AS PROVIDED IN THIS WRITTEN WARRANTY, NEITHER EPSON AMERICA, INC. NOR ITS AFFILIATES SHALL BE LIABLE FOR ANY LOSS, INCONVENIENCE, OR DAMAGE, INCLUDING DIRECT, SPECIAL, INCIDENTAL, OR CONSEQUENTIAL DAMAGES, RESULTING FROM THE USE OR INABILITY TO USE THE EPSON PRODUCT, WHETHER RESULTING FROM BREACH OF WARRANTY OR ANY OTHER LEGAL THEORY.
In Canada, warranties include both warranties and conditions.
Some jurisdictions do not allow limitations on how long an implied warranty lasts and some jurisdictions do not allow certain exclusions or limitations on damages, so the above limitations and exclusions may not apply to you. This warranty gives you specific legal rights, and you may also have other rights which vary from jurisdiction to jurisdiction.
To locate the EPSON Authorized Reseller or EPSON Customer Care Center nearest you call: (800) 922-8911 or write to: Epson America, Inc., P.O. Box 93008, Long Beach, CA 90809-9985.
Index
Numerics
35 mm film or slide, scanning, 18 to 23
A
Accessories, 19, 33
Advanced settings, TWAIN, 16 to 17
B
Base side, film, 19
Blurred image, 29
Brightness problems, 30
Buttons
E-Mail, 5 to 7
Photo Print, 4
Scan to Web, 11 to 14
Start, 2 to 3
troubleshooting, 28
C
Correcting color, 30 to 31
D
Dark image, 30
Document position, 1, 30
Documentation, how to use, 32
E
E-mail, scanning to, 5 to 7
Emulsion side, film, 19
ENERGY STAR, 38
EPSON
help, 33 to 34
PhotoCenter, 11 to 15
Store, 19, 33
TWAIN, 16 to 17
F
File size, 31
File, scanning to, 7 to 10
Film holders, 19
Film, scanning, 18 to 23
Fluorescent lamp, 28
H
Help
EPSON, 33 to 34
software, 34
I
Image quality problems, 29 to 31
Incorrect colors, 30 to 31
Installation, troubleshooting, 26 to 27
L
Lamp, fluorescent, 28
Light, scanner, 25, 26
M
Manual mode, TWAIN, 16 to 17
Manuals, 32
N
New Hardware Wizard, 26
O
Option, transparency unit, 19 to 23
P
Photo Print, 4
PhotoCenter, EPSON, 11 to 15
Photographs, scanning, 18
R
Recommended settings, 18
Reflective documents, 23
Requirements, system, 35 to 36
Resolution, choosing, 18
S
Safety instructions, 37 to 38
Scanner
buttons, 2
light, 25, 26
troubleshooting, 28
Scanning
problems, 29 to 31
to e-mail, 5 to 7
to file, 7 to 10
to Web, 11 to 15, 18
with Photo Print, 4
with Smart Panel, 2 to 3
Settings, resolution, 18
Setup problems, 26 to 27
Slides, scanning, 18 to 23
Smart Panel, overview, 2 to 3
Software
problems, 29
settings, 18
Software installation, troubleshooting, 26 to 27
Start button, 2 to 3
Support, 33 to 34
System requirements, 35 to 36
T
Technical support, 33 to 34
Text, scanning, 18
Transparency unit (TPU)
EPSON Perfection 1250 PHOTO, 22 to 23
EPSON Perfection 1650 PHOTO, 20 to 21
purchasing, 19
recommended image type/resolution, 18
troubleshooting, 23, 28
Transparency, scanning, 18 to 23
Troubleshooting
image quality, 29 to 31
scanner, 28
setup, 26 to 27
software, 29
transparency unit, 23, 28
Windows, 26 to 27
TWAIN, advanced scanning, 16 to 17
U
USB, 35, 36
W
Warranty, 40 to 41
Web, scanning to, 11 to 15, 18
Windows, troubleshooting, 26 to 27

- SCANNER BASICS
- COPYRIGHT NOTICE
- A NOTE CONCERNING RESPONSIBLE USE OF COPYRIGHTED MATERIALS
- TRADEMARKS
- CONTENTS
- SCANNING FROM START TO FINISH
- PROBLEM SOLVING
- REQUIREMENTS AND NOTICES
- INDEX
- PLACING YOUR DOCUMENT
- USING THE SCANNER BUTTONS
- USING EPSON SMART PANEL
- SCANNING AND PRINTING WITH PHOTO PRINT
- SCANNING TO E-MAIL
- SCANNING A PHOTO TO A FILE
- SCANNING TO THE EPSON PHOTOCENTER
- SHARING YOUR PHOTOS
- SELECTING TWAIN SETTINGS
- RECOMMENDED SETTINGS
- SCANNING TRANSPARENCIES
- USING FILM HOLDERS
- SCANNING WITH THE EPSON PERFECTION 1650 PHOTO
- SCANNING WITH THE EPSON PERFECTION 1250 PHOTO
- SCANNING REFLECTIVE DOCUMENTS OR PHOTOGRAPHS
- SCANNER LIGHT
- PROBLEMS AND SOLUTIONS
- SETUP PROBLEMS
- YOU ARE UNABLE TO INSTALL EPSON TWAIN IN WINDOWS
- YOU CANCELLED THE SCANNER SOFTWARE INSTALLATION BEFORE IT WAS COMPLETE, OR YOU CONNECTED THE SCANNER BEFORE INSTALLING THE SOFTWARE (WINDOWS)
- FOR WINDOWS ME OR 98 USERS
- FOR WINDOWS 2000 USERS
- SCANNER PROBLEMS
- THE FLUORESCENT LAMP ISN'T ON
- THE SCANNER DOESN'T SCAN
- THE SCANNER BUTTONS DON'T WORK AFTER PLUGGING IN THE USB CABLE OR AC ADAPTER (MACINTOSH)
- YOU'RE HAVING TROUBLE SCANNING WHILE USING THE TRANSPARENCY UNIT
- SOFTWARE PROBLEMS
- THE SCANNER SOFTWARE DOESN'T WORK PROPERLY
- IMAGE PROBLEMS
- YOUR SCANNED IMAGE IS BLURRED OR DISTORTED
- YOUR IMAGE IS TOO DARK
- THE EDGES OF THE DOCUMENT ARE NOT SCANNED
- THE SCANNER DOESN'T RECOGNIZE YOUR IMAGE TYPE WHEN SCANNING IN FULL AUTO MODE
- YOUR SOFTWARE SETTINGS ARE NOT CORRECT FOR YOUR DOCUMENT TYPE. TRY DIFFERENT COMBINATIONS OF IMAGE SETTINGS USING YOUR SCANNER SOFTWARE
- ADJUST YOUR SCAN SETTINGS. TRY SELECTING A LOWER RESOLUTION (DPI), SAVING THE FILE IN A DIFFERENT FORMAT, OR SCAN ONLY PART OF THE IMAGE
- THE PRINTED IMAGE IS LARGER OR SMALLER THAN THE ORIGINAL SIZE
- A DOTTED LINE APPEARS IN THE IMAGE
- WHERE TO GET HELP
- FOR MORE INFORMATION
- ON-SCREEN HELP
- EPSON PERFECTION 1250/1650 REFERENCE GUIDE
- EPSON SMART PANEL USER'S GUIDE
- EPSON TECHNICAL SUPPORT
- SYSTEM REQUIREMENTS
- WINDOWS
- MACINTOSH
- IMPORTANT SAFETY INSTRUCTIONS
- ENERGY STAR COMPLIANCE
- FCC COMPLIANCE STATEMENT
- FOR UNITED STATES USERS
- FOR CANADIAN USERS
- DECLARATION OF CONFORMITY
- WARRANTY
- EPSON AMERICA, INC. LIMITED WARRANTY
- NUMERICS
- A
- B
- C
- D
- E
- F
- H
- I
- L
- M
- N
- O
- P
- R
- S
- T
- U
- W
Brand : EPSON
Model : Perfection 1250 Photo
Category : Scanner