
SEM 1100 C3 - Coffee machine SILVERCREST - Free user manual and instructions
Find the device manual for free SEM 1100 C3 SILVERCREST in PDF.


| Product Type | Food Steamer |
| Model | SEM 1100 C3 |
| Power | 1100 W |
| Power Supply | 220-240 V, 50/60 Hz |
| Dimensions (approx.) | 30 x 30 x 25 cm |
| Weight | 2.5 kg |
| Capacity | 2 steaming tiers + rice bowl |
| Timer | Up to 60 minutes with automatic shut-off |
| Keep-Warm Function | Yes (after timer ends) |
| Water Level Indicator | Yes (external window) |
| Material | Plastic housing, stainless steel heating element |
| Dishwasher-Safe Parts | Steaming baskets and rice bowl |
| Cord Length | 1.0 m |
| Safety Features | Overheat protection, auto shut-off when water empty |
| Spare Parts Availability | Yes (contact manufacturer) |
Frequently Asked Questions - SEM 1100 C3 SILVERCREST
User questions about SEM 1100 C3 SILVERCREST
0 question about this device. Answer the ones you know or ask your own.
Ask a new question about this device
Download the instructions for your Coffee machine in PDF format for free! Find your manual SEM 1100 C3 - SILVERCREST and take your electronic device back in hand. On this page are published all the documents necessary for the use of your device. SEM 1100 C3 by SILVERCREST.
USER MANUAL SEM 1100 C3 SILVERCREST

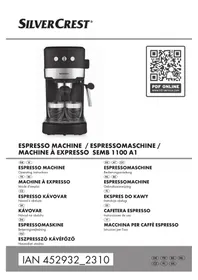
ESPRESSO MACHINE SEM 1100 C3
GB IE NI CY
ESPRESSO MACHINE
Operating instructions
DE AT CH
ESPRESSO MACHINE
Operating instructions
GR CY
ESPRESSO MACHINE
Operating instructions
IAN 353468_2007

GB IE NI CY
Before reading, unfold the page containing the illustrations and familiarise yourself with all functions of the device.
GR CY
GB/IE/NI/CY Operating instructions Page 1
Limitation of liability
Warnings
Intended use
Package contents/Transport inspection
Disposal of the packaging
Safety instructions
Appliance elements
Technical data
Temperature display
First use
Operation
Filling the water tank
Heating after a long time of inactivity / during first use
Heating up before every use
Preparing espresso
Preparing cappuccino 14
Tips for the milk froth 16
Drawing hot water 16
Cleaning and care 17
Cleaning the milk frother 17
Cleaning the hot water shower 18
Cleaning the accessories 18
Cleaning the appliance 19
Descaling the appliance 19
Ordering replacement parts 20
Troubleshooting....21
Disposal 22
Disposal of the appliance 22
Kompernass Handels GmbH warranty 23
Service 24
Importer 24
Introduction
Congratulations on the purchase of your new appliance.
You have selected a high-quality product. The operating instructions are part of this product. They contain important information on safety, usage and disposal. Before using the product, familiarise yourself with all operating and safety instructions. Use the product only as described and for the specified areas of application. Please also pass on these operating instructions to any future owner.
Copyright
This documentation is protected by copyright.
Any copying or reproduction, including in the form of extracts, or any reproduction of images (even in a modified state), is permitted only with the written authorisation of the manufacturer.
Limitation of liability
All technical information, data and information for installation and operation contained in these operating instructions corresponds to the latest version(s) at the time of printing and, to the best of our knowledge, takes into account our previous experience and know-how.
No claims can be derived from the details, illustrations and descriptions in these instructions.
The manufacturer assumes no responsibility for damage caused by failure to observe these instructions, improper use, incompetent repairs, unauthorised modifications or for the use of non-approved replacement parts.
Warnings
The following warning notice types are used in these operating instructions:
WARNING
A warning notice at this hazard level indicates a potentially hazardous situation.
Failure to avoid this hazardous situation could result in injury.
▶ Follow the instructions in this warning notice to prevent injury.
CAUTION
A warning notice at this hazard level indicates a potential for property damage.
Failure to avoid this situation could result in property damage.
▶ Follow the instructions in this warning notice to prevent property damage.
NOTE
▶ A note provides additional information that will assist you in using the appliance.
Intended use
The device is designed exclusively for the preparation of espresso/cappuccino and for frothing milk. It is exclusively intended for use in private households. Do not use it for commercial applications.
The appliance is not intended for any other purpose, nor for use beyond the scope described.
WARNING
Danger if not used for intended purpose!
Failure to use the appliance for its intended purpose and/or any other type of use can be hazardous.
▶ Use the appliance only for its intended purpose. ▶ Observe the procedures described in these operating instructions.
No claims of any kind will be accepted for damage arising as a result of incorrect use.
The risk shall be borne solely by the user.
Package contents/Transport inspection
WARNING
Risk of suffocation!
▶ Do not allow children to play with packaging materials. There is a risk of suffocation.
The appliance is supplied with the following components as standard:
- Espresso Machine
- Sieveholder • Large espresso sieve
- Small espresso sieve ● Measuring spoon with compactor • Descaler (125 ml)
- Short operating instructions
- Operating instructions
NOTE
▶ Check the package for completeness and for signs of visible damage. ▶ If the contents are incomplete or damaged due to defective packaging or through transportation, contact the Service Hotline.
Disposal of the packaging
The packaging protects the appliance from damage during transport.
The packaging materials have been selected for their environmental friendliness and ease of disposal, and are therefore recyclable.

The recirculation of packaging into the material circuit saves on raw material and reduces the amount of waste generated. Dispose of packaging material that is no longer needed according to the regionally established regulations.
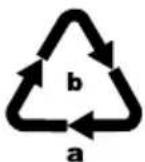
Dispose of the packaging in an environmentally friendly manner.
Note the labelling on the packaging and separate the packaging material components for disposal if necessary. The packaging material is labelled with abbreviations (a) and numbers (b) with the following meanings:
1-7: Plastics, 20-22: Paper and cardboard, 80-98: Composites.
NOTE
▶ If possible, keep the appliance's original packaging during the warranty period so that the appliance can be packed properly for return shipment in the event of a warranty claim.
Safety instructions
To ensure safe operation of the appliance, follow the safety guidelines set out below:

WARNING! RISK OF INJURY!
▶ Prior to use, check the appliance for visible external damage. Do not operate an appliance that has been damaged or dropped. The appliance and its connecting cable must be kept away from children younger than 8 years old. This appliance may be used by children aged 8 years or over if they are supervised or have been instructed how to use the appliance safely and have understood the potential risks. This appliance may be used by people with reduced physical, sensory or mental capabilities or lack of experience and/or knowledge if they are supervised and have been instructed in how to use the appliance safely and have understood the potential risks. - Cleaning and user maintenance must not be carried out by children, unless they are aged 8 or over and are supervised. ▶ Children must not use the appliance as a plaything. ▶ All repairs must be carried out by authorised specialist companies or by the Customer Service department. Improper repairs can pose significant risks to the user. It will also invalidate any warranty claims.

Never submerge the appliance in water or other liquids! Danger of electric shock!

WARNING! RISK OF INJURY!
▶ Never touch the appliance with wet or moist hands. ▶ To avoid risks, arrange for defective plugs and/or power cables to be replaced at once by qualified technicians or our Customer Service Department. ▶ Risk of burns! During use, some parts become very hot! ▶ Hot vapour plumes are formed when the product is in use. Take care to ensure that you do not scald yourself! Keep a safe distance away from the steam. The appliance should only be connected to correctly installed and earthed mains power sockets. ▶ After use, the surfaces of the heating elements will still have some residual heat. - Do not allow any liquid to get onto the appliance's plug connections. ▶ Use the appliance only for its intended purpose. Misuse can lead to injuries.
CAUTION! PROPERTY DAMAGE!
▶ Defective components must always be replaced with original replacement parts. Compliance with safety requirements can only be guaranteed if original replacement parts are used. ▶ Protect the appliance from penetration by moisture and liquids. ▶ Protect the appliance against knocks, dust, chemicals, extreme temperatures, etc. and keep it away from sources of heat (ovens, radiators). ▶ NEVER submerse the appliance in water or other liquids! ▶ Always remove the mains adapter from the mains outlet; never pull on the power cable.
CAUTION! PROPERTY DAMAGE!
▶ Never leave the appliance unattended during operation. - Do not use an external timer switch or a separate remote control system to operate the appliance. ▶ Do not operate the appliance in rooms where the temperatures are below or around 0°C. If the water in the pipes or the water tank freezes, the appliance could be damaged. ▶ Never operate the appliance outdoors. This appliance is intended for indoor use only. ▶ Do not generate steam when the descaler solution is in the water tank!
NOTE
▶ Repairs to the appliance during the warranty period may only be carried out by a customer service department authorised by the manufacturer, otherwise no warranty claims can be considered for subsequent damage.
Appliance elements
Figure A:
① On/Off switch "ON/OFF" ② Temperature indicator ③ "Espresso" button ④ "Steam" button ⑤ Green control lamp "Steam" ⑥ Storage space ⑦ Steam control ⑧ Handle ⑨ Water tank ⑩ Milk frother ⑪ Drip grille ⑫ Drip tray ⑬ Opening for the red float ⑭ Hot water shower ⑮ Green control lamp "Espresso" ⑯ Red operating lamp
Figure B:
⑰ Sieve block ⑱ Portafilter ⑲ Large espresso sieve ⑳ Small espresso sieve ㉑ Measuring spoon with compactor ㉒ Descaler
Technical data
| Mains voltage | 220 - 240 V ~ (alternating current), 50-60 Hz |
| Rated power 1100 W | |
| Pump pressure approx. 1.5 MPa (15 bar) | |
| Food-safe |
Temperature display
The temperature indicator ② indicates how far the appliance has heated up.

As soon as you switch the appliance on, it starts heating up until the pointer is approximately in the middle between 80°C and "The red operating lamp lights up. The "Espresso" control lamp flashes green.
Once the pointer reaches the red portion of the scale, the temperature is high enough to prepare an espresso. The "Espresso" control lamp ⑮ lights up permanently.
When you press the "Steam" button ④, the "Steam" control lamp ⑤ flashes green. The appliance continues to heat up and the pointer rises higher until it reaches the range of the scale between "☐" and "♥".
Once the pointer reaches the range between "☐" and "♥", the temperature is high enough to produce steam. The "Steam" control lamp ☐ lights up permanently.
First use
1)

Pull out the water tank ⑨ and remove the orange transport lock from the water outlet.
2) Clean the sieve holder 18, the measuring spoon 21, the espresso sieve 19 20, the drip grille 11 and the water tank 9 as described in the section "Cleaning and Care".
3) Place the appliance on a level and heat-resistant surface. Ensure that a mains power socket is in the vicinity.
4) Insert the drip grille ⑪ so that the red float ⑬ can protrude through the hole in the drip grille ⑪.
5) Place the sieve holder 18 in the appliance by inserting the "INSERT" mark, which is located next to the hot water shower 14, into the appliance and then turning it clockwise until the handle of the sieve holder 18 is facing the front ("LOCK" mark). 6) Insert the plug into a mains power socket. 7) Proceed as follows before the first use, so as to clean the internal pipelines: Allow sufficient water for about 5 cups of espresso (about 100 ml) to flow through the appliance. Refer to the section "Operation". 8) Let the appliance generate steam for about 30 seconds. Refer to the section "Operation".
NOTE
When using the appliance for the first time, it is possible that you can hear the pump working, even though no water comes out of the appliance. If this is the case, turn the steam control ⑦ in the direction of the „/”, so that the air can escape from the pipes of the appliance (the "Steam" button ④ is pressed). After approx. 20 seconds the air will have escaped, the noises disappear and water flows from the appliance.
Operation
Filling the water tank
NOTE
▶ Use only fresh drinking water for making espresso/cappuccino.
1) Remove the water tank ⑨ and fill it with water: Fill it with water to at least the Min marking. Never fill it past the Max marking.
2) Replace the water tank ⑨ in the machine.
Heating after a long time of inactivity / during first use
If you have not used it for some time, preheat the appliance as follows:
1) Fill the water tank ⑨ with tap water. 2) Place either the large 19 or the small espresso sieve 20 in the sieve holder 18:
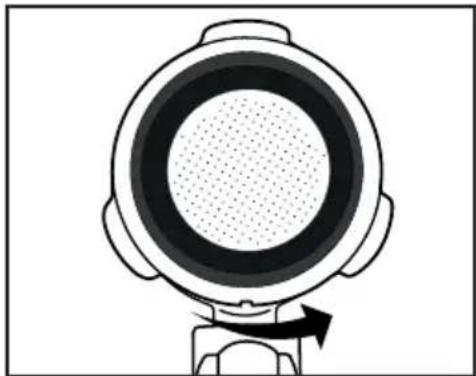
- Make sure that the small indentation on the large 19 or small espresso sieve 20 is located above the indentation on the sieve holder 18 when inserted.

- Then turn the large 19 or small espresso sieve 20 slightly to ensure it cannot fall out.
NOTE
▶ Wait until the espresso sieve 19 20 has cooled down before taking it out! In order to remove the espresso sieves 19 20 from the sieve holder 18, turn the inserted espresso sieve 19 20 until the indentation on the espresso sieve 19 20 is located directly above the indentation on the sieve holder 18. You can now remove the espresso sieve 19 20.
3) Place the sieve holder 18 in the appliance by inserting the "INSERT" mark, which is located next to the hot water shower 14, into the appliance and then turning it clockwise until the handle of the sieve holder 18 is facing the front ("LOCK" mark).
4) Place a cup under the sieve holder 18.
5) Close the steam control ⑦ (turn it as far as it will go in the direction of the "●" symbol).
6) Switch the appliance on using the On/Off switch ①. The red operating lamp ⑯ lights up. The "Espresso" control lamp ⑮ flashes green. The appliance starts to heat up.
7) As soon as the green "Espresso" control lamp ⑮ lights up continuously, press the "Espresso" button ☐ ③. Let the water run through for about 1 minute.
NOTE
▶ You may need to empty the cup in between. Interrupt the process by pressing the "Espresso" button ☐ ③. Empty the cup and press the "Espresso" button ☐ ③ again so that water flows through the appliance.
8) After about 1 minute, stop the pump by pressing the "Espresso" button again.
9) Wait until the "Espresso" control lamp 15 lights up continuously (if it is not already lit). The warming-up is concluded. You can now prepare espresso.
Heating up before every use
Before you can prepare an espresso or cappuccino, the appliance must be heated up.
1) Switch the appliance on using the On/Off switch ①. The red operating lamp ⑯ lights up. The "Espresso" control lamp ⑮ flashes green. Make sure that the steam control ⑦ is turned in the direction of the "●" as far as the stop. 2) Place the sieve holder 18 in the appliance by inserting the "INSERT" mark, which is located next to the hot water shower 14, into the appliance and then turning it clockwise until the handle of the sieve holder 18 is facing the front ("LOCK" mark). 3) Press the "Espresso" button ☐ ③ so that the appliance draws water from the water tank ⑨. As soon as water starts exiting the openings in the sieve holder, press the "Espresso" button ☐ ③ again to stop the pump. 4) Wait until the "Espresso" control lamp 15 lights up continuously. 5) Press the "Espresso" button ☐③ again and allow hot water to flow through for 20 seconds before stopping the pump again.
The preheating process is completed. You can now make an espresso/cappuccino.
Preparing espresso
NOTE
▶ Always ensure that the espresso sieve 19 20 is clean and free of coffee powder residues.
1) When the appliance is heated up: To prepare an espresso, place the small espresso sieve 20 into the sieve holder 18. To prepare two espressos, place the large espresso sieve 19 into the sieve holder 18.
2) Fill the small espresso sieve ⑳ with espresso powder up to the Max marking. This corresponds to approx. 7 g of powder or a level measuring spoon ②1. Or...
Fill the large espresso sieve ⑲ with espresso powder up to the Max marking. This equates to about 7 g + 7 g of powder or two level measuring spoons ⑳.
3) Tamp down the espresso powder using the compactor on the measuring spoon 21. Add more espresso powder, if required, until the espresso sieve 19 20 is full up to the Max marking. Tamp the coffee powder down once again.
NOTE
▶ Compaction of the coffee powder is an essential process for the preparation of an espresso. If the espresso powder is compacted very strongly, the espresso runs through more slowly and more crema is generated. If the espresso powder is not so strongly compacted, the espresso runs through more quickly and it creates very little crema.
4) Place the sieve holder 18 in the appliance at the "INSERT" mark, then turn it clockwise until the handle of the sieve holder 18 is facing the front ("LOCK" mark).
5) Place one (or two) cup(s) under the sieve holder openings. We recommend that you rinse the cups out with hot water beforehand, so that the espresso does not cool so quickly. You can place the cups onto the storage space 6.
6) As soon as the "Espresso" control lamp ⑮ lights up continuously, press the "Espresso" button ☐ ③. The espresso flows into the cup(s).
WARNING
Never remove the sieve holder Ⓗ while the espresso is coming out!
The resulting spray of hot espresso would lead to injury!
▶ Always press the "Espresso" button ③ again to stop the espresso output before removing the portafilter ⑱
7) Once the cups are filled up to the required amount (about 20 ml per cup), press the "Espresso" button ☐ ③ to stop the water being pumped through.
You can now drink the espresso.
8) Switch the appliance off with the on/off switch ①.
NOTE
If the "Espresso" ③ or "Steam" 🔊 ④ buttons are not pressed for about 30 minutes, the appliance switches off automatically.
9) After every use, remove the used espresso powder from the espresso sieve 19 20. Remove the sieve holder 18 from the appliance. To do this, fold the sieve blocker 17 upwards so that the espresso sieve 19 20 cannot fall out of the sieve carrier 18. Now empty the espresso sieve 19 20 by turning the sieve holder 18 and the blocked espresso sieve 19 20 over and knocking the espresso powder out. Always dispose of the espresso powder in an environmentally friendly manner, e.g. with the organic waste.
NOTE
Clean the hot water shower 14 (the hot water comes out of this) after each use. See also the section "Cleaning and Care".
NOTE
▶ Empty the drip tray ⑫ regularly, at the latest when the red float ⑬ is visible in the hole of the drip grille ⑪.
Preparing cappuccino
WARNING
Be careful when working with steam for the milk froth production!
The hot steam or hot splashes can lead to injuries!
▶ Always operate the steam control ⑦ slowly.
1) Fill a container for frothing (preferably made of stainless steel) to one third with cold milk.
2) Ensure that the steam control ⑦ is closed (turn it as far as it will go in the direction "●").
3) Push the milk frother ⑩ out to the side. Always hold it by the handle ⑧.
4) Press the "Steam" button ⏻ ④. Wait until the "Steam" control lamp ⑤ lights up continuously.
5) Hold an empty container under the milk frother ⑩. Slowly turn the steam control ⑦ in the direction “☐/▲”. Pressurised water/spray comes from the nozzle. This cleans the nozzle and the water circuit inside the appliance.
6) Wait 15 seconds and turn the steam control ⑦ towards "●" until no more steam comes out of the nozzle. Pour the water in the container away.
7) Now hold the frothing container in your hand to feel the milk temperature and guide the nozzle of the milk frother ⑩ gently into the milk. Hold the frothing container at a slight angle.
8) Slowly turn the steam control ⑦ in the direction " 🔊/▲▲".
9) Move the frothing container around in a circular motion while keeping the tip of the nozzle under the surface of the milk: deep enough that the milk does not spray out, but shallow enough to create a thick froth. Done properly, a deep buzzing sound is audible.
10) As the milk froth rises, push the nozzle deeper into the milk to froth up the next "layer" and to avoid a burnt taste in the froth.
11) Finally, insert the nozzle completely and close the steam control ⑦ approximately halfway, so that the milk is heated. Hold the frothing container at a slight angle, so that the milk gently swirls around while it is being stirred with the nozzle.
12) Once the milk froth has reached the desired consistency and temperature, turn the steam control ⑦ to off (up to the stop in the direction of the "●").
13) Now you can remove the nozzle from the milk.
14) Proceed as described in the section "Cleaning the milk frother".
NOTE
For cappuccino, always use bigger cups than for espresso because frothed milk will be added.
15) To prepare cappuccino, proceed exactly as you would for espresso (see section "Preparing espresso"; preheating is no longer necessary). Allow the water to flow through for about twice as long as an espresso (about 40 ml).
NOTE
The "Espresso" control lamp ⑮ may flash rapidly, if you press the "Espresso" button ⑦ directly after preparing frothed milk. This means that the appliance is too hot to prepare a perfect espresso. You can either continue making an espresso anyway or allow the appliance to cool down. As soon as the "Espresso" control lamp ⑮ lights up continuously, the optimum temperature range for espresso has been reached again.
16) Switch the appliance off with the On/Off switch ①.
NOTE
If the "Espresso" ③ or "Steam" ④ buttons are not pressed for about 30 minutes, the appliance switches off automatically.
17) Now add the frothed milk into the previously prepared espresso. The cappuccino is now ready. You can add sugar or sprinkle it with cocoa powder according to taste.
NOTE
▶ Always clean the milk frother 10 after every use. See also the section "Cleaning and Care".
Tips for the milk froth
■ Generally, any type of milk can be frothed, including soy and rice milk. However, some types of milk can only be frothed to a certain extent.
■ Low fat or skimmed milk does not burn as easily as whole milk, however, a too low fat content adds to the risk that the milk will not be well frothed. Therefore use a milk with a fat content of 3.5% or 1.5%, if possible.
■ Well-cooled milk can be better frothed than less cold. For the best results, use milk at a temperature of about 7°C.
■ Do not froth the milk a second time, otherwise it may burn.
- Allow frothed milk to stand for about 30 seconds before you pour it onto the espresso. This allows the larger bubbles to burst; the still liquid milk sinks to the bottom. You can then pour the fine froth onto the espresso.
Drawing hot water
You can also use the milk frother 10 to draw hot water; for example, to dilute a coffee (café americano) or prepare tea.
1) Switch the appliance on using the On/Off switch ①. The red operating lamp ⑯ lights up. The "Espresso" control lamp ⑮ flashes green. Make sure that the steam control ⑦ is turned in the direction of the "●" as far as the stop. Wait until the pointer of the temperature indicator ② is approximately half way between 80°C and "☐" and the "Espresso" control lamp ⑮ lights up continuously.
2) Hold a heat-resistant container under the milk frother ⑩.
3) Turn the steam control ⑦ at least half way towards "☐/☐".
4) Press the "Espresso" button ☐ ③. Hot water will come out of the milk frother ⑩.
5) Press the "Espresso" button ☐ 3 again to stop the flow of hot water.
Cleaning and care

WARNING! RISK OF INJURY!
▶ Always remove the plug from the mains power socket before you clean the appliance. Risk of electric shock! ▶ Always allow the appliance to cool down before cleaning it. Risk of burns!

Never immerse the appliance in water or other liquids! Risk of electric shock!
CAUTION! PROPERTY DAMAGE!
▶ To avoid damage, never use abrasive, aggressive or chemical cleaning agents to clean the surfaces of the appliance.
Cleaning the milk frother
1) Place an empty container under the milk frother ⑩. 2) Immediately after use, turn the steam control ⑦ to the " 🔊/💧" position and allow the steam to escape for a few seconds. 3) Turn the steam control ⑦ off (as far as it will go in the direction "●"), switch the appliance off and remove the plug from the mains power socket. 4) Allow the nozzle to cool down. 5) Pull the casing of the milk frother 10 off (Figure 1) and clean it thoroughly in warm water. 6) Wipe the nozzle under the casing with a damp cloth. If necessary, add a little mild detergent onto the cloth. After cleaning with detergent, always wipe off with a cloth moistened with clean water. Ensure that there is no detergent residue left on the nozzle. 7) Push the casing back onto the nozzle (Figure 1).

Figure 1
Cleaning the hot water shower
Clean the hot water shower 14 after each use:
1) After you have prepared the espresso/cappuccino and removed the sieve holder ⑬, wipe the entire surface of the hot water shower ⑭ with a moistened cloth to remove all powder residues.
2) Replace the sieve holder 18 without the espresso filters 19 20.
3) Place an empty cup under the portafilter ⑬ and press the "Espresso" button ⑦. Water flows out of the hot water shower ⑭, rinsing out the remaining powder residue.
4) After about 20 seconds, press the "Espresso" button ③ again and switch the appliance off with the On/Off switch ①.
5) Remove the sieve holder ⑱ again.
Cleaning the accessories
1) Clean the sieve holder ⑱, the two espresso sieves ⑲ ⑳, water tank ⑴, the measuring spoon ㉑, and the drip grille ⑪ in warm water.
NOTE
▶ If you put detergent into the water, it may affect the taste of the espresso. If the stains can only be removed with detergent, always rinse the items afterwards with lots of clean water.
2) Dry all parts well.
NOTE
▶

The two espresso sieves ⑲ ⑳, the measuring spoon ㉑, and the drip tray ⑪ are dishwasher-safe.
Cleaning the appliance
Clean the appliance with a moist cloth. If necessary, use a little detergent on the cloth. Ensure that the appliance is completely dry before the next use.
Descaling the appliance
CAUTION! PROPERTY DAMAGE!
Do not generate steam when the descaler solution is in the water tank ⑨!
Descale the appliance regularly. The appliance should be descaled after about 1–2 months (if used to make approx. 4 espressos per day). This value can vary depending on the hardness of the water in your region.
Proceed as follows to use the descaler 22 supplied with the appliance:
1) Add the descaler 22 (125 ml) to the water tank 9. 2) Fill the water tank ⑨ up to the Max mark with water and replace the tank in the appliance. 3) Switch on the appliance using the On/Off switch ①. Make sure the steam control ⑦ is shut off. 4) Insert the sieve holder 18 without any espresso sieve 19 20 into the appliance. 5) Place 2 cups or a container capable of holding at least 250 ml under the sieve holder openings. 6) As soon as the "Espresso" control lamp ⑮ lights up continuously, press the "Espresso" button ⑦ ③. Allow around 250 ml (around 2 cups) of descaler solution to run through and then stop the process by pressing the "Espresso" button ☐ 3 again. Carefully pour out the used descaler solution.
7) Allow the descaler 22 to act for approx. 1 minute.
8) Repeat steps 6 to 7 three more times. Empty the water tank Ⓞ completely the last time.
9) Place a sufficiently large container (at least 1 litre) under the sieve holder openings.
10) Rinse out the water tank ⑨ with fresh water and fill it with fresh water up to the Max mark.
11) As soon as the "Espresso" control lamp ⑮ lights up continuously, press the "Espresso" button ⑦ ③.
Allow the water to run through completely. Carefully pour out this water.
12) Repeat steps 10 to 11 once and then turn off the appliance.
13) After descaling, wipe off the appliance with a damp cloth to remove any splashes of the descaler solution. Ensure that the appliance is completely dry before the next use.
You can order more descaler 22 via our customer service (see section "Ordering replacement parts").
We recommend using the descaler 22 supplied with the appliance. You can also use other commercially available descaling agents for espresso machines.
If you do so, proceed as described in the operating instructions of the respective descaler.
Ordering replacement parts
You can order the following replacement parts for the product SEM 1100 C3:
• Descaler 22 (125 ml)
Order the product via our service hotline (see section Service) or comfortably on our web page under www.kompernass.com.
NOTE
▶ Please note that online ordering of replacement parts may not be possible in all countries. ▶ Have the IAN number of the appliance ready (can be found on the cover of these operating instructions) when you place your order.
Troubleshooting
| Malfunction Cause Solution | ||
| The espresso no longer flows out. | · The espresso powder is too moist and/or compressed too tightly. | · Re-prepare the espresso without compressing the powder as firmly; if necessary, use new powder. |
| · No water in the water tank 9. | · Fill the water tank 9 with water. | |
| · The holes of the sieve holder openings are blocked. | · Clean the sieve holder 18. | |
| The espresso drips over the edges of the sieve holder 18, not from the openings. | · The sieve holder 18 is not correctly inserted. | · Insert the sieve holder 18 correctly. |
| · The sieve holder openings are blocked. | · Clean the sieve holder 18. | |
| · There are espresso powder residues on the edges of the sieve holder 18. | · Clean the espresso powder residues from the edges of the sieve holder 18. | |
| The espresso is cold. | · The appliance was not preheated. | · Preheat the appliance. |
| · The "Espresso" control lamp 15 has not yet lit up continuously. | · Wait until the "Espresso" control lamp 15 lights up continuously. | |
| · The cups were not pre-warmed. | · Pre-warm the cups. | |
| The pump is unusually noisy. | · The water tank 9 is empty. | · Fill the water tank 9 with water. |
| The crema is too light (the espresso runs out of the sieve holder 18 quickly). | · Not enough espresso powder. | · Use more espresso powder. |
| · The espresso powder is too coarsely ground. | · Use only espresso powder specially manufactured for espresso. | |
| The crema is too dark (the espresso runs out of the sieve carrier 18 slowly). | · Too much espresso powder. · Use less espresso powder. | |
| · The powder is too finely ground or moist. | · Use only espresso powder specially manufactured for espresso. | |
| · The sieve 19 20 is blocked. | · Clean the sieve 19 20. | |
| The milk does not froth. | · The milk is not cold enough. | · Use milk from the refrigerator. |
| · The milk frother 10 is dirty. · Clean the milk frother 10. | ||
| The pump stops during operation, the "Espresso" control lamp 15 flashes. | · The pump stops after about 3 minutes of operation to prevent overheating. | · Allow the appliance to cool down before you use it again. |
| All lamps 5 15 16 flash simultaneously. | · The appliance has over heated or short-circuited. | · Unplug the mains plug from the mains socket and contact Customer Service. |
Disposal
Disposal of the appliance

Do not dispose of the appliance in your normal domestic waste. This product is subject to the provisions of the European WEEE (Waste Electrical and Electronic Equipment) Directive 2012/19/EU.
Dispose of the appliance via an approved waste disposal company or your municipal waste disposal facility. Please comply with all applicable regulations. Please contact your waste disposal facility if you are in any doubt.

Your local community or municipal authorities can provide information on how to dispose of the worn-out product.
This appliance has a 3-year warranty valid from the date of purchase. If this product has any faults, you, the buyer, have certain statutory rights. Your statutory rights are not restricted in any way by the warranty described below.
Warranty conditions
The warranty period starts on the date of purchase. Please keep your receipt in a safe place. This will be required as proof of purchase.
If any material or manufacturing fault occurs within three years of the date of purchase of the product, we will either repair or replace the product for you or refund the purchase price (at our discretion). This warranty service requires that you present the defective appliance and the proof of purchase (receipt) within the three-year warranty period, along with a brief written description of the fault and of when it occurred.
If the defect is covered by the warranty, your product will either be repaired or replaced by us. The repair or replacement of a product does not signify the beginning of a new warranty period.
Warranty period and statutory claims for defects
The warranty period is not prolonged by repairs effected under the warranty. This also applies to replaced and repaired components. Any damage and defects present at the time of purchase must be reported immediately after unpacking. Repairs carried out after expiry of the warranty period shall be subject to a fee.
Scope of the warranty
This appliance has been manufactured in accordance with strict quality guidelines and inspected meticulously prior to delivery.
The warranty covers material faults or production faults. The warranty does not extend to product parts subject to normal wear and tear or to fragile parts which could be considered as consumable parts such as switches, batteries or parts made of glass.
The warranty does not apply if the product has been damaged, improperly used or improperly maintained. The directions in the operating instructions for the product regarding proper use of the product are to be strictly followed. Uses and actions that are discouraged in the operating instructions or which are warned against must be avoided.
This product is intended solely for private use and not for commercial purposes. The warranty shall be deemed void in cases of misuse or improper handling, use of force and modifications / repairs which have not been carried out by one of our authorised Service centres.
Warranty claim procedure
To ensure quick processing of your case, please observe the following instructions:
■ Please have the till receipt and the item number (e.g. IAN 123456_7890) available as proof of purchase.
■ You will find the item number on the type plate on the product, an engraving on the product, on the front page of the operating instructions (below left) or on the sticker on the rear or bottom of the product.
If functional or other defects occur, please contact the service department listed either by telephone or by e-mail.
■ You can return a defective product to us free of charge to the service address that will be provided to you. Ensure that you enclose the proof of purchase (till receipt) and information about what the defect is and when it occurred.

You can download these instructions along with many other manuals, product videos and installation software at www.lidl-service.com.
This QR code will take you directly to the Lidl service page (www.lidl-service.com) where you can open your operating instructions by entering the item number (IAN) 353468_2007.
Service
GB Service Great Britain
Tel.: 0800 404 7657
E-Mail: kompernass@lidl.co.uk
IE Service Ireland
Tel.: 1890 930 034
(0,08 EUR / Min., (peak))
(0,06 EUR / Min., (off peak))
E-Mail: kompernass@lidl.ie
CY Service Cyprus
Tel.: 8009 4409
E-Mail: kompernass@lidl.com.cy
IAN 353468_2007
Importer
Please note that the following address is not the service address. Please use the service address provided in the operating instructions.
KOMPERNASS HANDELS GMBH
BURGSTRASSE 21 • 44867 BOCHUM
GERMANY
www.kompernass.com
Contents
Introduction 26
NOTE
Figure 1
NOTE
KOMPERNASS HANDELS GMBH
BURGSTRASSE 21
44867 BOCHUM
GERMANY
www.kompernass.com
Table of Contents
Introduction 50
Copyright....50
NOTE
Figure 1
NOTE
KOMPERNASS HANDELS GMBH
BURGSTRASSE 21
44867 BOCHUM
GERMANY
www.kompernass.com
KOMPERNASS HANDELS GMBH
BURGSTRASSE 21
44867 BOCHUM
GERMANY
www.kompernass.com


- ESPRESSO MACHINE SEM 1100 C
- GB IE NI CY
- GR CY
- SAFETY INSTRUCTIONS
- APPLIANCE ELEMENTS
- TECHNICAL DATA
- TEMPERATURE DISPLAY
- FIRST USE
- OPERATION
- CLEANING AND CARE
- ORDERING REPLACEMENT PARTS
- TROUBLESHOOTING
- DISPOSAL
- KOMPERNASS HANDELS GMBH WARRANTY
- INTRODUCTION
- COPYRIGHT
- LIMITATION OF LIABILITY
- WARNINGS
- WARNING
- A WARNING NOTICE AT THIS HAZARD LEVEL INDICATES A POTENTIALLY HAZARDOUS SITUATION
- CAUTION
- A WARNING NOTICE AT THIS HAZARD LEVEL INDICATES A POTENTIAL FOR PROPERTY DAMAGE
- NOTE
- INTENDED USE
- DANGER IF NOT USED FOR INTENDED PURPOSE
- PACKAGE CONTENTS/TRANSPORT INSPECTION
- RISK OF SUFFOCATION
- DISPOSAL OF THE PACKAGING
- WARNING! RISK OF INJURY
- CAUTION! PROPERTY DAMAGE
- FIGURE A
- FIGURE B
- FILLING THE WATER TANK
- HEATING AFTER A LONG TIME OF INACTIVITY / DURING FIRST USE
- HEATING UP BEFORE EVERY USE
- PREPARING ESPRESSO
- NEVER REMOVE THE SIEVE HOLDER Ⓗ WHILE THE ESPRESSO IS COMING OUT
- PREPARING CAPPUCCINO
- BE CAREFUL WHEN WORKING WITH STEAM FOR THE MILK FROTH PRODUCTION
- TIPS FOR THE MILK FROTH
- DRAWING HOT WATER
- CLEANING THE MILK FROTHER
- CLEANING THE HOT WATER SHOWER
- CLEANING THE ACCESSORIES
- CLEANING THE APPLIANCE
- DESCALING THE APPLIANCE
- DISPOSAL OF THE APPLIANCE
- WARRANTY CONDITIONS
- WARRANTY PERIOD AND STATUTORY CLAIMS FOR DEFECTS
- SCOPE OF THE WARRANTY
- WARRANTY CLAIM PROCEDURE
- SERVICE
- IMPORTER
- CONTENTS
- TABLE OF CONTENTS
Brand : SILVERCREST
Model : SEM 1100 C3
Category : Coffee machine