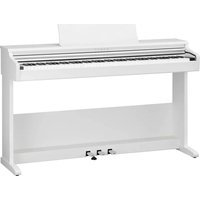
KDP75 - Piano KAWAI - Free user manual and instructions
Find the device manual for free KDP75 KAWAI in PDF.


| Product Type | Digital Piano |
| Model | KDP75 |
| Number of Keys | 88 |
| Key Action | Responsive Hammer Compact (RHC) with weighted keys |
| Touch Sensitivity | 4 levels (Light, Normal, Heavy, Off) |
| Built-in Sounds | 15 (including Grand Piano, Electric Piano, Organ, etc.) |
| Polyphony | 192 notes |
| Speaker System | 2 x 20W speakers |
| Pedals | 3 (Soft, Sostenuto, Sustain) |
| Reverb | 6 types |
| Chorus | 4 types |
| Metronome | Yes (9 time signatures) |
| Transpose | Yes |
| Dual Mode | Yes |
| Four-Hands Mode | Yes |
| Lesson Function | Yes (built-in Burgmüller, Czerny, etc.) |
| Recording | 3-track, 1 song |
| Connectivity | USB to Host (Type B), Audio In/Out (headphone jacks) |
| MIDI | USB MIDI |
| Dimensions (W x D x H) | 132.8 x 33.5 x 75.0 cm (52.3 x 13.2 x 29.5 inches) |
| Weight | 35 kg (77 lbs) |
| Power Consumption | 12 W (power adapter) |
| Accessories Included | AC adapter, music rack, sheet music, pedal board |
| Maintenance | Wipe with dry cloth; avoid moisture and extreme temperatures |
Frequently Asked Questions - KDP75 KAWAI
User questions about KDP75 KAWAI
0 question about this device. Answer the ones you know or ask your own.
Ask a new question about this device
Download the instructions for your Piano in PDF format for free! Find your manual KDP75 - KAWAI and take your electronic device back in hand. On this page are published all the documents necessary for the use of your device. KDP75 by KAWAI.
USER MANUAL KDP75 KAWAI
EN
Important Safety Instructions
SAVE THESE INSTRUCTIONS
INSTRUCTIONS PERTAINING TO A RISK OF FIRE, ELECTRIC SHOCK, OR INJURY TO PERSONS

CAUTION
RISK OF ELECTRIC SHOCK DO NOT OPEN

WARNING
TO REDUCE THE RISK OF FIRE OR ELECTRIC SHOCK, DO NOT EXPOSE THIS PRODUCT TO RAIN OR MOISTURE.
AVIS : RISQUE DE CHOC ELECTRIQUE - NE PAS OUVRIR.
TO REDUCE THE RISK OF ELECTRIC SHOCK, DO NOT OPEN THE AC ADAPTOR. NO USER-SERVICEABLE PARTS INSIDE. REFER SERVICING TO QUALIFIED SERVICE PERSONNEL.

The lighting flash with arrowhead symbol, within an equilateral triangle, is intended to alert the user to the presence of uninsulated "dangerous voltage" within the product's enclosure that may be of sufficient magnitude to constitute a risk of electric shock to persons.

The exclamation point within an equilateral triangle is intended to alert the user to the presence of important operating and maintenance (servicing) instructions in the literature accompanying the product.
Examples of Picture Symbols
| denotes that care should be taken.The example instructs the user to take care not to allow fingers to be trapped. | |
| denotes a prohibited operation.The example instructs that disassembly of the product is prohibited. | |
| denotes an operation that should be carried out.The example instructs the user to remove the power cord plug from the AC outlet. |
Read all the instructions before using the product.
1) Read these instructions.
2) Keep these instructions.
3) Heed all warnings.
4) Follow all instructions.
5) Do not use this apparatus near water.
6) Clean only with dry cloth.
7) Do not block any ventilation openings. Install in accordance with the manufacturer's instructions.
8) Do not install near any heat sources such as radiators, heat registers, stoves, or other apparatus (including amplifiers) that produce heat.
9) Do not defeat the safety purpose of the polarized or grounding-type plug. A polarized plug has two blades with one wider than the other. A grounding type plug has two blades and a third grounding prong. The wide blade or the third prongs are provided for your safety. If the provided plug does not fit into your outlet, consult an electrician for replacement of the obsolete outlet.
10) Protect the power cord from being walked on or pinched particularly at plugs, convenience receptacles, and the point where they exit from the apparatus.
11) Only use attachments/accessories specified by the manufacturer.
12) Use only with the cart, stand, tripod, bracket, or table specified by the manufacturer, or sold with the apparatus. When a cart is used, use caution when moving the cart/apparatus combination to avoid injury from tip-over.
13) Unplug this apparatus during lightning storms or when unused for long periods of time.
14) Refer all servicing to qualified service personnel. Servicing is required when the apparatus has been damaged in any way, such as power-supply cord or plug is damaged, liquid has been spilled or object have fallen into the apparatus, the apparatus has been exposed to rain or moisture, does not operate normally, or has been dropped.

Règles de sécurité
Anglais phrase: The nameplate label is located on the underside of the instruments, as indicated below.
WARNING - When using electric products, basic precautions should always be followed, including the following.

WARNING
Indicates a potential hazard that could result in death or serious injury if the product is handled incorrectly.
The product should be connected to an AC outlet of the specified voltage.
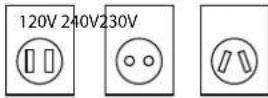
- If you are going to use an AC power cord, make sure that its has the correct plug shape and conforms to the specified power voltage.
● Failure to do so may result in fire.
Do not insert or disconnect the power cord plug with wet hands.

Doing so may cause electric shock.
Take care not to allow any foreign matter to enter the product.


Entry of water, needles or hair pins may result in breakdown or short-circuit. The product shall not be exposed to dripping or splashing. No objects filled with liquids, such as vases, shall be placed on the product.
The chair must be used properly (it must be used only when playing the product).
● Do not play with it or stand on it.
● Only one person is allowed to sit on it.
● Do not sit on it when opening the lid.
● Re-tighten the bolts occasionally.
Doing so may cause the chair to fall over or your fingers to be trapped, resulting in injury.
When using the headphones, do not listen for long periods of time at high volume levels.
Doing so may result in hearing problems.
Do not lean against the keyboard.
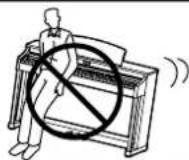
Doing so may cause the product to fall over, resulting in injury.
Do not disassemble, repair or modify the product.

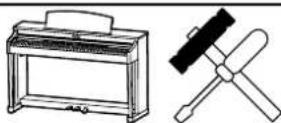
Doing so may result in product breakdown, electric shock or short-circuit.
When disconnecting the AC power cord's plug, always hold the plug and pull it to remove it.


● Pulling the AC power cord itself may damage the cord, causing a fire, electric shock or short-circuit.
The product is not completely disconnected from the power supply even when the power switch is turned off. If the product will not be used for a long time, unplug the AC power cord from the AC outlet.

● Failure to do so may cause fire in case of lightning.
● Failure to do so may over-heat the product, resulting in fire.
This product may be equipped with a polarized line plug (one blade wider than the other). This is a safety feature.
If you are unable to insert the plug into the outlet, contact an electrician to replace your obsolete outlet.
Do not defeat the safety purpose of the plug.
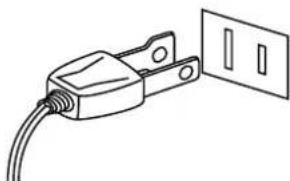
It is a good practice to have the instrument near the AC outlet and the power cord plug in a position so that it can readily be disconnected in an emergency because electricity is always charging while the plug is in the AC outlet even in a power switch off condition.

CAUTION
Indicates a potential hazard that could result in injury or damage to the product or other property if the product is handled incorrectly.
Do not use the product in the following areas.
● Areas, such as those near windows, where the product is exposed to direct sunlight
● Extremely hot areas, such as near a heater
● Extremely cold areas, such as outside
● Extremely humid areas
● Areas where a large amount of sand or dust is present
● Areas where the product is exposed to excessive vibrations
Using the product in such areas may result in product breakdown. Use the product only in moderate climates (not in tropical climates).
Use only the AC adaptor included with this instrument to power the instrument.
- Do not use other AC adaptors to power this instrument.
- Do not use the included AC adaptor or AC power cord to power other equipment.
When you close the keyboard cover, close it gently.


Closing it roughly may trap your fingers, resulting in injury.
Before connecting cords, make sure that the power to this product and other devices is turned OFF.

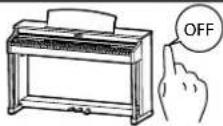
Failure to do so may cause breakdown of this product and other devices.
Do not drag the product on the floor. Take care not to drop the product.

Please lift up the product when moving it. Please note that the product is heavy and must be carried by more than two persons. Dropping the product may result in breakdown.
Do not place the product near electrical appliances such as TVs and radios.


● Doing so may cause the product to generate noise.
- If the product generates noise, move the product sufficiently away from the electrical appliance or connect it to another AC outlet.
When connecting the AC power cord and other cords, take care not to get them tangled.


Failure to do so may damage them, resulting in fire, electric shock or short-circuit.
Do not wipe the product with benzene or thinner.

● Doing so may result in discoloration or deformation of the product.
- When cleaning the product, put a soft cloth in lukewarm water, squeeze it well, then wipe the product.
Do not stand on the product or exert excessive force.

● Doing so may cause the product to become deformed or fall over, resulting in breakdown or injury.
Do not place naked flame, such as lighted candles on the product.

Doing so may cause the illumination to fall over, resulting in fire.
Ensure that the ventilation is not impeded by covering the ventilation openings with items, such as newspaper, table-cloths, curtains, etc.

Failure to do so may over-heat the product, resulting in fire.
The product should be located so that its location or position does not interfere with its proper ventilation. Ensure a minimum distance of 5cm around the product for sufficient ventilation.
The product should be serviced by qualified service personnel when:
● The power supply cord or the plug has been damaged.
● Objects have fallen, or liquid has been spilled into the product.
● The product has been exposed to rain.
● The product does not appear to operate normally or exhibits a marked change in performance.
● The product has been dropped, or the enclosure damaged.
Notes on Repair
Should an abnormality occur in the product, immediately turn the power OFF, disconnect the power cord plug, and then contact the shop from which the product was purchased.
CAUTION:
To prevent electric shock, match wide blade of plug to wide slot, fully insert.
ATTENTION:
An information on Disposal for users
If your product is marked with this recycling symbol it means that, at the end of its life, you must dispose of it separately by taking it to an appropriate collection point.
You should not mix it with general household waste. Disposing of this product correctly will prevent potential negative effects on the environment and human health which could otherwise arise due to inappropriate waste handling.
For further details, please contact your local authority.
(European Union only)
Instruction for AC power cord (U.K.)
IMPORTANT
THE WIRES IN THIS MAINS LEAD ARE COLOURED IN ACCORDANCE WITH THE FOLLOWING CODE.
BLUE: NEUTRAL
BROWN : LIVE
As the colours of the wires in the mains lead of this apparatus may not correspond with the coloured markings identifying the terminals in your plug, proceed as follows:
The wire which is coloured BLUE must be connected to the terminal which is marked with the letter N or coloured BLACK.
The wire which is coloured BROWN must be connected to the terminal which is marked with the letter L or coloured RED.
Do not plug either terminal of the power cord to the ground od AC outlet on the wall.
Canadian Radio Interference Regulations
This instrument complies with the limits for a class B digital apparatus, pursuant to the Radio Interference Regulations, C.R.C., c. 1374.
FCC Information (U.S.A)
CAUTION: Changes or modifications not expressly approved by the party responsible for compliance could void the user's authority to operate the equipment.
NOTE: This equipment has been tested and found to comply with the limits for a Class B digital device, pursuant to Part 15 of the FCC Rules. These limits are designed to provide reasonable protection against harmful interference in a residential installation. This equipment generates, uses and can radiate radio frequency energy and, if not installed and used in accordance with the instructions, may cause harmful interference to radio communications. However, there is no guarantee that interference will not occur in a particular installation. If this equipment does cause harmful interference to radio or television reception, which can be determined by turning the equipment off and on, the user is encouraged to try to correct the interference by one or more of the following measures:
- Reorient or relocate the receiving antenna.
- Increase the separation between the equipment and receiver.
- Connect the equipment into an outlet on a circuit different from that to which the receiver is connected.
- Consult the dealer or an experienced radio/TV technician for help.
Declaration of Conformity
Products : Electronic Piano
Model Number: KDP120/KDP75
Responsible Party Name : Kawai America Corporation
Address: 2055 East University Drive Rancho
Dominguez, CA 90220
Telephone
310-631-1771
This device complies with Part 15 of the FCC Rules.
Operation is subject to the following two conditions:
(1) this device may not cause harmful interference, and
(2) this device must accept any interference received, including interference that may cause undesired operation.
This applies only to products distributed by Kawai America Corporation.
The nameplate label is located on the underside of the instrument, as indicated below.

Thank you for purchasing this Kawai KDP120/KDP75 digital piano.
This owner's manual contains important information regarding the instrument's usage and operation. Please read all sections carefully, keeping this manual handy for future reference.
■ About this owner's manual
- This owner's manual provides information for customers to enjoy using this instrument immediately after purchase, and explanations about the various functions of this instrument.
- Display illustrations shown in this manual may differ from the actual displays of the product depending on its version.
Nameplate
The model name and serial number of the product are indicated on the nameplate label located on the underside of the instrument.
Cleaning
- Make sure to unplug the power cord before cleaning.
- Clean the product body with a dry, soft cloth.
- If the surface of the pedals becomes dirty, clean the pedals using a dry dish-washing sponge. Note that cleaning the gold pedals using a cloth may cause the pedals to become dull.
- Do not attempt to clean the pedals using rust-removing solvents, abrasives or files.
- Do not clean the product using benzine or thinner which may cause discoloring or deformation.
Intellectual property rights
- "Windows" is a registered trademark of Microsoft Corporation.
- The Bluetooth® word mark and logos are registered trademarks owned by the Bluetooth SIG, Inc. and any use of such marks by Kawai Musical Instruments Mfg. Co., Ltd. is under license.
- Other company names and product names mentioned or referenced herein are registered trademarks or trademarks of respective owners.
- Kawai Musical Instruments Mfg. Co., Ltd. shall have no liability for any acts in violation of the Copyright Act made by any users of this product.
Table of Contents
Important Information
Important Safety Instructions ....2
Introduction....8
Table of Contents 9
Part Names and Functions ....10
Preparation
Setting Up the Piano....11
Basic Operation
Operation Guide ...... 12
Selecting Sounds....16
Using the Pedals ...... 17
Dual Mode....18
Four Hands Mode....19
Metronome....20
Demo Songs....22
Concert Magic....23
Concert Magic demo modes....24
Concert Magic Mode 25
Concert Magic song arrangement types ..... 26
Lesson Function....27
-
Selecting a lesson book/song .....27
-
Listening to the selected lesson song .....28
-
Practicing left and right-hand parts separately ...29
Recorder 31
-
Recording a song 31
-
Playing back a song 32
-
Erasing recorded songs....32
Adjustments & Settings
Keyboard and Sound Settings....33
-
Damper Resonance 33
-
Reverb....34
-
Touch....34
-
Low Volume Balance 35
-
Tuning....35
-
Transpose....36
-
Brilliance....36
-
Virtual Technician (Smart Mode) 37
-
Spatial Headphone Sound....38
-
Phones Type....38
Auto Power Off....39
Bluetooth® MIDI (KDP120 only)....40
Information about Bluetooth ® (KDP120 only)....41
Appendix
Connecting to Other Devices 42
USB MIDI (USB to Host connector)....43
Troubleshooting 44
Assembly Instructions....45
Demo Song List 49
Concert Magic Song List....49
Lesson Function Song Lists ....50
Information about Adaptor Specifications ...52
EU Declaration of Conformity....53
Specifications....54
Part Names and Functions
* The following diagram shows KDP120. Only the model name and input voltage are different in KDP75.

① POWER switch
This switch is used to turn the KDP120/KDP75 digital piano on/off. Be sure to turn off the instrument after playing.
② MASTER VOLUME slider
This slider controls the master volume level of the KDP120/KDP75 digital piano's built-in speakers or headphones, if connected.
③ DEMO button
This button is used to start/stop playback of the KDP120/KDP75 digital piano's built-in Demo songs.
④ LESSON button
This button is used to select the KDP120/KDP75 digital piano's built-in Lesson songs.
⑤ PLAY / STOP button
This button is used to start/stop the playback of Recorder songs stored in memory and KDP120/KDP75 digital piano's built-in Lessons songs.
⑥ REC button
This button is used to record performances to the KDP120/KDP75 digital piano's internal memory.
⑦ METRONOME button
This button is used to turn the metronome function on/off, and also to adjust its tempo, time signature, and volume settings.
⑧ SOUND SELECT button
This button is used to select the sound(s) that will be heard when the keys are pressed.
⑨ PEDAL connector
This connector is used to connect the KDP120/KDP75 digital piano's pedal board to the instrument.
⑩ DC IN jack
This jack is used to connect the AC adaptor.
⑪ USB to Host port
This port is use to connect the instrument to a computer using a USB "B to A" type cable in order to send and receive MIDI data.
⑫ PHONES jacks
These jacks are used to connect stereo headphones to the KDP120/KDP75 digital piano. Two pairs of headphones can be connected and used simultaneously.
Operation Guide
The separate Operation Guide provides a convenient overview of the KDP120/KDP75 digital piano's various button and keyboard controls. This sheet is also reprinted in the Appendix section of this owner's manual.
Setting Up the Piano
1. Connecting the power adaptor
Connect the AC power adaptor to the DC IN terminal located on the underside of the instrument, as indicated below.
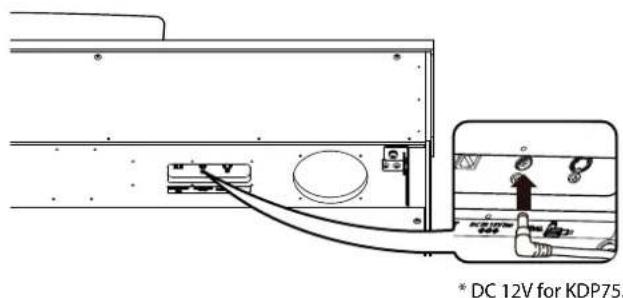
3. Turning on the power
Press the POWER switch, located on the right hand side of the keyboard.
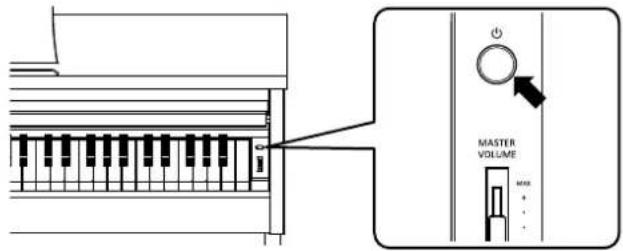
The LED indicator for the SOUND SELECT button will turn on and the Concert Grand sound will be selected automatically.
■ Using headphones
Use the jacks located beneath the keyboard on the left hand side, to connect stereo headphones to the KDP120/KDP75 digital piano.
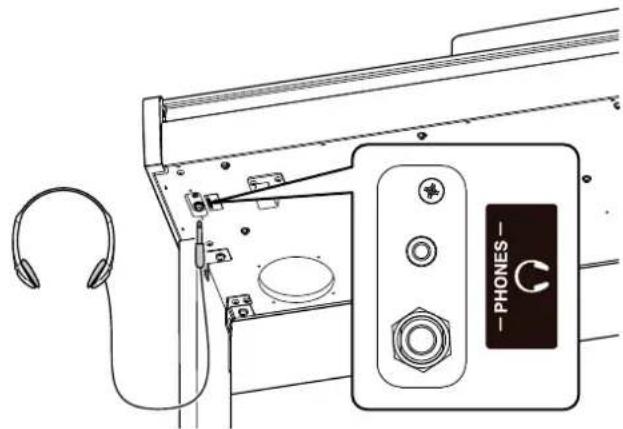
Up to two pairs of headphones can be connected and used simultaneously. When a pair of headphones is connected, sound will not be produced by the speakers.
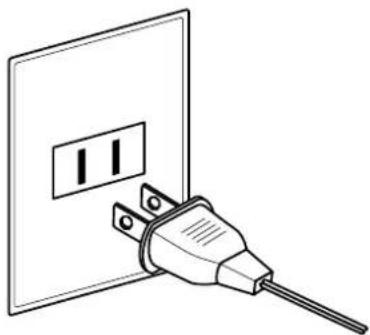
2. Connecting the power adaptor to an outlet
Connect the AC power adaptor to an AC outlet.
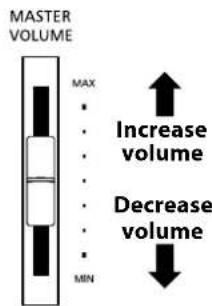
4. Adjusting the volume
Move the MASTER VOLUME slider up and down to increase and decrease the volume level of the instrument's speakers, or headphones if connected.
Adjust the volume to a comfortable listening level - the middle is often a good starting point.
■ Adjusting the pedal support bolt
A pedal support bolt is attached at the base of the pedal board to aid stability when the pedals are pushed. Turn the bolt anticlockwise until it makes contact with the floor and supports the pedals firmly.


When moving the instrument, always adjust or remove the pedal support bolt, then readjust when the instrument is in its new position.
Operation Guide
In addition to the side panel buttons, the KDP120/KDP75 digital piano can also controlled by pressing and holding a button, then pressing a key on the keyboard. This section explains the various functions for each panel button.
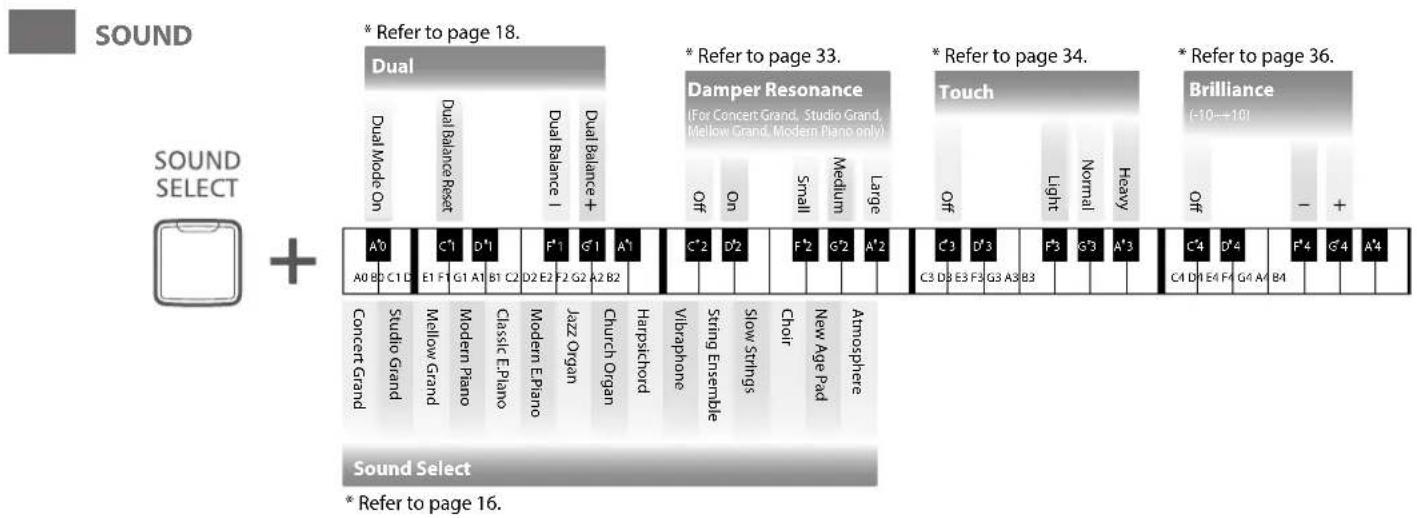

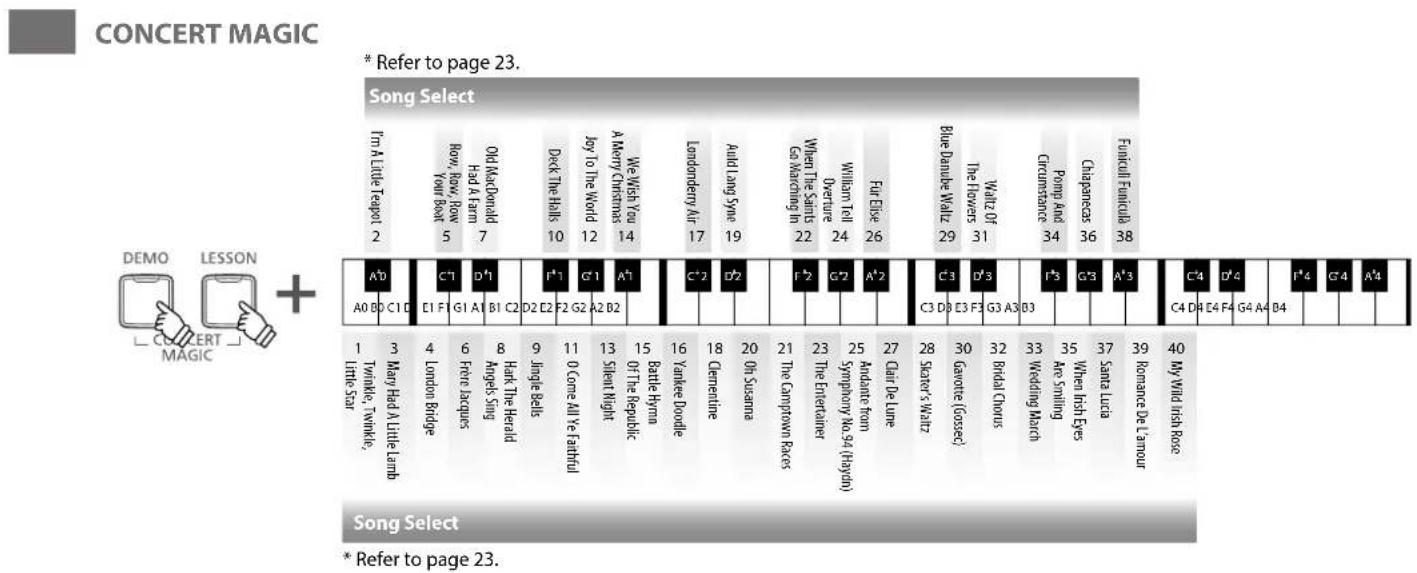
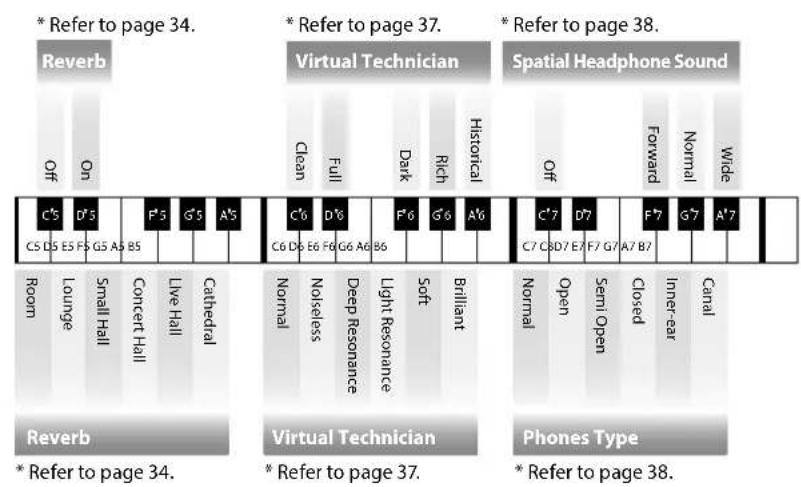


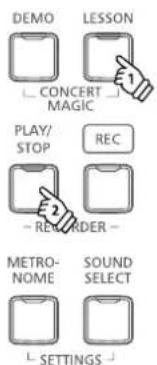
Operation Guide
SETTINGS
![graph TD A["Transmit MIDI Program Change"] --> B["Multi-timbral Mode"] B --> C["MIDI Channel"] D["Program Number (3 digits)"] --> E["Local Control"] E --> F["MIDI Channel"] style A fill:#f9f,stroke:#333 style B fill:#ccf,stroke:#333 style C fill:#cfc,stroke:#333 style D fill:#fcc,stroke:#333 style E…](/content/2026/06/1348579/images/036a531fc6a1ad768912edf8e7824e1da34e32f0f841890e5fa26831b21f93a1.jpg)
LESSON
* Refer to page 27.
Selecting a Lesson book and song

* Refer to page 28. * Refer to page 29.
Listening to the song
Selecting the part to practice

Press once: Left-hand only

* Refer to page 35. * Refer to page 36.

* Refer to page 35.* Refer to page 35.
* Refer to page 39.
RECORDER
* Refer to page 31.
Record song
![graph LR A["REC"] --> B["RECACT"] B --> C["+"] C --> D["Play/STOP"] subgraph Recording E["A0"] --> F["A0 B0 C1 D"] G["C1"] --> H["E1"] I["D1"] --> J["Song 1"] K["Song 2"] --> L["Song 3"] end subgraph Audio M["A0"] --> N["Song 1"] O["C1"] --> P["Song 2"] Q["D1"] --> R["Song 3"] end](/content/2026/06/1348579/images/cfc693c350d889b4b5396c3837d2952ab1e6378d6f403368c49a4fa86257ec31.jpg)
① Enter recording mode
② Select a song memory
③ Start recording
* Refer to page 32.
Play song
* Refer to page 32.
Erase all songs

① Hold both buttons
② Turn the power on
Selecting Sounds
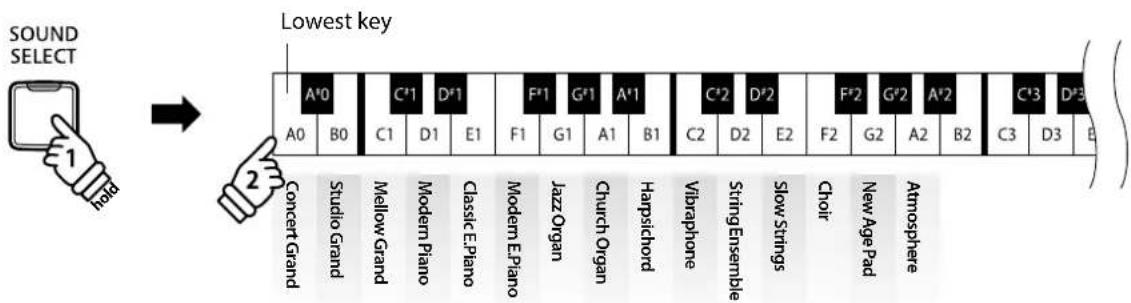
The KDP120/KDP75 digital piano features 15 different instrument sounds, which can be selected in one of two ways. By default the "Concert Grand" sound will be selected automatically when the instrument is turned on.
Instrument Sounds
PIANO E.PIANO / ORGAN OTHERS
| 1 | Concert Grand | 1 | Classic E.Piano |
| 2 | Studio Grand 2 Modern E.Piano 2 Vibraphone | ||
| 3 | Mellow Grand | 3 | Jazz Organ |
| 4 | Modern Piano 4 Church Organ 4 Slow Strings |
| 1 | Harpsichord |
| 3 | String Ensemble |
| 5 | Choir |
| 6 | New Age Pad |
| 7 | Atmosphere |
■ Selecting a sound: Method 1
Press the SOUND SELECT button repeatedly to cycle through the 15 available instrument sounds.
![graph LR A["SOUND SELECT"] -->|Press once| B["Studio Grand"] B -->|Press 13 times| C["Atmosphere"] C -->|Press once| D["Concert Grand"]](/content/2026/06/1348579/images/c1f4084945bc29a6024276be9154f782091130e74639b3d01ad935e34f03ca0d.jpg)
■ Selecting a sound: Method 2
Press and hold the SOUND SELECT button, then press one of the lowest 15 white keys to select the desired instrument sound.
As with a grand piano, the KDP120/KDP75 digital piano features three pedals: sustain, sostenuto, and soft.
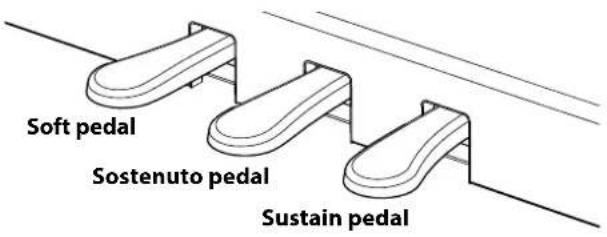
■ Sustain pedal (right pedal)
Depressing this pedal sustains the sound after one's hands have been lifted from the keyboard - greatly enriching the piano sound, while also assisting smooth "legato" passages.
The sustain pedal is capable of responding to half pedaling.
■ Sostenuto pedal (centre pedal)
Depressing this pedal after playing the keyboard and before releasing the keys, sustains the sound of only those notes that have been played. Any keys that are subsequently played after the sostenuto pedal is depressed will not be sustained.
■ Soft pedal (left pedal)
Depressing this pedal softens the sound, reducing its volume.
When the Jazz Organ sound is selected, the soft pedal is also used to alternate the speed of the rotary speaker simulation between "Slow" and "Fast" effect modes.
Grand Feel pedal system (KDP120 only)
The KDP120 digital piano features the new Grand Feel pedal system, which replicates the sustain, soft, and sostenuto pedal weighting of Kawai's SK-EX Concert Grand piano.
The Dual playing mode allows two sounds to be layered together, creating a more complex sound. For example, a piano sound layered with strings, or a church organ combined with a choir, etc.
■ Enabling Dual Mode : Method 1 Operation Guide: SOUND (page 12\~13)
Press and hold the SOUND SELECT button, then press two of the lowest 15 white keys simultaneously.
The sounds corresponding to the two keys will be layered together.
![graph TD A["SOUND SELECT"] --> B["hold"] B --> C["Lowest key"] C --> D["Dual Mode On"] C --> E["Dual Balance Reset"] C --> F["Dual Balance +"] C --> G["A*0"] C --> H["C*1"] C --> I["D*1"] C --> J["F*1"] C --> K["G*1"] C --> L["A*1"] C --> M["C*2"] C --> N["D*2"] C --> O["F*2"] C --> P["G*2"] C --> Q…](/content/2026/06/1348579/images/2638cce09ce05c06947dcf788228a5ba0e3ed4157301a4f4019f9cb1c1313e7c.jpg)
■ Enabling Dual Mode : Method 2 Operation Guide: SOUND (page 12\~13)
Press and hold the SOUND SELECT button, then press the A#0 key. While still holding the SOUND SELECT button, press two of the lowest 15 white keys in order.
![graph TD A["SOUND SELECT"] --> B["1 hold"] B --> C["Lowest key"] C --> D["A'0"] C --> E["C'1"] C --> F["D'1"] C --> G["F'1"] C --> H["G'1"] C --> I["A'1"] C --> J["C'2"] C --> K["D'2"] C --> L["F'2"] C --> M["G'2"] C --> N["A'2"] C --> O["C'3"] C --> P["D'3"] D --> Q["A0"] E --> R["C1"] F --> S["D1"…](/content/2026/06/1348579/images/b8a897711e1c57995c04ba58f90b6096e1ea88b750715299b77e87cc2fe63790.jpg)
■ Adjusting the volume balance Operation Guide: SOUND (page 12\~13)
Press and hold the SOUND SELECT button, then press the F#1 or G#1 key repeatedly to decrease or increase the volume balance between the two sounds, or the C#1 key to reset the volume balance.
■ Exiting Dual Mode
Press the SOUND SELECT button.
The Concert Grand sound will be selected automatically and the instrument will return to normal operation.
Four Hands Mode
The Four Hands playing mode function divides the keyboard into two sections in a similar way to that of the Split keyboard mode. However, with Four Hands keyboard mode enabled, the octave/pitch of each section is automatically adjusted to create two separate 44-key instruments with the same playing range. Furthermore, the damper (right) pedal and soft (left) pedal act as separate damper pedals for the respective right and left sections, allowing two people to perform piano duets using a single instrument.
■ Enabling Four Hands Mode
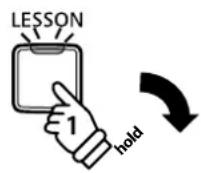
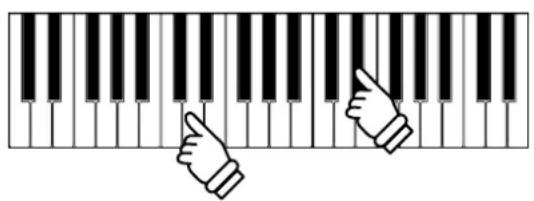
Press and hold the LESSON button, then press the D#3 key, as shown in the illustration below.
The LED indicators for the LESSON button will start to flash, indicating that Four Hands Mode is enabled.
* The selected keyboard sound can still be changed when Four Hands Mode is enabled.
Lowest key

■ Exiting Four Hands Mode
Press the LESSON button.
The instrument will return to normal operation.
* With the Four Hands Mode activated, selecting a different sound will affect both the left and right sections.
* The Split Point for the Four Hands Mode is set to F4, and cannot be adjusted.
* The sostenuto pedal will affect the right section sound only.
The Metronome function provides a steady beat to aid practicing the piano at a consistent tempo.
The time signature, volume, and tempo of the metronome can be freely adjusted.
■ Turning the metronome on/off
Press the METRONOME button.
The metronome will start to count and the LED indicator for the METRONOME button will turn on, indicating that the metronome is in use.
* By default the metronome will count with a 1/4 beat at 120 bpm.
Press the METRONOME button again to stop the metronome.

■ Changing the metronome time signature Operation Guide: METRONOME (page 12\~13)
Press and hold the METRONOME button, then press one of the 7 lowest black keys, as shown in the illustration below.
* The metronome can be set to one of seven time signatures: 1/4, 2/4, 3/4, 4/4, 5/4, 3/8, and 6/8.

■ Adjusting the metronome volume Operation Guide: METRONOME (page 12\~13)
Press and hold the METRONOME button, then press the keys marked -/+ in the illustration below.

■ Adjusting the metronome tempo Operation Guide: METRONOME (page 12\~13)
Press and hold the METRONOME button, enter the desired tempo using the lowest 12 white keys marked below, then release the METRONOME button.
* The metronome tempo can be adjusted within the range of 10-300 bpm.
* The metronome tempo can be entered precisely, or decreased and increased gradually.

Method 1:
While pressing the METRONOME button, press keys 1, 5, and 0 to set the tempo to 150 bpm, or keys 8 and 5 to set the tempo to 85 bpm.
Method 2:
While pressing the METRONOME button, press the - / + keys repeatedly to gradually decrease or increase the tempo in 2 bpm increments.
It is also possible to conveniently set the metronome tempo to correspond with musical terms such as Allegro or Andante.
Method 3:
While pressing the METRONOME button, press keys C3\~E5 to select the desired tempo.
| Key Description Tempo | ||||
| 1 | C3 | Grave | Very slow | 40 |
| 2 | D3 | Largo | Broadly | 46 |
| 3 | E3 | Lento | Slowly | 52 |
| 4 | F3 | Larghetto | Rather broadly | 56 |
| 5 | G3 | Adagio | Slowly, with great expression | 60 |
| 6 | A3 | Adagietto | Slightly faster than Adagio | 66 |
| 7 | B3 | Andante | At a walking pace | 72 |
| 8 | C4 | Andantino | Slightly faster than Andante | 80 |
| 9 | D4 | Maestoso | Majestic and stately | 88 |
| 10 | E4 | Moderato | At a moderate speed | 96 |
| 11 | F4 | Allegretto | Moderately fast | 108 |
| 12 | G4 | Animato | Lively and fast | 120 |
| 13 | A4 | Allegro | Fast, quick, and bright | 132 |
| 14 | B4 | Vivace | Active and quick | 160 |
| 15 | C5 | Presto | Very, very fast | 184 |
| 16 | D5 | Vivacissimo | Very fast and lively | 192 |
| 17 | E5 | Prestissimo | Even faster than Presto | 208 |
The KDP120/KDP75 digital piano includes a selection of demonstration songs to introduce each internal sound.
■ Demo songs
| Sound name Song name Composer | ||
| Concert Grand La Campanella | Liszt | |
| Studio Grand Original Kawai | ||
| Mellow Grand Sonata No.30 Op.109 Beethoven | ||
| Modern Piano Original | Kawai | |
| Classic E.Piano Original | ||
| Modern E.Piano Original | ||
| Jazz Organ Original | ||
| Church Organ Chorale Prelude "Wachet auf, ruft uns die Stimme." | Bach | |
| Harpsichord French Suite No.6 | ||
| Vibraphone | Original Kawai | |
| String Ensemble | Le quattro stagioni: la "Primavera" | Vivaldi |
| Slow Strings Original Kawai | ||
| Choir | Londonderry Air | Irish folk song |
| New Age Pad Original | Kawai | |
| Atmosphere | Original | |
* Kawai regret that sheet music for Kawai original demo songs is not available.
1. Playing the demo songs
Press the DEMO button.
The LED indicator for the DEMO button will start to flash, and the demo song for the Concert Grand sound will start to play.
* When the Concert Grand demo song has finished, another demo song will be selected at random. This process will continue until all of the demo songs have been played.
Press the DEMO button again to stop the demo.

2. Selecting a demo song
Operation Guide: SOUND (page 12\~13)
While the demo is playing:
To listen to the demo song for a particular sound, press and hold the SOUND SELECT button, then press one of the lowest 15 white keys assigned to the desired sound.

Alternatively, press the SOUND SELECT button to skip to the next demo song.
The Concert Magic function allows complete beginners to enjoy playing the piano by simply selecting one of the 40 pre-programmed songs, then tapping the keyboard with a steady rhythm and tempo.
The Concert Magic songs are categorised by group and assigned to the lowest 40 keys of the keyboard. For a complete listing of available Concert Magic songs, please refer to page 49 of this owner's manual.
■ Selecting a Concert Magic song Operation Guide: Concert Magic (page 12\~13)
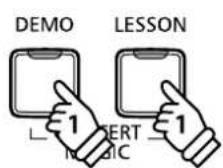
Press and hold the CONCERT MAGIC button (DEMO and LESSON buttons), then press the key assigned to the desired Concert Magic song.
The LED indicator for the CONCERT MAGIC button will turn on, indicating that Concert Magic playing mode is in use.

■ Listening to the selected Concert Magic song
Press the PLAY/STOP button.
The LED indicator for the PLAY/STOP button will turn on and the selected Concert Magic song will start to play.
* The selected song will play repeatedly until it is stopped.
* To listen to a different Concert Magic song simply repeat the above step.
Press either the PLAY/STOP or CONCERT MAGIC (DEMO and LESSON) button again to stop the song.

■ Performing the selected Concert Magic song
Press keys on the keyboard.
The song will advance with every key that is pressed.
Pressing the keys gently will produce a soft sound, while pressing heavily will produce a loud sound.
Similarly, pressing the keys quickly will increase the tempo of the song, while pressing slowly will decrease the tempo.
■ Exiting Concert Magic playing mode
Press the DEMO or LESSON button.
The LED indicator for the CONCERT MAGIC button will turn off and the instrument will return to normal operation.

Concert Magic demo modes
The Concert Magic demo modes allow the Concert Magic songs to be listened to in one of three ways: All Play, Category Play, and Random Play
AllPlay
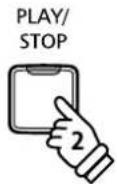
Press the CONCERT MAGIC button (DEMO and LESSON buttons), then press the PLAY/STOP button.
The LED indicator for the PLAY/STOP button will turn on and the Concert Magic songs will start to play in numerical order.
Press either the CONCERT MAGIC or PLAY/STOP button again to stop song playback.

Category Play Operation Guide: Concert Magic (page 12\~13)
Press and hold the CONCERT MAGIC button (DEMO and LESSON buttons), then press the key assigned to the desired Concert Magic song.
While still holding the CONCERT MAGIC button, press the G#7 key.
![graph LR A["After selecting a song"] --> B["LEMON"] B --> C["LESSON"] C --> D["LEMON"] D --> E["LESSON"] E --> F["hold"] G["Concert Magic demo modes"] --> H["Category Play"] H --> I["D7"] H --> J["E7"] H --> K["F7"] H --> L["G7"] H --> M["B7"] H --> N["C8"] O["Last key"] --> P["A0"] O --> Q["B0"] O…](/content/2026/06/1348579/images/614a2347230679013de1c76fe33d5a8b63011af55d4a3d756bd61565bca6250b.jpg)
The selected Concert Magic song will start to play.
* When the selected song finishes, the next song in the same category will start to play automatically.
■ Random Play Operation Guide: Concert Magic (page 12\~13)
Press the CONCERT MAGIC button (DEMO and LESSON buttons) and then press the A#7 key.
The KDP120/KDP75 digital piano will play back the first Concert Magic song, followed by the remaining 39 Concert Magic songs in random order.
![graph LR A["DEMO"] -->|1| B["LESSON"] C["CERT"] -->|1| B D["C#C"] -->|1| B B -->|hold| E["Concert Magic demo modes"] E --> F["Category Play"] E --> G["Random Play"] E --> H["Highest key"]](/content/2026/06/1348579/images/7b97034e6657ef31bc556c3fc8b592522e52251bbb70908de709b81d47f36702.jpg)
Concert Magic Mode
The Concert Magic Mode setting changes the Concert Magic playing mode, allowing all Concert Magic songs to be played by simply tapping any key with a constant steady beat, regardless of the song arrangement type.
■ Concert Magic Mode
| Concert Magic Mode Description Pedal | ||
| Normal | Concert Magic songs will be performed according to their arrangement type. | Soft |
| Steady Beat | All Concert Magic songs will be performed by tapping the key with a constant beat. | Sostenuto |
■ Changing the Concert Magic Mode
Press and hold the CONCERT MAGIC button (DEMO and LESSON buttons), then press the pedal assigned to the desired Concert Magic Mode.
To select Normal mode, press and hold the CONCERT MAGIC button, then depress the Soft pedal. To select Steady Beat mode, press and hold the CONCERT MAGIC button, then depress the Sostenuto pedal.
The selected Concert Magic Mode type will be applied immediately.
* When the instrument is turned on, the Concert Magic Mode setting will return to the default type of "Normal".
Concert Magic song arrangement types
Concert Magic songs are divided into three different arrangement types: Easy Beat (EB), Melody Play (MP), and Skillful (SK). Each arrangement type requires a different level of skill to be performed correctly.
Easy Beat EB
These are the easiest songs to play. To perform them, simply tap out a constant, steady beat on any key of the keyboard. For example, when playing the piece "Für Elise", a constant, steady rhythm should be maintained throughout the song.

Melody Play MP
These songs are also relatively easy to play, especially if they are familiar to the player. To perform them, tap out the rhythm of the melody on any key of the keyboard. Singing along as the rhythm is tapped can be helpful. For example, when playing the piece "Twinkle, Twinkle, Little Star", the rhythm of the melody should be played.
* When performing fast Concert Magic songs, it may be easier to press different keys with two alternating fingers in order to achieve greater speed.

Skillful
SK
These songs range in difficulty from moderately difficult to difficult. To perform them, tap out the rhythm of both the melody and the accompaniment notes on any key of the keyboard. For example, when playing the piece "Waltz of the Flowers", the rhythm of both the melody and the accompaniment should be played.
The Lesson function allows budding pianists to practice the piano using a selection of built-in song books. The left and right hand parts for each piece can be practiced separately, while adjusting the tempo allows difficult passages to be perfected.
For a complete listing of available Lesson Function songs, please refer to page 50 of this owner's manual.
■ Built-in lesson function song books
| US, Canada, Australasia Rest of the World | ||
| Book 1 | Alfred's Basic Piano Library Lesson Book Level 1A Beyer 106 (Vorschule im Klavierspiel, Opus 101) | |
| Book 2 | Alfred's Basic Piano Library Lesson Book Level 1B Burgmüller 25 (25 Etudes Faciles, Opus 100) | |
| Book 3 | Beyer 106 (Vorschule im Klavierspiel, Opus 101) Czerny 30 (Etudes de Mécanisme, Opus 849) | |
| Book 4 | Burgmüller 25 (25 Etudes Faciles, Opus 100) Alfred's Basic Piano Library Lesson Book Level 1A | |
| Book 5 | Czerny 30 (Etudes de Mécanisme, Opus 849) Alfred's Basic Piano Library Lesson Book Level 1B | |
* Lesson books sold separately - please refer to page 51 of this owner's manual for more information.
1 Selecting a lesson book/song
1. Entering lesson mode
Press the LESSON button.
The LED indicator for the LESSON button will turn on, indicating that lesson mode is enabled, and the Concert Grand sound will be selected automatically.

2. Selecting a lesson book Operation Guide: LESSON (page 14)
While holding down the LESSON button, press the black key assigned to the desired lesson book.
3. Selecting a lesson song Operation Guide: LESSON (page 14)
While holding down the LESSON button, enter the piece number by pressing the corresponding white keys in sequence (e.g. to select piece no.25, press D1 followed by G1). Then, release the LESSON button.
■ Selecting the Beyer variation
The Beyer lesson book includes 106 exercises. Exercise no.1 consists of 12 variations, while exercise no.2 consists of 8 variations.
To select the variation for the no.1 and no.2 exercises, first press and hold the LESSON button and press the corresponding black key to select the Beyer lesson book.
While holding down the LESSON button, press the C1 or D1 key to select the no.1 or no.2 exercise, then finally press the B0 key (+) multiple times to select the desired variation.
| Listing of Beyer's pieces | |
| No. 1 Theme | |
| 1-1 to 1-12 Variations | |
| No. 2 Theme | |
| 2-1 to 2-8 Variations | |
| No. 3 Theme | |
| No. 4 Theme | |
| ↓ | Theme |
| No. 106 | Theme |
2 Listening to the selected lesson song
This page will explain how to play and stop the selected lesson song, and adjust the tempo.
■ Playing the lesson song
After selecting a lesson book and song:
Press the PLAY/STOP button.
The LED indicator for the PLAY/STOP button will turn on, and a one bar count-in will be heard before the song starts to play.
While the lesson song is playing, press the METRONOME button to turn the metronome on/off.
* The metronome time signature and tempo will automatically be set to that of the currently selected lesson song.

■ Adjusting tempo of the lesson song Operation Guide: METRONOME (page 12\~13)
While the lesson song is playing:
Press and hold the METRONOME button, enter the desired tempo using the lowest 12 white keys marked below, then release the METRONOME button.
* The lesson song tempo can be adjusted within the range of 10-300 bpm.
* The lesson song tempo can be entered precisely, or decreased and increased gradually.

Method 1:
While pressing the METRONOME button, press keys 1, 5, and 0 to set the tempo to 150 bpm, or keys 8 and 5 to set the tempo to 85 bpm.
Method 2:
While pressing the METRONOME button, press the - / + keys repeatedly to gradually decrease or increase the tempo in 2 bpm increments.
■ Stopping the lesson song
While the lesson song is playing:
Press the PLAY/STOP button again to stop the lesson song.
The LED indicator for the PLAY/STOP button will turn off.

3 Practicing left and right-hand parts separately
This page will explain how to mute/activate the left and right-hand parts of the selected lesson song, allowing each part to be practiced separately.
The LED indicators for the METRONOME and SOUND SELECT buttons are used to indicate which part (left or right-hand) of the selected lesson song is muted/active.
| METRONOME button LED SOUND | SELECT button LED Lesson song | playback |
| On On Left and Right-hand parts | (default playing mode) | |
| On Off Left-hand part only | ||
| Off On Right-hand part only |
■ Muting/activating lesson song parts 1
After selecting a lesson book and song:
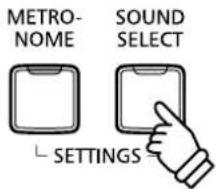
Press the SOUND SELECT button.
The LED indicator for the SOUND SELECT button will turn off (the LED indicator for the METRONOME button will remain turned on), indicating that only the left-hand part of the lesson song is active (i.e. the right-hand part will be muted).
Press the SOUND SELECT button again.
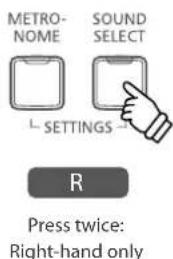
The LED indicator for the SOUND SELECT button will turn on and the LED indicator for the METRONOME button will turn off, indicating that only the right-hand part of the lesson song is active (i.e. the left-hand part will be muted).
Press the SOUND SELECT button once again.
The LED indicator for the SOUND SELECT button will remain turned on and the LED indicator for the METRONOME button will also turn on, indicating that both the left and right-hand parts of the lesson song are active.
Press once: Left-hand only

Press twice: Right-hand only

METRO- SOUND NOME SELECT

Press 3 times: Left and Right-hand

■ Muting/activating lesson song parts 2
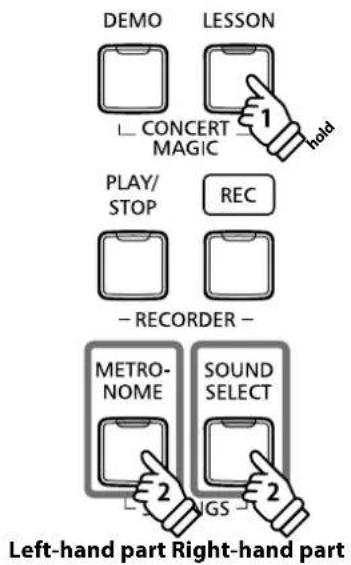
Select a part directly. While holding down the LESSON button, press the part button you want to replay.
Press and hold the METRONOME and SOUND SELECT buttons simultaneously, both the left and right parts will return to playback.
To restore the normal replay, exit the lesson mode and then enter the lesson mode again.
■ Exiting lesson mode
Press the LESSON button.
The LED indicator for the LESSON button will turn off, and the instrument will return to normal operation.
LESSON

The KDP120/KDP75 digital piano allows up to 3 different songs to be recorded, stored in internal memory, and played back at the touch of a button.
1 Recording a song
1. Entering song recorder mode
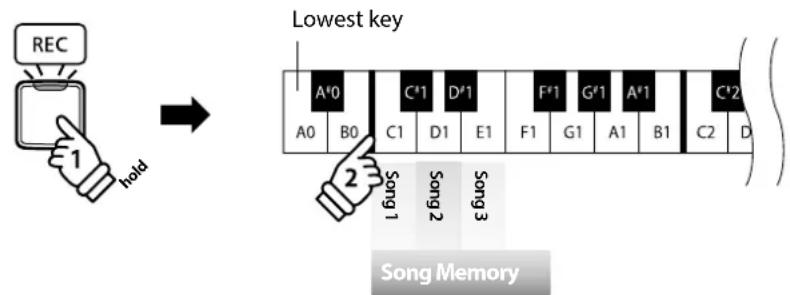
Press the REC button.
The LED indicator for the REC button will start to flash, to indicate that the piano is in recording standby mode.

2. Selecting a song memory Operation Guide: RECORDER (page 15)
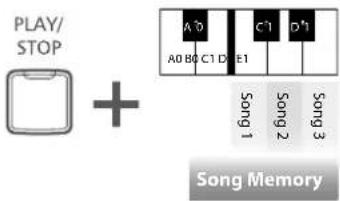
Press and hold the REC button, then press the C1, D1 or E1 key to select the desired song memory.
* Selecting a song memory that has already been used to record a song will automatically erase the previously recorded song.
3. Starting the song recorder
Press a key on the keyboard.
The LED indicators for the REC and PLAY/STOP buttons will turn on, and recording will start.
* Recording can also be started by pressing the PLAY/STOP button, allowing a rest period or empty bar to be inserted at the beginning of the song.

4. Stopping the song recorder
Press the PLAY/STOP button.
The LED indicators for the PLAY/STOP and REC buttons will turn off.
* The maximum recording capacity is approximately 10,000 notes, with button and pedal presses also counted as one note. If the maximum recording capacity is reached during recording, the recorder will stop automatically.
* Recorder songs will remain in memory after the power is turned off.
2 Playing back a song
1. Playing the recorded song
Press the PLAY/STOP button.
The LED indicator for the PLAY/STOP button will turn on, and the recorded song will start to play.
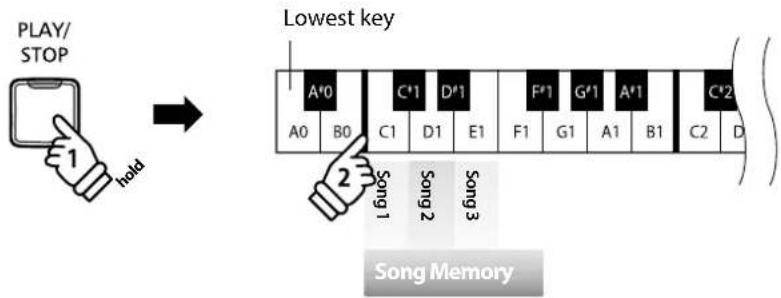
2. Playing a song stored in another memory Operation Guide: RECORDER (page 15)
Press and hold the PLAY/STOP button, then press the C1, D1 or E1 key to play the desired song memory.
* The selected song will start to play when the PLAY/STOP button is released.
3 Erasing recorded songs

Warning: This process will erase all three songs stored in internal memory, and cannot be undone.
■ Erasing the recorder songs
Press and hold the PLAY/STOP and REC buttons simultaneously, then turn the instrument's power on.
All recorder songs stored in memory will be erased.

Keyboard and Sound Settings
The KDP120/KDP75's keyboard and sound settings allow various aspects of the instrument to be adjusted.
■ Keyboard and Sound Settings
| Setting name Explanation Default setting | ||
| Damper Resonance | Adjust the resonance that is heard when depressing the damper pedal. | Medium |
| Reverb Change the type of reverberation added to the sound. On | ||
| Touch Change the touch sensitivity of the keyboard. Normal | ||
| Low Volume Balance | Change the difference in volume between pianissimo and fortissimo playing. | Type3 |
| Tuning | Increase or decrease the pitch of the keyboard in 0.5 Hz steps. | 440.0Hz |
| Transpose | Increase or decrease the pitch of the keyboard in semi-tone steps. | 0 |
| Brilliance | Adjust the brightness of the sound. | 0 |
| Virtual Technician | Select the tuning from 10 preset styles. | Off |
| Spatial Headphone Sound | Select the desired Spatial Headphone Sound mode. | Normal |
| Phones Type | Select the type of headphones to be used with the instrument. | Normal |
1 Damper Resonance
Depressing the sustain pedal of an acoustic piano raises all dampers, allowing the strings to vibrate freely. When a note or chord is played on the piano with the sustain pedal depressed, not only will the strings of the notes played vibrate, but also the strings of other notes, vibrating in sympathetic resonance.
The KDP120/KDP75 digital piano recreates this phenomenon, with the Damper Resonance setting allowing the volume of this resonance to be changed.
■ Damper Resonance
Sounds affected by Damper Resonance
| Concert Grand | Studio Grand | Mellow Grand | Modern Piano |
■ Damper Resonance type
| Damper Resonance type | Description | Key |
| Off | Disables the damper resonance effect. | C#2 |
| On | (Re)Enables the damper resonance effect. | D#2 |
| Small | Piano sounds produce a small amount of damper resonance. | F#2 |
| Medium (default) | Piano sounds produce a medium amount of damper resonance. | G#2 |
| Large | Piano sounds produce a large amount of damper resonance. | A#2 |
■ Changing the Damper Resonance type
Operation Guide: SOUND (page 12\~13)
Press and hold the SOUND SELECT button, then press the key assigned to the desired Damper Resonance type.
* To disable/enable the damper resonance effect, press the key assigned to the off/on function.
* If the damper resonance effect is disabled, it will be turned on automatically upon selecting a damper resonance type.
2 Reverb
Adjust the type and amount of reverb applied to the current sound, in order to simulate various different virtual environments. The most suitable reverb type is applied automatically when selecting each sound, however it is also possible to select a different reverb type manually if desired.
■Reverbtype
| Reverb type Description Key | ||
| Off Disables the reverb effect. C#5 | ||
| On (Re)Enables the reverb effect. D#5 | ||
| Room Simulates the ambiance of a small rehearsal room. C5 | ||
| Lounge Simulates the ambience of piano lounge. D5 | ||
| Small Hall Simulates the ambiance of a small hall. E5 | ||
| Concert Hall | Simulates the ambiance of a concert hall or theater. | F5 |
| Live Hall | Simulates the ambiance of a live hall or stage. | G5 |
| Cathedral | Simulates the ambiance of a large cathedral. | A5 |
■ Changing the Reverb type
Operation Guide: SOUND (page 12\~13)
Press and hold the SOUND SELECT button, then press the key assigned to the desired Reverb type.
* To disable/enable the reverb effect, press the key assigned to the "off/on" function.
* If the reverb effect is disabled, it will be turned on automatically upon selecting a reverb type.
3 Touch
As with an acoustic piano, the KDP120/KDP75 digital piano produces a louder sound when the keys are struck with force, and a softer sound when the keys are played gently. The volume and tonal character change in relation to the strength and speed of playing - on a digital piano this system is referred to as "touch sensitivity".
The Touch setting allows the touch sensitivity of the keyboard to be conveniently adjusted. There are four different preset touch settings available.
■ Touch type
| Touch type | Description | Key |
| Off | A constant volume is produced regardless of how hard the keys are struck.This setting is recommended for sounds that have a fixed dynamic range such as organ and harpsichord. | C#3 |
| Light | A louder volume is produced even when playing with a soft touch.This setting is recommended for children and organ players, or for those still developing finger strength. | F#3 |
| Normal (default) | Reproduces the standard touch sensitivity of an acoustic piano. | G#3 |
| Heavy | Requires a heavier touch to produce a loud volume.This setting is recommended to those with stronger fingers. | A#3 |
■ Changing the Touch type
Operation Guide: SOUND (page 12\~13)
Press and hold the SOUND SELECT button, then press the key assigned to the desired touch type.
4 Low Volume Balance
The Low Volume Balance setting reduces the difference in volume between pianissimo and fortissimo touches, allowing the piano to continue to be played at low volume without the sound of pianissimo notes being lost.
■ Low Volume Balance type
| Low Volume Balance type Description Key | ||
| Off Low Volume Balance adjustment is not applied. F4 | ||
| Type1 | When playing at low volume, a small amount of Low Volume Balance adjustment will be applied. | G4 |
| Type2 | A4 | |
| Type3 (default) B4 | The amount of Low Volume Balance adjustment applied when playing at low volume will gradually increase. | |
| Type4 C5 | ||
| Type5 | When playing at low volume, a large amount of Low Volume Balance adjustment will be applied. | D5 |
■ Changing the Low Volume Balance type Operation Guide: SETTINGS (page 14\~15)
Press and hold the METRONOME and SOUND SELECT buttons, then press the key assigned to the desired Low Volume Balance type.
5 Tuning
The Tuning setting allows the overall pitch of the KDP120/KDP75 digital piano to be raised and lowered in 0.5 Hz steps, and may therefore prove useful when playing with other instruments.
■ Adjusting the Tuning setting: Method 1 Operation Guide: SETTINGS (page 14\~15)
Press and hold the METRONOME and SOUND SELECT buttons, then enter the desired pitch using the number keys indicated below.
* The keyboard pitch can be adjusted within the range of 427 - 453 Hz.
* To reset the pitch to 440.0Hz, press the Reset key indicated below.
■ Adjusting the Tuning setting: Method 2 Operation Guide: SETTINGS (page 14\~15)
Press and hold the METRONOME and SOUND SELECT buttons, then press the keys assigned -/+ to lower or raise the keyboard pitch in 0.5 Hz steps.
6 Transpose
The Key Transpose setting allows the pitch of the KDP120/KDP75 digital piano keyboard to be raised or lowered in semi-tone steps. This is particularly useful when accompanying instruments with different tones, or when a song learned in one key must be played in another key. When transposed, the song can be played in the original key, yet heard in a different key.
■ Adjusting the Transpose setting Operation Guide: SETTINGS (page 14\~15)
Press and hold the METRONOME and SOUND SELECT buttons, then press the keys assigned -/+ to lower or raise the keyboard pitch in semi-tone steps.
* The transpose setting can be adjusted within the range of -6 - +5 semi-tones.
* To disable/enable the transpose setting, press the key assigned to the "off/on" function.
7 Brilliance
The Brilliance setting allows the brightness of the KDP120/KDP75 digital piano's sound to be adjusted.
■ Adjusting the Brilliance setting Operation Guide: SOUND (page 12\~13)
Press and hold the SOUND SELECT button, then press the F#4 or G#4 key repeatedly to decrease or increase the brightness of the sound.
* The Brilliance setting can be adjusted within the range of -10\~+10, with +10 being the brightest setting.
* To reset the Brilliance effect, press and hold the SOUND SELECT button, then press the C#4 key.
8 Virtual Technician (Smart Mode)
An experienced piano technician is essential to fully realise the potential of a fine acoustic piano. In addition to meticulously tuning each note, the technician also performs numerous regulation and voicing adjustments that allow the instrument to truly sing.
The KDP120/KDP75 digital piano's Virtual Technician simulates these refinements digitally, with ten preset configurations that intelligently adjust various characteristics of the grand piano sound to match different musical styles.
■ Virtual Technician type
| Virtual Technician type | Description Key | |
| Normal (default) | The default piano sound without additional adjustments. | C6 |
| Noiseless | A piano adjusted to minimise additional damper resonance. | D6 |
| Deep Resonance | A piano adjusted to emphasise damper resonance. | E6 |
| Light Resonance | A piano adjusted to reduce damper resonance. | F6 |
| Soft | A piano adjusted by softening the hammers and increasing the touch weight of the keyboard in order to produce a softer tone that is suitable for slow, quiet pieces. | G6 |
| Brilliant | A piano adjusted by hardening the hammers in order to produce a brighter tone for modern pieces. | A6 |
| Clean | A piano adjusted by hardening the hammers and reducing the damper resonance. | C#6 |
| Full | A piano adjusted to emphasise dynamics with a lightened keyboard touch and powerful damper resonance. | D#6 |
| Dark | A piano adjusted by hardening the hammers and increasing the touch weight of the keyboard, in order to produce a dark, gloomy tone. | F#6 |
| Rich | A piano adjusted by lightening the touch weight of the keyboard and increasing damper resonance. | G#6 |
| Historical | A piano adjusted for romantic, classical music, with a bright, open tone. | A#6 |
■ Selecting the Virtual Technician type
Operation Guide: SOUND (page 12\~13)
Press and hold the SOUND SELECT button, then press the key assigned to the desired Virtual Technician type.
Piano Remote
In addition to changing the piano's sound by selecting different Virtual Technician presets, it is also possible to adjust individual characteristics using the PianoRemote app. This app gives the player full control over every aspect of the piano's configuration, allowing precise adjustments to be made to voicing, damper resonance and various other acoustic characteristics, from a convenient touchscreen interface.
9 Spatial Headphone Sound
Spatial Headphone Sound is a special feature of the KDP120/KDP75 digital piano that enhances the depth and realism of the acoustic piano sound when listening through headphones or earphones.
The Spatial Headphone Sound setting allows the player to select from one of three different acoustic presets that adjust the spatial positioning of the sound, while also helping to reduce auditory fatigue when using earphones or headphones for extended periods of time.
■ Spatial Headphone Sound type
| Spatial Headphone Sound type Description Key | ||
| Off Disable the Spatial Headphone | Sound feature. C#7 | |
| Forward | Front focused, somewhat narrow spatial positioning. | F#7 |
| Normal (default) | Naturally balanced spatial positioning that is neither forward nor wide. | G#7 |
| Wide Wide, very open spatial positioning. A#7 | ||
Setting the Spatial Headphone Sound system Operation Guide: SOUND (page 12\~13)
Press and hold the SOUND SELECT button, then press the key assigned to the desired Spatial Headphone Sound type.
10 Phones Type
The Phones Type setting optimises the sound of the KDP120/KDP75 digital piano when listening through different types of headphones or earphones.
* This setting does not affect the speaker sound.
Phonestype
| Phones type | Description | Key |
| Normal (default) | Disables headphone optimisation. | C7 |
| Open | Optimises the sound for open type headphones. | D7 |
| Semi-open | Optimises the sound for semi-open type headphones. | E7 |
| Closed | Optimises the sound for closed type headphones. | F7 |
| Inner-ear | Optimises the sound for inner-ear type headphones. | G7 |
| Canal | Optimises the sound for canal-type headphones | A7 |
■ Phones Type setting
Operation Guide: SOUND (page 12\~13)
Press and hold the SOUND SELECT button, then press the key assigned to the desired Phones type.
The KDP120/KDP75 digital piano features a power saving function that can be used to automatically turn off the instrument after a specified period of inactivity.
■ Auto Power Off settings
| Auto Power Off Explanation Key | |
| Off The Auto Power Off function is disabled. G7 | |
| 15 min. The instrument will turn off automatically after 15 minutes of inactivity. A7 | |
| 60 min. The instrument will turn off automatically after 60 minutes of inactivity. B7 | |
| 120 min. The instrument will turn off automatically after 120 minutes of inactivity. C8 |
■ Selecting the Auto Power Off setting Operation Guide: SETTINGS (page 14\~15)
Press and hold the METRONOME and SOUND SELECT buttons simultaneously, then press the key assigned to the desired Auto Power Off setting.
* The Auto Power Off setting will be stored automatically, and recalled every time the instrument is turned on.
Bluetooth® MIDI (KDP120 only)
The Bluetooth MIDI setting is used to enable/disable the KDP120 digital piano's Bluetooth MIDI function. When enabled, the KDP120 digital piano can be connected to smart phones, tablets, and other smart devices to facilitate wireless MIDI communication, allowing a wide range of music-related apps to be enjoyed using the instrument.
* Availability of Bluetooth function dependent on market location.
Bluetooth MIDI settings
| Bluetooth MIDI Description Key | ||
| Off Disables the instrument's Bluetooth MIDI function. G#2 | ||
| On (default) | Enables the instrument's Bluetooth MIDI function. | A#2 |
■ Enabling/disabling Bluetooth MIDI Operation Guide: SETTINGS (page 14\~15)
Press and hold the METRONOME and SOUND SELECT buttons, then press the G#2 key to disable Bluetooth MIDI, or the A#2 key to enable Bluetooth MIDI.
■ Connecting the KDP120 digital piano to a smart device using Bluetooth MIDI
After enabling the Bluetooth MIDI function of the KDP120 digital piano, enable Bluetooth communications on the smart device. After a few moments the KDP120 digital piano should appear in the app's device list. Tap the KDP120 entry to connect the instrument to the smart device. It should now be possible for MIDI apps to communicate with the KDP120 digital piano.
* When the KDP120 digital piano is connected to a smart device via Bluetooth MIDI, the USB MIDI connector will be disabled.
* Please check for Bluetooth MIDI compatibility with the smart device manufacturer and app developer.
* For a list of potential issues and recommended solutions when using Bluetooth communications, please refer to page 44 of this owner's manual.
* For more detailed instructions regarding Bluetooth pairing, please refer to the Bluetooth support pages of the Kawai Global website: http://www.kawai-global.com/support/bluetooth/
Please refer to the following information about Bluetooth.
■ About Bluetooth
- The Bluetooth® word mark and logos are registered trademarks owned by the Bluetooth SIG, Inc. and any use of such marks by Kawai Musical Instruments Mfg. Co., Ltd. is under license.
• Frequency Band of Radio: 2400\~2483.5 MHz Maximum Transmit Power: 2.5 mW (Bluetooth Low Energy), 4.5mW (A2DP) - Availability of Bluetooth function dependent on market location.
For USA, Canada
It is strictly forbidden to use antenna except designated.
This equipment must not be co-located or operated in conjunction with any other antenna or transmitter.
For Canada
Connecting to Other Devices
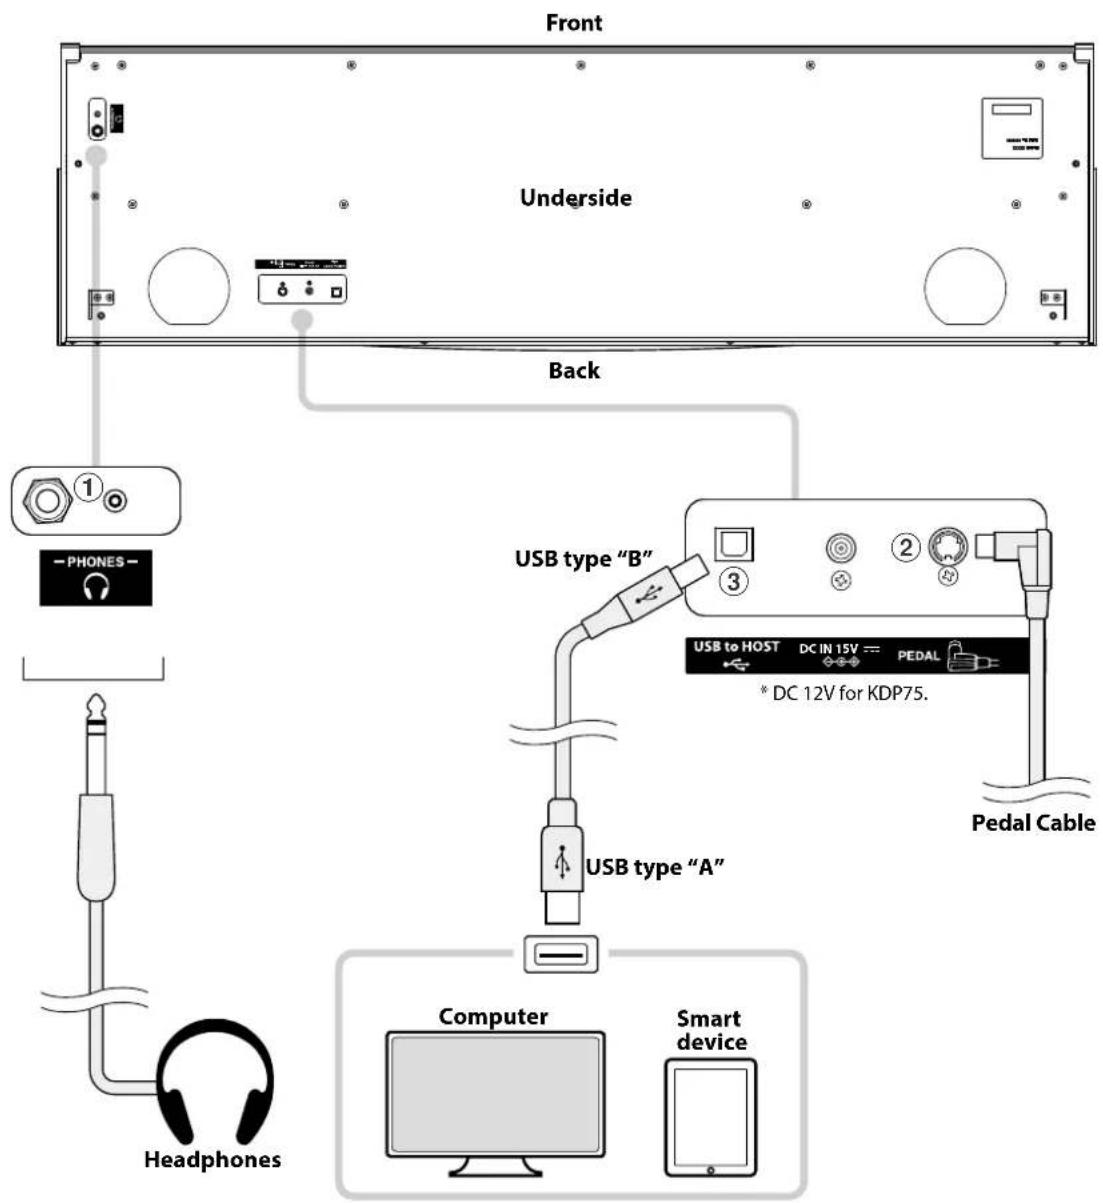
① PHONES jacks (1/4" & 1/8" phone jacks)
These jacks are used to connect stereo headphones to the KDP120/KDP75 digital piano. Headphones can be connected and used simultaneously. When a pair of headphones is connected, sound will not be produced by the speakers.
② PEDAL connector
This connector is used to connect the pedal board to the KDP120/KDP75 digital piano (see page 48).
③ USB to Host port ("B" type)
This port is used to connect the KDP120/KDP75 digital piano to a computer using an inexpensive USB cable. When connected, the instrument can be used as a standard MIDI device, allowing it to send and receive MIDI data. Connect a "B" type USB connector to the instrument, and an "A" type USB connector to the computer.
If there is no USB port of terminal A, a conversion adapter is required separately for connection.

Before connecting the KDP120/KDP75 digital piano to other devices, ensure that the power to both the instrument and the other device is turned off.
The KDP120/KDP75 digital piano features a "USB to Host" type connector, allowing the instrument to be connected to a computer using an inexpensive USB cable and utilised as a MIDI device. Depending on the type of computer and operating system installed, additional driver software may be required for USB MIDI communication to function correctly.
For more information regarding the USB MIDI driver, please visit the following website:
https://www.kawai-global.com/support/downloads/
USB MIDI information
■ Ensure that the instrument is turned OFF before attempting to connect the USB MIDI cable.
■ When connecting the instrument to a computer using the USB MIDI port, there may be a short delay before communications begin.
If the instrument is connected to a computer via a USB hub and USB MIDI communication becomes unreliable/unstable, please connect the USB MIDI cable directly to the one of the computer's USB ports.
■ Disconnecting the USB MIDI cable suddenly, or turning the instrument on/off while using USB MIDI may cause computer instability in the following situations:
– while installing the USB MIDI driver
– while starting up the computer
– while MIDI applications are performing tasks
- while the computer is in energy saver mode
If there are any further problems experienced with USB MIDI communication while the instrument is connected, please double-check all connections and relevant MIDI settings in the computer's operating system.
| Problem Possible Cause and Solution Page no. | |||
| Power | The instrument does not turn on. | Check that the power cable is firmly attached to the instrument, and connected to an AC outlet. | p.11 |
| The instrument turns itself off after a period of inactivity. | Check that the "Auto Power Off" function is not enabled. p. 39 | ||
| Sound | The instrument is turned on, however no sound is produced when the keys are played. | Check that the MASTER VOLUME slider is not set to the lowest position.Check that a pair of headphones (or headphone adaptor plug) are not connected to the PHONES jack.Check that Local Control is enabled in the MIDI Settings menu. | p.11p.11"MIDI Settings Manual" p.5 |
| The sound distorts when playing at very loud volume levels. | Check that the MASTER VOLUME slider is set to an appropriate level, reducing the volume if excessive distortion is heard. | p.11 | |
| Strange sounds or noises are heard when playing with piano sounds. | The KDP120/KDP75 digital piano attempts to reproduce the rich variety of tones created by an acoustic grand piano as accurately as possible. This includes damper resonances and other subtle effects that contribute to the overall piano playing experience.While these additional effects are intended to enhance the realism of the instrument, it is possible to reduce their prominence, or disable them altogether using the sound settings. | p.33p.34 | |
| Pedals | The pedals are unreliable or do not function at all. | Check that the pedal cable is firmly connected to the instrument. p. 48 | |
| When depressing a pedal, the pedal board flexes and is not firm. | Check that the pedal support bolt is fully extended. p. 48 | ||
| The top 18 notes of the keyboard sustain for longer than neighbouring notes, even when the damper pedal is not pressed. | This is the correct behaviour, and intended to reproduce the undamped notes (typically the top two octaves) of an acoustic grand piano. | — | |
| USB MIDI, Bluetooth® MIDI | The instrument is connected to the computer using a USB cable, however the software does not respond to key presses. | Check that a USB MIDI driver is installed on the computer.Check that "USB Audio Device" or "KAWAI USB MIDI" is selected in the software's input/output device settings.Check that the instrument is not connected to a smart device using Bluetooth MIDI. (KDP120 only) | p.43p.43p.40 |
| The instrument cannot connect to the smart device/app via Bluetooth. (KDP120 only) | Check that the instrument's Bluetooth MIDI function is turned On.Ensure that the mobile device's Bluetooth function is turned On.Try deleting the instrument's Bluetooth connection using the mobile device's "Forget Device" function.Try turning the instrument Off and then On, and/or restarting the mobile device. | p.40 | |

Please read these assembly instructions thoroughly before attempting to assemble the KDP120/KDP75 digital piano.
Please ensure that two or more people work on assembling the KDP120/KDP75 digital piano, especially when lifting the main body of the instrument onto the stand in step 3.
Included parts
Before attempting to assemble the KDP120/KDP75 digital piano, ensure that all parts below are included. A Phillips-head screwdriver (not included) will also be required in order to assemble the instrument.

① Main body

② Side panel (left, right)
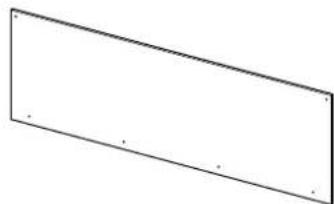
③ Back board
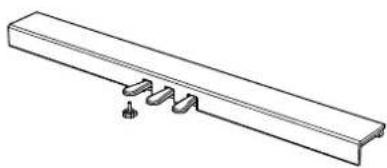
④ Pedal board Pedal support bolt

⑤ AC/DC Adaptor

⑥ Power cable
Screw set
⑦ Screw (with flat washer and spring washer) x 4

⑧ Tapping screw (long, black, 4 x 30 mm) x 2 *

⑨ Tapping screw (short, black, 4 x 20 mm) x 4 *

⑩ Tapping screw (silver, 4 x 16 mm) x 4

* For White finished instruments, black screws will be replaced with silver screws.
* ⑩ Silver screws are provided in a separate bag.
⑪ Headphone hook set x 1
Headphone hook x 1 Mounting screw x 2

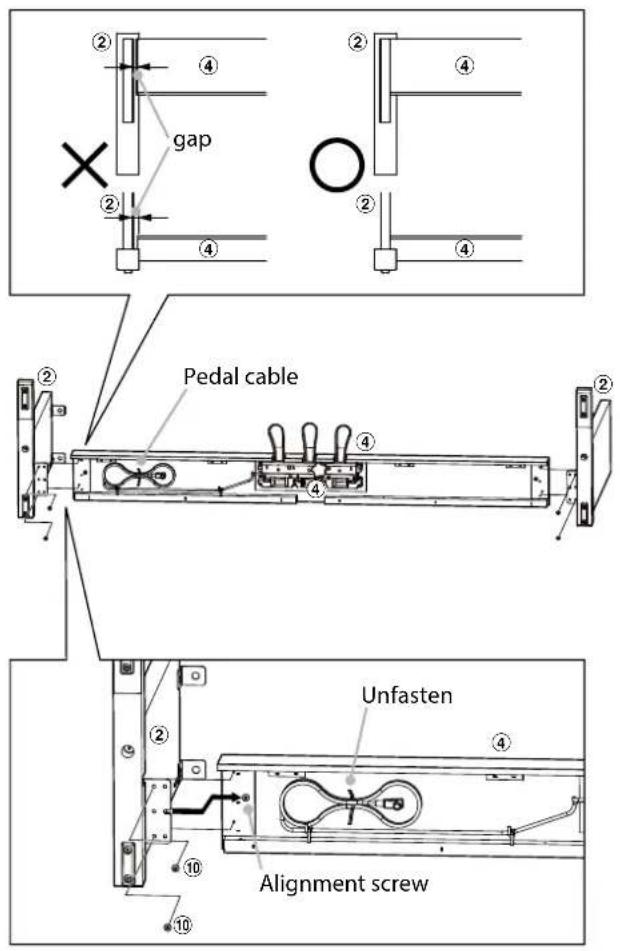
1. Assembling the side panels ②, and pedal board ④
Unfasten and extend the pedal connection cable attached to the bottom of the pedal board ④.
Attach the pedal board ④ to the left and right side panels ② using the alignment screws located on either end of the pedal board. Ensure that the correct side panel is used for the left and right side.
Ensure that the pedal board and side panels make close contact, and that there are no large gaps between the assembled parts.
Insert the four short silver tapping screws ⑩ into the holes as shown, and securely fasten the pedal board to the and left and right side panels.
2. Attaching the back board ③
Allow the assembled pedal board and side panels to stand upright (vertically) on the floor.
* Ensure that the adjustor bolt is attached to the pedal board.
Temporarily fix the back board ③ to the left and right side panels using the two long black tapping screws ⑧*, leaving a tightening allowance of approximately 1-2 mm.
Then attach the bottom of the back board to the pedal board using the four short black tapping screws ⑨*.
* For White finished instruments, black screws will be replaced with silver screws.

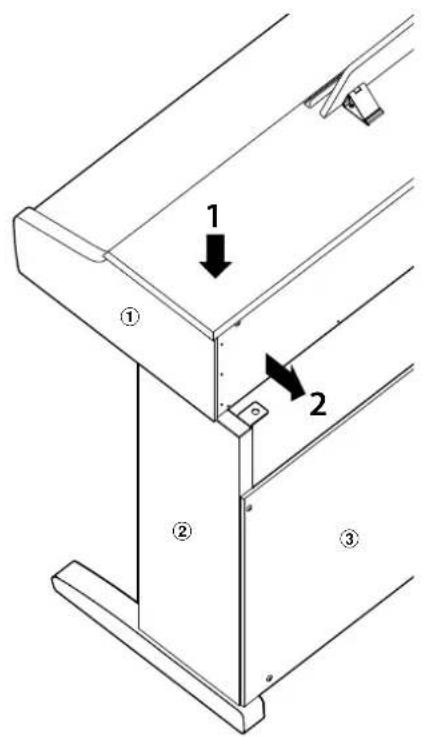
3. Mounting the main body ①

Ensure that two or more people undertake the following step of the assembly process.
Lift the main body ① and carefully place it onto the stand.
Position the main body towards the front of the stand, so that the metal fitting holes are visible when viewed from above.
Gently slide the main body backwards until the base engages with the fixings inside the side panels and locks into place.

When lifting the main body onto the stand, be careful not to catch/trap hands and fingers.
Secure the main body to the stand from below, using the four screws (with the flat washer and spring washer) ⑦.

Tighten all screws securely to ensure that the main body is firmly attached to the stand. Failing to do so may result in serious injury.
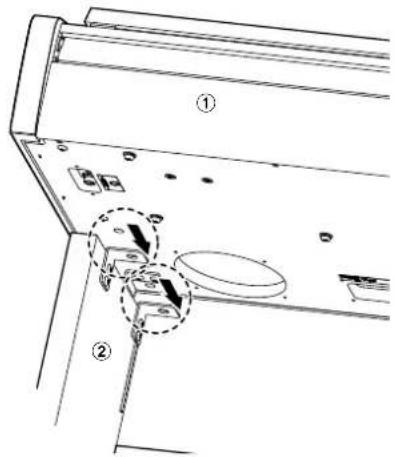

4. Connecting the pedal cable and AC/DC adaptor
Connect the pedal cable to the PEDAL terminal located on the underside of the main body.
Connect the AC/DC adaptor ⑤ to the DC IN terminal.
Use the binders to fix the cables in place.

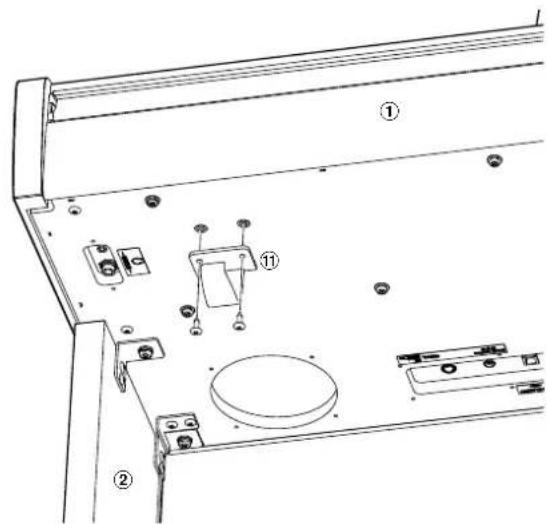
5. Attaching the headphone hook (optional)
If desired, attach the headphone hook to the underside of the main body using the two tapping screws provided.
6. Adjusting the pedal support bolt
Turn the pedal support bolt anti-clockwise until it makes contact with the floor and supports the pedals firmly.


When moving the instrument, always adjust or remove the pedal support bolt, then readjust when the instrument is in its new position.
Demo Song List
| Key | No. | Sound Name (Song Title) | Composer |
| A0 | 1 | Concert Grand (La Campanella) | Liszt |
| B0 | 2 | Studio Grand (Original) | Kawai |
| C1 3 Mellow Grand (Sonata No.30 Op.109) Beethoven | |||
| D1 4 Modern Piano (Original) | Kawai | ||
| E1 5 Classic E.Piano (Original) | |||
| F1 6 Modern E.Piano (Original) | |||
| G1 7 Jazz Organ (Original) | |||
| A1 8 Church Organ (Chorale Prelude “Wachet auf, ruft uns die Stimme.”) | Bach | ||
| B1 9 Harpsichord (French Suite No.6) | |||
| C2 | 10 | Vibraphone (Original) | Kawai |
| D2 | 11 | String Ensemble (Le quattro stagioni: la “Primavera”) | Vivaldi |
| E2 | 12 | Slow Strings (Original) | Kawai |
| F2 | 13 | Choir (Londonderry Air) | Irish folk song |
| G2 14 New Age Pad (Original) | Kawai | ||
| A2 15 Atmosphere (Original) | |||
Concert Magic Song List
| Key | No. | Song Name | Composer | Type |
Children's Songs
| A0 | 1 | Twinkle, Twinkle, Little Star | French folk song | MP |
| A#0 | 2 | I'm A Little Teapot | Traditional | MP |
| B0 | 3 | Mary Had A Little Lamb | American folk song | MP |
| C1 | 4 | London Bridge | Traditional | MP |
| C#1 | 5 | Row, Row, Row Your Boat | American folk song | MP |
| D1 | 6 | Frère Jacques | French folk song | MP |
| D#1 | 7 | Old MacDonald Had A Farm | American folk song | MP |
Christmas Songs
| E1 | 8 | Hark The Herald Angels Sing | Mendelssohn | MP |
| F1 | 9 | Jingle Bells | Traditional | MP |
| F#1 | 10 | Deck The Halls | Welsh Air | MP |
| G1 | 11 | O Come All Ye Faithful | J.Reading | MP |
| G#1 | 12 | Joy To The World | Traditional | MP |
| A1 | 13 | Silent Night | Traditional | MP |
| A#1 | 14 | We Wish You A Merry Christmas | British folk song | MP |
American Classics
| B1 | 15 | Battle Hymn Of The Republic | Traditional | MP |
| C2 | 16 | Yankee Doodle | American folk song | MP |
| C#2 | 17 | Londonderry Air | Irish folk song | EB |
| D2 | 18 | Clementine | American folk song | MP |
| D#2 | 19 | Auld Lang Syne | Scottish folk song | MP |
| E2 | 20 | Oh Susanna | S.C.Foster | SK |
| F2 | 21 | The Camptown Races | S.C.Foster | MP |
| F#2 | 22 | When The Saints Go Marching In | American folk song | EB |
| G2 | 23 | The Entertainer | S.Joplin | SK |
| Key | No. | Song Name | Composer | Type |
Classical Selections
| G#2 | 24 | William Tell Overture | Rossini | SK |
| A2 | 25 | Andante from Symphony No.94 | Haydn | MP |
| A#2 | 26 | Für Elise | Beethoven | EB |
| B2 | 27 | Clair De Lune | Debussey | SK |
| C3 | 28 | Skater's Waltz | E.Waldteuful | SK |
| C#3 | 29 | Blue Danube Waltz | Strauss | SK |
| D3 | 30 | Gavotte | Gossec | SK |
| D#3 | 31 | Waltz Of The Flowers | Tchaikovsky | SK |
Special Occasions
| E3 | 32 | Bridal Chorus | Wagner | MP |
| F3 | 33 | Wedding March | Mendelssohn | SK |
| F#3 | 34 | Pomp And Circumstance | Elgar | SK |
International Songs
| G3 | 35 | When Irish Eyes Are Smiling | E.R.Ball | EB |
| G#3 | 36 | Chiapanecas | Mexican folk song | SK |
| A3 | 37 | Santa Lucia | Naplish folk song | SK |
| A#3 | 38 | Funiculi Funiculà | L.Denza | SK |
| B3 | 39 | Romance De L'amour | Spanish folk song | EB |
| C4 | 40 | My Wild Irish Rose | Chauncy Alcote | EB |
Lesson Function Song Lists
No. Alfred's Basic Piano Library Lesson Book Level 1A
| 1 Right & Left 1 Step Right Up! |
| 2 Left & Right 2 The Carousel |
| 3 Merrily We Roll Along/O'er the Deep Blue Sea 3 Hail to Thee, A |
| 4 Hand-Bells 4 Brother John |
| 5 Jolly Old Saint Nicholas 5 Good Sounds |
| 6 Old MacDonald 6 The Cuckoo |
| 7 Batter Up! 7 Money Can't Buy Ev'rything! |
| 8 My Clever Pup 8 Ping-Pong |
| 9 The Zoo 9 Grandpa's Clock |
| 10 Playing in a New Position 10 When the Saints Go Marching In |
| 11 Sailing 11 G's in the "BAG" |
| 12 | Skating |
| 13 | Wishing Well |
| 14 | Rain, Rain! |
| 15 | A Happy Song |
| 16 | Position C |
| 17 | A Happy Song |
| 18 | See-Saws |
| 19 | Just a Second! |
| 20 | Balloons |
| 21 | Who's on Third? |
| 22 | Mexican Hat Dance |
| 23 | Rock Song |
| 24 | Rockets |
| 25 | Sea Divers |
| 26 | Play a Fourth |
| 27 | July the Fourth! |
| 28 | Old Uncle Bill |
| 29 | Love Somebody |
| 30 | My Fifth |
| 31 The Donkey | |
| 32 | Position G |
| 33 | Jingle Bells! |
| 34 | Willie & Tillie |
| 35 | A Friend Like You |
| 36 | My Robot |
| 37 | Rockin' Tune |
| 38 | Indian Song |
| 39 | Raindrops |
| 40 | It's Halloween! |
| 41 | Horse Sense |
No. Alfred's Basic Piano Library Lesson Book Level 1B
| merica! | |
| 12 | Join the Fun |
| 13 | Oom-Pa-pa! |
| 14 | The Clown |
| 15 | Thumbs on C! |
| 16 Waltz Time | |
| 17 | Good King Wenceslas |
| 18 | The Rainbow |
| 19 | Yankee Doodle |
| 20 | The Windmill |
| 21 Indians | |
| 22 | New Position G |
| 23 | Pedal Play |
| 24 | Harp Song |
| 25 | Concert Time |
| 26 | Music Box Rock |
| 27 | A Cowboy's Song |
| 28 | The Magic Man |
| 29 | The Greatest Show on Earth! |
| 30 | The Whirlwind |
| 31 The Planets | |
| 32 | C Major Scale Piece |
| 33 | G Major Scale Piece |
| 34 | Carol in G Major |
| 35 | The Same Carol in C Major |
| 36 | French Lullaby |
| 37 Sonatina | |
| 38 | When Our Band Goes Marching By! |
| No. | Burgmüller 25 (25 Etudes Faciles, Opus 100) Czerny 30 (E |
| 1 La candeur No. 1 to No. 30 | |
| 2 Arabesque | |
| 3 Pastorale | |
| 4 Petite réunion No. 1 (1-1 to 1-12) | |
| 5 Innocence No. 2 (2-1 to 2-8) | |
| 6 Progrès No. 3 to No. 106 | |
| 7 Courant Limpide | |
| 8 La gracieuse | |
| 9 La chasse | |
| 10 Tendre fleur | |
| 11 La bergeronnette | |
| 12 Adieu | |
| 13 Consolation | |
| 14 La styrienne | |
| 15 Ballade | |
| 16 Douce plainte | |
| 17 Babillarde | |
| 18 Inquiétude | |
| 19 Ave Maria | |
| 20 Tarentelle | |
| 21 Harmonie des anges | |
| 22 Barcarolle | |
| 23 Retour | |
| 24 L'hirondelle | |
| 25 La chevaleresque | |
■ Lesson Function song book availability
Alfred's Basic Piano Library, Burgmüller: Etudes Faciles, Czerny: Etudes de Mécanisme, and Beyer lesson song books are sold separately. Please check your local dealer for more information. Alfred's international offices may also be contacted directly:
USA / Canada Australia
Alfred Music Publishing
PO Box 10003
Van Nuys, CA 91410
Tel: +1 (800) 292-6122
Email: sales@alfred.com
Website: http://www.alfred.com
Alfred Publishing Australia
PO Box 2355
Taren Point NSW 2229
Tel: +61 (02) 9524 0033
Email: sales@alfredpub.com.au
Information about Adaptor Specifications
This adapter specification table conforms to the requirements of EU Commission Regulation (EU) 2019/1782.
| Adaptor Type | ||||
| PS-129 PS-154 | PS-241 PS-242 | |||
| Manufacturer's trademark KAWAI | KAWAI KAWAI KAWAI | |||
| Model identifier | PS-129 | PS-154 | PS-241 | PS-242 |
| Input voltage 230 V 230 V 230 V 230 V | ||||
| Input AC frequency 50 Hz 50 Hz 50 Hz 50 Hz | ||||
| Output voltage | 12.0 V | 15.0 V | 24.0 V | 24.0 V |
| Output current | 2.0 A | 4.0 A | 6.2 A | 5.0 A |
| Output power | 24.0 W | 60.0 W | 150.0 W | 120.0 W |
| Average active efficiency | 90.38% | 88.80% | 90.41% | 91.55% |
| Efficiency at low load (10%) | 85.71% | 84.33% | 78.62% | 88.84% |
| No-load power consumption | 0.061 W | 0.082 W | 0.135 W | 0.020 W |
| BG | ОПРОСТЕНА ЕС ДЕКЛАРАЦИЯ ЗА СЪОТВЕТСТВИЕ |
| Bulgarian | С настоящото Кawai Europa GmbH декларира, че този тип радиоспоряжение | KDP120/KDP75 | е в съответствие с Директива 2014/53/ЕС.Цялоестният текст на ЕС декларацията за съответствие може да се намери на следния интернет адрес: |
| ES | DECLARACIÓN UE DE CONFORMIDAD SIMPLIFICADA |
| Spanish | Por la presente, Kawai Europa GmbH declara que el tipo de equipo radioeléctrico | KDP120/KDP75 | es conforme con la Directiva 2014/53/UE.El texto completo de la declaración UE de conformidad está disponible en la dirección Internet siguiente: |
| CS | ZJEDNODUŠENÉ EU PROHLÁŠENÍ O SHODĚ |
| Czech | Tímio Kawai Europa GmbH prohlašuje, že typ rádiového zařízení [ KDP120/KDP75 ] je v souladu se směmici 2014/53/EU.Úplné znění EU prohlášení o shodě je k dispozici na této internetové adrese: |
| DA | FORENKLET EU-OVERENSSTEMMELSESERKLÆRING |
| Danish | Hermed erklærer Kawai Europa GmbH, at radioudstyrstypen [ KDP120/KDP75 ] er i overensstemmelse med direktiv 2014/53/EU.EU-overensstemmelseserklæringens fulde tekst kan findes på folgende internetadresse: |
| DE | VEREINFACHTE EU-KONFORMITÄTSERKLÄRUNG |
| German | Iliermit erklärt Kawai Europa GmbH, dass der Funkanlagentyp [ KDP120/KDP75 ] der Richtlinie 2014/53/EU entspricht.Der vollständige Text der EU-Konformitätserklärung ist unter der folgenden Internetadresse verfügbar: |
| ET | LIHTSUSTATUD ELI VASTAVUSDEKLARATSIOON |
| Estonian | Käcsolevaga deklarcerih Kawai Europa GmbH, et käcsolev raadiosadme tüüp [ KDP120/KDP75 ] vastab direktiivi 2014/53/EL nõuctele.ELi vastavusdeklaratsiooni täielik tekst on kältesaadav järgmisel internetiaadressil: |
| EL | АПЛОУЗТЕУМЕНН ДНАЮЗЕН SYMMОРФОЗЕНЗ ЕЕ |
| Greek | Ме тип пороїєю о/н Kawai Europa GmbH, δηλώνει ότι ο παδιούεροπλησός [ KDP120/KDP75 ] πληροί την οδηγία 2014/53/EE.To αλάρκε καιμενο της δήλωσης συμμόρφοσης ΕΕ δυτίθεται στην ακώλούθη κετοιολίδια στο διαδίκτυο: |
| EN | SIMPLIFIED EU DECLARATION OF CONFORMITY |
| English | Ihereby, Kawai Europa GmbH declares that the radio equipment type [ KDP120/KDP75 ] is in compliance with Directive 2014/53/EU.The full text of the EU declaration of conformity is available at the following internet address: |
| FR | DECLARATION UE DE CONFORMITE SIMPLIFIEE |
| French | Le soussigné, Kawai Europa GmbH, declare que l'équipement radioélectrique du type [ KDP120/KDP75 ] est conforme à la directive 2014/53/UE.Le texte complet de la déclaration UF de conformité est disponible à l'adresse internet suivante: |
| HR | POJEDNOSTAVLJENA EU IZJAVA O SUKLADNOSTI |
| Croatian | Kawai Europa GmbH ovimc izjavljuje da je radijska oprcma tipa [ KDP120/KDP75 ] u skladu s Direktivom 2014/53/EU.Cjeloviti tekst EU izjave o sukladnosti dostupan je na sljede?oj internetskoj adresi: |
| IT | DICHIARAZIONE DI CONFORMITÀ UE SEMPLIFICATA |
| Italian | Il fabbricante, Kawai Europa GmbH, dichiara che il tipo di apparecchiatura radio [ KDP120/KDP75 ] è conforme alla direttiva 2014/53/UE.Il testo completo della dichiarazione di conformità UE è disponibile al seguente indarizzo Internet: |
| LV | VIENKÄRŠOTA ES ATBILSTÍBAS DEKLARÁCIJA |
| Latvian | Ar šo Kawai Europa GmbH deklarē, ka radioiekārta [ KDP120/KDP75 ] atibilst Direktīvai 2014/53/ES.Pilns ES atbilstības deklarícijas teksts ir pieejans šādā interneta vietně: |
| LT | SUPAPRASTINTA ES ATITIKTIES DEKLARACIJA |
| Lithuanian | Aš, Kawai Europa GmbH, patvirtinu, kad radijo jrenginių tipas [ KDP120/KDP75 ] atitinka Direktryva 2014/53/ES.Visas ES atitikties deklaracijos tekstas pricinamas šiuo interneto adresu: |
| HU | EGYSZERÜSÍTETT EU-MEGFELELŐSÉGI NYILATKOZAT |
| Hungarian | Kawai Europa GmbH igazolja, hogy a | KDP120/KDP75 | tipusú rádióberendezés megfelel a 2014/53/EU irányelvaek.Az EU-megfelelőségi nyilatkozat teljes szövege elérhető u következő internetes címen: |
| MT | DIKJARAZZJONI SSIMPLIFIKATA TA' KONFORMITÀ TAL-UE |
| Maltese | B'dan, Kawai Europa GmbH, niddikjara li dan it-tip ta' taghmir tar-radju [ KDP120/KDP75 ] huwa konformi mad-Direttiva 2014/53/UE.It-lest kollu tud-dikjarazzjoni ta' konformità tul-UT huwa disponibbli f'dan l-indirizz tul-Internet li ğej: |
| NL | VEREENVOUDIGDE EU-CONFORMITEITSVERKLARING |
| Dutch | Iierbij verklaar ik, Kawai Europa GmbH, dat het type radioapparatuur [ KDP120/KDP75 ] conform is met Richtlijn 2014/53/EU.De volledige tekst van de EU-conformiteitsverklaring kan worden geraadplecgő op het volgende internetadres: |
| PL | UPROSZCZONA DEKLARACJA ZGODNOŚCI UE |
| Polish | Kawai Europa GmbH niniejszym oświadcza, że typ urządzenia radiowego [ KDP120/KDP75 ] jest zgodny z dyrektywą 2014/53/UE.Pelny tekst deklaracji zgodności UE jest dostępny pod następującym adresem internetowym: |
| PT | DECLARAÇÃO UE DE CONFORMIDADE SIMPLIFICADA |
| Portuguese | O(a) abaixo assinado(a) Kawai Europa GmbH declara que o presente tipo de equipamento de rádio [ KDP120/KDP75 ] está cm conformidade com a Diretiva 2014/53/UE.O texto integral da declaração de conformidade está disponível no seguínie endereço de Internet: |
| RO | DECLARAȚIA UE DE CONFORMITATE SIMPLIFICATĂ |
| Romanian | Prin prezenta, Kawai Europa GmbH declará că tipul de echipamente radio [ KDP120/KDP75 ] este in conformitate cu Direktiva 2014/53/UE.Textul integral al declarației UT. de conformitate este disponibil la urmăourea adresă internet: |
| SK | ZJEDNODUŠENÉ EU VYHLÁSENIE O ZHODE |
| Slovak | Kawai Europa GmbH týmto vyhlasuje, že rádiové zariadenie typu [ KDP120/KDP75 ] je v súlade so smernicou 2014/53/TÜ.Úplné EU vyhlásenie o zhode je k dispozicii na tejto internetovej adrese: |
| SL | POENOSTAVLJENA IZJAVA EU O SKLADNOSTI |
| Slovenian | Kawai Europa GmbH potruije, da je tip radijske opreme [ KDP120/KDP75 ] skladen z Direktivo 2014/53/EU.Celotno hesedilo izjave FU o skladnosti je na voljo na naslednjem spletnem naslovu: |
| FI | YKSINKERTAISTETTU EU-VAATIMUSTENMUKAISUUSVAKUUTUS |
| Finnish | Kawai Europa GmbH vaknuttaa, että radiolaitetyppi [ KDP120/KDP75 ] on direktiivin 2014/53/EU mukainen.EU-vaatimustenmukaisuusvakautuksen täysimitainen teksti on saatavilla seuraavassa internetosoitteessa: |
| SV | FÖRENKLAD EU-FÖRSÄKran OM ÖVERENSSTÄMMELSE |
| Swedish | Härmed försäkrar Kawai Europa GmbH att denna typ av radioutrusning [ KDP120/KDP75 ] överensstämmer med direktiv 2014/53/EU.Den fullständiga texten till EU-försäkran om överensstämmelse finns på följande webbadress: |
| https://www.kawai-global.com/ | |
Specifications
| KDP120 KDP75 | |||
| Keyboard | 88 weighted keysResponsive Hammer Compact II (RHC II) action | 88 weighted keysResponsive Hammer Compact (RHC) action | |
| Sound Source | Harmonic ImagingTM (HI), 88-key piano sampling | ||
| Internal Sounds | Concert Grand, Studio Grand, Mellow Grand, Modern Piano, Classic E.Piano, Modern E.Piano,Jazz Organ, Church Organ, Harpsichord, Vibraphone, String Ensemble, Slow Strings, Choir,New Age Pad, Atmosphere | ||
| Polyphony | max. 192 notes | ||
| Reverb | Room, Lounge, Small Hall, Concert Hall, Live Hall, Cathedral | ||
| Internal Recorder | 3 song recorder - approximately 10,000 note memory capacity | ||
| Lesson Function | Alfred, Burgmüller, Czerny and Beyer lesson songs | ||
| Metronome | Beat: 1/4, 2/4, 3/4, 4/4, 5/4, 3/8, 6/8Tempo: 10-300 bpm | ||
| Demo Songs | 15 songs | ||
| Keyboard Modes | Dual Mode (with adjustable volume balance)Four Hands Mode | ||
| Virtual Technician | Smart Mode: 10 presets | ||
| Advanced Mode:(adjustable via app) | Touch Curve, Damper Resonance, Hammer Delay,Topboard Simulation, Decay Time, Minimum Touch, Stretch Tuning,Temperament, Temperament Key, Half-Pedal Point, Soft Pedal Depth,Voicing, Release Time | ||
| Other Functions | Damper Resonance, Reverb, Touch, Low Volume Balance, Tuning, Transpose, Brilliance,Spatial Headphone Sound, Phones Type, Auto Power Off, Bluetooth MIDI (KDP120 only),Transmit Program Change Number, MIDI Channel, Local Control, Multi-timbral mode | ||
| Bluetooth *(KDP120 only) | Bluetooth (Ver. 4.1; GATT compatible)Bluetooth Low Energy MIDI Specification compliant | ||
| Pedals | Sustain (with half-pedal support), Soft, Sostenuto(GFPS) | Sustain (with half-pedal support), Soft, Sostenuto(GFPS) | |
| Jacks | Headphones × 2, USB to HOST | ||
| Speakers | 12 cm × 2 (8 × 12) cm × 2 | ||
| Output Power | 20 W × 2 9 W × 2 | ||
| Power Consumption | 15 W 7 W | ||
| Key Cover | Sliding type | ||
| Dimensions | 1360 (W) × 405 (D) × 855 (H) mm (folding Music Rack) | ||
| Weight | 37 kg 36 kg | ||
Specifications are subject to change without notice.
* Availability of Bluetooth function dependent on market location.
KAWAI
THE FUTURE OF THE PIANO
- IMPORTANT SAFETY INSTRUCTIONS
- SAVE THESE INSTRUCTIONS
- WARNING
- AVIS : RISQUE DE CHOC ELECTRIQUE - NE PAS OUVRIR
- READ ALL THE INSTRUCTIONS BEFORE USING THE PRODUCT
- RÈGLES DE SÉCURITÉ
- CAUTION
- THE PRODUCT SHOULD BE SERVICED BY QUALIFIED SERVICE PERSONNEL WHEN
- NOTES ON REPAIR
- ATTENTION
- AN INFORMATION ON DISPOSAL FOR USERS
- INSTRUCTION FOR AC POWER CORD (U.K.)
- IMPORTANT
- CANADIAN RADIO INTERFERENCE REGULATIONS
- FCC INFORMATION (U.S.A)
- DECLARATION OF CONFORMITY
- ABOUT THIS OWNER'S MANUAL
- NAMEPLATE
- CLEANING
- INTELLECTUAL PROPERTY RIGHTS
- TABLE OF CONTENTS
- IMPORTANT INFORMATION
- PREPARATION
- BASIC OPERATION
- ADJUSTMENTS & SETTINGS
- APPENDIX
- PART NAMES AND FUNCTIONS
- OPERATION GUIDE
- SETTING UP THE PIANO
- CONNECTING THE POWER ADAPTOR
- TURNING ON THE POWER
- USING HEADPHONES
- CONNECTING THE POWER ADAPTOR TO AN OUTLET
- ADJUSTING THE VOLUME
- ADJUSTING THE PEDAL SUPPORT BOLT
- LESSON
- RECORDER
- SELECTING SOUNDS
- INSTRUMENT SOUNDS
- SELECTING A SOUND: METHOD 1
- SELECTING A SOUND: METHOD 2
- SUSTAIN PEDAL (RIGHT PEDAL)
- SOSTENUTO PEDAL (CENTRE PEDAL)
- SOFT PEDAL (LEFT PEDAL)
- GRAND FEEL PEDAL SYSTEM (KDP120 ONLY)
- ENABLING DUAL MODE : METHOD 1 OPERATION GUIDE: SOUND (PAGE 12\~13)
- ENABLING DUAL MODE : METHOD 2 OPERATION GUIDE: SOUND (PAGE 12\~13)
- ADJUSTING THE VOLUME BALANCE OPERATION GUIDE: SOUND (PAGE 12\~13)
- EXITING DUAL MODE
- FOUR HANDS MODE
- ENABLING FOUR HANDS MODE
- EXITING FOUR HANDS MODE
- TURNING THE METRONOME ON/OFF
- CHANGING THE METRONOME TIME SIGNATURE OPERATION GUIDE: METRONOME (PAGE 12\~13)
- ADJUSTING THE METRONOME VOLUME OPERATION GUIDE: METRONOME (PAGE 12\~13)
- ADJUSTING THE METRONOME TEMPO OPERATION GUIDE: METRONOME (PAGE 12\~13)
- METHOD 1
- METHOD 2
- METHOD 3
- PLAYING THE DEMO SONGS
- SELECTING A DEMO SONG
- SELECTING A CONCERT MAGIC SONG OPERATION GUIDE: CONCERT MAGIC (PAGE 12\~13)
- LISTENING TO THE SELECTED CONCERT MAGIC SONG
- PERFORMING THE SELECTED CONCERT MAGIC SONG
- EXITING CONCERT MAGIC PLAYING MODE
- CONCERT MAGIC DEMO MODES
- ALLPLAY
- CATEGORY PLAY OPERATION GUIDE: CONCERT MAGIC (PAGE 12\~13)
- RANDOM PLAY OPERATION GUIDE: CONCERT MAGIC (PAGE 12\~13)
- CONCERT MAGIC MODE
- CHANGING THE CONCERT MAGIC MODE
- CONCERT MAGIC SONG ARRANGEMENT TYPES
- EASY BEAT EB
- MELODY PLAY MP
- SKILLFUL
- BUILT-IN LESSON FUNCTION SONG BOOKS
- 1 SELECTING A LESSON BOOK/SONG
- ENTERING LESSON MODE
- SELECTING A LESSON BOOK OPERATION GUIDE: LESSON (PAGE 14)
- SELECTING A LESSON SONG OPERATION GUIDE: LESSON (PAGE 14)
- SELECTING THE BEYER VARIATION
- 2 LISTENING TO THE SELECTED LESSON SONG
- PLAYING THE LESSON SONG
- ADJUSTING TEMPO OF THE LESSON SONG OPERATION GUIDE: METRONOME (PAGE 12\~13)
- STOPPING THE LESSON SONG
- 3 PRACTICING LEFT AND RIGHT-HAND PARTS SEPARATELY
- MUTING/ACTIVATING LESSON SONG PARTS 1
- MUTING/ACTIVATING LESSON SONG PARTS 2
- EXITING LESSON MODE
- 1 RECORDING A SONG
- ENTERING SONG RECORDER MODE
- SELECTING A SONG MEMORY OPERATION GUIDE: RECORDER (PAGE 15)
- STARTING THE SONG RECORDER
- STOPPING THE SONG RECORDER
- 2 PLAYING BACK A SONG
- PLAYING THE RECORDED SONG
- PLAYING A SONG STORED IN ANOTHER MEMORY OPERATION GUIDE: RECORDER (PAGE 15)
- 3 ERASING RECORDED SONGS
- ERASING THE RECORDER SONGS
- KEYBOARD AND SOUND SETTINGS
- 1 DAMPER RESONANCE
- DAMPER RESONANCE
- DAMPER RESONANCE TYPE
- CHANGING THE DAMPER RESONANCE TYPE
- 2 REVERB
- CHANGING THE REVERB TYPE
- 3 TOUCH
- CHANGING THE TOUCH TYPE
- 4 LOW VOLUME BALANCE
- LOW VOLUME BALANCE TYPE
- CHANGING THE LOW VOLUME BALANCE TYPE OPERATION GUIDE: SETTINGS (PAGE 14\~15)
- 5 TUNING
- ADJUSTING THE TUNING SETTING: METHOD 1 OPERATION GUIDE: SETTINGS (PAGE 14\~15)
- ADJUSTING THE TUNING SETTING: METHOD 2 OPERATION GUIDE: SETTINGS (PAGE 14\~15)
- 6 TRANSPOSE
- ADJUSTING THE TRANSPOSE SETTING OPERATION GUIDE: SETTINGS (PAGE 14\~15)
- 7 BRILLIANCE
- ADJUSTING THE BRILLIANCE SETTING OPERATION GUIDE: SOUND (PAGE 12\~13)
- 8 VIRTUAL TECHNICIAN (SMART MODE)
- SELECTING THE VIRTUAL TECHNICIAN TYPE
- PIANO REMOTE
- 9 SPATIAL HEADPHONE SOUND
- SPATIAL HEADPHONE SOUND TYPE
- SETTING THE SPATIAL HEADPHONE SOUND SYSTEM OPERATION GUIDE: SOUND (PAGE 12\~13)
- 10 PHONES TYPE
- PHONESTYPE
- PHONES TYPE SETTING
- AUTO POWER OFF SETTINGS
- SELECTING THE AUTO POWER OFF SETTING OPERATION GUIDE: SETTINGS (PAGE 14\~15)
- BLUETOOTH® MIDI (KDP120 ONLY)
- BLUETOOTH MIDI SETTINGS
- ENABLING/DISABLING BLUETOOTH MIDI OPERATION GUIDE: SETTINGS (PAGE 14\~15)
- CONNECTING THE KDP120 DIGITAL PIANO TO A SMART DEVICE USING BLUETOOTH MIDI
- ABOUT BLUETOOTH
- FOR USA, CANADA
- FOR CANADA
- CONNECTING TO OTHER DEVICES
- ① PHONES JACKS (1/4" & 1/8" PHONE JACKS)
- ② PEDAL CONNECTOR
- ③ USB TO HOST PORT ("B" TYPE)
- USB MIDI INFORMATION
- INCLUDED PARTS
- SCREW SET
- ASSEMBLING THE SIDE PANELS ②, AND PEDAL BOARD ④
- ATTACHING THE BACK BOARD ③
- MOUNTING THE MAIN BODY ①
- CONNECTING THE PEDAL CABLE AND AC/DC ADAPTOR
- ATTACHING THE HEADPHONE HOOK (OPTIONAL)
- DEMO SONG LIST
- CONCERT MAGIC SONG LIST
- LESSON FUNCTION SONG LISTS
- LESSON FUNCTION SONG BOOK AVAILABILITY
- USA / CANADA AUSTRALIA
- INFORMATION ABOUT ADAPTOR SPECIFICATIONS
- SPECIFICATIONS
- KAWAI
Brand : KAWAI
Model : KDP75
Category : Piano