
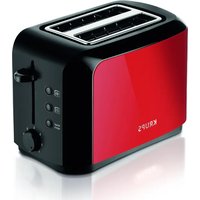
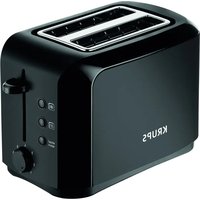
Prelude TT6190 - Toaster KRUPS - Free user manual and instructions
Find the device manual for free Prelude TT6190 KRUPS in PDF.
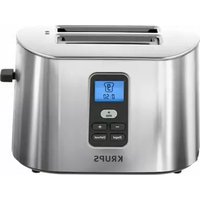


| Product Type | Toaster |
| Brand | Krups |
| Model | Prelude TT6190 |
| Dimensions (approx.) | 30 cm x 20 cm x 25 cm |
| Weight (approx.) | 1.5 kg |
| Power Rating | 900 W |
| Number of Slots | 2 |
| Browning Control | 7-level adjustable |
| Functions | Cancel, Lift, Reheat, Defrost |
| Housing Material | Stainless steel and plastic |
| Crumb Tray | Removable, easy to clean |
| Safety Features | Auto shut-off, cool-touch exterior |
| Cleaning | Wipe exterior with damp cloth; empty crumb tray regularly |
| Spare Parts Availability | Available from Krups service centers |
| Warranty | 1 year standard warranty |
Frequently Asked Questions - Prelude TT6190 KRUPS
User questions about Prelude TT6190 KRUPS
0 question about this device. Answer the ones you know or ask your own.
Ask a new question about this device
Download the instructions for your Toaster in PDF format for free! Find your manual Prelude TT6190 - KRUPS and take your electronic device back in hand. On this page are published all the documents necessary for the use of your device. Prelude TT6190 by KRUPS.
USER MANUAL Prelude TT6190 KRUPS
Instruction for use E
Modo de empleo S
Mode d'emploi F

KRUPS

PARTS AND FEATURES
A Control lever with HIGH-LIFT position B STOP button C Browning selection button, 9 levels (1 to 9) D DEFROST button E BAGEL button F Removable crumb tray G LCD screen
G1 BAGEL setting
G2 Level selected
G3 DEFROST setting
G4 Remaining toasting time
IMPORTANT SAFEGUARDS
When using electrical appliances, basic safety precautions should always be followed including the following:
- Read all instructions.
- Do not touch hot surfaces. Use the handle. Use handles or knobs.
- To protect against electrical shock do not immerse cord, plugs, or this appliance in water or other liquid.
- Not intended for use by children. Close supervision is necessary for any appliance being used near children.
- Unplug from outlet when not in use and before cleaning. Allow to cool before putting on or taking off parts.
- Do not operate any appliance with a damaged cord or plug or after the appliance malfunctions, or has been damaged in any manner. Return appliance to the nearest authorized service facility for examination, repair or adjustment.
- The use of accessory attachments not recommended by the appliance manufacturer may cause injuries.
- Do not use outdoors.
- Do not let cord hang over edge of table or counter, or touch hot surfaces.
- Do not place on or near a hot gas or electric burner, or in a heated oven.
- Always attach plug to appliance first, then plug cord into the wall outlet. To disconnect, turn any control to "off," then remove plug from wall outlet.
- Do not use appliance for other than intended use.
- Oversize foods, metal foil packages, or utensils must not be inserted in a toaster as they may involve a risk of fire or electric shock.
- A fire may occur if toasters are covered or touching flammable material, including curtains, draperies, walls, and the like, when in operation.
- Do not attempt to dislodge food when toaster is plugged in.
SAVE THESE INSTRUCTIONS
DO
■ The toaster must always be used in the upright position (not on its side or tilted forward or back). ■ Before each use, make sure that the crumb tray is in its proper location. ■ Regularly remove crumbs from crumb tray. ■ The control lever must be in the "Up" position before attaching or disconnecting the plug from wall outlet. If bread jams in the slots after toasting, the unit will automatically shut off. Disconnect the plug immediately from the wall outlet and wait for the appliance to cool before attempting to remove the bread. ■ Disconnect the appliance if it shows any working abnormalities.
DO NOT
■ Never leave the toaster unattended during operation, particularly when toasting for the first time or when changing settings. - Do not touch the metal parts or hot surfaces of the appliance when it is working. - Do not try to toast bread that may melt (with icing) or drip in the toaster and do not toast crusts as this may damage the appliance or cause a fire. ■ Do not try to toast very thick slices of bread that could block the toasting mechanism. - Bread can burn; do not cover this appliance while in use and do not use this appliance near any flammable materials such as curtains, under shelving or wall cupboards, etc. It should be attended when in use. ■ Do not put paper towels, cardboard or plastic in, on or under the toaster. If flames were to arise from parts of the toaster, never attempt to extinguish them with water. Unplug the appliance and smother the flames with a damp cloth. ■ Do not use this appliance as source of heating or drying. ■ Do not use the toaster for cooking, grilling or defrosting frozen food other than bread products. ■ Do not unplug appliance by pulling on cord. Instead grasp plug and pull to disconnect. ■ Never wrap cord around toaster. Use cord storage on the underside of unit.
This product has been designed for household use only. Any professional use, inappropriate use or failure to comply with the instructions will void the warranty.
DO NOT

■ Do not immerse toaster in water or run water into the toaster.

■ Do not operate toaster under or around any flammable materials, such as curtains, or under cabinets.

■ Do not place the toaster in the dishwasher.

■ Do not cover toast chambers when in use.

■ Do not insert objects into the toaster.

■ Do not use abrasive cleaners, metallic ustensils or scouring pads.
SAFETY INSTRUCTIONS
■ For your safety, this appliance complies with applicable technical rules and norms. ■ Check that the main voltage corresponds to the voltage indicated on the appliance (alternating voltage only). ■ Use a stable work surface, away from any contact with water and never in a built-in kitchen alcove. ■ Do not move the appliance when working.
POLARIZATION INSTRUCTIONS
This appliance has a polarized plug (one blade is wider than the other). To reduce the risk of electric shock, this plug is intended to fit into a polarized outlet only one way. If the plug does not fit fully into the outlet, reverse the plug. If it still does not fit, contact a qualified electrician. Do not attempt to modify the plug in any way.
SHORT CORD
a A short power-supply cord (or detachable power-supply cord) is to be provided to reduce the risk resulting from becoming entangled in or tripping over a longer cord. b Longer detachable power-supply cords or extension cords are available and may be used if care is exercised in their use. c If a long detachable power-supply cord or extension cord is used,
1) The marked electrical rating of the cord or extension cord should be at least as great as the electrical rating of the appliance, and 2) The cord should be arranged so that it will not drape over the countertop or tabletop where it can be pulled on by children or tripped over unintentionally.
■ Remove toaster from packaging.

■ Clean the toaster with a damp cloth. Place it on a stable surface.

■ Unwind the power cord completely. Never operate with cord partially unrolled. Plug the toaster into the wall outlet.
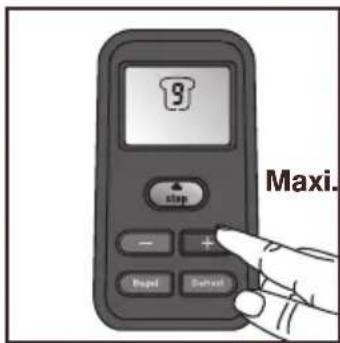
■ Select maximum browning setting without inserting any bread.

■ Press lever for 3 sequential toasting sessions to remove "new" smell.
TOASTING BREAD
Helpful hints
Differences in moisture levels from one bread to another can result in varying toasting times and browning levels. Below are some general recommendations:
■ Slightly dry bread should be toasted on a lower setting. ■ Very fresh bread or whole wheat bread should be toasted on a slightly darker setting. Breads with uneven surfaces, such as English muffins, may require a darker setting. ■ When toasting items with fruit, such as raisin bread or teacakes, remove any loose fruit before toasting (raisins may fall into the appliance and create a fire hazard). ■ When toasting bagels, slice the bagel into two equal halves before toasting. If you are toasting one slice of bread, set the browning control to a lower setting. ■ Use caution when warming or toasting sugar coated or filled items (such as toaster pastries). Always set the browning control to the lowest setting.

■ Insert bread. ⚠️ Never leave toaster unattended when in use.

■ Select browning level by pressing + or - buttons between 1 and 9. The select level will appear on the screen.

■ Press down lever to start toasting. The toasting begins.
Note: The lever can only lock in the down position when plugged in. Once the toasting cycle is engaged the remaining toasting time appears on the screen.

■ The toasting chamber automatically lifts the toast once the toasting cycle is complete. The LCD screen switches off after a short time if the toaster remains unused.
HI-LIFT

To remove smaller-sized breads after the toasting cycle.
■ Push lever up in the high position and remove toast. ⚠️ Never insert anything into toaster especially when plugged in.
STOP/EJECT

■ Press the stop button at any time to stop the toasting cycle.

■ The toasting chamber automatically lifts the toast and lever. Do not try to force lever up.
DEFROST

To toast frozen breads, use the Defrost setting.
■ Insert frozen bread.

■ Adjust the browning level with + and - buttons. Press the defrost button. A symbol will appear on the screen.

■ Press down the lever to start toasting.
The defrost function will take longer to toast than settings 1-9 as the toaster will automatically defrost the bread before toasting.
Once the toasting cycle is engaged the remaining toasting time appears on the screen.

■ The toasting chamber automatically lifts the toast and lever once the toasting cycle is complete.
BAGEL

To toast the bagel on the inside and warm it on the outside, use the Bagel button.
Insert the bagel as shown, with the cut sides facing in. Adjust the browning level with the + and - buttons.

Press the BAGEL button. The symbol will appear on the screen.
Press the lever down to start toasting. Once the toasting cycle is engaged, the remaining toasting time appears on the screen.

The heating elements will turn on. Your bagel will toast on the cut sides and will be warm on the outside.

The toasting chamber automatically lifts once the toasting cycle is complete.
CLEANING

Unplug the toaster from the wall outlet and allow the toaster to cool completely, approximately 10 minutes.

Clean the toaster with a damp cloth.

A removable crumb tray is provided for easy cleaning. Pull out the tray completely and discard the crumbs.

Replace the crumb tray after cleaning.
LIMITED WARRANTY
This Krups product is warranted for 1 year from the date of purchase against defects in material and workmanship. During this period, the Krups product that, upon inspection by Krups, is proved defective, will be repaired or replaced, at Krups' option, without charge to the customer. If a replacement product is sent, it will carry the remaining warranty of the original product. This warranty does not apply to any defect arising from a buyer's or user's misuse of the product, negligence, failure to follow Krups' instructions, use on current or voltage other than that stamped on the product, wear and tear, alteration or repair not authorized by Krups, or use for commercial purposes.
THE WARRANTIES SET FORTH HEREIN ARE EXCLUSIVE AND NO OTHER WARRANTIES, EXPRESS OR IMPLIED, INCLUDING BUT NOT LIMITED TO ANY WARRANTY OF MERCHANTABILITY OR FITNESS FOR A PARTICULAR PURPOSE OR USE, ARE MADE BY KRUPS OR ARE AUTHORIZED TO BE MADE WITH RESPECT TO THE PRODUCT.
Some states do not allow limitation on how long an implied warranty lasts or do not allow the exclusion of incidental or consequential damages, so the above limitations may not apply to you. This warranty gives you specific legal rights, and you may also have other rights, which vary from state to state. If you believe your product is defective, take the product (or send it postage prepaid) along with proof of purchase to the nearest authorized Krups Service Center. (To find the nearest authorized Krups Service Center visit the Krups website or contact the Krups Consumer Service in your country indicated below). If you send the product, please include a letter explaining the nature of the claimed defect.
Krups Service Centre locations can be found by visiting the website
www.krupsUSA.com in the USA or www.krups.ca in Canada.
When shipping the product to the service center please include a note explaining the issue, a copy of the sales receipt and provide a valid return address on the outside of the shipping box (no PO Boxes). If the product is out of warranty or warranty can't be validated, the service center will send an estimate of repair for your approval.
CONSUMER SERVICE
If you have additional questions, please call our Consumer Service Department. It is helpful to have the product available at the time of your call and to know the reference number that can generally be found on the base of the product.
USA CANADA
Phone 1-800-526-5377 Phone 1-800-418-3325
Hours* Monday – Thursday Hours* Monday – Friday
from 8:00 a.m. - 6:30 p.m. (EST) 8:30 a.m. - 4:30 p.m. (EST)
Friday from 8:00 a.m. - 6:30 p.m. (EST)
Letters should be addressed to: Letters should be addressed to:
196 Boston Avenue 455 Finchdene Square
Medford, MA 02155 USA Scarborough, Ontario M1X 1B7
Only letters can be accepted at this address. Packages without a return authorization number will be refused.
*Please note hours are subject to change.
ENVIRONMENTAL PROTECTION
■ The packaging of your product is made of recyclable materials. Do not throw it out with your usual garbage; take advantage of your local recycling program.

- KRUPS
- PARTS AND FEATURES
- IMPORTANT SAFEGUARDS
- WHEN USING ELECTRICAL APPLIANCES, BASIC SAFETY PRECAUTIONS SHOULD ALWAYS BE FOLLOWED INCLUDING THE FOLLOWING
- SAVE THESE INSTRUCTIONS
- DO
- DO NOT
- SAFETY INSTRUCTIONS
- POLARIZATION INSTRUCTIONS
- SHORT CORD
- TOASTING BREAD
- HELPFUL HINTS
- HI-LIFT
- STOP/EJECT
- DEFROST
- BAGEL
- CLEANING
- LIMITED WARRANTY
- CONSUMER SERVICE
- USA CANADA
- ENVIRONMENTAL PROTECTION
Brand : KRUPS
Model : Prelude TT6190
Category : Toaster