
Perfection V700 - Scanner EPSON - Free user manual and instructions
Find the device manual for free Perfection V700 EPSON in PDF.


| Product Type | Flatbed Scanner |
| Model | Perfection V700 |
| Brand | Epson |
| Scan Type | Flatbed with transparency unit |
| Optical Resolution | 6400 x 9600 dpi |
| Scan Modes | Film, Photo, Document |
| Max Document Size | 8.5 x 11.7 inches (A4) |
| Film Scanning | 35mm, 120/220, slides, medium format |
| Connectivity | USB 2.0 |
| Dimensions (W x D x H) | 12.4 x 19.6 x 5.6 inches |
| Weight | 13.2 lbs (6.0 kg) |
| Power Supply | AC adapter, 100-240V, 50/60Hz |
| Power Consumption | 16W (operating), 3.5W (standby) |
| Operating Systems | Windows, macOS |
| Maintenance | Clean glass panel with soft, lint-free cloth; avoid liquids |
| Safety | Do not disassemble; keep away from moisture |
| Spare Parts | Power adapter, USB cable, film holders |
| Repairability | Serviceable by authorized technicians |
Frequently Asked Questions - Perfection V700 EPSON
User questions about Perfection V700 EPSON
0 question about this device. Answer the ones you know or ask your own.
Ask a new question about this device
Download the instructions for your Scanner in PDF format for free! Find your manual Perfection V700 - EPSON and take your electronic device back in hand. On this page are published all the documents necessary for the use of your device. Perfection V700 by EPSON.
USER MANUAL Perfection V700 EPSON
Overview of Your Scanner Features
These features help you create the best possible scans, no matter what shape your original is in.

Placing Originals on the Scanner
Follow the steps here to place your original documents or photos on the scanner.
Scanning Special Projects
Follow the instructions here for specific scanning projects you may need to create.

Solving Problems
If you have a problem using your scanner or its software, check here for solutions.
Guide to the Scanner Parts
Check this section to identify the parts of your scanner.

Scanning Your Originals
Follow the step-by-step instructions here to scan your original documents or photos using any of the available scanning methods.

Maintenance
Follow the guidelines here to maintain and transport your scanner.

Technical Specifications
Check here for technical details about your scanner and its accessories.
× Safety Copyright and Trademarks Operating System Versions
Home > Overview of Your Scanner Features
Overview of Your Scanner Features
These features help you create the best possible scans, no matter what shape your original is in.

Color Restoration

Dust Removal

DIGITAL ICE Technology and DIGITAL ICE Lite Technology

Backlight Correction

Text Enhancement
Home > Guide to the Scanner Parts
Guide to the Scanner Parts
Check these sections to identify the parts of your scanner.

Scanner Parts

Lights and Start Button
Home > Placing Originals on the Scanner
Placing Originals on the Scanner
Follow the steps in the sections here to place your original documents, photos, film, or slides on the scanner.

Placing Documents or Photos

Placing Film or Slides
Home > Scanning Your Originals
Scanning Your Originals
Follow the step-by-step instructions in the sections here to scan your original documents, photos, film, or slides using any of the available scanning methods.

Starting Epson Scan

Selecting an Epson Scan Mode

Changing the Scan Mode

Scanning in Full Auto Mode

Scanning in Office Mode

Scanning in Home Mode

Scanning in Professional Mode

Selecting File Save Settings

Detailed Setting Instructions

Finishing the Scan
Home > Scanning Special Projects
Scanning Special Projects
Follow these instructions for specific scanning projects you may need to create.

Restoring Color

Removing Dust Marks with the Dust Removal Feature

Removing Dust and Scratch Marks from Originals Using DIGITAL ICE Technology

Fixing Backlit Photos

Text Enhancement

Using the Scanner as a Copier

Scanning to a PDF File

Converting Scanned Documents Into Editable Text

Scanning Color Accurate Images

Assigning a Program to the Start Button
Home > Maintenance
Maintenance
Follow the guidelines here to maintain and transport your scanner.

Cleaning the Scanner

Replacing the Scanner Light Source

Power Off Timer Setting

Transporting the Scanner
Home > Solving Problems
Solving Problems
Troubleshooting
If you have a problem using your scanner or its software, check here for solutions.

Scanner Problems

Scanning Problems

Scan Quality Problems

Uninstalling Your Scanning Software
Where To Get Help

Epson Technical Support

Other Software Technical Support
Home > Technical Specifications
Technical Specifications
Check here for technical details about your scanner and its accessories.

System Requirements

Scanner Specifications

Note:
Epson offers a recycling program for end of life products. Please go to www.epson.com/recycle for information on how to return your products for proper disposal.
Home > Safety
Important Safety Instructions
Restrictions on Copying
Read all these instructions, and follow all warnings and instructions marked on the scanner.
• In this document, warnings, cautions, and notes indicate the following:

Warnings
must be followed carefully to avoid bodily injury.

Cautions
must be observed to avoid damage to your equipment.

Notes
contain important information and useful tips on the operation of this product.
- Place the scanner close enough to the computer for the USB cable to reach it easily. Do not place or store the scanner or the AC adapter outdoors, near excessive dirt or dust, water, heat sources, or in locations subject to shocks, vibrations, high temperature or humidity, direct sunlight, strong light sources, or rapid changes in temperature or humidity. Do not use with wet hands.
- Place the scanner and the AC adapter near an electrical outlet where the adapter can be easily unplugged.

Caution:
Be sure the AC power cord meets the relevant local safety standards.
- The AC power cord should be placed to avoid abrasions, cuts, fraying, crimping, and kinking. Do not place objects on top of the AC power cord and do not allow the AC adapter or the power cord to be stepped on or run over. Be particularly careful to keep the AC power cords straight at the end and the point where it enters the AC adapter.
- Use only the AC adapter that comes with your scanner. Using any other adapter could cause fire, electrical shock, or injury.
- The AC adapter is designed for use with the scanner with which it was included. Do not attempt to use it with other electronic devices unless specified.
- Use only the type of power source indicated on the AC adapter's label, and always supply power directly from a standard domestic electrical outlet with the AC adapter that meets the relevant local safety standards.
- When connecting this product to a computer or other device with a cable, ensure the correct orientation of the connectors. Each connector has only one correct orientation. Inserting a connector in the wrong orientation may damage both devices connected by the cable.
- Avoid using outlets on the same circuit as photocopiers or air control systems that regularly switch
on and off.
- If you use an extension cord with the scanner, make sure the total ampere rating of the devices plugged into the extension cord does not exceed the cord's ampere rating. Also, make sure the total ampere rating of all devices plugged into the wall outlet does not exceed the wall outlet's ampere rating.
- Never disassemble, modify, or attempt to repair the AC adapter, scanner, or scanner option by yourself except as specifically explained in the scanner's guides.
- Do not insert objects into any opening as they may touch dangerous voltage points or short out parts. Beware of electrical shock hazards.
If damage occurs to the plug, replace the cord set or consult a qualified electrician. If there are fuses in the plug, make sure you replace them with fuses of the correct size and rating.
- Unplug the scanner and the AC adapter, and refer servicing to qualified service personnel under the following conditions: The AC adapter or plug is damaged; liquid has entered the scanner or the AC adapter; the scanner or the AC adapter has been dropped or the case has been damaged; the scanner or the AC adapter does not operate normally or exhibits a distinct change in performance. (Do not adjust controls that are not covered by the operating instructions.)
- Unplug the scanner and the AC adapter before cleaning. Clean with a damp cloth only. Do not use liquid or aerosol cleaners.
- If you are not going to use the scanner for a long period, be sure to unplug the AC adapter from the electrical outlet.

Warning
The film holders included with this scanner contain small parts. Keep out of the reach of children.
Restrictions on Copying
Observe the following restrictions to ensure responsible and legal use of your scanner.
Copying of the following items is prohibited by law:
- Bank bills, coins, government-issued marketable securities, government bond securities, and municipal securities
- Unused postage stamps, pre-stamped postcards, and other official postal items bearing valid postage • Government-issued revenue stamps, and securities issued according to legal procedure
Exercise caution when copying the following items:
- Private marketable securities (stock certificates, negotiable notes, checks, etc.), monthly passes, concession tickets, etc. Passports, driver's licenses, warrants of fitness, road passes, food stamps, tickets, etc.

Note:
Copying these items may also be prohibited by law.
A note concerning responsible use of copyrighted materials
Epson encourages each user to be responsible and respectful of the copyright laws when using any Epson product. While some countries' laws permit limited copying or reuse of copyrighted material in certain circumstances, those circumstances may not be as broad as some people assume. Contact your legal advisor for any questions regarding copyright law.
Home > Copyright and Trademarks
Copyright and Trademarks
No part of this publication may be reproduced, stored in a retrieval system, or transmitted in any form or by any means, electronic, mechanical, photocopying, recording, or otherwise, without the prior written permission of Seiko Epson Corporation. No patent liability is assumed with respect to the use of the information contained herein. Neither is any liability assumed for damages resulting from the use of the information contained herein.
Neither Seiko Epson Corporation nor its affiliates shall be liable to the purchaser of this product or third parties for damages, losses, costs, or expenses incurred by the purchaser or third parties as a result of: accident, misuse, or abuse of this product or unauthorized modifications, repairs, or alterations to this product.
Seiko Epson Corporation and its affiliates shall not be liable against any damages or problems arising from the use of any options or any consumable products other than those designated as Original Epson Products or Epson Approved Products by Seiko Epson Corporation.
EPSON® and Perfection® are registered trademarks and EPSON Exceed Your Vision is a registered logomark of Seiko Epson Corporation.
Microsoft®, Windows®, and Windows Vista® are registered trademarks of Microsoft Corporation.
Adobe®, Adobe Reader®, Acrobat®, Photoshop®, and Photoshop Elements are either registered trademarks or trademarks of Adobe Systems Incorporated in the United States and/or other countries.
Apple®, ColorSync®, Mac®, and Mac OS® are registered trademarks of Apple Inc.
ABBYY® and ABBYY FineReader® names and logos are registered trademarks of ABBYY Software House.
PRINT Image Matching™ and the PRINT Image Matching logo are trademarks of Seiko Epson Corporation.
SilverFast® and LaserSoft Imaging® are either registered trademarks or trademarks of LaserSoft Imaging AG in the U.S. and other countries.
X-Rite® is a registered trademark of X-Rite, Incorporated.
Epson Scan Software is based in part on the work of the Independent JPEG Group.
libtiff
Copyright © 1988-1997 Sam Leffler
Copyright © 1991-1997 Silicon Graphics, Inc.
Permission to use, copy, modify, distribute, and sell this software and its documentation for any purpose is hereby granted without fee, provided that (i) the above copyright notices and this permission notice appear in all copies of the software and related documentation, and (ii) the names of Sam Leffler and Silicon Graphics may not be used in any advertising or publicity relating to the software without the specific, prior written permission of Sam Leffler and Silicon Graphics.
THE SOFTWARE IS PROVIDED "AS-IS" AND WITHOUT WARRANTY OF ANY KIND, EXPRESS, IMPLIED OR OTHERWISE, INCLUDING WITHOUT LIMITATION, ANY WARRANTY OF MERCHANTABILITY OR FITNESS FOR A PARTICULAR PURPOSE.
IN NO EVENT SHALL SAM LEFFLER OR SILICON GRAPHICS BE LIABLE FOR ANY SPECIAL, INCIDENTAL, INDIRECT OR CONSEQUENTIAL DAMAGES OF ANY KIND, OR ANY DAMAGES WHATSOEVER RESULTING FROM LOSS OF USE, DATA OR PROFITS, WHETHER OR NOT ADVISED OF THE POSSIBILITY OF DAMAGE, AND ON ANY THEORY OF LIABILITY, ARISING OUT OF OR IN CONNECTION WITH THE USE OR PERFORMANCE OF THIS SOFTWARE.

Digital ICE is a trademark of Kodak.
General Notice: Other product names used herein are for identification purposes only and may be trademarks of their respective owners. Epson disclaims any and all rights in those marks.
This information is subject to change without notice.
5/13
© 2013 Epson America, Inc.
CPD-38474
Home > Operating System Versions
Operating System Versions
In this manual, the following abbreviations are used.
Windows refers to Windows 8, Windows 7, Windows Vista, Windows XP, and Windows XP x64.
- Windows 8 refers to Windows 8 and Windows 8 Pro.
- Windows 7 refers to Windows 7 Home Basic, Windows 7 Home Premium, Windows 7 Professional, and Windows 7 Ultimate.
- Windows Vista refers to Windows Vista Home Basic Edition, Windows Vista Home Premium Edition, Windows Vista Business Edition, Windows Vista Enterprise Edition, and Windows Vista Ultimate Edition.
- Windows XP refers to Windows XP Home Edition, Windows XP Professional x64 Edition, and Windows XP Professional.
Mac refers to Mac OS X.
• Mac OS X refers to Mac OS X 10.5.8, 10.6.x, 10.7.x, and 10.8.x.
Home > Overview of Your Scanner Features
Color Restoration
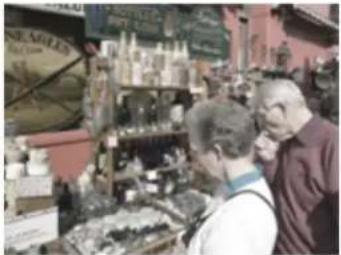
Using the Color Restoration feature in Epson Scan, you can transform an old, faded, or badly exposed photo into one with true-to-life color and sharpness.
| Original image Color Restoration applied | |||
 |  |
For instructions on using this feature, see Restoring Color.
Home > Overview of Your Scanner Features
Dust Removal
Using the Dust Removal feature in Epson Scan, you can virtually "clean" the dust marks from your originals as you scan them.
Original image Dust Removal applied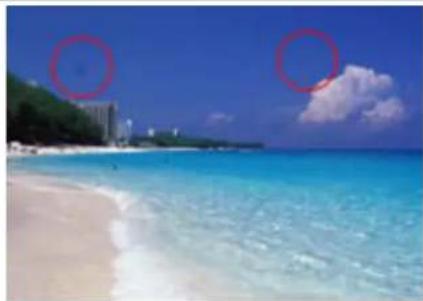

For instructions on using this feature, see Removing Dust Marks with the Dust Removal Feature.
Home > Overview of Your Scanner Features
DIGITAL ICE Technology and DIGITAL ICE Lite Technology
Your scanner and its Epson Scan software are equipped with the DIGITAL ICE Technology and DIGITAL ICE Lite Technology features that remove stubborn dust or scratch marks from color photos, film, or slides.
Original image DIGITAL ICE Technology applied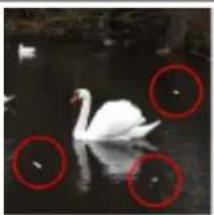
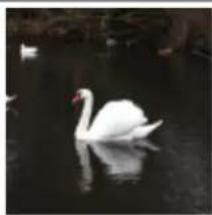
DIGITAL ICE Technology can remove dust marks that the Dust Removal feature cannot. However, it takes longer to scan using DIGITAL ICE Technology and also uses more of your system resources. It is best to try removing dust marks using Dust Removal before using DIGITAL ICE Technology.
For instructions on using this feature, see Removing Dust and Scratch Marks from Originals Using DIGITAL ICE Technology for instructions.
Home > Overview of Your Scanner Features

Backlight Correction
Using the Backlight Correction feature in your scanning software, you can remove shadows from photos that have too much background light.
| Original image Backlight Correction applied | |
 |  |
For instructions on using this feature, see Fixing Backlit Photos.
Home > Overview of Your Scanner Features
Text Enhancement
When you scan documents, you can sharpen the text and increase accuracy by using the Text Enhancement feature in Epson Scan.
| Original Text Enhancement: Off Text Enhancement: On | |||||
| A B | A B | ||||
For instructions on using this feature, see Text Enhancement.
Home > Guide to the Scanner Parts
Scanner Parts

Note:
Your product may look different from the illustrations in this guide, but the instructions are the same.
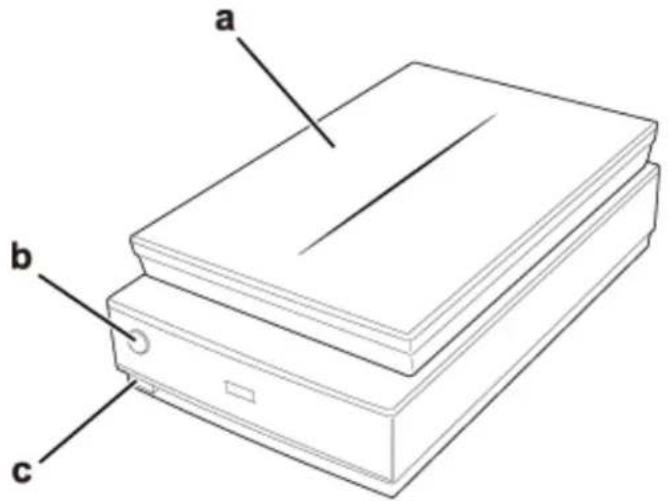
a. scanner cover b. Start button c. ⏻ power button

a. document mat b. transparency unit transportation lock c. document table d. carriage
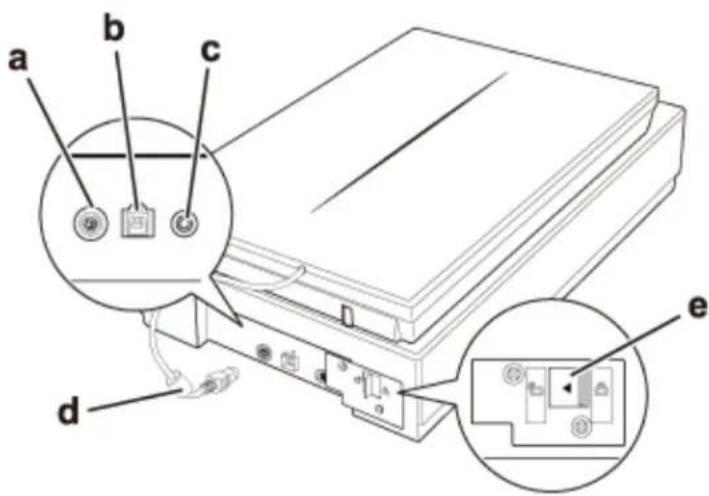
a. option interface connector b. USB interface connector c. DC inlet d. cover cable e. scanner transportation lock
Home > Guide to the Scanner Parts

Lights and Start Button

Lights

Button
The scanner has one button for scanning operations. The scanner light indicates the scanner's status.
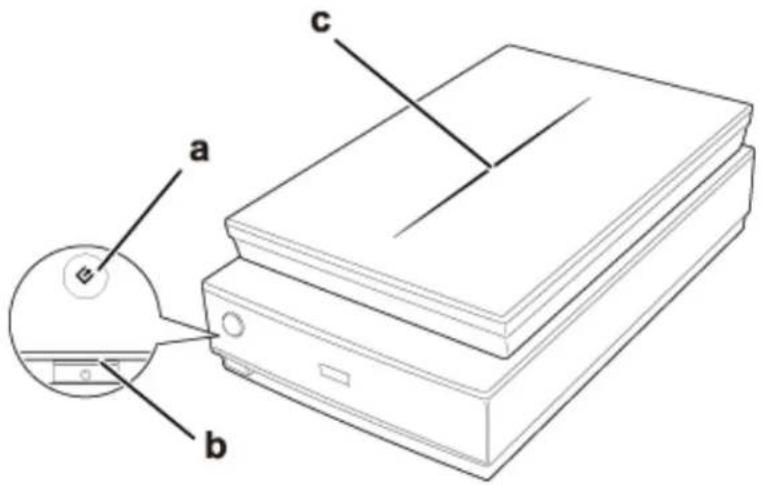
a. Start button b. scanner light c. scanner cover light
Lights
The scanner light is located above the power button, and the scanner cover light is on the top of the scanner cover.
| Light Color Indicator | Status | Meaning | |
| Scanner light | Green | [5242] | Ready to scan images. |
| [WBAB] | Initializing or scanning. | ||
| Red |  | An error has occurred. See The Status Light Is Flashing for more information. | |
| — | [026K] | The scanner is off. | |
| Scanner cover light | Blue |  | Scanning transparencies (such as film or slides). |
| — |  | Scanning reflective documents (such as documents and photographs). | |
Button
Before using the Start button, make sure you have installed Epson Scan.
| Button Function | |
| Start | Epson Scan starts. |
See Using the Scanner Button.

Note for Mac OS X 10.5.8 users:
The Start button is not supported. To start Epson Scan, see Using the Epson Scan Icon for instructions.
Top
Home > Placing Originals on the Scanner

Placing Documents or Photos

Placing Documents or Photos on the Document Table

Placing Large or Thick Documents

Caution:
Do not place heavy objects on the document table glass and do not press the glass with too much force.
Placing Documents or Photos on the Document Table

Open the scanner cover.
Make sure the document mat is installed inside the cover. If it is not installed, see Replacing the Document Mat for instructions.
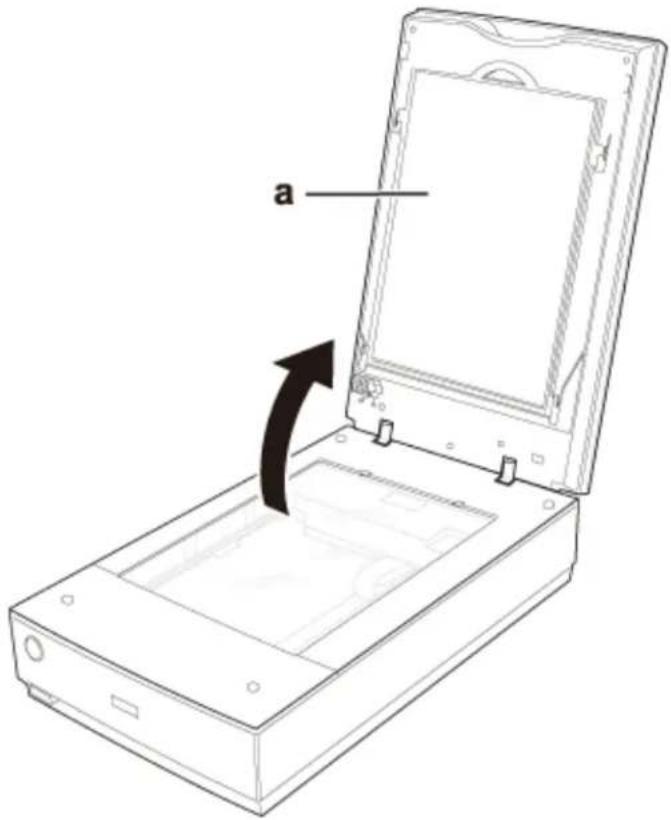
a. document mat
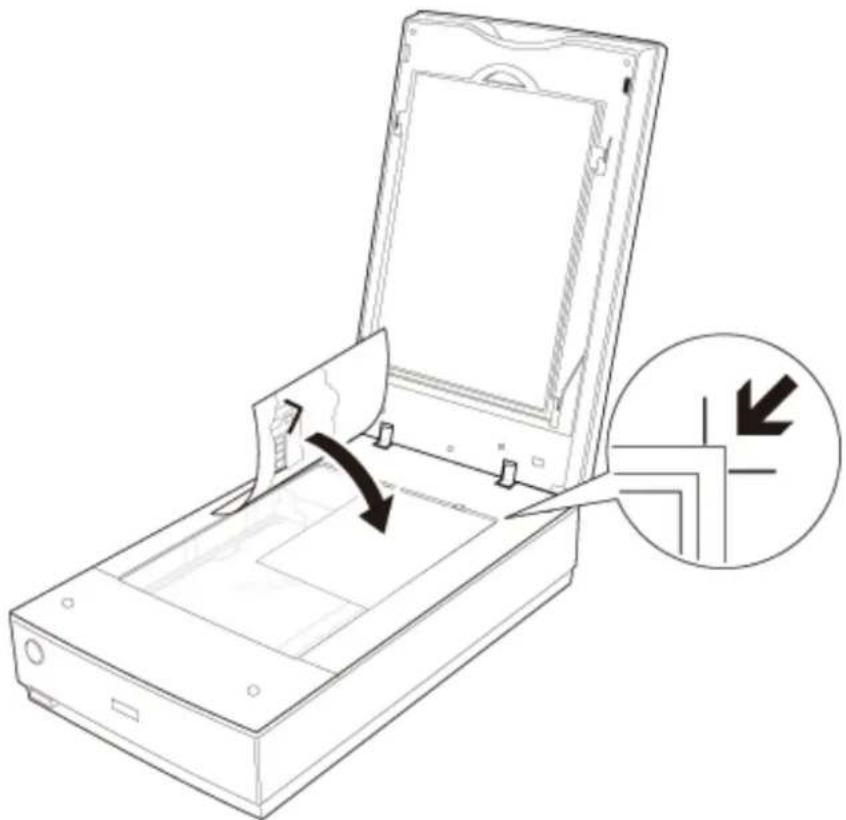
2. Place your document or photo facedown on the document table. Make sure the top of the document or photo is against the upper right corner of the document table, next to the arrow mark.

Note:
If you are scanning multiple photos at once, position each photo at least 20 mm (0.8 inch) apart from the others.
3.
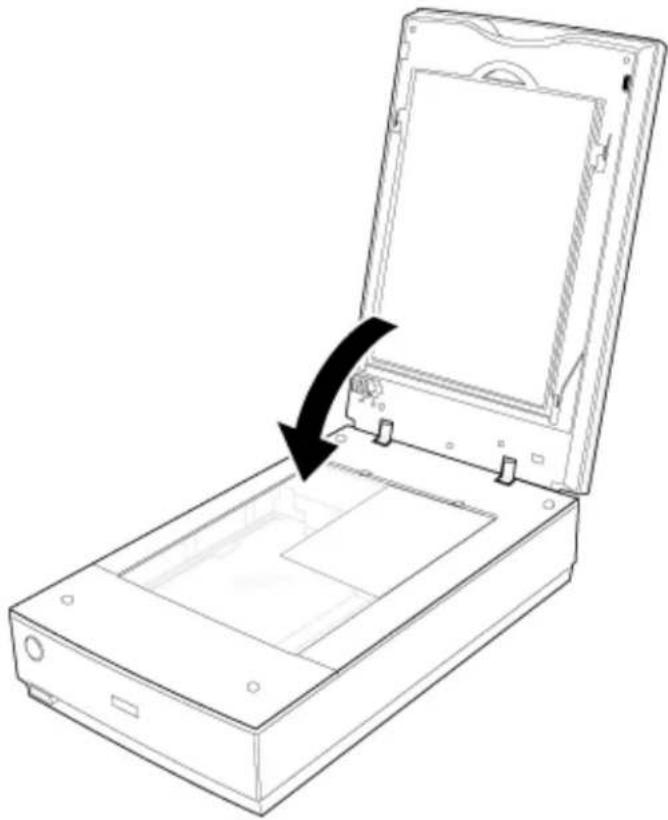
Close the scanner cover gently so that your original does not move.

Note:
• Always keep the document table clean. - Do not leave photos on the document table for an extended period of time as they may stick to the glass.
To start scanning, see Starting Epson Scan for instructions.
Placing Large or Thick Documents
When you scan a large or thick document, you can remove the scanner cover.
1 Turn off the scanner using its power button. 2 Disconnect the cover cable.
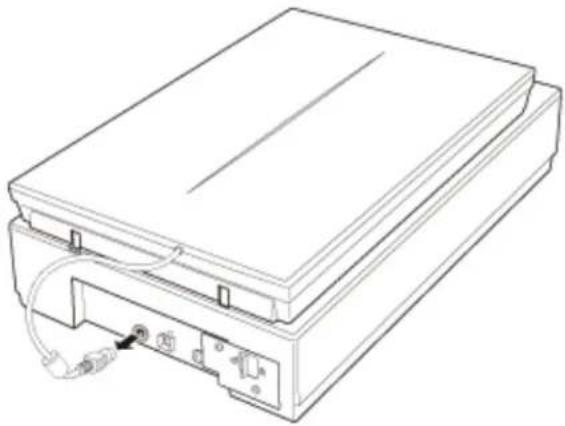
3
Open the scanner cover.
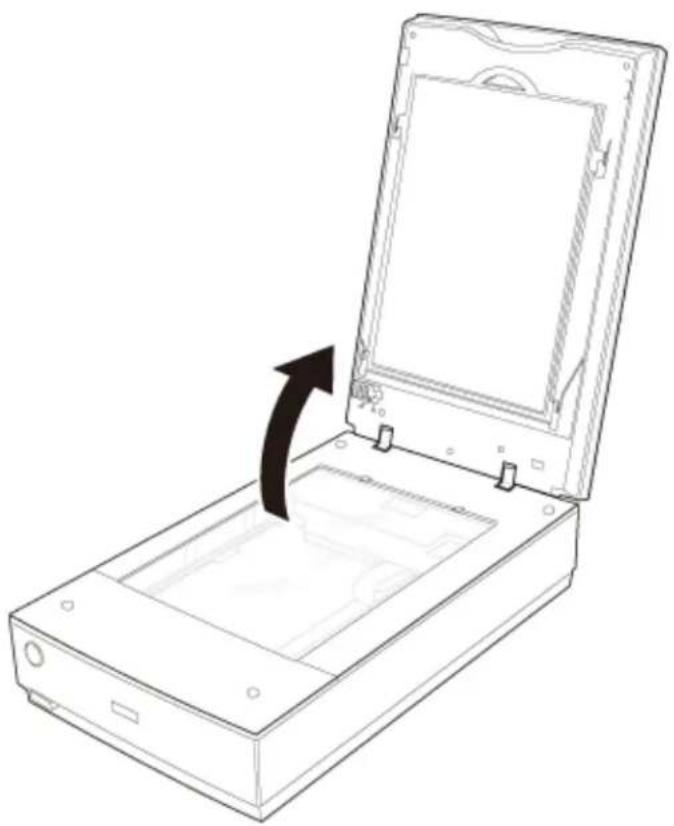
4
Pull the scanner cover straight up and off the scanner.
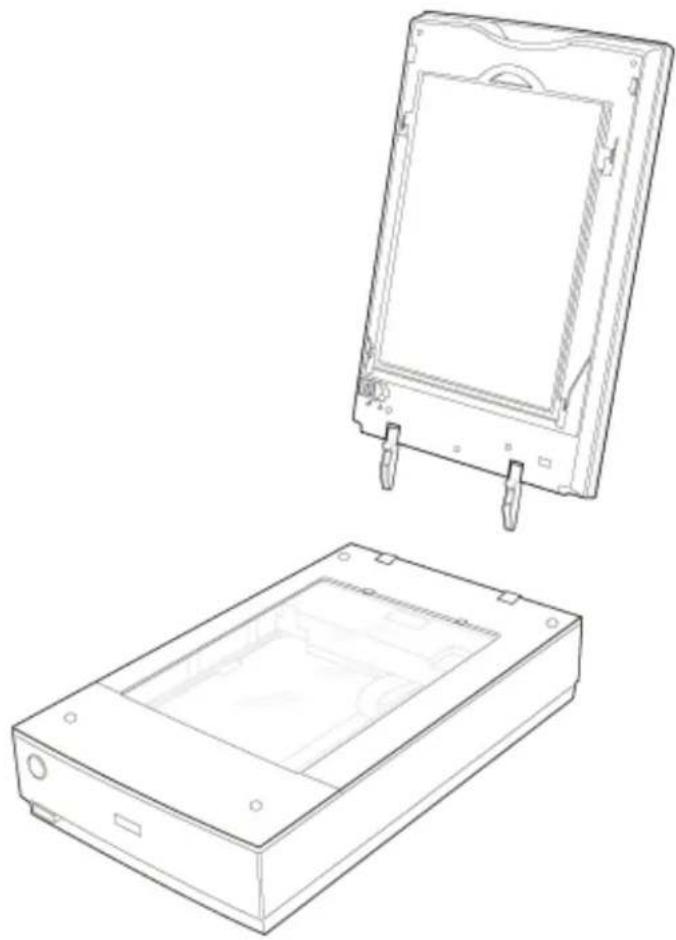
5 Turn on the scanner using its power button.

Note:
When scanning without the scanner cover, gently press down on your document to flatten it.
6 When you are finished scanning, replace the scanner cover in the reverse order that you removed it.
Home > Placing Originals on the Scanner

Placing Film or Slides
Removing the Document Mat Placing Film in the Holder Placing Slides in the Holder Placing Film in the Film Area Guide Replacing the Document Mat
Removing the Document Mat
To scan film strips or slides, you need to remove the document mat from the scanner cover. This uncovers the transparency unit so your scanner can use it to scan your film or slides.

Make sure the cover cable is connected to the scanner's OPTION port.
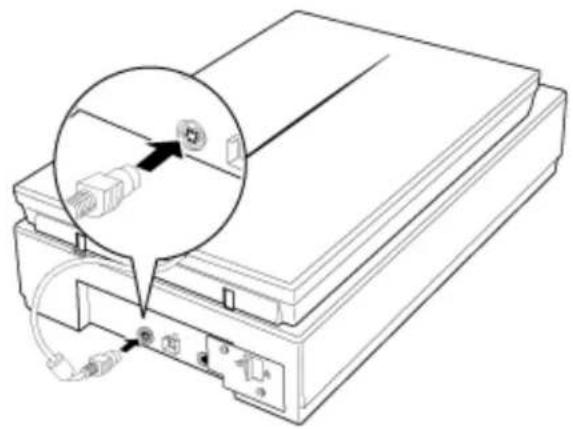

Note:
Before connecting or disconnecting the cover cable, turn off the scanner using its power button.

Open the scanner cover and gently slide up the document mat to remove it. Also make sure the transparency unit transportation lock is unlocked.
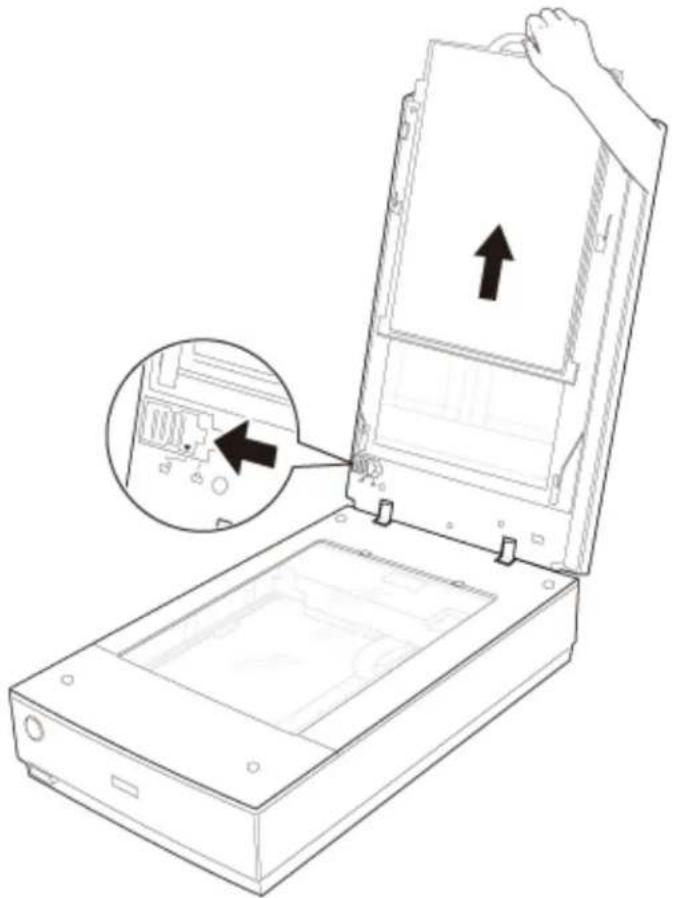
3
Use a soft cloth to wipe the transparency unit window and the document table before placing your film or slides.
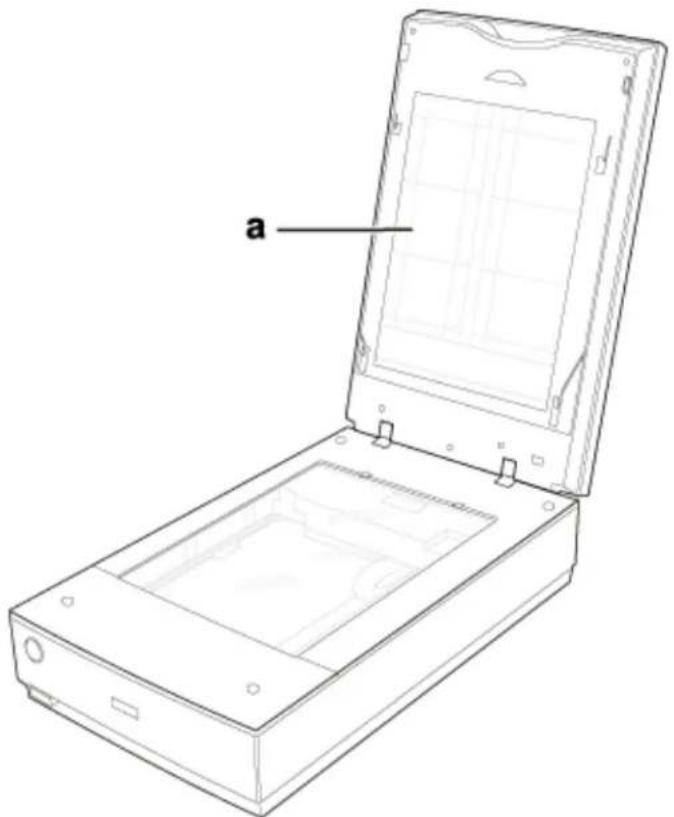
a. transparency unit window
To place film for scanning, see Placing Film in the Holder.
To place slides for scanning, see Placing Slides in the Holder.
Top

Placing Film in the Holder
Placing 35 mm Film Strips
1 Remove the film strip cover(s) on the film holder.
2 Slide up to four film strips all the way into the film holder with the shiny base side facing down. Your images and any wording on the film strips should appear backwards on the side that faces up, as shown by the illustration on the film holder.
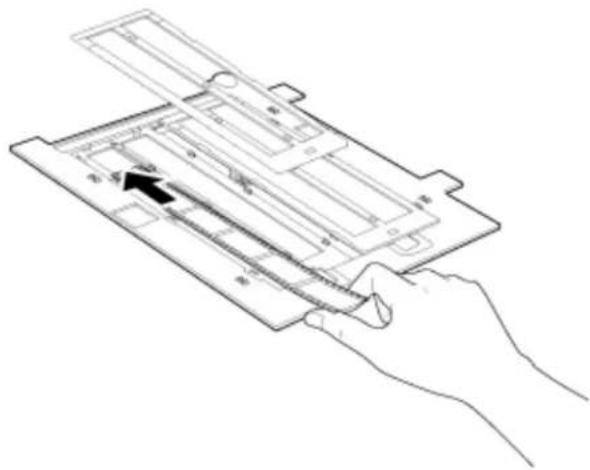

Note:
- Hold the edge of the film gently or use gloves to touch the film; otherwise you may damage the film.
- Make sure the white stickers on the back of the film holder and the areas around them are not scratched, dusty, or covered in any way. If the areas are obscured, the scanner may have trouble recognizing your film in Full Auto Mode.
- Do not cover any of the tiny holes in the film holder or the scanner may have trouble recognizing which film holder you are using.
3 Place the cover(s) over the film and press them down until they click. Then press down on all the edges of the covers to secure them.
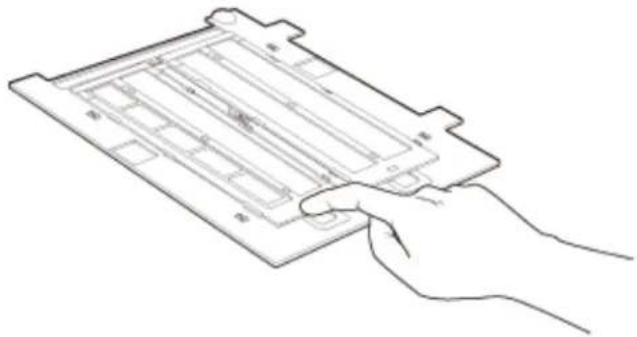
4 Place the film holder on the document table so that it is aligned with the upper right corner.
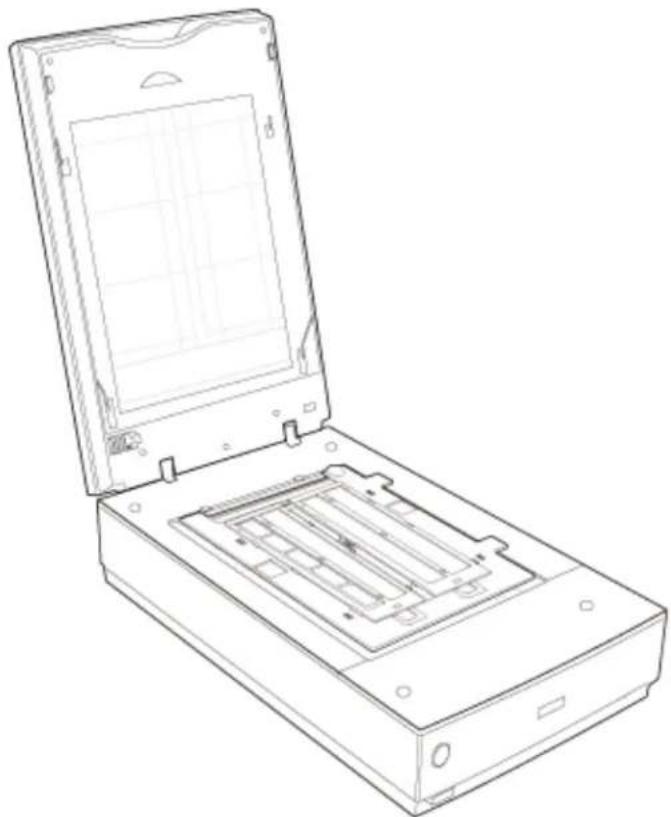
5 Make sure you removed the document mat. See Removing the Document Mat.
6 Close the scanner cover.
To scan your film, see Starting Epson Scan.
When you are finished scanning film, be sure to replace the document mat before scanning documents or photos. See Replacing the Document Mat.
Placing Medium Format Film
1 Open the cover on the medium format film holder.
2 Slide up to two medium format film images into the film holder with the shiny base side facing down. Your images and any wording on the film should appear backwards on the side that faces up, as shown by the illustration on the film holder. Make sure the entire image frame is positioned in the film holder opening.
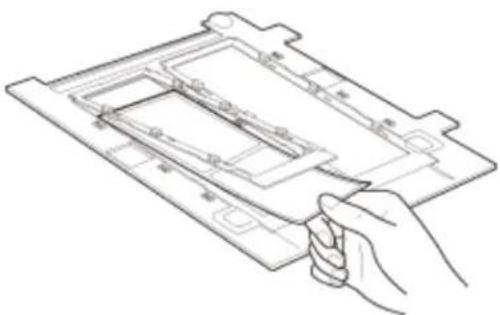

Note:
- Hold the edge of the film gently or use gloves to touch the film; otherwise you may damage the film.
- Make sure the white stickers on the back of the film holder and the areas around them are not scratched, dusty, or covered in any way. If the areas are obscured, the scanner may have trouble recognizing your film in Full Auto Mode.
- Do not cover any of the tiny holes in the film holder or the scanner may have trouble recognizing which film holder you are using.
3 Close the cover over the film and press it down until it clicks. Then press down on all the edges of the cover to secure it.
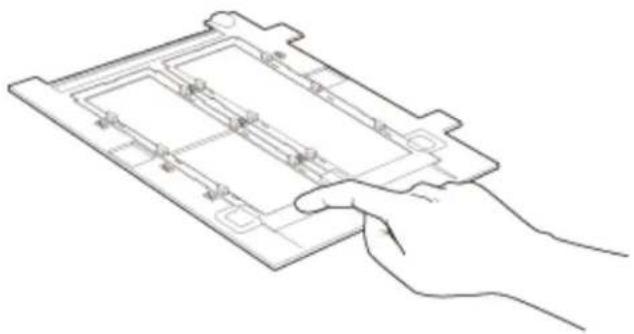
4 Place the film holder on the document table so that it is aligned with the upper right corner.
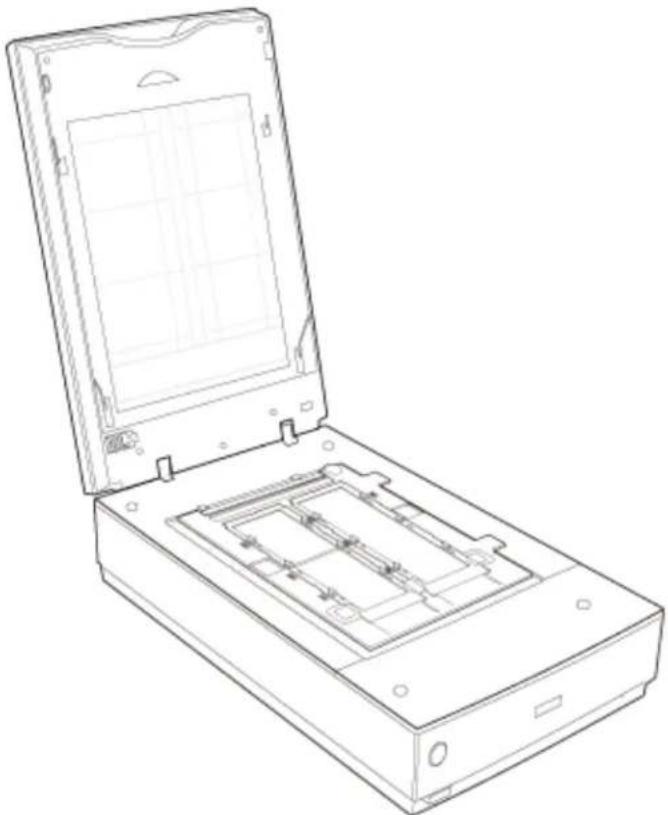
5 Make sure you removed the document mat. See Removing the Document Mat.
6 Close the scanner cover.
To scan your film, see Starting Epson Scan.

Note:
You cannot use Full Auto Mode to scan medium format film.
When you are finished scanning film, be sure to replace the document mat before scanning documents or photos. See Replacing the Document Mat.
Placing 4 × 5 inch Film
1 Open the covers on the 4 × 5 inch film holder.
2 Place the film into the film holder with the shiny base side facing down. Your images and any wording on the film should appear backwards on the side that faces up, as shown by the illustration on the film holder. Make sure the entire image frame is positioned in the film holder opening.
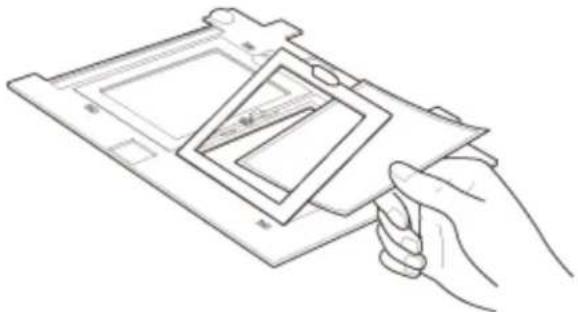

Note:
- Hold the edge of the film gently or use gloves to touch the film; otherwise you may damage the film.
- Make sure the white stickers on the back of the film holder and the areas around them are not scratched, dusty, or covered in any way. If the areas are obscured, the scanner may have trouble recognizing your film in Full Auto Mode.
- Do not cover any of the tiny holes in the film holder or the scanner may have trouble recognizing which film holder you are using.
3 Close the cover over the film and press it down until it clicks. Then press down on all the edges of the cover to secure it.
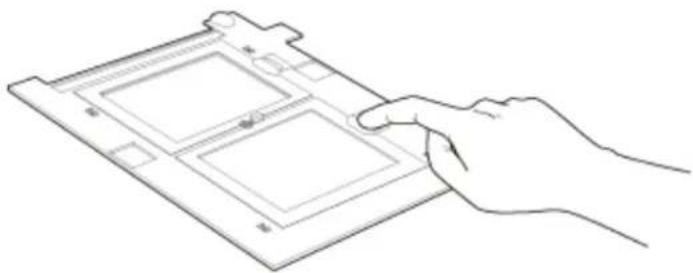
4 Place the film holder on the document table so that it is aligned with the upper right corner.
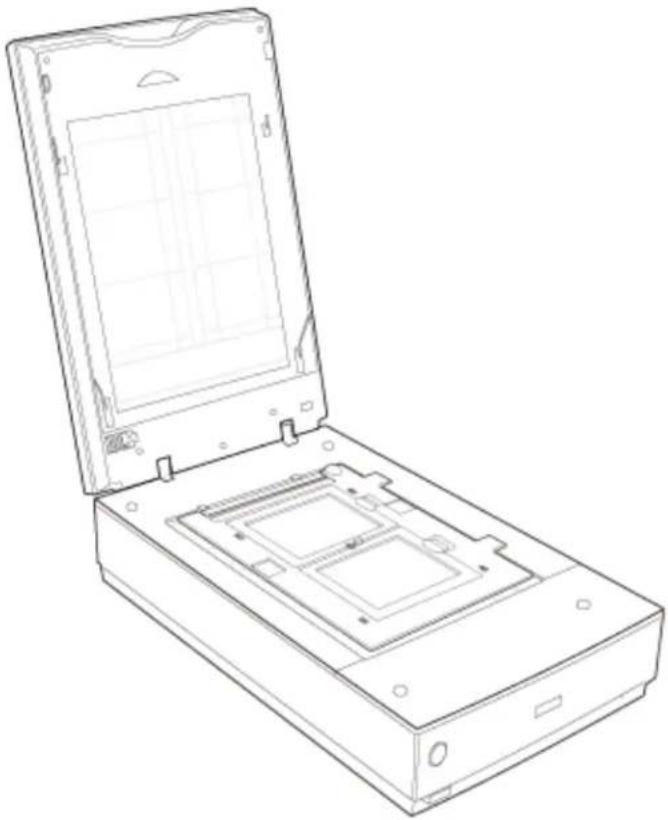
5 Make sure you removed the document mat. See Removing the Document Mat.
Close the scanner cover.
To scan your film, see Starting Epson Scan.

Note:
You cannot use Full Auto Mode to scan 4 × 5 inch film.
When you are finished scanning film, be sure to replace the document mat before scanning documents or photos. See Replacing the Document Mat.
Top
Placing Slides in the Holder
You can scan up to twelve 35 mm slides at a time using the slide holder.

Note:
• You cannot scan negative slides. - Make sure the white stickers on the back of the film holder and the areas around them are not scratched, dusty, or covered in any way. If the areas are obscured, the scanner may have trouble recognizing your slides in Full Auto Mode. - Do not cover any of the tiny holes in the film holder or the scanner may have trouble recognizing which film holder you are using.
1 Place up to twelve slides in the 35 mm slide holder with the shiny base side facing down. Your image should appear backwards on the side that faces up, as shown by the illustration on the film holder. The top of your images should face the open end of the film holder as shown below.
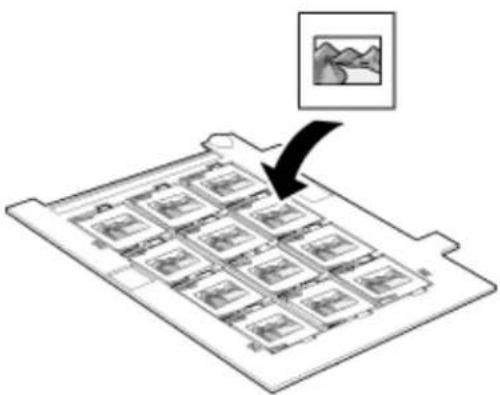
2 Place the film holder on the document table so that it is aligned with the upper right corner.
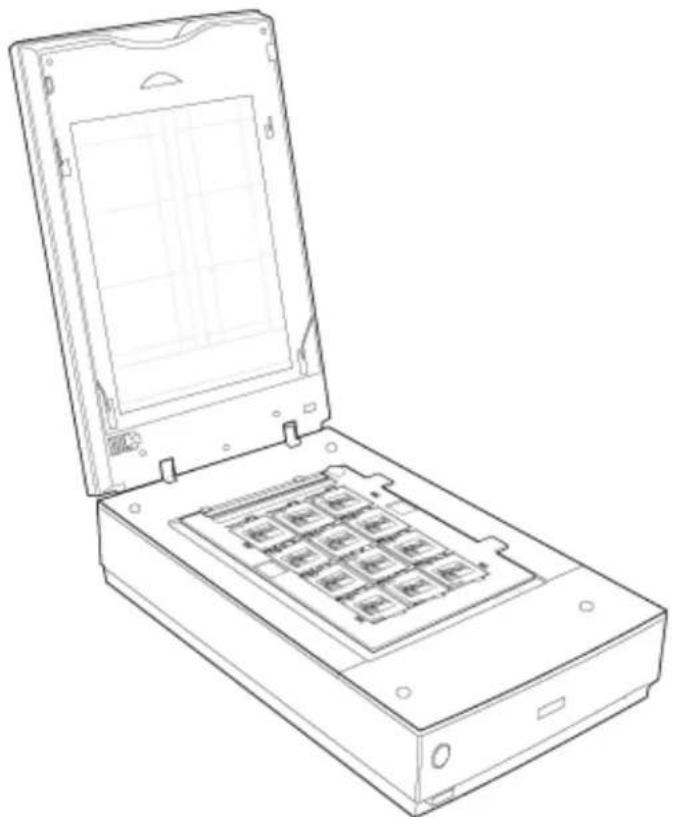
3 Make sure you removed the document mat. See Removing the Document Mat.
4 Close the scanner cover.
To scan your slides, see Starting Epson Scan.
When you are finished scanning slides, be sure to replace the document mat before scanning documents or photos. See Replacing the Document Mat.
Top
Placing Film in the Film Area Guide
You can scan film that cannot be placed in the film holders (up to 8 × 10 inch film) using the film area guide in Professional Mode. When scanning film using the film area guide, always select Film (with Film Area Guide) as the Document Type.

Note:
- You cannot use DIGITAL ICE Technology when scanning film with the film area guide.
- If you scan 8 × 10 inch film at 4800 dpi resolution and 24 bit color as the Image Type, do not save it in BMP, Tiff, or JPEG format.
- When scanning using the film area guide, striped (newton) rings may appear in your scanned images.
1 Make sure the tab on the long edge of the film area guide is on the left side.
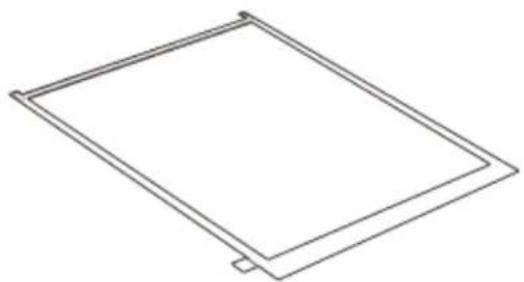
2 Fold the tab along the perforated lines as shown.
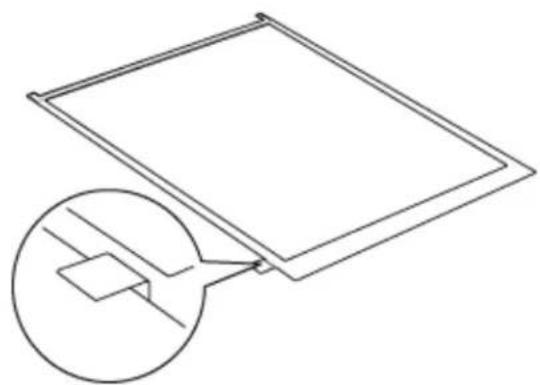
3
Place the film area guide on the document table with the tab facing the left side of the scanner.
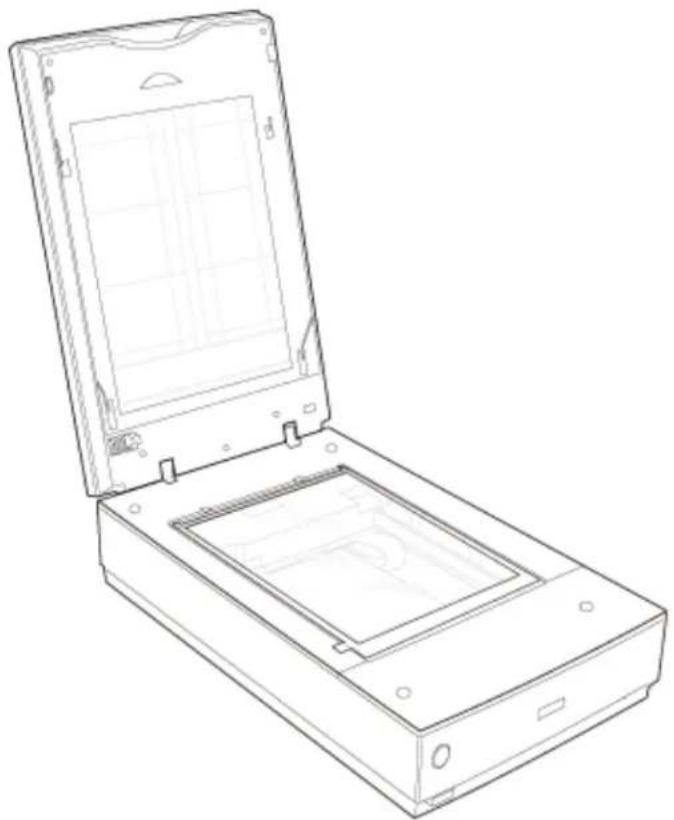
4
Place the film in the film area guide (up to 8 × 10 inch film) with the shiny base side facing down. Your images and any wording on the film should appear backwards on the side that faces up. Make sure the entire image frame is positioned in the film area guide opening.
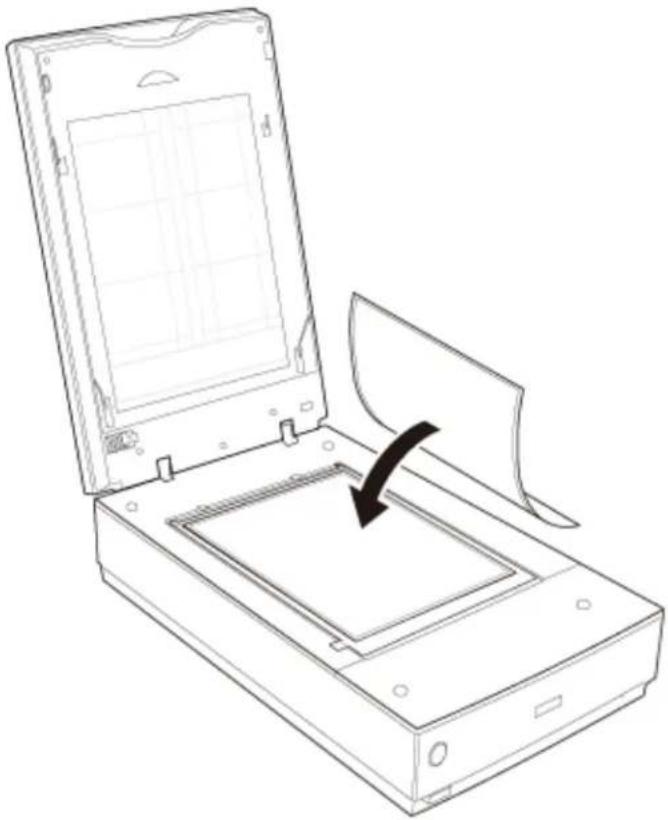

Note:
Leave the part of the film area guide circled below uncovered or colors in your scans will be affected.
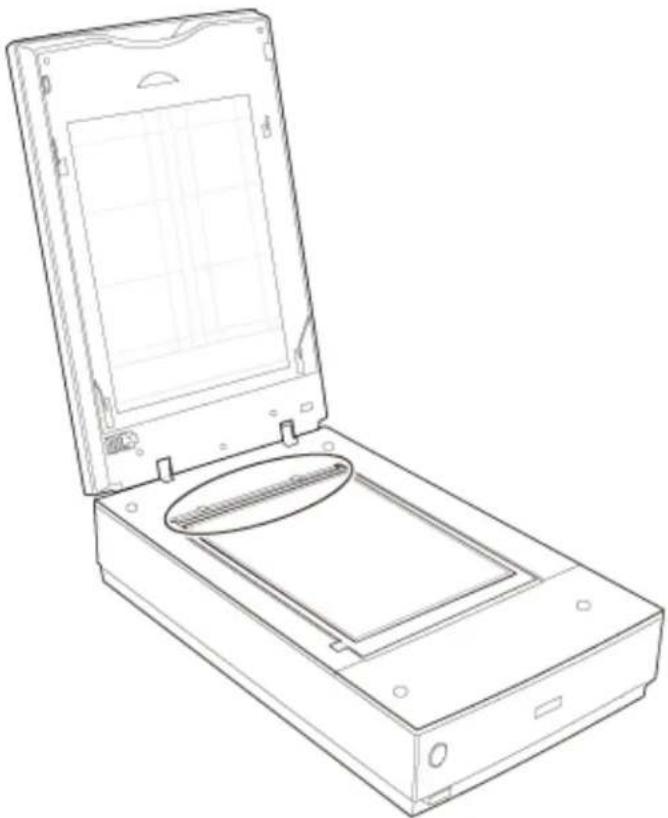
5 Make sure you removed the document mat. See Removing the Document Mat.
6 Close the scanner cover.
To scan your film, see Starting Epson Scan.

Note:
You cannot use Full Auto Mode, Office Mode, or Home Mode when scanning film with the film area guide.
When you are finished scanning film, be sure to replace the document mat before scanning documents or photos. See Replacing the Document Mat.
Top
Replacing the Document Mat
Replace the document mat by sliding it into the notches in the scanner cover. Make sure the white surface faces outwards.
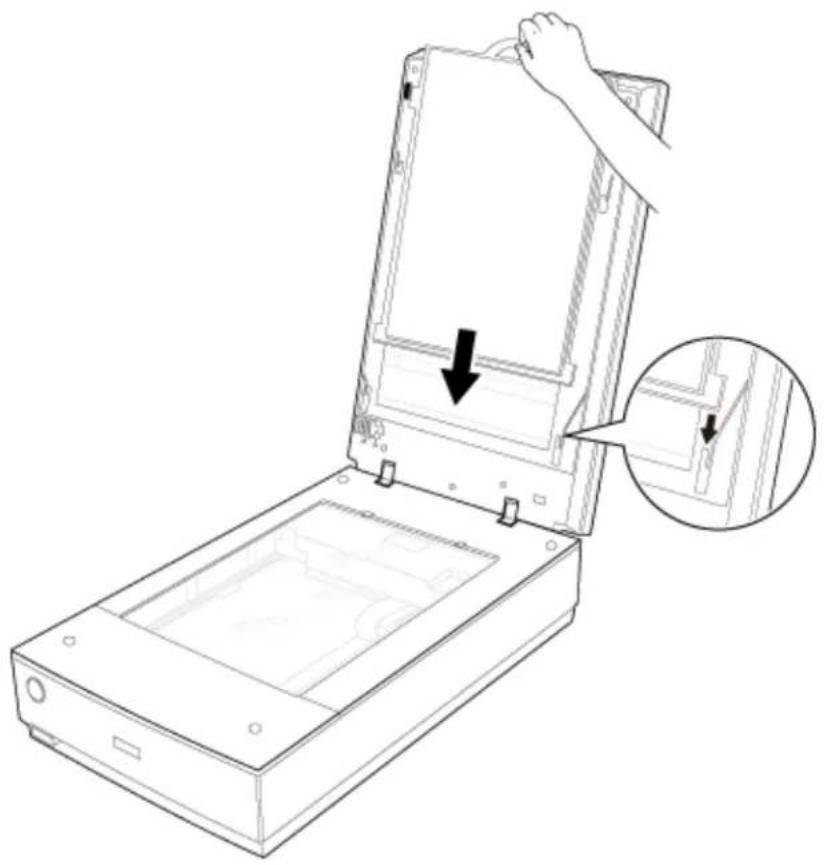
Top
Home > Scanning Your Originals

Starting Epson Scan
Using the Scanner Button Using the EPSON Scan Icon Using Another Scanning Program
Using the Scanner Button
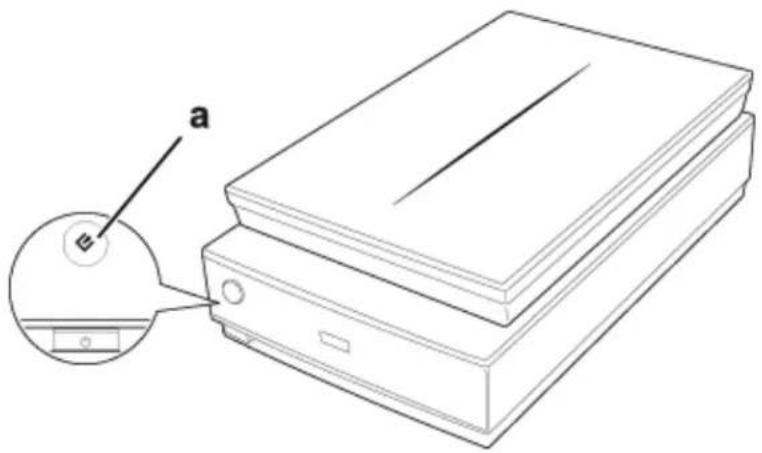
a. Start button
You can start Epson Scan just by pressing the Ⓧ Start button on the scanner. The Epson Scan window automatically opens. See Selecting an Epson Scan Mode for instructions on selecting an Epson Scan mode.

Note for Mac OS X 10.5.8 users:
The Start button is not supported. To start Epson Scan, see Using the Epson Scan Icon for instructions.
Top
Using the Epson Scan Icon
You can start Epson Scan by double-clicking the EPSON Scan icon.
Windows 8:
Double-click the EPSON Scan icon on the desktop.
Or, navigate to the Start screen and select EPSON Scan.
Windows (other versions):
Double-click the EPSON Scan icon on the desktop.

Or, select Start > All Programs or Programs > EPSON > EPSON Scan > EPSON Scan.
Mac OS X:
Select Applications > EPSON Software > EPSON Scan.
The Epson Scan window automatically opens. See Selecting an Epson Scan Mode for instructions on selecting an Epson Scan mode.
Using Another Scanning Program
You can use any TWAIN-compliant scanning program, such as Adobe Photoshop Elements, to scan with your scanner. You open the program, select Epson Scan, and scan. When you are finished scanning, the scanned image opens in your scanning program so you can modify, print, and save it.
1 Start a TWAIN-compliant scanning program. Double-click the program icon on the desktop, if it is available, or do one of the following.
Windows 8:
Navigate to the Start screen and select the program icon.
Windows (other versions):
Select or Start > Programs or All Programs > program folder > program icon.
Mac OS X:
Open the Applications folder on your hard drive, select the program folder, and double-click the program icon.
2. Select your scanner.
In some programs, you must select the scanner as the "source" first. If you see a Select Source option, select it and choose your scanner there first.

Note for Windows:
Do not select a WIA option for your scanner from the Import or Acquire list; you will not be able to use all the features of your scanner.
The Epson Scan window automatically opens. See Selecting an Epson Scan Mode for instructions on selecting an Epson Scan mode.
Home > Scanning Your Originals
Selecting an Epson Scan Mode
Epson Scan offers several scanning modes to choose from.
- Full Auto Mode lets you scan quickly and easily, without selecting any settings or previewing your image. Full Auto Mode is best when you need to scan your originals at 100% size and you do not need to preview the images before scanning. You can restore faded colors or remove dust marks in Full Auto Mode. This is the default mode in Epson Scan.
• See Changing the Scan Mode for instructions on switching to Full Auto Mode. • See Scanning in Full Auto Mode for instructions on making settings in Full Auto Mode.
- Office Mode lets you quickly select settings for scanning text documents and check their effects with a preview image.
• See Changing the Scan Mode for instructions on switching to Office Mode. • See Scanning in Office Mode for instructions on making settings in Office Mode.
- Home Mode lets you customize some scanning settings and check their effects with a preview image.
Home Mode is best when you want to preview images of your originals before scanning them. You can size the image as you scan, adjust the scan area, and adjust many image settings, including color restoration, dust removal, and backlight correction.
• See Changing the Scan Mode for instructions on switching to Home Mode. • See Scanning in Home Mode for instructions on making settings in Home Mode.
- Professional Mode gives you total control of your scanning settings and lets you check their effects with a preview image.
Professional Mode is best when you want to preview your image and make extensive, detailed corrections to it before scanning. You can sharpen, color correct, and enhance your image with a full array of tools, including color restoration, dust removal, and backlight correction.
• See Changing the Scan Mode for instructions on switching to Professional Mode. • See Scanning in Professional Mode for instructions on making settings in Professional Mode.
Home > Scanning Your Originals
Changing the Scan Mode
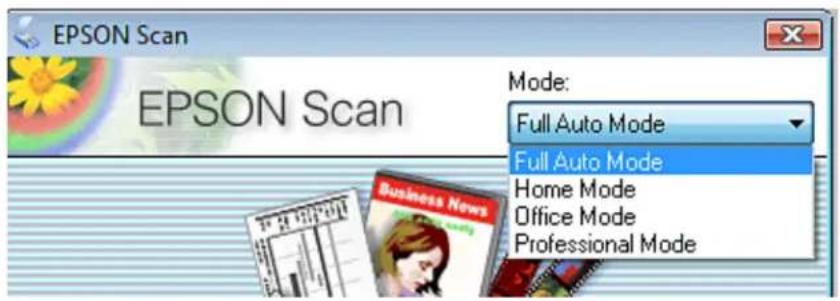
To change the scan mode, click the arrow in the Mode box in the upper right corner of the Epson Scan window. Then, select the mode you want to use from the list that appears.

Note:
The mode you select remains in effect when you start Epson Scan next time.
For instructions on scanning using these modes, see one of these sections.
Full Auto Mode: Scanning in Full Auto Mode
Office Mode: Scanning in Office Mode
Home Mode: Scanning in Home Mode
Professional Mode: Scanning in Professional Mode
Home > Scanning Your Originals
Scanning in Full Auto Mode
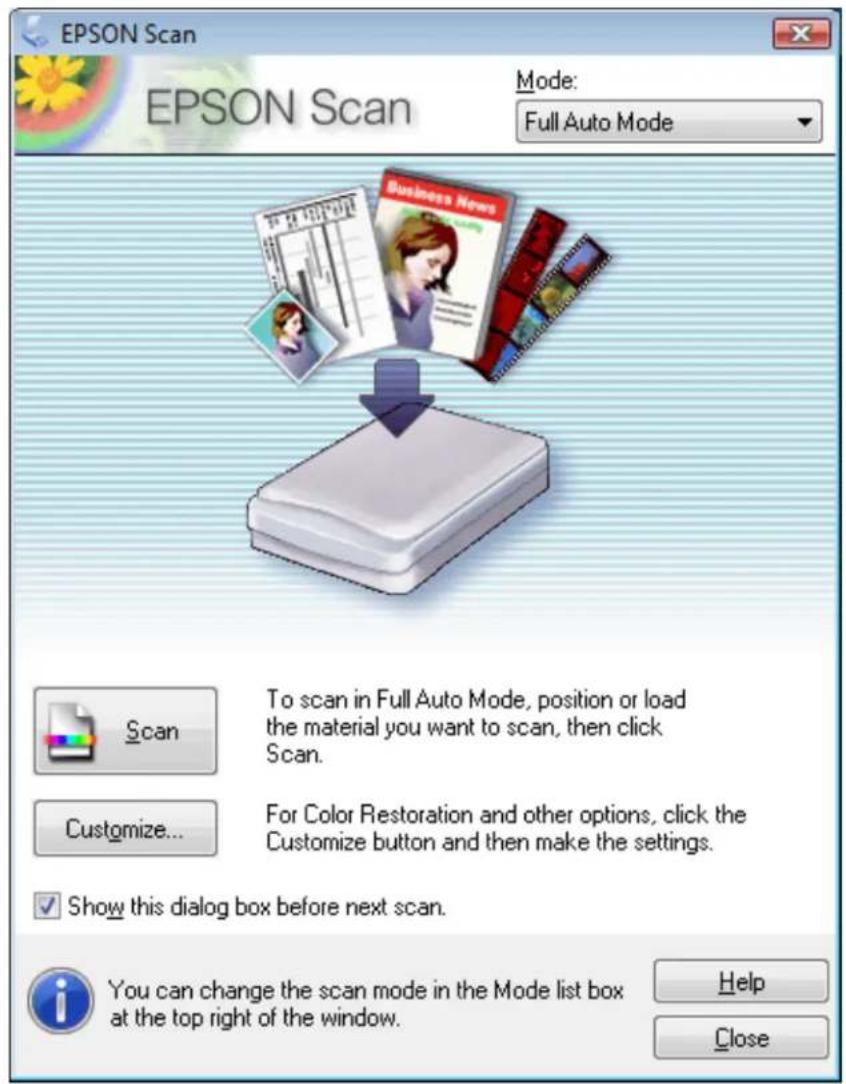
When you start Epson Scan for the first time, it runs in Full Auto Mode and displays the Epson Scan Full Auto Mode window.
Note for film or slides:
In Full Auto Mode, you can only scan 35 mm color film strips or color positive slides. To scan other types of film, use Home Mode or Professional Mode. To change the scan mode, see Changing the Scan Mode.

Note:
If the Show this dialog box before next scan check box is cleared, Epson Scan starts scanning immediately without displaying this screen. To return to this screen, click Cancel in the Scanning dialog box during scanning.
1 Place your original(s) on the document table. See one of these sections for instructions.
Documents or photos: Placing Documents or Photos
Film or slides: Placing Film or Slides
2 Start Epson Scan. See Starting Epson Scan for instructions.
3 Select Full Auto Mode from the Mode list. See Changing the Scan Mode for instructions.
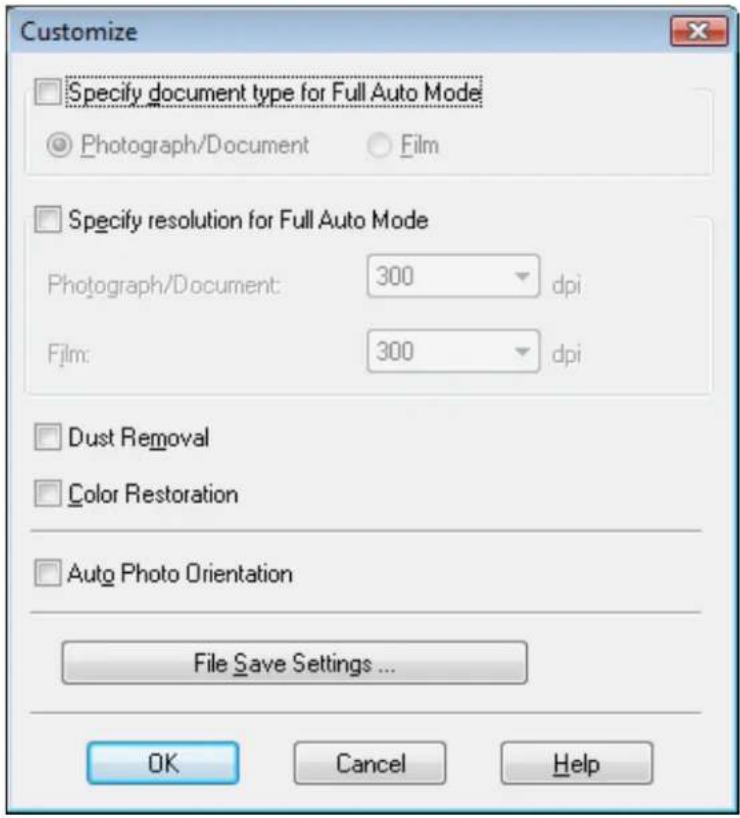
4 If you want to select a custom resolution, restore faded colors, or remove dust marks, click Customize. You see the Customize window.

Note:
If you started scanning from a TWAIN-compliant program like Adobe Photoshop Elements, the File Save Settings button does not appear.
5 Select your settings and click OK. For details on selecting the settings in the Customize window, see Epson Scan Help. 6 Click Scan. Epson Scan starts scanning in Full Auto Mode.
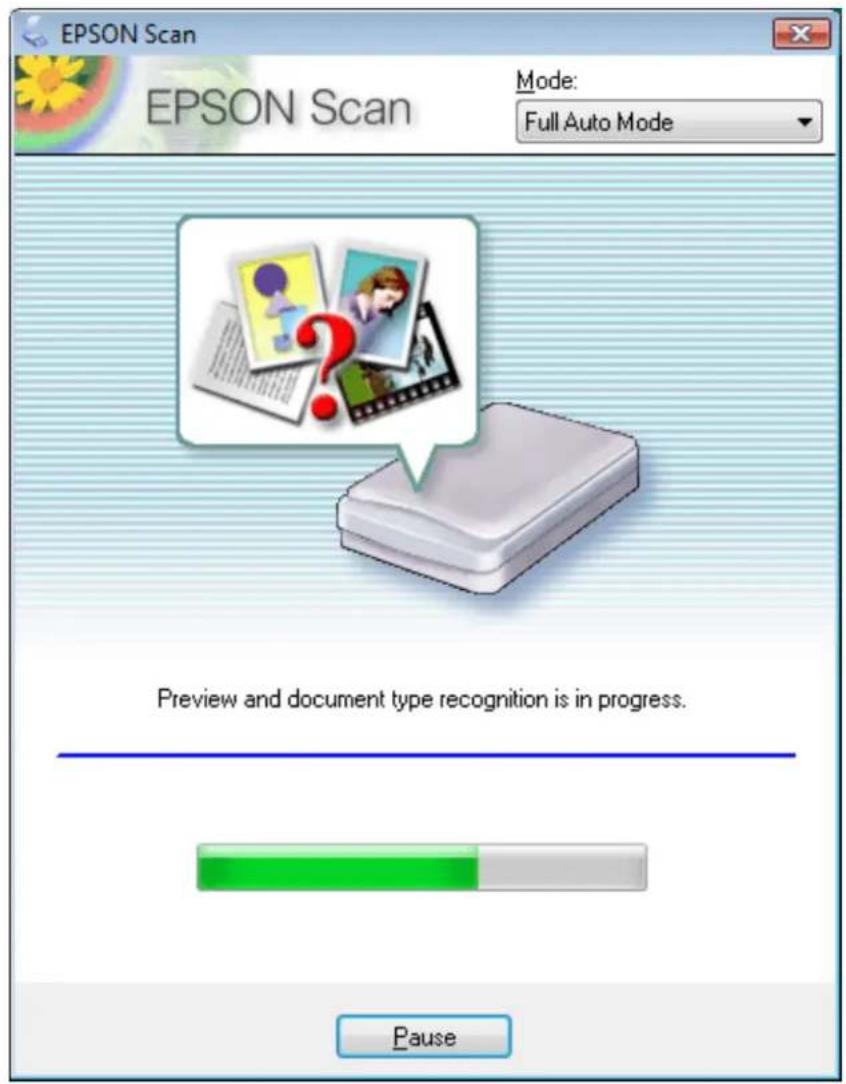
Epson Scan previews each image, detects which type of original it is, and selects the scan settings automatically. After a moment, you see a small preview of each image in the Epson Scan window.

Note:
• It takes a few minutes to scan a full film strip. - If you need to change any settings, click Pause. You will return to the Epson Scan Full Auto Mode window. • If you need to cancel scanning, click Cancel when it appears.
What happens next depends on how you started your scan. See Finishing the Scan for instructions.
Home > Scanning Your Originals

Scanning in Office Mode
When you select Office Mode, you see the Epson Scan Office Mode window.
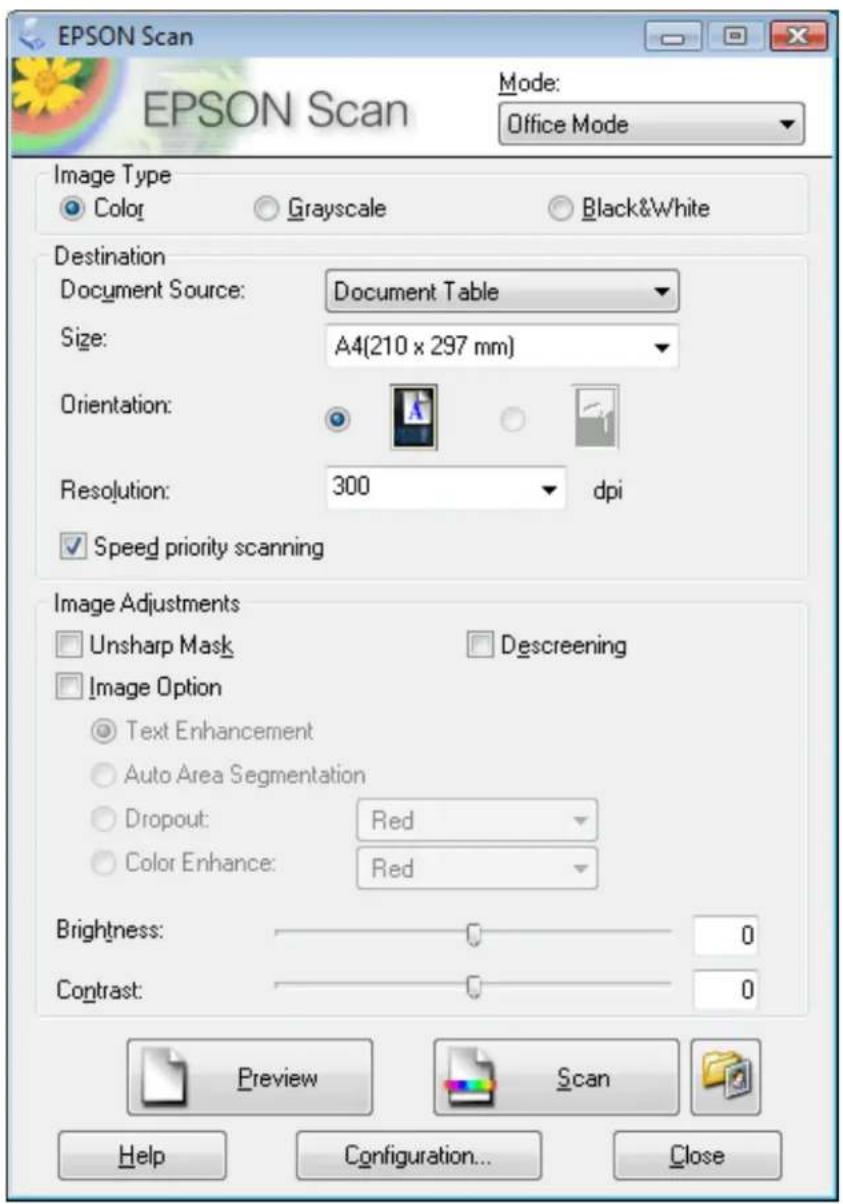
1 Place the original(s) on the document table. See Placing Documents or Photos for instructions. 2 Start Epson Scan. See Starting Epson Scan for instructions. 3 Select Office Mode in the Mode list. See Changing the Scan Mode for instructions.
4 Select Color, Grayscale, or Black&White as the Image Type setting. 5 Select Document Table as the Document Source setting. 6 Select the size of your original document as the Size setting. 7 Click the arrow to open the Resolution list and select an appropriate resolution for your original. See Selecting the Scan Resolution for instructions. 8 Click Preview to preview your image(s). The Preview window appears and displays your image. See Previewing and Adjusting the Scan Area for instructions. 9 Modify the image quality if necessary. See Adjusting the Color and Other Image Settings for instructions. 10 Click Scan.
What happens next depends on how you started your scan. See Finishing the Scan for instructions.
Home > Scanning Your Originals

Scanning in Home Mode
When you select Home Mode, you see the Epson Scan Home Mode window.


Place your original(s) on the document table. See one of these sections for instructions.
Documents or photos: Placing Documents or Photos
Film or slides: Placing Film or Slides
2 Start Epson Scan. See Starting Epson Scan for instructions. 3 Select Home Mode in the Mode list. See Changing the Scan Mode for instructions. 4 Click the arrow to open the Document Type list, and select the type of your original(s) you are scanning. 5 Select Color, Grayscale, or Black&White as the Image Type setting. 6 In the Destination box, click the button for the way you plan to use the scanned image(s).
- Screen/Web for images you will view only on a computer screen or post on the web.
- Printer for image(s) you will be printing or converting to editable text with an OCR (Optical Character Recognition) program.
- Other if you want to select a specific resolution for other purposes.
Epson Scan selects a default resolution setting based on the Destination setting you select. If you selected Other as the Destination setting to select a specific resolution, see Selecting the Scan Resolution for instructions.
7 Click Preview to preview your image(s). The Preview window appears and displays your image(s). See Previewing and Adjusting the Scan Area for instructions. 8 Modify the image quality, if necessary. See Adjusting the Color and Other Image Settings for instructions. 9 Click the arrow to open the Target Size list to select the size of the scanned image(s), if necessary. You can scan your images at their original size, or you can reduce or enlarge their size by selecting Target Size. See Selecting the Scan Size for instructions. 10 Click Scan.
What happens next depends on how you started your scan. See Finishing the Scan for instructions.
Home > Scanning Your Originals

Scanning in Professional Mode
When you select Professional Mode, you see the Epson Scan Professional Mode window.

1 Place your original(s) on the document table. See one of these sections for instructions.
Documents or photos: Placing Documents or Photos
Film or slides: Placing Film or Slides
2 Start Epson Scan. See Starting Epson Scan for instructions.
3 Select Professional Mode in the Mode list. See Changing the Scan Mode for instructions.
4 Click the arrow to open the Document Type list and select Reflective (for scanning documents or photos) or Film (for scanning film or slides).
5 If you selected Reflective (for scanning documents or photos) as the Document Type setting, click the arrow in the Auto Exposure Type list and select Photo or Document.
If you selected Film (for scanning film or slides) as the Document Type, click the arrow in the Film Type list and select Positive Film, Color Negative Film, or B&W Negative Film.
6 Click the arrow to open the Image Type list and select the detailed image type you are scanning.
| Image Type setting | Type of image you are scanning |
| 48-bit Color Color photos that you may want to modify in a 48-bit image-editing program | |
| 24-bit Color Color photos | |
| Color Smoothing Color graphics, such as a chart or graph | |
| 16-bit Grayscale Black-and-white photos with many shades of gray | |
| 8-bit Grayscale Black-and-white photos with just a few shades of gray | |
| Black & White Documents with black text and/or line art | |

Note:
If you select 8-bit Grayscale or Black & White, you can also select an Image Option setting, as described below.
| Image Option Setting Description | |
| None No Image Option setting is applied. | |
| Dropout: Red Drops out red from the scan. | |
| Dropout: Green Drops out green from the scan. | |
| Dropout: Blue Drops out blue from the scan. | |
| Color Enhance: Red Enhances red in the scan. | |
| Color Enhance: Green Enhances green in the scan. | |
| Color Enhance: Blue Enhances blue in the scan. |
7 Click the arrow to open the Resolution list and select an appropriate resolution for your original(s). See Selecting the Scan Resolution for instructions. 8 Click Preview to preview your image(s). The Preview window appears and displays your image(s). See Previewing and Adjusting the Scan Area for instructions on settings in the Preview window. 9 Click the arrow to open the Target Size list to select the size you want of the scanned image(s), if necessary. You can scan your images at their original size, or you can reduce or enlarge their size by selecting Target Size. See Selecting the Scan Size for instructions. 10 Modify the image quality, if necessary. See Adjusting the Color and Other Image Settings for instructions. 11 Click Scan.
What happens next depends on how you started your scan. See Finishing the Scan for instructions.
Home > Scanning Your Originals
Selecting File Save Settings
When you see the File Save Settings window, you can select the location, name, and format of the scanned image file.
1 Full Auto Mode: Click Customize, then click File Save Settings.
Office Mode, Home Mode, or Professional Mode: Click the File Save Settings icon to the right of the Scan button.
The File Save Settings window appears.
![File Save Settings Location Documents Pictures Other: Desktop Browse... File Name (Prefix + 3-digit number) Prefix: img Start Number: 001 Image Format Type: JPEG (*.jpg) Options... Details: Compression Level: [16] Encoding: Standard Embed ICC Profile: ON Overwrite any files with the same name Show t…](/content/2026/06/1343594/images/8e44d54caff6696746c4ad151af2d9df1f8e6d593a8b6f49b1fe70feb51f28a6.jpg)

Note:
If you start Epson Scan from a TWAIN-compliant program, such as Adobe Photoshop Elements, the File Save Settings button and File Save Settings icon do not appear.
2 In the File Save Settings window, specify the file folder in which you want to save your scanned image. Click the Documents or Pictures radio button, or the My Documents or My Pictures radio button. If you want to select another folder, click the Other radio button, then click Browse (Windows) or Choose (Mac OS X) and select the folder. If you want to save your image on the desktop, simply click the Other radio button.
3 Specify a file name prefix with an alphanumeric character string. A 3-digit number is automatically added to the file name, but you can change the Start Number if you like. If you are scanning multiple images at once, each image will receive a different 3-digit number.

Note:
The following characters cannot be used in the prefix.
Windows: \, /, :, _, *, ?, ", <, >, |
Mac OS X: :
4 Click the arrow to open the Type list and select a file format as described in the following table. Depending on the format, the Options button may be available for making detailed settings.
| Format (File Extension) | Description |
| BITMAP (*.bmp)(Windows only) | A standard image file format for Windows. Most Windows programs, including word processing programs, can read images in this format. |
| JPEG (*.jpg) A compressed file format in which the Compression Level can be selected. The JPEG format lets you highly compress image data. However, the higher the compression, the lower the image quality. Any lost image quality data cannot be restored, and the quality deteriorates each time the data is saved. The TIFF format is recommended when modification and retouching are required. | |
| Multi-TIFF (*.tif) A TIFF format where multiple pages are saved to the same file. You can also edit the scanned images before saving them. See Epson Scan Help for details. To open Multi-TIFF files, you need a program that supports it. | |
| PDF (*.pdf) A document format that can be read on both Windows and Mac OS X systems (platform independent). To use PDF documents in Windows, you need Adobe Reader or Acrobat. Multi-page documents can be saved as one PDF file. When you save color or grayscale images in PDF, you can select a Compression Level. | |
| PICT (*.pct) (Mac OS X only) | A standard image file format for Mac OS X. Most Mac OS X programs, including word processing programs, can read images in this format. |
| PRINT Image Matching II JPEG (*.jpg) or TIFF (*.tif) | A file format that includes PRINT Image Matching II data for enhanced quality and a wider color range. Print Image Matching II compatible printers can then print this data for brilliant, true-to-life results. (PRINT Image Matching data does not affect the way the image displays on the screen.) Available in JPEG or TIFF format. |
| TIFF (*.tif) A file format created for exchanging data between many programs, such as graphic and DTP software. When scanning black & white images, you can specify the Compression type. | |
5 The check boxes at the bottom of the window give you these options.
- Overwrite any files with the same name Select this option if you want to reuse the selected file name and location and overwrite previous files with the same names.
- Show this dialog box before next scan (Office Mode, Home Mode, or Professional Mode only) Select this option if you want the File Save Settings window to appear automatically before you scan. If you
deselect it, you must click the

File Save Settings icon to open the window before clicking the Scan
Open image folder after scanning
Select this option if you want Windows Explorer or the Mac OS X Finder to automatically open the folder where your scanned image file is saved when Epson Scan finishes scanning.
• Show Add Page dialog after scanning
Select this option if you want the Add Page Confirmation window to appear automatically after each scan in PDF or multi-TIFF. The Add Page Confirmation window includes the Add page, Edit page, and Save File buttons.
Click OK.
Home > Scanning Your Originals

Detailed Setting Instructions
Selecting the Scan Resolution Previewing and Adjusting the Scan Area Adjusting the Color and Other Image Settings Selecting the Scan Size
Selecting the Scan Resolution
You can select a specific Resolution setting for your images. Keep in mind that higher resolution settings increase scanning time, so do not select a higher resolution than you need. See the following table to reference the appropriate resolution setting to use so that you do not have to take more time than necessary.
| What you will do with the scanned image Suggested scan resolution | |
| Send via e-mail, upload to web, or view only on the screen | 96 to 150 dpi |
| Convert to editable text (OCR) 400 dpi | |
| Create searchable PDF 200 to 400 dpi | |
| Print using ink jet printer with normal quality 150 dpi (Color or Grayscale)360 dpi (Black & White) | |
| Print using ink jet printer with high quality 300 dpi (Color or Grayscale)720 dpi (Black & White) | |
| Print using page printer 200 dpi (Color or Grayscale)600 dpi (Black & White) | |
| Fax 200 dpi | |
| Enlarge after scanning at 100% Increase Resolution setting by same amount youwill increase image size after scanning.For example, if the resolution is 300 dpi, but youwill increase the image size to 200%, change theresolution setting to 600 dpi. | |
To select the resolution setting, see one of these sections.
Full Auto Mode: Selecting the Resolution in Full Auto Mode
Home Mode: Selecting the Resolution in Home Mode
Office Mode or Professional Mode: Selecting the Resolution in Office Mode or Professional Mode
Selecting the Resolution in Full Auto Mode
You can change the resolution you want at any time. Follow these steps to select the resolution setting.
In the Full Auto Mode window, click Customize. The Customize window appears.
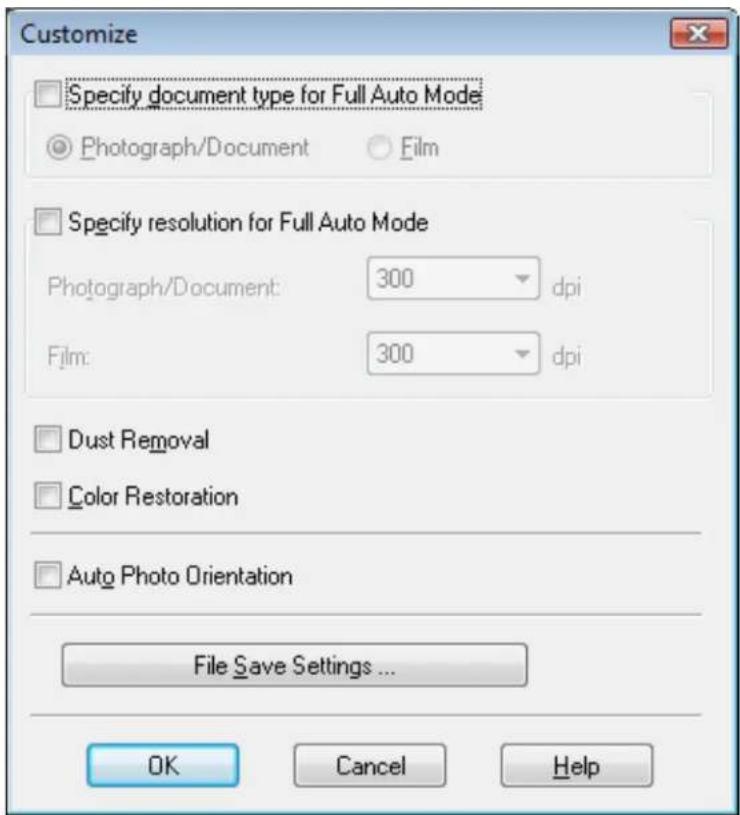
2 Click the Specify resolution for Full Auto Mode check box and select the number of dpi (dots per inch) at which you want to scan.
Selecting the Resolution in Home Mode
To change the resolution, first select Other as the Destination setting.
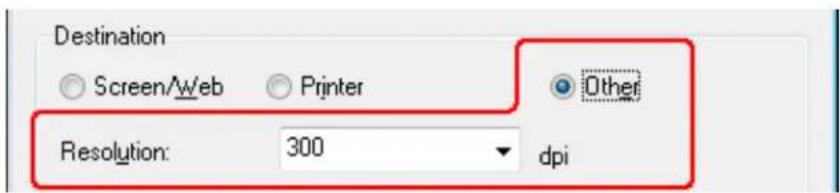
Click the arrow next to the Resolution list and select the number of dpi (dots per inch) at which you want to scan.
Selecting the Resolution in Office Mode or Professional Mode
You can select the resolution you want at any time.
Office Mode
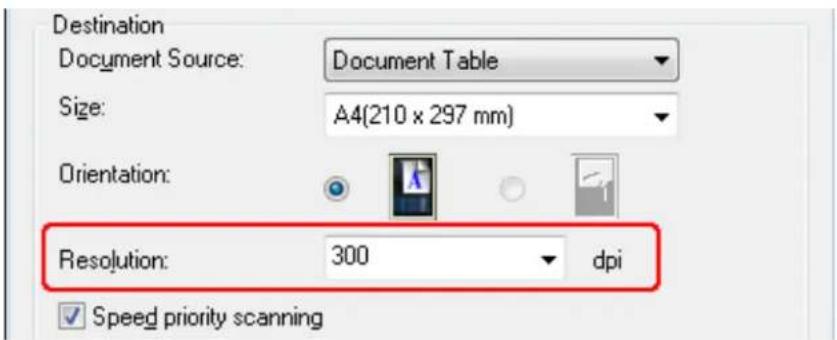
Professional Mode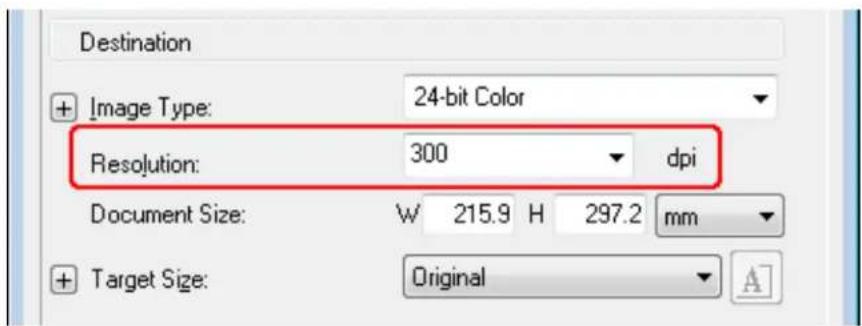
Click the arrow next to the Resolution list and select the number of dpi (dots per inch) at which you want to scan.
Top
Previewing and Adjusting the Scan Area
Once you have selected your basic settings and resolution, you can preview your image and select or adjust the image area of the image(s) in a Preview window on your screen. There are two types of preview.
- Normal preview displays your previewed image(s) in their entirety. You must select the scan area and make any image quality adjustments manually.
- Thumbnail preview displays your previewed image(s) as thumbnail(s). Epson Scan automatically locates the edges of your scan area, applies automatic exposure settings to the image(s), and rotates the image(s) if necessary.
To preview your image, follow the steps below.

Note:
If you are using Full Auto Mode or Office Mode, the thumbnail preview is not available.
1 Click Preview. If you want to change the preview mode, select the Normal or Thumbnail tab on Preview window if it is available.

Note:
- Depending on your document type and other settings, you may not be able to change the preview type.
- You can resize the Preview window. To resize the Preview window, click and drag the corner of the Preview window.
- If you preview with the Preview dialog not displayed, image(s) will be displayed in the default preview mode. If you preview with the Preview dialog displayed, image(s) will be displayed in the preview mode that was displayed just before previewing.
- Some of the settings that you change while previewing will be reset if you change the Preview mode.
Epson Scan prescans your image(s) and displays them in one of the following Preview windows.
Normal preview
Document Film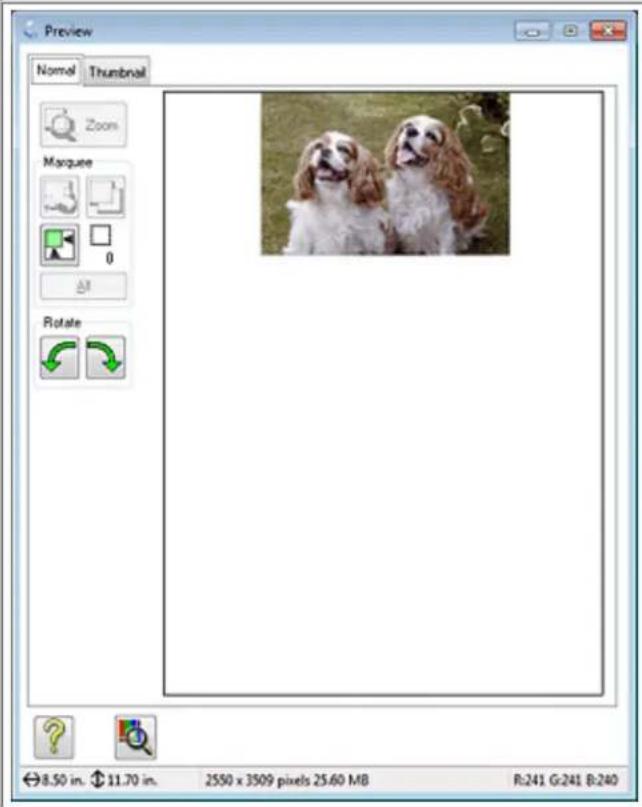
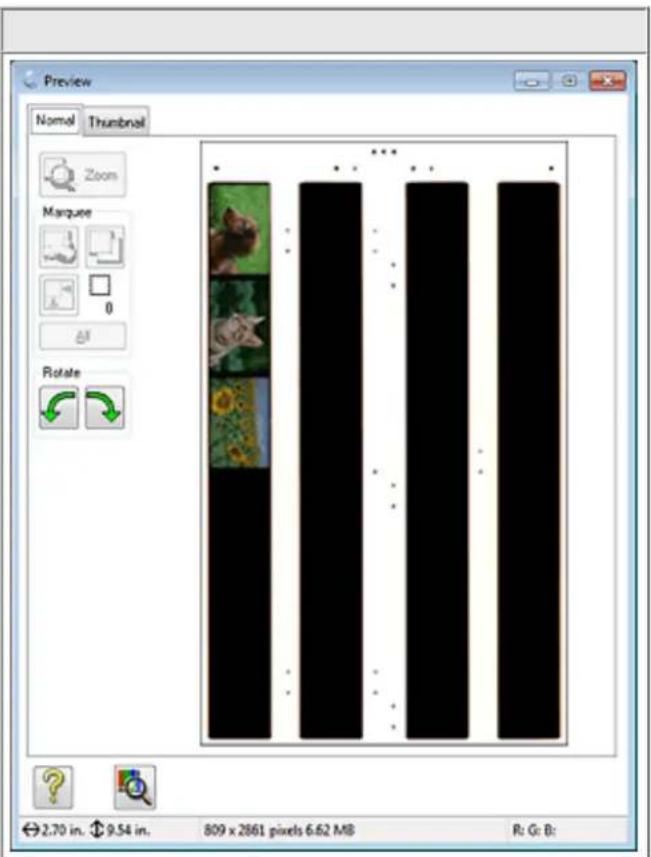
Thumbnail preview
Document Film
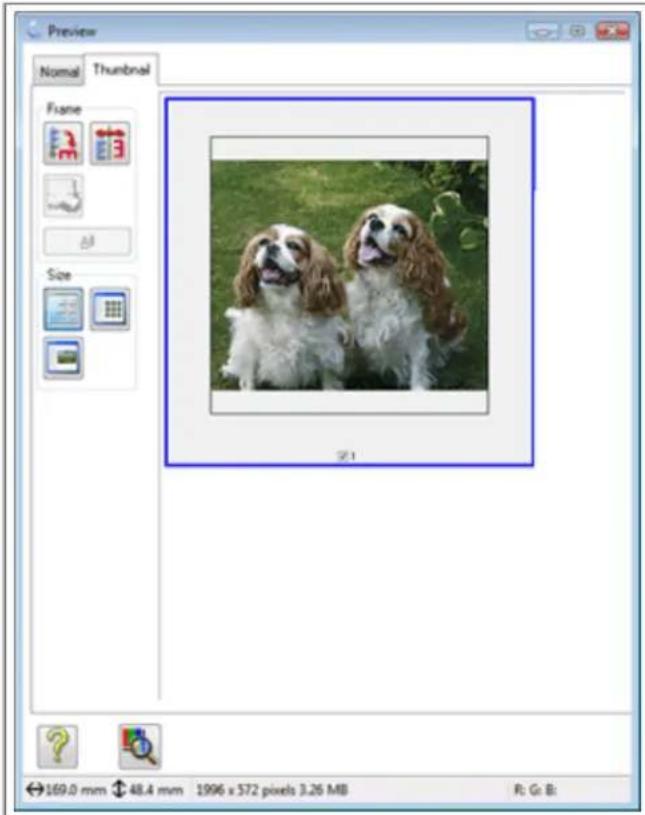
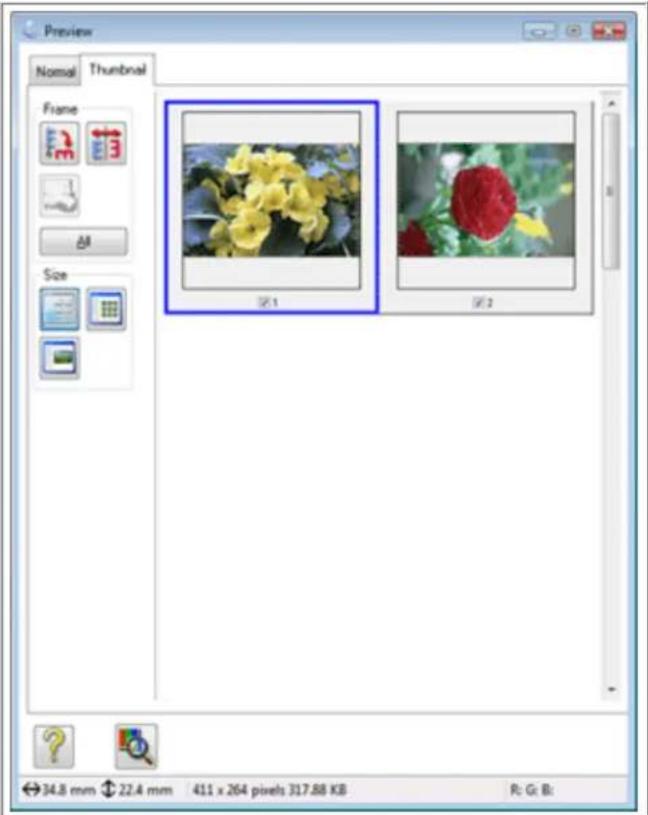
2 If you are viewing the Normal preview, you can do the following to adjust the image(s).
To select your scan area, click the auto locate icon to create a marquee that marks the edges of your image area (if you have only one photo or document on the document table), or draw a marquee manually. You can move the marquee to change the scan area. See Creating a Marquee on a Preview Image for instructions.

Note:
If you are going to scan at a different size than your original, you must first select your Target Size and automatically create a marquee that is proportioned to that size. See Selecting the Scan Size for instructions. You can then copy the marquee and place it on each image you will scan at that size.
- To enlarge or reduce the preview image in the Normal preview, resize the Preview window. The image size changes corresponding to the Preview window size.
- To zoom in on an image in the Normal preview, click inside the scan area and click the Zoom button.

Note:
Click the Full button to exit Zoom display.
• To rotate an image, click the left or right rotate icon.
- To adjust the image quality, click the scan area(s) you want to modify and make the adjustments. See Adjusting the Color and Other Image Settings for instructions.
If you are viewing the Thumbnail preview, you can do the following to adjust the image(s).
• To zoom in on an image in the Thumbnail preview, double-click the thumbnail to zoom in.
- You can change the size of the thumbnail by clicking either the Thumbnail , Thumbnail , or Full size of 1 frame button.
• To rotate an image or flip it horizontally (like a mirror image), click its thumbnail and then click the

rotation icon or

flipping icon.

Note:
If your image is not rotated correctly, see Images are Rotated Incorrectly.
- To adjust the scan area to crop your image differently, you can create and move a marquee that marks the edges of your scan. See Creating a Marquee on a Preview Image for instructions.
- To adjust the image quality, click the image(s) or scan area(s) you want to modify and make the adjustments. See Adjusting the Color and Other Image Settings for instructions. If you want to apply the adjustments you have made to all of your images, click All.
Creating a Marquee on a Preview Image
A marquee is a moving dotted line that appears on the edges of your preview image to indicate the scan area.
Documents or photos Film or Slides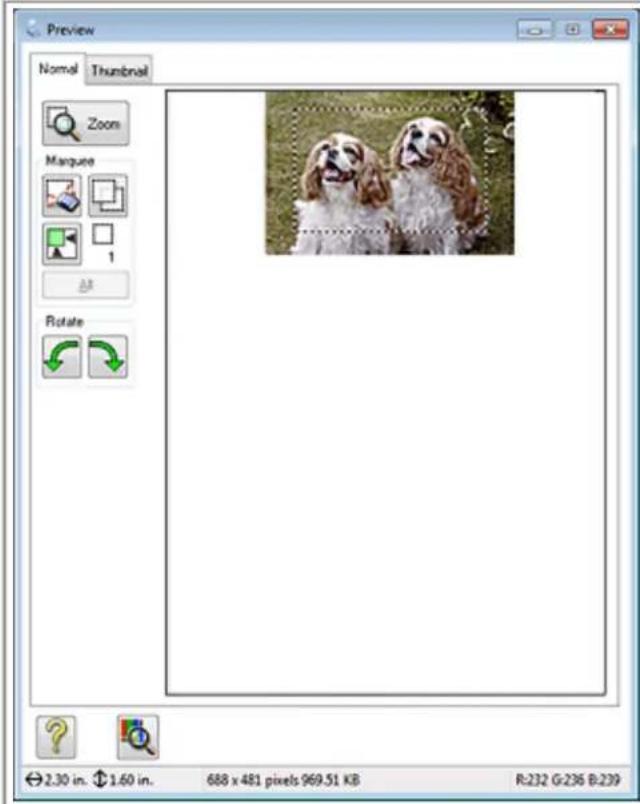
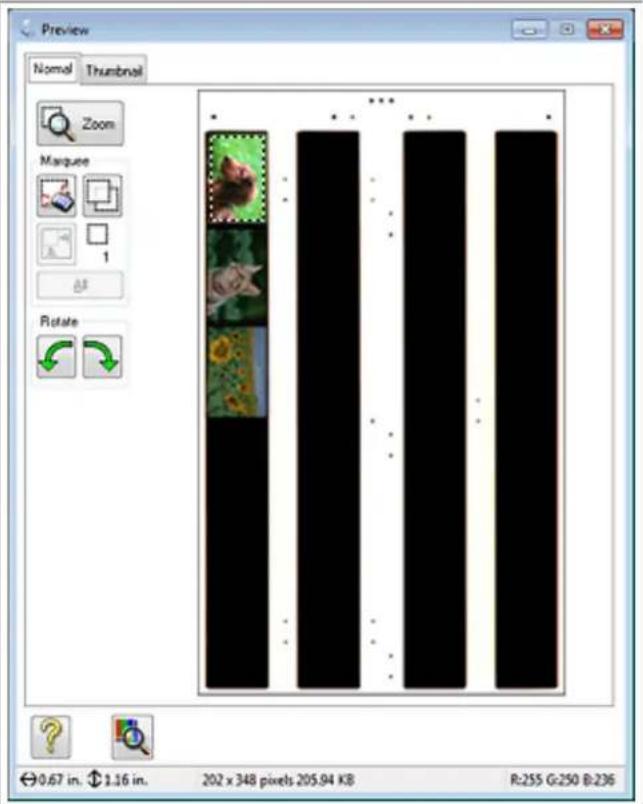
You can move the marquee and adjust its size. If you are viewing the Normal preview, you can create multiple marquees (up to 50) on each image to scan different image areas in separate scan files.

Note for film or slides:
When you use the Thumbnail preview, Epson Scan automatically creates marquees around your image(s) for you. If you need to adjust a marquee, click inside it and click the delete marquee icon before completing the steps in this section. If you do not need to adjust any marquees, skip to Adjusting the Color and Other Image Settings.
To draw a marquee, move your cursor over a preview image. The pointer becomes a set of cross-hairs.

Note:
If you are viewing the Normal preview and you only have one photo or document on the document table, you can click the auto locate icon to automatically draw a marquee, then skip to step 3.
2 Position the pointer in the area where you want to place the corner of your marquee and click. Hold down the mouse button and drag the cross-hairs over the image to the opposite corner of the desired scan area. Then release the mouse button. You see the moving dotted line of the marquee.

3 Do one of the following to adjust the marquee.
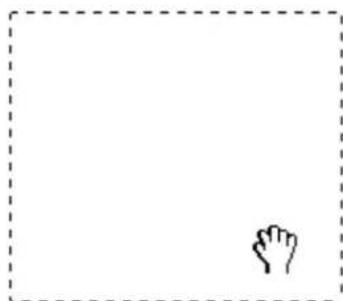
- To move the marquee, position your cursor inside the marquee. The pointer becomes a hand. Click and drag the marquee to the desired location.
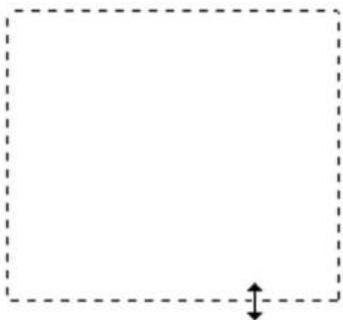
- To resize the marquee, position your cursor over the edge or corner of the marquee. The pointer becomes a straight or angled double-arrow. Click and drag the edge or corner to the desired size.

Note:
- To restrict the movement of the marquee to vertical or horizontal only, hold down the Shift key as you move the marquee.
- To restrict the size of the marquee to the current proportions, hold down the Shift key as you resize the marquee.
- For best results and image exposure, make sure all sides of the marquee are located inside the preview image. Do not include any of the area around the preview image in the marquee.
4 If you are viewing the Normal preview, you can create multiple marquees (up to 50). Just draw them as described in steps 1 through 3, or click the copy marquee icon to create additional marquees of the same size. You can move and resize all the marquees as described in step 3. To delete a marquee, click inside it and click the

delete marquee icon.

Note:
If you draw multiple marquees, make sure you click All in the Preview window before you scan. Otherwise, only the area inside the last marquee you drew will be scanned.

Adjusting the Color and Other Image Settings
Once you have previewed your image(s) and adjusted the scan area, you can modify the image quality, if necessary. Epson Scan offers a variety of settings for improving color, sharpness, contrast, and other aspects affecting image quality. Before you make adjustments, be sure to click the image or marquee for the area you want to adjust.
To adjust the color and other image settings, see one of these sections.
Office Mode: Making Color Adjustments and Other Image Settings in Office Mode
Home Mode: Making Color Adjustments and Other Image Settings in Home Mode
Professional Mode: Making Color Adjustments and Other Image Settings in Professional Mode
Making Color Adjustments and Other Image Settings in Office Mode
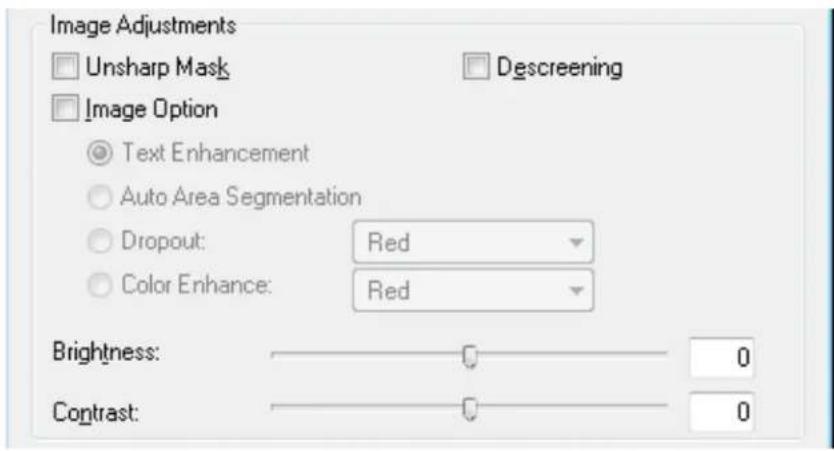
The table below describes the settings available in Office Mode. For details on adjusting these settings, see Epson Scan Help.

Note:
If you are scanning multiple images at the same time and you want to apply the image adjustments to all of your images or scan areas, click All in the Preview window before you begin making your adjustments.
| Setting Description | ||
| Unsharp Mask Turn on to make the edges of image | age areas clearer for an overall sharper image. Turn off to leave softer edges. This setting is available only when the Image Type is set to Color or Grayscale. | |
| Descreening Removes the rippled pattern that can appear in subtly-shaded image areas, such as in skin tones. Also improves results when scanning magazine or newspaper images which include screening in their original print processes. This setting is available only when the Image Type is set to Color or Grayscale. The results of descreening do not appear in the preview, only in your scanned image. | ||
| Image Option Text Enhancement Enhances text | recognition when scanning text documents.This setting is available when Image Option is selected.When the Image Type is set to Black&White, the results of Text Enhancement do not appear in the preview, only in your scanned image. | |
| Contrast Adjusts the difference between the light | and dark areas of the overall image.When the Image Type is set to Black&White, select Auto Area Segmentation to make this setting available. | |
| Threshold Adjusts the level at which the black area | areas in text and lineart are delineated, improving text recognition in OCR programs.This setting is available under the following conditions:- The Image Type is set to Black&White, and Image Option is not selected.- The Image Type is set to Black&White, and Image Option and Color Enhance are selected. | |

Note:
• To view the red, green, and blue levels at particular points in your preview image as you make adjustments, click the densitometer icon in the Preview window and move your cursor over an image area. See Epson Scan Help for details. - Certain settings may not be available, or may be automatically selected, depending on the type of image you are previewing and other settings you have selected. - You can customize how certain Epson Scan settings behave by clicking Configuration and changing settings in the window that appears. See Epson Scan Help for details. - To undo any image quality adjustments you make to the preview image, click Reset if available, turn off the settings, or preview your image again.
Making Color Adjustments and Other Image Settings in Home Mode
Image Adjustments
□ Descreening
Color Restoration
Image Option (×)
Text Enhancement
Auto Area Segmentation
Brightness...
Backlight Correction
DIGITAL ICE Technology
The table below describes the settings available in Home Mode. For details on adjusting these settings, see Epson Scan Help.

Note:
If you are scanning multiple images at the same time and you want to apply the image adjustments to all of your images or scan areas, click All in the Preview window before you begin making your adjustments.
Setting Description
| Descreening Removes the rippled pattern that can appear in subtly-shaded image areas, such as in skin tones. Also improves results when scanning magazine or newspaper images which include screening in their original print processes. This setting is available only when the Image Type is set to Color or Grayscale. The results of descreening do not appear in the preview, only in your scanned image. | |
| Backlight Correction Removes shadows from photos that have too much background light.This setting is available when you select Photograph as the Document Type setting and the Image Type is set to Color or Grayscale. | |
| Color Restoration Restores the colors in faded photos automatically.This setting is available when you select Photograph as the Document Type setting and the Image Type is set to Color or Grayscale. | |
| DIGITAL ICE Technology Remove dust marks that the Dust Removal feature cannot.DIGITAL ICE Technology takes longer to scan and also uses more of your system resources.This setting is available when you select Photograph, Positive Film, Color Negative Film, or B&W Negative Film as the Document Type and the Image Type is set to Color or Grayscale. | |
| Image Option Text Enhancement enhances text recognition when scanning text documents.This setting is available when you select Magazine, Newspaper, or Text/Line Art as the Document Type setting and Image Option is selected. | |
| Auto Area Segmentation | Makes images clearer and text recognition more accurate by separating the text from the graphics.This setting is available when you select Magazine, Newspaper, or Text/Line Art as the Document Type, the Image Type is set to Black&White, and Image Option is selected. |
| Brightness Adjusts the overall image lightness and darkness.When the Image Type is set to Black&White, and Magazine, Newspaper, or Text/Line Art is set as the Document Type, select Auto Area Segmentation to make this setting available.Click Brightness to access the Brightness setting. | |
| Contrast Adjusts the difference between the light and dark areas of the overall image.When the Image Type is set to Black&White, and Magazine, Newspaper, or Text/Line Art is set as the Document Type, select Auto Area Segmentation to make this setting available.Click Brightness to access the Contrast setting. | |
| Threshold Adjusts the level at which the black areas in text and line art are delineated, improving text recognition in OCR programs.Available only when the Image Type is set to Black&White, and Image Option is not selected.Click Brightness to access the Threshold setting. | |
• To view the red, green, and blue levels at particular points in your preview image as you make adjustments, click the densitometer icon in the Preview window and move your cursor over an image area. See Epson Scan Help for details. - Certain settings may not be available, or may be automatically selected, depending on the type of image you are previewing and other settings you have selected. - You can customize how certain Epson Scan settings behave by clicking Configuration and changing settings in the window that appears. See Epson Scan Help for details. - To undo any image quality adjustments you make to the preview image, click Reset if available, turn off the settings, or preview your image again.

Making Color Adjustments and Other Image Settings in Professional Mode

The table below describes the settings available in Professional Mode. For details on adjusting these settings, see Epson Scan Help.

Note:
- You may need to scroll down to view the Adjustments area of the Professional Mode window.
- If you are scanning multiple images at the same time and you want to apply the image adjustments to all of your images or scan areas, click All in the Preview window before you begin making your adjustments.
| Setting Description | |
| Auto Exposure |  Click the ____ Auto Exposure icon. To turn it on continuously, clickConfiguration, click theColortab and selectContinuous auto exposure. You can adjust the level of exposure adjustment using the slider. Click the ____ Auto Exposure icon. To turn it on continuously, clickConfiguration, click theColortab and selectContinuous auto exposure. You can adjust the level of exposure adjustment using the slider. |
Histogram Provides a graphical interface for adjusting highlight, shadow, and gamma levels individually. For advanced users only. Click the____ Histogram Adjustment icon to access the Histogram setting. Histogram Adjustment icon to access the Histogram setting. | |
| Tone Correction Provides | a graphical interface for adjusting tone levels individually. For advanced users only.Click the Tone Correction icon to access the Tone Correction setting. |
| Brightness Adjusts the difference between the light and dark areas of the overall image.Click the Image Adjustment icon to access the Brightness setting. | |
| Contrast Adjusts the difference between the light and dark areas of the overall image.Click the Image Adjustment icon to access the Contrast setting. | |
| Saturation Adjusts the density of colors in the overall image.Click the Image Adjustment icon to access the Saturation setting. | |
| Color Balance Adjusts the balance of red, green, and blue colors in the overall image.Click the Image Adjustment icon to access the Color Balance settings. | |
| Color Palette Provides a graphical interface for adjusting mid-tone levels, such as skin tones, without affecting the highlight and shadow areas of the image. For advanced users only. See Using the Color Palette Feature (for Professional Mode Only) for more information.Click the Color Palette icon to use the Color Palette settings. | |
| Unsharp Mask Turn on to make the edges of image areas clearer for an overall sharper image. The level of sharpness is adjustable. Turn off to leave softer edges. This setting is available when the Image Type is set to 48-bit Color, 24-bit Color, 16-bit Grayscale, or 8-bit Grayscale. | |
| Descreening Removes the rippled pattern that can appear in subtly shaded image areas, such as skin tones. Also improves results when scanning magazine or newspaper images that include screening in their original print processes. The results of descreening do not appear in the preview, only in your scanned image. The level of descreening is adjustable.This setting is available when the Image Type is set to 48-bit Color, 24-bit Color, Color Smoothing, 16-bit Grayscale, or 8-bit Grayscale. | |
| Color Restoration Restores the colors in faded photos automatically.This setting is available when you select Photo as the Auto Exposure Type setting and the Image Type is set to 48-bit Color, 24-bit Color, 16-bit Grayscale, or 8-bit Grayscale. | |
| Backlight Correction Removes shadows from photos that have too much background light. The level of backlight correction is adjustable.This setting is available when you select Photo as the Auto Exposure Type setting and the Image Type is set to 48-bit Color, 24-bit Color, 16-bit Grayscale, or 8-bit Grayscale. | |
| Dust Removal Removes dust marks from your originals automatically. The results of Dust Removal do not appear in the preview, only in your scanned image. The level of dust removal is adjustable.This setting is available when you select Photo as the Auto Exposure Type setting and the Image Type is set to 48-bit Color, 24-bit Color, 16-bit Grayscale, or 8-bit Grayscale. | |
| Digital ICE Technology and DIGITAL ICE Lite Technology | Remove dust marks that the Dust Removal feature cannot. DIGITAL ICE Technology takes longer to scan and also uses more of your system resources.This setting is available under the following conditions:- You select Reflective as the Document Type and the Auto Exposure Type is set to Photo.- You select Film as the Document Type. |
| Threshold Adjusts the level at which the black areas in text and line art are delineated, improving text recognition in OCR programs. This setting is available only when you select Black & White as the Image Type setting. | |
• To view red, green, and blue levels at particular points in your preview image as you make adjustments, click the densitometer icon in the Preview window and move your cursor over an image area. See Epson Scan Help for details. - Certain settings may not be available, or may be automatically selected, depending on the type of image you are previewing and other settings you have selected. - You can customize how certain Epson Scan settings behave by clicking Configuration and changing settings in the window that appears. See Epson Scan Help for details. - To undo any image quality adjustments you make to the preview image, click Reset if available, turn off the setting, or preview your image again.

Selecting the Scan Size
You can scan your images at their original size, or you can reduce or enlarge their size as you scan them. You do this using the Target Size setting.
If you are going to scan your image to a specific size, you should select the Target Size setting after previewing it, but before adjusting your scan area indicated by creating a marquee. This sets the scan area to correct proportions so your image will not be cropped unexpectedly.
To select the scan size, see one of these sections.
Home Mode: Selecting the Scan Size in Home Mode
Professional Mode: Selecting the Scan Size in Professional Mode
Selecting the Scan Size in Home Mode
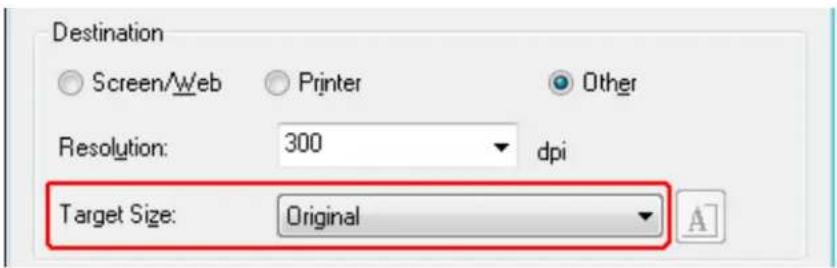
1 You can select a predefined scan size from the Target Size list. Click the arrow to open the list and select the size you want. A marquee (dotted line) proportioned for that size appears on your preview image.
Documents or photos Film or Slides
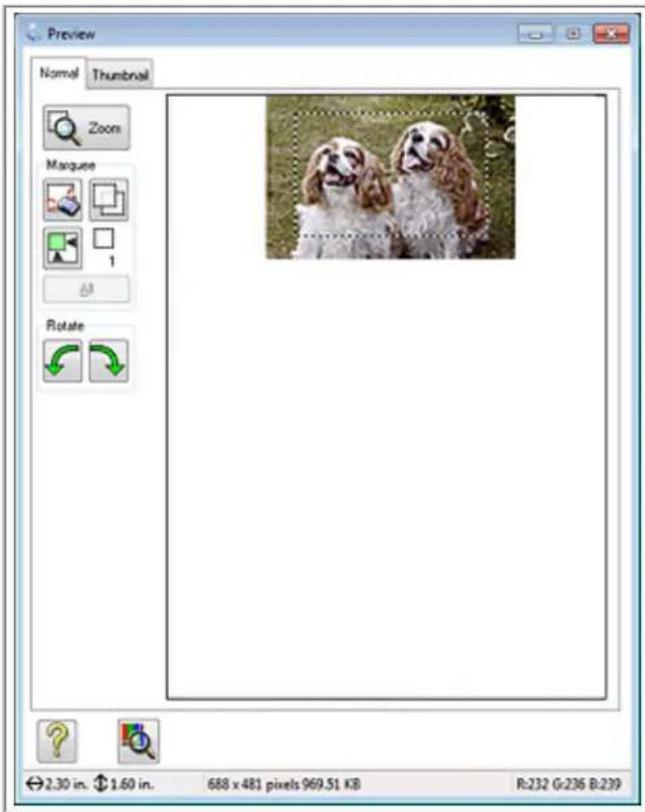
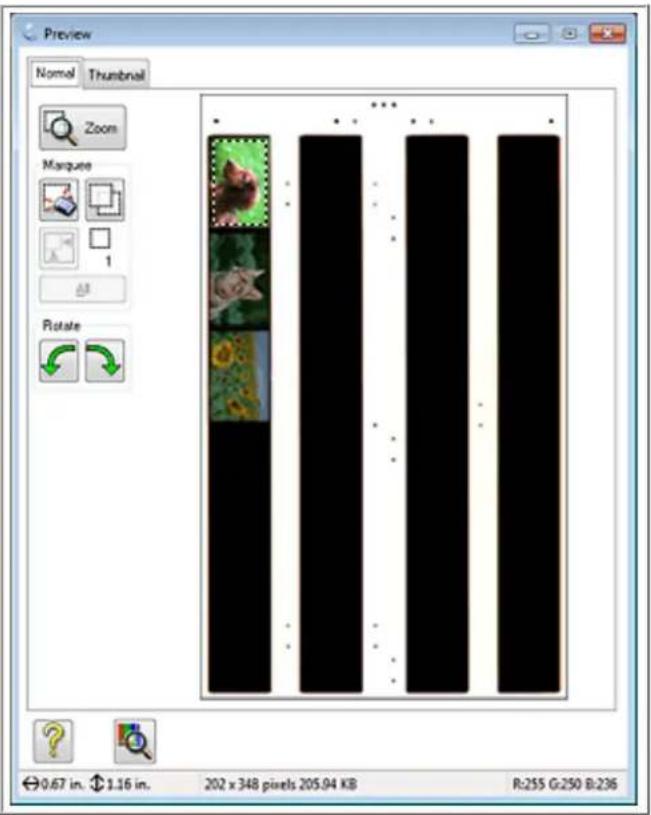
2 If you need to create a scan size that is not in the Target Size list, you can create a custom size. Click the arrow to open the list and select Customize. You see the Target Size window.
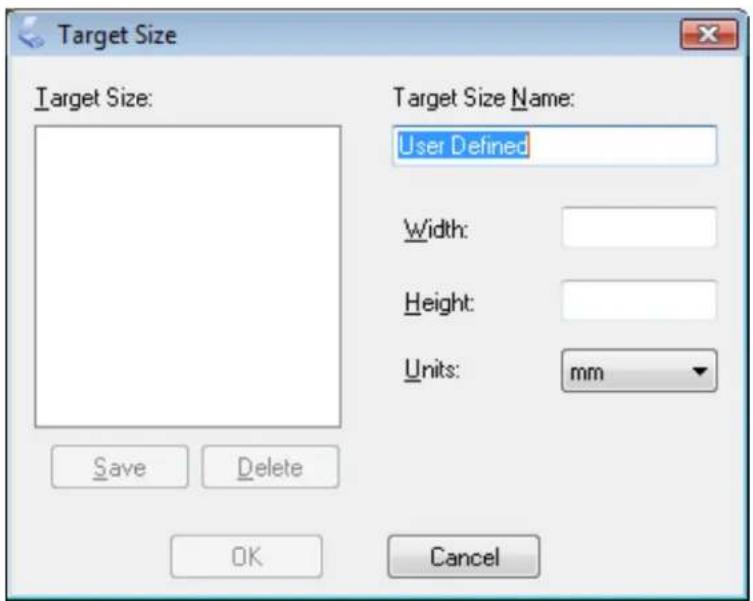
3 Type a name for your custom size, enter the size, click Save, then click OK. Your new size appears in the Target Size list. Once you have selected your scan size, you can click and drag the marquee to the area in the image you want to scan. For details, see Creating a Marquee on a Preview Image. The marquee proportions are retained as you adjust it.
If you need to rotate the marquee for a landscape or portrait image without changing its aspect ratio, click the

orientation icon.

Note:

The orientation icon is not available if you selected Original as the Target Size setting.
Selecting the Scan Size in Professional Mode
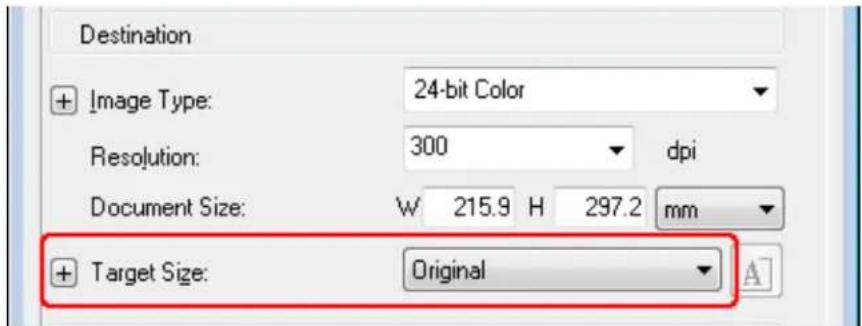
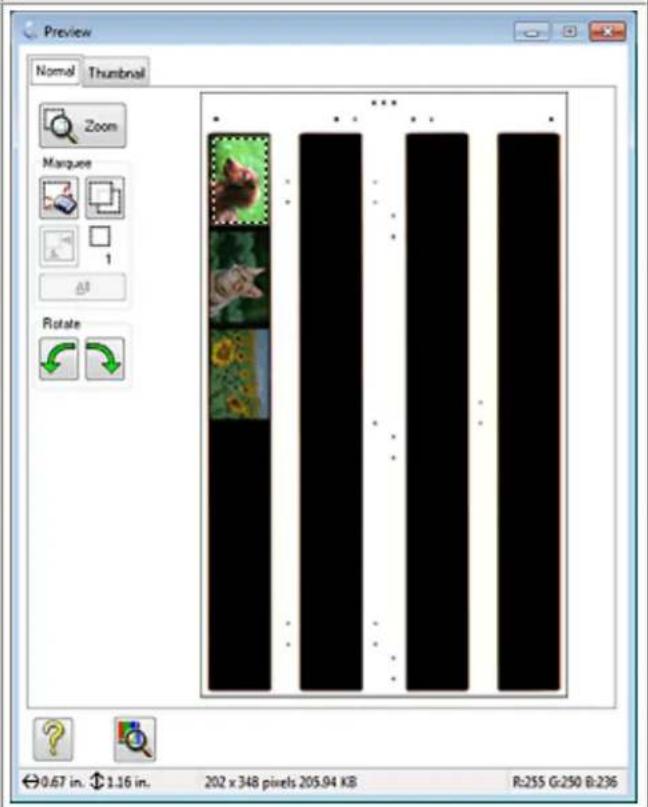
You can select a predefined scan size from the Target Size list. Click the arrow to open the list and select the size you want. A marquee (dotted line) proportioned for that size appears on your preview image.
Documents or photos Film or Slides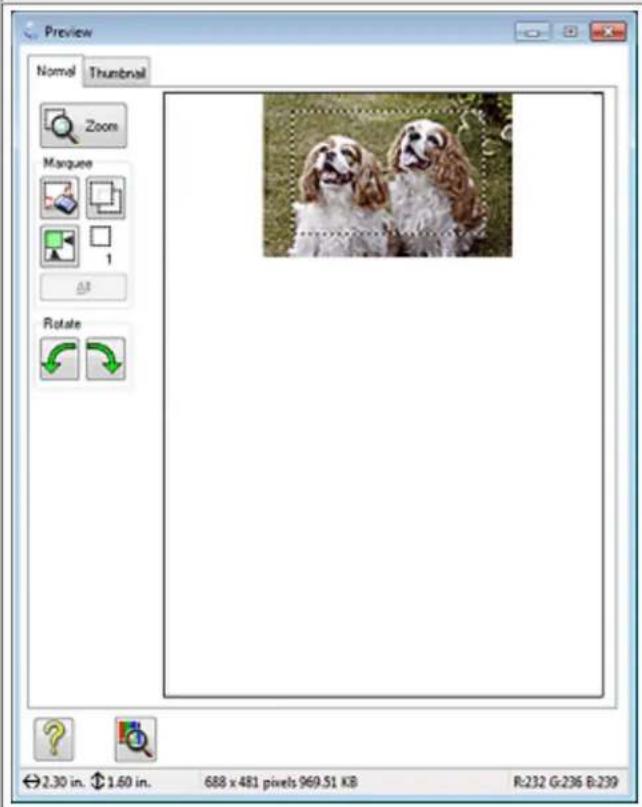
2 If you need to create a scan size that is not in the Target Size list, you can create a custom size. Click the arrow to open the list and select Customize. You see the Target Size window.
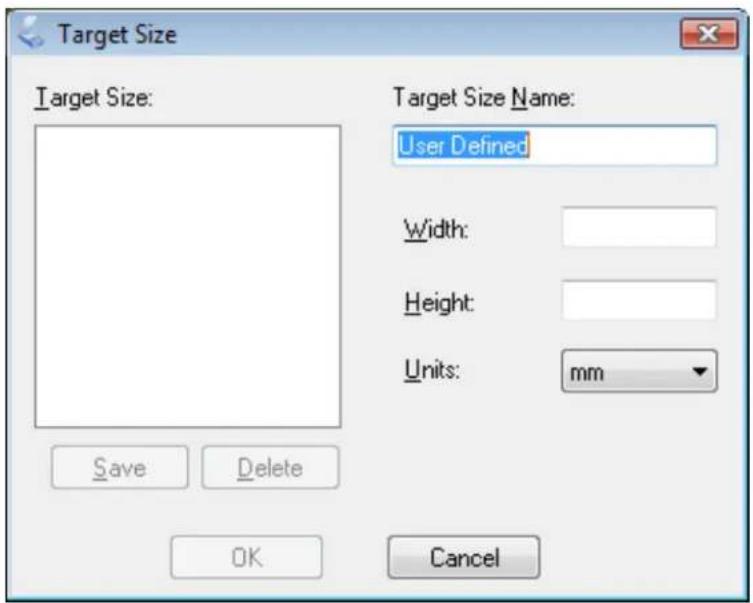
3 Type a name for your custom size, enter the size, click Save, then click OK. Your new size appears in the Target Size list.
4 You can fine-tune the size using additional tools. Click the + (Windows) or ▶ (Mac OS X) button next to Target Size to display these tools.
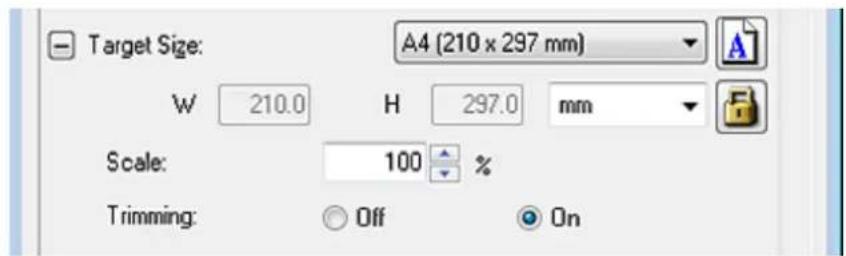
• To size your image by a certain percentage, adjust the Scale value. - To change the way your image is cropped, turn Trimming on or off. See Epson Scan Help for details. • To unlock the proportions of your scan size, click the lock icon. Then adjust the marquee or enter new width/height measurements.
5 Once you have selected your scan size, you can click and drag the marquee to the area in the image you want to scan. For details, see Creating a Marquee on a Preview Image. The marquee proportions are retained as you adjust it.
If you want to rotate the marquee for a landscape or portrait image without changing its aspect ratio, click the orientation icon.

Note:
The orientation icon is not available if you selected Original as the Target Size setting.
Home > Scanning Your Originals

Finishing the Scan
What happens after you scan depends on how you started your scan.
Full Auto Mode:
- If you started your scan by running Epson Scan from the EPSON Scan icon or by pressing the Start button on the scanner, your scanned image is saved in the file format and location you selected in the File Save Settings window. If you did not select any settings in the File Save Settings window, it is saved as a JPEG file in Pictures or My Pictures.
- If you started your scan from a TWAIN-compliant program such as Adobe Photoshop Elements, your scanned image opens in the program window. If Epson Scan does not automatically close after scanning, click Close to exit the Epson Scan window and view your image in the program window.
Office Mode, Home Mode, or Professional Mode:
- If you started your scan by running Epson Scan from the EPSON Scan icon or by pressing the Start button on the scanner, you see the File Save Settings window. This lets you select the name and location of your saved scan files. See Selecting File Save Settings for details. After you select these settings, Epson Scan starts scanning.
- If you started your scan from a TWAIN-compliant program such as Adobe Photoshop Elements, your scanned image(s) opens in the program window. If Epson Scan does not automatically close after scanning, click Close to exit the Epson Scan window and view your image(s) in the program.
Home > Scanning Special Projects

Restoring Color
Color Restoration in Full Auto Mode Color Restoration in Home Mode Color Restoration in Professional Mode Using the Color Palette Feature (for Professional Mode Only)
Using the Color Restoration feature in Epson Scan, you can transform old, faded, or badly exposed photos into ones with true-to-life color and sharpness. You can restore printed photos, film, or slides automatically as you scan them.
| Original image Color Restoration applied | |
See one of these sections for instructions on restoring colors.
Full Auto Mode: Color Restoration in Full Auto Mode
Office Mode: This feature is not available in Office Mode. Change the scan mode to Full Auto Mode, Home Mode, or Professional Mode. See Changing the Scan Mode for instructions.
Home Mode: Color Restoration in Home Mode
Professional Mode: Color Restoration in Professional Mode
Color Restoration in Full Auto Mode

Place your original(s) on the document table. See one of these sections for instructions.
Documents or photos: Placing Documents or Photos
Film or slides: Placing Film or Slides

Note for film or slides:
You can scan only 35 mm color film strip or color positive slides in Full Auto Mode. To scan other types of film, use Home Mode or Professional Mode. To change the scan mode, see Changing the Scan Mode.

Start Epson Scan. See Starting Epson Scan for instructions.
3 In the Full Auto Mode window, click Customize. The Customize window appears.
4 Click the Color Restoration check box.
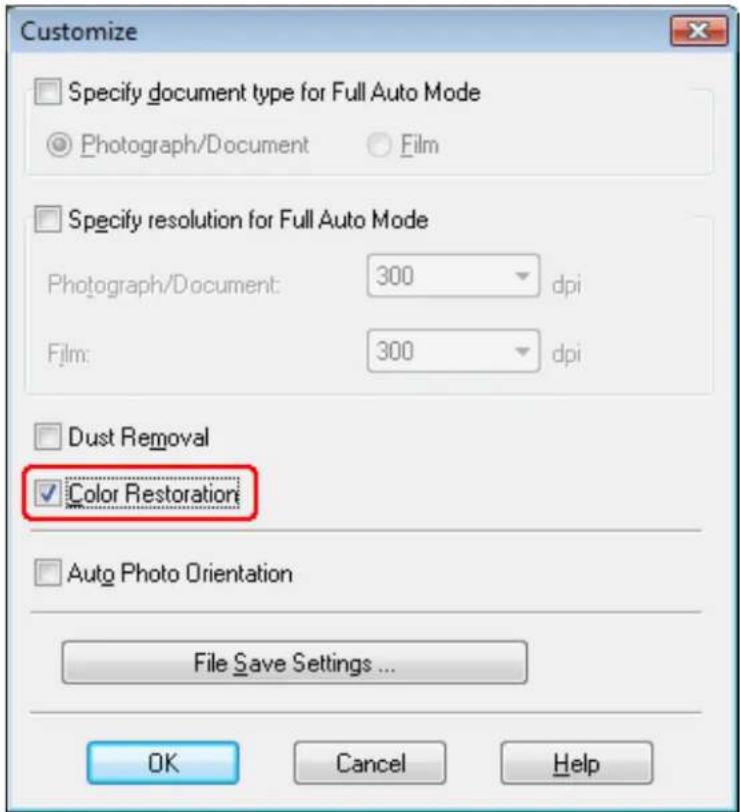
5 If you want to select the file save settings, click File Save Settings. See Selecting File Save Settings for instructions.

Note:
If you started Epson Scan from a TWAIN-compliant program like Adobe Photoshop Elements, the File Save Settings button does not appear.
6 When you finish making all the necessary settings, click OK to return to the Full Auto Mode window.
7 Click Scan.
What happens next depends on how you started Epson Scan. See Finishing the Scan for instructions.
Top
Color Restoration in Home Mode
1 Place your original(s) on the document table. See one of these sections for instructions.
Documents or photos: Placing Documents or Photos
Film or slides: Placing Film or Slides
2 Start Epson Scan. See Starting Epson Scan for instructions. 3 In the Home Mode window, select the Document Type, Image Type, and Destination settings. For details, see Scanning in Home Mode. 4 Click Preview to preview your image(s), then select your scan area. See Previewing and Adjusting the Scan Area for details. 5 Click the Color Restoration check box.
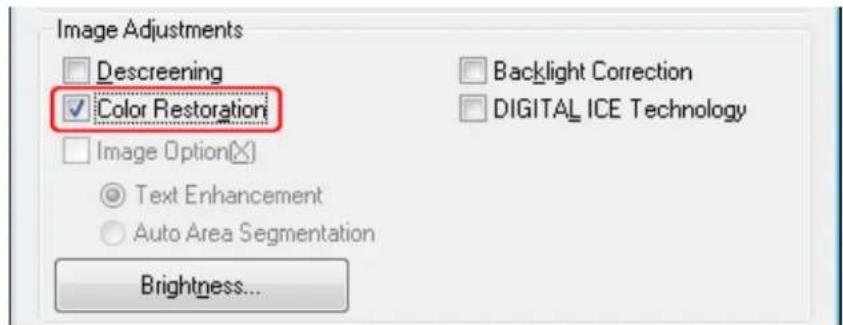

Note:
If you are scanning multiple images at the same time and you want to apply the Color Restoration feature to all of your images or scan areas, click All in the Preview window before you click the check box.
6 Make any other necessary image adjustments. See Adjusting the Color and Other Image Settings for details. Size your image(s) as necessary. See Selecting the Scan Size for details. 8 Click Scan.
What happens next depends on how you started Epson Scan. See Finishing the Scan for instructions.
Top

Color Restoration in Professional Mode
1 Place your original(s) on the document table. See one of these sections for instructions.
Documents or photos: Placing Documents or Photos
Film or slides: Placing Film or Slides
2 Start Epson Scan. See Starting Epson Scan for instructions.
3 In the Professional Mode window, select the Document Type, Document Source, Auto Exposure Type (for scanning documents or photos) or Film Type (for scanning film or slides), Image Type, and Resolution settings. For details, see Scanning in Professional Mode.
4 Click Preview to preview your image(s), then select your scan area. See Previewing and Adjusting the Scan Area for details.
5 Scroll down to the Adjustments area and click the Color Restoration check box.
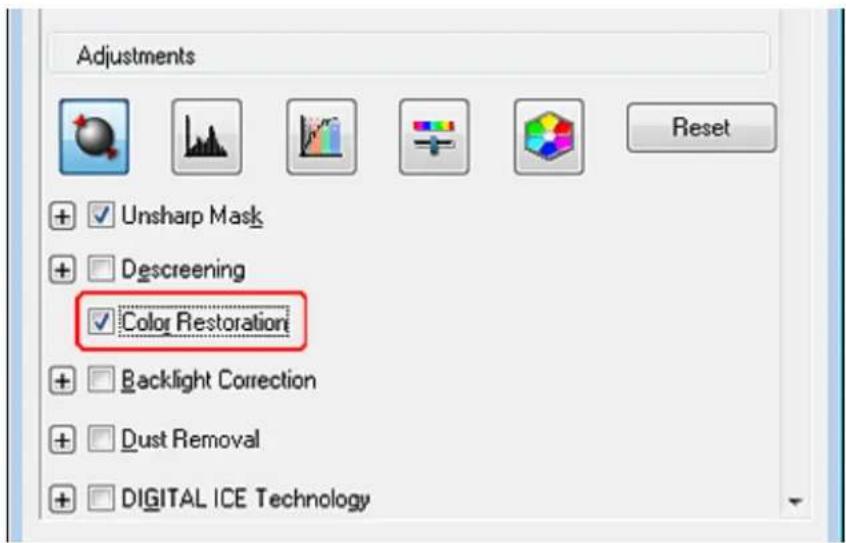

Note:
If you are scanning multiple images at the same time and you want to apply the Color Restoration feature to all of your images or scan areas, click All in the Preview window before you click the check box.
6 Make any other necessary image adjustments. See Adjusting the Color and Other Image Settings for details.
7 If you want to make more precise color adjustments, click the Color Palette icon. See Using the Color Palette Feature (for Professional Mode Only) for instructions.
8 Size your image(s) as necessary. See Selecting the Scan Size for details.
9 Click Scan.
What happens next depends on how you started Epson Scan. See Finishing the Scan for instructions.

Using the Color Palette Feature (for Professional Mode Only)
Follow the steps in these sections to fine-tune the colors in your image using the Color Palette feature in Professional Mode.
This feature is available only after previewing your images, so make sure to click Preview to activate this feature.
Sampling a Color from an Image

Click the

or Palette icon.
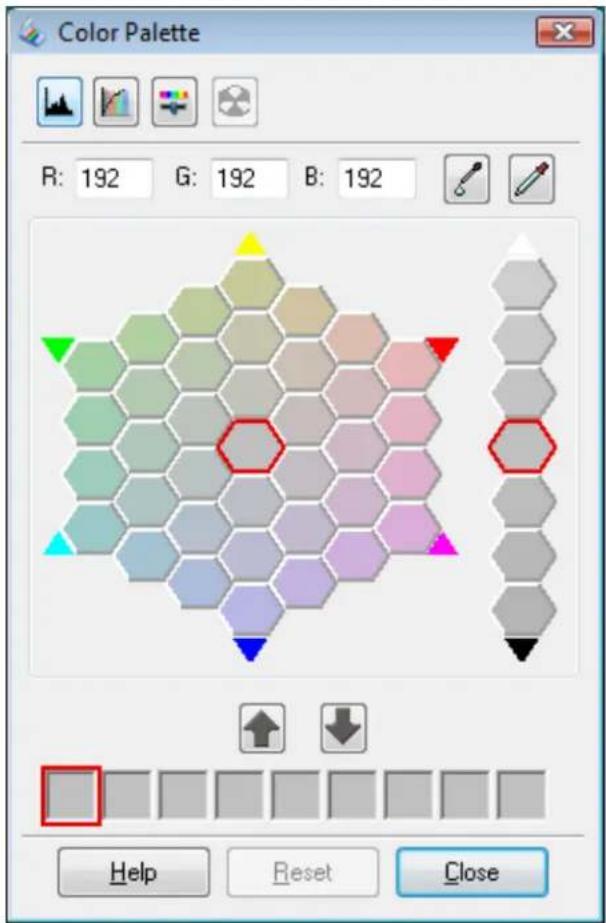

Click the

or extractor icon. Your cursor changes to an eye dropper.

In the Preview window, click on the color in your image that needs adjustment.
The color you selected is moved to the center cell in the Color Palette window with variations in hue in the surrounding cells.

Select the cell that contains the hue you would like to use to adjust the color in your image. This color now becomes the color of the center cell and the color change is reflected in your image.

Note:
You can also use the cells to the right of the adjustment area to change the brightness, if necessary.

If you want to continue adjusting the color, repeat step 4.
If you want to save the color for future scans, click the save icon. The color appears in the save area.

Note:
To load a previously saved color, select the color and click the

apply to palette icon.
When you are finished adjusting the color, click Close to return to the Professional Mode window.
For further details on using the Color Palette feature, see Epson Scan Help.
Applying a Color to an Image
1
Click the

Palette icon.

2 Select the cell that contains the hue you would like to use to adjust the color in your image. This color now becomes the color of the center cell.

Note:
You can also use the cells to the right of the adjustment area to change the brightness, if necessary.
3 Click the color applicator icon. Your cursor changes to a droplet. 4 In the Preview window, click on the color in your image that needs adjustment. The color change is reflected in your image. 5 If you want to continue adjusting the color, repeat steps 2 through 4.
If you want to save the color for future scans, click the save icon. The color appears in the save area.

Note:
To load a previously saved color, select the color and click the

apply to palette icon.
6 When you are finished adjusting the color, click Close to return to the Professional Mode window.
For further details on using the Color Palette feature, see Epson Scan Help.
Top
Home > Scanning Special Projects
Removing Dust Marks with the Dust Removal Feature

Dust Removal in Full Auto Mode

Dust Removal in Professional Mode
Using the Dust Removal feature in Epson Scan, you can virtually "clean" the dust marks from your originals as you scan them.
Original image Dust Removal applied


Note:
• Before scanning your originals, carefully remove any dust that you can see on them. - Do not use Dust Removal to scan your originals that do not contain dust or scratch marks; otherwise your scanned image may be distorted or blurred. - The Dust Removal feature is available for Full Auto Mode or Professional Mode only (it is not available for Home Mode). To remove dust marks from color film or slides in Home Mode, use the DIGITAL ICE Technology feature as described in Removing Dust and Scratch Marks from Originals Using DIGITAL ICE Technology. - If you still have dust marks after using the Dust Removal feature, try scanning it again using DIGITAL ICE Technology as described in Removing Dust and Scratch Marks from Originals Using DIGITAL ICE Technology. This feature is not available if DIGITAL ICE Technology check box is selected.
See one of these sections for instructions on removing dust marks from your original(s).
Full Auto Mode: Dust Removal in Full Auto Mode
Office Mode: This feature is not available in Office Mode. Change the scan mode to Full Auto Mode or Professional Mode. See Changing the Scan Mode for instructions.
Home Mode: This feature is not available in Home Mode. Change the scan mode to Full Auto Mode or Professional Mode. See Changing the Scan Mode for instructions.
Professional Mode: Dust Removal in Professional Mode
Dust Removal in Full Auto Mode
1 Place your original(s) on the document table. See one of these sections for instructions.
Documents or photos: Placing Documents or Photos
Film or slides: Placing Film or Slides

Note for film or slides:
You can only scan 35 mm color film strip or color positive slides in Full Auto Mode. To scan other types of film, use Home Mode or Professional Mode. To change the scan mode, see Changing the Scan Mode.
2 Start Epson Scan. See Starting Epson Scan for instructions.
3 In the Full Auto Mode window, click Customize. The Customize window appears.
4 Click the Dust Removal check box.
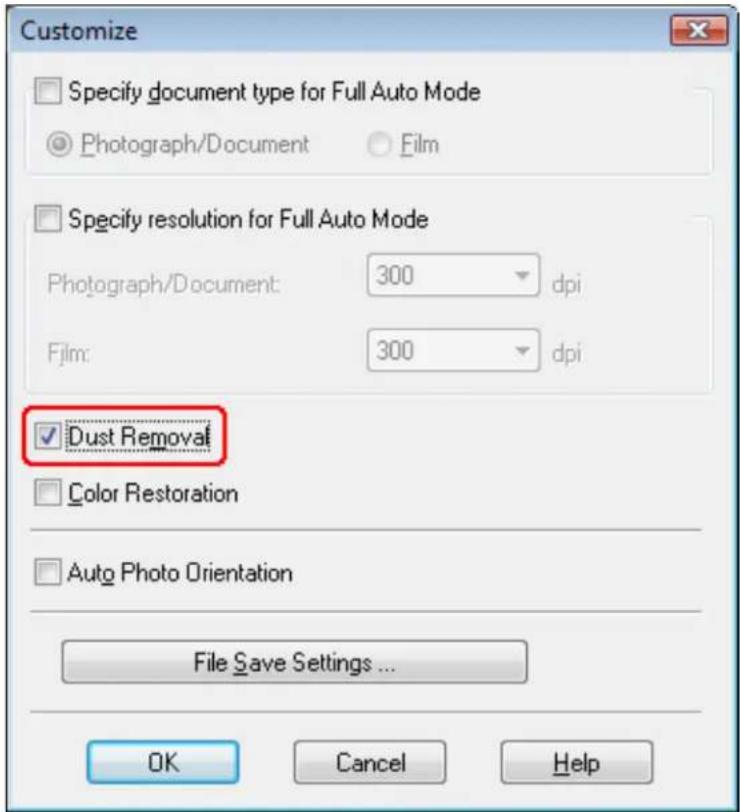
5 If you want to select the file save settings, click File Save Settings. See Selecting File Save Settings for instructions.

Note:
If you started Epson Scan from a TWAIN-compliant program like Adobe Photoshop Elements, the File Save Settings button does not appear.
6 When you finish making all the necessary settings, click OK to return to the Full Auto Mode window. 7 Click Scan.
What happens next depends on how you started Epson Scan. See Finishing the Scan for instructions.
Top
Dust Removal in Professional Mode
1 Place your original(s) on the document table. See one of these sections for instructions.
Documents or photos: Placing Documents or Photos
Film or slides: Placing Film or Slides
2 Start Epson Scan. See Starting Epson Scan for instructions. 3 In the Professional Mode window, select the Document Type, Document Source, Auto Exposure Type (for scanning documents or photos) or Film Type (for scanning film or slides), Image Type, and Resolution settings. For details, see Scanning in Professional Mode. 4 Click Preview to preview your image(s), then select your scan area. See Previewing and Adjusting the Scan Area for details. 5 Scroll down to the Adjustments area and click the Dust Removal check box. If you want to increase or decrease the level of the dust removal effect, click the + (Windows) or ▶ (Mac OS X) button next to the option and select a setting in the Level list.
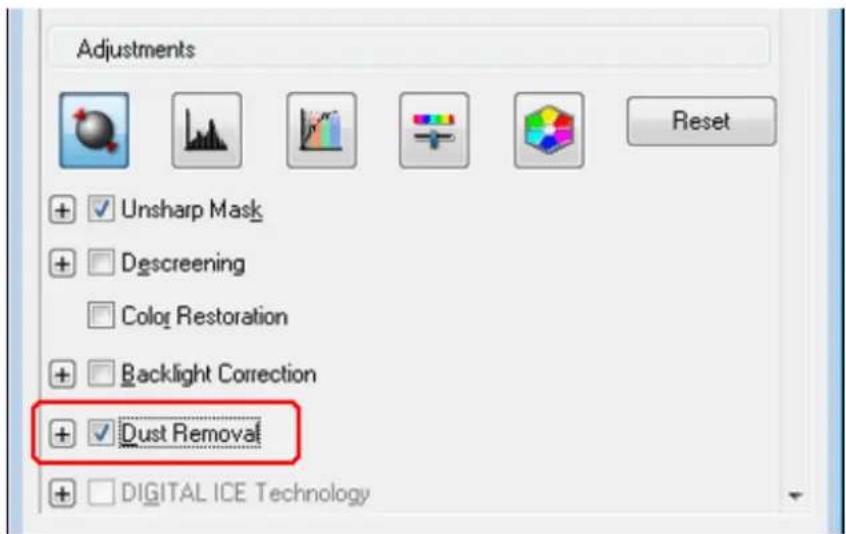

Note:
The result of the Dust Removal does not appear in the image(s) in the Preview window. - If you are scanning multiple images at the same time and you want to apply the Dust Removal feature to all of your images or scan areas, click All in the Preview window before you click the check box. • This feature is not available if DIGITAL ICE Technology check box is selected.
6 Make any other necessary image adjustments. See Adjusting the Color and Other Image Settings for instructions.
7 Size your image(s) as necessary. See Selecting the Scan Size for instructions.
8 Click Scan.
What happens next depends on how you started Epson Scan. See Finishing the Scan for instructions.
Top
Home > Scanning Special Projects
Removing Dust and Scratch Marks from Originals Using DIGITAL ICE Technology

DIGITAL ICE Technology Specifications

Using DIGITAL ICE Technology in Home Mode

Using DIGITAL ICE Technology in Professional Mode
Your scanner and its Epson Scan software are equipped with the DIGITAL ICE Technology and DIGITAL ICE Lite Technology features that remove stubborn dust or scratch marks from color photos, film, and slides.
| Original image DIGITAL ICE Technology applied | |||
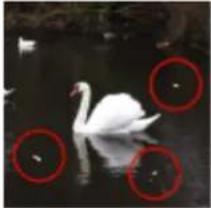 | 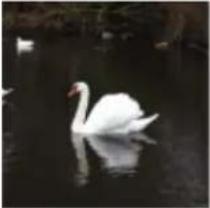 |
DIGITAL ICE Technology can remove dust marks that the Dust Removal feature cannot. However, it takes longer to scan using DIGITAL ICE Technology and also uses more of your system resources. It is best to try removing dust marks using Dust Removal before using DIGITAL ICE Technology. See Removing Dust Marks with the Dust Removal Feature for details.

Note:
- You cannot use Dust Removal and DIGITAL ICE Technology at the same time.
- Do not use DIGITAL ICE Technology to scan photos, film, or slides that do not contain dust or scratch marks; otherwise your scanned image(s) may be distorted or blurred.
- You cannot use DIGITAL ICE Technology when scanning film with the film area guide. Images scanned with DIGITAL ICE Technology may appear softer than your original images. • DIGITAL ICE Lite Technology is for scanning film and slides only.
Before using DIGITAL ICE Technology, make sure your system meets the requirements in DIGITAL ICE Technology Specifications.
DIGITAL ICE Technology Specifications
To use DIGITAL ICE Technology, your system memory and hard disk space must meet the requirements in the table below. DIGITAL ICE Technology needs additional resources to process and store your scanned images at the sizes and resolutions specified here.
| Original type Resolution * Hard disk space System memory | ||
| 4 × 6-inch (10.2 × 15.2 cm) photograph 60 dpi 157 MB 185 MB | ||
| 4800 dpi 626 MB 370 MB |
| A4 size photograph 600 dpi 631 MB 255 MB | |||
| 4800 dpi 2524 MB 510 MB | |||
| 35 mm film or slide 150 dpi 1 MB 8 MB | |||
| 300 dpi 1 MB 15 MB | |||
| 600 dpi 4 MB 30 MB | |||
| 1200 dpi 16 MB 59 MB | |||
| 2400 dpi 63 MB 117 MB | |||
| 3600 dpi 142 MB 175 MB | |||
| 12800 dpi 251 MB 233 MB | |||
| Medium format film (6 × 20 cm) 150 dpi 4 MB 34 MB | |||
| 300 dpi 8 MB 70 MB | |||
| 600 dpi 29 MB 139 MB | |||
| 1200 dpi 116 MB 277 MB | |||
| 2400 dpi 464 MB 553 MB | |||
| 3600 dpi 1042 MB 830 MB | |||
| 12800 dpi 1853 MB 1106 MB | |||
| 4 × 5 inch film 150 dpi 4 MB 36 MB | |||
| 300 dpi 13 MB 72 MB | |||
| 600 dpi 51 MB 144 MB | |||
| 1200 dpi 202 MB 287 MB | |||
| 2400 dpi 805 MB 573 MB | |||
| 3600 dpi 1811 MB 859 MB | |||
| 12800 dpi 3219 MB 1145 MB | |||
* This is the actual scan resolution used by DIGITAL ICE Technology, which is higher than the scan resolution you specify in Epson Scan. Make sure your system resources meet these increased requirements.
You can use DIGITAL ICE Technology on the following types of film or slides.
| Original DIGITAL ICE Technology DIGITAL ICE Lite | Technology | |
| Photograph (reflective) Yes No | ||
| Color negative film Yes Yes | ||
| Color positive film or slides | Yes * | Yes |
| Monochrome negative film | No ** | No |
| Monochrome positive film or slides | No | No |
* Kodachrome film is not supported. ** Only chromogenic monochrome negative film is supported.

Note:
- It may take much longer to scan and for your software to respond to clicking Cancel if you have insufficient system resources.
- If you place your original on the document table at an angle, DIGITAL ICE Technology may require even more system memory to process your images. Be sure to place your original straight on the document table.
See one of these sections for instructions on using DIGITAL ICE Technology.
Full Auto Mode: This feature is not available in Full Auto Mode. Change the scan mode to Home Mode or Professional Mode. See Changing the Scan Mode for instructions.
Office Mode: This feature is not available in Office Mode. Change the scan mode to Home Mode or Professional Mode. See Changing the Scan Mode for instructions.
Home Mode: Using DIGITAL ICE Technology in Home Mode
Professional Mode: Using DIGITAL ICE Technology in Professional Mode
Top
Using DIGITAL ICE Technology in Home Mode
1 Place your original photo, film, or slide on the document table. See one of these sections for instructions.
Photos: Placing Documents or Photos
Film or slides: Placing Film or Slides
2 Start Epson Scan. See Starting Epson Scan for instructions. 3 In the Home Mode window, select the Document Type, Image Type, and Destination settings. For details, see Scanning in Home Mode. 4 Click Preview to preview your image(s), then select your scan area. See Previewing and Adjusting the Scan Area for details. 5 Click the DIGITAL ICE Technology check box.
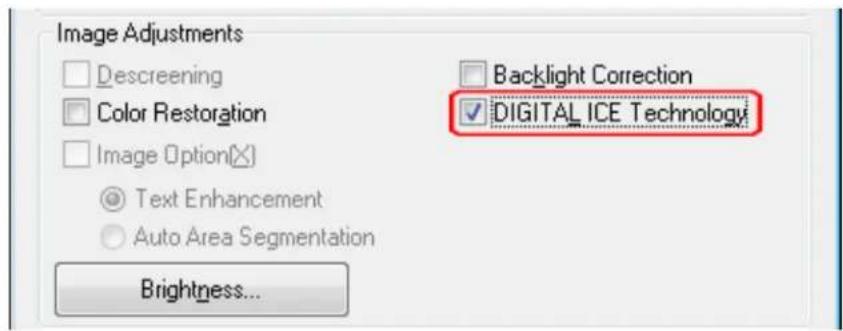

Note:
The results of DIGITAL ICE Technology do not appear in the images in the Preview window, but apply to all of them. You must scan the images to see the effects.
6 Make any other necessary image adjustments. See Adjusting the Color and Other Image Settings for instructions. 7 Size your image(s) as necessary. See Selecting the Scan Size for instructions.
8 Click Scan to scan and remove dust and scratch marks in your image(s).
What happens next depends on how you started Epson Scan. See Finishing the Scan for details.
Top
Using DIGITAL ICE Technology in Professional Mode
1 Place your original photo, film, or slide on the document table. See one of these sections for instructions.
Photos: Placing Documents or Photos
Film or slides: Placing Film or Slides
2 Start Epson Scan. See Starting Epson Scan for instructions. 3 In the Professional Mode window, select the Document Type, Auto Exposure Type (for scanning documents or photos), Film Type (for scanning film or slides), Image Type, Resolution, and Document Size settings. For details, see Scanning in Professional Mode. 4 Click Preview to preview your image(s), then select your scan area. See Previewing and Adjusting the Scan Area for details. 5 Scroll down to the Adjustments area and click the DIGITAL ICE Technology check box.
If you want to decrease the level of the DIGITAL ICE Technology correction effect when scanning film or slides, click the + (Windows) or ▼ (Mac OS X) button next to the option and select the DIGITAL ICE Lite Technology - Speed setting in the Mode list.

If you want to increase the level of the DIGITAL ICE Technology correction effect when scanning photos, click the + (Windows) or ▼ (Mac OS X) button next to the option and select the High setting in the Mode list.

Note:
The results of DIGITAL ICE Technology do not appear in the images in the Preview window, but apply to all of them. You must scan the images to see the effects.
6 Make any other necessary image adjustments. See Adjusting the Color and Other Image Settings for instructions. 7 Size your image(s) as necessary. See Selecting the Scan Size for instructions. 8 Click Scan to scan and remove dust and scratch marks in your image(s).
What happens next depends on how you started Epson Scan. See Finishing the Scan for details.
Home > Scanning Special Projects

Fixing Backlit Photos

Backlight Correction in Home Mode

Backlight Correction in Professional Mode
Using the Backlight Correction feature in Epson Scan, you can remove shadows from photos that have too much background light. You can fix printed photos, film, or slides automatically as you scan them.
| Original image Backlight Correction applied | |
See one of these sections for instructions on fixing backlit photos.
Full Auto Mode: This feature is not available in Full Auto Mode. Change the scan mode to Home Mode or Professional Mode. See Changing the Scan Mode for instructions.
Office Mode: This feature is not available in Office Mode. Change the scan mode to Home Mode or Professional Mode. See Changing the Scan Mode for instructions.
Home Mode: Backlight Correction in Home Mode
Professional Mode: Backlight Correction in Professional Mode
Backlight Correction in Home Mode
1 Place your original(s) on the document table. See one of these sections for instructions. Documents or photos: Placing Documents or Photos Film or slides: Placing Film or Slides 2 Start Epson Scan. See Starting Epson Scan for instructions. 3 In the Home Mode window, select the Document Type, Image Type, and Destination settings. For details, see Scanning in Home Mode. 4 Click Preview to preview your image(s), then select your scan area. See Previewing and Adjusting the Scan Area for details. 5 Click the Backlight Correction check box.


Note:
If you are scanning multiple images at the same time and you want to apply the Backlight Correction feature to all of your images or scan areas, click All in the Preview window before you click the check box.
6 Make any other necessary image adjustments. See Adjusting the Color and Other Image Settings for details. 7 Size your image(s) as necessary. See Selecting the Scan Size for details. 8 Click Scan.
What happens next depends on how you started Epson Scan. See Finishing the Scan for instructions.
Backlight Correction in Professional Mode
1 Place your original(s) on the document table. See one of these sections for instructions.
Documents or photos: Placing Documents or Photos
Film or slides: Placing Film or Slides
2 Start Epson Scan. See Starting Epson Scan for instructions. 3 In the Professional Mode window, select the Document Type, Document Source, Auto Exposure Type (for scanning documents or photos) or Film Type (for scanning film or slides), Image Type, and Resolution settings. For details, see Scanning in Professional Mode. 4 Click Preview to preview your image(s), then select your scan area. See Previewing and Adjusting the Scan Area for details. 5 Scroll down to the Adjustments area and click the Backlight Correction check box. If you want to increase or decrease the level of the backlight correction effect, click the + (Windows) or ▶ (Mac OS X) button next to the option and select a setting in the Level list.
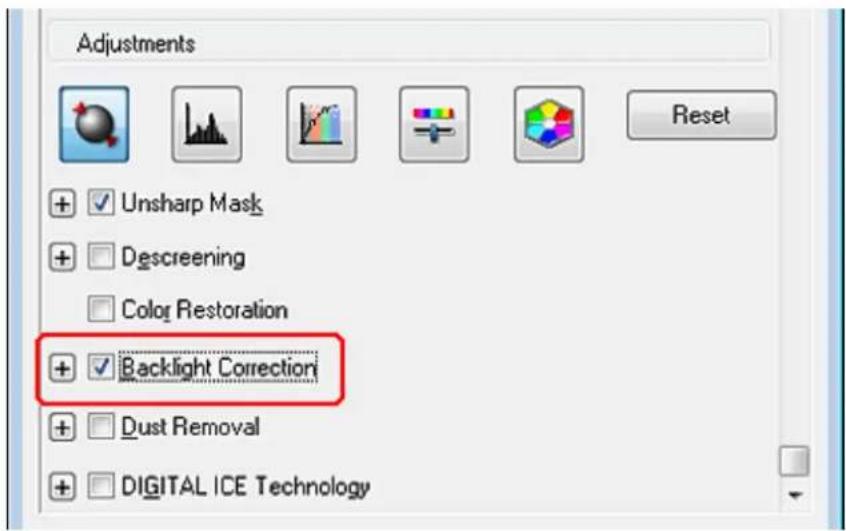

Note:
If you are scanning multiple images at the same time and you want to apply the Backlight Correction feature to all of your images or scan areas, click All in the Preview window before you click the check box.
6 Make any other necessary image adjustments. See Adjusting the Color and Other Image Settings for details. Size your image(s) as necessary. See Selecting the Scan Size for details. 8 Click Scan.
What happens next depends on how you started Epson Scan. See Finishing the Scan for instructions.
Home > Scanning Special Projects

Text Enhancement

Text Enhancement in Office Mode

Text Enhancement in Home Mode
When you scan documents, you can sharpen the text and increase accuracy by using the Text Enhancement feature in Epson Scan.
| Original Text Enhancement: Off Text Enhancement: On | |||||
| A B | A B | ||||

Note:
You can enhance text only when you scan using a resolution of 600 dpi or less.
See one of these sections for instructions on text enhancement.
Full Auto Mode: This feature is not available in Full Auto Mode. Change the scan mode to Home Mode or Office Mode. See Changing the Scan Mode for instructions.
Office Mode: Text Enhancement in Office Mode
Home Mode: Text Enhancement in Home Mode
Professional Mode: This feature is not available in Professional Mode. Change the scan mode to Home Mode or Office Mode. See Changing the Scan Mode for instructions.

Note:
The instructions in these sections are for scanning to a PDF file, but text enhancement is also effective when you convert scanned documents into editable text. See Converting Scanned Documents Into Editable Text for details.
Text Enhancement in Office Mode
1. Place your document on the document table. See Placing Documents or Photos for instructions. 2. Start Epson Scan. See Starting Epson Scan for instructions.
3 In the Office Mode window, select the Image Type, and Destination settings. For details, see Scanning in Office Mode.
4 Click the Image Option check box, and then select Text Enhancement.
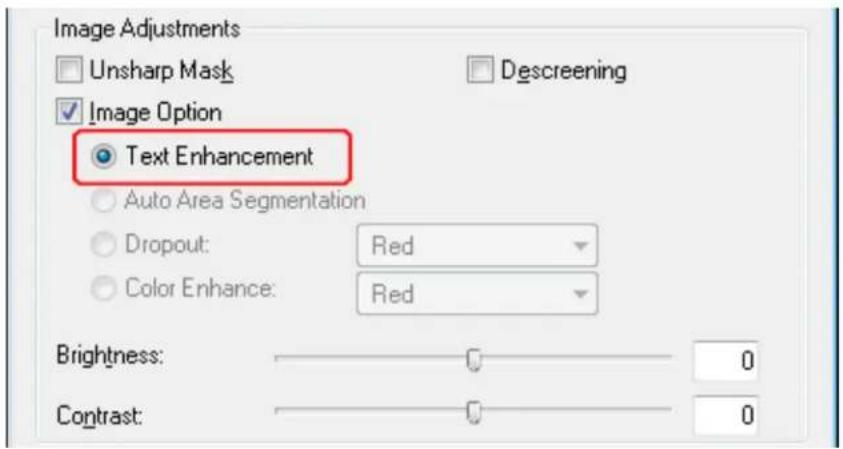
5 Click Preview to preview your document, then select your scan area. For details, see Previewing and Adjusting the Scan Area. Make any other necessary image adjustments. See Adjusting the Color and Other Image Settings for details. 7 Click Scan. The File Save Settings window appears. 8 Select File Save and PDF settings as necessary. See Scanning to a PDF File in Office Mode for details. 9 Click OK.
Text Enhancement in Home Mode
1 Place your document on the document table. See Placing Documents or Photos for instructions. 2 Start Epson Scan. See Starting Epson Scan for instructions. 3 In the Home Mode window, select the Document Type, Image Type, and Destination settings. For details, see Scanning in Home Mode. 4 Click the Image Option check box, and then select Text Enhancement.
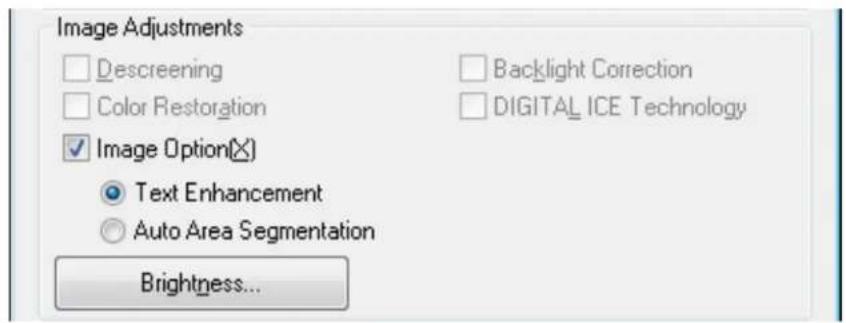
5 Click Preview to preview your document, then select your scan area. For details, see Previewing and Adjusting the Scan Area. 6 Make any other necessary image adjustments. See Adjusting the Color and Other Image Settings for details. 7 Size your image(s) as necessary. See Selecting the Scan Size for details. 8 Click Scan. The File Save Settings window appears. 9 Select File Save and PDF settings as necessary. See Scanning to a PDF File in Home Mode for details. 10 Click OK.

Home > Scanning Special Projects
Using the Scanner as a Copier
You can use your scanner along with a printer connected to your computer just like you would use a copy machine. You can even enlarge and reduce, restore faded colors, remove dust, enhance text, and adjust image brightness and contrast as you copy.
1 Place your original(s) on the document table. See one of these sections for instructions.
Documents or photos: Placing Documents or Photos
Film or slides: Placing Film or Slides
2 Start the Copy Utility.
- Windows 8: Navigate to the Start screen and select Copy Utility.
- Windows (other versions):

Select or Start > Programs or All Programs > Epson Software > Copy Utility.
- Mac OS X: Select Applications > Epson Software > Copy Utility, and double-click the Copy Utility icon. You see the Copy Utility window.
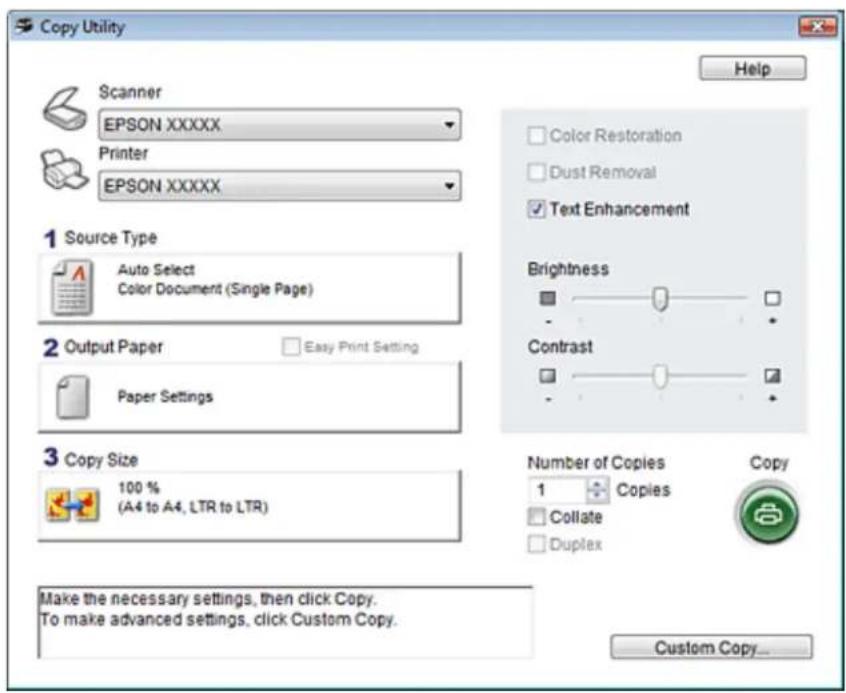
3 Select your scanner from the Scanner list at the top of the window. 4 Select your printer from the Printer list.
5 Click the Source Type box, select the type of original(s) you are copying, and click OK. See the table below for guidance.
| Source Type setting Type of | document |
| Color Document (Single Page) | One-page color documents containing text or text and graphics, such as a flyer. |
| Black & White Document (Single Page) | One-page black and white documents containing text or text and graphics, such as a letter. |
| Color Document (Multiple Pages) | Multiple page color documents containing text or text and graphics, such as a brochure. |
| Black & White Document (Multiple Pages) | Multiple page black and white documents containing text or text and graphics, such as a manual. |
| Photo Color or black-and-white | photographs. |
| Negative Film Color negative film strips. | |
| Positive Film Color positive slides or positive film strips. | |
6 Click the Output Paper box, select the type and size of paper you loaded in your printer, and click OK.

Note:
If you are printing on certain Epson printers, you see the printer settings window. See your printer documentation for instructions on selecting settings.
7 If you want to enlarge or reduce your image(s) as you copy it, click the Copy Size box, select the enlargement/reduction, and click OK.

Note:
If you are printing on an Epson printer that supports borderless printing, you can select options for Margins (borders) or No Margins (borderless).
8 If you are copying a faded photo and want to restore the colors, click the Color Restoration check box. It is available only when the Source Type is Photo, Negative Film, or Positive Film.
9 If you need to remove dust marks as you copy, click the Dust Removal check box. It is available only when the Source Type is Negative Film or Positive Film.
10 If you are copying a color or black-and-white document, you can improve the definition of text and line art by leaving the Text Enhancement check box checked. It is available only when the Source Type is Color Document (Single Page), Black & White Document (Single Page), Color Document (Multiple Pages), or Black & White Document (Multiple Pages).
11 If you need to adjust the lightness or darkness of your original(s) or adjust the contrast between them as you copy, click the slider beneath the Brightness and/or Contrast settings. Contrast is only adjustable when the Source Type is Photo, Negative Film, or Positive Film.
12 Click the arrow in the Number of Copies box to select the number of copies you want, if necessary.
13
When you are ready to scan and print, click Copy.

Note:
If you want to preview your scan before printing it or select additional copy settings, click Custom Copy at the bottom of the window. Click Help in the Copy Utility for instructions on using the Custom Copy features.
Home > Scanning Special Projects

Scanning to a PDF File
Scanning to a PDF File in Office Mode Scanning to a PDF File in Home Mode Scanning to a PDF File in Professional Mode
Using Epson Scan, you can create a PDF file with the following features.
Scanning multiple document pages into a single PDF file: You can scan multiple document pages and save them in a single PDF file.
Creating a searchable PDF file: You can create a PDF file with search functionality, so that you can look for words in the file. (This feature may not be available in some countries.)
Specifying the number of pages in a single PDF file: You can specify the maximum number of pages that can be included in one PDF file. For example, if you are scanning a 20-page document, and specify the page number to be included in one PDF as 4, 5 PDF files are automatically created.

Note:
You need ABBYY FineReader (included with your scanner) to use some of these features. If you have installed your scanning software as described in the Start Here sheet, it has already been installed. (ABBYY FineReader may not be available in some countries.)
See one of these sections to start scanning to a PDF file.
Full Auto Mode: Select PDF as the Image Type setting in the File Save Settings window. See Scanning in Full Auto Mode for instructions. If you want to scan multiple document pages into one PDF file, change the scan mode to Office Mode, Home Mode, or Professional Mode. See Changing the Scan Mode for instructions.
Office Mode: Scanning to a PDF File in Office Mode
Home Mode: Scanning to a PDF File in Home Mode
Professional Mode: Scanning to a PDF File in Professional Mode
Scanning to a PDF File in Office Mode
1. Place your document on the document table. See Placing Documents or Photos for instructions. 2. Start Epson Scan. See Starting Epson Scan for instructions. 3. In the Office Mode window, select the Image Type, Document Source, Size, and Resolution settings. For details, see Scanning in Office Mode. 4. Click Preview to preview your image(s), then select your scan area. For details, see Previewing and Adjusting the Scan Area.
5. Make any other necessary image adjustments. See Adjusting the Color and Other Image Settings for details. 6. Click Scan. The File Save Settings window appears. 7. Select PDF as the Type setting. The current Paper Size, Orientation, Margin, and other settings are displayed below it.
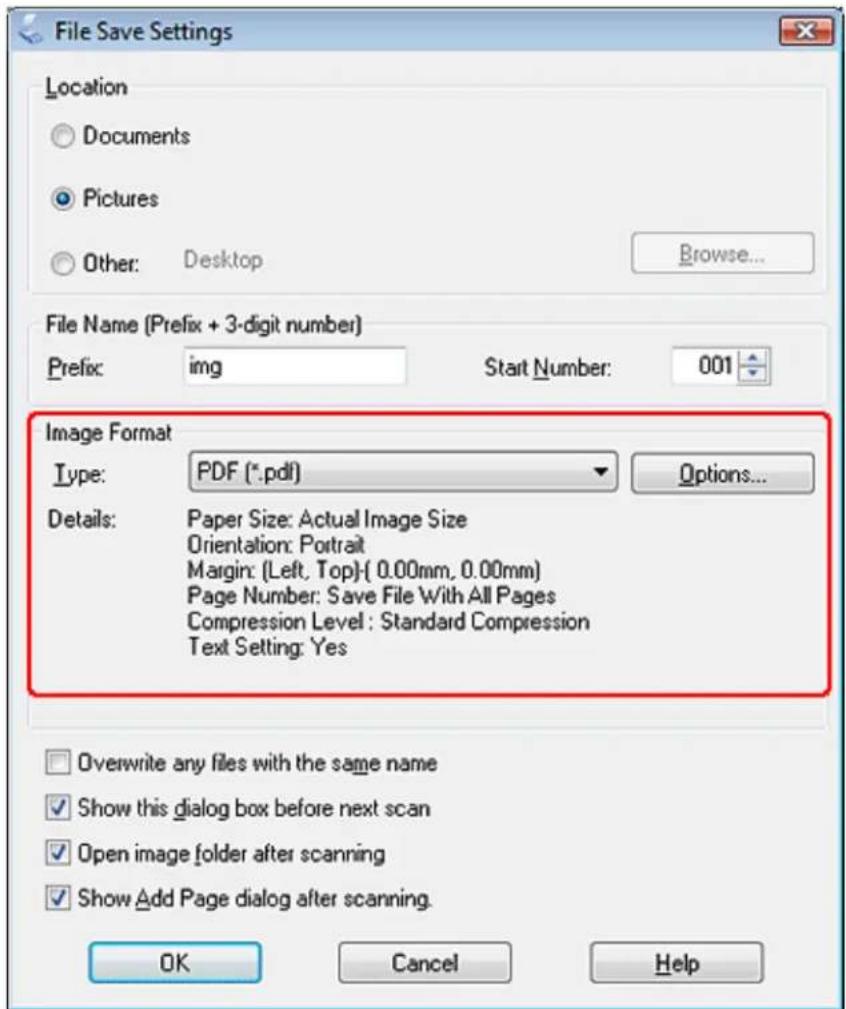
8. Click Options. You see the EPSON PDF Plug-in Settings window.
To create a searchable PDF file, click the Text tab, select the Create searchable PDF check box, then select your language from the Text Language list.
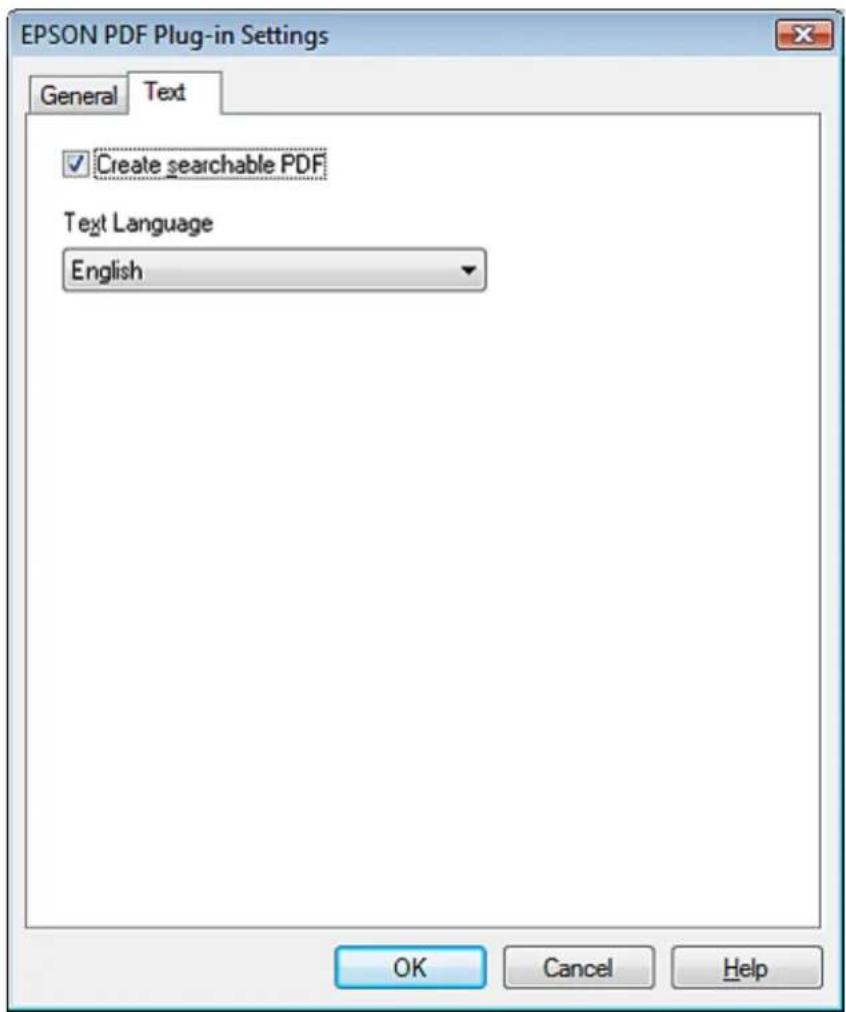

Note:
The Text tab is available only when ABBYY FineReader is installed. If ABBYY FineReader is not available in your country, you will not see the Text tab.
To specify the maximum number of pages that can be included in one PDF file, click the General tab and adjust the Select number to make file setting.
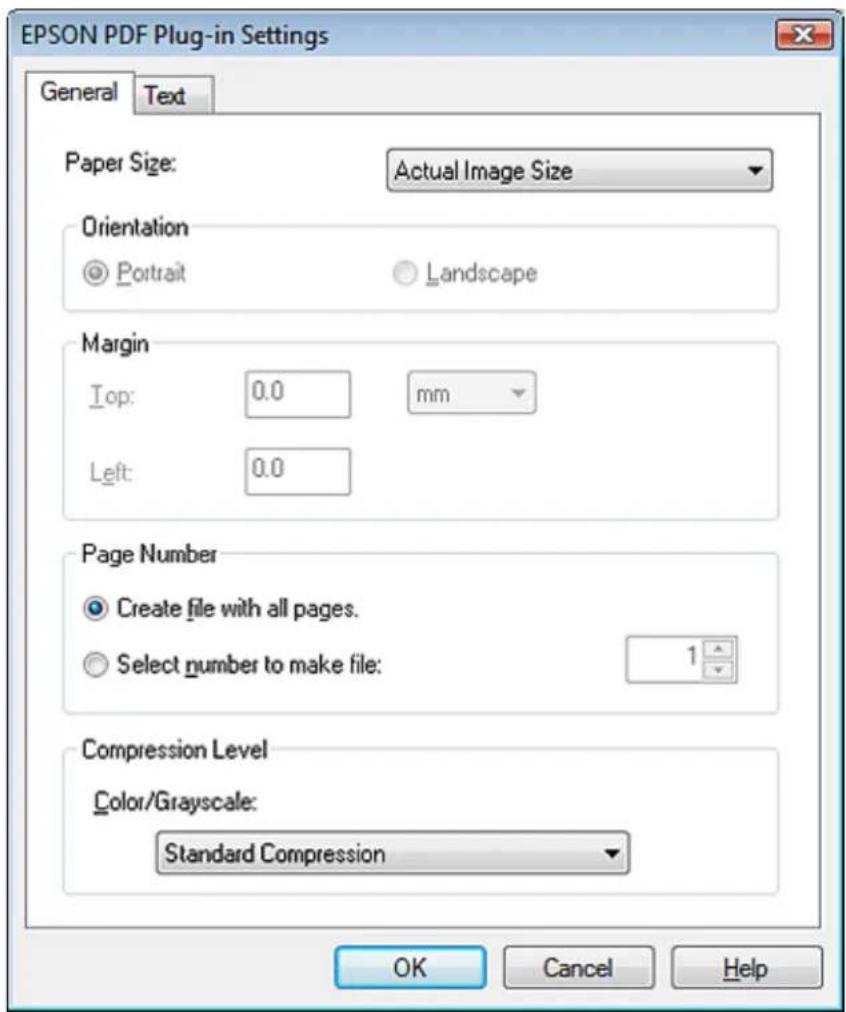
For other settings in the EPSON PDF Plug-in Settings window, see Epson Scan Help for details.
9
Select the settings that match your document and click OK. You return to the File Save Settings window.
10
Make any other file save settings, and click OK. Epson Scan scans your document and displays the window below.
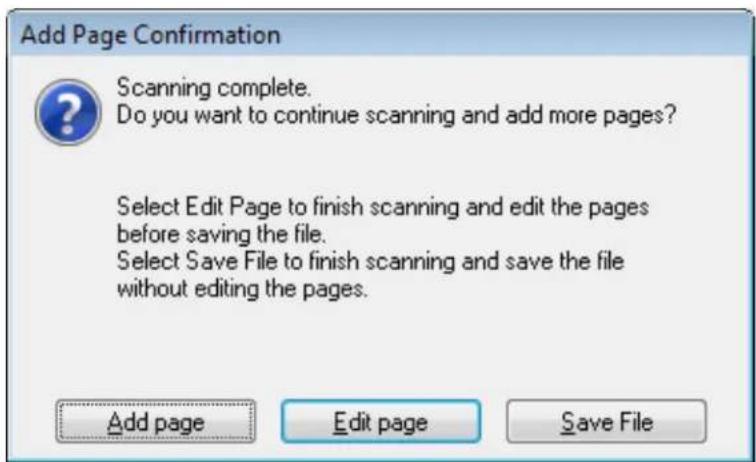

Note:
If you deselect the Show Add Page dialog after scanning check box in the File Save Settings window, this window does not appear and Epson Scan automatically saves your document.
11 Select one of the following options.
- Add page: Click this button to scan the next page of your document. Replace the first page on the document table with the next page, and click Scan. Repeat this step for each page in your document. When you are finished, click Edit page and go to step 12.
- Edit page: Click this button if you have scanned all the necessary pages so you can edit the scanned pages before saving them in one PDF file. Then go to step 12.
- Save File: Click this button when you are ready to finish scanning and save the scanned pages into one PDF without editing them. Then go to step 14.
12 You see the Editing Page window displaying thumbnail images of each scanned page.
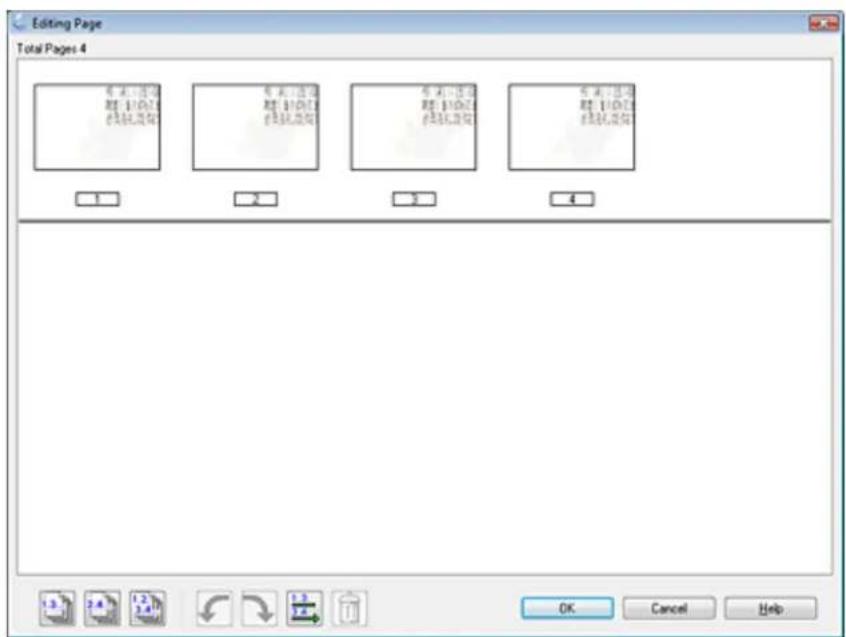
Use the tools below the Editing Page window to select, rotate, reorder, and delete pages.
If you want to include all the document pages in your PDF files as they currently look, go to step 13.
If you want to rotate pages, click the pages, or use the odd pages, even pages, or all pages icon to select the pages, then click the left or right rotate icon to rotate them.
If you want to delete pages, click the pages, or use the odd pages, or even pages icon to select the pages, then click the delete icon to delete them.

Note:
The delete icon is not available when all pages are selected.
For further details on the tools in the Editing Page window, see Epson Scan Help.
13 When you have finished editing your pages, click OK. The pages are saved in one PDF file in Pictures, My Pictures, or the location you selected in the File Save Settings window, and you return to the Office Mode window. 14 Click Close to exit Epson Scan.
Scanning to a PDF File in Home Mode
1 Place your document on the document table. See one of these sections for instructions.
Documents or photos: Placing Documents or Photos
Film or slides: Placing Film or Slides
2 Start Epson Scan. See Starting Epson Scan for instructions. 3 In the Home Mode window, select the Document Type, Image Type, and Destination settings. For details, see Scanning in Home Mode. 4 Click Preview to preview your image(s), then select your scan area. For details, see Previewing and Adjusting the Scan Area. 5 Make any other necessary image adjustments. See Adjusting the Color and Other Image Settings for details. 6 Size your image as necessary. See Selecting the Scan Size for details. 7 Click Scan. The File Save Settings window appears. 8 Select PDF as the Type setting. The current Paper Size, Orientation, Margin, and other settings are displayed below it.
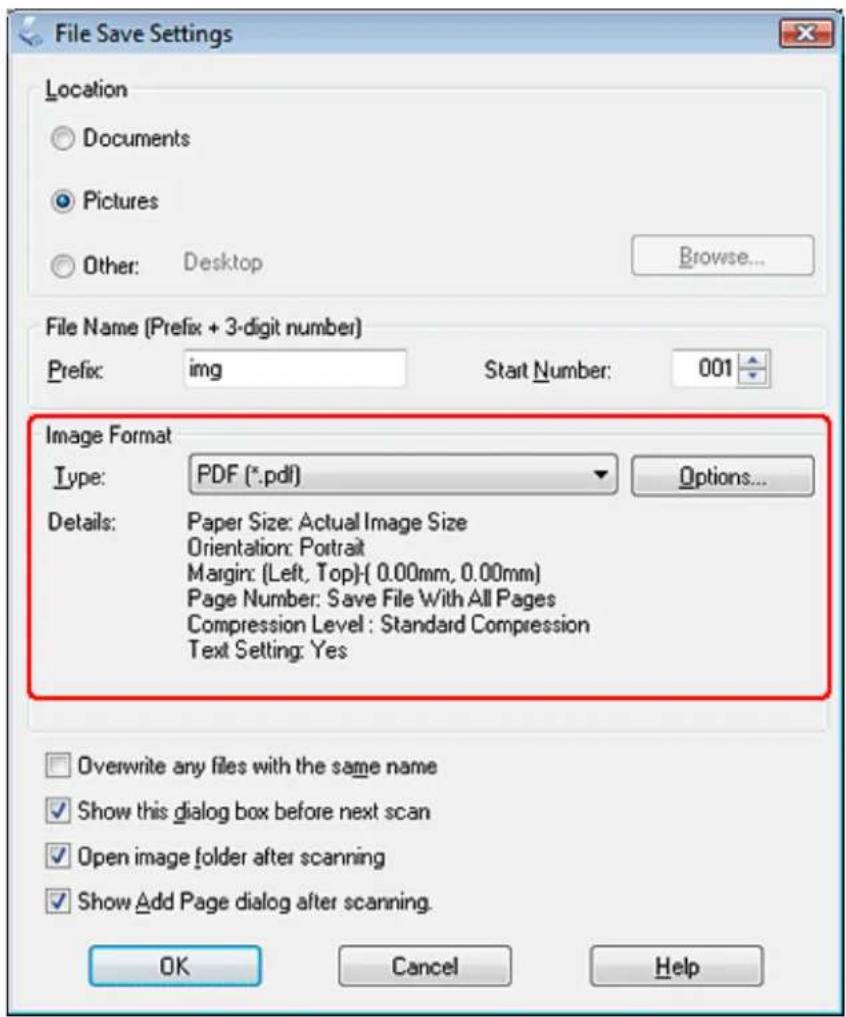
9
Click Options. You see the EPSON PDF Plug-in Settings window.
To create a searchable PDF file, click the Text tab, select the Create searchable PDF check box, then select your language from the Text Language list.


Note:
The Text tab is available only when ABBYY FineReader is installed. If ABBYY FineReader is not available in your country, you will not see the Text tab.
To specify the maximum number of pages that can be included in one PDF file, click the General tab and adjust the Select number to make file setting.
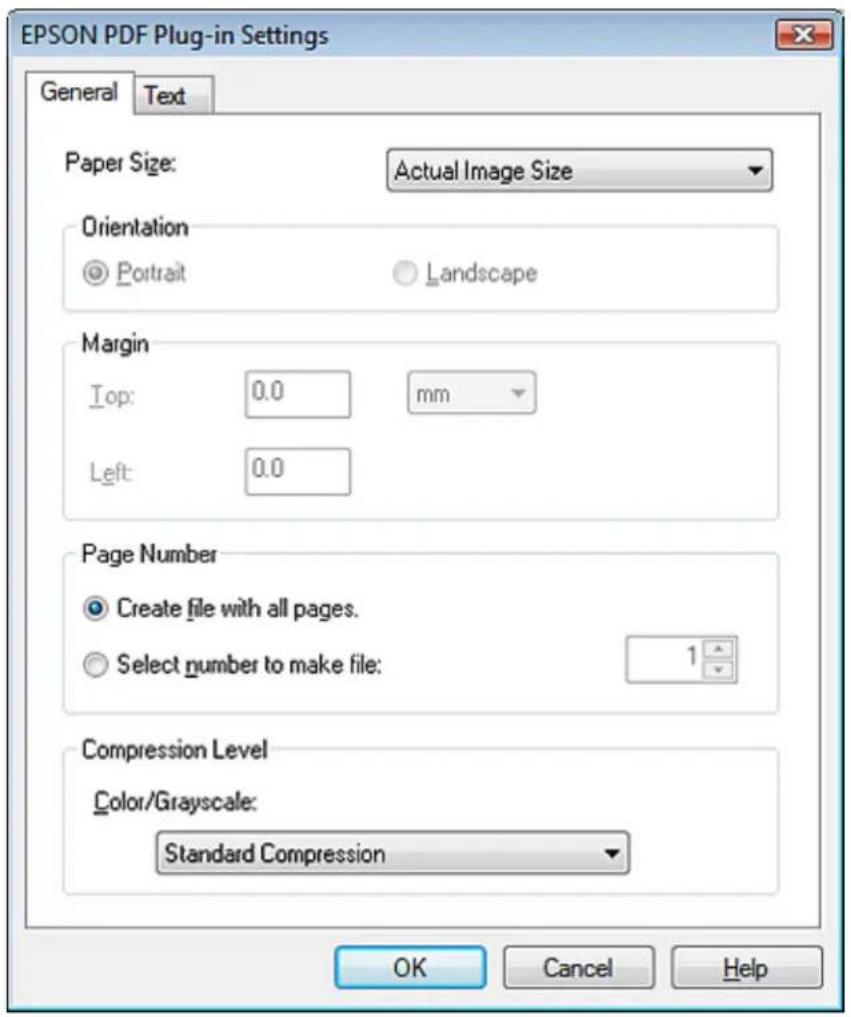
For other settings in the EPSON PDF Plug-in Settings window, see Epson Scan Help for details.
10
Select the settings that match your document and click OK. You return to the File Save Settings window.
11
Make any other file save settings, and click OK. Epson Scan scans your document and displays the window below.
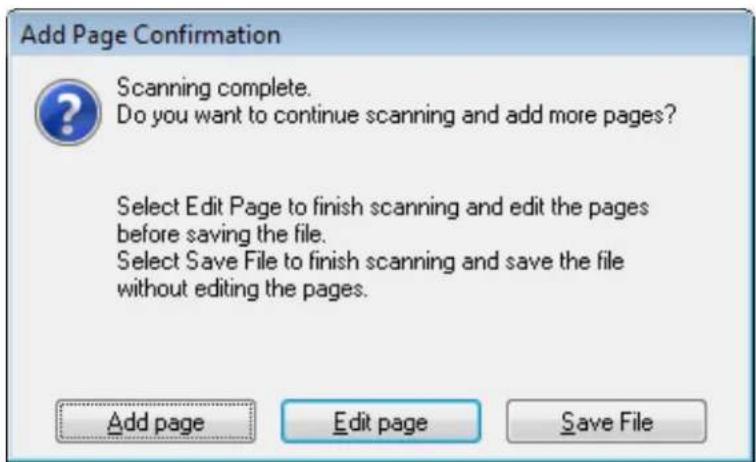

Note:
If you deselect the Show Add Page dialog after scanning check box in the File Save Settings window, this window does not appear and Epson Scan automatically saves your document.
12 Select one of the following options.
- Add page: Click this button to scan the next page of your document. Replace the first page on the document table with the next page, and click Scan. Repeat this step for each page in your document. When you are finished, click Edit page and go to step 13.
- Edit page: Click this button if you have scanned all the necessary pages so you can edit the scanned pages before saving them in one PDF file. Then go to step 13.
- Save File: Click this button when you are ready to finish scanning and save the scanned pages into one PDF without editing them. Then go to step 15.
13 You see the Editing Page window displaying thumbnail images of each scanned page.
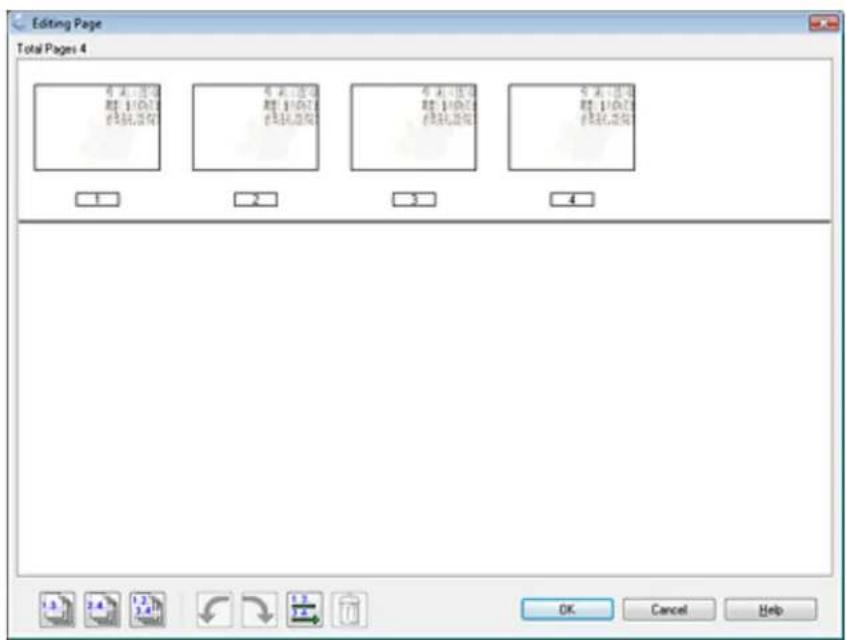
Use the tools below the Editing Page window to select, rotate, reorder, and delete pages.
If you want to include all the document pages in your PDF files as they currently look, go to step 14.
If you want to rotate pages, click the pages, or use the odd pages, even pages, or all pages icon to select the pages, then click the left or right rotate icon to rotate them.
If you want to delete pages, click the pages, or use the odd pages or even pages icon to select the pages, then click the delete icon to delete them.

Note:
The delete icon is not available when all pages are selected.
For further details on the tools in the Editing Page window, see Epson Scan Help.
14 When you have finished editing your pages, click OK. The pages are saved in one PDF file in Pictures, My Pictures, or the location you selected in the File Save Settings window, and you return to the Home Mode window. 15 Click Close to exit Epson Scan.
Top
Scanning to a PDF File in Professional Mode
1 Place your document on the document table. See one of these sections for instructions.
Documents or photos: Placing Documents or Photos
Film or slides: Placing Film or Slides
2 Start Epson Scan. See Starting Epson Scan for instructions. 3 In the Professional Mode window, select the Document Type, Document Source, Auto Exposure Type, Image Type, and Resolution settings. For details, see Scanning in Professional Mode. 4 Click Preview to preview your image(s), then select your scan area. For details, see Previewing and Adjusting the Scan Area. 5 Make any other necessary image adjustments. See Adjusting the Color and Other Image Settings for details. 6 Size your image as necessary. See Selecting the Scan Size for details. 7 Click Scan. The File Save Settings window appears. 8 Select PDF as the Type setting. The current Paper Size, Orientation, Margin, and other settings are displayed below it.
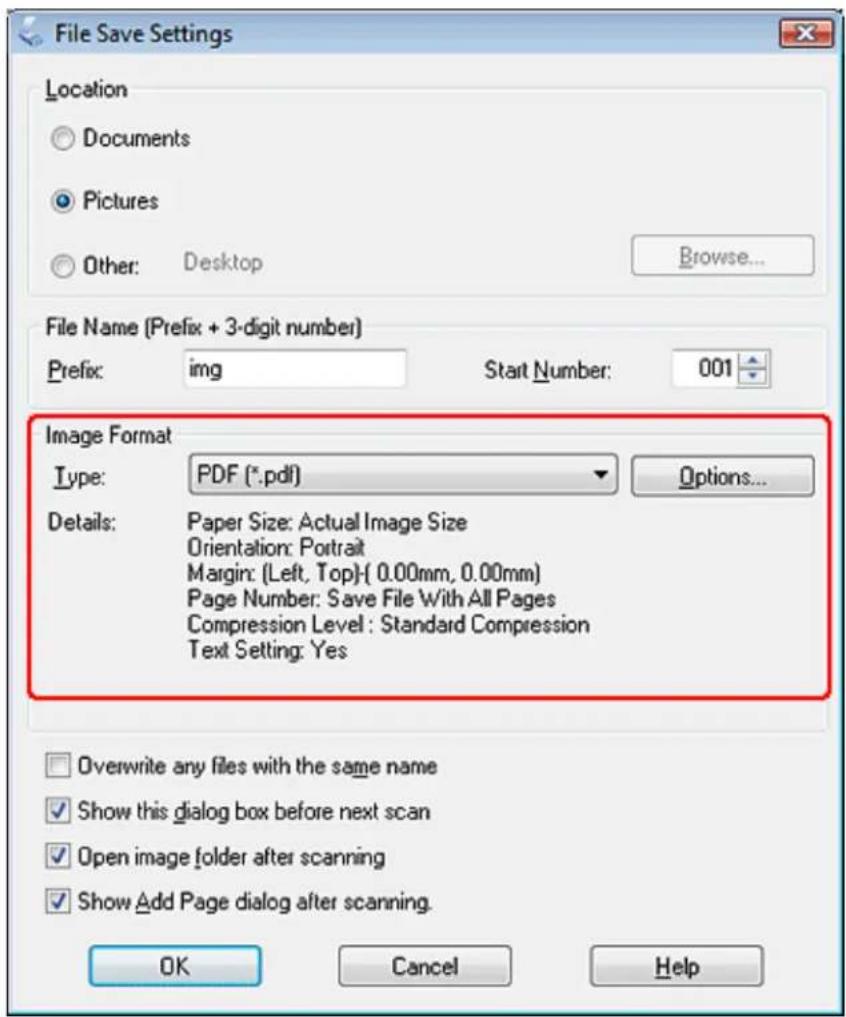
9
Click Options. You see the EPSON PDF Plug-in Settings window.
To create a searchable PDF file, click the Text tab, select the Create searchable PDF check box, then select your language from the Text Language list.
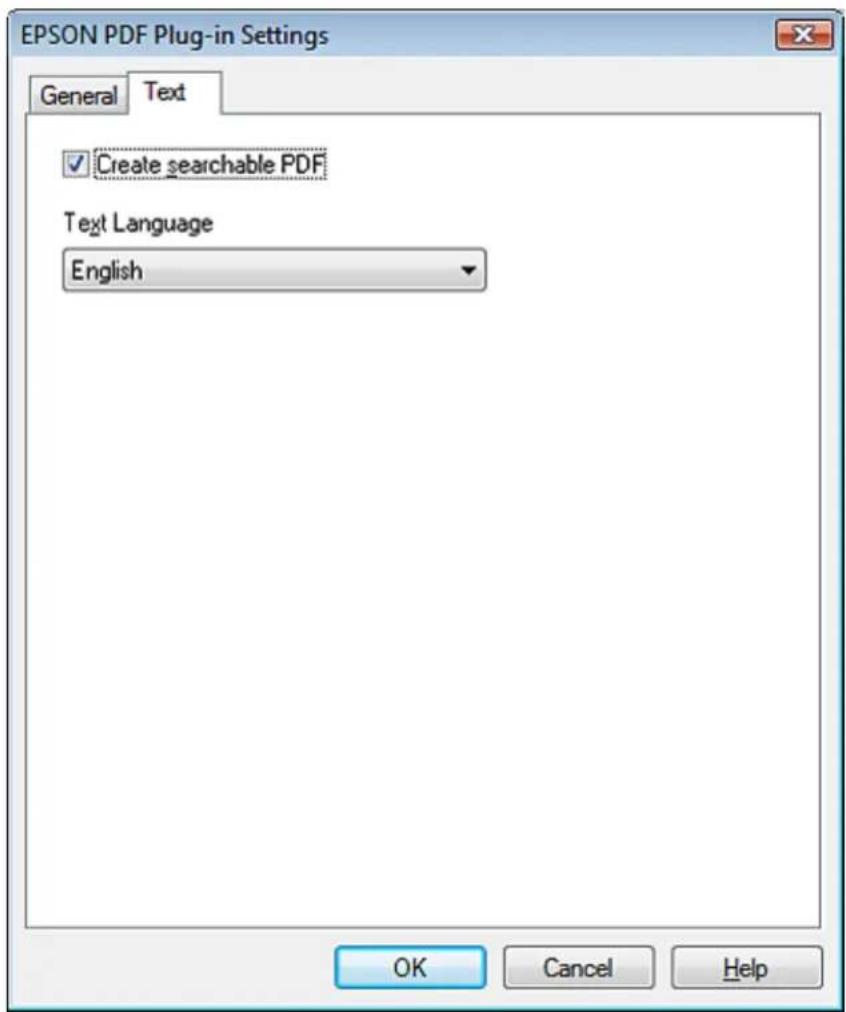

Note:
The Text tab is available only when ABBYY FineReader is installed. If ABBYY FineReader is not available in your country, you will not see the Text tab.
To specify the maximum number of pages that can be included in one PDF file, click the General tab and adjust the Select number to make file setting.

For other settings in the EPSON PDF Plug-in Settings window, see Epson Scan Help for details.
10
Select the settings that match your document and click OK. You return to the File Save Settings window.
11
Make any other file save settings, and click OK. Epson Scan scans your document and displays the window below.
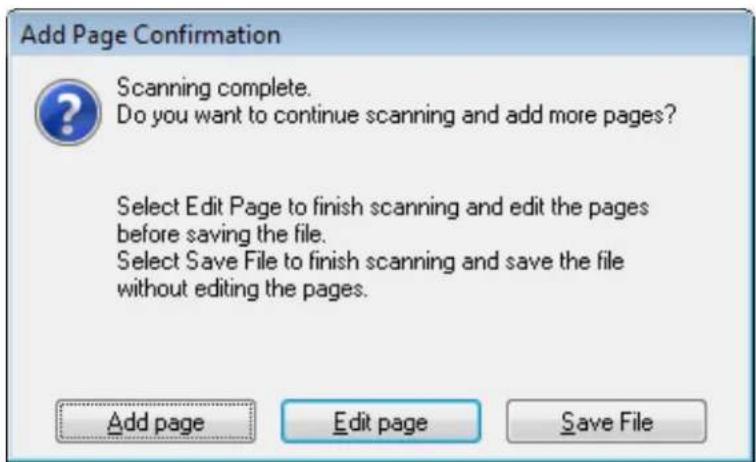

Note:
If you deselect the Show Add Page dialog after scanning check box in the File Save Settings window, this window does not appear and Epson Scan automatically saves your document.
12 Select one of the following options.
- Add page: Click this button to scan the next page of your document. Replace the first page on the document table with the next page, and click Scan. Repeat this step for each page in your document. When you are finished, click Edit page and go to step 13.
- Edit page: Click this button if you have scanned all the necessary pages so you can edit the scanned pages before saving them in one PDF file. Then go to step 13.
- Save File: Click this button when you are ready to finish scanning and save the scanned pages into one PDF without editing them. Then go to step 15.
13 You see the Editing Page window displaying thumbnail images of each scanned page.

Use the tools below the Editing Page window to select, rotate, reorder, and delete pages.
If you want to include all the document pages in your PDF files as they currently look, go to step 14.
If you want to rotate pages, click the pages, or use the odd pages, even pages, or all pages icon to select the pages, then click the left or right rotate icon to rotate them.
If you want to delete pages, click the pages, or use the odd pages or even pages icon to select the pages, then click the delete icon to delete them.

Note:
The delete icon is not available when all pages are selected.
For further details on the tools in the Editing Page window, see Epson Scan Help.
14 When you have finished editing your pages, click OK. The pages are saved in one PDF file in Pictures, My Pictures, or the location you selected in the File Save Settings window, and you return to the Professional Mode window.
15 Click Close to exit Epson Scan.
Top
Home > Scanning Special Projects
Converting Scanned Documents Into Editable Text
Converting into Editable Text in Office Mode Converting into Editable Text in Home Mode Converting into Editable Text in Professional Mode
You can scan a document and convert the text into a format that you can edit with a word processing program. This process is called OCR (Optical Character Recognition). To scan and use OCR, you need to use an OCR program, such as the ABBYY FineReader program that came with your scanner.

Note:
ABBYY FineReader may not be included in some countries.
OCR software cannot recognize or has difficulty recognizing the following types of documents or text:
- Handwritten characters
- Items that have been copied from other copies, faxes, text with tightly spaced characters or line pitch, text that is in tables or underlined, cursive or italic fonts, and font sizes less than 8 points
See one of these sections to scan and convert text using ABBYY FineReader.
Office Mode: Converting into Editable Text in Office Mode
Home Mode: Converting into Editable Text in Home Mode
Professional Mode: Converting into Editable Text in Professional Mode
Converting into Editable Text in Office Mode
Windows
1. Place your document on the document table. See Placing Documents or Photos for details.
2. Do one of the following to start ABBYY FineReader.
Windows 8:
Navigate to the Start screen and select ABBYY FineReader 9.0 Sprint.
Windows (other versions):
Select Start > Programs or All Programs > ABBYY FineReader 9.0 Sprint > ABBYY FineReader 9.0 Sprint.
You see this window:
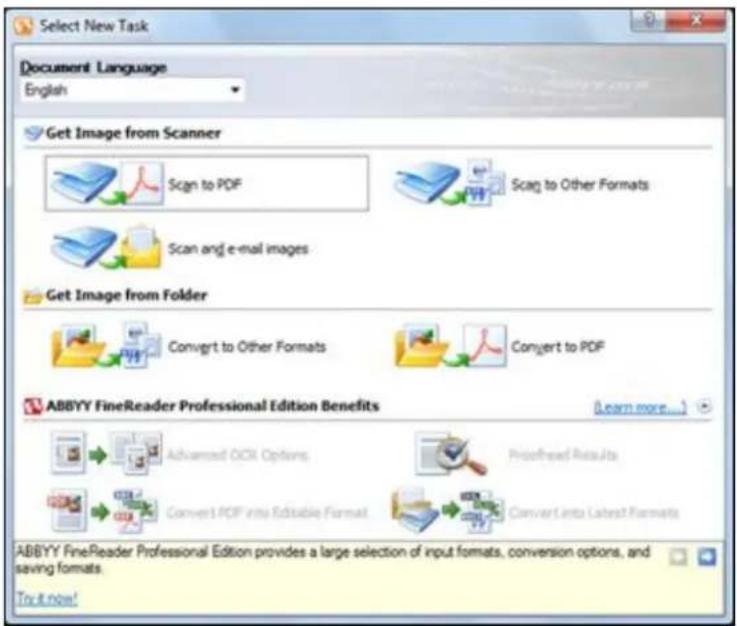
3 Select the language used in the document you are going to scan as the Document Language setting. 4 Click either the Scan to Other Formats icon or the icon that corresponds with the program you want to scan to. 5 If you see the Select Scanner window, select your product and click OK.

Note:
Do not select a WIA option for your product; it will not work correctly.
6 Select your scan settings. 7 Click Preview and adjust the area you want to scan, if necessary. 8 Click Scan.

Note:
For each additional page that you want to scan, place the document on the document table and click Scan.
9 When you are finished scanning, click Close. Your document is scanned and processed into editable text, then you see the Save As window.
10 Select a name and a file format for your document and click Save. The file is saved and then opened in an application associated with the file type you selected, if available on your system.
Top
Mac OS X
1 Place your document on the document table. See Placing Documents or Photos for details.
2 Select Applications > ABBYY FineReader Sprint 8.0.
You see this window:
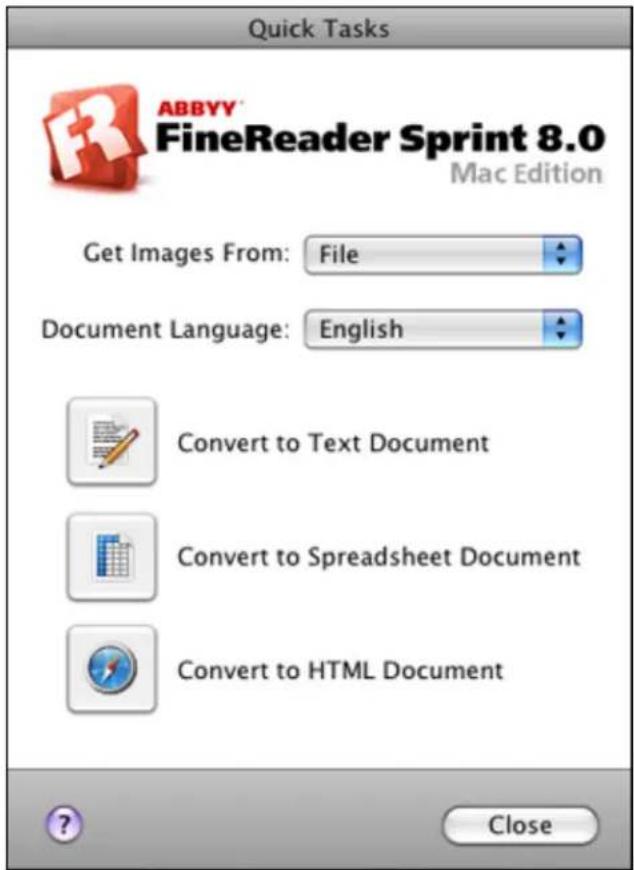
3 Select your scanner from the Get Images From list. 4 Select the language used in the document you are going to scan as the Document Language setting. 5 Click the icon for the type of document you want to scan to. Epson Scan starts in the last mode you used. 6 Change the scan mode to Office Mode if necessary. See Changing the Scan Mode for instructions. 7 Select Color, Grayscale, or Black&White as the Image Type setting. 8 Select the size of your original document as the Size setting.
9 Select 300 as the Resolution setting. 10 Click Preview to preview your document. The Preview window appears and displays your document. See Previewing and Adjusting the Scan Area for instructions. 11 Modify the image quality if necessary. See Adjusting the Color and Other Image Settings for instructions. 12 Click Scan. Your document is scanned and processed into editable text.

Note:
If the characters in your text are not recognized very well, you can improve recognition by selecting the Text Enhancement check box or adjusting the Threshold setting. See Adjusting the Color and Other Image Settings for instructions.
13 When you see the Document Conversion window with the finished message, click Close in the Epson Scan window. 14 Follow the instructions in ABBYY FineReader Help to edit and save your document.
Top
Converting into Editable Text in Home Mode
Windows
1 Place your document on the document table. See Placing Documents or Photos for details. Do one of the following to start ABBYY FineReader.
Windows 8:
Navigate to the Start screen and select ABBYY FineReader 9.0 Sprint.
Windows (other versions):
Select or Start > Programs or All Programs > ABBYY FineReader 9.0 Sprint > ABBYY FineReader 9.0 Sprint.
You see this window:
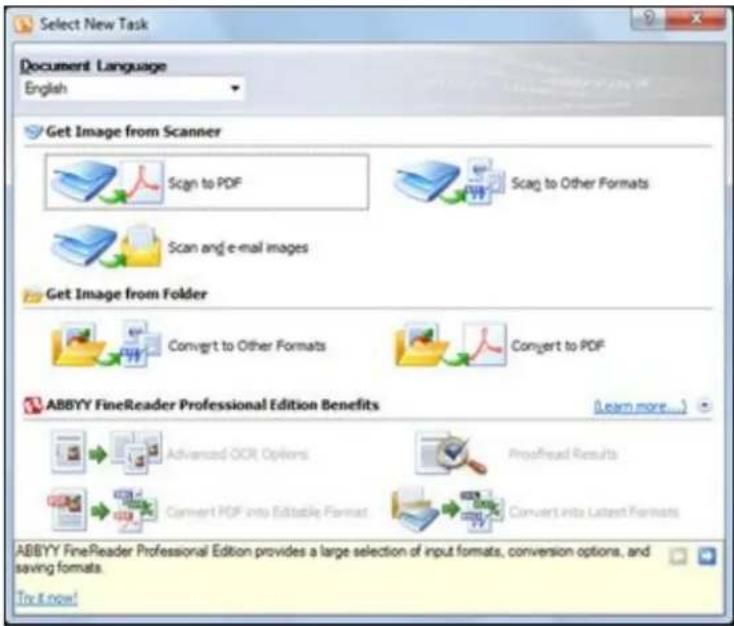
3 Select the language used in the document you are going to scan as the Document Language setting. 4 Click either the Scan to Other Formats icon or the icon that corresponds with the program you want to scan to. 5 If you see the Select Scanner window, select your product and click OK.

Note:
Do not select a WIA option for your product; it will not work correctly.
6 Select your scan settings. 7 Click Preview and adjust the area you want to scan, if necessary. 8 Click Scan.

Note:
For each additional page that you want to scan, place the document on the document table and click Scan.
g When you are finished scanning, click Close. Your document is scanned and processed into editable text, then you see the Save As window. 10 Select a name and a file format for your document and click Save. The file is saved and then opened in an application associated with the file type you selected, if available on your system.
Mac OS X
1 Place your document on the document table. See Placing Documents or Photos for details.
2 Select Applications > ABBYY FineReader Sprint 8.0.
You see this window:

3 Select your scanner from the Get Images From list. 4 Select the language used in the document you are going to scan as the Document Language setting. 5 Click the icon for the type of document you want to scan to. Epson Scan starts in the last mode you used. 6 Change the scan mode to Home Mode if necessary. See Changing the Scan Mode for instructions. 7 Select Magazine, Newspaper, or Text/ Line Art as the Document Type setting. 8 Select Black&White or Color as the Image Type setting. 9 Select Printer or Other as the Destination setting.

Note:
If you select Other, select 300 as the Resolution setting.
10 Click Preview to preview your document. The Preview window appears and displays your document. See Previewing and Adjusting the Scan Area for instructions. 11 Modify the image quality if necessary. See Adjusting the Color and Other Image Settings for instructions. 12 Click Scan. Your document is scanned and processed into editable text.

Note:
If the characters in your text are not recognized very well, you can improve recognition by selecting the Text Enhancement check box or adjusting the Threshold setting. See Adjusting the Color and Other Image Settings for instructions.
13 When you see the Document Conversion window with the finished message, click Close in the Epson Scan window. 14 Follow the instructions in ABBYY FineReader Help to edit and save your document.
Converting into Editable Text in Professional Mode
Windows
1 Place your document on the document table. See Placing Documents or Photos for details. Do one of the following to start ABBYY FineReader.
Windows 8:
Navigate to the Start screen and select ABBYY FineReader 9.0 Sprint.
Windows (other versions):
Select or Start > Programs or All Programs > ABBYY FineReader 9.0 Sprint > ABBYY FineReader 9.0 Sprint.
You see this window:
3 Select the language used in the document you are going to scan as the Document Language setting. 4 Click either the Scan to Other Formats icon or the icon that corresponds with the program you want to scan to. 5 If you see the Select Scanner window, select your product and click OK.

Note:
Do not select a WIA option for your product; it will not work correctly.
6 Select your scan settings. 7 Click Preview and adjust the area you want to scan, if necessary. 8 Click Scan.

Note:
For each additional page that you want to scan, place the document on the document table and click Scan.
When you are finished scanning, click Close. Your document is scanned and processed into editable text, then you see the Save As window. Select a name and a file format for your document and click Save. The file is saved and then opened in an application associated with the file type you selected, if available on your system.
Mac OS X
1. Place your document on the document table. See Placing Documents or Photos for details.
2. Select Applications > ABBYY FineReader Sprint 8.0.
You see this window:
3. Select your scanner from the Get Images From list. 4. Select the language used in the document you are going to scan as the Document Language setting. 5. Click the icon for the type of document you want to scan to. Epson Scan starts in the last mode you used. 6. Change the scan mode to Professional Mode if necessary. See Changing the Scan Mode for instructions. 7. Select Reflective as the Document Type setting. 8. Select Document as the Auto Exposure Type setting. 9. Select Black & White, 24-bit Color, or 48-bit Color as the Image Type setting.
10. Select 300 as the Resolution setting. 11. Click Preview to preview your document. The Preview window appears and displays your document. See Previewing and Adjusting the Scan Area for instructions. 12. Modify the image quality if necessary. See Adjusting the Color and Other Image Settings for instructions. 13. Click Scan. Your document is scanned and processed into editable text.

Note:
If the characters in your text are not recognized very well, you can improve recognition by selecting the Text Enhancement check box or adjusting the Threshold setting. See Adjusting the Color and Other Image Settings for instructions.
14. When you see the Document Conversion window with the finished message, click Close in the Epson Scan window. 15. Follow the instructions in ABBYY FineReader Help to edit and save your document.
Top
Home > Scanning Special Projects
Scanning Color Accurate Images
1. Start Epson Scan, select Home Mode or Professional Mode, select the appropriate scan settings, then click Preview to prescan your image and adjust the marquee. For details, see one of these sections.
Home Mode: Scanning in Home Mode
Professional Mode: Scanning in Professional Mode

Note:
You cannot use Full Auto Mode or Office Mode for color management.
2 Click Configuration, then click the Color tab and select ICM (Windows) or ColorSync (Mac OS X).
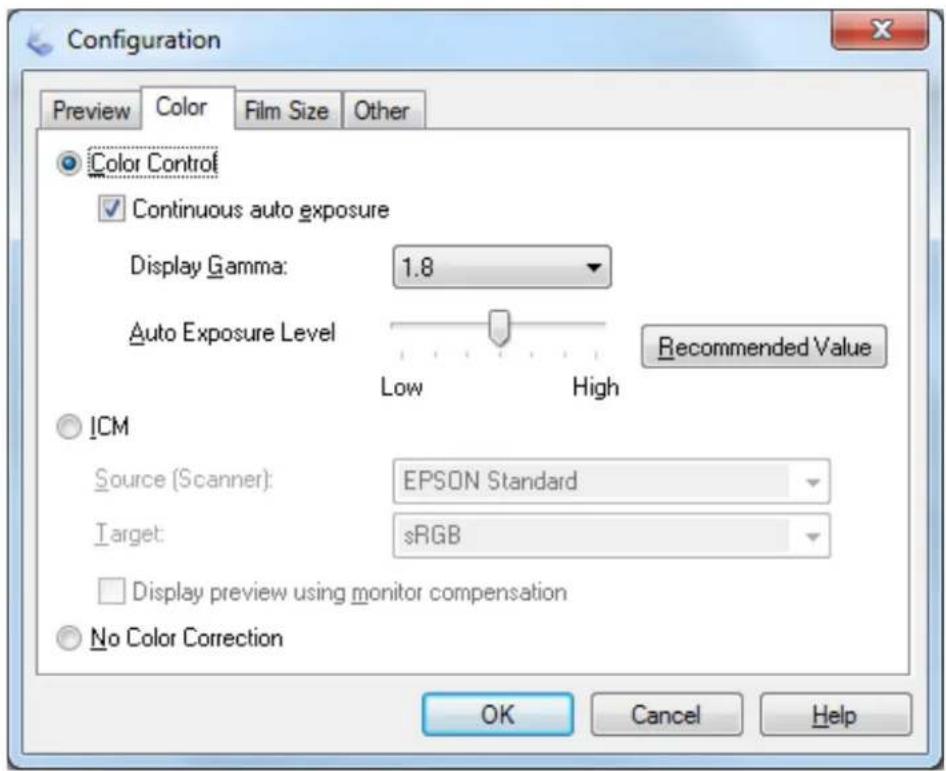
3 For the Source (Scanner) setting, select EPSON Standard. If you have color management software and created a custom ICC profile, select it as the Source (Scanner) setting.

Note:
When creating a custom ICC profile for the scanner, be sure to place the profile in the following folder.
- Windows: C:\Windows\System32\spool\drivers\color Mac OS X: hard disk drive\Library\ColorSync\Profiles
4 For the Target setting, select Adobe RGB.

Note for Windows:
If you do not see the Adobe RGB option, select sRGB.
5 Select Display preview using monitor compensation, then click OK to return to the Epson Scan window. 6 Click Scan.
What happens next depends on how you started your scan. See Finishing the Scan for instructions.

Note:
You can also optimize the color accuracy of your images using a photo-editing application, such as Adobe Photoshop Elements. For help using Adobe Photoshop Elements, click the Help button in the software, see the software documentation, or see Other Software Technical Support.
Home > Scanning Special Projects
Assigning a Program to the Start Button
Assigning a Project Program in Epson Event Manager to the Start Button
By default, the Start button opens Epson Scan when you press it.
Assigning a Project Program in Epson Event Manager to the Start Button
You can assign the Start button to open a program in the Epson Event Manager to make scanning your projects even quicker.

Note for Mac OS X 10.5.8 users:
The Start button is not supported. To start Epson Scan, see Using the Epson Scan Icon for instructions.
1 Do one of the following to start Epson Event Manager:
Windows 8:
Navigate to the Start screen and select Event Manager.
Windows (other versions):
Select or Start > Programs or All Programs > Epson Software > Event Manager.
Mac OS X:
Select Applications > Epson Software, and double-click the Launch Event Manager icon.
You see the Button Settings tab in Epson Event Manager.
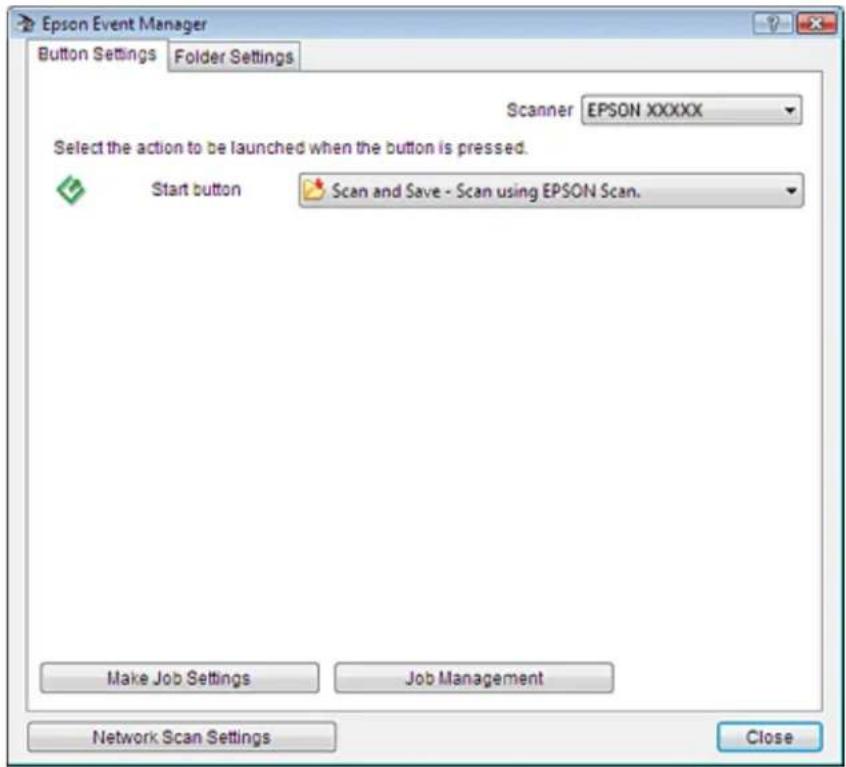
2 Click the arrow in the list next to the button name, then select the action you want to assign.
3 Click Close to close the Epson Event Manager window.
Now whenever you press the Ⓧ Start button, the action you selected occurs.

Note:
If you need help using Epson Event Manager, do one of the following. Windows: Click the 🔒 icon in the upper right corner of the screen. Mac OS X: Click Help from menu, then Epson Event Manager Help.
Top
Home > Maintenance
Cleaning the Scanner
To keep your scanner operating at its best, clean it periodically using the following procedure.

Caution:
- Do not press the glass surface of the document table with any force.
- Be careful not to scratch or damage the glass surface of the document table, and do not use a hard or abrasive brush to clean it. A damaged glass surface can decrease the scan quality.
- Never use alcohol, thinner, or corrosive solvent to clean the scanner. These chemicals can damage the scanner components and the case.
- Be careful not to spill liquid into the scanner mechanism or electronic components. This could permanently damage the mechanism and circuitry. Do not spray lubricants inside the scanner. Never open the scanner case.
1. Turn off the scanner using its power button. 2. Unplug the AC power cord from the scanner. 3. Disconnect the USB cable from the scanner. 4. Clean the outer case with a cloth dampened with mild detergent and water. 5. If the glass surface of the document table gets dirty, clean it with a soft dry cloth. If the glass surface is stained with grease or some other hard-to-remove material, use a small amount of glass cleaner on a soft cloth to remove it. Wipe off all remaining liquid.

Caution:
Do not spray glass cleaner directly onto the scanner glass.
6. Remove the document mat and clean the transparency unit window as described in step 5.
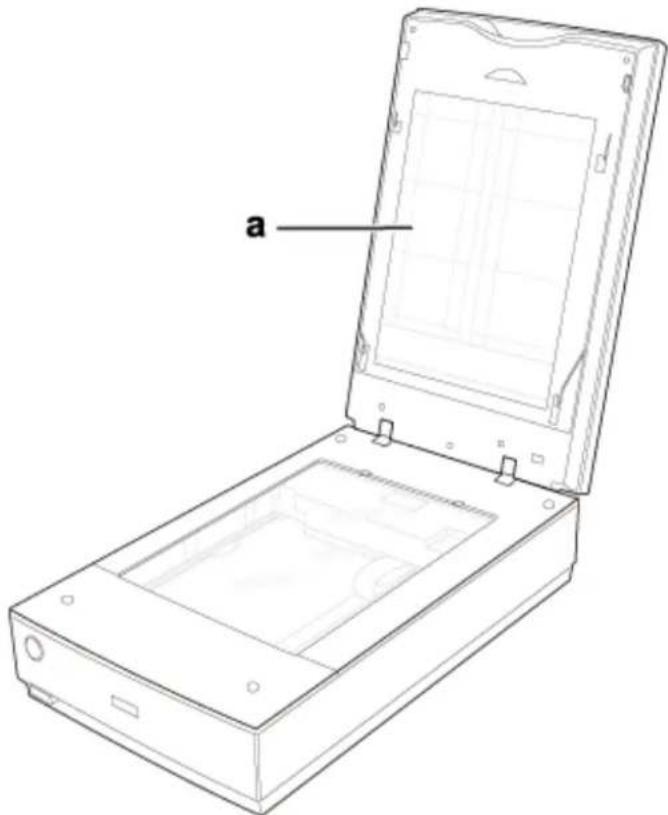
a. Transparency unit window
Make sure that no dust builds up on the surface of the document table or the transparency unit window. Dust can cause spots in your scanned images.
Replacing the Scanner Light Source
The luminosity of the scanner light source declines over time. If the light source breaks or becomes too dim to operate normally, the scanner stops working and the Status light rapidly flashes. When this happens, the light source assembly must be replaced by a professional. For details, contact Epson.
Power Off Timer Setting
The product turns off automatically if no operations are performed for the selected period. You can adjust the time before power off occurs. Any increase will affect the product's energy efficiency. Please consider the environment before making any change.
Follow the steps below to adjust the time.
1. Make sure that the scanner is connected to your computer and that the scanner is turned on. 2. Start Epson Scan Settings.
Windows 8:
Navigate to the Start screen and select EPSON Scan Settings.
Windows (other versions):
Select or Start > All Programs or Programs > EPSON > EPSON Scan > EPSON Scan Settings.
Mac OS X:
Select Applications > EPSON Software > EPSON Scan Settings.
3 Click Power Off Timer. 4 Set the Power Off Timer, and then click OK.

Note:
If you want to turn off the Power Off Timer, set the Power Off Timer to 0.
Home > Maintenance
Transporting the Scanner
Before transporting the scanner for a long distance or storing it for an extended period of time, you need to lock the scanner's carriage and transparency unit to prevent damage.
1 Plug in the scanner, turn on the scanner using its power button, and wait until the carriage moves to the home position (near the cover hinge). While the scanner light is green, turn off the scanner using its power button.
2 Open the scanner cover and slide the transparency unit transportation lock to the locked position. Then close the scanner cover.
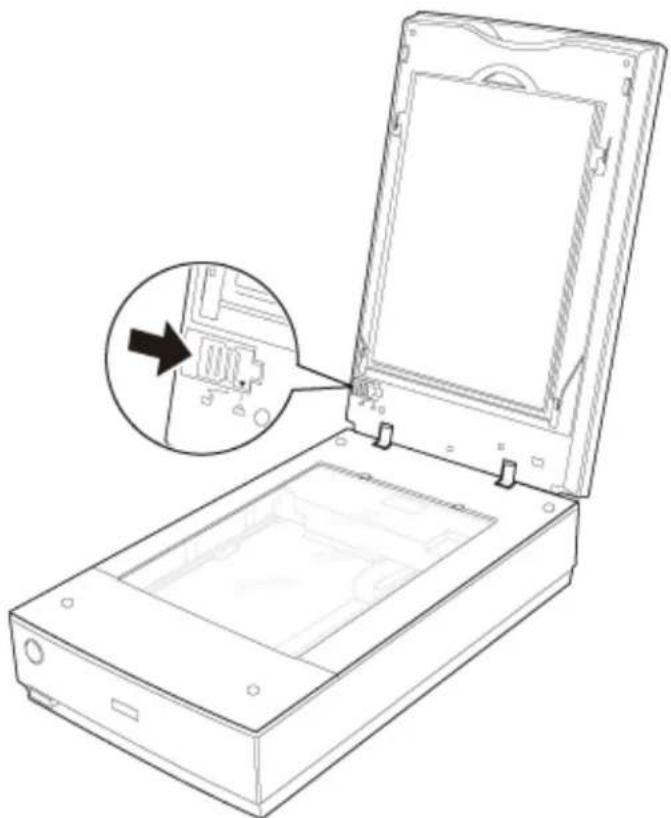
3 Disconnect the scanner's USB cable from your computer. 4 Disconnect the scanner's cover cable.
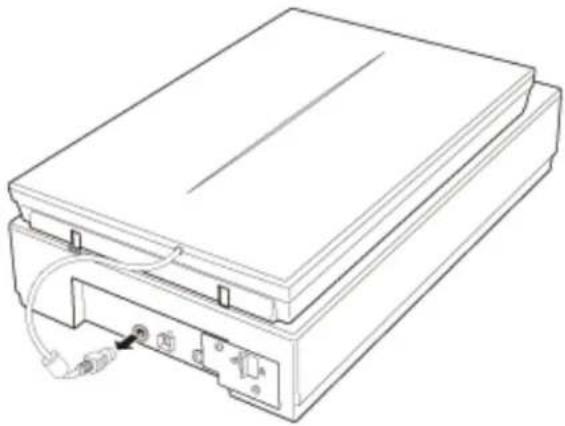
5
On the back of the scanner, slide the transportation lock to the locked position to secure the scanner carriage.
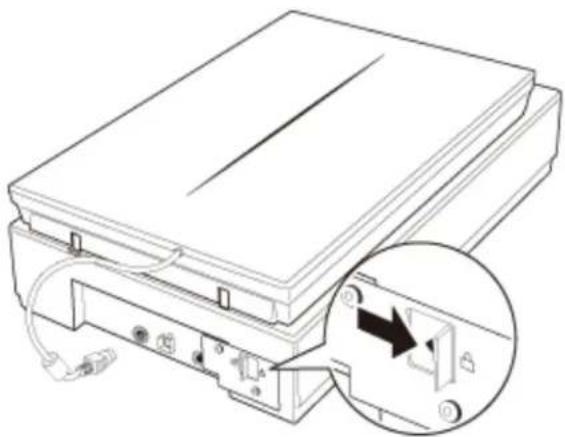
6
Attach the protective materials that came with the scanner, then repack the scanner in its original box or a similar box that fits the scanner snugly.
Home > Solving Problems

Scanner Problems
The Status Light Is Flashing The Scanner Does Not Turn On The Scanner Turns Off You Cannot Start Epson Scan Pressing a Scanner Button Does Not Start the Correct Program
The Status Light Is Flashing
The scanner light is located above the power button, and the scanner cover light is on the top of the scanner cover.
| Light Color I | Indicator | Status | Meaning |
| Scanner light | Green | On | Ready to scan images. |
| Flashing | Initializing or scanning. | ||
| Red | Flashing | An error has occurred.Make sure the scanner is connected to your computer properly. See the Start Here sheet for instructions on connecting the scanner to your computer.Make sure the scanner software is fully installed. See the Start Here sheet for instructions on installing the scanner software.Make sure the scanner and/or the transparency unit transportation lock is unlocked. If it is locked, slide the lock to the unlock position.Turn off the scanner using its power button, then turn it on again. If the scanner light is still flashing red, the scanner may be malfunctioning, or the scanner light source may need to be replaced.Contact Epson for details. | |
| — | Off | The scanner is off. | |
| Scanner cover light | Blue | On | Scanning transparencies (such as film or slides). |
| — | Off | Scanning reflective documents (such as documents and photographs). |
Make sure your scanner's AC adapter is securely connected to the scanner and a working electrical outlet. - Make sure the electrical outlet works. If necessary, test it by plugging in another electrical device and turning it on.
Top
The Scanner Turns Off
- The Power Off Timer may be set. For more details, see Power Off Timer Setting.
Top
You Cannot Start Epson Scan
- Wait until the green status light stops flashing to indicate that the scanner is ready to scan. Make sure the scanner is turned on.
- Turn off the scanner and computer, then check the USB cable connection between them to make sure it is secure. Use the USB cable that came with your scanner.
- Connect the scanner directly to the computer's USB port or through one USB hub only. The scanner may not work properly when connected to the computer through more than one USB hub. Make sure your computer supports USB.
- If you are using any TWAIN-compliant program, such as Adobe Photoshop Elements, make sure that the correct scanner is selected as the Scanner or Source setting.
- If you upgraded your computer's operating system, you need to reinstall Epson Scan. Uninstall Epson Scan as described in Uninstalling Your Scanning Software, then reinstall it as described in the Start Here sheet.
For Windows only:
Make sure your scanner's name appears under Imaging device without a (?) or an exclamation (!) mark in the Device Manager window. If the scanner's name appears with one of these marks or as an Unknown device, uninstall Epson Scan as described in Uninstalling Your Scanning Software, then reinstall it as described in the paper manual.
Top
Pressing a Scanner Button Does Not Start the Correct Program
Make sure Epson Scan is installed correctly. - Windows: Click the Events tab in your scanner's Properties window and make sure Take no action is not selected. Also, make sure the desired button is selected in the Select an event list box, and Start this program is selected. * Mac OS X 10.5.8: The Start button is not supported. To start Epson Scan, see Using the Epson Scan Icon for instructions.
Top
Home > Solving Problems

Scanning Problems
You Cannot Scan Using the Thumbnail Preview You Have Trouble Adjusting the Scan Area in the Thumbnail Preview Negative Film Preview Images Look Strange You Cannot Scan Multiple Images at One Time You Cannot Scan in Full Auto Mode Scanning Takes a Longer Time You Cannot Scan Film or Slides
You Cannot Scan Using the Thumbnail Preview
- If you are using Full Auto Mode and Office Mode, the thumbnail preview is not available. Change the scan mode to Home Mode or Professional Mode. See Changing the Scan Mode for instructions.
- If you are scanning images with a very dark or bright background, use normal preview and create marquees on the area you want to scan. See Previewing and Adjusting the Scan Area for instructions.
- If you are scanning a film strip including both panoramic and regular size images, the panoramic images are not previewed. For the panoramic images, use normal preview and create marquees on the area you want to scan. See Previewing and Adjusting the Scan Area for instructions.
- If you are scanning a large size document, use normal preview and create marquees on the area you want to scan. See Previewing and Adjusting the Scan Area for instructions.
- Make sure the Document Type setting (Home Mode) or Document Type and Film Type settings (Professional Mode) are correct. See Scanning in Home Mode or Scanning in Professional Mode for instructions.
- Click Configuration, select the Preview tab, and adjust the thumbnail cropping area using the Thumbnail Cropping Area slider.
- If you are scanning in Home Mode and Illustration, Magazine, Newspaper or Text/Line Art is selected as Document Type, the thumbnail preview is not available.
Top
You Have Trouble Adjusting the Scan Area in the Thumbnail Preview
- Create a marquee or adjust the existing marquee to select the area you want to scan. See Creating a Marquee on a Preview Image for instructions.
- Click Configuration, select the Preview tab, and adjust the thumbnail cropping area using the Thumbnail Cropping Area slider.
- Use the normal preview and create marquees on the area you want to scan. See Previewing and Adjusting the Scan Area for instructions.
Top
Negative Film Preview Images Look Strange
- Make sure the Document Type setting (Home Mode) or Film Type settings (Professional Mode) are set correctly for your film. See Scanning in Home Mode or Scanning in Professional Mode for instructions.
- If you are in normal preview, the dark area around the film and the frame of the film holder is perceived as white. This alters the exposure and causes images to appear darker. Create marquees on the image area you want to scan, then click Zoom to preview the area. See Previewing and Adjusting the Scan Area for instructions.
- Use thumbnail preview instead of normal preview. See Previewing and Adjusting the Scan Area for instructions.
Top
You Cannot Scan Multiple Images at One Time
Position photos at least 0.8 inch (20 mm) apart from each other on the document table.
Top
You Cannot Scan in Full Auto Mode
- If you are scanning images with a very dark or bright background, switch to Office Mode, Home Mode, or Professional Mode. To change the scan mode, see Changing the Scan Mode. Then, use normal preview and create marquees on the area you want to scan. See Previewing and Adjusting the Scan Area for instructions.
- If you are scanning a large size document, such as Letter, switch to Office Mode, Home Mode, or Professional Mode. To change the scan mode, see Changing the Scan Mode. Then, use normal preview and create marquees on the area you want to scan. See Previewing and Adjusting the Scan Area for instructions.
Top
Scanning Takes a Longer Time
- Try scanning your original at a lower resolution setting to speed up scanning. See Selecting the Scan Resolution for instructions.
- Computers with USB 2.0 (high speed) ports can scan faster than those with USB 1.1 ports. If you are using a USB 2.0 port with your scanner, make sure it meets the system requirements. See System Requirements for details.
- If you scan using DIGITAL ICE Technology function, scanning takes a longer time.
Top
You Cannot Scan Film or Slides
- Make sure the document mat is removed from the scanner cover. See Removing the Document Mat for instructions.
- Make sure your film or slides are placed in the film holder correctly and the film holder is properly positioned on the document table. See Placing Film or Slides for instructions.
• Make sure the Document Type setting (Home Mode) or Film Type settings (Professional Mode) are set correctly for your film/slide type. See Scanning in Home Mode or Scanning in Professional Mode for instructions. - Make sure the cover cable is securely connected to the scanner's OPTION port.
Home > Solving Problems
Scan Quality Problems
The Edges of Your Original Are Not Scanned You See Only a Few Dots in Your Scanned Image A Line or Line of Dots Always Appears in Your Scanned Images Straight Lines in Your Image Come Out Crooked Your Image Is Blurred Colors Are Patchy or Distorted at the Edges of Your Image Your Scanned Image Is Too Dark An Image on the Back of Your Original Appears in Your Scanned Image Ripple Patterns Appear in Your Scanned Image Characters Are Not Recognized Well When Converted into Editable Text (OCR) Scanned Colors Differ From the Original Colors Striped Rings Appear in Your Scanned Image of Film or Slides Images Images are Rotated Incorrectly
The Edges of Your Original Are Not Scanned
- If you are scanning in Full Auto Mode, or using thumbnail preview in Home Mode or Professional Mode, move the document about 0.2 inch (5.1 mm) away from the top or bottom edges or 0.21 inch (5.3 mm) away from the side edges of the document table to avoid cropping.
- If you are scanning using normal preview in Office Mode, Home Mode, or Professional Mode, move the document about 0.08 inch (2.1 mm) away from the top or bottom edges or 0.1 inch (2.3 mm) away from the side edges of the document table to avoid cropping.
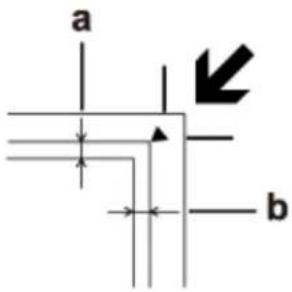

You See Only a Few Dots in Your Scanned Image
- Make sure the document or photo is placed facedown on the document table. See Placing Documents or Photos for details.
- When scanning with the Black&White setting in Office Mode or Home Mode, or the Black & White setting in Professional Mode, change the Threshold setting. See Adjusting the Color and Other Image Settings for
instructions.
Top
A Line or Line of Dots Always Appears in Your Scanned Images
The document table or transparency unit window may need cleaning. See Cleaning the Scanner.
If you still have the problem, the document table or transparency unit window may be scratched. Contact Epson.
Top
Straight Lines in Your Image Come Out Crooked
Make sure the document lies perfectly straight on the document table.
Top
Your Image Is Blurred

- Make sure the document or photo lies flat on the document table. Also make sure your document or photo is not wrinkled or warped. Make sure you do not move the document or photo, or your scanner while scanning. Make sure the scanner is placed on a flat, stable surface.
- Select the Unsharp Mask check box in Office Mode or Professional Mode window. See Adjusting the Color and Other Image Settings for instructions.
- Adjust the Auto Exposure setting in Professional Mode window. See Adjusting the Color and Other Image Settings for instructions.
- Click Configuration, select the Color tab, and select Color Control and Continuous auto exposure. See Epson Scan Help for details.
- Click Configuration, select the Color tab, and click Recommended Value to return the Auto Exposure setting to the default. See Epson Scan Help for details.
- Increase the resolution setting. See Selecting the Scan Resolution for instructions.
If you are not satisfied with the quality of scanned film images after trying all the solutions above, you can adjust the height between the film holder and the document table. See the instructions below to increase or decrease the space between the film holder and document table. The default height between the film holder and document table is 0.12 inch (3 mm).
- Remove and rotate the film height adjusters on the back of the film holder so that the arrow on the adjusters face the + symbol on the bottom of the film holder. This increases the height between the film holder and document table to 0.14 inch (3.5 mm).
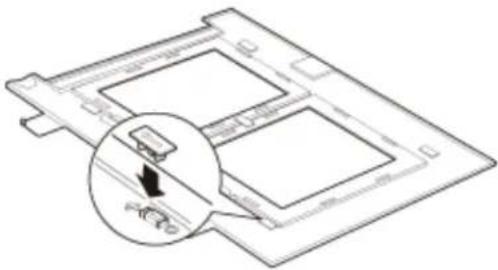
- Remove all of the film height adjusters on the back of the film holder to decrease the height between the film holder and the document table to 0.1 inch (2.5 mm).
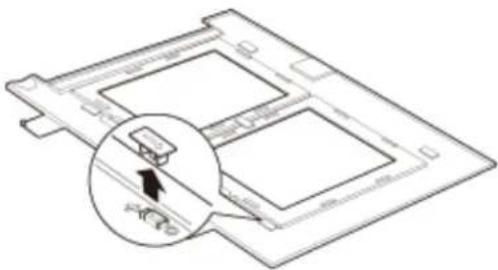
To return the film holder to its default height, 0.12 inch (3 mm), place the film height adjusters so that the arrow on the adjusters face the ○ symbol on the bottom of the film holder.
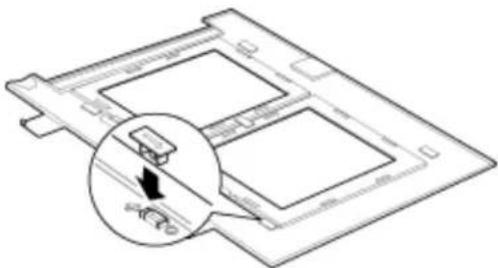
Colors Are Patchy or Distorted at the Edges of Your Image

If your document is very thick or curled at the edges, cover the edges with paper to block external light as you scan.
Your Scanned Image Is Too Dark

- If your original is too dark, try using the Backlight Correction feature in Home Mode or Professional Mode. See Fixing Backlit Photos for instructions.
- Check the Brightness setting in Office Mode, Home Mode, or Professional Mode. See Epson Scan Help for details.
- Click Configuration, select the Color tab, and change the Display Gamma setting to match your output device, such as a monitor or printer. See Epson Scan Help for details.
- Click Configuration, select the Color tab, and select Color Control and Continuous auto exposure. See Epson Scan Help for details.
- Click Configuration, select the Color tab, and click Recommended Value to return the Auto Exposure setting to the default. See Epson Scan Help for details. • Click the Histogram Adjustment icon in Professional Mode to adjust the brightness.
- Check the brightness and contrast settings of your computer monitor.
An Image on the Back of Your Original Appears in Your Scanned Image
If your original is printed on thin paper, images on the back may be visible to the scanner and appear in your scanned image.
• Try scanning the original with a piece of black paper placed on the back of it. • Also check the scanning software settings such as image type and image adjustment. - Try using the Text Enhancement function. See Scanning in Home Mode or Scanning in Professional Mode for instructions.
Ripple Patterns Appear in Your Scanned Image
A ripple or cross-hatch pattern (called moiré) may appear in a scanned image of a printed document. It is caused by interference from the differing pitches in the scanner's screen and the halftone screen in your original.
Original image Descreening applied
Off
On
- Select the Descreening check box in Office Mode, Home Mode, or Professional Mode. In Professional Mode, select an appropriate Screen Ruling for the Descreening and deselect the Unsharp Mask setting. See Adjusting the Color and Other Image Settings for instructions.
- Select a lower resolution setting. See Selecting the Scan Resolution for instructions.

Note:
You cannot remove ripple patterns when you are scanning film or monochrome images, or scanning using a resolution higher than 600 dpi.
Characters Are Not Recognized Well When Converted into Editable Text (OCR)
• Make sure the document lies perfectly straight on the document table. • In Office Mode or Home Mode, select the Text Enhancement check box. - Adjust the Threshold setting.
- Office Mode or Home Mode: Select Black & White as the Image Type setting. Then try adjusting the Threshold setting. See Converting Scanned Documents Into Editable Text for instructions. • Professional Mode: Click the + (Windows) or ▶ (Mac OS X) button next to Image Type and make the appropriate Image Option setting. Then try adjusting the Threshold setting. See Converting Scanned Documents Into Editable Text for instructions.
- Check your OCR software manual to see if there are any settings you can adjust in your OCR software.
Scanned Colors Differ From the Original Colors
- Make sure the Image Type setting is correct. See Scanning in Office Mode, Scanning in Home Mode, or Scanning in Professional Mode for instructions.
- Click Configuration, select the Color tab, and change the Display Gamma setting to match your output device, such as a monitor or printer. See Epson Scan Help for details.
- Adjust the Auto Exposure setting in Professional Mode. Also try selecting a different Tone Correction setting. See Adjusting the Color and Other Image Settings for instructions.
- Click Configuration, select the Color tab, and select Color Control and Continuous auto exposure in the Color menu. See Epson Scan Help for details.
- Click Configuration, select the Color tab, and click Recommended Value to return the Auto Exposure setting to the default. See Epson Scan Help for details.
- Click Configuration, select the Preview tab, and turn on the Quality Preview setting in the Preview menu. See Epson Scan Help for details.
- Make sure to enable the Embed ICC Profile setting. In the File Save Settings window, select JPEG or TIFF as the Type setting. Click Options, then select the Embed ICC Profile check box. To access the File Save Settings window, see Selecting File Save Settings.
- Check the color matching and color management capabilities of your computer, display adapter, and software. Some computers can change the palette of colors on your screen. See your software and hardware manuals for details.
- Use the color management system for your computer: ICM for Windows, or ColorSync for Mac. Add a color profile that matches your monitor to improve on-screen color matching. Exact color matching is very difficult. Check your software and monitor documentation for information on color matching and calibration.

Note:
- In Home Mode, when Illustration, Magazine, Newspaper, Text/Line Art is selected for the document type, EPSON sRGB is embedded even if another ICM/ColorSync setting is selected.
- In Office Mode, EPSON sRGB is embedded even if another ICM/ColorSync setting is selected.
- In Professional Mode, when Document is selected for the Auto Exposure type, EPSON sRGB is embedded even if another ICM/ColorSync setting is selected.
- Printed colors can never exactly match the colors on your monitor because printers and monitors use different color systems: monitors use RGB (red, green, and blue) and printers typically use CMYK (cyan, magenta, yellow, and black).

Striped Rings Appear in Your Scanned Image of Film or Slides Images
A ring-shaped pattern of stripes (called a Newton ring) sometimes appears on scanned images of transparent materials. This may occur if the film is curled.
Place the film or slides with the base side facing up and preview using thumbnail preview. Then flip the previewed image by clicking the [icon] mirroring icon in the Preview window. See Adjusting the Color and Other Image Settings for instructions.

Images are Rotated Incorrectly
- Make sure the documents or photos are placed on the document table correctly. See Placing Documents or Photos for instructions.
- Make sure the film or slides are placed in the film holder correctly and the film holder is properly positioned on the document table. See Placing Film or Slides for instructions.
- If you are scanning using thumbnail previews in Home Mode or Professional Mode, select the image and click the rotation icon to rotate it. See Previewing and Adjusting the Scan Area for instructions.
- Try disabling or enabling the Auto Photo Orientation setting. Full Auto Mode: Click Customize, and select or deselect Auto Photo Orientation.
- Home Mode or Professional Mode: Click Configuration, select the Preview tab, and select or deselect Auto Photo Orientation.


Note:
- The Auto Photo Orientation feature will not work when you scan newspaper or magazine pages, documents, illustrations, or line art. The feature will also not work when you scan images that are 2 inches (5.1 cm) or smaller on any side.
- The Auto Photo Orientation feature may not work correctly if the faces in your image are very small or not looking straight ahead, or if the faces are of infants. The feature may also not work correctly if you scan an indoor image that contains no faces, an outdoor image in which the sky is not at the top, or any image containing bright spots or objects in locations other than the top of your image.
- The Auto Photo Orientation feature will not work when you scan newspaper or magazine pages, documents, illustrations, or line art. The feature will also not work when you scan images that are 2 inches (5.1 cm) or smaller on any side.
- The Auto Photo Orientation feature may not work correctly if the faces in your image are very small or not looking straight ahead, or if the faces are of infants. The feature may also not work correctly if you scan an indoor image that contains no faces, an outdoor image in which the sky is not at the top, or any image containing bright spots or objects in locations other than the top of your image.
Home > Solving Problems
Uninstalling Your Scanning Software
For Windows
For Mac OS X
You may need to uninstall and then re-install your scanner software to solve certain problems or if you upgrade your operating system.
For Windows

Note:
- For Windows 8, Windows 7, and Windows Vista, you need an administrator account and password if you log on as a standard user.
- For Windows XP, you must log on to a Computer Administrator account.
1 Turn off the scanner. 2 Disconnect the scanner's USB cable from your computer. 3 Do one of the following.
Windows 8: Navigate to the Start screen, right-click, select All apps, and select Control Panel.
Windows (other versions): Click Start and select Control Panel.
4 Do one of the following.
Windows 8, Windows 7, and Windows Vista: Select Uninstall a program from the Programs category.
Windows XP: Select Add or Remove Programs.
5 Select the software you want to uninstall such as Epson Scan or another application from the list displayed.
6 Do one of the following.
Windows 8 and Windows 7: Click Uninstall or Uninstall/Change.
Windows Vista: Click Uninstall or Uninstall/Change, and then click Continue in the User Account Control window.
Windows XP: Click Remove or Change/Remove.
7 When the confirmation window appears, click Next, Yes, or OK.
8 Follow the on-screen instructions.
In some cases, a message may appear to prompt you to restart your computer. If so, make sure "I want to restart my computer now" is selected and click Finish.
To re-install your product software, see the Start Here sheet for instructions.
Top
For Mac OS X
In most cases, you do not need to uninstall your product software before re-installing it. However, you can download the Uninstaller utility from the Epson support website to uninstall your product software as described here.

Note:
- To uninstall applications you must log on to a Computer Administrator account. You cannot uninstall programs if you log on as a Limited account user.
- If you find that re-installing your product software does not solve a problem, contact Epson.
To download the Uninstaller utility, visit the Epson download site (U.S. downloads or Canadian downloads). 2. Follow the instructions on the screen to install the Uninstaller utility. 3. Quit all applications currently running on your Mac. 4. Double-click the Uninstaller icon. 5. Select the checkbox for each software program you want to uninstall. 6. Click Uninstall. 7. Follow the on-screen instructions to uninstall the software. 8. To re-install your product software, see the Start Here sheet for instructions.
Top
Home > Solving Problems

Epson Technical Support

Internet Support

Speak to a Support Representative

Purchase Accessories
Internet Support
Visit Epson's support website at www.epson.com/support (U.S.) or www.epson.ca/support (Canada) and select your product for solutions to common problems. You can download drivers and documentation, get FAQs and troubleshooting advice, or e-mail Epson with your questions.
Top
Speak to a Support Representative
Before you call Epson for support, please have the following information ready:
Product name • Product serial number (located on a label on the product) • Proof of purchase (such as a store receipt) and date of purchase • Computer configuration • Description of the problem
Then call:
(562) 276-4382 (U.S.) or (905) 709-3839 (Canada), 6 AM to 8 PM, Pacific Time, Monday through Friday, and 7 AM to 4 PM, Pacific Time, Saturday
Days and hours of support are subject to change without notice. Toll or long distance charges may apply.

Note:
For help using any other software on your system, see the documentation for that software or Other Software Technical Support.
Top
Purchase Accessories
You can purchase genuine Epson accessories from an Epson authorized reseller. To find the nearest reseller, call 800-GO-EPSON (800-463-7766). Or you can purchase online at www.epsonstore.com (U.S. sales) or www.epson.ca (Canadian sales).
Home > Solving Problems
Other Software Technical Support
Adobe Photoshop Elements, LaserSoft Imaging SilverFast, X-Rite i1 Profiler, ABBYY FineReader
Adobe Photoshop Elements
(800) 833-6687
www.adobe.com/support
Top
LaserSoft Imaging SilverFast
(941) 312-0690
www.silverfast.com
www.silverfast.com/problemreport/en.html
Top
X-Rite i1Profiler
(800) 248-9748
www.xrite.com/support/i1Profiler
ABBYY FineReader
(408) 457-9777
www.abbyy.com
support@abbyyusa.com
Home > Technical Specifications

System Requirements

Windows System Requirements

Mac System Requirements
Make sure your system meets the requirements in these sections before using it with your scanner.
Windows System Requirements
| System Microsoft | Windows 8, Windows 7, Windows Vista, Windows XP |
| Interface USB 2.0 | (Type-B standard Connector) |
| Display Color monitor with 1024 × 768 screen resolution or higher, and 24-bit (Full Color) color(Color and tone reproduction are subject to the display capability of your computer system, including the video card, display monitor, and software. See your system documentation for details.) | |

Mac System Requirements
| System Mac OS | X 10.5.8, Mac OS X 10.6.x, Mac OS X 10.7.x, or Mac OS X 10.8.x. Fast User Switching on Mac OS X is not supported. |
| Interface Mac USB | |
| Display Color monitor with 1024 × 768 screen resolution or higher, and millions of colors(Color and tone reproduction are subject to the display capability of your computer system, including the video card, display monitor, and software. See your system documentation for details.) | |

Note:
Epson Scan does not support the UNIX File System (UFS) for Mac OS X. You must install Epson Scan on a disk or in a partition that does not use UFS.
Top

Home > Technical Specifications

Scanner Specifications

General

Mechanical

Electrical

Environmental

Interfaces

Standards and Approvals

Note:
Specifications are subject to change without notice.
General
| Scanner type Flatbed color | |
| Photoelectric device Color CCD | line sensor |
| Effective pixels 40800 × 56160 | pixels at 4800 dpiScanning area may be restricted if resolution setting is large. |
| Document size Reflective: | 8.5 × 11.7 inches (216 × 297 mm) A4 or US letter sizeTransparent:8 × 10 inches (203.2 × 254 mm)(four 35 mm film strips [6 frames each], twelve 35 mm slides, two medium format 6 × 20 cm film frames or two 4 × 5 inch film frames) |
| Scanning resolution 4800 dpi | (main scan: optical resolution by 6 line CCD with 122,400 pixels)6400 dpi (main scan: optical resolution by 6 line CCD with 113,280 pixels)9600 dpi with Micro Step |
| Output resolution 25 to 12,800 | dpi (1 dpi steps) |
| Image data 16 bits per pixel | per color internal16 bits per pixel per color external (maximum) |
| Interface One Hi-Speed USB/USB port | USB port |
| Light source White cold cathode | fluorescent lamp IR LED |

Note:
Optical resolution is the maximum scan resolution of the CCD elements, using the definition of ISO 14473. ISO 14473 defines optical resolution as the fundamental sampling rate of the scan sensor.
Mechanical
| Dimensions Width: 19.8 inches (503 mm)Depth: 12.1 inches (308 mm)Height: 6.0 inches (152.5 mm) |
| Weight Approx. 14.5 lb (6.6 kg) |
Top
Electrical

Note:
Check the label on the AC adapter or on the back of the scanner for voltage information.
Scanner
| Rated voltage DC 24 V | |
| Rated input current 1.3 A | |
| Power consumption 32 W Operating | 21 W Ready Mode4 W Sleep Mode0.5 W Power off |
AC Adapter
| 100-120 V model 220-240 | V model | |
| AC adapter model A411B A411 | 1E | |
| Rated input voltage AC 100 to | 120 V AC 220 to 240 V | |
| Rated input current 1.0 A 0.5 | A | |
| Rated input frequency 50 to 60 Hz | ||
| Rated output voltage DC 24 V | ||
| Rated output current 1.3 A | ||

Note:
The AC adapter model varies in certain locations.
Environmental
| Temperature Operating | 41 to 95 °F (5 to 35 °C) | |
| Storage | -13 to 140 °F (-25 to 60 °C) | |
| Humidity Operating 10 to 80%, without condensation | ||
| Operating conditions Ordinary office or home conditions. | Avoid operating the scanner in direct sunlight, near a strong light source, or in extremely dusty conditions. | |
Top
Interfaces
USB Interface
| Interface type Universal Serial | Bus Specification Revision 2.0 |
| Electrical standard Full Speed | mode (12 Mbits per second) and Hi-Speed mode (480 Mbits per second) of Universal Serial Bus Specification Revision 2.0. |
| Connector type One Type B port |
Top
Standards and Approvals
Scanner
| EMC FCC Part 15 Subpart B Class B | CAN/CSA-CEI/IEC CISPR22 Class B |
AC Adapter
| Safety UL60950-1 | CAN/CSA-C22.2 No. 60950-1 |
| EMC FCC Part 15 Subpart B Class B | CAN/CSA-CEI/IEC CISPR22 Class B |
Default Delay Times for Power Management for Epson Products
This product will enter sleep mode after a period of nonuse. The time interval has been set at the factory for energy efficiency and cannot be modified by the consumer.

- OVERVIEW OF YOUR SCANNER FEATURES
- PLACING ORIGINALS ON THE SCANNER
- SCANNING SPECIAL PROJECTS
- SOLVING PROBLEMS
- GUIDE TO THE SCANNER PARTS
- SCANNING YOUR ORIGINALS
- MAINTENANCE
- TECHNICAL SPECIFICATIONS
- TROUBLESHOOTING
- WHERE TO GET HELP
- SYSTEM REQUIREMENTS
- SCANNER SPECIFICATIONS
- NOTE
- IMPORTANT SAFETY INSTRUCTIONS
- RESTRICTIONS ON COPYING
- WARNINGS
- CAUTIONS
- NOTES
- CAUTION
- WARNING
- COPYING OF THE FOLLOWING ITEMS IS PROHIBITED BY LAW
- EXERCISE CAUTION WHEN COPYING THE FOLLOWING ITEMS
- A NOTE CONCERNING RESPONSIBLE USE OF COPYRIGHTED MATERIALS
- COPYRIGHT AND TRADEMARKS
- OPERATING SYSTEM VERSIONS
- COLOR RESTORATION
- DUST REMOVAL
- DIGITAL ICE TECHNOLOGY AND DIGITAL ICE LITE TECHNOLOGY
- BACKLIGHT CORRECTION
- TEXT ENHANCEMENT
- SCANNER PARTS
- LIGHTS AND START BUTTON
- LIGHTS
- BUTTON
- PLACING DOCUMENTS OR PHOTOS
- PLACING DOCUMENTS OR PHOTOS ON THE DOCUMENT TABLE
- PLACING LARGE OR THICK DOCUMENTS
- PLACING FILM OR SLIDES
- REMOVING THE DOCUMENT MAT
- PLACING FILM IN THE HOLDER
- PLACING 35 MM FILM STRIPS
- PLACING 4 × 5 INCH FILM
- PLACING SLIDES IN THE HOLDER
- PLACING FILM IN THE FILM AREA GUIDE
- REPLACING THE DOCUMENT MAT
- STARTING EPSON SCAN
- USING THE SCANNER BUTTON
- START BUTTON
- USING THE EPSON SCAN ICON
- WINDOWS
- USING ANOTHER SCANNING PROGRAM
- NOTE FOR WINDOWS
- SELECTING AN EPSON SCAN MODE
- CHANGING THE SCAN MODE
- SCANNING IN FULL AUTO MODE
- NOTE FOR FILM OR SLIDES
- SCANNING IN OFFICE MODE
- SCANNING IN HOME MODE
- SCANNING IN PROFESSIONAL MODE
- SELECTING FILE SAVE SETTINGS
- FULL AUTO MODE: CLICK CUSTOMIZE, THEN CLICK FILE SAVE SETTINGS
- DETAILED SETTING INSTRUCTIONS
- SELECTING THE SCAN RESOLUTION
- SELECTING THE RESOLUTION IN FULL AUTO MODE
- SELECTING THE RESOLUTION IN HOME MODE
- SELECTING THE RESOLUTION IN OFFICE MODE OR PROFESSIONAL MODE
- PREVIEWING AND ADJUSTING THE SCAN AREA
- NORMAL PREVIEW
- THUMBNAIL PREVIEW
- CREATING A MARQUEE ON A PREVIEW IMAGE
- ADJUSTING THE COLOR AND OTHER IMAGE SETTINGS
- MAKING COLOR ADJUSTMENTS AND OTHER IMAGE SETTINGS IN HOME MODE
- MAKING COLOR ADJUSTMENTS AND OTHER IMAGE SETTINGS IN PROFESSIONAL MODE
- SELECTING THE SCAN SIZE
- SELECTING THE SCAN SIZE IN HOME MODE
- SELECTING THE SCAN SIZE IN PROFESSIONAL MODE
- FINISHING THE SCAN
- FULL AUTO MODE
- OFFICE MODE, HOME MODE, OR PROFESSIONAL MODE
- RESTORING COLOR
- COLOR RESTORATION IN FULL AUTO MODE
- COLOR RESTORATION IN HOME MODE
- COLOR RESTORATION IN PROFESSIONAL MODE
- USING THE COLOR PALETTE FEATURE (FOR PROFESSIONAL MODE ONLY)
- SAMPLING A COLOR FROM AN IMAGE
- REMOVING DUST MARKS WITH THE DUST REMOVAL FEATURE
- DUST REMOVAL IN FULL AUTO MODE
- DUST REMOVAL IN PROFESSIONAL MODE
- REMOVING DUST AND SCRATCH MARKS FROM ORIGINALS USING DIGITAL ICE TECHNOLOGY
- DIGITAL ICE TECHNOLOGY SPECIFICATIONS
- USING DIGITAL ICE TECHNOLOGY IN HOME MODE
- USING DIGITAL ICE TECHNOLOGY IN PROFESSIONAL MODE
- FIXING BACKLIT PHOTOS
- BACKLIGHT CORRECTION IN HOME MODE
- BACKLIGHT CORRECTION IN PROFESSIONAL MODE
- TEXT ENHANCEMENT IN OFFICE MODE
- TEXT ENHANCEMENT IN HOME MODE
- USING THE SCANNER AS A COPIER
- SCANNING TO A PDF FILE
- SCANNING TO A PDF FILE IN OFFICE MODE
- SELECT ONE OF THE FOLLOWING OPTIONS
- YOU SEE THE EDITING PAGE WINDOW DISPLAYING THUMBNAIL IMAGES OF EACH SCANNED PAGE
- SCANNING TO A PDF FILE IN HOME MODE
- SCANNING TO A PDF FILE IN PROFESSIONAL MODE
- CONVERTING SCANNED DOCUMENTS INTO EDITABLE TEXT
- CONVERTING INTO EDITABLE TEXT IN OFFICE MODE
- MAC OS X
- CONVERTING INTO EDITABLE TEXT IN HOME MODE
- CONVERTING INTO EDITABLE TEXT IN PROFESSIONAL MODE
- SCANNING COLOR ACCURATE IMAGES
- ASSIGNING A PROGRAM TO THE START BUTTON
- ASSIGNING A PROJECT PROGRAM IN EPSON EVENT MANAGER TO THE START BUTTON
- CLEANING THE SCANNER
- REPLACING THE SCANNER LIGHT SOURCE
- POWER OFF TIMER SETTING
- TRANSPORTING THE SCANNER
- SCANNER PROBLEMS
- THE STATUS LIGHT IS FLASHING
- THE SCANNER TURNS OFF
- YOU CANNOT START EPSON SCAN
- FOR WINDOWS ONLY
- PRESSING A SCANNER BUTTON DOES NOT START THE CORRECT PROGRAM
- SCANNING PROBLEMS
- YOU CANNOT SCAN USING THE THUMBNAIL PREVIEW
- YOU HAVE TROUBLE ADJUSTING THE SCAN AREA IN THE THUMBNAIL PREVIEW
- NEGATIVE FILM PREVIEW IMAGES LOOK STRANGE
- YOU CANNOT SCAN MULTIPLE IMAGES AT ONE TIME
- YOU CANNOT SCAN IN FULL AUTO MODE
- SCANNING TAKES A LONGER TIME
- YOU CANNOT SCAN FILM OR SLIDES
- SCAN QUALITY PROBLEMS
- THE EDGES OF YOUR ORIGINAL ARE NOT SCANNED
- YOU SEE ONLY A FEW DOTS IN YOUR SCANNED IMAGE
- A LINE OR LINE OF DOTS ALWAYS APPEARS IN YOUR SCANNED IMAGES
- STRAIGHT LINES IN YOUR IMAGE COME OUT CROOKED
- YOUR IMAGE IS BLURRED
- COLORS ARE PATCHY OR DISTORTED AT THE EDGES OF YOUR IMAGE
- YOUR SCANNED IMAGE IS TOO DARK
- AN IMAGE ON THE BACK OF YOUR ORIGINAL APPEARS IN YOUR SCANNED IMAGE
- RIPPLE PATTERNS APPEAR IN YOUR SCANNED IMAGE
- CHARACTERS ARE NOT RECOGNIZED WELL WHEN CONVERTED INTO EDITABLE TEXT (OCR)
- SCANNED COLORS DIFFER FROM THE ORIGINAL COLORS
- STRIPED RINGS APPEAR IN YOUR SCANNED IMAGE OF FILM OR SLIDES IMAGES
- IMAGES ARE ROTATED INCORRECTLY
- UNINSTALLING YOUR SCANNING SOFTWARE
- FOR WINDOWS
- FOR MAC OS X
- EPSON TECHNICAL SUPPORT
- INTERNET SUPPORT
- SPEAK TO A SUPPORT REPRESENTATIVE
- PURCHASE ACCESSORIES
- OTHER SOFTWARE TECHNICAL SUPPORT
- ADOBE PHOTOSHOP ELEMENTS
- LASERSOFT IMAGING SILVERFAST
- X-RITE I1PROFILER
- ABBYY FINEREADER
- WINDOWS SYSTEM REQUIREMENTS
- MAC SYSTEM REQUIREMENTS
- MECHANICAL
- ELECTRICAL
- ENVIRONMENTAL
- INTERFACES
- USB INTERFACE
- STANDARDS AND APPROVALS
- SCANNER
- AC ADAPTER
- DEFAULT DELAY TIMES FOR POWER MANAGEMENT FOR EPSON PRODUCTS
Brand : EPSON
Model : Perfection V700
Category : Scanner