
VL-SD20S - Camcorder SHARP - Free user manual and instructions
Find the device manual for free VL-SD20S SHARP in PDF.


| Product Type | Camcorder |
| Brand | Sharp |
| Model | VL-SD20S |
| Dimensions (Approx.) | 90 x 75 x 145 mm |
| Weight (Approx.) | 480 g (without battery) |
| Power Supply | Rechargeable battery pack, AC adapter |
| Recording Media | MiniDV cassette |
| Optical Zoom | 10x |
| Digital Zoom | 20x |
| Image Sensor | CCD |
| LCD Screen | 2.5-inch color LCD |
| Video Output | Composite AV, S-Video |
| Audio Recording | Stereo PCM |
| Battery Type | Lithium-ion rechargeable |
| Charging Time | Approx. 2 hours |
| Recording Time (Battery) | Up to 90 minutes |
| Maintenance | Clean lens with soft cloth; avoid moisture |
| Safety Precautions | Do not expose to water or extreme temperatures; use only specified batteries |
| Spare Parts Available | Batteries, chargers, cables, remote control |
| Repairability | Serviceable by authorized Sharp centers |
Frequently Asked Questions - VL-SD20S SHARP
User questions about VL-SD20S SHARP
0 question about this device. Answer the ones you know or ask your own.
Ask a new question about this device
Download the instructions for your Camcorder in PDF format for free! Find your manual VL-SD20S - SHARP and take your electronic device back in hand. On this page are published all the documents necessary for the use of your device. VL-SD20S by SHARP.
USER MANUAL VL-SD20S SHARP
Before using the VIEWCAM, please read this operation manual carefully, especially page i.
OPERATION MANUAL
ENGLISH
WARNING
TO PREVENT SHOCK HAZARD, DO NOT EXPOSE THIS APPLIANCE TO RAIN OR MOISTURE.
This equipment should be used with DC 7.4 V --- only or recommended AC adapter.
CAUTION
To prevent electric shocks and fire hazards, do NOT use any other power source.
CAUTION
To prevent shock, do not open the cabinet. No user serviceable parts inside. Refer servicing to qualified dealer or service centre.
Important:
Audio-visual material may consist of copyrighted works which must not be recorded without the authority of the owner of the copyright. Please refer to relevant laws in your country.
Power supply:
This unit can be operated by connecting it to either the AC adapter or battery pack. The AC adapter incorporates the AUTO VOLTAGE (AC 110–240 V, 50/60 Hz) function.
NOTE
The VIEWCAM's LCD panel is a very high technology product with close to 90,000 thin-film transistors*, giving you fine picture detail. Occasionally, a pixel may appear on the screen as a fixed point of blue, green, red, or black. Please note that this does not affect your VIEWCAM's performance.
*Specifications are subject to change without notice.
Precautions
- When the VIEWCAM is not in use, remember to remove the cassette tape, turn off the power, and disconnect the VIEWCAM from the power source.
- Do not aim the lens at the sun.
Do not allow direct sunlight to strike the VIEWCAM lens or LCD monitor screen, whether or not recording is in progress, as it may damage the CCD sensor or LCD screen surface. Be particularly careful when recording outside.
- When shooting in dark places, avoid sudden brightly lit objects or light sources, such as the sun. Otherwise, the image may white out. Should this happen, point the lens in a different direction until the picture returns to normal.
- Avoid magnetic sources.
Using the VIEWCAM near strong fluorescent lights, motors, televisions, or other magnetic sources may affect recorded images.

- Using the VIEWCAM near a broadcasting station or other powerful transmission source may cause buzzing or picture deterioration.
- Avoid shocks and dropping.
Do not drop or otherwise subject the VIEWCAM to hard shocks or strong vibrations. Bumping or striking the unit during recording will generate noise in the recorded image.

- Avoid placing the VIEWCAM in close proximity to lighting equipment.
The heat from incandescent lights may deform the VIEWCAM, or cause it to malfunction.

• Always respect prohibitions or restrictions on the use of electronic equipment on commercial flights or in other sensitive areas. - Be aware of the temperature and humidity.
You can use your VIEWCAM at 0°C to +40°C, and at 30% to 80% relative humidity. Do not store the unit in an unventilated car in the summer, in direct sunlight, or near strong heat sources; this can result in severe damage to the unit casing and circuitry.
- Avoid situations where water, sand, dust or other foreign matter could get on or inside the VIEWCAM, and do not use or leave your VIEWCAM in areas with excessive smoke, steam or moisture.
Such environments can cause malfunctions or cause mildew to form on the lenses. Be sure to keep the unit in a well-ventilated location.

- Some small, portable tripods may be difficult to attach and may not be sturdy enough to support your VIEWCAM. Be sure to use only a strong, stable tripod.

- When using your VIEWCAM in a cold environment, the LCD monitor screen often appears less bright immediately after the power is turned on. This is not a malfunction. To prevent the VIEWCAM from becoming too cold, wrap it in a thick cloth (a blanket, etc.).

About Your VIEWCAM
DV Technology
Digital video, DV, is a revolutionary technology that enables recording and playback of high quality images with the use of special digital features previously unavailable with conventional analog formats.
• High horizontal resolution
Detailed, accurate images with the highest level of horizontal resolution for home use.
- Clear colour reproduction with virtually no colour contamination
Provides three times the colour resolution of conventional VCRs (based on Sharp models). Clear images with virtually no distracting colour contamination (which usually appears as red).
- Standard use of TBC (Time Base Corrector) to prevent jittery images
Ensures stable images with a high signal-to-noise ratio.
• PCM digital recording
PCM digital recording gives you high-quality stereo sound that puts you in the middle of the action.
The “DV” trademark can only be used on digital VCR products which have been evaluated and have met the specifications set by the HD Digital VCR Conference for Standardization of Consumer Use Digital VCR Formats.
This product incorporates copyright protection technology that is protected by method claims of certain U.S. patents and other intellectual property rights owned by Macrovision Corporation and other rights owners. Use of this copyright protection technology must be authorized by Macrovision Corporation, and is intended for home and other limited viewing uses only unless otherwise authorized by Macrovision Corporation. Reverse engineering or disassembly is prohibited.
DV and conventional video cassette tapes
There are two kinds of DV-format video cassette tapes: the Mini DV cassette and the larger DV cassette used for extended playback and recording. This VIEWCAM only operates with Mini DV cassettes. DV cassettes cannot be used. Be sure to use Mini DV cassettes with the "DV" mark.
Mini DV cassette DV cassette


8 mm, VHS, and Beta cassettes cannot be used for playback or recording with this VIEWCAM.
VHS cassette Beta cassette 8 mm cassette


Note:
- This VIEWCAM reproduces the highest picture quality when used with an ME tape. We recommend you use an ME tape for high-quality recording and playback.
LCD Monitor Screen
The VIEWCAM is equipped with a large LCD monitor screen that allows you to record scenes while comfortably holding the camcorder. The LCD monitor screen can be rotated for easy recording at high or low angles. It also functions as a handy playback monitor so you can enjoy what you have just recorded.
Cautions:
- Do not apply pressure to the screen.
- Do not expose the screen to shocks, as it may break.
- Do not place the VIEWCAM with the screen facing down.
Note:
- Use a soft cloth to clean the screen.
Supplied Accessories
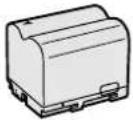 Battery packBT-L241 AC adapter Power cord Battery packBT-L241 AC adapter Power cord |  |  |  Infrared remote control Infrared remote control |
 Digital cable S-video cable Digital cable S-video cable |  Audio/video cable Audio/video cable | 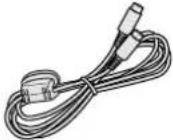 |  CR2025 type lithium battery × 2 CR2025 type lithium battery × 2 |
 |  | 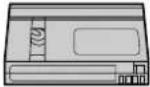 30-minuteMini DV cassetteLens capShoulder strap 30-minuteMini DV cassetteLens capShoulder strap | |
Optional Accessories
Standard type battery pack BT-L241
Extended type battery pack BT-L441

Video capture software VR-PK100S
Contents
Operation References
Part Names 3
On-screen Display Index 5
Quick Reference Index 6
Warning Indicators 7
Preparation
Inserting and Removing the Battery Pack 8
Charging the Battery Pack 9
Powering the VIEWCAM from an AC Outlet 10
Inserting and Removing a Mini DV Cassette 11
Adjusting the Grip Strap 12
Using the Lens Cap 12
Attaching the Shoulder Strap 12
Installing the Lithium Memory Battery 13
Selecting the Language for the On-screen Display ... 14
Setting the Area, Date and Time 15
Displaying the Date and Time of Recording.... 16
Basic Operations
Camera Recording
Easy Camera Recording with Full Auto Mode 17
Zooming 18
Tips on Recording Positions.... 18
Remaining Recording Time Display 19
Remaining Battery Power Display 19
Playback
Playback 20
Volume Control 20
Watching the Playback on a TV 21
Video Search 22
Still 22
Operations of the
Using the Controls 23
Using the Menu Screens 25
On-screen Displays
Useful Features
Camera Recording
Recording in LP (Long Play Recording) Mode 26
Selecting the 16-bit Audio Recording Mode .... 27
Setting the Digital Zoom 27
Digital Quick Zoom (Extend Zoom) 28
Gamma Brightness Compensation 29
Gain-up (Cat's Eye) 30
Digital Image Stabilization (DIS).... 31
Quick Review 31
Quick Return 32
Edit Search 32
Fade In and Fade Out 33
Useful Features
Auto Focus 35
Macro Shots 35
Wide Screen (16:9) 35
Still Recording 36
Multiple Strobe Recording 37
Using the Remote Control 38
Self Recording 39
Setting the VIEWCAM to Full Auto Mode 41
Playback
Slow 42
Frame Advance 42
Strobe Playback 42
Programme Search....43
Using the Time Code 44
Using the Tape Counter 45
Beep 47
Turning Off the LCD Monitor Backlight.... 47
Advanced Features
Camera Recording
Scene Menu (Programme AE).... 48
Picture Effects 49
Manual Focus 50
Setting the Shutter Speed 51
White Balance Lock 53
Manual Iris 54
Picture/Backlight Adjustments 55
Windbreak....56
Selecting Summer Time 56
World Clock 57
Playback
Playback Zoom 59
Gamma Playback 60
Multiple Strobe Playback 60
Still Image Overlap 61
Wipe 62
Picture Effect Playback 63
Editing 64
Editing to Video Equipment with the DV Terminal (IEEE1394) 65
Audio Dubbing Feature 66
Selecting the Audio Playback Mode 68
Connecting to a Personal Computer 68
Appendix
Useful Information 69
Demonstration Mode 74
Before Requesting Service 75
Specifications 77
Operation References
Part Names
For details on the use of each part, refer to the page number indicated in the brackets.
Front view![Stereo microphone [p. 66] Zoom lens Shoulder strap loop [p. 12] Speaker MIC AUDIO/VIDEO Microphone jack [p. 66] AUDIO/VIDEO jack [pp. 21, 64] Jack cover [p. 21]](/content/2026/06/1342022/images/3aa71f3d1f17a3286502170db49ebbdd6f0aa859a7b843fc81b025c99118f4bb.jpg)
When the cassette compartment door is open![Cassette holder [p. 11] Cassette compartment door release [p. 11] Lithium battery holder [p. 13] Cassette compartment door [p. 11]](/content/2026/06/1342022/images/6812acac227577aedbdd696194ffee144dc19e111181c47f9c05514419e1f684.jpg)

Rear view![RECord START/STOP button [p. 17] LCD monitor screen POWER Zoom Wide angle/Telephoto control [p. 18] VOLUME control [p. 20] CONTROL switch [p. 23] PC CONNECTION jack [p. 68] Terminal cover [p. 21] S-VIDEO socket [pp. 21, 64] Operation buttons [p. 24] DC IN jack [pp. 9, 10] Remote sensor [p. 38] SNAPS…](/content/2026/06/1342022/images/a26f928ac5cf8fbc8df5216b8b7ba9d12e6faee9e406c349eaf50a9436ddd239.jpg)
When the lens section is rotated![DV terminal [p. 65] DV terminal cover [p. 65]](/content/2026/06/1342022/images/a17ecb3b813d5ba266871f65a78e95886a9e203337c666156f4f8cfb5c70cb08.jpg)
Bottom view![Battery compartment door [p. 8] Tripod socket Battery compartment door release [p. 8]](/content/2026/06/1342022/images/d76cf2e890006b8e7135a0844b6b49633513f2787cc29be3190edcf760ec2da8.jpg)
4 GB
Operation References
On-screen Display Index
For details on the use of each function, refer to the page number indicated.
![graph TD A["Camera Mode"] --> B["pp. 29, 30 p. 31"] A --> C["p. 55 p. 49"] A --> D["p. 32 pp. 44-46"] A --> E["p. 31"] B --> F["AUTO EX-TEND GAMA EXT. EFF. FADE QK. REW"] C --> G["AUTO FOCUS MANUAL"] D --> H["AUTO RE-TURN TIME CODE"] E --> I["MENU 2"] style A fill:#f9f,stroke:#333 style B fill:#ccf,…](/content/2026/06/1342022/images/d1c1d64d01bd1093158331abbf8ffe92ef41d4559d6f1887690d9ed972cac2c5.jpg)
![graph TD A["VCR Mode"] --> B["pp. 20, 22"] B --> C["p. 20"] C --> D["AUDIO 1+2"] D --> E["PLAY/FF STOPREW STILL"] E --> F["SP"] F --> G["PP"] G --> H["p. 59"] H --> I["AUDIO 1 +2"] I --> J["PB SE AUDIO 0 DUB."] J --> K["ARCHZOOM"] K --> L["p. 43"] L --> M["SP"] M --> N["p. 66"] N --> O["PP"] O --> P…](/content/2026/06/1342022/images/5b24e6d7617e138048a017789d45210c4d08da2c9698cde02b32ef489193858e.jpg)
Note: See pages 23 and 25 for the procedure to display the desired screen.
Quick Reference Index
This index lists some example uses of the VIEWCAM's features.
• To record powerful close-up images. —See page 27 (Setting the Digital Zoom) • To instantly zoom in on a subject. —See page 28 (Digital Quick Zoom) • To record a backlit subject. —See page 29 (Gamma Brightness Compensation) or page 54 (Manual Iris) • To record in a dark or poorly-illuminated location. —See page 30 (Gain-up) • To quickly check what you have just recorded. —See page 31 (Quick Review) • To quickly return the tape to the end of the last recorded scene after playback. —See page 32 (Quick Return) • To record a still picture of a scene like a photo. —See page 36 (Still Recording) • To record or play back a multi-frame picture of a high-speed action, such as a tennis or golf swing. —See page 37 (Multiple Strobe Recording) or page 60 (Multiple Strobe Playback) • To record yourself while monitoring the shot. —See page 39 (Self Recording) • To return to Full Auto mode for easy recording after using the manual settings. —See page 41 (Setting the VIEWCAM to Full Auto Mode) • To find the beginning of a recorded scene to be played back. —See page 43 (Programme Search) • To display the elapsed recording or playback time. —See page 45 (Using the Tape Counter) • To focus on an off-centred subject. —See page 50 (Manual Focus) • To enlarge any part of the picture during playback. —See page 59 (Playback Zoom) • To create an interesting presentation of recorded still images. —See page 61 (Still Image Overlap) or page 62 (Wipe)
Warning Indicators

| Displayed for the first 3 seconds | Displayed after 3 seconds | Description of warning |
| EJECT THE CASSETTE. | EJECT THE CASSETTE. | The video cassette is defective and should be removed (see page 11). |
| DEW | Dew has formed inside the VIEWCAM. Wait for a few hours until the dew disappears (see page 72). About 10 seconds after this warning appears, the VIEWCAM automatically turns off. | |
| BATTERY IS TOO LOW. | The battery is almost depleted. Replace it with a fully charged battery pack (see page 8). | |
| [D250] | The video heads are clogged and should be cleaned (see page 73). | |
| INSERT A CASSETTE. |  | There is no video cassette in the VIEWCAM. Insert a cassette (see page 11). |
| CASSETTE NOT RECORDABLE. | [2CK2] | The erasure protect tab on the video cassette has been slid to the record-protect position, preventing recording (see page 70). |
| THE TAPE ENDS SOON. |  | The tape is about to end. Prepare a new cassette (see page 11). |
| CHANGE THE CASSETTE. | TAPE END | The tape has reached the end. Replace it with a new cassette (see page 11). |
| LAMP | LAMP | The fluorescent lamp behind the LCD monitor is close to the end of its service life. Call your local authorized Sharp dealer to have it replaced. |
 | In Self Recording mode, all warnings will be indicated by displayed in the centre of the monitor. To check the type of warning, rotate the monitor back to the normal position. |
Note: Indicates a flashing display.
Preparation
Inserting and Removing the Battery Pack
Inserting the Battery Pack
1 Make sure that the Power switch is set to OFF.

2 With the lens facing up, slide the battery compartment door release to OPEN (①), and open the battery compartment door (②).
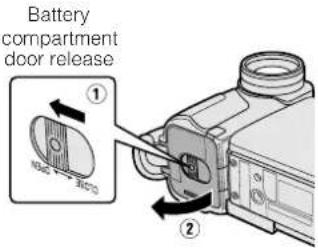
3 Insert the battery pack into the compartment with the ▲ mark facing up, and push it in completely until it locks into place.

4 Firmly press the door closed (①), and slide the release to CLOSE (②).

Removing the Battery Pack
1 Perform steps 1 and 2 above. 2 Press the battery release as shown (①), and remove the battery pack (②).

Cautions:
- BEFORE REMOVING THE BATTERY PACK, ALWAYS STOP THE TAPE AND TURN THE POWER OFF. If you remove the battery pack during recording or playback, the tape will remain wound around the video head drum, potentially causing damage to the tape.
- Make sure the battery compartment door is closed firmly during operation. If it is not, the battery pack may fall out or VIEWCAM operation may fail because of the poor contact pressure.
- Remove the battery pack from the VIEWCAM if the VIEWCAM will not be used for a long period of time.
- When removing the battery pack, do not tilt the VIEWCAM so that the battery compartment faces down. The battery pack may fall out.
- Do not expose the battery compartment door to strong force, as it may come off.
- Use only SHARP model BT-L241 or BT-L441 battery packs with this VIEWCAM. Use of other batteries may present a risk of fire or explosion.
Charging the Battery Pack
1 Insert the battery pack into the VIEW-CAM (see page 8). Make sure that the Power switch is set to OFF.
- The battery pack is not charged when the Power switch is set to CAMERA or VCR.
2 Connect the power cord to the AC adapter, then insert the AC plug into a power outlet.
3 Insert the DC plug of the AC adapter into the DC IN jack on the VIEWCAM.
- The CHARGE indicator will light up in red.

- The CHARGE indicator will light up in green when the battery is fully charged.
4 Remove the DC plug from the VIEW-CAM and the AC plug from the power outlet.
Cautions:
- Charge only SHARP model BT-L241 or BT-L441 battery packs. Other types of battery packs may burst, causing personal injury and damage.
- Charge the battery pack at a temperature of 10°C to 30°C. The battery pack may not charge properly at temperatures too low or too high.
- When removing the plugs, grasp the plug, not the cable.
Charging time and maximum continuous camera recording and playback times
| Battery pack | Charging time | Max. continuous recording time | Max. continuous playback time |
| BT-L241 | 100 | 105 | 105 |
| BT-L441 | 200 | 210 | 210 |
- The chart specifies the approximate times in minutes.
Notes:
• Using the zoom (see page 18) and other functions or turning the power on and off frequently will increase power consumption which may result in a decrease of more than 50% in the actual recording time compared to the maximum continuous recording time listed above. - The charging time and recording time may vary depending on the ambient temperature and the condition of the battery pack. • We recommend that you have enough battery packs on hand to provide two to three times your estimated recording time. • See page 71 for more information on using the battery pack.
Extending Battery Pack Life
Even when the battery pack is not used, the capacity of the battery pack will naturally deteriorate over time. To limit the deterioration of the capacity of the battery pack, it is recommended to perform the following procedure at least once every six months:
① Insert the battery pack into the VIEWCAM, and charge it until the CHARGE indicator lights up in green. ② Set the Power switch to CAMERA without inserting a cassette. Allow the battery pack to fully drain by leaving it in the VIEWCAM until the power automatically turns off. ③ Remove the battery pack and store it at a temperature of 10°C to 20°C.
Powering the VIEWCAM from an AC Outlet
Caution:
- The supplied AC adapter is specially designed for use with this VIEWCAM, and should not be used as a power supply for other camcorders.
1 Connect the power cord to the AC adapter, then insert the AC plug into a power outlet. 2 Make sure that the Power switch on the VIEWCAM is set to OFF. 3 Insert the DC plug of the AC adapter into the DC IN jack on the VIEWCAM.

4 Hold down the Lock button and slide the Power switch to CAMERA or VCR.

Cautions:
- BEFORE REMOVING THE DC PLUG, ALWAYS STOP THE TAPE AND TURN THE POWER OFF.
If you remove the DC plug during recording or playback, the tape will remain wound around the video head drum, potentially causing damage to the tape.
- Remove the DC plug from the VIEWCAM if the VIEWCAM will not be used for a long period of time.
- When removing the plugs, grasp the plug, not the cable.
Preparation
Inserting and Removing a Mini DV Cassette
Inserting a Cassette
Preparation
1 Supply power to the VIEWCAM, then slide the cassette compartment door release and open the cassette compartment door.
- The cassette holder extends and opens automatically.

2 Insert the cassette fully with the window facing outwards, and with the erasure protect tab facing upwards.

3 Press the PUSH mark gently until the cassette holder clicks into place.
- The cassette holder retracts automatically.

4 Wait for the cassette holder to fully retract. Close the compartment door by pressing the centre until it clicks into place.
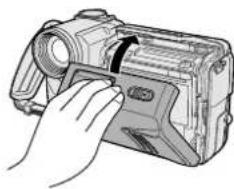
Removing a Cassette
Perform step 1 above, then take out the cassette.
Cautions:
- Do not try to close the cassette compartment door while the cassette holder is extending or retracting.
- Be careful not to get your fingers caught in the cassette holder.
- Do not apply force to the cassette holder except when pressing the PUSH mark to close it.
- Do not tilt the VIEWCAM or hold it upside down when you are inserting or removing a cassette. It may damage the tape.
- Remove the cassette if you will not use the VIEWCAM for a long period of time.
- If you do not correctly close the cassette holder in step 3, the VIEWCAM's cassette protection mechanism might eject the cassette. If this happens, repeat the insertion procedure.
- Do not attempt to pick up the VIEWCAM by the cassette compartment door.
Notes:
- If the battery power is too low, you may not be able to eject the cassette. Replace the battery pack with a fully charged one. • See page 70 for more information on the video cassette tapes for use with this VIEWCAM.
Adjusting the Grip Strap
1 Open the hand strap flap (①) and grip strap (②).

2 Loosen the grip strap, pass your hand through the loop and put your thumb close to the Power Zoom control. Then pull the grip strap tight until it fits snugly.
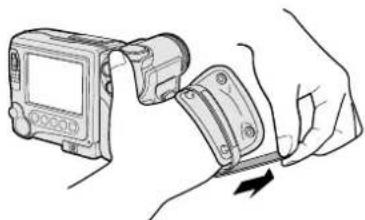
3 Seal the velcro closure of the grip strap (①) and close the hand strap flap (②).

Caution:
- Do not swing the VIEWCAM by the hand strap.
Using the Lens Cap
Attach the lens cap cord to the VIEWCAM as shown below (①), and attach the lens cap to the lens (②).

When recording, remove the lens cap (①) and attach the lens cap cord to the fastener (②) so the lens cap will not get in the way.

Note:
• Always replace the lens cap on the lens when the VIEWCAM is not in use.
Attaching the Shoulder Strap
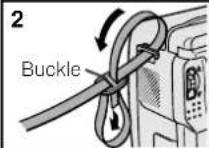
1 Hold one end of the strap and thread it through the loop on the left side of the LCD screen. 2 Loosen the strap in the buckle, then feed the end of the strap through the buckle, as shown. 3 Draw the strap in the direction of the arrow to secure. 4-6 Use the same procedure to attach the other end of the strap to the loop on the lens side.

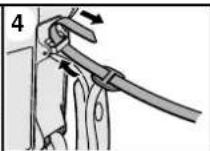


Preparation
Installing the Lithium Memory Battery
The supplied lithium battery is used to store the memory of the date and time settings.
1 Slide the cassette compartment door release and open the cassette compartment door.

Note: The cassette holder will extend and open when the VIEWCAM is connected to a power source. Be sure to close the cassette holder before proceeding to the next step (see page 11).
2 Pull out the lithium battery holder using a pointed object such as the tip of a ballpoint pen.

Lithium battery holder
3 Insert the lithium battery into the battery holder with the + side of the battery facing the ⊕ side of the holder.
④ mark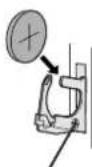
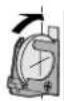
4 Push the battery holder back into position.
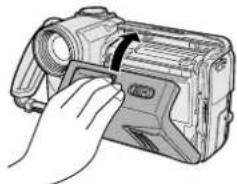
5 Close the cassette compartment door by pressing the centre until it clicks into place.
Removing the Lithium Battery
Perform steps 1 and 2 above, then lift out the battery from the battery holder.
Note:
- Replace the battery with a new CR2025 battery when the VIEWCAM time indicator starts to fall behind the correct time.
Notes on the Use of the Lithium Battery
CAUTION: Danger of explosion if battery is incorrectly replaced. Replace only with the same or equivalent type CR2025 recommended by the equipment manufacturer.
WARNING KEEP THIS BATTERY AWAY FROM CHILDREN. IF SWALLOWED, CONSULT A PHYSICIAN IMMEDIATELY FOR EMERGENCY TREATMENT.
CAUTION BATTERY MAY EXPLODE IF MISUSED OR INSTALLED WITH POLARITY REVERSED. DO NOT RECHARGE, DISASSEMBLE OR DISPOSE OF IN FIRE.
- Do not short-circuit, recharge, disassemble, or heat the lithium battery.
- Should the lithium battery leak, wipe the battery compartment and holder clean, and then insert a new battery.
- The lithium battery will last about one year of normal usage.
Selecting the Language for the On-screen Display
This VIEWCAM allows you to choose from among English, German or French for the on-screen display language.
CONTROL switch
Operation buttons
Setting the Language
When using the VIEWCAM for the first time, select the desired language for the on-screen display by performing the procedure below.
1 Hold down the Lock button and slide the Power switch to CAMERA.
• The language selection screen appears.

2 Press the ▼ or ▲ button (◀◀ or ▶/■) (①) to select the desired language, then press the SET (EINST. or REGLAGE) button (▶▶) (②).

Changing the Language
1 In Recording Standby mode, display the menu screen (see page 25).
2 Toggle the CONTROL switch (①) to select "LANGUAGE" ("SPRACHE" or "LANGUE"), then press the CONTROL switch (②).
• The language selection screen appears.

3 Toggle the CONTROL switch (①) to select the desired language, then press the CONTROL switch (②).
- The menu screen is displayed in the language selected.
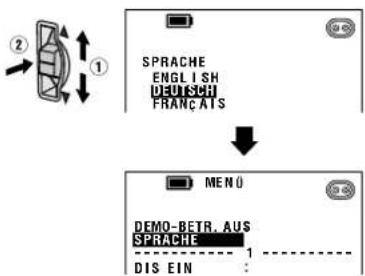
4 Press the FERTIG (SORTIE or EXIT) button (MODE DISPLAY) to turn off the menu screen.
Note:
- The English, German and French portions of this operation manual are based on the use of on-screen displays in their respective languages. The portions of this manual in other languages, however, are based on the use of English on-screen displays.
Preparation
Setting the Area, Date and Time
Example: Setting the date to 2 June 2000 (2. 6.2000) and the time to 10:30 am (10:30) in Paris.
Notes:
- Before performing the procedure below, make sure that the lithium battery has been installed (see page 13).
- If you are in an area that observes summer time, set the time to the standard time. You can then correct for summer time by performing the procedure on page 56.

1 Hold down the Lock button and slide the Power switch to CAMERA.

2 Press the CONTROL switch until appears.


3 Press the MENU button (◀◀) to display the menu screen.

4 Press the SET button (▶) until "2 PARIS" appears.

Note: See pages 57 and 58 for the area number and name of the representative city for your time zone.
5 Press the ▼ button (◀◀) (①) to select "SETTING", then press the SET button (▶▶) (②).

6 Press the ▲ or ▼ button (▶/|| or ◀◀) to select "2" (day), then press the SET button (▶◀).

7 Press the ▲ or ▼ button to select "6" (month), then press the SET button.

8 Press the ▲ or ▼ button to select "2000" (year), then press the SET button.

9 Press the ▲ or ▼ button to select "10" (hour), then press the SET button.

10 Press the ▲ or ▼ button to select "30" (minute), then press the SET button.
• The internal clock now starts operating.

11 Press the EXIT button (MODE DISPLAY) to turn off the menu screen.
Changing to the 12-hour Time Mode
After performing step 10 above, press the ▼ or ▲ button (◀◀ or ▶/■) (①) to select "12H/24H", then press the SET button (▶▶) (②) to select "12H".

Notes:
- The date and time, once set, are internally recorded even when not displayed on the screen.
- The menu screen automatically turns off if no settings are made within 5 minutes.
- You can also use the CONTROL switch to adjust the menu settings (see page 25).
Displaying the Date and Time of Recording
Follow the procedure below to display the date, or both the date and time, of recording on the screen. You can display the date and time during both recording and playback.
- The example screens for this feature are for Camera mode.
1 Hold down the Lock button and slide the Power switch to CAMERA or VCR. 2 Press the CONTROL switch until appears. 3 Press the MENU button (◀◀) to display the menu screen. 4 Press the ▼ or ▲ button (◀◀ or ▶/■) (①) to select "DISPLAY", then press the SET button (▶▶) (②) to select "DATE" or "DATE+TIME".

5 Press the EXIT button (MODE DISPLAY) to turn off the menu screen.

Notes:
- Before recording, make sure that the date and time have been correctly set. If they have not been set, the display will be left blank when playing back the tape. (The display will also be left blank for unrecorded or damaged portions of the tape.)
- In VCR mode, the current date and time are displayed when the tape is not being played back.
- You can also display the date and time by pressing the DATE DISPLAY button on the remote control.
Basic Operations
Camera Recording
Easy Camera Recording with Full Auto Mode
Before you start recording, perform the operations described on pages 8 through 16 to prepare your VIEWCAM for recording.
REC START/STOP button
1 Remove the lens cap.
2 Hold down the Lock button and slide the Power switch to CAMERA.
- The picture from the lens is now displayed on the LCD monitor screen.
- The VIEWCAM is now ready to record (Recording Standby mode).
Lock button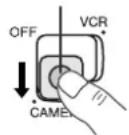

Full Auto mode indicator
Note: If, at this time, "AUTO" does not appear, set the VIEWCAM to Full Auto mode by following the procedure described on page 41.
3 Press the REC START/STOP button to begin recording.


Note:
- When recording at the beginning of a tape, advance the tape about 15 seconds before you begin recording. This will prevent the beginning of the recording being cut off when it is played back.
To Pause Recording
Press the REC START/STOP button again. Recording pauses, and the VIEWCAM enters the Recording Standby mode.


To Turn the Power Off
Slide the Power switch to OFF.
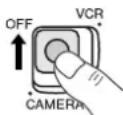
Notes:
• The speaker is off in Camera mode. - Battery power is consumed in Recording Standby mode. Turn off the power if you will not be recording again soon. - If the VIEWCAM is kept in Recording Standby mode for more than approximately 5 minutes, the power will automatically turn off to save battery power and to protect the tape from being damaged. To continue recording after this, set the Power switch to OFF, and then back to CAMERA.
Maximum Continuous Camera Recording and Actual Recording Times
| Battery pack | Max. continuous recording time | Actual recording time |
| BT-L241 | 105 | 55 |
| BT-L441 | 210 | 110 |
The chart specifies the approximate times in minutes.
Note:
Using the zoom (see page 18) and other functions or turning the power on and off frequently will increase power consumption which may result in a decrease of more than 50% in the actual recording time compared to the maximum continuous recording time listed above.
Zooming
Zooming allows you to move visually closer to or farther from a subject without physically changing your position.
![graph TD A["Zooming in (when you want to centre attention on the subject)"] --> B["Wide angle"] B --> C["Zooming out (when you want to show the surroundings)"] C --> D["Tele-photo"]](/content/2026/06/1342022/images/42b357391c25dceea122c9e7f72d6db80c4c03e46bbb5392e25043cbc38dba68.jpg)
To Zoom In
Push the Power Zoom control to the T (telephoto) side to get a close-up view (①).
To Zoom Out
Push the Power Zoom control to the W (wide angle) side to get a wide field of view (②).

- The on-screen display shows you the current zoom setting.
- The zoom speed changes depending on how far you push the Power Zoom control.
Notes:
- The VIEWCAM is unable to focus when zooming in on subjects within 1.5 m. The VIEWCAM will automatically zoom out until it is able to focus on the subject. (See page 35 for recording macro shots.) • See page 27 for use of the digital zoom.
Tips on Recording Positions
The rotating LCD monitor screen lets you enjoy easy video recording in a more relaxed posture without having to hold the VIEWCAM up to your eye. The LCD monitor also makes it easier to record high-angle and low-angle shots.
Holding the VIEWCAM
Put the fingers of your right hand through the hand strap, and place your right thumb close to the REC START/STOP button and Power Zoom control.
Place your left thumb on the thumb rest below the CONTROL switch.

Basic Posture
Press your elbows against your sides.

High Angle
You can record while still viewing the screen. This is convenient when you want to record over a crowd.
Low Angle
Put one knee on the ground for the best stability.

Notes:
- In hand-held recording, the VIEWCAM has to be steadied to prevent image shakes. For very stable recording, use a tripod. • Take care not to touch the microphone with your fingers during recording. It will cause noise on the audio track.
Basic Operations: Camera Recording
Remaining Recording Time Display
When the VIEWCAM is recording in Camera mode, an on-screen indicator displays the approximate remaining recording time.

| Approx. remaining recording time | On-screen indicator |
| Less than half of the total tape time | |
| 10 min.-8 min. | |
| 8 min.-6 min. | |
| 6 min.-4 min. | |
| 4 min.-2 min. | |
| 2 min.-1 min. | |
| 1 min.-0 min. | THE TAPE ENDS SOON.↓-TAPE END- |
| 0 min.(The tape has reached the end.) | CHANGE THE CASSETTE.↓TAPE END |
To turn off the time-remaining indicator, press the MODE DISPLAY button.
Notes:
- The time-remaining indicators only show the approximate time left. Also, they vary slightly depending on the length of tape used. (This function's design is based on the DVM60 tape standard.)
- If you turn off the time-remaining indicator, it will reappear after a short interval to indicate the new time remaining.
- The remaining recording time display appears 5 seconds after pressing the REC START/STOP button to begin recording.
Remaining Battery Power Display
When using the VIEWCAM with the battery pack as the power source, you can turn on and off the remaining battery power display by pressing the MODE DISPLAY button. If the battery power becomes very low, a warning indicator will appear. Replace the battery pack.


(Green)

(Green)

(Red)
BATTERY IS TOO LOW.

Remaining battery power display
Warning indicator
Notes:
- Use the remaining battery power display only as an approximate indication.
- The battery power display may change to either a higher or lower level if you set the Power switch to OFF and then back to CAMERA or VCR.
- In cold environments, the red remaining battery power display may appear sooner. The battery pack, however, can be used until the warning indicator appears. Replace the battery pack at this time.
- Battery consumption may vary depending on the condition of use.
- Use of the zoom functions when the warning indicator is displayed may cause the VIEWCAM to suddenly lose power.
Basic Operations Playback
Playback
The LCD monitor screen makes it possible to play back and see what you have just recorded. Nothing needs to be connected, allowing instant on-screen playback with the sound through the built-in speaker.

1 Hold down the Lock button and slide the Power switch to VCR.
• The screen appears.

2 Press the REW (◀◀) (or FF [▶▶]) button to rewind (or fast forward) the tape to the desired point.

3 Press the PLAY/STILL button ( ) to begin playback.

To Stop Playback
Press the STOP button ( ■ ).

Notes:
- If you wish to turn the Operation button indicators on or off, press the MODE DISPLAY button. The Playback Operation buttons will still function as indicated even after the indicators are turned off.
- To use the infrared remote control, make sure that the REMOTE menu item is set to "ON" (see page 38).
Auto Tape Rewind
The tape is automatically rewound when playback reaches the end of the tape.
To Turn the Power Off
Slide the Power switch to OFF.
Volume Control
While the VIEWCAM is in VCR mode, push the Volume control to the + or - side to increase (①) or decrease (②) the volume to your preference.
The volume level indicator will appear on the screen during adjustment only. When the Volume control is released, the volume level indicator will disappear shortly afterwards.
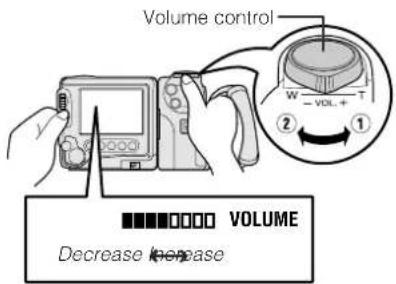
Basic Operations
Playback
Watching the Playback on a TV
You can also connect the VIEWCAM to a TV to allow a larger audience to enjoy video playback.
Caution:
- Make sure that the VIEWCAM, TV, VCR and other equipment to be connected have been turned off before you make connections. Making connections with any of the components left turned on may cause picture noise or a malfunction.
1 Open the jack and terminal covers on the VIEWCAM.

About the S-video socket
S-video sockets are used to separately pass the chroma (colour) and luminance (brightness) components of video signals. They serve to improve the picture quality in both recording and playback.
- If your TV or VCR has an S-video input socket, you can connect it to the S-VIDEO socket on the VIEWCAM with the supplied S-video cable.
2 Connect the VIEWCAM to your TV (or VCR) with the supplied audio/video cable, as shown.
3 Turn on the TV and set it to the "AV" or "VIDEO" channel. (See the operation manual of your TV.)
- When connecting to a TV via a VCR, turn on the VCR and set it to the "AV" or "LINE" input channel. Operate the TV as you normally do to see the signal from the VCR. (See the operation manuals of your TV and VCR.)
4 Set the Power switch on the VIEWCAM to VCR, and begin tape playback (see page 20).
Notes:
- If your TV or VCR has a 21-pin Euro-SCART connector, use the RCA/21-pin Euro-SCART conversion connector (QSOCZ0033TAZZ).
21-pin Euro-SCART on TV or VCR

RCA/21-pin Euro-SCART
conversion connector
(QSOCZ0033TAZZ)
Video Audio R Audio L
- If your TV or VCR has only one audio input jack, use the white plug for the audio connection on the TV or VCR.
- When the VIEWCAM is connected to a TV for playback, the picture on the TV screen may flicker if the volume on the VIEWCAM is set to maximum. Should this occur, turn the volume down (see page 20).
- Close the jack and terminal covers after use.
Video Search
The video search function makes it easy to search for a desired scene on the tape.
1 During playback, press the Forward Search (▶) (or Reverse Search [◀]) button.
- The playback picture fast forwards (or reverses).

2 When you find the desired scene, press the PLAY/STILL button (▶/■) to return to normal playback.
Notes:
• The sound is off during search. - Some picture noise appears during search. This is not a malfunction.
Still
The still function makes it possible to pause playback.
During playback, press the PLAY/STILL button (▶/Ⅲ).

To return to normal playback, press the PLAY/STILL button again.
Notes:
• The sound is off in Still mode. • To protect the tape, the VIEWCAM automatically returns to normal playback if it is left in Still mode for more than 5 minutes. - If the still function is used when connected to a TV, noise will appear and distort the playback image.
Operations of the On-screen Displays
Using the Controls
The following controls on the VIEWCAM can be used to select and operate the various functions, settings and on-screen displays.

Power switch
For use of the camera recording functions, hold down the Lock button and slide the Power switch to CAMERA to set the VIEWCAM to Camera mode.
Lock button
For use of the VCR playback functions, hold down the Lock button and slide the Power switch to VCR to set the VIEWCAM to VCR mode.

To turn the power off, slide the Power switch to OFF.

CONTROL switch
The CONTROL switch is used to select the mode screens. Each time you press the CONTROL switch, the mode screen changes from 1/4

4/4 Camera mode![graph TD A["AUTO"] --> B["EX-TEND"] B --> C["MAN-FOCUS"] C --> D["MAN-UAL"] D --> E["AUTO"] E --> F["RE-TURN"]](/content/2026/06/1342022/images/7942d91e9e56d3863eaba0ee4056c9c04a86fd6567f694c06f04207b95bac764.jpg)
VCR mode![graph TD A["Panel 1: AUDIO 1+2, SP SP, PLAY/FF, STOPREW STILL"] --> B["Panel 2: AUDIO 1+2, SP SP, PB, OUB."] B --> C["Panel 3: AUDIO 1+2, SP SP, GAMA, TIME, CODE"] C --> D["Arrow pointing to Panel 1"]](/content/2026/06/1342022/images/a2073ca41d3c20e00a55f297aac5932d767750ec241962b28f380c06728a0a07.jpg)
The CONTROL switch can also be used to easily adjust the settings on the following screens.
• Language selection screen - Menu screen - Manual focus screen - Manual setting screen • Picture/backlight adjustment screen - Playback zoom screen
Operation buttons
The Operation buttons are used to select recording and playback functions on the screens. Press the Operation button corresponding to the indicator of the desired function displayed on the screen.
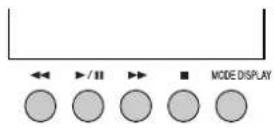
Note:
- The Operation button indicators are normally displayed in blue. When a function is selected, its indicator is displayed in yellow. When a function cannot be used, its indicator is displayed in gray.
The Operation buttons can also be used to adjust the settings on the language selection, menu, manual setting and picture/backlight adjustment screens. The procedures for adjusting these settings in the following sections of this operation manual are based upon the use of the CONTROL switch. To adjust these settings with the Operation buttons, follow the rules below.
- Press the ▼ or ▲ button (◀◀ or ▶/■) when indicated to toggle the CONTROL switch.

- Press the SET button (▶▶) when indicated to press the CONTROL switch.

About the MODE DISPLAY button
Press the MODE DISPLAY button to turn the on-screen indicators on or off.

Notes:
- The warning indicators and some other indicators cannot be turned off by pressing the MODE DISPLAY button.
- The MODE DISPLAY button functions as the EXIT button on the menu, manual setting and picture/backlight adjustment screens ("EXIT" is displayed above the MODE DISPLAY button). When the EXIT button is pressed, the screen returns to the mode screen.
Operations of the On-screen Displays
Using the Menu Screens
The menu screens can be used to adjust the various settings of the VIEWCAM.
- The example screens on this page are for Camera mode.
1 Hold down the Lock button and slide the Power switch to CAMERA or VCR.

2 Press the CONTROL switch until appears.


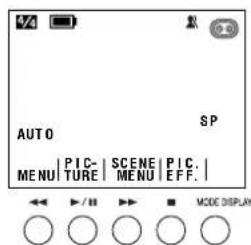
3 Press the MENU button (◀◀) to display the menu screen.


4 Press the ▼ or ▲ button (◀◀ or ▶/■) or toggle the CONTROL switch to select the desired menu item.
- You can display additional menu items by continually pressing the ▼ or ▲ button or toggling the CONTROL switch in either direction.
Example

5 Press the SET button (▶) or the CONTROL switch to select the desired setting.
• Each time you press the SET button or the CONTROL switch, the setting changes.
Example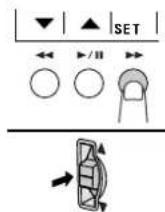

6 Press the EXIT button (MODE DISPLAY) to turn off the menu screen.
Notes:
- Certain menu items are common in both Camera and VCR modes. If the REMOTE menu item, for example, is set to "OFF" in Camera mode, it will be automatically set to "OFF" in VCR mode.
- The menu screen is not displayed during recording.
- The menu screen automatically turns off if no settings are made within 5 minutes.
Useful Features
Camera Recording
Recording in LP (Long Play Recording) Mode
This VIEWCAM allows you to record in LP (Long Play Recording) mode for approximately 50% more recording time with the same picture quality as that in SP (Standard Play Recording) mode.
1 In Recording Standby mode, display the menu screen (see page 25). 2 Toggle the CONTROL switch (①) to select "TAPE SPEED", then press the CONTROL switch (②) to select "LP".

3 Press the EXIT button (MODE
DISPLAY) to turn off the menu screen.
- The recording mode indicator changes from "SP" to "LP".

Recording mode indicator
To return to SP mode
Press the CONTROL switch to set the TAPE SPEED menu item to "SP" in step 2 above.
Notes on the Use of LP Mode
- To record in LP mode, be sure to use a Mini DV cassette labelled for use with LP mode.
- Frozen images, mosaic-pattern picture noise, audio interruptions or audio loss may occur in the following cases: —When using a tape which is not designated for use with LP mode. —When playing back a tape recorded in LP mode at high temperature. —When a tape recorded in LP mode with the VIEWCAM is played back on a Mini DV player or camcorder from another manufacturer. —When a tape recorded in LP mode is played back on a Mini DV player or camcorder without an LP function.
- Audio dubbing is not possible with LP mode recordings.
Useful Features Camera Recording
Selecting the 16-bit Audio Recording Mode
This VIEWCAM allows you to select between the 12-bit and 16-bit audio recording modes. The VIEWCAM normally records audio in the 12-bit audio recording mode. For higher-quality audio, select the 16-bit audio recording mode.
1 In Recording Standby mode, display the menu screen (see page 25). 2 Toggle the CONTROL switch (①) to select "AUDIO MODE", then press the CONTROL switch (②) to select "16BIT".

3 Press the EXIT button (MODE DISPLAY) to turn off the menu screen.
To return to 12-bit audio recording mode
Press the CONTROL switch to set the AUDIO MODE menu item to "12BIT" in step 2 above.
Note:
- When using the audio dubbing feature with 16-bit audio recordings, both the dubbed and original sounds will be recorded in mono (see page 66).
Setting the Digital Zoom
You can select from among three different zoom ranges: 1–10× (optical zoom), 10–40× (digital zoom) or 10–100× (digital zoom). The digital zoom allows you to record powerful close-up pictures with the same operation as normal zooming.
Notes:
- The digital zoom is in addition to the optical zoom giving a combined maximum zoom range of 1–100×.
- As the image is enlarged digitally, the picture may become distorted when higher digital zoom settings are used.
- The digital zoom cannot be used with the Digital Quick Zoom or the STRETCH or SLIM EFF. picture effects.
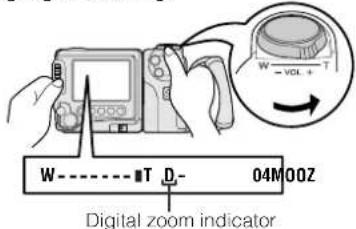
1 In Recording Standby mode, display the menu screen (see page 25). 2 Toggle the CONTROL switch (①) to select "DGTL ZOOM", then press the CONTROL switch (②) to select "40×" or "100×".

3 Press the EXIT button (MODE DISPLAY) to turn off the menu screen. - The "D" digital zoom indicator is displayed during digital zooming.
To return to optical zoom
Press the CONTROL switch to set the DGTL ZOOM menu item to "OFF" in step 2 above.
Digital Quick Zoom (Extend Zoom)
The digital quick zoom function allows you to instantly zoom in on a subject. You can select from among three digital quick zoom ranges, 2×, 4× or 10×.
Using Digital Quick Zoom
1 Press the CONTROL switch until 1/4 appears (Camera mode).

2 During recording, press the EXTEND button (◀◀).
- The zoom range indicator appears and the subject is instantly magnified.


Notes:
• The picture quality decreases when the Digital Quick Zoom is used. - The Digital Quick Zoom cannot be used in the digital zoom range or together with the STRETCH or SLIM EFF. picture effects.
Setting the Digital Quick Zoom Ranges
1 In Recording Standby mode, display the menu screen (see page 25). 2 Toggle the CONTROL switch (①) to select "EXTEND", then press the CONTROL switch (②) to select "2×", "4×", "10×", or "ALL".

3 Press the EXIT button (MODE DISPLAY) to turn off the menu screen.
- When "ALL" is selected, each time you press the EXTEND button (◀◀) during recording, the zoom range changes as shown.

Note:
- When the Digital Quick Zoom is used with the optical zoom at 10×, —“2×” increases the zoom power to 20×, —“4×” increases the zoom power to 40×, —“10×” increases the zoom power to 100×.
To cancel Digital Quick Zoom
Press the EXTEND button until the zoom range indicator disappears.
Useful Features Camera Recording
Gamma Brightness Compensation
When the subject is backlit, the image will be darkened if it is recorded normally. The gamma brightness compensation function improves the picture by increasing the brightness of the subject while leaving the brighter portions of the image unaffected.
1 Press the CONTROL switch until appears (Camera mode).
Note: At locations where lighting is insufficient, "LIGHT" appears on the screen. The Gamma Brightness Compensation cannot be used in this case.
2 Press the GAMA EFF. button (▶/11) once.
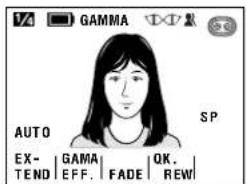
- "GAMMA" appears, indicating that the Gamma Brightness Compensation is now working.
To obtain a brighter picture
Press the GAMA EFF. button (▶) again. • The indicator appears.


Note:
- When the indicator is displayed, the background will become slightly brighter.
To cancel Gamma Brightness Compensation
Press the GAMA EFF. button until "GAMMA" disappears.


Gain-up (Cat's Eye)
When you are recording in a dark or poorly-illuminated location, "LIGHT" is displayed on the screen. Use the gain-up function to record a brighter picture.
1 Press the CONTROL switch until appears (Camera mode).
Note: At locations where lighting is adequate, "LIGHT" will not appear. The gain-up function cannot be used in this case.
2 Press the GAMA EFF. button ( )▶/■ once.
- "GAMMA" appears, indicating that the gain-up function is now working.


To obtain a brighter picture
Press the GAMA EFF. button (▶)/again.
• The Indicator appears.

To cancel the gain-up function
Press the GAMA EFF. button until "GAMMA" disappears.
Notes:
- Gain-up mode will disengage automatically if the VIEWCAM is moved to a bright location.
- Some picture noise appears in Gain-up mode. The picture noise increases when the ①⑦ indicator is displayed.
Useful Features Camera Recording
Digital Image Stabilization (DIS)
The digital image stabilization (DIS) function is factory preset to on to stabilize the image by electronically compensating for relatively small image shakes that are often annoying in close-up shots.

The DIS function cannot compensate for excessive image shakes, or for the subjects or situations described below. In these cases, turn off the DIS function and use the VIEWCAM on a tripod.
- Subject with low contrast
- Subject with a plain background • Dark or dimly lit subject
- Many moving subjects in a single frame
- Subject with vertical or horizontal stripes
Turning Off the DIS Function
1 In Recording Standby mode, display the menu screen (see page 25). 2 Toggle the CONTROL switch (①) to select "DIS", then press the CONTROL switch (②) to select "OFF".

3 Press the EXIT button (MODE DISPLAY) to turn off the menu screen.
• The indicator is turned off.
To return to DIS mode
Press the CONTROL switch to set the DIS menu item to "ON" in step 2 above.
Quick Review
The quick review function lets you check the last 5 seconds of tape just recorded without switching to VCR mode, to make sure that the recording has come out right.
1 In Recording Standby mode, press the CONTROL switch until 1/4 appears.
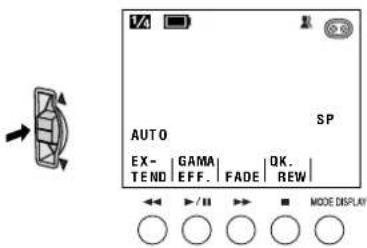
2 Press the QK. REW button ( ■ ).
- The tape rewinds to the point of 5 seconds before the current tape position; playback then starts automatically.


After 5 seconds of playback, the VIEW-CAM enters the Recording Standby mode.
Quick Return
When you have been playing back what you have recorded, and wish to quickly return to recording again from the end of the last recorded scene, use the quick return function.
1 In Recording Standby mode, press the CONTROL switch until 3/4 appears.

2 Press the RETURN button (◀◀).
- The tape will begin fast forwarding or rewinding to the end of the last recorded scene.
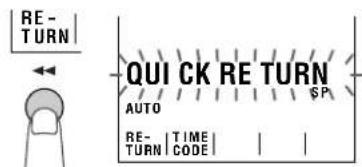
When the tape reaches the end of the last recorded scene, the VIEWCAM enters the Recording Standby mode.
Notes:
- To cancel the quick return function, press the RETURN button again in step. 2.
- If the cassette has been removed since the last recording or if no recording has been made since the cassette was loaded, the quick return function cannot be used.
Edit Search
The edit search function lets you search, without switching from Camera mode to VCR mode, for the point on the tape where you wish to start recording next.
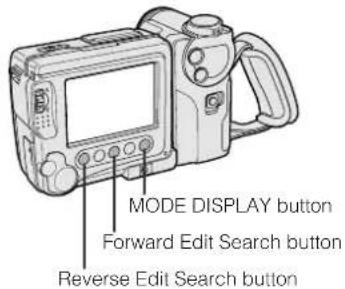
1. In Recording Standby mode, make sure that no Operation button indicators are displayed on the screen. - If they are displayed, turn them off by pressing the MODE DISPLAY button.
2. Press and hold down the Forward Edit Search button (▶) or Reverse Edit Search button (◀).
Forward edit search
Reverse edit search

3. When you find the point where you want to begin recording, release the button.
Notes:
• The sound is off during search. - Some picture noise appears during reverse edit search. - Forward edit search is performed at the same speed as normal playback, and reverse edit search at five times the normal playback speed.
Useful Features Camera Recording
Fade In and Fade Out
The fade function allows you to gradually bring the image and sound in or out at the beginning or end of a scene to create a scene transition. This VIEWCAM features one normal and four animated fade modes.
Type of Fade Modes
NORMAL: The picture fades in from and out to white.
HOLIDAY: The picture fades in from an animated firework sequence with the title "HAPPY HOLIDAYS!", and fades out to white.
![graph TD A["Start"] --> B{HAPPY HOLIDAYS!} B --> C["Step 1"] B --> D["Step 2"] B --> E["Step 3"] C --> F["End"]](/content/2026/06/1342022/images/ad9acae8063188fb90ec4f1bf3a01753c5e070981f4269171245a288206f4e1a.jpg)
Useful Features
BIRTHDAY: The picture fades in from an animated birthday cake sequence with the title "HAPPY BIRTHDAY!", and fades out to white.
![graph TD A["1"] --> B["2"] B --> C["3"] C --> D["4"] D --> A](/content/2026/06/1342022/images/eb7a7f499951168254007fda3f62e02865cf084625d3c14e8065264bcaa637c1.jpg)
VACATION: The picture fades in from an animated car sequence with the title "HAPPY VACATION!", and fades out to white.
![graph TD A["Car icon"] --> B{Happy Vacation!} B --> C["Car icon"] C --> D{Happy Vacation!} D --> E["Car icon"] E --> F{Happy Vacation!} F --> G["Car icon"]](/content/2026/06/1342022/images/1a98e05d2cac137366f5363774969f9b080274816706bd9f3c900e05bf80a50f.jpg)
PARTY: The picture fades in from an animated musical note sequence with the title "HAPPY PARTY!", and fades out to white.
![graph TD A["dp\nHAPPY PARTY!"] --> B["dp\nHAPPY PARTY!"] B --> C["dp\nHAPPY PARTY!"] C --> D["dp\nHAPPY PARTY!"]](/content/2026/06/1342022/images/56832dee58050e63211c328e8839f491a61aab8a1e88820aad002c7eeaefe839.jpg)
Note:
- When playing back images recorded with the animated fade, first turn off the date/time and time code (or tape counter) displays to fully enjoy the animated fade (see pages 16, 44 and 45).
Selecting Fade Mode
1 In Recording Standby mode, display the menu screen (see page 25). 2 Toggle the CONTROL switch (①) to select "FADE", then press the CONTROL switch (②) to select the desired fade mode.

3 Press the EXIT button (MODE DISPLAY) to turn off the menu screen.
Using Fade Mode
1 In Recording Standby mode, press the CONTROL switch until 1/4 appears.

2 Press the FADE button (▶).
- "FADE" changes from blue to yellow and the selected fade mode indicator appears. ("FADE" is displayed for the NORMAL fade mode indicator.)

Fade mode indicator
3 Press the REC START/STOP button to begin recording.
- The picture and sound fade in with the selected fade mode.

4 Press the REC START/STOP button at the point where you wish to stop recording.
- The picture and sound fade out as the screen gradually turns white. The VIEWCAM then returns to Recording Standby mode.

Useful Features
To cancel Fade mode
Press the FADE button. "FADE" returns to blue.
To use fade out only
1 During recording, press the FADE button (▶) on the 1/4 screen. 2 Press the REC START/STOP button at the point where you wish to stop recording.
Useful Features Camera Recording
Auto Focus
The VIEWCAM is preset to Auto Focus mode, which is designed to focus on most types of subjects. In Auto Focus mode, the VIEWCAM automatically focuses on whatever is in the centre of the scene. Always keep the subject in the centre of the screen.
Notes:
- If no subject is in the centre of the screen, the focus area will expand and the subject nearest the centre will be focused on.
- If no subject is displayed on the screen, the VIEWCAM will automatically zoom out until a subject comes into the frame.
- The Auto Focus may not work in the situations described on page 50. In these situations, use the manual focus function.
Macro Shots
This VIEWCAM lets you shoot close-up images of small objects such as flowers and insects, or make title frames for your videos. When you want to record a magnified image of a subject which is within approximately 1.5 m of the VIEWCAM, do not zoom in on it. Instead, zoom out all the way by pushing the Power Zoom control to the W side, and then move the VIEWCAM closer to the subject until you obtain the desired angle of view. The VIEWCAM will automatically focus on the subject when the lens is set for the widest angle.

Notes:
- When you are recording a macro shot, be sure that the subject receives sufficient illumination.
- It is recommended that you use a tripod for recording macro shots, to prevent image shakes.
Wide Screen (16:9)
The wide screen function lets you record scenes with the wide-screen feel of a movie shown in a theatre. The top and bottom of the picture are masked with black bands to produce an effective screen aspect ratio of 16:9.
Normal screen Wide screen
1 In Recording Standby mode, display the menu screen (see page 25). 2 Toggle the CONTROL switch (①) to select "16:9", then press the CONTROL switch (②) to select "ON".

3 Press the EXIT button (MODE DISPLAY) to turn off the menu screen.
- The screen displays the picture with the top and bottom portions masked.
To return to normal screen
Press the CONTROL switch to set the 16:9 menu item to "OFF" in step 2 above.
Note:
- You can only use the wide screen function when the VIEWCAM is in Camera mode.

Still Recording
You can record still images of subjects with normal sound by selecting one of three still recording modes.
Type of Still Recording Modes
SNAP: A still picture (snapshot) is recorded for 6 seconds.
STILL: A continuous still image is recorded.
PHOTO SHOT: A still picture is recorded for 6 seconds following the sound and visual effects of a camera shutter closing. (The sound and visual effects are not recorded.)
Selecting Still Recording Mode
1 In Recording Standby mode, display the menu screen (see page 25).
2 Toggle the CONTROL switch (①) to select "MULTI FRAME", then press the CONTROL switch (②) to select "1".

3 Toggle the CONTROL switch (①) to select "PHOTO SNAP", then press the CONTROL switch (②) to select the desired still recording mode.

4 Press the EXIT button (MODE DISPLAY) to turn off the menu screen.
Using Still Recording
1 In Recording Standby mode, press the SNAP button.
- A still image of the subject is displayed.
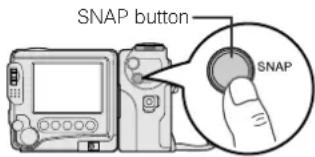
2 Press the REC START/STOP button.
- The still image of the subject will be recorded.

In SNAP and PHOTO SHOT modes, the VIEWCAM returns to Recording Standby mode after recording a still image for 6 seconds.
SNAP/PHOTO SHOT
To pause recording, press the REC START/STOP button.
To cancel the still image, press the SNAP button in Recording Standby mode.
STILL
To pause recording, press the REC START/STOP button.
To cancel the still image, press the SNAP button.
Notes:
- SNAP and STILL can also be used during recording by pressing the SNAP button.
- If PHOTO SHOT is used during recording, a still picture will be recorded for 6 seconds without the sound and visual effects of a camera shutter closing.
- The picture quality in these modes will be slightly lower than normal pictures.
O P H T S
Useful Features Camera Recording
Multiple Strobe Recording
The multiple strobe recording function allows you to record a fast-moving subject at intervals of 1/10 of a second using a 9- or 16-frame picture. This is useful when you want to check your form in sports such as tennis or golf.

Setting Multiple Strobe Recording Mode
1 In Recording Standby mode, display the menu screen (see page 25). 2 Toggle the CONTROL switch (①) to select "PHOTO SNAP", then press the CONTROL switch (②) to select "SNAP" or "STILL".
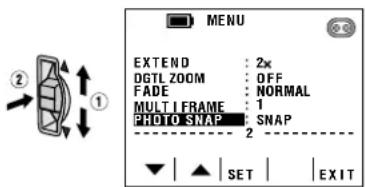
SNAP: A multi-frame picture is recorded for 6 seconds.
STILL: A multi-frame picture is continuously recorded until the REC START/STOP button is pressed again.
Note: The Multiple Strobe Recording cannot be used with PHOTO SHOT mode.
3 Toggle the CONTROL switch (①) to select "MULTI FRAME", then press the CONTROL switch (②) to select "9" (9-frame picture) or "16" (16-frame picture).

4 Press the EXIT button (MODE DISPLAY) to turn off the menu screen.
Using Multiple Strobe Recording
1 In Recording Standby mode, press the SNAP button.
- A multi-frame picture of the subject is displayed.

2 Press the REC START/STOP button. • The multi-frame picture will be recorded.
In SNAP mode, the VIEWCAM returns to Recording Standby mode after recording a multi-frame picture for 6 seconds.
SNAP
To pause recording, press the REC START/STOP button.
To cancel the multi-frame picture, press the SNAP button in Recording Standby mode.
STILL
To pause recording, press the REC START/STOP button.
To cancel the multi-frame picture, press the SNAP button.
Notes:
- The Multiple Strobe Recording can also be used during recording by pressing the SNAP button.
- The picture quality in Multiple Strobe Recording mode will be slightly lower than normal pictures.
- The Multiple Strobe Recording cannot be used with the digital zoom, Digital Quick Zoom, picture effects, or 1/30 sec. shutter speed.
Using the Remote Control
Use the remote control to operate the VIEW-CAM from a distance, such as when you want to record yourself in a scene, or when the VIEWCAM is connected to a TV for use as a VCR.
Installing the Battery
1 Hold the remote control facing down, and pull out the battery holder while pressing the tab toward the centre.

2 Insert the supplied lithium battery into the holder with the + side of the battery facing the ⊕ side of the holder.
3 Insert the holder in the direction of the arrow.
• Make sure that the ⊕ side faces the back of the remote control.
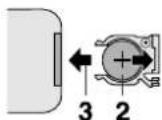
Notes:
- See page 13 for use of the lithium battery. - When the battery is depleted and the remote control does not operate, replace it with a new CR2025 lithium battery.
Turning On the Remote Control Mode
1. Display the menu screen (see page 25). 2. Toggle the CONTROL switch (①) to select "REMOTE", then press the CONTROL switch (②) to select "ON".

3. Press the EXIT button (MODE DISPLAY) to turn off the menu screen.
Operating the Remote Control
Aim the remote control at the remote sensor of the VIEWCAM, and press the control buttons for operation.

![PICTURE EFFECT button [p. 63] REC START/STOP button [p. 17] SLOW button [p. 42] ZOOM buttons [pp. 18, 59] STOP button [p. 20] PLAY button [p. 20] FF button [p. 20] REW button [p. 20] PAUSE/STILL button [p. 22] TIME CODE buttons [p. 44] PLAYBACK ZOOM buttons [p. 59] DATE DISPLAY button [p. 16] VOLUME…](/content/2026/06/1342022/images/427375a1a2c5de6a96e1760557aca6aaaa96f69e28639e8907b0c8c831c70d2a.jpg)
F. ADV/STROBE button [p. 42]
Notes:
- Be careful not to allow direct sunlight or bright light from interior illumination to fall onto the VIEWCAM remote sensor, as this may prevent the remote control from operating properly.
- Be sure that there are no obstacles between the remote control and the VIEWCAM remote sensor.
- The ▶, ■, II, ◀ and ▶ buttons on the remote control do not correspond to the Operation buttons when using the mode and menu screens except for the 1/4 screen in VCR mode.
Useful Features Camera Recording
Self Recording
The LCD monitor can be rotated 180° vertically so that the monitor screen faces the subject. This lets you record yourself while watching your image on the screen.
You can enjoy recording a portrait of yourself, or recording yourself and your friends together at a party, using the remote control.

Normal Self Recording
1 Set the Power switch to CAMERA.
2 Rotate the monitor section 180° vertically.
- The screen image will be inverted to show a mirror image of the subject, and the self-recording mode screen appears.

3 Push the Power Zoom control to obtain the desired angle of view.

4 Press the REC START button (▶▶) to begin recording.

To pause recording, press the REC STOP button (▶▶).
Cautions:
- Do not rotate the monitor to the self recording position during recording or playback.
- For recording in Self Recording mode, be sure to rotate the monitor, NOT the lens. If you hold the VIEWCAM upside down with the lens at the bottom, the subject will be recorded upside down.
Note:
- In Self Recording mode, only the REC START/STOP button and the ZOOM buttons can be used on the remote control.
More Information on Self Recording
- The screen image is automatically inverted when the monitor rotation is between 135° and 200°. When the monitor is turned back to the normal position, the image returns to normal.
- In Self Recording mode, all standard warning indicators on the screen are replaced by the flashing ◆ Indicator. To check the type of warning, rotate the monitor back to the normal position. (See page 7 for descriptions of the warning indicators.)
- In Self Recording mode, it is not possible to display other mode and menu screens or use some functions and settings.
- You can play back images even while the monitor is in the self recording position. Set the Power switch to VCR. The Operation buttons still retain their functions as during normal playback, even though the button indicators are not displayed. (For example, the Button still works as the Play/Still button.)
Self-recording Message
In Self Recording mode, you can record a short video message for somebody. This feature is convenient for editing video letters.
- Complete steps 1 to 3 of "Normal Self Recording" on page 39, then perform the procedure below.
When the remaining recording time reaches 5 seconds, "EXTEND" will begin flashing.


1 Press the MESSAGE button ( ■ ) to display the self-recording message screen.


3 When you want to extend the recording time, press the EXTEND button (◀) within 5 seconds. - You may record continuously for 10 more seconds.

At the end of the recording, the screen fades out, and the VIEWCAM returns to Recording Standby mode.
To turn off the self-recording message screen
Press the MESSAGE button in Recording Standby mode.
Note:
- When you want to stop recording before message recording stops automatically, press the REC STOP button (▶).
2 Press the REC START button (▶) to begin recording. Record your message while facing the lens of the VIEWCAM.
- The recording time is preset for 20 seconds.
- The bar on the screen indicates the remaining recording time.


Useful Features Camera Recording
Setting the VIEWCAM to Full Auto Mode
This VIEWCAM is equipped with auto exposure, auto focus, auto shutter speed, auto white balance, and auto iris functions. For easy, high-quality camera recording, record subjects in Full Auto mode.
If "AUTO" is not displayed on the screen, perform the procedure below to set the VIEWCAM to Full Auto mode.
1 In Recording Standby mode, press the CONTROL switch until 274 appears. If "MAN'L FOCUS" is displayed, press the ▶/|| button to change it to "FOCUS".


2 If "MANUAL" is displayed in yellow, press the MANUAL button ( ■ ) to display the manual setting screen, then press the AUTO button ( ■ ).


Press the EXIT button (MODE DISPLAY) to turn off the manual setting screen.
3 Press the CONTROL switch until 44 appears. If "SCENE MENU" is not displayed above the ▶ button, press this button until "SCENE MENU" appears.

4 If "PIC. EFF." is not displayed above the ■ button, press this button until "PIC. EFF." appears.


5 Press the MODE DISPLAY button.
- The Operation button indicators disappear, and "AUTO" is displayed on the screen.


Full Auto mode indicator
Useful Features Playback
You can operate the functions on this page using the supplied remote control.

Slow
The slow function allows you to play back images in slow motion.
During playback, press the SLOW button (▶).
To return to normal playback, press the PLAY button (▶).
Notes:
- To protect the tape, the VIEWCAM automatically returns to normal playback if it is left in Slow mode for more than 10 minutes.
- If the slow function is used when connected to a TV, noise will appear and distort the playback image.
Frame Advance
The frame advance function allows you to play back still images frame by frame.
During still playback, press the F. ADV/STROBE button (▶)
• Each time you press the button, the picture advances one frame.
To return to normal playback, press the PLAY button (▶).
Strobe Playback
The strobe playback function allows you to quickly play back a series of still images.
During normal playback, press the F. ADV/STROBE button (▶)
- The VIEWCAM plays back one frame at a time at approximately 1/4 sec. intervals.
To return to normal playback, press the PLAY button (▶).
Notes:
- The sound is off during slow, frame advance and strobe playback.
- If you use the slow or frame advance function with the tape recorded in LP mode, the picture may advance several frames at a time.
Useful Features Playback
Programme Search
The programme search function automatically finds and plays back the beginning of a number of previously recorded scenes. Up to 10 different scenes can be found on one tape.
Note:
- This function does not work if no recording has been made since the cassette was loaded or if the cassette has been removed after the recordings were made.
1 Press the CONTROL switch until appears (VCR mode).


2 Press the SEARCH button ( ■ ).
- "PROG. SEARCH" is displayed and one of or both "REW" and "FF" will start flashing.


3 Press the REW (◀◀) (or FF [▶▶]) button.
- The tape rewinds (or fast forwards) to the beginning of a scene immediately before (or after) the current tape position; playback then starts automatically.

4 To continue searching, press the REW (or FF) button while "REW" (or "FF") is still displayed.
Notes:
- Use this function when the tape is stopped or during normal playback.
- This function finds the beginning of each scene immediately before or after the current tape position. It is not possible to skip a scene.
- This function cannot spot recordings that are shorter than 10 seconds in length.
- In steps 2 and 4, if the tape is at a point after the last (or before the first) recording, the FF (or REW) indicator will be displayed in gray and the FF (or REW) button cannot be used.
- To cancel programme search, press the EXIT button (MODE DISPLAY).
Example: When using a tape with 5 different scenes.
![graph TD A["Monitor display"] --> B["PROG. SEARCH"] B --> C["AUD 10 1 +2 SP"] C --> D["EX I T"] D --> E["Current tape position"] E --> F["Video tape"] F --> G["Beginning of each scene"] G --> H["First recording Last recording"] H --> I["When you are at this position: Press the REW button (◀◀) to rew…](/content/2026/06/1342022/images/7d14c2bb1f1c946e2bade61b39329db7e0ad93e61cb0154fff7627ed1c73341e.jpg)
GB 43
Using the Time Code
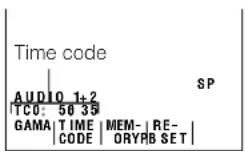
The time code shows the hour, minute and second of recording, and the frame number (1 frame = approx. 1/25 sec.). This is automatically recorded along with the subject. You can display the time code on the screen as an accurate counter in both VCR and Camera modes.
Display format
- The example screens for this feature are for VCR mode.
1 During playback (or recording), press the CONTROL switch until 3/4 appears.

2 Press the TIME CODE button ( ) to display the time code.

Note: If "TC" does not appear, press the MEMORY button (▶) until "TC" is displayed.
- When images are played back in Still or Frame Advance mode (see pages 22 and 42), the frame number is displayed for each frame.

To turn off the time code
Press the TIME CODE button on the 3/4 screen.
Notes:
- When the tape reaches an unrecorded section, the time code returns to zero (TC0:00:00). Once recorded, the time code cannot be changed.
- You can also turn on and off the time code by pressing the TIME CODE DISPLAY button on the remote control.
Displaying the Time Code on a TV During Playback
1 In VCR mode, display the menu screen (see page 25). 2 Toggle the CONTROL switch (①) to select "TC OUT", then press the CONTROL switch (②) to select "ON".

Useful Features
Playback
Using the Tape Counter
The tape counter shows elapsed playback or recording time in hours, minutes and seconds. (The counter continues to count internally even while it is not being displayed.) This feature can be set and used in both VCR and Camera modes.
VCR mode
1 Press the CONTROL switch until 3/4 appears.


2 Press the TIME CODE button ( ) to display the time code.

3 Press the RESET button ( ■ ).
- The time code display changes to the tape counter display, which is set to "0:00:00".


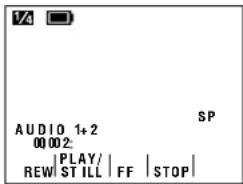
4 Press the CONTROL switch until appears, then begin playback. 1/4
- You can check the playback time with the tape counter.
Camera mode
1 Perform steps 1 to 3 above.
2 Press the REC START/STOP button to begin recording.
- You can check the recording time with the tape counter.
Note:
- The counter reading may differ slightly from the actual time. This is especially noticeable when the tape has been rewound or fast forwarded a number of times, in which case there can be a difference of several seconds.
To turn off the tape counter
Perform step 1 above for VCR mode, and press the TIME CODE button.
Counter Memory
Use the counter memory feature when you want to return to the beginning of a particular scene. The position where the counter was reset (M 0:00:00) is stored in memory to make it easier to return to that point on the tape.
VCR mode
1 During playback, press the CONTROL switch until 3/4 appears.
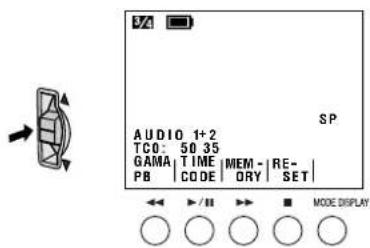
- If "MEMORY" is not displayed, press the TIME CODE button ( ).
2 Press the MEMORY button (▶) to display the counter memory.
- "M" will be displayed to the left of the counter.
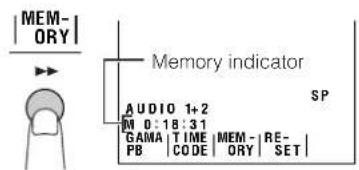
3 Press the RESET button ( ■ ) to reset the counter to zero at the beginning of the scene that you want to return to later.

4 Press the CONTROL switch until 1/4 appears. When you are ready to finish playback, press the STOP button ( ■ ).
5 Press the REW button (◀◀).
- The tape will automatically stop when the counter reaches "M 0:00:00".

Notes:
- The FF button (▶▶) can be used in the same way.
- The tape may stop slightly ahead or behind the point where you reset the counter to "M 0:00:00".
6 Press the PLAY/STILL button ( ) to view the desired scene.
Camera mode
1 During recording, press the CONTROL switch until 3/4 appears. - If "MEMORY" is not displayed, press the TIME CODE button (▶/▶)
2 Perform steps 2 and 3 above. 3 When you are ready to finish recording, press the REC START/STOP button. 4 Set the Power switch to VCR, then perform steps 5 and 6 above.
To turn off the counter memory
Press the MEMORY button on the 3/4 screen. The counter memory display will change to the time code display.
Note:
• This feature does not work during video search.
Useful Features Playback
Beep
This VIEWCAM provides confirmation sounds in the following situations.
| Situation | Sound |
| Before the cassette holder extends or retracts. | Single beep |
| When the Power switch is set from OFF to CAMERA or VCR. | Single beep |
| When the Power switch is set from CAMERA or VCR to OFF. | Single beep |
| When the REC START/STOP button is pressed to begin recording. | Single beep |
| When the REC START/STOP button is pressed to stop recording. | Double beep |
| After leaving the VIEWCAM in Recording Standby mode for about 4 minutes. (Warning that the power will turn off in one minute.) | Double beep |
| After leaving the VIEWCAM in Recording Standby mode for more than 5 minutes. (The power automatically turns off to save battery power and to protect the tape.) | Single beep |
Useful Features
Turning Off the Beep
1 In VCR mode, display the menu screen (see page 25). 2 Toggle the CONTROL switch (①) to select "BEEP", then press the CONTROL switch (②) to select "OFF".

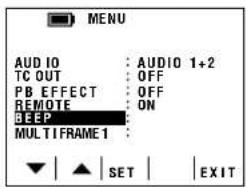
3 Press the EXIT button (MODE DISPLAY) to turn off the menu screen.
Turning Off the LCD Monitor Backlight
The LCD monitor uses a fluorescent lamp for backlighting (see page 72). In order to reduce battery consumption, you can turn off the lamp when backlighting is not necessary (e.g. when you are watching playback on the screen of a connected TV).
Hold down the MODE DISPLAY button. Three seconds later, "LCD LAMP OFF" starts flashing on the monitor. Keep the MODE DISPLAY button down for three more seconds, and the backlight turns off.

To turn on the backlight again, press the MODE DISPLAY button, or set the Power switch to OFF and then back to CAMERA or VCR.
Note:
- Turning the backlight on and off repeatedly may deplete the battery power.
Advanced Features
Camera Recording
Scene Menu (Programme AE)
You can select one of four scene settings to create the best results for a specific type of recording situation. The VIEWCAM will automatically set the exposure, white balance, and shutter speed to produce the optimum picture quality for the selected situation.
Type of Scene Settings
SPORT: When you want to record a fast-moving subject.
SUNLIGHT: When the background is very bright.
DUSK: When you want to faithfully record the red of the setting sun, and the surrounding twilight.
PARTY: When the illumination is from a spotlight or candles.
1 In Recording Standby mode, press the CONTROL switch until 4/4 appears.

2 Press the ▶ button to select the scene setting that best fits the recording situation.
• Each time you press the ▶ button, the scene setting changes as shown below.
![graph TD A["SCENE MENU"] --> B["MC"] B --> C["PC-"] C --> D["MENU FURE"] D --> E["SPORT"] E --> F["PIC."] F --> G["SP"] G --> H["SPORT"] H --> I["SP"] I --> J["EFFECT."] J --> K["SPORT"] K --> L["PIC."] L --> M["SPORT"] M --> N["SP"] N --> O["EFFECT."] O --> P["SPORT"] P --> Q["PIC."] Q --> R["EFFEC…](/content/2026/06/1342022/images/d16e93ef1159e2431871b16fa58f1111b4cc73eee354d18c9275c58fd38b4c61.jpg)
To cancel the scene setting
Select "SCENE MENU" in step 2 above.
Notes:
- Even after you turn off the scene setting indicator, the selected scene setting will remain in effect.
- When "SPORT" is selected, recording under the light of fluorescent lamps, mercury lamps, or sodium lamps may cause colour shifts or fluctuations in picture brightness.
- When "DUSK" is selected, the picture may not be satisfactory if the lighting is very dim.
- We recommend that you select "SCENE MENU" to record outdoor parties.
- Changing the scene setting when a still image is displayed does not affect the still image.
Advanced Features Camera Recording
Picture Effects
These picture effects let you record the subject with a more dramatic effect.
Type of Picture Effects
B/W EFF.: The picture is recorded in black-and-white.
SEPA EFF.: The picture is recorded in sepia colour similar to that of an old photograph.
MOSAIC: The picture is divided up into tiles.
SOLARI: The contrast of the subject is enhanced, creating a unique artistic image.
STRETCH: The image is stretched horizontally to make the subject look wider.
SLIM EFF.: The image is stretched vertically to make the subject look taller.
NEGA EFF.: The blacks and whites of the image are reversed and colours of the image are inverted.
1 In Recording Standby mode, press the CONTROL switch until 4/4 appears.


2 Press the ■ button to select the desired picture effect.
• Each time you press the ■ button, the picture effect changes as shown below.
![graph TD A["|PIC.EFF.|"] --> B["SP"] B --> C["|PIC-SCENE B/W MENU|"] C --> D["MENU TURE MENU"] D --> E["→ PIC.EFF. → B/W EFF. → SEPA EFF. → MO-SA IC"] E --> F["NEGA EFF. ← SLIM EFF. ← STRE-TCH ← SO-LARI"]](/content/2026/06/1342022/images/e0f0680615c7b029cd19ace0fd52d3faf8f8030dc73126ca0f07c23c535e18c5.jpg)
3 Press the MODE DISPLAY button to turn off the Operation button indicators.
To cancel the picture effect
Select "PIC. EFF." in step 2 above.
Notes:
• Picture effects cannot be selected when a still image is displayed. - The STRETCH and SLIM EFF. picture effects cannot be used with the digital zoom or Digital Quick Zoom. - The PICTURE EFFECT button on the remote control can be used only when the VIEWCAM is in VCR mode.
Manual Focus
The Auto Focus may not be able to focus on the subject in the situations shown below. In such situations, set the VIEWCAM to Manual Focus mode and focus manually.
 Subject is too dark. Subject is too dark. |  Lack of contrast, o.g. snow scene. Lack of contrast, o.g. snow scene. |
 Fast-moving subject. Background is too bright. Fast-moving subject. Background is too bright. |  |
 Subject has vortical or horizontal stripes. Subject has vortical or horizontal stripes. |  Subject is being shot through a dirty or wet window. Subject is being shot through a dirty or wet window. |
 Light reflects off the subject. Light reflects off the subject. |  Two subjects at different distances overlap in the same scene. Two subjects at different distances overlap in the same scene. |
 Subject has fine, repeated patterns. Subject has fine, repeated patterns. |  Subjects at different distances appear in the centre of the scene at the same time. Subjects at different distances appear in the centre of the scene at the same time. |
 High-speed shutter being used under fluorescent lighting. High-speed shutter being used under fluorescent lighting. |  |
1 In Recording Standby mode, press the CONTROL switch until 2/4 appears.

2 Press the FOCUS button ( ) to set the VIEWCAM to Manual Focus mode ("MAN'L FOCUS").


3 Push the Power Zoom control to frame the subject as you desire.

4 Toggle the CONTROL switch upwards (far) or downwards (near), or press the FAR (◀◀) or NEAR (▶▶) button, to focus on the subject.
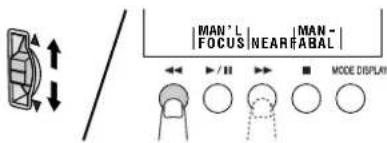
To cancel Manual Focus mode
Perform step 1 above, and press the ▶/II button to set the VIEWCAM to Auto Focus mode ("FOCUS").
Notes:
- The VIEWCAM may not be able to focus correctly if the subject is within approximately 1.5 m. Set the zoom control to wide angle, and then try refocusing.
- If the lens is dirty or fogged, the VIEWCAM may not be able to correctly focus.
Advanced Features Camera Recording
Setting the Shutter Speed
The shutter speed of the VIEWCAM is preset to the standard speed (1/50 sec.). According to the subject or situation, you may want to select the appropriate shutter speed to create a higher-quality picture.
1 In Recording Standby mode, press the CONTROL switch until 2/4 appears.


2 Press the MANUAL button ( ■ ) to display the manual setting screen.


3 Press the CONTROL switch. - "SHUT. SPEED" is displayed in yellow.


4 Toggle the CONTROL switch to select the desired shutter speed.
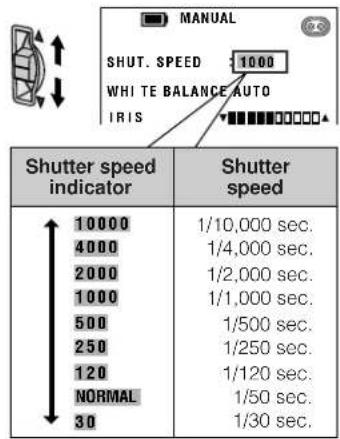
5 Press the CONTROL switch to set the shutter speed.


6 Press the EXIT button (MODE DISPLAY) to turn off the manual setting screen.
To return to the standard shutter speed, select "NORMAL" in step 4 above.
Recommended Shutter Speeds
The faster the shutter speed, the darker the picture becomes. Select the most appropriate shutter speed for the ambient light.
| Situation | Recommended shutter speed |
| Recording sports action in bright daylight.Recording in bright day-light at a ski resort. | 1/10,000 sec.1/1,000 sec. |
| Recording outdoor sports on a partially cloudy day.Recording an outside scene through a car window (when you want to minimize blurs caused by camera shake). | 1/1,000 sec.1/250 sec. |
| When you want to reduce the light by half. Use as a substitute for an ND2 filter. | 1/120 sec. |
| Recording in a poorly-illuminated location.When you want to create artistic trailing images of fast-moving subjects. | 1/30 sec. |
Tips on Using the Shutter Speed
- Fast shutter speeds can be used with the still recording function (see page 36) to record higher quality still images of fast-moving subjects.
- If the picture on the monitor flickers when recording under fluorescent lighting, you may be able to compensate by setting the shutter speed to 1/120 sec.
Notes:
- Using a fast shutter speed under fluorescent lighting will cause flickering in the picture and possibly periodic colour shifts.
- Recording with a shutter speed faster than 1/50 sec. ("NORMAL") tends to darken the picture. Record in bright locations when you use a fast shutter speed.
- The Auto Focus does not work when the shutter speed is set to 1/30 sec. ("30"). Use the manual focus function (see page 50).
- The shutter speed setting will be cancelled if the Scene Menu is set thereafter.
Advanced Features Camera Recording
White Balance Lock
The color of the subject on the screen tends to look different depending on the lighting condition. The VIEWCAM is preset to Auto White Balance mode, which automatically adjusts the hue of the picture for the current lighting condition.
The Auto White Balance may not work properly for the following subjects. In this case, use the white balance lock function.
- Subjects with one dominant color or subjects against a background with one dominant color
- Subjects under a very bright light source, e.g., video lights
- Subjects under a light source with a red hue, e.g., glow of sunset
- Close-up images of small objects
1 In Recording Standby mode, press the CONTROL switch until 2/4 appears. 2 Press the MANUAL button (■) to display the manual setting screen. 3 Toggle the CONTROL switch to select "WHITE BALANCE".

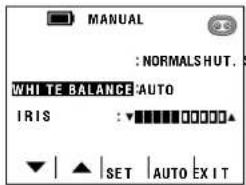
5 Press the CONTROL switch to set the white balance.
- "LOCK" flashes during the locking procedure.


6 Press the EXIT button (MODE DISPLAY) to turn off the manual setting screen. 7 Aim the lens at the desired subject and press the REC START/STOP button to begin recording.
To cancel White Balance Lock
Perform steps 1 to 3 above, and press the CONTROL switch. "LOCK" changes to "AUTO".
Notes:
- If the light source changes or if you move from indoors to outdoors, or vice versa, when recording with the white balance locked, the white balance may shift. Reset the white balance.
- Even after the white balance has been locked, white balance shifts may occur due to slight changes in illumination or depending on the subject.
- Do not move the VIEWCAM while "LOCK" is flashing in step 5.
- If "LOCK" does not stop flashing in step 5, press the CONTROL switch to cancel the locking procedure and repeat step 5.
- The White Balance Lock will be cancelled if the Scene Menu is set thereafter.
Manual Iris
The VIEWCAM is preset to Auto Iris mode, which automatically chooses the optimal aperture. When there is too much contrast in brightness between the subject and background, however, you may not be able to record a clear image. In this case, use the manual iris function to correct the iris value.
Background is too bright and subject too dark (backlit subject).
- Select a larger iris value to allow more light through the lens.

Subject is too bright against background.
- Select a smaller iris value to allow less light through the lens.

1 In Recording Standby mode, press the CONTROL switch until 2/4 appears.
2 Press the MANUAL button ( ■ ) to display the manual setting screen.

4 Toggle the CONTROL switch to select the desired iris value.
• The bar indicates the selected iris value.

5 Press the CONTROL switch to set the iris value.

6 Press the EXIT button (MODE DISPLAY) to turn off the manual setting screen.
To cancel Manual Iris mode
Select the centre setting in step 4 above.
Note:
- Manual Iris mode will be cancelled if the Scene Menu is set thereafter.
Advanced Features Camera Recording
Picture/Backlight Adjustments
If the monitor picture is difficult to see due to ambient lighting, etc., adjust the picture settings. This feature can be adjusted in both Camera and VCR modes.
- The example screens for this feature are for Camera mode.
1 Press the CONTROL switch until 4/4 appears.
2 Press the PICTURE button ( ) to display the adjustment screen.


4 Toggle the CONTROL switch to adjust the item to the desired setting.
![graph TD A["BACKLIGHT : NORMAL"] --> B["BRIGHT"] C["BACKLIGHT : AUTO"] --> B D["BACKLIGHT BRIGHT"] --> B style A fill:#f9f,stroke:#333 style C fill:#f9f,stroke:#333 style D fill:#ccf,stroke:#333 style B fill:#cff,stroke:#333 note1["BRIGHT : ▼ Darker ←→ Brighter"] note2["COLOUR : ▼ Decrease ←→ Increa…](/content/2026/06/1342022/images/1e8ac35e8597381811fdbf0f2c3043ecb02f5001fc2b8fae2fbfe51a459e27d9.jpg)
Type of Backlight modes ("BACKLIGHT")
AUTO: The VIEWCAM automatically switches between "NORMAL" and "BRIGHT" depending on the ambient lighting. This mode is only available in Camera mode.
NORMAL: For use indoors or under moderate lighting conditions.
BRIGHT: For use outdoors under strong lighting conditions, such as bright daylight.
5 Press the CONTROL switch to set the picture/backlight setting.
6 Press the EXIT button (MODE DISPLAY) to turn off the adjustment screen.
Notes:
- If you set the backlight ("BACKLIGHT") to "AUTO" in Camera mode and then set the VIEWCAM to VCR mode, the backlight mode automatically changes to "NORMAL".
- When the colour is adjusted, the picture on the screen may differ from the picture actually recorded. Do not change the colour setting unless it is necessary. (This adjustment only affects the monitor picture, not the recorded image.)
Windbreak
The windbreak function allows you to reduce annoying noise from strong winds when recording.
1 In Recording Standby mode, display the menu screen (see page 25). 2 Toggle the CONTROL switch (①) to select "WIND", then press the CONTROL switch (②) to select "ON".

3 Press the EXIT button (MODE DISPLAY) to turn off the menu screen.
To cancel Windbreak
Press the CONTROL switch to set the WIND menu item to "OFF" in step 2 above.
Note:
- Keep the windbreak function off during normal recording. If it is left on, the recorded audio may sound somewhat altered when played back.
Selecting Summer Time
Perform the procedure below to advance the clock of the VIEWCAM one hour to summer time.
1 In Recording Standby mode, display the menu screen (see page 25). 2 Toggle the CONTROL switch to select "SUMR TIME".


3 Press the CONTROL switch to select "ON".
- The time automatically changes to summer time.


4 Press the EXIT button (MODE DISPLAY) to turn off the menu.
- The indicator appears when the date/time is displayed.


To reset to standard time
Select "OFF" in step 3 above.
Advanced Features Camera Recording
World Clock
The world clock function allows you to easily adjust the clock to the local time when you use the VIEWCAM while travelling anywhere around the world.
- Set the area, date and time for your home time zone if they have not already been set (see page 15).
Example: Changing the clock from Paris time to London time.
1 In Recording Standby mode, display the menu screen (see page 25). 2 Toggle the CONTROL switch to select "AREA".


3 Press the CONTROL switch to select "1 LONDON".
- The VIEWCAM is now set to London time.


4 Press the EXIT button (MODE DISPLAY) to turn off the menu screen.
Time Zone Chart Advanced Features

Area Table
| Area number | Area name | Countries or areas* |
| 1 | LONDON | England, Morocco, GMT (Greenwich mean time) |
| 2 | PARIS | Austria, France, Germany, Italy, Netherlands, Spain, Sweden, Switzerland, Portugal, CST (Continental Standard Time), Tunisia |
| 3 | CAIRO | Egypt, Finland, Greece, Turkey |
| 4 | MOSCOW | Ethiopia, Iraq, Kenya, Mauritius, Saudi Arabia, Seychelles, Russia (Moscow) |
| 5 | DUBAI | United Arab Emirates |
| 6 | KARACHI | Maldives, Pakistan |
| 7 | DACCA | Bangladesh, India, Myanmar |
| 8 | BANGKOK | Cambodia, Indonesia (Jakarta), Thailand, Vietnam |
| 9 | HNGKNG | Australia (Perth), China, Hong Kong, Indonesia (Borneo, Bali), Malaysia, Philippines, Singapore, Taiwan |
| 10 | TOKYO | Japan, Korea |
| 11 | SYDNEY | Australia (Sydney) |
| 12 | SOLOMON | New Caledonia |
| 13 | WLLNGTN | Fiji, New Zealand |
| 14 | SAMOA | Western Samoa |
| 15 | HAWAII | Hawaii Is., Tahiti, HST (Hawaii Standard Time) |
| 16 | ANCHRGE | U.S.A. (Alaska), AST (Alaska Standard Time) |
| 17 | L.A. | U.S.A. (Los Angeles, San Francisco), PST (Pacific Standard Time) |
| 18 | DENVER | U.S.A. (Denver), MST (Mountain Standard Time) |
| 19 | CHICAGO | Mexico, U.S.A. (Chicago), CST (Central Standard Time) |
| 20 | NEW YORK | Canada (Montreal), Jamaica, Peru, U.S.A. (New York, Washington D.C.), EST (Eastern Standard Time) |
| 21 | CARACAS | Chile, Dominica, Venezuela |
| 22 | RIO | Argentina, Brazil, Uruguay |
| 23 | FN ISL. | Fernando de Noronha |
| 24 | AZORES | Azores Islands |
Advanced Features
* These are commonly used names. The formal names may be different.
Advanced Features Playback
Playback Zoom
The playback zoom function allows you to magnify the playback picture up to 10 times the original size.
1 During playback, press the CONTROL switch until 2/4 appears.

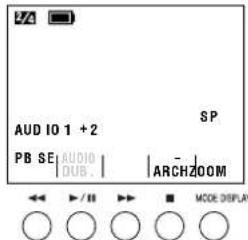
2 Press the PB ZOOM button (◀◀) to display the playback zoom screen.


3 Toggle the CONTROL switch upwards to zoom in.

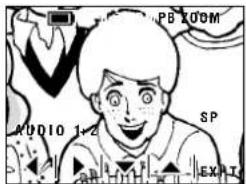
- Toggle the CONTROL switch downwards to zoom out.
Note: The Power Zoom/Volume control can only be used to adjust the volume when the VIEWCAM is in VCR mode.
4 Press the ◀(◀◀), ▶(▶/■), ▼(▶▶) or ▲(■) button to shift the displayed image.


To cancel Playback Zoom
Press the EXIT button (MODE DISPLAY).
Notes:
- To pause the playback picture, press the PAUSE/STILL button on the remote control.
- Use of the Playback Zoom may cause a reduction in picture quality for still images.
- You cannot transfer images to a personal computer in Playback Zoom mode.
- The Playback Zoom cannot be used with the STRETCH or SLIM EFF. Picture Effect Playback.
Operating with the Remote Control

1 During playback, press the ZOOM T button to zoom in. • Press the ZOOM W button to zoom out. 2 Press the PLAYBACK ZOOM ◀, ▶, ▼ or ▲ button to shift the displayed image.
To cancel Playback Zoom
Press the ZOOM_W button until the widest angle is obtained.
Gamma Playback
The gamma playback function improves the picture by increasing the brightness of the subject while leaving the brighter portions of the image unaffected.
1 During playback, press the CONTROL switch until 3/4 appears.


2 Press the GAMA PB button (◀◀).
- "GAMMA" appears and the picture becomes brighter.


To cancel Gamma Playback
Press the GAMA PB button again. "GAMMA" disappears.
Multiple Strobe Playback
The multiple strobe playback function can be used to capture the action of a fast-moving subject at intervals of 1/10 of a second using a 9- or 16-frame picture. This is useful when you want to check your form in sports such as tennis or golf.
Selecting Multiple Strobe Playback Mode
1 In VCR mode, display the menu screen (see page 25). 2 Toggle the CONTROL switch (①) to select "MULTI FRAME", then press the CONTROL switch (②) to select "9" (9-frame picture) or "16" (16-frame picture).

3 Press the EXIT button (MODE DISPLAY) to turn off the menu screen.
Using Multiple Strobe Playback
During playback, press the SNAP button at the point where you want to begin the multiple strobe playback.
- A multi-frame picture of the image is displayed.

To cancel the Multiple Strobe Playback, press the SNAP button again.
Note:
- The Multiple Strobe Playback cannot be used during still or slow playback, or together with the Playback Zoom or Picture Effect Playback.
Advanced Features Playback
Still Image Overlap
The still image overlap function can be used to create a dissolve effect between images during playback. A still image recorded in Still Recording mode fades out while the next image fades in. The two scenes momentarily overlap during the transition.
Preparation
1. Plan the scene transition, and record still images with the still recording function (see page 36).
Notes:
- The still image overlap function can also be used to provide a transition from a still image to a moving image.
- Record images for 6 seconds or longer. An image recorded for less than 6 seconds may not dissolve properly.
2. Rewind the tape to just before the position you want to playback.
Using Still Image Overlap
1. In VCR mode, display the menu screen (see page 25). 2. Toggle the CONTROL switch (①) to select "PB EFFECT", then press the CONTROL switch (②) to select "OVERLAP".


3. Press the EXIT button (MODE DISPLAY) to turn off the menu screen, then press the MODE DISPLAY button to turn off the mode screen.
4. Press the button to begin playback.
- The still image fades out as the following image fades in, replacing it. The two scenes momentarily overlap.
![graph TD A["Family Member"] --> B["Group Photo"] B --> C["Student at Field"]](/content/2026/06/1342022/images/c08140fb0a6a996c2adaaaf7f60492a6ae0f281acaee999fa3c0f55798ce0018.jpg)
To cancel Still Image Overlap mode
Press the CONTROL switch to set the PB EFFECT menu item to "OFF" in step 2 above.
Note:
Still Image Overlap mode will be cancelled if the Playback Zoom, Multiple Strobe Playback, or Picture Effect Playback is used thereafter.
Wipe
The wipe function can be used to create an interesting presentation of playback images in which a still image is replaced with the next image appearing in the middle of the screen.
Preparation
1. Plan the scene transition, and record still images with the still recording function (see page 36).
Notes:
- The wipe function can also be used to provide a transition from a still image to a moving image.
- Record images for 6 seconds or longer. An image recorded for less than 6 seconds may not dissolve properly.
2. Rewind the tape to just before the position you want to playback.
Using Wipe
1. In VCR mode, display the menu screen (see page 25). 2. Toggle the CONTROL switch (①) to select "PB EFFECT", then press the CONTROL switch (②) to select "WIPE".

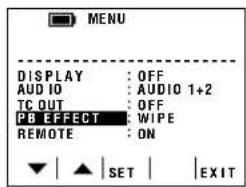
3. Press the EXIT button (MODE DISPLAY) to turn off the menu screen, then press the MODE DISPLAY button to turn off the mode screen.
4. Press the button to begin playback.
- The still image is replaced with the next image appearing in the middle of the screen.
![graph TD A["Participant Drawing"] --> B["Drawing Picture"] B --> C["Shot at Goal"]](/content/2026/06/1342022/images/68d67dd98f517ad1419a93d4af402fe1e9ec96d37516e17df1fa4adb05f75220.jpg)
To cancel Wipe mode
Press the CONTROL switch to set the PB EFFECT menu item to "OFF" in step 2 above.
Note:
- Wipe mode will be cancelled if the Playback Zoom, Multiple Strobe Playback or Picture Effect Playback is used thereafter.
Advanced Features Playback
Picture Effect Playback
These picture effects let you play back images with a more dramatic effect.
Type of Picture Effects
B/W EFF.: The picture is displayed in black-and-white.
SEPA EFF.: The picture is displayed in sepia colour similar to that of an old photograph.
MOSAIC: The picture is divided up into tiles.
SOLARI: The contrast of the subject is enhanced, creating a unique artistic image.
STRETCH: The image is stretched horizontally to make the subject look wider.
SLIM EFF.: The image is stretched vertically to make the subject look taller.
NEGA EFF.: The blacks and whites of the image are reversed and colours of the image are inverted.
1 During playback, press the CONTROL switch until 4/4 appears.


2 Press the ■ button to select the desired picture effect.
• Each time you press the ■ button, the picture effect changes as shown below.
![graph TD A["|PIC.EFF.|"] --> B["Speaker"] B --> C["|PIC-MENU TURE|"] C --> D["SP"] D --> E["→ PIC.EFF. → B/W.EFF. → SEPA.EFF. → MO-SA IC"] E --> F["NEGA.EFF. ← SLIM.EFF. ← STRE-TCH ← SO-LARI"]](/content/2026/06/1342022/images/1c0b70092242ed7cbae7699f1bd0cc4c2aa13d4756c696fac59ba27a942f7278.jpg)
3 Press the MODE DISPLAY button to turn off the Operation button indicators.
To cancel Picture Effect Playback
Select "PIC. EFF." in step 2 above.
Notes:
- You can also select the picture effect by pressing the PICTURE EFFECT button on the remote control during playback.
- You cannot transfer images to a personal computer in Picture Effect Playback mode.
- The Picture Effect Playback will be cancelled if Still Image Overlap or Wipe mode is set thereafter. • The Picture Effect Playback cannot be used during still or slow playback.
- The STRETCH and SLIM EFF. Picture Effect Playback cannot be used with the Playback Zoom.
Editing
Video editing lets you refine your videos by removing unwanted sequences from your tape, or transposing one sequence with another. This VIEWCAM lets you monitor the source programme on the built-in LCD monitor without having to connect it to an external TV or video monitor.
Connect the VIEWCAM to a VCR with the supplied audio/video cable, as shown.

Notes:
- If your VCR has a 21-pin Euro-SCART connector, use the RCA/21-pin Euro-SCART conversion connector (QSOCZ0033TAZZ).

- If your VCR has only one audio input jack, use the white plug for the audio connection on the VCR.
- If your VCR has an S-video input socket, you can connect it to the S-VIDEO socket on the VIEW-CAM with the supplied S-video cable.
Cutting Unwanted Sequences
1. Play back the tape to be edited, and locate the beginning and end of the sequence you wish to cut. Write down the time code or tape counter readings at the beginning and end of that sequence (see pages 44 and 45). Then rewind the tape to the beginning of the portion that you wish to keep. 2. Load a video cassette into the recording VCR. 3. Set the Power switch on the VIEWCAM to VCR. Press the PLAY/STILL button (▶/Ⅲ) on the VIEWCAM and the REC (Record) button on the VCR at the same time. 4. Press the Pause/Still button on the VCR to pause recording when the source tape reaches the beginning of the sequence to be cut. 5. Press the Pause/Still (or REC) button on the VCR to resume recording when the source tape reaches the end of the sequence to be cut.
To stop editing
Press the Stop buttons on the VIEWCAM and the VCR.
Notes:
- Some of the transitions between edited sequences may be slightly off.
- There may be picture noise during video search or still picture playback. This does not imply a defect in the VIEWCAM.
- The time code display will be recorded along with the edited sequences if the TC OUT menu item is set to "ON". Set to "OFF" before editing (see page 44).
- The VIEWCAM cannot be used as the recording source.
Advanced Features Playback
Editing to Video Equipment with the DV Terminal (IEEE1394)
This VIEWCAM enables you to perform digital video editing, using the VIEWCAM as the playback source. Connect the VIEWCAM to video equipment with a DV terminal using the supplied DV cable. The DV cable is able to transfer all dubbing signals including video, audio and subcode.
Cutting Unwanted Sequences
Perform "Cutting Unwanted Sequences" on page 64, using the video equipment as the recording source.
Notes:
- The DV terminal on the VIEWCAM outputs the normal playback signal regardless of use of the strobe playback, playback zoom or picture effect playback function.
- The VIEWCAM cannot be used as the recording source.
![graph TD A["Recording"] --> B["Video equipment with DV terminal"] C["DV cable (supplied)"] --> D["To DV terminal"] E["Playback"] --> F["Slide the DV terminal cover in the direction of the arrow to open."]](/content/2026/06/1342022/images/163d7bc681f89447fdbe30e9e2dade5c1f70bca0c10897fbe226ff03357bb23f.jpg)
Advanced Features
GB 65
Audio Dubbing Feature
You can add narrations to recordings made with the VIEWCAM using the built-in microphone or an external microphone, while preserving the original audio and video recordings.

*About the MIC jack
This external microphone jack outputs a DC voltage of 4.0 V. It is for use with microphones that comply with the specifications listed on page 77. Use of any other type of microphone may result in damage to the microphone or the VIEWCAM. A microphone with a separate power plug cannot be used.
Note:
- The built-in microphone automatically turns off when an external microphone is connected to the MIC jack.
Audio recording in normal recording mode
12-bit audio recording
The audio is recorded in stereo on two channels. The same stereo audio signals are recorded on both channels.
Audio 1: Stereo (left and right) sound
Audio 2: Stereo (left and right) sound
16-bit audio recording
The audio is recorded in stereo with the left and right sound on two separate channels.
Audio 1: Left sound
Audio 2: Right sound
Audio recording in Audio Dubbing mode
12-bit audio recording
The dubbed audio is recorded on Audio 2 over the original stereo sound.
Audio 1: Original stereo (left and right) sound
Audio 2: Dubbed stereo (left and right) sound
16-bit audio recording
The dubbed audio is recorded on Audio 2 over the original right sound. Both the dubbed and original sounds are in mono.
Audio 1: Original left sound
Audio 2: Dubbed sound
Note:
- You can select the 12-bit or 16-bit audio recording mode by performing the procedure on page 27.
Advanced Features Playback
Audio Dubbing
Note:
- Audio dubbing cannot be used with recordings made in LP mode.
1 Play back the recorded Mini DV cassette and locate the tape position where you wish to start audio dubbing. 2 Press the PLAY/STILL button ( ) to pause playback. 3 Press the CONTROL switch until 2/4 appears.


4 Press the AUDIO DUB. button ( ) screen display the audio dubbing screen.


5 Press the START button (▶▶) to begin audio dubbing. Record your narration.

To pause audio dubbing
Press the STOP button ( ■ ).
To quit audio dubbing
Press the EXIT button (MODE DISPLAY). The audio dubbing screen will disappear.
If you wish to change the dubbed audio or dub additional scenes
1 Press the EXIT button (MODE DISPLAY) to turn off the audio dubbing screen. 2 Press the CONTROL switch until 1/4 appears. 3 Repeat steps 1 to 5 above.
Notes:
- We recommend that you use the audio dubbing feature only with recordings made with the VIEWCAM. Use of recordings made with other digital camcorders may result in poor audio quality.
- Audio dubbing will automatically pause if the original audio changes from 12-bit mode to 16-bit mode or vice versa. Press the START button (▶) to resume operation.
- Audio dubbing will automatically stop if a portion recorded in LP mode is encountered.
- You can play back the dubbed audio and the original audio together or separately (see "Selecting the Audio Playback Mode" on next page).
Selecting the Audio Playback Mode
You can select any of the following audio playback modes.
Audio 1+2
• 12-bit recording in stereo (Audio 1 and Audio 2 channels)
• 16-bit recording in stereo (left and right channels)
Audio 1
• 12-bit recording in stereo (Audio 1 channel only) • 16-bit recording in mono (left channel only) Audio 2 • 12-bit recording in stereo (Audio 2 channel only) • 16-bit recording in mono (right channel only)
1 Play back a Mini DV cassette with dubbed audio. 2 Display the menu screen (see page 25). 3 Toggle the CONTROL switch (①) to select "AUDIO", then press the CONTROL switch (②) to select the desired audio playback mode.

4 Press the EXIT button (MODE DISPLAY) to turn off the menu screen.
• The selected audio playback mode indicator is displayed.


Note:
- The audio playback mode indicator is displayed in different colours depending on the recording mode (12- or 16-bit) used for the recording being played back. A white display indicates 12-bit recording mode, and a green display, 16-bit recording mode.
Connecting to a Personal Computer
The VIEWCAM can be connected to a personal computer for editing still images with the optional VR-PK100S video capture software.

Notes:
- Still playback images or still images can be transferred to a personal computer. Use Sharp PixLab Browser and PixLab TWAIN (YUV) Module to transfer images to a personal computer. • Images with the following functions cannot be transferred to a personal computer.
—VCR mode: Playback Zoom, Picture Effect Playback
—Camera mode: Digital Zoom, Digital Quick Zoom, picture effects, 1/30 sec, shutter speed
- For details, see the operation manual of the optional video capture software.
Appendix
Useful Information
Hints for Better Shooting
- Position the subject in the centre of the screen. When you are using auto focus, whatever is in the centre of the screen is kept in focus.
Position the subject in the centre.
Focus manually when you need to position the subject off centre (see page 50).
- Avoid backlit subjects. For the best picture, shoot with the light source behind you. When the background is brighter than the subject, the subject often becomes too dark. If you have to record with this lighting, use the Gamma Brightness Compensation or correct the iris to improve the picture (see pages 29 and 54).

Light from behind Backlighting
- Before zooming, think about how to best frame the shot. Frequent zooming produces unattractive pictures. It also increases the battery power consumption.
- When image shakes are noticeable during zoomed-in telephoto shooting, use a tripod or push the Power Zoom control to the W side to zoom out.
- Horizontal panning (lateral movement) and tilting (vertical movement) should be done slowly to emphasize the wide expanse of a scene or the height of a building, and to make scenes easy to watch during playback.
- Use a wide-angle setting for fast-moving subjects.
Note:
- It may take longer to focus when zooming and panning are used frequently.
Lighting
For clear, good-quality recording, 500 to 100,000 lux is needed. Recording is possible with less light, but the picture quality may suffer. Adequate lighting is also essential for correct white balance.
| Brightness (Lux) | Situation (Lux) |
| 100,000 | Blue skyClear day at noon (100,000) |
| 10,000 | Clear day at 10 am (65,000)Clear day at 3 pm (35,000)Cloudy day at noon (32,000)Cloudy day at 10 am (25,000) |
| 1,000 | Cloudy day, one hour after sunrise (2,000)Clear day, one hour before sunset (1,000)Fluorescent light near window (1,000) |
| 100 | Factory floor (700–800)Sales counter in department store (500–700)Bowling alley (500)Library (400–500)Office with fluorescent lighting (400–500) |
| Fluorescent desk lamp (400)Flashlight at 1 m (250)Shop stairway (100) | |
| 10 | During intermission at movie theatre (15–35)Cigarette lighter at 30 cm (15–20)Candles on birthday cake at 20 cm (10–15)Candlelight |
Note: The figures in the chart are approximations.
Tips on Good Lighting
In most outdoor, daytime scenes, natural lighting is adequate for home videos. Indoors, however, artificial lighting is usually required. Video lights with halogen lamps provide the most natural artificial light over a long operating life.
Mini DV Cassette

Precautions when using a Mini DV cassette
- Be sure to use only Mini DV cassettes with the Mark.
- This VIEWCAM can record and play back using Mini DV cassettes with cassette memory, but it cannot record or play back this memory.
- To record in LP mode, use a Mini DV cassette labelled for use with LP mode.
- Do not insert anything into the holes on the bottom of the Mini DV cassette or block them in any way.
- Avoid placing the Mini DV cassette in an area conducive to dust or mold.
- Do not place the Mini DV cassette near magnetic sources such as electric clocks or magnetic devices as this may adversely affect recorded material.
- When a previously recorded Mini DV cassette is used again for recording, the previously recorded material will be automatically erased.
- The Mini DV cassette will not operate if inserted in the wrong direction.
- Do not repeatedly insert and eject the Mini DV cassette without running the tape as this may cause uneven tape winding and damage the tape.
- Do not place the Mini DV cassette in direct sunlight, near strong heat sources, or in areas with excessive steam.
- Store the Mini DV cassette in its case and stand it in an upright position.
- If the tape is not properly wound, rewind the tape.
- Do not drop the Mini DV cassette or subject it to excessive shocks.
To protect recordings against accidental erasure
Slide the protect tab on the rear of the Mini DV cassette to the "SAVE" position.
Erasure protect tab
To record over a previously recorded tape, slide the protect tab to the "REC" position.

Appendix
Battery Pack
This VIEWCAM uses a lithium-ion type battery pack.
- The lithium-ion type battery pack gradually self-discharges even if stored in a fully charged state. Charge the battery pack soon (a day) before use.
- The lithium-ion type battery pack does not need to be stored in a fully discharged state.
Charging
Charge the battery pack at a temperature of 10°C to 30°C.
Use
- To conserve battery power, be sure to turn off the VIEWCAM power when not in use.
- Recording with many starts and stops, frequent zooming, and recording in low temperatures will shorten actual recording times.
- Do not use an insufficiently charged or weak battery pack. Use of such battery packs may cause the power to automatically stop during VIEWCAM operation to protect both the battery pack and the unit.
- Use of additional battery packs is recommended to prevent undesirable interruptions in your recording.
Battery power is consumed even when the VIEWCAM power is turned off. If you are not going to use your VIEWCAM immediately, remove the battery pack (see page 8).
Note:
- Use only SHARP BT-L241 or BT-L441 battery packs. These are designed specifically for use with this VIEWCAM.
Storage
- Store the battery pack in a dry, cool place.
- When storing a fully charged battery pack, put the cover on it so that the "CHARGE" mark printed on the label is seen through the window, as shown.

- When storing a battery pack that is not fully charged, put the cover upside down so that only the battery pack casing is seen through the window.
Cautions:
- Improper handling of the battery pack may present a risk of fire or explosion. Pay close attention to the following: —Do not dispose of the battery pack in fire. —Do not allow metallic objects to come in contact with the terminals. This can cause a short circuit. —Do not disassemble or repair the battery pack by yourself. —Do not use any battery charging equipment other than that designed for use with these battery packs. —Do not place the battery pack under direct sunlight or in excessively hot places (over 60°C) such as the dashboard of cars. —Do not expose the battery pack to moisture or water. —Do not drop the battery pack or subject it to strong force. —Keep the battery pack out of reach of children. —Dispose of used battery packs promptly.
- To protect the terminals, put the cover on the battery pack when it is not being used.
Notes:
- The battery pack will become warm during charging and use. This is not a malfunction.
- The battery pack has a limited service life. If the period of use becomes noticeably shorter with a normal charge, the battery pack is at the end of its service life. Replace it with a new battery pack.
AC Adapter
- The AC adapter may interfere with reception if used near a radio.
- Prevent flammables, liquids, and metal objects from entering the adapter.
- The adapter is a sealed unit. Do not attempt to open or modify it.
- Do not damage, drop, or subject the adapter to vibration.
- Do not leave the adapter in direct sunlight.
- Avoid using the adapter in humid or extremely hot places.
Replacing the Fluorescent Lamp
This VIEWCAM uses a fluorescent lamp to backlight the LCD monitor. If the monitor becomes dark or difficult to view, the fluorescent lamp may need to be replaced. Contact the nearest SHARP service centre or your dealer for further advice.
Dew Formation
• What is "dew formation"?
When cold water is poured into a glass, dew drops form on the glass. This clinging of water drops is called dew formation.
- When dew forms in your VIEWCAM.
Dew will gradually form on the head drum of your VIEWCAM and make the video tape stick to the head. This causes damage both to the head and the tape. When dew formation occurs, recording and playback may not function properly.
Dew is likely to form in the following circumstances:
- When moving the VIEWCAM from a cold place to a warm place.
- When placing the VIEWCAM in a cold room which is then heated rapidly.
- When moving the VIEWCAM outdoors from an air conditioned room.
- When placing the VIEWCAM in the direct path of air blowing from an air conditioner.
- When placing the VIEWCAM in a humid room.

• How to prevent trouble due to dew formation.
When using the VIEWCAM in a place where dew formation is likely to occur, allow the VIEWCAM and the video tape to acclimate to the surroundings for about one hour. For example, when bringing the VIEWCAM indoors after skiing, place it in a plastic bag.

① Be sure to tightly seal the plastic bag containing the VIEWCAM. ② Remove the bag when the air temperature inside it reaches the temperature of the room.
• "Dew" warning feature
If dew forms, the word "DEW" flashes on the LCD monitor, and the power will automatically turn off in approximately 10 seconds.

① If "DEW" flashes on the LCD monitor, remove the cassette, leave the cassette compartment open, and wait for a few hours to allow the VIEWCAM to acclimate to the surrounding temperature. ② To use the VIEWCAM again, turn on the power after waiting for a few hours. Be sure that "DEW" has disappeared from the monitor. ③ Do not insert a cassette while "DEW" is flashing; this may result in damage to the tape. ④ Since dew forms gradually, it may take 10 to 15 minutes before the dew warning feature engages.
Appendix
Dirty Video Heads
Using the VIEWCAM when the video tape is dirty may cause the heads to clog, producing noise on the recorded image or preventing the image from being recorded at all.
If the video heads become clogged, the ✗ indicator appears on the screen. Contact the nearest SHARP service centre or your dealer for further advice.

Using a Cleaning Tape (Commercially Available)
Video head cleaning can be done by using a commercially-available cleaning tape.
Notes:
- Excessive use of the cleaning tape, however, may cause damage to the video heads. Please read the instructions accompanying the cleaning tape carefully before using it.
- The fast forward and rewind functions cannot be used when the cleaning tape is in the VIEWCAM.
1 Insert a cleaning tape into the VIEWCAM.
2 Hold down the Lock button and slide the Power switch to VCR.
• The video head cleaning screen appears.
3 Press the START button ( ) to begin video head cleaning.
- "NOW CLEANING" flashes.

Video head cleaning automatically finishes in about 20 seconds.
4 Remove the cleaning tape.
To cancel cleaning, press the STOP button ( ■ ).
Cleaning
- Many plastic parts are used in the VIEWCAM casing. Do not use thinners, benzenes or other strong chemical cleaners. These may cause discoloration and damage to the casing.
- Clean the casing with a soft, dry cloth. If the casing is particularly dirty, wipe the casing with a tightly wrung cloth dampened with a diluted, neutral detergent. Then wipe it again with a soft, dry cloth.
- Use a soft cloth to wipe finger marks and other soiling off the LCD screen.
- Use a soft cloth, or compressed air and lens paper designed for photographic lenses to clean the lens.
Using Your VIEWCAM Abroad
Television signal standards and electrical voltages and frequencies vary substantially from country to country. When you are abroad, check the sections below before using the AC adapter or connecting the VIEWCAM to a TV.
AC Adapter (Supplied Accessory)
The supplied AC adapter is compatible with 50 Hz and 60 Hz electrical systems in the range of 110 V to 240 V AC.
Television Signal Standards
In any country, you can always watch the video picture by using the LCD monitor screen. However, if you want to watch the picture on a TV screen, the TV must be PAL system compatible. PAL is used in the following countries:
Germany, Great Britain, Sweden, Denmark, Austria, Belgium, Switzerland, Italy, Spain, Holland, Finland, Portugal, Norway, Hong Kong, Thailand, Australia, New Zealand, Singapore, Kuwait, China, etc.
Demonstration Mode
You can watch a brief demonstration of the special VIEWCAM features in Demo mode. If the demonstration appears on the screen when you turn on the VIEWCAM for the first time, cancel the Demo mode to use your VIEWCAM.
Note:
• The demonstration is only displayed in English.
CONTROL switch
Operation buttons
Watching the Demonstration
1 Make sure that there is no video cassette in the VIEWCAM.
- If a cassette is in the VIEWCAM, Demo mode does not work. Perform the procedure on page 11 to remove it.
2 Hold down the Lock button and slide the Power switch to CAMERA.

3 Press the CONTROL switch until appears.


4 Press the MENU button (◀◀) to display the menu screen.
5 Toggle the CONTROL switch (①) to select "DEMO MODE", then press the CONTROL switch (②) to select "ON".
• The demonstration begins.


Cancelling Demo Mode
1 During the demonstration, press the CONTROL switch.

2 Perform steps 3 and 4 above.
3 Toggle the CONTROL switch (①) to select "DEMO MODE", then press the CONTROL switch (②) to select "OFF".

4 Press the EXIT button (MODE DISPLAY) to turn off the menu screen.
Note:
- The demonstration will stop if you press the CONTROL switch. If you leave it for 60 seconds, or turn the power off temporarily and then set the Power switch to CAMERA, the demonstration will begin again.
Before Requesting Service
Before calling for service, please check the following troubleshooting table.
| PowerCamera mode | Symptom | Possible cause | Suggested solution |
| No power. | Power source is not properly connected. | Connect power source properly (pp._8, 10). | |
| Battery pack is not charged. | Charge battery pack sufficiently (p._9). | ||
| Dew in VIEWCAM. | Wait until dew dries (p. 72). | ||
| Safety function is in effect. | Set Power switch to OFF and remove battery pack; wait for 2 seconds, then reinstall battery pack and turn on power (p. 8). | ||
| REC START/STOP button does not work. | Erasure protect tab on video cassette is open. | Close tab or use a new cassette (p._70). | |
| Power suddenly turns off. | VIEWCAM left in Recording Standby mode for 5 minutes. | Set Power switch to OFF and then back to CAMERA. | |
| Auto focus does not work. | Manual Focus mode is engaged. | Set to Auto Focus mode (p. 50). | |
| Zoom used on close subject. | Zoom out from subject (p. 18). | ||
| Subject has little contrast in brightness, or is full of horizontal or vertical stripes. | Focus manually (p. 50). | ||
| Bright subject produces wide vertical lines. | Occurs when shooting subject with strong contrast to the background. Does not indicate a malfunction. | — | |
| Automatically zooms out without operating Zoom control. | VIEWCAM is unable to focus when zooming in on subject within 1.5 m, and automatically zooms out until it focuses on subject. | — | |
| No subject in the field of view. | Direct lens to some subject, or set zoom to widest angle before shooting (p. 18). | ||
| On-screen displays automatically change. | VIEWCAM is in Demo mode. | Set DEMO MODE menu item to "OFF" (p. 74). | |
| VCR mode | Tape stops during rewind or fast forward. | Counter memory is on. | Turn off counter memory (p._46). |
| No image appears on connected TV screen. | Video input channel on TV or TV channel is not selected properly. | Select video input channel or TV channel properly (p. 21). | |
| A/V or S-video cable is not properly connected. | Connect A/V or S-video cable properly (p. 21). |
Appendix
GB 75
| VCR modeGeneral | Symptom | Possible cause | Suggested solution |
| Cannot play back, rewind or fast forward tape. | Position at beginning or end of tape. | Rewind or fast forward tape to desired point (p. 20). | |
| Video noise in image. | Dirty video heads. | Call for service, or use a commercially-available video head cleaning tape (p. 73). | |
| Old or worn tape. | Use a new cassette. | ||
| Cassette will not eject. | Power source is not properly connected. | Connect power source properly (pp._8, 10). | |
| Battery pack is not charged. | Charge battery pack sufficiently (p._9). | ||
| VIEWCAM is recording. | Stop tape and try again (p. 17). | ||
| No image on monitor. | Backlight has been turned off. | Turn on backlight (p. 47). | |
| Fluorescent lamp is burned out. | Call for service. | ||
| Monitor picture is hard to see. | Inappropriate picture adjustments. | Adjust picture (p. 55). | |
| CHARGE indicator flashes when charging battery pack. | AC adapter or battery pack has malfunctioned. | Call for service. | |
| Cannot edit to connected video equipment. | A/V, S-video or DV cable is not properly connected. | Connect A/V, S-video or DV cable properly (pp. 64, 65). | |
| Lens makes rattling sound when VIEWCAM is moved in VCR mode or with power off. | Does not indicate a malfunction. | — | |
| Remote control does not function. | REMOTE menu item is set to "OFF". | Set REMOTE menu item to "ON" (p._38). | |
| Remote control lithium battery has run down. | Replace remote control lithium battery with a new one (p. 38). | ||
| Remote control used beyond operating range. | Use remote control within operating range (p. 38). | ||
| Intense daylight falling on VIEWCAM remote sensor. | Protect remote sensor from exposure to intense daylight (p. 38). | ||
| Obstacle between remote control and VIEWCAM remote sensor. | Remove obstacle or use remote control from different angle (p. 38). |
Notes:
- This unit is equipped with a microprocessor. Its performance could be adversely affected by external electrical noise or interference. If this should happen, turn off the power and disconnect the unit from any power sources, including the lithium battery, etc. Then reconnect the power sources to resume operation.
- If the characters displayed on the monitor screen appear to malfunction, disconnect the power source and remove the lithium battery, then reconnect the power source, insert the lithium battery, and turn the power on again. The characters on the monitor should be normal. Set the date and time, then resume operation.
Appendix
Specifications
VIEWCAM
Signal System: PAL standard
Recording System: 2 rotary heads, helical scanning system
Cassette: Digital VCR Mini DV video cassette
Recording/Playback Time: 90 minutes (DVM60, LP mode)
Tape Speed: SP mode: 18.831 mm/second
LP mode: 12.568 mm/second
Pickup Device: 1/3" (8.5 mm, effective size: 6.0 mm) CCD image sensor (with
approx. 770,000 pixels including optical black)
Lens: 10× optical/100× digital power zoom lens (F1.8–2.8,
f=4.5-45 mm), full-range auto focus
Lens Filter Diameter: 30 mm
Monitor: 3" (7.5 cm) full-colour LCD screen (TFT active matrix)
Microphone: Electret stereo microphone
Colour Temperature Compensation: Auto white balance with white balance lock
Minimum Illumination: 6 lux* (with gain-up, F1.8)
Video Output Level: 1.0 Vp-p 75-ohm unbalanced
Audio Output Level: -8 dBs, impedance less than 2.2 kohms
Speaker Output: 300 mW
External Microphone Input: 3.5 mm diameter mini-plug, -66 dBs, output impedance
6.8 kohms, DC 4.0 V, for plug-in-power microphone use
Power Requirement: DC 7.4 V
Power Consumption: 4.8 W (during camera recording in Full Auto mode with zoom
motor off and backlight in normal mode)
Operating Temperature: 0°C to +40°C
Operating Humidity: 30% to 80%
Storage Temperature: -20°C to +60°C
Dimensions (approx.): 158 mm (W) × 98 mm (H) × 74 mm (D)
Weight (approx.): 555 g (without battery pack, lithium battery, video cassette, and
lens cap)
AC Adapter
Power Requirement: AC 110–240 V, 50/60 Hz
DC Output: 9.0 V
Power Consumption: 15 W
Dimensions (approx.): 68 mm (W) × 37 mm (H) × 130 mm (D)
Weight (approx.): 230 g
Specifications are subject to change without notice.
*Minimum illumination: Since there is no widely accepted testing procedure for determining minimum illumination capability, lux ratings are comparable only between models from the same manufacturer.
- OPERATION MANUAL
- ENGLISH
- WARNING
- TO PREVENT SHOCK HAZARD, DO NOT EXPOSE THIS APPLIANCE TO RAIN OR MOISTURE
- CAUTION
- IMPORTANT
- POWER SUPPLY
- NOTE
- PRECAUTIONS
- ABOUT YOUR VIEWCAM
- DV TECHNOLOGY
- DV AND CONVENTIONAL VIDEO CASSETTE TAPES
- LCD MONITOR SCREEN
- CAUTIONS
- SUPPLIED ACCESSORIES
- OPTIONAL ACCESSORIES
- CONTENTS
- OPERATION REFERENCES
- PREPARATION
- BASIC OPERATIONS
- CAMERA RECORDING
- PLAYBACK
- OPERATIONS OF THE
- ON-SCREEN DISPLAYS
- USEFUL FEATURES
- ADVANCED FEATURES
- APPENDIX
- PART NAMES
- ON-SCREEN DISPLAY INDEX
- QUICK REFERENCE INDEX
- WARNING INDICATORS
- INSERTING AND REMOVING THE BATTERY PACK
- INSERTING THE BATTERY PACK
- REMOVING THE BATTERY PACK
- CHARGING THE BATTERY PACK
- NOTES
- EXTENDING BATTERY PACK LIFE
- POWERING THE VIEWCAM FROM AN AC OUTLET
- INSERTING AND REMOVING A MINI DV CASSETTE
- INSERTING A CASSETTE
- REMOVING A CASSETTE
- ADJUSTING THE GRIP STRAP
- USING THE LENS CAP
- ATTACHING THE SHOULDER STRAP
- INSTALLING THE LITHIUM MEMORY BATTERY
- REMOVING THE LITHIUM BATTERY
- NOTES ON THE USE OF THE LITHIUM BATTERY
- SELECTING THE LANGUAGE FOR THE ON-SCREEN DISPLAY
- SETTING THE LANGUAGE
- CHANGING THE LANGUAGE
- SETTING THE AREA, DATE AND TIME
- CHANGING TO THE 12-HOUR TIME MODE
- DISPLAYING THE DATE AND TIME OF RECORDING
- EASY CAMERA RECORDING WITH FULL AUTO MODE
- TO PAUSE RECORDING
- TO TURN THE POWER OFF
- ZOOMING
- TO ZOOM IN
- TO ZOOM OUT
- TIPS ON RECORDING POSITIONS
- HOLDING THE VIEWCAM
- HIGH ANGLE
- BASIC OPERATIONS: CAMERA RECORDING
- REMAINING RECORDING TIME DISPLAY
- REMAINING BATTERY POWER DISPLAY
- BASIC OPERATIONS PLAYBACK
- TO STOP PLAYBACK
- AUTO TAPE REWIND
- VOLUME CONTROL
- WATCHING THE PLAYBACK ON A TV
- ABOUT THE S-VIDEO SOCKET
- VIDEO SEARCH
- STILL
- OPERATIONS OF THE ON-SCREEN DISPLAYS
- USING THE CONTROLS
- POWER SWITCH
- CONTROL SWITCH
- OPERATION BUTTONS
- ABOUT THE MODE DISPLAY BUTTON
- USING THE MENU SCREENS
- RECORDING IN LP (LONG PLAY RECORDING) MODE
- TO RETURN TO SP MODE
- NOTES ON THE USE OF LP MODE
- USEFUL FEATURES CAMERA RECORDING
- SELECTING THE 16-BIT AUDIO RECORDING MODE
- TO RETURN TO 12-BIT AUDIO RECORDING MODE
- SETTING THE DIGITAL ZOOM
- TO RETURN TO OPTICAL ZOOM
- DIGITAL QUICK ZOOM (EXTEND ZOOM)
- USING DIGITAL QUICK ZOOM
- SETTING THE DIGITAL QUICK ZOOM RANGES
- TO CANCEL DIGITAL QUICK ZOOM
- GAMMA BRIGHTNESS COMPENSATION
- TO OBTAIN A BRIGHTER PICTURE
- TO CANCEL GAMMA BRIGHTNESS COMPENSATION
- GAIN-UP (CAT'S EYE)
- TO CANCEL THE GAIN-UP FUNCTION
- DIGITAL IMAGE STABILIZATION (DIS)
- TURNING OFF THE DIS FUNCTION
- TO RETURN TO DIS MODE
- QUICK REVIEW
- QUICK RETURN
- EDIT SEARCH
- FADE IN AND FADE OUT
- TYPE OF FADE MODES
- SELECTING FADE MODE
- USING FADE MODE
- TO CANCEL FADE MODE
- TO USE FADE OUT ONLY
- AUTO FOCUS
- MACRO SHOTS
- WIDE SCREEN (16:9)
- TO RETURN TO NORMAL SCREEN
- STILL RECORDING
- TYPE OF STILL RECORDING MODES
- SELECTING STILL RECORDING MODE
- USING STILL RECORDING
- SNAP/PHOTO SHOT
- MULTIPLE STROBE RECORDING
- SETTING MULTIPLE STROBE RECORDING MODE
- USING MULTIPLE STROBE RECORDING
- SNAP
- USING THE REMOTE CONTROL
- INSTALLING THE BATTERY
- TURNING ON THE REMOTE CONTROL MODE
- OPERATING THE REMOTE CONTROL
- SELF RECORDING
- NORMAL SELF RECORDING
- MORE INFORMATION ON SELF RECORDING
- SELF-RECORDING MESSAGE
- TO TURN OFF THE SELF-RECORDING MESSAGE SCREEN
- SETTING THE VIEWCAM TO FULL AUTO MODE
- USEFUL FEATURES PLAYBACK
- SLOW
- FRAME ADVANCE
- STROBE PLAYBACK
- PROGRAMME SEARCH
- USING THE TIME CODE
- TO TURN OFF THE TIME CODE
- DISPLAYING THE TIME CODE ON A TV DURING PLAYBACK
- USING THE TAPE COUNTER
- VCR MODE
- CAMERA MODE
- TO TURN OFF THE TAPE COUNTER
- COUNTER MEMORY
- TO TURN OFF THE COUNTER MEMORY
- BEEP
- TURNING OFF THE BEEP
- TURNING OFF THE LCD MONITOR BACKLIGHT
- SCENE MENU (PROGRAMME AE)
- TYPE OF SCENE SETTINGS
- TO CANCEL THE SCENE SETTING
- ADVANCED FEATURES CAMERA RECORDING
- PICTURE EFFECTS
- TYPE OF PICTURE EFFECTS
- TO CANCEL THE PICTURE EFFECT
- MANUAL FOCUS
- TO CANCEL MANUAL FOCUS MODE
- SETTING THE SHUTTER SPEED
- RECOMMENDED SHUTTER SPEEDS
- TIPS ON USING THE SHUTTER SPEED
- WHITE BALANCE LOCK
- TO CANCEL WHITE BALANCE LOCK
- MANUAL IRIS
- TO CANCEL MANUAL IRIS MODE
- PICTURE/BACKLIGHT ADJUSTMENTS
- TYPE OF BACKLIGHT MODES ("BACKLIGHT")
- WINDBREAK
- TO CANCEL WINDBREAK
- SELECTING SUMMER TIME
- TO RESET TO STANDARD TIME
- WORLD CLOCK
- ADVANCED FEATURES PLAYBACK
- PLAYBACK ZOOM
- TO CANCEL PLAYBACK ZOOM
- OPERATING WITH THE REMOTE CONTROL
- GAMMA PLAYBACK
- TO CANCEL GAMMA PLAYBACK
- MULTIPLE STROBE PLAYBACK
- SELECTING MULTIPLE STROBE PLAYBACK MODE
- USING MULTIPLE STROBE PLAYBACK
- STILL IMAGE OVERLAP
- USING STILL IMAGE OVERLAP
- TO CANCEL STILL IMAGE OVERLAP MODE
- WIPE
- USING WIPE
- TO CANCEL WIPE MODE
- PICTURE EFFECT PLAYBACK
- TO CANCEL PICTURE EFFECT PLAYBACK
- EDITING
- CUTTING UNWANTED SEQUENCES
- TO STOP EDITING
- EDITING TO VIDEO EQUIPMENT WITH THE DV TERMINAL (IEEE1394)
- AUDIO DUBBING FEATURE
- ABOUT THE MIC JACK
- AUDIO RECORDING IN NORMAL RECORDING MODE
- BIT AUDIO RECORDING
- AUDIO RECORDING IN AUDIO DUBBING MODE
- AUDIO DUBBING
- TO PAUSE AUDIO DUBBING
- TO QUIT AUDIO DUBBING
- IF YOU WISH TO CHANGE THE DUBBED AUDIO OR DUB ADDITIONAL SCENES
- SELECTING THE AUDIO PLAYBACK MODE
- CONNECTING TO A PERSONAL COMPUTER
- USEFUL INFORMATION
- HINTS FOR BETTER SHOOTING
- LIGHTING
- TIPS ON GOOD LIGHTING
- MINI DV CASSETTE
- PRECAUTIONS WHEN USING A MINI DV CASSETTE
- TO PROTECT RECORDINGS AGAINST ACCIDENTAL ERASURE
- BATTERY PACK
- THIS VIEWCAM USES A LITHIUM-ION TYPE BATTERY PACK
- CHARGING
- USE
- STORAGE
- AC ADAPTER
- REPLACING THE FLUORESCENT LAMP
- DEW FORMATION
- WHAT IS "DEW FORMATION
- WHEN DEW FORMS IN YOUR VIEWCAM
- HOW TO PREVENT TROUBLE DUE TO DEW FORMATION
- DEW" WARNING FEATURE
- DIRTY VIDEO HEADS
- USING A CLEANING TAPE (COMMERCIALLY AVAILABLE)
- CLEANING
- USING YOUR VIEWCAM ABROAD
- AC ADAPTER (SUPPLIED ACCESSORY)
- TELEVISION SIGNAL STANDARDS
- DEMONSTRATION MODE
- WATCHING THE DEMONSTRATION
- CANCELLING DEMO MODE
- BEFORE REQUESTING SERVICE
- SPECIFICATIONS
- VIEWCAM
Brand : SHARP
Model : VL-SD20S
Category : Camcorder