
SKMK 1200 B2 - Food Processor SILVERCREST - Free user manual and instructions
Find the device manual for free SKMK 1200 B2 SILVERCREST in PDF.


| Product Type | Food Processor |
| Brand | SilverCrest |
| Model | SKMK 1200 B2 |
| Power Consumption | 1200 W |
| Voltage | 220-240 V |
| Frequency | 50/60 Hz |
| Bowl Capacity | 2.5 L (working capacity) |
| Main Material | Plastic body, stainless steel blades |
| Dimensions (approx.) | 25 x 20 x 35 cm |
| Weight (approx.) | 4.2 kg |
| Functions | Chopping, slicing, shredding, mixing, kneading, whisking, pureeing |
| Speed Settings | 2 fixed speeds + pulse |
| Pulse Function | Yes, for short bursts |
| Safety Features | Safety lock, non-slip feet, overload protection, automatic shut-off |
| Cleaning | Bowl, lid, and most accessories dishwasher safe; wipe motor unit with damp cloth |
| Accessories Included | Chopping blade, kneading hook, whisk, slicing disc, shredding disc, spatula |
| Warranty | 2 years |
| Cord Length | Approx. 1 m |
Frequently Asked Questions - SKMK 1200 B2 SILVERCREST
User questions about SKMK 1200 B2 SILVERCREST
0 question about this device. Answer the ones you know or ask your own.
Ask a new question about this device
Download the instructions for your Food Processor in PDF format for free! Find your manual SKMK 1200 B2 - SILVERCREST and take your electronic device back in hand. On this page are published all the documents necessary for the use of your device. SKMK 1200 B2 by SILVERCREST.
USER MANUAL SKMK 1200 B2 SILVERCREST
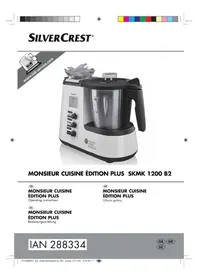
MONSIEUR CUISINE ÉDITION PLUS SKMK 1200 B2
GB
MONSIEUR CUISINE ÉDITION PLUS
Operating instructions
GR
MONSIEUR CUISINE ÉDITION PLUS
Οδηγία χρήσης
DE
MONSIEUR CUISINE ÉDITION PLUS
Bedienungsanleitung
IAN 288334

Ελληνικά 2
English.... 36
Deutsch 68
ID: SKMK 1200 B2_17_V1.3

INSTRUCTIONS:

15.5 Desalination
shop.monsieur-cuisine.com


- Overview 38
- Display screens 39
- Functions in an overview 40
- Intended purpose 41
- Safety instructions 42
- Items supplied 45
- Unpacking and setting up 46
- Scale 46
- Operating the device 47
9.1 Power supply.... 47 9.2 Switching the device on and off.... 47 9.3 Display.... 47 9.4 Operating the buttons.... 48 9.5 Setting the time.... 49 9.6 Setting the temperature.... 49 9.7 Setting the speed 50 9.8 Anti-clockwise rotation.... 50 9.9 Turbo function 51 9.10 Overflow 51 9.11 Starting and stopping the device.... 51
- Using the blender jug 52
10.1 Markings inside the blender jug.... 52 10.2 Using and removing the blade assembly.... 52 10.3 Insert blender jug.... 53 10.4 Insert and remove the mixer attachment 53 10.5 Put on the lid of the blender jug 54 10.6 Use the lid for the filler opening.... 54 10.7 Cooking and steaming with the cooking pot.... 54 10.8 Using the spatula 55
- Steaming 56
11.1 General programme information.... 56 11.2 Preparation of the steamer inserts.... 56 11.3 Starting the steaming process 57 11.4 Checking the doneness.... 57 11.5 Steaming with the cooking pot.... 58 11.6 Overheating protection.... 58
- Tips on steaming 58
12.1 Using steamer inserts.... 58 12.2 Preparing menus.... 58
- Kneading 59
13.1 General programme information.... 59 13.2 Starting the program 59

14. Browning 60
14.1 General programme information 60 14.2 Starting the program....60
15. Cleaning and servicing the device 60
15.1 Cleaning the base unit 61 15.2 Cleaning in the dishwasher 61 15.3 Cleaning the accessories....61 15.4 Cleaning, checking and replacing seals.... 61 15.5 Descaling....62 15.6 Storage.... 62
16. Malfunctions, Cause, Remedy 63
16.1 Malfunctions during operation 63 16.2 Error messages on the display.... 64
17. Disposal 65
18. Technical specifications 65
19. How to order accessories 65
20. Warranty of HOYER Handel GmbH 66





1. Overview
1 Lid for the steamer baskets 2 Steamer basket, shallow 3 Steamer basket, deep 4 Seal of the deep steamer basket (ensure the correct position) 5 Blender jug
6 0 / I Main switch
7 Power cable with mains plug
8 Mains power socket
9 Holder for blender jug (with gear ring)
10 Overflow hole
11 Locking system
12 Base unit
13 Suction feet
14 Scale
15 Temperature controller
16 Speed controller
17 START/ STOP Starting and stopping the device
18 TURBO Pulse button
19 REVERSE Changing the direction of rotation
20 ROAST Browning program
21 STEAMER Steaming program
22 KNEAD Dough kneading program
23 SCALE/ TARE Starting the scale / activate tare function
24 Timer
25 Display
26 Seal for blade assembly (ensure the correct position)
27 Blade assembly (with cog wheel)
28 Cooking pot
29 Mixer attachment
30 Spatula
31 Seal for the lid of the blender jug (ensure the correct position)
32 Lid for the blender jug
33 Measuring beaker
not shown:
34 Unlocking lever


2. Display screens

A Time display (1 second to 90 minutes) B Blender jug has not been positioned or closed correctly C Selected speed (1 - 4) is suited for the mixer attachment D Temperature of the food in the blender jug E Display of the weight in grams up to 5,000 g F Display of the speed 1 - 10 G Set to anti-clockwise / active H Symbol for the speed I set temperature (37 °C - 130 °C)
- Functions in an overview
| Button/ Component | Function Notes | |
| SCALE/ TARE 23 / Scale 14 | Weighing accurately to the gram with tare function (set to 0 to weigh additional ingredients) | up to 5 kg |
| REVERSE 19 | Gentle mixing of food not to be chopped | |
| TURBO 18 | Briefly switch to the highest speed, e.g. to chop nuts and small amounts of herbs or onions | - Function is blocked if the food temperature in the blender jug exceeds 60 °C.- For liquids: up to no more than 1 litre- Do not use with a mixer attachment 29 |
| Blade assembly 27 | - To crush, chop, crush, mash- For the programme KNEAD- With the function REVERSE for gentle mixing | - Must always be used to seal the blender jug 5- If necessary, cut food first in pieces with an edge length of approx. 3 - 4 cm |
| Mixer attachment 29 | For fluid food- To whip cream (at least 200 ml)- To whip egg white (at least 2 eggs)- To emulsify (e.g. mayonnaise) | - must only be used with speed settings 1 to 4- Must not be used with function TURBO |
| Cooking pot 28 | To cook and stew | Fill the blender jug 5 with at least 500 ml of water |
| STEAMER 21 | Programme for the gentle steaming with steamer baskets 2 and 3, especially for vegetables, fish and meat | Also possible with the cooking pot 28 |
| KNEAD 22 | To knead doughs with the blade assembly 27 | A maximum of 500 g of flour can be processed |
| ROAST 20 | For lightly browning food, e.g. meat or onions | Small quantities, cut in pieces |
Thank you for your trust!
Congratulations on the purchase of your new "Monsieur Cuisine Édition Plus" food processor with cooking function.
For a safe handling of the product and in order to get to know the entire scope of features:
• Thoroughly read these user instructions prior to initial use. - Above all, observe the safety instructions! - The device should only be used as described in these operating instructions. - Keep these user instructions for reference. - If you pass the device on to someone else, please include this copy of the user instructions.
We wish you a lot of joy with your new food processor with cooking function "Monsieur Cuisine Édition Plus"!
4. Intended purpose
Monsieur Cuisine is used to mix, whisk, beat, stir, chop, mash, emulsify, steam, stew, knead, brown, cook and weigh food.
These user instructions describe the basic functions such as mixing, chopping and steaming. For information on the preparation of special dishes, refer to the recipe book included in the delivery.
The device is designed for private, domestic use. The device must only be used indoors. This device must not be used for commercial purposes.
Foreseeable misuse
WARNING! Risk of material damage!
Do not use the device to chop particularly hard food such as bones or nutmegs.
Symbol on your device

The food-safe material of devices with this symbol will not change the taste or smell of food.

This symbol warns you against touching the hot surface.

This symbol warns against coming into contact with the hot water steam.
5. Safety instructions
Warnings
If necessary, the following warnings will be used in these user instructions:

DANGER! High risk: failure to observe this warning may result in injury to life and limb.
WARNING! Moderate risk: failure to observe this warning may result in injury or serious material damage.
CAUTION: low risk: failure to observe this warning may result in minor injury or material damage.
NOTE: circumstances and specifics that must be observed when handling the device.
Instructions for safe operation
- Children must be prevented from using this device.
- This device with its power cable must be stored out of the reach of children.
- Cleaning and user maintenance must not be performed by children.
- Children must be supervised to ensure that they do not play with the device.
- This device can be used by people with restricted physical, sensory or intellectual abilities or people without adequate experience and/or understanding if they are supervised or instructed on how to use this device safely and if they are aware of the resulting risks.
- The device must be disconnected from the mains if left unattended and prior to assembly, disassembly or cleaning.
- Please remember that the blades of the blade assembly are very sharp:
- Never touch the blades with your bare hands, to avoid cuts.
- When washing manually, the water should be sufficiently clear so that you can see the blade assembly easily to avoid injuries caused by the very sharp blades.
- When emptying the blender jug, ensure not to touch the blades of the blade assembly.
- When removing and inserting the blade assembly ensure not to touch the blades.
- During the turbo function, ensure that no hot ingredients are in the blender jug. These could be ejected and may cause scalding.
- After being switched off, the blade assembly and the mixer attachment will continue to rotate for a while. Please wait until all parts have come to a standstill before unlocking the blender jug and opening the lid.
- This device is not intended to be operated using an external timer clock or a separate remote control system.
- If the power cable of this device should become damaged, it must be replaced by the manufacturer, the manufacturer's customer service department or a similarly qualified specialist, in order to avoid any hazards.
- Prior to replacement of parts or attachments which move when in operation, the device must be switched off and disconnected from the mains.
- Please take note of the chapter on cleaning (see “Cleaning and servicing the device” on page 60).

DANGER for children
Children must not play with packing material. Do not allow children to play with plastic bags. There is a risk of suffocation.

DANGER to and from pets and livestock
Electrical devices can represent a hazard to pets and livestock. In addition, animals can also cause damage to the device. For this reason you should keep animals away from electrical devices at all times.

DANGER! Risk of electric shock due to moisture
The device must never be operated in the vicinity of a bathtub, a shower, a filled hand basin or similar. The base unit, the power cable and the mains plug must not be immersed in water or other liquids. - Protect the base unit against moisture, water drips and splashes.
- Should liquids enter the base unit, pull out the mains plug immediately. Have the device checked before reusing.
- Never touch the device with wet hands.
- If the device falls into water, disconnect the mains plug immediately. Only then is it safe to retrieve the device.

DANGER! Risk of electric shock
- Only plug the mains plug into the wall socket after the device has been completely assembled.
- Only connect the mains plug to a properly installed and easily accessible grounded wall socket whose voltage corresponds to the specifications on the rating plate. The wall socket must continue to be easily accessible after the device is plugged in.
- Ensure that the power cable cannot be damaged by sharp edges or hot points. Do not wrap the power cable around the device.

- Even after it has been switched off, the device has not been completely disconnected from the mains. In order to fully disconnect it, pull out the mains plug.
- Ensure that the power cable never develops into a trip hazard, and that nobody can get caught in or stand on it.
- Keep the power cable away from hot surfaces (e.g. hot plate).
- When using the device, ensure that the power cable cannot be trapped or crushed.
- When removing the mains plug from the wall socket, always pull the plug and never the cable.
- Disconnect the mains plug from the wall socket ...
... if there is a fault, ... while you do not use the Monsieur Cuisine, ... before you assemble or disassemble the Monsieur Cuisine, ... before you clean the Monsieur Cuisine and ... during thunderstorms.
- Do not use the device if there is visible damage to the device or the power cable.
- To avoid any risk, do not make modifications to the product.

DANGER! Risk of injury from cutting
- The device must never be operated without the container.
- Never reach into the rotating blades. Do not touch rotating parts with spoons or similar utensils. Keep long hair or loose clothing away from rotating parts as well.
Single exception: the spatula included in the delivery is designed so that when stirring clockwise it does not come into contact with the blade assembly. The spatula must not be used with the mixer attachment.
- Please note that the blades keep spinning for a short time after switching the device off. This applies in particular at high rotation speeds. Do not reach into the pot until the blades come to a complete standstill.

FIRE HAZARD
Before turning the device on, place it on a level, stable, dry, heat-resistant surface. - It is not necessary to constantly supervise during operation, but just to check regularly. This applies in particular when very long cooking times are set.

DANGER! Risk of injury through burning
The surfaces of the device become very hot during operation. During operation, always use potholders or oven gloves when touching the steamer baskets or the lids for the steamer baskets. - Only transport the device when it has cooled down. - Wait for the device to cool down before cleaning.

DANGER! Risk of injury through scalding
- Avoid opening the lids for the steamer baskets during the cooking process, since hot steam will escape.
- Ensure that hot steam escapes through the steam vents of the lid for the steamer inserts. Never cover these openings, since otherwise steam might have backed up in the device escaping abruptly when the lid is opened.
- If you want to open the lids for the steamer baskets, lift the lid first at the rear so that the escaping surge of steam is guided away from you.

WARNING! Risk of material damage
- Place the device exclusively on a level, dry, non-slip and waterproof surface, so that it can neither fall nor slip off.
- Never place the device on a hot surface, e.g. hot plate.
- The mixer attachment must only be used with speed settings 1 to 4.
- The button TURBO must not be used when using the mixer attachment.
- Use the blender jug exclusively with the lid in place, otherwise liquid might be ejected.
Do not change the position of the device, as long as there is still food or dough in the device.
- Never overfill the blender jug, since otherwise the contents might be ejected. Overflowing liquid would flow onto the surface. You should therefore place the device on a waterproof surface.
- Ensure that during steaming, there is never too much or too little water in the device.
- Never place the device directly under a wall-mounted cupboard, as steam comes out from the top and could damage the furniture.
- Only ever use clean drinking water for producing steam.
Do not operate the device when it is empty, as this causes the motor to overheat and may result in it being damaged.
- Only use the original accessories.
- Do not use any astringent or abrasive cleaning agents.
The device is equipped with non-slip synthetic suction feet. As furniture is coated with a wide array of varnishes and synthetics, and is also treated with different care products, it cannot be fully ruled out that some of these materials contain ingredients that could attack and soften the non-slip plastic bases. If necessary, place a non-slip mat under the device.
6. Items supplied
1 food processor with cooking function "Monsieur Cuisine Édition Plus", base unit 12
1 blender jug 5 with:
- Blade assembly 27
- Lid for the blender jug 32
- Measuring beaker 33
1 cooking pot 28
1 mixer attachment 29
1 spatula 30
1 steamer attachment, comprising:
- Steamer basket, deep 3
- Steamer basket, shallow 2
- Lid for the steamer baskets 1
1 copy of the user instructions 1 recipe book


During production, a thin film of oil is applied to protect many components. Prior to the first use, operate the device only with water so that any residues can evaporate.
NOTE: when in operation for the first time, some odour may be generated by the device. This is harmless. Please ensure adequate ventilation.
- Remove all packing material.
- Check to ensure that all parts are present and undamaged.
- Clean the device prior to its first use! (see "Cleaning and servicing the device" on page 60).
- Use the blender jug 5 to bring 2.2 litres of water to a boil once, pouring it away afterwards (see "Setting the temperature" on page 49).
- Place the base unit 12 on a level, dry, non-slip and waterproof surface, so that it can neither fall nor slip off.
CAUTION: overflowing liquid would flow onto the surface. You should therefore place the device on a waterproof surface.
8. Scale
The installed kitchen scales allows accurate weighing to the gram up to 5 kg.
The scale 14 is easy to operate and ready for use unless another cycle is in operation.
Easy weighing
- The device is switched on but no other cycle is in operation.
- Press the button SCALE/ TARE 23. The button lights up. The display 25 shows 0000 g.
0000g
- Place the object to be weighed on the scale 14. On the display 25, the weight will be shown in grams up to 5 kilograms.
- Remove the object to be weighed from the scale 14.
- Press one of the program buttons or select a time or temperature to end the weighing function.
Weighing with the tare function
Apply the tare function, if you want to set the weight of an object placed on the scale 14 to 0 grams and then add another object to be weighed.
- The device is switched on but no other cycle is in operation.
- Press the button SCALE/ TARE 23. The button lights up. The display 25 shows 0000 g.
- Place the object to be weighed on the scale 14. This may also be, for instance, an empty or filled bowl. On the display 25, the weight will be shown in grams up to 5 kilograms.
- Press SCALE/TARE 23 to set the weight indicator to 0.

- Add the new object to be weighed to the existing object to be weighed. On the display 25 the weight of the added object to be weighed is shown in grams.
- Repeat the procedure with an additional object to be weighed or remove the object to be weighed from the scale 14.
- Press one of the program buttons or select a time or temperature to end the weighing function.
NOTE: if too much weight is put on the scale, . . . . appears on the display.
9. Operating the device
For safety reasons, the settings described in this chapter can only be selected when the device has been assembled completely.
9.1 Power supply
- First, connect the power cable 7 to the mains power socket 8 of the base unit 12 and then plug the mains plug 7 into a suitable wall socket. The wall socket must continue to be easily accessible after the device is plugged in.
9.2 Switching the device on and off
- Set the main switch 6 on the rear to 1:
- All buttons light up briefly.
- The display 25 is lit and briefly shows a control display. Then the control symbols are displayed. All adjustable values are set to 0.

- An acoustic signal sounds.
- Set the main switch 6 on the rear to 0 to switch the device off.
9.3 Display
The display 25 shows all settings and operating values.
After approx. 5 minutes, the illumination of the display 25 goes off. As soon as any button is pressed or a control is turned, the illumination of the display 25 is switched on again for 5 minutes.


9.4 Operating the buttons
| Illumination/ Flashing of the button(s) | Situation Function of the button | |
| START/ STOP 17 flashes. | Settings were performed, and a cycle can be started. | Press the button to start a cycle. |
| START/ STOP 17 lights up. | The cycle is in operation. Press the button to stop a cycle. | |
| TURBO 18 lit white. | Turbo function can be activated. | Keep the button pressed as long as the function is needed. |
| TURBO 18 lit red. | The function is blocked (e.g. because the food temperature inside the blender jug exceeds 60 °C). | The button is blocked. |
| Program button (KNEAD 22, STEAMER 21, ROAST 20) lights up and START/ STOP 17 flashes. | The programme is selected but not yet started. | Press START/ STOP 17 to start the function. |
| Program button (KNEAD 22, STEAMER 21, ROAST 20) lights up and START/ STOP 17 lights up. | The programme is selected and started. | In order to abort the programme early, press START/ STOP 17. |
| Program button STEAMER 21 flashes and START/ STOP 17 lights up. | The programme is selected and started. However, the heat-up time of 10 minutes is still ongoing. | The programme starts automatically.- The timer 24 can be used to change the pre-set time.- In order to start the programme before the 10 minutes expired, press STEAMER 21. |
| SCALE/ TARE 23 lights up. | The scale is activated. In order to set the weight indicator to 0, press SCALE/ TARE 23. | |

9.5 Setting the time
Turn the timer 24 to set the time of the cooking process or the processing:
- Turn the timer 24 in the direction “-”: reduce time
- Turn the timer 24 in the direction “+”: increase time
- The adjustable time ranges from 1 second to 90 minutes.
- The adjustment takes place via the following steps:
- up to 1 minute in intervals of seconds,
- as of 1 minute in 30-second intervals,
- as of 10 minutes in intervals of minutes.
- The time set is shown on the display 25.

TIME
20:00
- After the function is started, the time is counted down.
- If no time and no temperature are specified, the time display will show the time from 0 seconds (00:00) up to 90 minutes (90:00). Then, the device will be stopped automatically.
- During operation, the time can be changed.
- Once the time set has elapsed,
- the device stops;
- an acoustic signal is issued.
9.6 Setting the temperature
Turn the temperature controller ⚪ 15 to set the cooking temperature:
- The adjustable temperature ranges from 37 °C to 130 °C.
- The temperature set is shown on the display 25.

TEMP.
120°C
- In order to start the heat-up process, a speed setting must be selected and a time setting must be entered.
- During the heating process, the indication of the food temperature may vary substantially.
- As soon as the selected temperature has been reached, an acoustic signal is issued and the temperature of the food is shown behind the symbol 🌐
- During operation, the temperature can be changed.
NOTE: If a speed is set exceeding 3, the heating function is blocked and no temperature can be set.





9.7 Setting the speed
Turn the speed controller Ⓧ 16 to set the speed:
- The speed can be adjusted in 10 increments:
- Speed 1 - 4: for the mixer attachment 29;
- Speed 1 - 10: for the blade assembly 27.
CAUTION:
The mixer attachment 29 must only be used with speed settings 1 to 4. On the display 25, a respective indication appears.

When mixing liquids at speed 10, the blender jug 5 must not contain more than 1 litre, since otherwise liquid might be ejected (see "Using the blender jug" on page 52). For speed settings of less than 10, the blender jug 5 may only be filled up to a maximum of 2.2 litres.
- For further notes: see "Functions in an overview" on page 40.
- The speed set is shown on the display 25.

- During operation, the speed setting can be changed.
- The speed cannot be set for the Steaming function.
- If during operation you change the speed to 0, the device will stop. To continue working, select a speed and press the button START/STOP 17.
- If a temperature has been selected, only the speed settings 1 - 3 are available.
Soft start
In order to avoid that during sudden acceleration of hot food liquid is ejected from the blender jug 5 or the device starts wobbling, a soft start is provided for all settings except for the turbo function:
- Soft start for food temperatures exceeding 60 °C.
9.8 Anti-clockwise rotation
The anti-clockwise rotation is used for gentle stirring of food not to be chopped.
- By pressing button REVERSE 19 the direction of rotation of the blade assembly 27 can be changed in standard operation at any time.
- The anti-clockwise rotation can only be applied at low speed settings 1 to 3.
- For programmes KNEAD and ROAST, the anti-clockwise rotation is controlled by the programme.
- Press REVERSE 19 to activate the anti-clockwise rotation.

- Press REVERSE 19 again to deactivate the anti-clockwise rotation.


9.9 Turbo function
CAUTION:
- When mixing liquids, the blender jug 5 must not contain more than 1 litre, since otherwise liquid might be ejected.
- Never use this function when the mixer attachment 29 is used.
With the turbo function you can briefly select speed setting 10 (maximum). This, for example, is used to quickly chop nuts, small amounts of herbs or onions.
- TURBO 18 lit white: the function is possible.
- TURBO 18 lit red: the button is blocked, the function is disabled (e.g. because the food temperature inside the blender jug exceeds 60 °C).
- Press and keep button TURBO 18 pressed for as long as you need the function.

NOTES:
• The turbo function will only work - if the blade assembly 27 is not turning. - if the food temperature in the blender jug 5 is less than 60 °C.
- The speed is promptly increased to setting 10 (maximum).
9.10 Overflow
In the holder of the blender jug 9 there is an overflow hole 10.

Should liquid escape from the blender jug 5, this will not collect in the base unit 12, but can escape via the overflow hole 10 onto the surface.
9.11 Starting and stopping the device
• After setting one or more values or a programme, start the device by pressing button START/ STOP 17. - By pressing button START/ STOP 17 again, you abort an ongoing cooking or processing process.


10. Using the blender jug
NOTE: these user instructions describe the basic functions such as mixing, chopping and steaming. For information on the preparation of special dishes, refer to the recipe book included in the delivery.
10.1 Markings inside the blender jug

On the inside, the blender jug 5 is provided with markings regarding the filling volume:
- Bottom marking: approx. 0.5 litres
- Marking I: approx. 1 litre
- Centre marking: approx. 1.5 litres
- Marking II: approx. 2 litres
- Top marking MMAX: approx. 2.2 litres, corresponding to the maximum admissible filling volume
CAUTION:
When mixing liquids at speed 10 or with button TURBO 18, the blender jug 5 must not contain more than 1 litre, since otherwise liquid may be ejected. For speed settings of less than 10, the blender jug 5 may only be filled up to a maximum of 2.2 litres.
NOTE:
- For some applications, the blender jug 5 should not contain an insufficient amount of liquid, so that the device can function properly. Thus, for whipping cream, for instance, you should use at least 200 ml and when beating egg white use at least two eggs.
10.2 Using and removing the blade assembly
The blade assembly 27 is used to chop food.
The blender jug 5 must never be used without the blade assembly 27, since the blade assembly 27 seals the blender jug 5 on the bottom.

DANGER! Risk of injury from cutting!
- Please remember that the blades of the blade assembly 27 are very sharp. Never touch the blades with your bare hands, to avoid cuts.
In order to remove the blade assembly 27, proceed as follows:

- Position the blender jug 5 horizontally.

- Press the unlocking lever 34 on the underside of the blender jug 5 so that it points to the open lock symbol.

- Pull out the blade assembly 27 carefully towards the top.
In order to insert the blade assembly 27, proceed as follows:
- Position the blender jug 5 horizontally.
- Insert the blade assembly 27 from the top.
Please take note that the two cams at the bottom of the blade assembly 27 must be pushed through the two recesses in the underside of the blender jug 5.
CAUTION: ensure that the seal 26 for the blade assembly 27 is positioned correctly, since otherwise the content may escape.
- In order to lock the blade assembly 27, move the unlocking lever 34 on the underside of the blender jug 5 so that it points to the closed lock symbol.

NOTE: chop large pieces into smaller ones with an edge length of approx. 3 - 4 cm. Otherwise larger pieces might get stuck in the blades.
10.3 Insert blender jug
- Place the blender jug 5 into the holder for the blender jug 9.
- Press the blender jug 5 slightly downward until the cog wheel of the blade assembly 27 locks in place in the gear ring of the holder 9.
NOTES:
- If the blender jug 5 cannot be pressed downward, "wobble" slightly so that the cog wheel of the blade assembly 27 in the blender jug 5 will slide into the gear ring of the holder 9.
- Should the blender jug 5 not be positioned correctly, a safety mechanism prevents the functioning of the device.
10.4 Insert and remove the mixer attachment
The mixer attachment 29 serves to combine liquid foods, e.g. to whip cream, beat egg white, emulsify (e.g. mayonnaise). The mixer attachment 29 is put onto the blade assembly 27:
- The wings of the mixer attachment 29 are located in the spaces between the blades.
- For further notes: see "Functions in an overview" on page 40.
CAUTION:
- The mixer attachment 29 must only be used with speed settings 1 to 4.
- The pulse button 18 must not be pressed if the mixer attachment 29 is used.
- When using the mixer attachment 29, the spatula 30 must not be used, since it might get into the mixer attachment 29.
- When adding food, ensure that it will not block the mixer attachment 29.
In order to remove the mixer attachment 29, pull it out upward.





10.5 Put on the lid of the blender jug
The lid for the blender jug 32 can only be placed on if the blender jug 5 was inserted correctly.
- Put the lid for the blender jug 32 slightly twisted onto the blender jug 5. The symbol of the opened lock points to the arrow of the locking system 11.

- Press and turn the lid 32 clockwise with both hands until the closed lock symbol points to the arrow of the locking system 11. Only when the lid 32 is correctly closed, the device can start.

NOTES:
- In order to facilitate the closing of the lid somewhat, put a few drops of oil on a cloth and rub it on the seal 31.
- The device can only be started when the lid 32 is put on correctly. To make the lid 32 properly lock in place, it is helpful to press lightly on the lock symbol while closing the lid.
- If the lid 32 has not been put on correctly, the symbol shown here on the right will appear on the display 25.

10.6 Use the lid for the filler opening
Simultaneously, the measuring beaker 33 is used to close the lid of the blender jug 5 and to measure ingredients.
In order to close the blender jug 5, place the measuring beaker 33 with the opening at the bottom into the lid 32 and lock it in place by turning it clockwise.
CAUTION:
Prior to removing the measuring beaker 33, you must reduce the speed to setting 1, 2 or 3, so that no food can be ejected.
- In order to fill in ingredients, the measuring beaker 33 can be removed briefly. To measure ingredients, turn the measuring beaker 33 upside down and fill in the food. The values can be read in ml from the outside.
10.7 Cooking and steaming with the cooking pot
- Fill at least 500 ml of water into the blender jug 5. Only fill so much water into the blender jug 5 that the maximum filling volume of 2.2 litres will not be exceeded when the food is added.
- If the entire food is covered by water, it will be cooked.
- If the food is not completely covered by water, it will be steamed.
- Fill food into the cooking pot 28.
NOTE: Always make sure that the filling level does not exceed the marking MAX.
- Place the cooking pot 28 into the blender jug 5.
- Close the blender jug 5 with the lid 32 and the measuring beaker 33.

- Use the main switch 6 to switch on the device.
- Use the timer ⏻ 24 to set the desired time.
- Use the temperature controller 15 to set the desired temperature, e.g. 100 °C for cooking.
The display 25 shows the time set and the selected temperature.
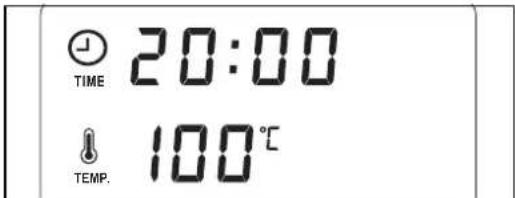
- Select the speed setting 1 for an even distribution of the heat in the water.
- Press the START/STOP button 17. The device starts to operate.
- After the set time has elapsed, a signal sounds and the illumination of the button goes off.
- Press the main switch 6 to switch off the device.
10.8 Using the spatula
The spatula 30 is used to stir the ingredients and to remove the cooking pot 28.
CAUTION:
The spatula 30 must not be used with the mixer attachment 29 in place. Otherwise, the spatula 30 might be caught in the mixer attachment 29. Do not use any other kitchen utensil to stir the ingredients. The utensil might get into the blades and cause damage.
- Always stir clockwise. The spatula 30 is designed such that when stirring clockwise it cannot come into contact with the blade assembly 27 even if that is running.

The hook on the rear of the spatula 30 can be used to remove the hot cooking pot 28 without having to touch it directly. Simply hook on the metal bracket of the cooking pot 28 and pull it out upwards.


11. Steaming

DANGER! Risk of injury through scalding!
- When opening the lid 1 or 32 during operation, hot steam may escape.
NOTE: these user instructions describe the basic functions such as mixing, chopping and steaming. For information on the preparation of special dishes, refer to the recipe book included in the delivery.
11.1 General programme information
- Preset time: 20 minutes (adjustable)
- Preset temperature: 120 °C (fixed)
- Speed: off, not selectable
- STEAMER 21 flashes, no countdown of the preset time takes place: The heat-up time of 10 minutes is running.
- STEAMER 21 lights up, countdown of preset time takes place: The steaming is started and in operation.
11.2 Preparation of the steamer inserts
- Place the blender jug 5 into the holder 9.
- Fill 1 litre of water into the blender jug 5. This corresponds with the second marking from the bottom (I).

- Check that the seal 4 of the deep steamer basket 3 has been placed correctly.
- Put the deep steamer basket 3 slightly twisted onto the blender jug 5.

- Turn the deep steamer basket 3 so that it locks clearly into place. The device can only be started when the steamer basket 3 is put on correctly.
NOTES:
- If the steamer basket 3 has not been put on correctly, the symbol shown here on the right will appear on the display 25.


- In order to facilitate the attaching of the steamer attachment 3 somewhat, put a few drops of oil on a cloth and rub it on the seal 4.
- Fill food into the steamer baskets 3 and (if required) 2.
NOTE: even if you only need the shallow steamer basket 2, always both steamer baskets 3 and 2 must be inserted, so that no steam can escape to the side.
- Place the filled steamer basket 2 on steamer basket 3.
- Close the steamer baskets with the lid for the steamer baskets 1.
11.3 Starting the steaming process
- Use the main switch 6 to switch on the device.
- Press the button STEAMER 21. The button STEAMER 21 lights up and the programme values are shown on the display 25.
- Press the button START/STOP 17. A heat-up time of 10 minutes is started. During this time
- there is no countdown of the time on the display 25;
- the button STEAMER 21 flashes;
- the timer 24 can be used to change the preset time.
- After 10 minutes elapsed, a short signal sounds. The button STEAMER 21 lights up.

120°C .....
NOTE: To start the program before the 10 minutes have elapsed, press the flashing STEAMER 21 button once.
- After the set time has elapsed, a short signal sounds, the START/STOP 17 and STEAMER 21 buttons go off, and the display 25 shows all values with 0 (except for the temperature).
- Press the main switch 6 to switch off the device.

DANGER! Risk of injury from scalding!
- When opening the lid 1 or 32 during operation, hot steam may escape.
- Remove the food from the steamer baskets 2/3.
11.4 Checking the doneness
You should ensure that the food is not cooked too long, since vegetables may become too soft and meat and fish too dry and tough.

DANGER! Risk of injury from scalding!
- When opening the lid 1 during operation, hot steam may escape.
To check the condition of the food being cooked from time to time, proceed as follows:
- Carefully open the lid for the steamer baskets 1. When opening the lid 1, make sure not to be hit by a surge of hot steam.
- Remove the lid 1 completely.


- Check the condition of the food being cooked with a longer stick or a fork:
- Once the food to be cooked is done, press button START/STOP 17 and then the main switch 6 to switch off the device.
- If the food to be cooked is not done yet, replace the lid 1 and let the device continue the operation.
11.5 Steaming with the cooking pot
NOTE: you can also use the cooking pot 28 when the Steaming function is selected. However, if you open the lid 32 to check the doneness, the settings will be lost. In order to continue the cooking process the settings must be entered again.
- Fill 500 ml of water into the blender jug 5.
- Fill food into the cooking pot 28.
- Place the cooking pot 28 into the blender jug 5.
- Close the blender jug 5 with the lid 32 and the measuring beaker 33.
- Use the main switch 6 to switch on the device.
- Start the program (see "Starting the steaming process" on page 57).
- When the programme comes to an end, open the lid 32 and remove the cooking pot 28 (see "Using the spatula" on page 55).
- Press the main switch 6, to switch off the device or move to the next step in the recipe.
11.6 Overheating protection
The device has an overheating protection system. As soon as there is no water left in the blender jug 5 thus causing the device to become too hot, the device will automatically switch off.
In this case, pull out the mains plug 7 and allow the device to cool.
You may then fill in water and put the device back into operation.
12. Tips on steaming
Steaming is one of the healthiest methods of cooking food. Not only nutrients and colour of the food are maintained to the largest extent possible but also the natural flavour and texture are the gourmet's delight. Thus, it is possible to use salt, fat and spices sparingly.
12.1 Using steamer inserts
As required, you can either use only the deep steamer basket 3 or both steamer baskets (2 and 3).
The shallow steamer basket 2 cannot be used without the deep steamer basket 3.
12.2 Preparing menus
If you prepare a whole menu and therefore use both steamer inserts on top of one another, please make sure that:
- Meat and fish should always be cooked in the bottom steamer basket 3, so that dripping juice will not come into contact with other food;
- The food with the most weight to be cooked should possibly be cooked in the bottom steamer basket 3.
13. Kneading
The appliance can be used to process up to max. 500 g of flour. The programme is only operated with the blade assembly 27.
13.1 General programme information
- Preset time: 1:30 minutes (adjustable)
- Maximum time: 3 minutes
- Preset temperature: 0 °C (fixed)
- Preset speed: 4 (fixed)
- Clockwise/anti-clockwise rotation: is controlled by the programme
- After the time set has elapsed, a short signal sounds, the buttons START/STOP 17 and KNEAD 22 go off, and the display 25 shows all values with 0 (except for the temperature).
- Press the main switch 6 to switch off the device or move to the next step in the recipe.
13.2 Starting the program
- Fill the dough quantity into the blender jug 5.
- Close the blender jug 5 with the lid 32.
- Use the main switch 6 to switch on the device.
- Press the button KNEAD 22. The button KNEAD 22 lights up and the programme values are shown on the display 25.
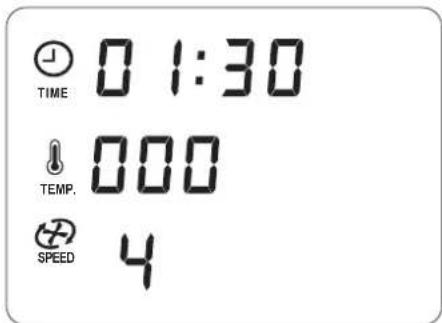
- Press the flashing button START/STOP 17.
The programme is started. The time set is counted down on the display 25. The button KNEAD 22 lights up. The programme controls the clockwise/anti-clockwise rotation automatically.
14. Browning
With this programme, you can slightly brown up to 200 g of meat, fish, or vegetables, e.g. to release roasting flavours. Large pieces must first be cut up into chunks.
14.1 General programme information
- Preset time: 7 minutes (adjustable)
- Maximum time: 14 minutes
- Preset temperature: 130 °C (adjustable)
- Preset speed: 1 (fixed)
- Clockwise/anti-clockwise rotation: is controlled by the programme
14.2 Starting the program
- Put some fat (e.g. oil) into the blender jug 5.
- Fill food into the blender jug 5.
- Close the blender jug 5 with the lid 32.
- Use the main switch 6 to switch on the device.
- Press the button ROAST 20. The button ROAST 20 lights up and the programme values are shown on the display 25.
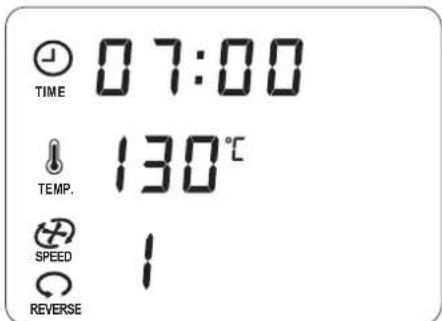
- Press the flashing button START/STOP 17.
The programme is started. The time set is counted down on the display 25. The button ROAST 20 lights up. The programme controls the anti-clockwise rotation automatically. At a fixed interval, the blade assembly 27 starts for a brief anti-clockwise rotation.
- After the time set elapsed, a short signal sounds, the buttons START/ STOP 17 and ROAST 20 go off and the display 25 shows all values with O (except for the temperature).
- Press the main switch 6, to switch off the device or move to the next step in the recipe.
15. Cleaning and servicing the device

DANGER! Risk of electric shock!
- Disconnect the mains plug 7 from the wall socket before any cleaning.
- Never immerse the base unit 12 in water.

DANGER! Risk of injury from cutting!
- Please remember that the blades of the blade assembly 27 are very sharp. Never touch the blades with your bare hands, to avoid cuts. Before removing the blade assembly 27, rinse the blender jug 5 with water and remove scraps of food from the blades so that the blade assembly 27 can be removed safely.
- When washing manually, the water should be sufficiently clear so that you can see the blade assembly 27 easily to avoid injuries caused by the very sharp blades.

CAUTION :
- Never use any abrasive, corrosive or scratching cleaning agents. These might damage the device.
NOTE:
- Certain food or spices (e.g. curry) may discolour plastic. This is not a defect with the device and harmless to health.
15.1 Cleaning the base unit
- Clean the outside of the base unit 12 with a damp cloth. You can also use some detergent.
- Use clear water and wipe with a clean cloth.
- Do not use the base unit 12 until it is completely dry again.
15.2 Cleaning in the dish-washer
The following parts are dishwasher-safe:
- Blender jug 5
- Measuring beaker 33
- Lid for blender jug 32
- Seal for the lid of the blender jug 31
- Blade assembly 27
- Seal for blade assembly 26
- Cooking pot 28
- Mixer attachment 29
Spatula 30
Steamer basket, deep 3
- Seal of the deep steamer basket 4
- Steamer basket, shallow 2
- Lid for the steamer baskets 1
Never use a dishwasher to clean the following parts:
Base unit 12
NOTE: before cleaning the blender jug 5 in the dishwasher, always remove the blade assembly 27.
15.3 Cleaning the accessories
- Rinse the blender jug 5 with warm water and dump the water.
- Remove the blade assembly 27 (see "Using and removing the blade assembly" on page 52) and take the seal 26 off (see "Cleaning, checking and replacing seals" on page 61).
- Clean all accessories by hand in a sink with dishwater or in the dishwasher.
- When cleaning by hand, rinse all parts with clean water.
- Allow the parts to dry completely before using them again.
- Before using the device again, reinsert the blade assembly 27.
15.4 Cleaning, checking and replacing seals
Remove seals 26, 31 and 4 for cleaning and check them for damage. Pay attention to changes (e.g. porous material or tears).
- The removed seals 26, 31 and 4 can be cleaned in the dishwasher.
- Damaged seals 26, 31 and 4 must be replaced with new ones. You can reorder new seals (see "How to order accessories" on page 65).
CAUTION:
Prior to the next use, damaged seals 26, 31 and 4 must be inserted again or replaced with new ones. An operation without seals 26, 31 and 4 in place is not permitted.
Blade assembly 27
- Remove the blade assembly 27 from the blender jug 5 (see "Using and removing the blade assembly" on page 52).
- Pull seal 26 off the blade assembly 27.


- Insert the cleaned seal or a new one.
- Before using the device again, reinsert the blade assembly 27.
Deep steamer basket 3
- Pull seal 4 off the underside of the deep steamer basket 3.
- Insert the cleaned seal 4 or a new one in the deep steamer basket 3. Ensure that the seal is in continuous contact with the surface without any waves.
Lid of the blender jug 32
- Pull seal 31 off the underside of the lid of the blender jug 32.
- Insert the cleaned seal 31 or a new one in the lid for the blender jug 32.

15.5 Descaling
When steaming with hard water, limescale may build up on the parts used, especially in the blender jug 5.
Normal cleaning
In most cases, the limescale deposits are removed by cleaning in the dishwasher or by hand.
Slight limescale deposits
- Remove slight limescale deposits, which cannot be removed with normal cleaning by hand or in the dishwasher, with a cloth on which you put some household vinegar.
- Rinse with clear water.
Major limescale deposits
CAUTION:
Do not use commercially available descaling agent, not even glacial acetic acid or vinegar essence. Use the following gentle method.
- Prepare a mixture of 50% white house-hold vinegar and 50% boiling water.
- Fill this mixture into the blender jug 5 or put other furred-up parts into a container with this mixture.
- Allow the mixture to react for 30 minutes.
NOTE: more extended reaction periods do not improve the limescale deposits but may damage the parts permanently.
- Rinse with clear water.
- Allow the parts to dry completely before using them again.
15.6 Storage
- Store the device protected against dust and dirt and out of the reach of children.
16. Malfunctions, Cause, Remedy
16.1 Malfunctions during operation
| Malfunction Cause | use Remedy | |
| Device does not start. | Blender jug 5 is not positioned correctly | Insert blender jug 5 correctly (see “Insert blender jug” on page 53). |
| Lid 32 or deep steamer basket 3 have not been placed correctly onto the blender jug 5. | Place lid 32 or deep steamer basket 3 correctly. | |
| No power supply | Check mains plug 7, main switch 6 and possibly the fuse. | |
| Liquid underneath the device | The blade assembly 27 has not been inserted correctly so that the blender jug 5 is leaking. | Insert blade assembly 27 correctly (see “Using and removing the blade assembly” on page 52). |
| Seal 26 for the blade assembly is defective. | Insert new seal 26 (see “Cleaning, checking and replacing seals” on page 61). | |
| Liquid escaped from the blender jug 5 flowing onto the surface through the overflow hole 10 of the base unit 12. (see “Overflow” on page 51) | When mixing liquids at speed 10 or with button TURBO 18, the blender jug 5 must not contain more than 1 litre, since otherwise liquid may be ejected. For speed settings of less than 10, the blender jug 5 may only be filled up to a maximum of 2.2 litres. | |
| Liquid escapes at the lid 32 of the blender jug 5 | Seal 31 has not been inserted correctly. | Insert seal 31 correctly (see “Cleaning, checking and replacing seals” on page 61). |
| Seal 31 is defective. | Insert new seal 31 (see “Cleaning, checking and replacing seals” on page 61). | |
| No temperature can be set. | A speed setting 4 - 10 was selected. | Select speed setting 0 - 3 (see “Setting the speed” on page 50) |
| Parts of the device are discoloured. | Certain food or spices (e.g. curry) may discolour plastic. This is not a defect with the device | Remedy unnecessary, since not harmful to health. |
| A speed setting exceeding 3 cannot be selected. | A temperature has been set. Set temperature to 0. | |
16.2 Error messages on the display
| Display Cause Remedy | ||
| E3 | The device is overloaded. Odour / smoke may develop. | |
 | Lid 32 or deep steamer basket 3 have not been placed correctly onto the blender jug 5. | |
| HHH | Temperature in the blender jug 5 is too high. There is not enough food or liquid in the blender jug 5 | |
| ---- The scale is overloaded. Remove some weight from the scale. | ||
17. Disposal
This product is subject to the provisions of European Directive 2012/19/EC. The symbol showing a wheelie bin crossed through indicates that the product requires separate collection.

Separate refuse collection in the European Union. This applies to the product and all accessories marked with this symbol. Products identified with this symbol may not be discarded with normal household waste, but must be taken to a collection point for recycling electric and electronic appliances. Recycling helps to reduce the consumption of raw materials and protect the environment.
When disposing of the packaging, make sure you comply with the environmental regulations applicable in your country.
When disposing of the packaging, make sure you comply with the environmental regulations applicable in your country.
On our website you can find information regarding the accessories that can be reordered.
On our website, you can find information about accessories that can be reordered.
shop.monsieur-cuisine.com
shop.monsieur-cuisine.com

18. Technical specifications
| Model: SKMK 1200 | B2 |
| Mains voltage: 230 V ~ 50/60 Hz | |
| Protection class: I | |
| Power rating: 1,200 | wattBlender: 800 wattCooking: 1,000 watt |
| Maximum filling volume of the blender jug 5: 2.2 litres | |
| Maximum weighing capacity of the scale 14: | 5 k |
Subject to technical modification.
CE
20. Warranty of HOYER Handel GmbH
Dear Customer,
Your device is provided with a 3-year warranty starting from the date of purchase. In the event of product defects, you are entitled to statutory rights against the vendor. These statutory rights are not restricted by our warranty presented below.
Warranty conditions
The warranty period starts with the date of purchase. Please keep the original purchase receipt in a safe place. This document is required to verify the purchase.
If within three years from the purchase date of this product a material or factory defect occurs, the product will be repaired or replaced by us – at our discretion – free of charge to you. This warranty implies that within the period of three years the defective device and the purchase receipt are presented, including a brief written description of the defect and the time it occurred.
If the defect is covered by our warranty, the repaired or a new product will be returned to you. No new warranty period starts with a repair or replacement of the product.
Warranty period and statutory claims for defects
The warranty period is not extended when the warranty has been claimed. This also applies to replaced and repaired parts. Any damages and defects already existing at the time of purchase must be reported immediately upon unpacking. Repairs arising after the expiration of the warranty period are subject to a charge.
Warranty coverage
The device was produced carefully according to strict quality guidelines and tested diligently prior to delivery.
The warranty applies to material or factory defects.
Excluded from the warranty are wear parts subject to normal wear and damages to fragile parts, e.g. switches, batteries, lamps or other parts manufactured from glass.
This warranty expires if the product is damaged, not used as intended or not serviced. For the proper operation of the product, all instructions listed in the operating instructions must be observed carefully. Any form of use and handling that is advised against in the operating instructions or warned against must always be avoided.
The product is only intended for private and not for commercial use. In the case of incorrect and improper treatment, use of force and interventions not performed by our authorised Service Centre, the warranty shall cease.
Handling in case of a warranty claim
In order to ensure prompt processing of your matter, please observe the following notes:
- Please keep the article number IAN: 288334 and the purchase receipt as a purchase verification for all inquiries.
- The article number can be found on the rating plate, an engraving, the title page of your instructions (in the bottom left), or as a label on the rear or underside of the device.
- If faulty operation or other defects occur, first contact the Service Centre listed in the following by telephone or email.
- Then, you are able to send a product reported as defective free of charge to the service address specified to you, including the purchase receipt and the information on the defect and when it occurred.

Please visit www.lidl-service.com to download this and many other manuals, product videos and software.

Service Centre
CY Service Cyprus
Tel.: 8009 4409
E-Mail: hoyer@lidl.com.cy
IAN: 288334

Supplier
Please note that the following address is not a service address. First contact the aforementioned Service Centre.
HOYER Handel GmbH
Tasköprüstraße 3
DE-22761 Hamburg
GERMANY
Contents
NOTES:





11. Steaming

15.5 Descaling
shop.monsieur-cuisine.com




- MONSIEUR CUISINE ÉDITION PLUS SKMK 1200 B
- MONSIEUR CUISINE ÉDITION PLUS
- INSTRUCTIONS
- DESALINATION
- BROWNING
- CLEANING AND SERVICING THE DEVICE
- MALFUNCTIONS, CAUSE, REMEDY
- DISPOSAL
- TECHNICAL SPECIFICATIONS
- HOW TO ORDER ACCESSORIES
- WARRANTY OF HOYER HANDEL GMBH
- OVERVIEW
- DISPLAY SCREENS
- THANK YOU FOR YOUR TRUST
- INTENDED PURPOSE
- FORESEEABLE MISUSE
- SYMBOL ON YOUR DEVICE
- SAFETY INSTRUCTIONS
- WARNINGS
- INSTRUCTIONS FOR SAFE OPERATION
- DANGER FOR CHILDREN
- DANGER TO AND FROM PETS AND LIVESTOCK
- DANGER! RISK OF ELECTRIC SHOCK DUE TO MOISTURE
- DANGER! RISK OF ELECTRIC SHOCK
- DANGER! RISK OF INJURY FROM CUTTING
- FIRE HAZARD
- DANGER! RISK OF INJURY THROUGH BURNING
- DANGER! RISK OF INJURY THROUGH SCALDING
- WARNING! RISK OF MATERIAL DAMAGE
- ITEMS SUPPLIED
- SCALE
- EASY WEIGHING
- WEIGHING WITH THE TARE FUNCTION
- OPERATING THE DEVICE
- POWER SUPPLY
- SWITCHING THE DEVICE ON AND OFF
- DISPLAY
- SETTING THE TIME
- SETTING THE TEMPERATURE
- SETTING THE SPEED
- CAUTION
- SOFT START
- ANTI-CLOCKWISE ROTATION
- TURBO FUNCTION
- NOTES
- OVERFLOW
- STARTING AND STOPPING THE DEVICE
- USING THE BLENDER JUG
- MARKINGS INSIDE THE BLENDER JUG
- NOTE
- USING AND REMOVING THE BLADE ASSEMBLY
- INSERT BLENDER JUG
- INSERT AND REMOVE THE MIXER ATTACHMENT
- PUT ON THE LID OF THE BLENDER JUG
- USE THE LID FOR THE FILLER OPENING
- COOKING AND STEAMING WITH THE COOKING POT
- USING THE SPATULA
- STEAMING
- GENERAL PROGRAMME INFORMATION
- PREPARATION OF THE STEAMER INSERTS
- STARTING THE STEAMING PROCESS
- DANGER! RISK OF INJURY FROM SCALDING
- CHECKING THE DONENESS
- STEAMING WITH THE COOKING POT
- OVERHEATING PROTECTION
- TIPS ON STEAMING
- USING STEAMER INSERTS
- PREPARING MENUS
- KNEADING
- STARTING THE PROGRAM
- CLEANING THE BASE UNIT
- CLEANING IN THE DISH-WASHER
- CLEANING THE ACCESSORIES
- CLEANING, CHECKING AND REPLACING SEALS
- BLADE ASSEMBLY
- DEEP STEAMER BASKET
- LID OF THE BLENDER JUG
- DESCALING
- NORMAL CLEANING
- SLIGHT LIMESCALE DEPOSITS
- MAJOR LIMESCALE DEPOSITS
- STORAGE
- MALFUNCTIONS DURING OPERATION
- WHEN DISPOSING OF THE PACKAGING, MAKE SURE YOU COMPLY WITH THE ENVIRONMENTAL REGULATIONS APPLICABLE IN YOUR COUNTRY
- ON OUR WEBSITE YOU CAN FIND INFORMATION REGARDING THE ACCESSORIES THAT CAN BE REORDERED
- SHOP.MONSIEUR-CUISINE.COM
- WARRANTY CONDITIONS
- WARRANTY PERIOD AND STATUTORY CLAIMS FOR DEFECTS
- WARRANTY COVERAGE
- HANDLING IN CASE OF A WARRANTY CLAIM
- SERVICE CENTRE
- SUPPLIER
- CONTENTS
Brand : SILVERCREST
Model : SKMK 1200 B2
Category : Food Processor