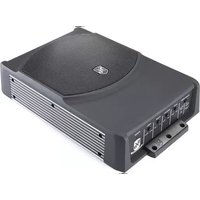
B-8PTD - Subwoofer Sound Ordnance - Free user manual and instructions
Find the device manual for free B-8PTD Sound Ordnance in PDF.


| Product Type | Powered Subwoofer |
| Driver Size | 8 inches |
| Amplifier Power (RMS) | 150 Watts |
| Amplifier Power (Peak) | 300 Watts |
| Frequency Response | 30 Hz – 200 Hz |
| Impedance | 4 Ohms |
| Enclosure Type | Ported (Bass Reflex) |
| Dimensions (W x H x D) | 12.5 x 12.5 x 13.5 inches |
| Weight | 18.5 lbs |
| Input Connections | RCA (L/R), Speaker Level Inputs |
| Output Connections | RCA (L/R) pass-through |
| Controls | Volume, Low-Pass Crossover (40-200 Hz), Phase (0/180°) |
| Protection Features | Thermal, Overload, Short Circuit Protection |
| Power Supply | 120V AC, 60 Hz (internal) |
| Power Consumption | 200W max |
| Fuse Rating | 2A, 250V |
| Cabinet Material | MDF with black vinyl finish |
| Grille | Removable cloth grille |
| Placement | Floor standing, front-firing |
| Recommended Room Size | Up to 200 sq. ft. |
| Auto Power On/Off | Yes (signal sensing) |
| Compliance | CE, RoHS |
| Warranty | 1 year limited |
Frequently Asked Questions - B-8PTD Sound Ordnance
User questions about B-8PTD Sound Ordnance
0 question about this device. Answer the ones you know or ask your own.
Ask a new question about this device
Download the instructions for your Subwoofer in PDF format for free! Find your manual B-8PTD - Sound Ordnance and take your electronic device back in hand. On this page are published all the documents necessary for the use of your device. B-8PTD by Sound Ordnance.
USER MANUAL B-8PTD Sound Ordnance
Thank you for purchasing Sound Ordnance
You're now ready to win the battle for great sound.

To ensure safe operation, always follow the instructions and guidelines in this manual.
Keep this manual handy for reference.
www.soundordnace.com
All rights reserved.
TABLE OF CONTENTS
Safety Instructions 3
Setup and Installation 4
Connections 5
Wiring 7
Controls and Setup 8
Troubleshooting 9
Operation 10
SAFETY INSTRUCTIONS

The product's warranty is rendered void in cases of damage resulting from failure to comply with safety and operating instructions. We do not accept any liability for consequential damages. We do not accept any liability for personal injury or damage to property caused by incorrect handling of the device or failure to observe the safety and operating instructions. In such cases the warranty is rendered void.
High volume levels can cause hearing damage or loss. Use care when setting the volume of your subwoofer. Obey any local noise laws or ordinances.
To prevent injury or damage to your powered subwoofer, please read and follow the instructions in the manual.
If you're not confident about installing your powered subwoofer, call us at 1-800-955-9094.
Disconnect the cable to your car battery's negative terminal before starting the installation.
- For safety reasons, do not attempt to modify the subwoofer.
- Only a 12V DC car supply system (negative ground) should be used. Never connect the subwoofer to any other voltage supply.
- Extra care should be taken when first turning on the amplifier after installation. Please follow the operating instructions carefully.
-
Keep water and other liquids away from the vicinity of the powered subwoofer. This could result in a fire or a fatal electrical shock. If liquids get into the subwoofer, immediately disconnect the power to the subwoofer.
-
Do not expose the subwoofer to high temperatures, strong vibrations or heavy loads.
- Do not leave packaging material unattended around childern.
- Observe the safety and operating instructions of this subwoofer and any other devices connected to the subwoofer.
- Disconnect the negative battery terminal to your car battery before beginning installation. Some vehicles may require a reset after this. Consult with your car dealer or mechanic.
SETUP AND INSTALLATION

To ensure proper operation, please read these instructions carefully before installing and using this powered subwoofer.
These installation instructions do not cover all possible installation issues. If you're not confident about installing your powered subwoofer, call us at 1-800-955-9094.
- Read and understand the instructions before attempting to install this powered subwoofer.
- Disconnect the negative terminal from the battery prior to starting the installation. Disconnecting the negative terminal on some vehicles may result in safety equipment becoming disabled. Consult with your car dealer or mechanic if you have any questions or concerns.
-
For the best possible sound, use high-quality connectors and wiring.
-
Exercise caution before doing any drilling or cutting in your car. Be careful of fuel lines, electrical wiring, vacuum lines, or fuel tanks in your vehicle.
- Never run power or speaker wires underneath your vehicle. Protect the wires by keeping them inside the vehicle.
6 Avoid running power or speaker wires over, near, or through sharp-edged surfaces. Use rubber grommets to protect wires running through openings in metal.
CONNECTIONS

Do not use both low and high level inputs at the same time - connect only one or the other.
Never run any wires underneath or outside the vehicle.
NOTE: Be sure to follow specific instructions included with your amplifier installation kit (not included with this powered subwoofer). The information below should be used a general guideline only.
Power Wire (BAT+)
- Disconnect the negative battery terminal before proceeding. Call 1-800-955-9094 for instructions if you are unsure.
- Plan wire routing before cutting any wires to length. Begin by routing the power BAT+ wire from the battery to the subwoofer location. Use a grommet when running wires through the firewall or metal openings. Avoid running the power wire near existing vehicle wiring to prevent induced noise from entering the audio system.
• Exercise caution when drilling holes to avoid damaging fuel lines or existing vehicle wiring. - The BAT+ wire MUST be fused within 18" of the battery for protection of the vehicle's electrical system.
Ground Wire (GND)
- The subwoofer's ground wire should be as short as possible. Choose a
clean unpainted section of metal or the vehicle chassis when attaching the ground connection. Be sure to clean the area of any dirt or grease.
Remote Turn-on Wire (REM)
- The remote turn-on wire connects to the head unit's amplifier turn-on lead or other switched 12-volt source.
Input Signal
- The subwoofer's input signal connects to the head unit's low level (RCA) or high level (speaker wire) outputs.
• Dedicated subwoofer or low level inputs signal deliver the best performance. If unavailable, use the high level inputs - when interfacing with factory head unit for instance. Be sure to observe the correct polarity when using the high level inputs.
B-8P Connections and Controls
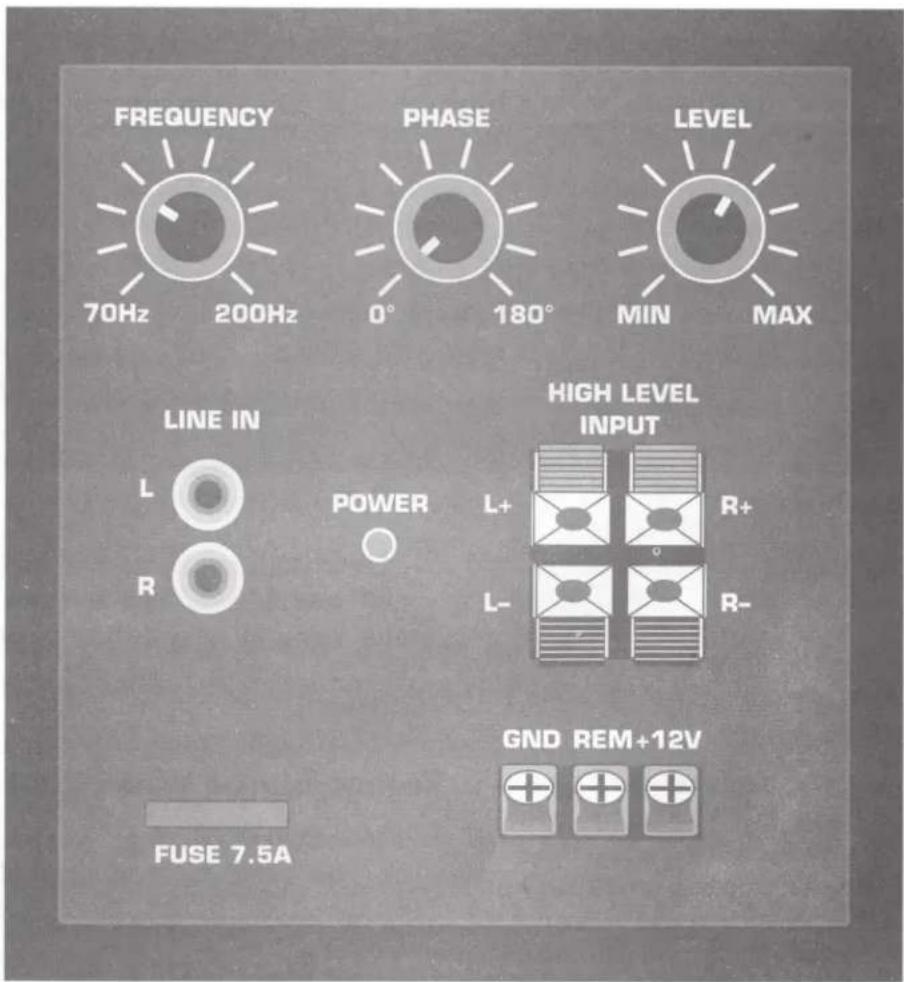
B-8PTD Connections

WIRING
B-8P / B-8PTD

GND (ground)

CONTROLS AND SETUP
| POWER MODE(AUTO MODE) | Set the switch to AUTO MODE is your system setup doesn't have a remote wire, as with stock head units. The subwoofer will turn on automatically when it detects an incoming signal. |
| POWER MODE(REMOTE WIRE) | Set the switch to REMOTE WIRE is you have attached a remote turn-on lead to the subwoofer. |
| LEVEL | The LEVEL control (gain) is used to obtain the best possible match between the head unit audio output and the amplifier input. Begin by turning the input level control fully counterclockwise. Next, turn up the head unit volume control around 3/4 of the way up. Adjust the input level control clockwise until audible distortion is heard, then slightly counterclockwise to provide the best match. |
| BASS EQ | The BASS EQ lets you boost or attenuate the bass level to match your listening preference. Set the Bass EQ at 0dB to start, and increase the level for stronger bass. |
| PHASE | The PHASE control compensates for delay between the subwoofer's output and the rest of the sound system. Begin with the phase control set to 0 degrees. If the sound is adequate from the normal listening position inside the vehicle, no further adjustment is necessary. If the sound is thin or lacking bass, adjust the phase control until the bass is full and punchy. |
| FREQ | The FREQ is an adjustable crossover will filter out frequencies the frequency it's set for. Adjust it to where the sub's sound output blends with the rest of the sound system. |
| POWER | The POWER LED indicator illuminates red during normal operation. |
TROUBLESHOOTING
| PROBLEM | CAUSE | ACTION |
| Unit will not turn on (no power LED indicator) | BAT+ wire not connected or incorrect voltage REM wire not connected or incorrect voltageGND wire not connectedFuse(s) blown | Check connections for proper voltage (11~16VDC)Check connection to groundReplace fuse(s) |
| Unit will not turn on (no power LED indicator) | Volume turned all the way downSpeaker defective or damagedInput signal not connected | Increase volume level at head unitCheck/replace speakerCheck high or low level inputs for proper connection |
| Unit blows fuse(s) | Incorrect fuse ratingBAT+ wire touching chassis groundSubwoofer defective or damaged | Use fuse(s) with correct ratingCheck for pinched wireCheck/replace subwoofer |
| Engine noise | Bad ground connectionSignal ground loop or RFI (radio frequency interference) | Make sure subwoofer is grounded to clean bare metalRe-route RCA cables from existing high current wiring |
| Distorted audio output | Incorrect input signal type or input level too high | Check connections and reduce/adjust input level |
| Low audio output | Incorrect input signal type or input level too low | Check connections and increase or adjust input level |
| Weak bass | Low frequency output is out of phase | Adjust phase control as needed |
SPECIFICATIONS
| B-8P | B-8PTD | |
| Maximum Output Power | 160 W | 250 W |
| Continuous Output Power | 80 W | 125 W |
| Frequency Response | 20-200Hz | 40-200Hz W |
| Crossover Frequency | 70-200Hz | 80-200Hz |
| Crossover Slope | 6dB/octabe | 18dB/octave |
| Phase | 0-180 degrees | 0-180 degrees |
| Fuse | 1 x 7.5 amp | 1 x 15 amp |
| Dimensions (mm) | 390 x 234 x 390 | 230 x 80 x 340 |

SOUND ORDNANCE

To ensure safe operation, always follow the instructions and guidelines in this manual.
Keep this manual handy for reference.
www.soundordnance.com
All rights reserved.
MOUNTING FEET (B8PTD ONLY)


Virtual Gateways LLC™ Limited Warranty (Valid Only in the U.S.A. and Canada)
Virtual Gateways LLC (“Virtual”) warrants this Product (expressly excluding any accessories) against defects in material or workmanship as follows:
Terms of warranty coverage: This warranty covers the product during the warranty period so long as the product is owned by the same individual whose name appears on the invoice received upon purchase of the product. Product must be purchased from an authorized dealer or this Warranty will not be honored. Transferring possession of the product to a subsequent owner will void this warranty. In the event service is required the product must be delivered within the warranty period, transportation prepaid by you to Virtual Gateways LLC, 1 Crutchfield Park, Charlottesville, VA 22911. Prior to returning the product you must first obtain a return authorization number from Virtual by calling 1-800-955-9094. You will need to carefully package the product using adequate packing material to prevent damage in transit and include in the package your Return Authorization Number, name, address, telephone number where you can be reached during business hours, a copy of your dated sales receipt, and a detailed description of the problem. You are responsible for removal and installation of the product. Proof of purchase in the form of a bill of sale which is evidence that the product is within the warranty period MUST be presented to obtain warranty service. Virtual will pay the cost of returning the repaired or replacement product to you within the United States of America or Canada within 8 to 12 weeks from the time of receipt of a product which is determined to be covered under this warranty by Virtual. Any removal or defacement of the unit's serial number will void this warranty.
Warranty Period: For a period of 3 years for parts and 3 year for labor from date of the original purchase from an authorized dealer, if this Product is determined by Virtual to be defective Virtual will repair or replace the Product with a new, rebuilt or refurbished unit of comparable value, at Virtual's sole option, without charge to you for parts or actual repair work. Parts and/or replacement units supplied under this warranty may be new, rebuilt or refurbished at the option of Virtual.
What's Not Covered: This warranty does not cover any product used in any trade, business, industrial or commercial application; customer instruction, installation, set up adjustments, signal reception problems, cabinet, cosmetic or appearance items, any damage to recordings, or recordings of tapes or discs, any damage to product resulting from alterations, modifications, accident, misuse, negligence or abuse, damage due to lightning or power surges; subsequent damage from leaking, damaged or inoperative batteries or the use of batteries different from those specified in the owner instructions; speakers subjected to power in excess of published power rating; damage due to improper operation or maintenance, connection to improper voltage supply; attempted repair by anyone other than Virtual; damage from improper maintenance; damage incurred in transit; damage or defects caused by the use of unauthorized parts or labor. This warranty does not cover consumables, (fuses, batteries, etc.).
This warranty does not cover the cost of parts and labor which would be otherwise provided without charge under this warranty, obtained from any source other than Virtual.
This warranty is invalid if the factory applied serial number has been modified, altered or removed from the Product.
This warranty is only valid in the United States of America and Canada.
Your Rights: REPAIR OR REPLACEMENT AS PROVIDED UNDER THIS WARRANTY IS THE EXCLUSIVE REMEDY OF THE CONSUMER. VIRTUAL SHALL NOT BE LIABLE FOR ANY INCIDENTAL OR CONSEQUENTIAL DAMAGES FOR BREACH OF ANY EXPRESS OR IMPLIED WARRANTY ON THIS PRODUCT. EXCEPT TO THE EXTENT PROHIBITED BY APPLICABLE LAW, ANY IMPLIED WARRANTY OF MERCHANTABILITY OR FITNESS FOR A PARTICULAR PURPOSE ON THIS PRODUCT IS LIMITED IN DURATION TO THE DURATION OF THIS WARRANTY. Some states or provinces do not allow limitations on how long an implied warranty lasts, and some states or provinces do not allow the exclusion or limitation of incidental or consequential damages. The above limitations or exclusions may not apply to you. This warranty gives you specific legal rights, and you may have other rights which vary from state to state or province.
Brand : Sound Ordnance
Model : B-8PTD
Category : Subwoofer