
BigTel 50 Alarm Plus - Telephone Amplicomms - Free user manual and instructions
Find the device manual for free BigTel 50 Alarm Plus Amplicomms in PDF.


| Product Type | Amplified Alarm Telephone |
| Brand | Amplicomms |
| Model | BigTel 50 Alarm Plus |
| Dimensions | Approximately 230 x 200 x 100 mm |
| Weight | Approximately 800 g |
| Power Supply | AC adapter (included) |
| Amplification | Up to 40 dB gain |
| Ringer Volume | Adjustable up to 90 dB |
| Keypad | Large, raised keys with tactile feedback |
| Display | Backlit LCD with large digits |
| Alarm Functions | Visual and audible alarm with strobe light |
| Visual Call Indicator | Flashing light for incoming calls |
| Hearing Aid Compatibility | Yes (M3/T4 rating) |
| Handset | Extra sturdy with coiled cord |
| Wall Mountable | Yes |
| Memory | 10 speed dial memories |
| Redial | Last number redial |
| Pause Function | Yes |
| Maintenance | Clean with a soft, damp cloth; do not use solvents |
| Spare Parts Availability | Contact Amplicomms for spare parts |
Frequently Asked Questions - BigTel 50 Alarm Plus Amplicomms
User questions about BigTel 50 Alarm Plus Amplicomms
0 question about this device. Answer the ones you know or ask your own.
Ask a new question about this device
Download the instructions for your Telephone in PDF format for free! Find your manual BigTel 50 Alarm Plus - Amplicomms and take your electronic device back in hand. On this page are published all the documents necessary for the use of your device. BigTel 50 Alarm Plus by Amplicomms.
USER MANUAL BigTel 50 Alarm Plus Amplicomms

Teléfono
Acertar a data e as horas 34
Definir a língua 35
Definir a melodia 35
Acertar a data e as horas
- Prima . (MENU)
Skærmikoner

Erstat
batterierne.
Visning af tiden.
Visning af dato.
INNEHÅLLSFÖRTECKNING
Komma igång 81
* Values may vary according to environment.
- Call back button
- One-touch dialling button M1
- Delete
- One-touch dialling button M2
- Scroll upwards
- SOS Button (emergency call button)
- Scroll downwards
- LED: New call indication
- Menu button
- Calls list (CLIP) / Phone book
- R button
- Microphone muting button
- Redial button
- LED, handsfree mode
- Handsfree mode button
- LED, telephone is ringing
- Receiver +40 dB boost button
- Volume boost on LED
- Control knob, receiver volume (located under handset)
- "Ringing volume" slide control
- "Tone" slide control
- "Handsfree volume" slide control
Alarm bracelet
- Start automatic emergency call
- LED, battery level indicator
CONTENTS
Getting started 105
Check box contents....105
Connecting the telephone 105
Wall mounting 106
Setting date and time....108
Setting the language 108
Setting the melody 108
Making and receiving calls 109
Dialling a telephone number 109
Ending a call 109
Taking a call 109
Activating/deactivating handsfree mode 109
Boost the handset earpiece volume 109
Setting the handset receiver volume 110
Ringer volume 110
Setting the handset receiver tone 110
Setting the handsfree volume 110
Muting the microphone 110
Dialling a telephone number using the redial function ..... 110
Calling back missed calls 110
Dialling a telephone number from the phone book ..... 111
One-touch dialling 111
Chain dialling 111
Phone settings 112
Phone book 112
Entering a name 112
Recording phone book entries /Direct memories (M1,M2) ..... 112
Editing entries in the phone book 113
Record names to phonebook entries. 113
Deleting recordings....113
Deleting a single entry from the phone book . . . . . . . . . . . . . . . . . . . . 114
Delete all entries from the phone book ..... 114
Call list 114
Displaying phone numbers in the calls list. 114
Storing numbers from the calls list in the phone book . . . . . . . . . . . 114
Deleting phone numbers individually ..... 115
Deleting all entries 115
Alarm bracelet 115
Outgoing alert message 115
Recording an outgoing alert message 116
Playing the outgoing alert message 116
Deleting the outgoing alert message 116
Storing emergency call 116
Automatic emergency calls 116
STARTING/CANCELLING the emergency call .... 116
Testing the Alarm bracelet battery....117
Replacing the battery....117
Alarm bracelet Registration/De-Registration 118
Settings 119
Special use 120
Appendix 120
Help and support / Troubleshooting guide ..... 122
Guarantee 123
Declaration of conformity 124
Technical Specifications 124
Getting started
Important: please make sure you've read the safety information on page 120 before you set up your phone system.
Important: Your phone can produce very high sound when Boost is switched on. Please take care if the handset is used by others.
Check box contents
You should have:
• 1 corded phone base
• 1 power adapter plug
- 1 handset
• 1 coiled cord for handset
• 1 Alarm bracelet, (splash-proof)
• 1 telephone line connector cable
• 4 Batteries, AA 1.5 V
• 1 wall-mounting bracket
- 1 user guide
• 1 Battery type CL2025 3V already installed in the emergency call unit
Important:
- Use only the power adapter supplied with your telephone.
- Use only the telephone cable supplied with your telephone otherwise your phone may not work.
Connecting the telephone
For using all features e. g. Hands-Free and Amplification it is essential that the telephone is powered by the power supply and the batteries.
- Insert the batteries in the open battery compartment.
Only use 4 batteries of the type AA 1.5 V. Pay attention to the correct polarity. Close the battery compartment cover.

Pay attention that the telephone is not connected to the telephone line socket and/or mains power connection when the batteries are being inserted or replaced.
- Connect the telephone as illustrated in the diagram. Only use the telephone cable supplied because the equipment may not function if another telephone cable is used.
![graph TD A["Mains power wall socket"] --> B["Device with plug"] B --> C["Device with plug"] C --> D["Device with plug"] D --> E["Telephone wall socket"] E --> F["Device with plug"] style A fill:#f9f,stroke:#333 style B fill:#ccf,stroke:#333 style C fill:#cfc,stroke:#333 style D fill:#fcc,stroke:#333…](/content/2026/06/1332973/images/1685781b9bce8322beba551d53c858e0539afdabe4ffd72ffb15648b6cf2d8c8.jpg)
Wall mounting
The telephone can also be installed on a wall. You require two screws in order to fix the telephone on a wall.
Feed the guide tabs (1) on the wall-mounting bracket (2) in the slots (3) on the rear side of the telephone. Slide the wall bracket (2) 10 mm upwards until it audibly snaps into place.
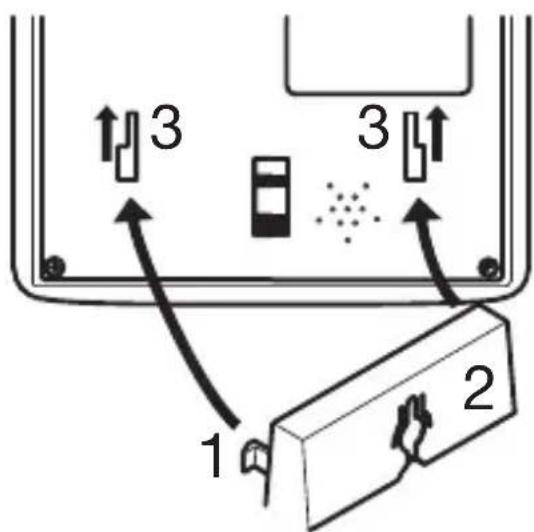
Warning: Ensure that there are no cables or pipes etc. under the surface of the wall where you want to drill the holes.
Drill two holes whose distance apart corresponds to the bracket to be used, insert the screws and allow them to project 5 mm from the wall. Position the telephone on the bracket, fit the screws in the slots and slide the telephone downwards a little.
Turn the receiver hook (4) in the receiver cradle 180° so that the receiver can be hooked in.
![graph TD A["Step 4"] --> B["Step 4"] B --> C["Step 4"] C --> D["Step 4"] D --> E["Step 4"] E --> F["Step 4"] F --> G["Step 4"] G --> H["Step 4"] H --> I["Step 4"] I --> J["Step 4"] J --> K["Step 4"] K --> L["Step 4"] L --> M["Step 4"] M --> N["Step 4"] N --> O["Step 4"] O --> P["Step 4"] P --> Q["St…](/content/2026/06/1332973/images/ed992a89d358066039f09cc0b9f41f14aaa72e5af1bab5cddc17e975459c5fcb.jpg)
Display icons
Replace the batteries.
Display of the time.
Display of the date.
The phone book is open.
The callist is open.
The NEW in the calls list is new.
IndREPEATrepeat call.
CALLS Position number in the call list.
There are XX entries in the call list.
There are XX new entries in the call list.
Flashing: Recording mode is active
(see pages 113).
On: A name has been recorded for this phone book entry.
Emergency call number has been dialed
(see page 112, 115, 116, 117)
Setting date and time
- Press . ⓂMENU
- Select TIME/DATE using / and press OK.
- Adjust the hours using / and press OK
- Adjust the minutes using / and press . OK
- Adjust the month using / and press . OK
- Adjust the day using / and press . OK
- Press to exit the menu.
Setting the language
- Press . ⓂMENU
- Select LANGUAGE using / and press.
- Select a language using / and press.
- Press to exit the menu.

Setting the melody
- Press . MENU
- Select RINGER MELODY.
- Press . OK
- Press / to select one melody.
- Press to confirm.
For more settings please refer to the chapter "Settings" on page 112. 108
Making and receiving calls
Dialling a telephone number
To start a call you have the following options:
- lift the handset and enter the phone number. - enter the phone number and lift the handset.
or alternatively
- enter the phone number and press OK. Handsfree mode will be activated and the phone number will be dialled (for handsfree mode power supply/batteries necessary).
- During a call you can see the call time on the display.
Ending a call
For ending a call you can:
- replace the handset.
or alternatively
- press if the call was made in handsfree mode, the red LED within the handsfree button is on.
Taking a call
Lift the handset or press

Activating/deactivating handsfree mode
During a call you are making using the handset you can switch to handsfree mode to switch on the loudspeaker (power supply/batteries necessary).
Press and then replace the handset.
If you want to continue the call using the handset simply lift the handset.
Please note:
- During handsfree mode your speech is transmitted via the microphone on the base. Speak at a distance of not more than 0.5 meters facing the front of the unit.
- High background noise levels can prevent satisfactory operation.
Boost the handset earpiece volume
You can boost the handset earpiece volume to +40 dB (power supply/batteries necessary). Press 📋The "On" LED is on.
Caution: This telephone is capable of producing very high volume levels when the amplifier is switched on and the volume control is set to maximum.
Extreme caution should be taken if the handset is to be shared between users with normal hearing and those with hearing impairment.
Setting the handset receiver volume
You can adjust the handset receiver volume using the control (19) / (refer to page 2).
Ringer volume
You can adjust the ringer volume using the control (20) (refer to page 2).
Setting the handset receiver tone
You can adjust the handset receiver tone using the control (21) if the Boost function is on (refer to page 2).
Setting the handsfree volume
You can adjust the handsfree volume using the control (22) (refer to page 2).
Muting the microphone
The microphone in the handset can be activated and deactivated during a telephone conversation.
Press and hold ⚡Switch the microphone off (muting)
Release 📄 Switch the microphone on
Dialling a telephone number using the redial function
Your telephone stores the last phone number dialled.
- Lift the handset or press and then press.

Calling back missed calls
The telephone stores the numbers of missed calls in a calls list. For further information please refer to the chapter „Calls list“ on page 114.
- Lift the handset or press, then select the desired entry
using

and




- Select the desired entry using and press. OK The loudspeaker will be switched on. If you want to proceed the call using the handset, just lift it up. The loudspeaker will be switched off.
Dialling a telephone number from the phone book
For how to create and store phonebook entries please refer to the chapter "Phone book" on page 112.
- Lift the handset or press
- Press , phone book icon display on LCD select the desired entry using and and press . OK

or
- Press , phone book icon display on LCD before select the desired entry using and and press . The OK
loudspeaker will be switched on. If you want to proceed the call using the handset, just lift it up. The loudspeaker will be switched off.
One-touch dialling
The one-touch dialling buttons M1 or M2 can be used for normal quick dial numbers. For how to store one-touch numbers please refer to the chapter Recording Phonebook entries/Direct memories (M1,M2) page 112 and 113.
- Lift the handset or press .
- Press briefly the one-touch memory button or
- Press briefly the one-touch memory button
- Lift the handset or press .





Note: The telephone numbers assigned to the one-touch dialling buttons can not be deleted. When storing new numbers, the existing entries are overwritten.
Chain dialling
The function is used in more complex telephone services, e.g. for telephone banking, call-by-call or calling card procedures. Several numbers stored in the phone book can be dialled successively when a connection has already been made. It is also possible to combine numbers for transfer from the phone book with numbers entered manually. Numbers stored in the phone book can be chained and transmitted as required.
- Whilst in a call press, select the desired entry using and and press. OK

Phone settings
Phone book
30 phone numbers can be stored in the phone book together with the associated names.
• Always enter the area access code with the phone numbers so that the telephone can also assign incoming local calls to a phone book entry.
- When the memory capacity of the phone book is used up, the message MEMORY FULL appears when an attempt is made to store another number. To create space, an existing entry must first be deleted.
- The phone book entries are arranged alphabetically. To skip to the required phone book entry directly, enter the first letter of the corresponding entry.
Entering a name
The digit keys are also labelled with letters for the entry of the respective letters. Pressing the respective key the necessary number of times enables capital letters and digits to be entered.
Enter a space by pressing .1
Delete a character by pressing . C
To enter the same letter twice, press the button to enter the letter. Wait until the cursor skips one place forward. Enter the letter again.
Recording phone book entries /Direct memories (M1,M2)
Register phone book:
- Press
- Select STORE NUMBER using ▲ and ▼ and press OK.
- Enter the telephone number and press
- Enter the name and press . OK
- If you want to make the stored number be one of emergency call number, select "ALARM NUMBER" using and and press . Select emergency call dial out priority location using and and press . OK



Register direct memories (M1, M2):
- Repeat steps 1. 2. 3. above.
- Enter the name and press either M1 or M2.
- Continue step 5.
Editing entries in the phone book
- Press and select an entry using and
- Press and hold for approx. 3 s and confirm EDIT? by pressing .OK
- Enter the new telephone number if necessary and confirm with OK.
- Enter the new name if necessary and confirm with . OK


Record names to phonebook entries
A spoken name can be recorded for each phone number stored in the phone book. When you subsequently select an entry in the phone book, the recording you made for it is played and you can hear the entry you have selected.
- Press . ⓂMENU
- Select NAME RECORDING using and and press OK
- Then select an entry using and
- Press and hold 3 seconds to start recording and release OK for ending.
Note: If the key is not released, recording is automatically stopped after 3 seconds.
- Press to exit the menu.
Deleting recordings
- Press . MENU
- Select NAME RECORDING using and press OK
- Then select an entry using and
- Press during playback to delete the recording.
Deleting a single entry from the phone book
- Press and Select an entry using and
- Press . The display shows DELETE?
- Press and hold again. Entry is deleted.
- To abort the deleting procedure press .



Delete all entries from the phone book
- Press and select an entry using and
- Press and hold for approx. 4 s. The display shows DELETE ALL?.
- Press again
• To abort the deleting procedure press .



Call list
Note: The caller number display function, essential for the call list, is a supplementary service offered by telephone network providers. Contact your network provider for further information.
If this function is available with your telephone line, the number of the caller and the name, if an entry in the telephone book exists, appears in the display or is spoken when the phone rings. If the caller has suppressed transmission of his phone number or it is otherwise unavailable, a corresponding message appears in the display. The phone number is not displayed and, as a result, is not stored in the call list.
The idle display shows, how many entries are in the call list and how many of them are NEW (not yet seen). A total of 64 call numbers can be stored in the calls list. The flashing red LED indicates new calls in the calls list. This LED will ash as long as there are still new (not read) calls in the calls list. To stop lashing press repeatedly.
Displaying phone numbers in the calls list
- Select an entry using


Storing numbers from the calls list in the phone book
- Select an entry using
- Press and hold for approx. 3 seconds and confirm SAVE NUMBER with .OK


- The phone number is stored in the phone book without a name being assigned. Then enter a name for the phone number (see “Editing entries in the phonebook”).
Note: When the number in the phone book is stored together with a name, the name entered also appears in the calls list.
Deleting phone numbers individually
- Select an entry using
- Press . The display shows DELETE?
- Press again. The entry is deleted.


Deleting all entries
- Select an entry using
- Press and hold for approx. 4 s.
The display shows DELETE ALL? - Press and hold for approx. 4 s. again.


Note: Before deleting the phone numbers, check that the entries have been viewed.
Alarm bracelet
The emergency call unit can be used to dial an emergency services exchange or persons for assistance.
Outgoing alert message
There is a default outgoing alert message recorded on the telephone. You can replace this message with one of your own. After activating an automatic emergency call, the phone book numbers assigned ALARM NUMBER are called automatically. The alert message is played repeatedly until your emergency call is acknowledged by the person receiving it through pressing the “0” key. For this reason, you must end your own alert message clearly telling the receiving party to “...take this emergency call by pressing the 0 key!”.
Note: When recording your message, make sure that the person called recognize your name in the emergency call. Inform them clearly that this is an emergency call and that you need help.
Recording an outgoing alert message
- Press . ⓂMENU
- Select RECORD MESSAGE using / and press OK.
- Press and hold down when you speak your message.
- Release to end recording.
Playing the outgoing alert message
- Press . MENU
- Select CHECK MESSAGE using ▲/ ▼ and press OK.
Deleting the outgoing alert message
- Press . MENU
- Select CHECK MESSAGE using / and press OK.
- Press during playback. The message will be deleted.
Storing emergency call
Store emergency number into phone book, please refer to “Recording Phone book entries” (Page 112 and 113) and ensure “ALARM NUMBER” is selected.
Automatic emergency calls
The automatic emergency call can be initiated by pressing and hold (2 seconds) the buttons on the telephone or the button on the emergency call unit.
If no phone number has been assigned to no phone number is dialled but a loud warning signal is issued from the telephone.
Note: Pay attention that the alarm bracelet is within range of the telephone.
The battery in the Alarm bracelet should always be full.
STARTING/CANCELLING the emergency call
The following procedure will start the emergency call
-
Press or SOS button (1) on the bracelet during standby of BT50 for 2 seconds to activate the emergency call.
-
After the emergency call is activated, the BT50 will emit "BEEP" sound for 15 seconds.
- After the "BEEP" sound, the BT50 will dial out preset number under the PHONEBOOK - ALARM NUMBER based on the priority order with the interval of approx. 60 seconds, if not success.
- The person who answers the call will hear the alert message. The person who takes the call can stop the outgoing message by pressing "0" which will put the BT50 into Handsfree mode to start conversation.
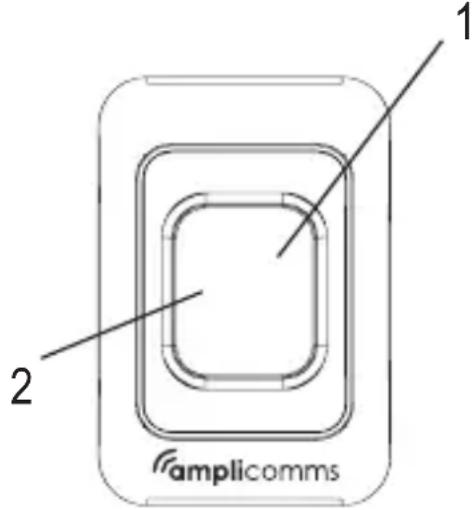
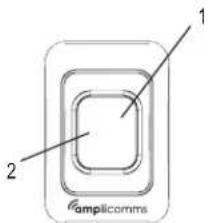
Note: To STOP an emergency call, press the SOS Key/Alarm bracelet (1) button for 4 seconds.
Testing the Alarm bracelet battery
- Press and hold the button (1) on the emergency call unit briefly. The LED (2) lights up.
- If the LED (2) no longer lights up when the button is pressed and held, replace the battery.
Replacing the battery
- Remove the screw on the rear side of the emergency call unit using a small, crosstip screwdriver.
- Insert the tip of a small screwdriver in the notch and open the housing.
- Replace the battery. Only use batteries of the same type. Pay attention to correct polarity.
- Close the housing.

Alarm bracelet Registration/De-Registration
Up to 5 identical alarm bracelets can be paired.
The following procedure to Register an ALARM BRACELET to BT50.
- Press then until display ALARM BRACELET .
- Press , will display PAIRING then press again and will display PAIRING ..... Now the BT50 is ready to register a New Pendant.
- Press the key on SOS bracelet to complete the registration process, if registration is successful the BT50 will display PAIRED, then press
The following procedure to De-Register all alarm bracelets from BT50. It is not possible to delete a single bracelet.
- Press then until display ALARM BRACELET.
Press then until DELETE? or DELETE ALL? if more
than one bracelet is paired.
- Press and all the registered will be removed from BT50
Note: After DELETE, the BT50 will longer have any registered bracelet, user MUST perform registration procedure to register bracelet AGAIN.
Settings
You can perform various settings on your phone.
- Press to open the menu.
- Scroll using and to the desired entry and press to open the relevant sub-menu.

PAIRING Adding new Pendant device to BT50 FLASH In most situations the flash time of 100 ms should be selected. In some cases, e. g. when connecting the phone to a PABX, it may be necessary to switch to 300 ms. For further information please refer to the user guide of the PABX.
VOICE When a button is pressed, a voice accompagnies the action. This voice can be activated and deactivated, as required.
LANGUAGE see page 108. The outgoing messages and display texts on the telephone are available in 4 languages.
CHECK MESSAGE see page 116. RECORD MESSAGE see page 116. NAME RECORDING see page 113.
STORE NUMBER see page 112.
- Press to exit the menu.
Special use
Use on a private branch exchange
If your phone's on an exchange (e.g. you need to dial 9 to get an outside line), you can transfer calls and use call back by using the button.
You'll need to check your private exchange manual to find out which timing to use for your exchange.
Insert a dialling pause
If you have to dial a number for an outside line and it takes a while to connect, you can insert a pause so you don't have to wait to hear the dialling tone.
To insert a dialling pause, simply enter the number you usually dial for an outside line and then press 📄
Using additional services
Your phone should be able to support services such as call waiting and conference calls. You'll need to check with your telephone network provider for further information on these services.
Appendix
Safety notes
Please make sure you read this user guide carefully and keep it for further use.
Intended use
The telephone is suitable for telephoning within a analogue public telephone network system. Any other use is considered unintended use. Unauthorised modification or reconstruction is not permitted. Under no circumstances open the device or attempt any repair work yourself.
Installation location
Make sure your phone:
- is on a dry, flat and stable surface or mounted to a wall.
- isn't a trip hazard with its cables.
- isn't exposed to smoke, dust, vibration, chemicals, moisture, heat and direct sunlight.
- is at least one metre from other electrical appliances to avoid mutual interference.
Make sure that the access to the power adapter plug is not obstructed by furniture or such.
Power supply
Caution: Only use the power adapter plug supplied because other power supplies could damage the telephone. Ensure access to the power adapter plug is not obstructed by furniture or such.
The included mains adapter meets the eco-design requirements of the European Union (Directive 2005/32/EG). Thus, its power consumption is considerably lower, both in operated as well as in non-operated mode, compared with the mains adapter of previous design.
Hearing aid compatibility
Your phone works with most popular hearing aids. However, given the wide range of hearing aids available, we can't guarantee that your phone will function fully with every hearing aid.
Important: Your phone can produce very high sound when Boost is switched on. Please take care if the handset is used by others.

WARNING - KEEP BUTTON BATTERIES OUT OF REACH OF CHILDREN
- Swallowing button battery may lead to serious or fatal injury in as little as 2 hours, due to chemical burns and potential perforation of the oesophagus.
- Never allow children to replace button batteries of any device.
- If you suspect your child has swallowed or inserted a button battery immediately call the 24-hour Poisons Information Centre.
- Regularly examine devices and make sure the battery compartment is correctly secured, e.g. that the screw or other mechanical fastener is tightened. Do not use if compartment is not secure.
- Dispose of used button batteries immediately and safely out of the reach of children. A battery can still be dangerous even when it can no longer operate the device.
- Tell others about the risk associated with button batteries and how to keep their children safe.
Disposal
You are obliged to dispose of consumable goods properly in accordance with the applicable legal regulations.
The symbol on this product indicates that electrical and electronic apparatus and batteries must be disposed of separately from domestic waste at suitable collection points provided by the public waste authorities. Batteries can also often be disposed of at the point of sale.

Packaging materials must be disposed of according to local regulations.

Help and support / Troubleshooting guide
Helpline
Should problems arise with the telephone, please refer to the following information first. In the case of technical problems, please contact our hotline service.
The number of our service hotline can be found on our website :
www.amplicomms.com
In the case of claims under the terms of guarantee, please contact your sales outlet.
There is a 2 year period of guarantee.
I can't make phone calls
- Make sure the phone cable is connected properly. If it is, there may be a fault. Please make sure you're using the phone cable that came with your phone.
Some features e. g. the boost function and handsfree are not working
- Check the power supply.
- Make sure the batteries are inserted correctly, they are of the correct type and they are not exhausted.
The display of incoming call numbers is not working
- Check you have this service on your phone line. Please call your network provider.
- The caller may have withheld their phone number.
Maintenance
- Please clean your equipment's surfaces with a soft, fluff-free cloth.
- Never use cleaning agents or solvents.
Guarantee
AMPLICOMMS equipment is produced and tested according to the latest production methods. The implementation of carefully chosen materials and highly developed technologies ensure trouble free functioning and a long service life.
The terms of the guarantee do not apply where the cause of the equipment malfunction is the fault of the telephone network operator or any interposed private branch extension system. The terms of the guarantee do not apply to the rechargeable batteries or power packs used in the products. The period of guarantee is 24 months, (36 months if the product was purchased in Spain or Portugal) from the date of purchase.
All deficiencies resulting from material of production faults which occur during the period of guarantee will be eliminated free of charge. Rights to claims under the terms of guarantee are annulled following intervention by the purchaser or third parties. Damage caused as a result of improper handling or operation, incorrect positioning or storing, improper connection or installation,
Acts of God or other external influence are not covered by the terms of guarantee.
In the case of complaints, we reserve the right to repair or replace defect parts or provide a replacement device. Replacement parts or devices become our property.
Rights to compensation in the case of damage are excluded where there is no evidence or intent or gross negligence by the manufacturer.
If your equipment shows signs of defect during the period of guarantee, please return to the sales outlet in which you purchased the
AMPLICOMMS equipment together with the purchase receipt. All rights to claims under the terms of guarantee in accordance with this agreement must be asserted exclusively with regard to your sales outlet. Two years after the purchase of our products, claims under the terms of guarantee can no longer be asserted.
Declaration of conformity
Hereby, ATLINKS EUROPE declares that the Corded type Telephone (BigTel 50 Plus) is in compliance with Legislation: Electromagnetic Compatibility Regulations 2016 (S.I. 2016/1091), and Electrical Equipment (Safety) Regulations 2016 (S.I. 2016/1101). To view the complete Declaration of Conformity, please refer to the free download available on our website: www.amplicomms.com

Hereby, ATLINKS EUROPE declares that the radio equipment is in compliance with Legislation : Radio Equipment Regulations 2017 (SI 2017/1206). The full text of the UKCA declaration of conformity is available at the following internet address: www.amplicomms.com

Technical Specifications
| Free Field Range (Alarm bracelet) Up to 30 meters* | |
| Max RF power (Alarm bracelet) < 10dBm | |
| Operation frequency 433.92MHz | |
| Number of Alarm bracelet Up to 5 | |
| Alarm bracelet Battery CL2025 (3V Lithium Batteries) | |
| Alarm bracelet Battery Life (average values) | 3 years standby (New battery) |
| Electrical Connection/Base Adaptor | Base adapter :Model No .: S003ATV0900020(EU) / S003ATB0900020 (UK)Input: 100-240 V / 50-60 Hz / 0.15 AOutput: 9 V DC / 200 mA, 1.8 WUse only the adapters provided with the phone.Single-phase AC, excluding IT installations defined by the standard EN62368-1.Attention: The network voltage is classified as dangerous according to the criteria of this standard. |
| Telephone Connection Appliance | designed for connection to a TNV3 class(telecommunications network voltage) analogue telephone line as defined by the EN62368 standard. |
| Operating Temperature From 5°C | to 40°C |
* Values may vary according to environment.
© ATLINKS 2022 - Reproduction prohibited.
The Manufacturer reserves the right to modify the specifications of its products in order to make technical improvements or comply with new regulations.
AMPLICOMMS and ATLINKS are registered trademarks.
www.amplicomms.com
ATLINKS Europe
28 Boulevard Belle Rive
92500 RUEIL-MALMAISON France
RCS Nanterre 508 823 747
ATLINKS UK Ltd
3rd Floor, Waverley House
7-12 Noel Street, London, W1F 8GQ. UK
Company registration: 13809295


- TELÉFONO
- ACERTAR A DATA E AS HORAS
- SKÆRMIKONER
- INNEHÅLLSFÖRTECKNING
- KOMMA IGÅNG 81
- ALARM BRACELET
- CONTENTS
- GETTING STARTED 105
- MAKING AND RECEIVING CALLS 109
- PHONE SETTINGS 112
- GETTING STARTED
- CHECK BOX CONTENTS
- IMPORTANT
- CONNECTING THE TELEPHONE
- WALL MOUNTING
- WARNING: ENSURE THAT THERE ARE NO CABLES OR PIPES ETC. UNDER THE SURFACE OF THE WALL WHERE YOU WANT TO DRILL THE HOLES
- DISPLAY ICONS
- SETTING DATE AND TIME
- SETTING THE LANGUAGE
- SETTING THE MELODY
- MAKING AND RECEIVING CALLS
- DIALLING A TELEPHONE NUMBER
- ENDING A CALL
- TAKING A CALL
- ACTIVATING/DEACTIVATING HANDSFREE MODE
- PLEASE NOTE
- BOOST THE HANDSET EARPIECE VOLUME
- SETTING THE HANDSET RECEIVER VOLUME
- RINGER VOLUME
- SETTING THE HANDSET RECEIVER TONE
- SETTING THE HANDSFREE VOLUME
- MUTING THE MICROPHONE
- DIALLING A TELEPHONE NUMBER USING THE REDIAL FUNCTION
- CALLING BACK MISSED CALLS
- DIALLING A TELEPHONE NUMBER FROM THE PHONE BOOK
- ONE-TOUCH DIALLING
- CHAIN DIALLING
- PHONE SETTINGS
- PHONE BOOK
- ENTERING A NAME
- RECORDING PHONE BOOK ENTRIES /DIRECT MEMORIES (M1,M2)
- EDITING ENTRIES IN THE PHONE BOOK
- RECORD NAMES TO PHONEBOOK ENTRIES
- DELETING RECORDINGS
- DELETING A SINGLE ENTRY FROM THE PHONE BOOK
- DELETE ALL ENTRIES FROM THE PHONE BOOK
- CALL LIST
- DISPLAYING PHONE NUMBERS IN THE CALLS LIST
- STORING NUMBERS FROM THE CALLS LIST IN THE PHONE BOOK
- DELETING PHONE NUMBERS INDIVIDUALLY
- DELETING ALL ENTRIES
- OUTGOING ALERT MESSAGE
- RECORDING AN OUTGOING ALERT MESSAGE
- PLAYING THE OUTGOING ALERT MESSAGE
- DELETING THE OUTGOING ALERT MESSAGE
- STORING EMERGENCY CALL
- AUTOMATIC EMERGENCY CALLS
- STARTING/CANCELLING THE EMERGENCY CALL
- TESTING THE ALARM BRACELET BATTERY
- REPLACING THE BATTERY
- ALARM BRACELET REGISTRATION/DE-REGISTRATION
- SETTINGS
- SPECIAL USE
- USE ON A PRIVATE BRANCH EXCHANGE
- INSERT A DIALLING PAUSE
- USING ADDITIONAL SERVICES
- APPENDIX
- SAFETY NOTES
- INTENDED USE
- INSTALLATION LOCATION
- POWER SUPPLY
- HEARING AID COMPATIBILITY
- WARNING - KEEP BUTTON BATTERIES OUT OF REACH OF CHILDREN
- DISPOSAL
- HELP AND SUPPORT / TROUBLESHOOTING GUIDE
- HELPLINE
- I CAN'T MAKE PHONE CALLS
- SOME FEATURES E. G. THE BOOST FUNCTION AND HANDSFREE ARE NOT WORKING
- THE DISPLAY OF INCOMING CALL NUMBERS IS NOT WORKING
- MAINTENANCE
- GUARANTEE
- DECLARATION OF CONFORMITY
Brand : Amplicomms
Model : BigTel 50 Alarm Plus
Category : Telephone