
SDM 1000 A1 - Kitchen appliance SILVERCREST - Free user manual and instructions
Find the device manual for free SDM 1000 A1 SILVERCREST in PDF.


| Product Type | Milk Frother & Hot Chocolate Maker |
| Model | SDM 1000 A1 |
| Brand | SilverCrest |
| Dimensions (W x D x H) | Approx. 12 x 12 x 22 cm |
| Weight | Approx. 0.8 kg |
| Power Supply | 220-240 V ~ 50-60 Hz |
| Power Consumption | 500 W |
| Capacity (max fill) | 500 ml (max), 250 ml (min) |
| Material (Jug) | Stainless steel double-walled |
| Main Functions | Frothing milk, heating milk, preparing hot chocolate |
| Operating Modes | Froth cold, froth hot, heat only |
| Control Type | One-button operation with indicator light |
| Safety Features | Automatic shut-off, overheat protection, non-slip base |
| Cleaning & Maintenance | Non-stick coating inside; hand wash recommended, detachable lid |
| Spare Parts & Repairability | Replacement jug and whisk attachments available |
| General Information | BPA-free materials, suitable for all milk types |
| Accessories Included | Whisk attachment, measuring spoon, instruction manual |
| Warranty | 3 years (EU) |
Frequently Asked Questions - SDM 1000 A1 SILVERCREST
User questions about SDM 1000 A1 SILVERCREST
0 question about this device. Answer the ones you know or ask your own.
Ask a new question about this device
Download the instructions for your Kitchen appliance in PDF format for free! Find your manual SDM 1000 A1 - SILVERCREST and take your electronic device back in hand. On this page are published all the documents necessary for the use of your device. SDM 1000 A1 by SILVERCREST.
USER MANUAL SDM 1000 A1 SILVERCREST
Doughnut Maker SDM 1000 A1
TARGA GMBH
50494 SOIST
GERMANY
Last Information Update: 01/2015, Idres No: SDN 1000 A1 012015.1
GD IE
Doughnut Maker
User manual and service information
DE AI
Donut-Maker
Introduction.... 3 Intended use 3 Scope of delivery 3 Technical data 4 Safety information 4 Copyright 6 Before use 6 Initial use....7 Maintenance / Cleaning 8 Storage during non-use 9 Troubleshooting 9 Environmental instructions and disposal information 10 Compliance statements.... 10 Recipe suggestions.... 11 Information about warranty and service processing.... 13
Introduction
Thank you for purchasing a SilverCrest Donut Maker SDM 1000 A1, hereafter referred to as Donut Maker.
Intended use
The Donut Maker is easy to use and makes 6 donuts in one cycle. You can then continue processing the donuts and decorate them to your liking.
This Donut Maker is not intended for business or commercial use. Only use the Donut Maker for household purposes; any other use is improper. In addition, never use the Donut Maker outside of confined spaces or in tropical climate zones. This Donut Maker meets all norms and standards associated with CE conformity. Any modification of the Donut Maker not coordinated with the manufacturer will result in said compliance with standards no longer being guaranteed. The manufacturer is not liable for damages or liability for defects resulting from such modification.
Please observe the national regulations or laws of the country of use.
Scope of delivery

| A | Donut Maker |
| B These instructions for use | |
These instructions for use (B) feature a flip-out cover. The inside of the cover shows the Donut Maker (A) with numbers. The numbers mean:
1 Red indicator light 2 Green indicator light 3 Cover 4 Handle 5 Latch 6 Baking surfaces 7 Donut moulds
Technical data
| Model SilverCrest SDM 1000 A1 | |
| Power Supply 220-240V | ~, 50/60Hz |
| Power consumption 800 - 1000W | |
| Dimensions (w x h x d) approx. 24 x 11 x 23 | cm |
| Weight approx. 1422 g |
Technical data and design subject to change without notice.
Safety information
Please carefully read the following instructions before using the Donut Maker (A) for the first time and follow all the warnings, even if you are familiar with handling appliances. Keep these instructions in a safe location for future reference. When selling or passing on the Donut Maker (A), be sure to also include these instructions.

WARNING! This symbol indicates important information for safely operating the Donut Maker (A) and to protect the user.
This symbol indicates additional helpful information on this topic.

The Donut Maker (A) is not intended for use with an external time switch or a separate telecontrol system.

This Donut Maker (A) may be used by children age 8 years and up, as well as by persons with reduced physical, sensory or mental capacities, or lacking experience and/or knowledge, so long as they are supervised or instructed in the safe use of the Donut Maker (A) and understand the associated risks. Do not allow children to play with the Donut Maker (A). Do not allow children to clean or perform user maintenance unless over age 8 years and supervised. Also keep the packaging film away from children. Suffocation hazard.

Keep children under age 8 years away from the appliance and the connector cable.
In the event of smoke, unusual noises or odours, immediately unplug the Donut Maker (A) from the socket. In these cases discontinue use of the Donut Maker (A) and have it inspected by an expert. Never inhale smoke from a potential appliance fire. If you did inhale smoke nevertheless, seek medical attention. Inhaling smoke can be harmful to your health.

Do not damage the Donut Maker (A) to prevent hazards.

Verify no open fire sources (e.g. burning candles) are on or next to the Donut Maker (A). Fire hazard!

Never operate the Donut Maker (A) unsupervised. Always unplug from the socket when not in use. Only store the Donut Maker (A) once it has completely cooled off. Fire hazard!

Attention: fire hazard! Never use the Donut Maker (A) near highly flammable materials, e.g. curtains, drapery, etc.

Never expose the Donut Maker (A) to direct heat sources (e.g. heaters) or direct sunlight or strong artificial lighting. Also avoid contact with splashing or dripping water and aggressive liquids. Do not operate the Donut Maker (A) near water. Never immerse the Donut Maker (A). Do not place objects filled with liquids, e.g. vases or beverages atop the Donut Maker (A). Please also be sure not to expose the Donut Maker (A) to excessive shock or vibration. Do not allow foreign objects to enter the appliance. The Donut Maker (A) could otherwise be damaged.
Power cord

Always hold the mains cable by the plug, do not pull on the power cord itself.

Do not set the Donut Maker (A), furniture or other heavy objects on the power cable and be sure not to bend it.

Never make a knot in the power cable and do not together with other cables. The power cable should be positioned so nobody can step on or be hindered by it.

Ensure the power cable does not touch hot surfaces of the Donut Maker (A).

Do not use adapter plugs or extension cables which do not meet the applicable safety standards and do not manipulate the power cable! If the power cable is damaged it must be replaced by the manufacturer or his customer service, or a similarly qualified person to prevent hazards.
Copyright
All contents of these instructions are subject to copyright and are solely made available to the reader for information purposes. Any copying or duplication of data and information without the express written approval of the author is prohibited. This also pertains to the commercial use of the contents and data. Text and illustrations are current at the time of print. Subject to change.
Before use
Remove the Donut Maker (A) from the packaging and remove all packaging materials. Check the Donut Maker (A) for damage. Do not use the Donut Maker (A) if damaged.
Clean the Donut Maker (A) as described in chapter "Cleaning". Grease the baking plates (6) and the doughnut moulds (7) with vegetable oil. This will make it easier for any manufacturing residue on the baking surfaces (6) to release. Now plug the power plug into a power socket and the Donut Maker (A) with the cover (3) once until the green indicator light (2) shows the baking temperature has been reached.

Risk of burns! The temperature of accessible surfaces can be very high whilst baking.

A slight odour and even minimal smoke may form during first use due to manufacturing residue. This is normal and will disappear after a short time. Please ensure adequate ventilation. If necessary, open a window.
Now unplug from the power outlet and allow the Donut Maker (A) to cool off with the lid (3) open. Next clean the Donut Maker (A) again as described in chapter "Cleaning".
The Donut Maker (A) is now ready for use.
Initial use

Risk of burns! The temperature of accessible surfaces can be very high during use.

Place the Donut Maker (A) on a level, heat-resistant surface. When using on a delicate surface, place a heat-resistant pad under the Donut Maker (A).

Never operate the Donut Maker (A) with a time switch or a remote controlled socket.

Depending on the batter used, it may be beneficial to first lightly brush the baking surfaces (6) and donut moulds (7) with vegetable oil. This may make it easier to remove the finished donuts.
- Plug the power plug into an easy to reach socket. The Donut Maker (A) does not feature an On/Off switch and will start heating up immediately. The red indicator light (1) will light up once the Donut Maker (A) is connected to power. The green indicator light (2) will light up once the baking temperature has been reached.

Parts of the Donut Makers (A) can become very hot. Use pot holders or oven mitts to prevent burns. Risk of injury.
- Open the Donut Maker (A) and carefully add batter to the donut moulds (7) using a spoon or a piping bag. The fill level varies by the batter being used. Do not fill batter past the top edge of the donut moulds (7). Close the Donut Maker (A). Do not lock the cover with the latch (5) whilst baking to allow the batter to expand. Use the latch (5) to secure the cover (3) from opening when you want to store the doughnut maker (A).

The green indicator light (2) will be lit during the baking cycle whilst the baking temperature is within the optimal range. If the temperature drops too much, the green indicator light (2) will extinguish and the Donut Maker (A) will reheat.
- Bake the donuts to your preferences. The baking time varies between approx. 5 to 7 minutes. Depending on the batter being used and your preferences, the baking time may be a bit shorter or longer. Briefly lift the cover (3) after 4 minutes to check doneness. Lifting the cover (3) sooner may cause the donuts to break open. Only hold the cover (3) by the handle (4), where the temperature is lowest.
- Once you are happy with the baking results, remove the finished donuts from the open Donut Maker (A) by lifting them out of the donut moulds (7) using e.g. a wooden fork or wood pick. Never use metal objects to remove the donuts to prevent damaging the donut moulds (7).
- You may now process the donuts to your liking, by e.g. decorating with chocolate icing or sprinkling with powdered sugar.
- If you no longer wish to use the Donut Maker (A), unplug from the socket and allow the Donut Maker (A) to cool off completely.
- Clean the Donut Maker (A) as described in chapter "Cleaning".
Maintenance / Cleaning
Maintenance

Maintenance is required if the Donut Maker (A) is damaged, liquids or objects have entered the housing, the Donut Maker (A) was exposed to rain or moisture, or if the Donut Maker (A) is not working properly or fell. If you notice smoke, unusual noises or odour, immediately shut off the Donut Maker (A) and unplug from the socket. In these cases discontinue using the Donut Maker (A) until it has been inspected by an expert. Any maintenance must be performed by skilled professionals. Never open the housing of the Donut Maker (A).
Cleaning

Unplug from the mains socket before cleaning, risk of electric shock!

Wait for the Donut Maker (A) to cool off. Risk of burns!

Never immerse the Donut Maker (A) in water!
Do not use any solvents to clean the doughnut maker (A). This will prevent damaging the Donut Maker (A) and cleaning residue in the next batch of donuts. Proceed as follows:
- After using the Donut Maker (A) first clean the baking surfaces (6) and donut moulds (7) with a dry paper towel to remove grease residue.
- Clean all surfaces, the power cable and the housing with washing-up liquid and water for rinsing.
- Next, use a new, clean cloth to remove the residue of washing-up liquid. • Dry the Donut Maker (A) well before using again.
Storage during non-use
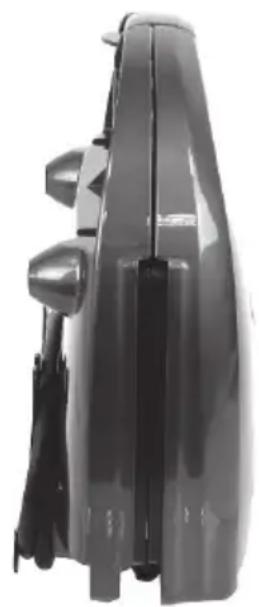
When the Donut Maker (A) is not being used, it can easily be stored by wrapping the power cord around the rear foot and storing the Donut Maker (A) vertically to save space. Use the latch (5) to secure the cover (3) from opening when you want to store the Donut Maker (A).
Troubleshooting
The Donut Maker (A) is not working.
- Verify that the plug is correctly connected to the mains socket.
- Check if the socket being used is live. Try plugging the Donut Maker (A) into a different socket.
Batter leaks from the sides of the Donut Maker (A).
- Add less batter to the donut moulds (7). The expansion varies by the batter being used.
Environmental instructions and disposal information

Devices with this marking are subject to European Directive 2012/19/EU. All used appliances and electronics must be disposed of separately from household waste through sites designated by the government. Proper disposal of the used appliance prevents environmental damage and jeopardizing your personal health. For more information on proper disposal of the used appliance, please contact your municipality, waste disposal authorities, or the shop where the appliance was purchased.
Also dispose of packaging in an environmentally friendly manner. Cartons can be disposed of through paper collection or public collection sites for recycling. Film and plastics from packaging are collected by your local waste management company for environmentally friendly disposal.
Compliance statements
CE
This appliance complies with the basic requirements and other applicable provisions of the Low Voltage Directive 2006/95/EC, EMC Directive 2004/108/EC, ErP Directive 2009/125/EC, and RoHS Directive 2011/65/EU. The respective conformity/compliance statement can be found at the end of these instructions.
Recipe suggestions
Basic recipe (makes approx. 30 donuts)
Batter:
◆ 130 g Sugar ◆ 260 g Flour ◆ 1 pkt vanilla sugar (8g) 1/4 Litre milk 3 Eggs ◆ 5 Tbs oil (sunflower oil) ◆ 1 pkt. baking powder
Glaze:
◆ Powdered sugar, icing/chocolate coating
In a bowl, cream sugar, vanilla sugar and eggs with a mixer, add the oil. Mix until it is nice and creamy. Combine the baking powder and flour, sift and add to the mixture. Last, add the milk and mix the batter.
Let the finished batter stand for 15 minutes before baking.
Orange-Almond Donuts (makes approx. 20 donuts)
Ingredients:
◆ 110 g Soft butter ◆ 100 g Sugar 2 Eggs ◆ 150 g Flour ◆ 1 pkt vanilla sugar (8g) ◆ 50 g Starch ◆ 50 g Ground almonds ◆ 2 ts Baking powder ◆ 50 ml Orange juice ◆ Orange zest (of 1/2 untreated orange)
In a bowl, cream butter with a mixer and slowly add sugar, vanilla sugar and eggs. Keep mixing until nice and creamy. Combine the baking powder and flour, sift and add to the mixture, then add the starch.
Last, add the ground almonds, orange juice and zest, and mix the batter.
Chocolate-Donuts (makes approx. 30 donuts)
Batter:
◆ 130 g Sugar ◆ 260 g Flour ◆ 1 pkt vanilla sugar (8g) 1/4 Litre milk ◆ 3 Eggs ◆ 5 Tbs oil (sunflower oil) ◆ 1 pkt baking powder ◆ 2 Tbs cocoa powder ◆ 2 EL Hazelnut spread
Glaze:
◆ Powdered sugar, icing/chocolate coating
In a bowl, cream sugar, vanilla sugar and eggs with a mixer, add the oil. Keep mixing until nice and creamy. Combine the baking powder and cocoa with the flour, sift and add to the mixture. Last, add the milk and hazelnut spread and mix the batter.
Let the finished batter stand for 15 minutes before baking.
Tips for perfect donuts
Prepare Donut Maker according to instructions. Bake donuts.
To glaze the donuts, please allow the donuts to cool off for 10-15 minutes.
Sprinkles will stick better if you allow the glaze to dry briefly.
Information about warranty and service processing
Warranty of TARGA GmbH
Dear Customer,
This device is sold with three years warranty from the date of purchase. In the event of product defects, you have legal rights towards the seller. These statutory rights are not restricted by our warranty as described below.
Warranty conditions
The warranty period commences upon the date of purchase. Please keep the original receipt in a safe place as it is required as proof of purchase. If any material or manufacturing faults occur within three years of purchase of this product, we will repair or replace the product free of charge as we deem appropriate.
Warranty period and legal warranty rights
The warranty period is not extended in the event of a warranty claim. This also applies to replaced and repaired parts. Any damage or defects discovered upon purchase must be reported immediately when the product has been unpacked. Any repairs required after the warranty period will be subject to charge.
Scope of warranty
The device was carefully manufactured in compliance with stringent quality guidelines and subjected to thorough testing before it left the works. The warranty applies to material and manufacturing faults. This warranty does not cover product components which are subject to normal wear and which can therefore be regarded as wearing parts, or damage to fragile components such as switches, rechargeable batteries or components made of glass. This warranty is void if the product is damaged, incorrectly used or serviced. To ensure correct use of the product, always comply fully with all instructions contained in the user manual. The warnings and recommendations in the user manual regarding correct and incorrect use and handling of the product must always be observed and complied with. The product is solely designed for private use and is not suitable for commercial applications. The warranty is rendered void in the event of incorrect handling and misuse, if it is subjected to force, and also if any person other than our authorised service technicians interfere with the device. No new warranty period commences if the product is repaired or replaced.
Submitting warranty claims
To ensure speedy handling of your complaint, please note the following:
Before using your product for the first time, please read the enclosed documentation carefully. Should any problems arise which cannot be solved in this way, please call our hotline. - Always have your receipt, the product article number as well as the serial number (if available) to hand as proof of purchase. - If it is not possible to solve the problem on the phone, our hotline support staff will initiate further servicing procedures depending on the fault.

Service

Phone: 0207 - 36 50 744
E-Mail: service.GB@targa-online.com

Phone: 01 - 242 15 83
E-Mail: service.IE@targa-online.com

Phone: 800 - 62 175
E-Mail: service.MT@targa-online.com

Phone: 800 - 92 496
E-Mail: service.CY@targa-online.com
IAN: 103939

Manufacturer
Please note that the following address is not a service address. First contact the service point stated above.
TARGA
GmbH
Coesterweg 45
59494 SOEST
GERMANY
Table of contents
Introduction 16
Troubleshooting
EU Declaration of Conformity
Address:
Targa GmbH
Coesterweg 45
59494 Soest, Germany
Product:
Donutmaker
Model:
Silvercrest SDM 1000 A1
Identification number:
IAN 103939
The product complies with the requirements of the following European directives:
2006/95/EC
Low Voltage Directive (LVD)
2004/108/EC
Electromagnetic Compatibility
2009/125/EC
Energy Relating Products
This declaration of conformity is issued under the sole responsibility of the manufacturer
The object of the declaration described above is in conformity with Directive 2011/65/EU of the European Parliament and of the Council of 8 June 2011 on the restriction of the use of certain hazardous substances in electrical and electronic equipment
Compliance was proved by the application of the following standards:
EMC:
EN 55014-1: 2006 + A1: 2009 + A2: 2011
EN 55014-2: 1997 + A1: 2001 + A2: 2008
EN 61000-3-2: 2006 + A1: 2009 + A2: 2009
EN 61000-3-3: 2008
RoHS:
EN 62321: 2009
SAFETY:
EN 60335-1: 2012
EN 60335-2-9: 2003 + A1: 2004 + A2: 2006
+ A12: 2007 + A13: 2010
EN 62233: 2008
ErP:
Regulation 1275/2008
Year of CE marking:
15
Soest, 6th April 2015
Matthias Klauke, Managing Director
- INTRODUCTION
- INTENDED USE
- SCOPE OF DELIVERY
- TECHNICAL DATA
- SAFETY INFORMATION
- POWER CORD
- COPYRIGHT
- BEFORE USE
- INITIAL USE
- MAINTENANCE / CLEANING
- MAINTENANCE
- CLEANING
- STORAGE DURING NON-USE
- TROUBLESHOOTING
- THE DONUT MAKER (A) IS NOT WORKING
- BATTER LEAKS FROM THE SIDES OF THE DONUT MAKER (A)
- ENVIRONMENTAL INSTRUCTIONS AND DISPOSAL INFORMATION
- COMPLIANCE STATEMENTS
- RECIPE SUGGESTIONS
- CHOCOLATE-DONUTS (MAKES APPROX. 30 DONUTS)
- BATTER
- GLAZE
- TIPS FOR PERFECT DONUTS
- INFORMATION ABOUT WARRANTY AND SERVICE PROCESSING
- WARRANTY OF TARGA GMBH
- WARRANTY CONDITIONS
- WARRANTY PERIOD AND LEGAL WARRANTY RIGHTS
- SCOPE OF WARRANTY
- SUBMITTING WARRANTY CLAIMS
- MANUFACTURER
- TABLE OF CONTENTS
- EU DECLARATION OF CONFORMITY
- ADDRESS
- PRODUCT
- EC
- EMC
- ROHS
- SAFETY
- ERP
- YEAR OF CE MARKING
Brand : SILVERCREST
Model : SDM 1000 A1
Category : Kitchen appliance