
Diverse Deskphone - Telephone BT - Free user manual and instructions
Find the device manual for free Diverse Deskphone BT in PDF.


| Product Type | Corded Desk Phone |
| Dimensions (Approx.) | 200 x 180 x 100 mm |
| Weight (Approx.) | 0.8 kg |
| Power Supply | AC Adapter (9V DC) |
| Display | Backlit LCD |
| Keypad | Standard 12-key dial pad with navigation keys |
| Speakerphone | Full-duplex speakerphone |
| Caller ID | Yes, with call history memory |
| Call Waiting | Yes |
| Volume Control | Adjustable handset and speaker volume |
| Ringer Options | Multiple ringer tones and volume levels |
| Headset Compatibility | Yes, via dedicated headset port |
| Wall Mountable | Yes |
| Memory Storage | Up to 50 contacts (speed dial) |
| Redial Function | Last 10 numbers redial |
| Mute Function | Yes |
| Hold Function | Yes, with music on hold |
| Flash/Recall Button | Yes |
| Maintenance | Clean with soft dry cloth; avoid liquids |
| Safety | Use only supplied adapter; keep away from water |
| Spare Parts | Handset cord, base unit, power adapter |
| Manual | Free PDF download available online |
Frequently Asked Questions - Diverse Deskphone BT
User questions about Diverse Deskphone BT
0 question about this device. Answer the ones you know or ask your own.
Ask a new question about this device
Download the instructions for your Telephone in PDF format for free! Find your manual Diverse Deskphone - BT and take your electronic device back in hand. On this page are published all the documents necessary for the use of your device. Diverse Deskphone by BT.
USER MANUAL Diverse Deskphone BT
Diverse Deskphone
For use with Diverse 1010, 1015, 2010, 2015, 2-Line and ISDN base stations
User Guide
This equipment is not designed for making emergency telephone calls when the power fails. Alternative arrangements should be made for access to emergency services.
At a glance
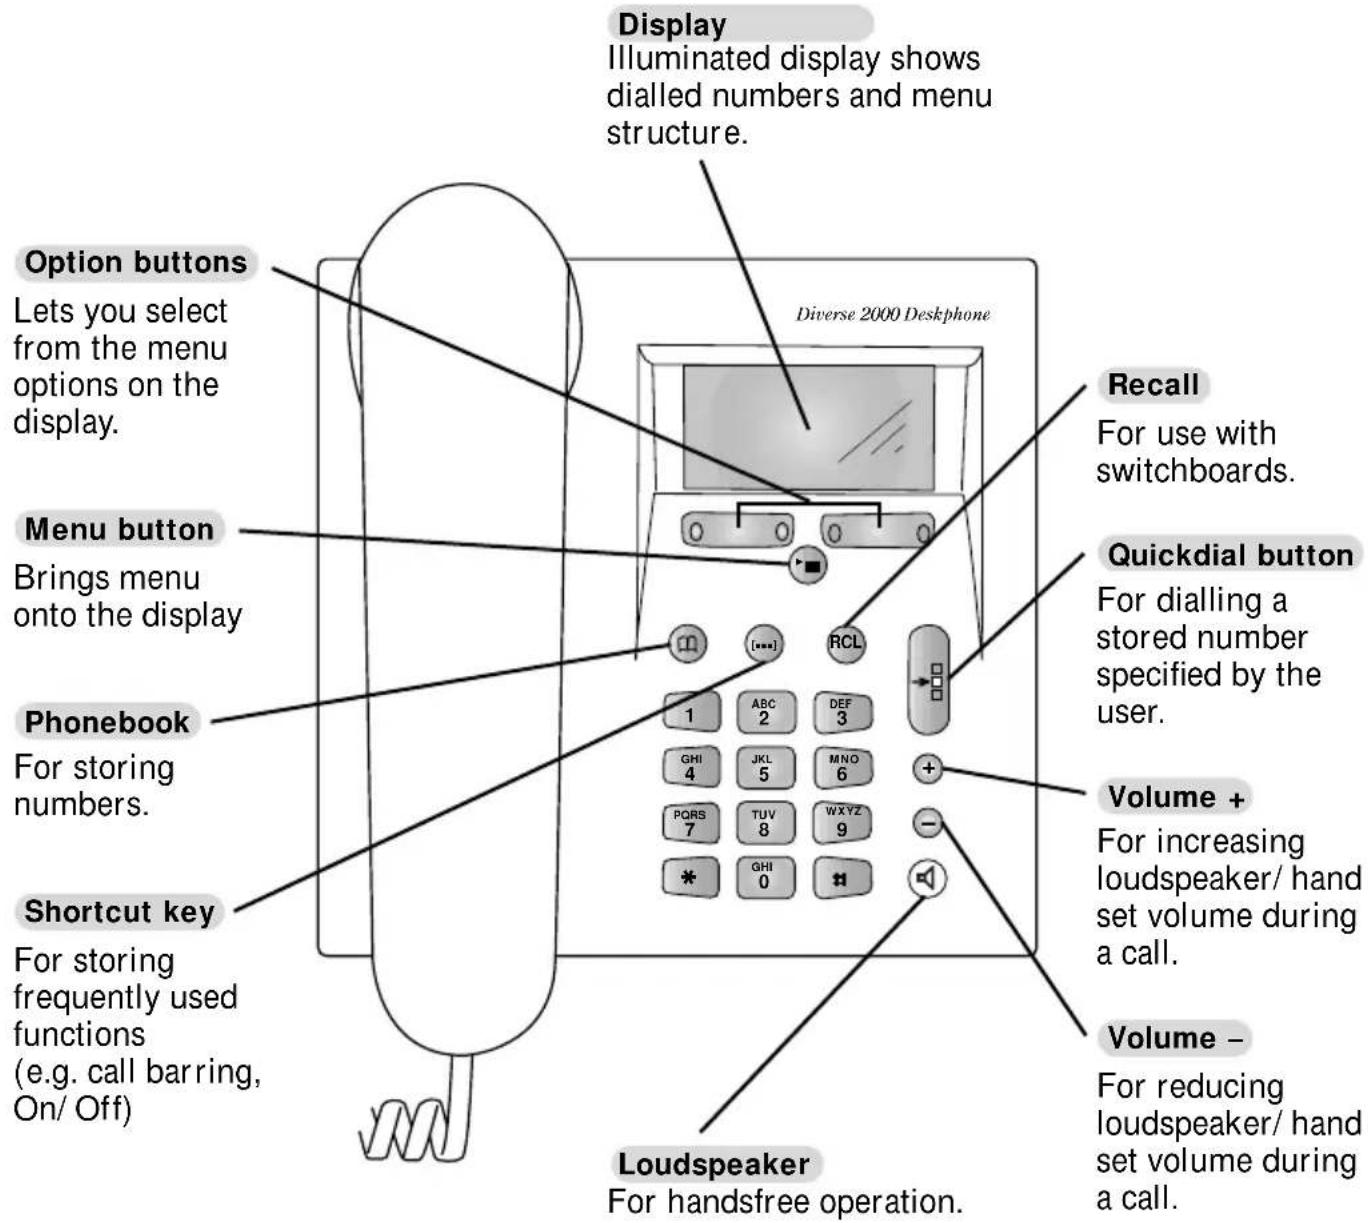
For your records
| Date of purchase: |
| Place of purchase: |
| Serial number (on the underside of the telephone base station): |
| Purchase price: |
For warranty purposes, proof of purchase is required, so please keep your receipt.
Personal Emergency Numbers
| 1 | |
| 2 | |
| 3 | |
| 4 |
Please use this space to record your selected Diverse Deskphone PIN code.
See page 29 for the default PIN code and for full instructions on how to change that code for added security.




Please open this page for an ‘at a glance’ guide to your Diverse Deskphone.
In this guide
At a glance 1
Introduction 4
Installation 6
Registering your Diverse Deskphone with a base station 8
Your Diverse Deskphone menu display 11
Using the Diverse Deskphone 13
Using the Diverse Deskphone with a switchboard 27
Additional Features 29
Operating with additional base stations 33
How to use the shortcut function 36
Maintenance 40
Help 41
Technical Information 42
Index 43
Introduction
Your Diverse Deskphone has been designed for ease of use and made to the high standards set by BT.
Please read the instructions carefully before use and retain this user guide for future reference.
Your Diverse Deskphone is designed for use with a Diverse telephone system. It must be registered to an existing base station before it will work.
This guide explains the basic features of the Diverse Deskphone. For more comprehensive instructions, see your main Diverse user guide. The instructions for using a Diverse Deskphone are the same as using a Diverse 2000 Executive Handset. If you have a Diverse 2-Line or ISDN base station, you should also follow the more detailed instructions for the Executive Handset as described in the user guides that are supplied with the base station.
DECT
By purchasing your Diverse Deskphone, you now own a product that offers flexibility of location, combined with the performance advantages of a high-quality telephone system. It complies with the Digital Enhanced Cordless Telecommunications (DECT) standard and offers unparalleled quality and features.
Building up a phone system
You can add further handsets or Deskphones to your base stations to build up a comprehensive and easy-to-use cordless telephone system.
Most Diverse base stations can have up to 6 handsets or Deskphones registered to them (the Diverse 2-Line and Diverse ISDN will register 8). You can register your Diverse Deskphone at up to three base stations.
![graph TD A["Central Device"] --> B["Mobile Phone 1"] A --> C["Mobile Phone 2"] A --> D["Mobile Phone 3"] A --> E["Mobile Phone 4"] A --> F["Mobile Phone 5"] A --> G["Mobile Phone 6"] A --> H["Mobile Phone 7"] A --> I["Mobile Phone 8"] A --> J["Mobile Phone 9"] A --> K["Mobile Phone 10"] A -.-> L["Ap…](/content/2026/06/1327547/images/6bb9162504e75cbf80922b5eec6cdd06043187d82325f709c7fb1c90e47433c9.jpg)
Important information
- Do not use any power supply other than the one provided with your telephone unit (supplied BT unit C39280-Z4-C66). Use of other power supply units may cause irreparable damage to your telephone; it will invalidate your warranty and the approval given to the apparatus.
- Research has shown that in certain cases medical equipment can be affected by cordless telephones. A distance of at least one metre should therefore be observed between the telephone and medical equipment. Also follow any special instructions from the institution in which the product is to be used.
- Diverse telephone systems can also interfere with other electrical equipment, e.g., answering machines, TV and radio sets, clock/radio alarms, and computers, if placed too close. To avoid risk of interference, place the unit at least one metre away.
- If you wear a hearing aid, please note that a humming noise may result from the radio signals sent between the base station and handset.
- There is a slight chance that your phone could be damaged by an electrical storm. We recommend that you unplug your Diverse Deskphone from the mains power during storms.
- Do not use the unit in bathrooms, near fire or water, or in areas where there is a danger of explosion.
- Clean the Diverse Deskphone with a damp (not wet) cloth or antistatic wipe. Never use a dry cloth as this may cause a static shock.
Unpacking your Diverse Deskphone
If anything is missing, please contact your place of purchase immediately.
• Diverse Deskphone
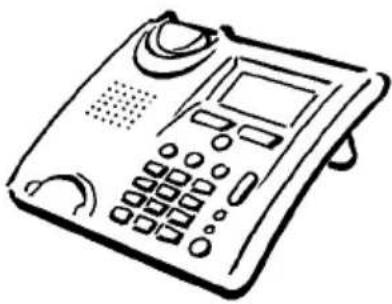
- Handset

- Handset cord (coiled)

- Mains power unit

Installation
Follow these steps to set up your Diverse Deskphone ready for use.
Plan the location of your Diverse Deskphone
Make sure your Diverse Deskphone is within 2 metres of the phone and mains sockets.
1 Connect the handset to the Deskphone
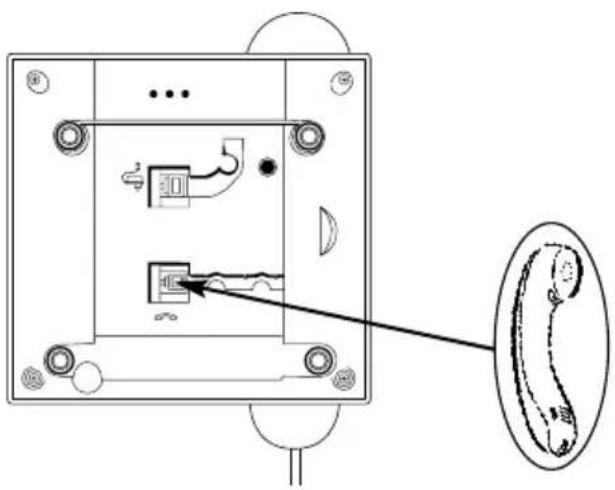
Put the connector (at the straight long end of the handset cord) into the socket marked on the underside of the telephone. Secure the cord in its groove. Insert the other end of the cord into the handset.
2 Connect the Deskphone to the mains power supply
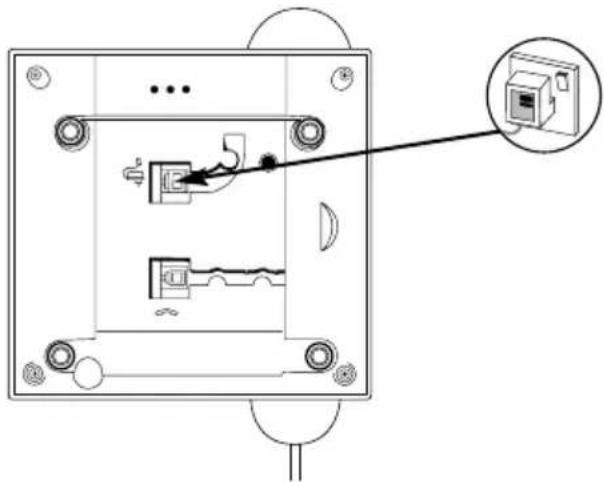
Insert the telephone power supply lead into the socket marked on the underside of the telephone. Put the other end of the plug-in power unit into a 220/230V electricity socket.
For your own safety use only the BT approved plug-in power unit (C39280-Z4-C66) supplied with your telephone.
To make and receive calls your telephone needs to be positioned within range of its base station. The maximum range inside most buildings is 50 metres. Outside, the range is extended to approximately 300 metres (the range will vary depending on where your Diverse base station and Diverse Deskphone are sited, and the conditions within your building). You can set your telephone to beep if it is not within range. See page 23.
In order to ensure that you achieve the maximum range possible with your Diverse system, please note the following advice:
Install the base station in a central location in your home or office. Avoid placing the base station or Deskphone:
- Behind metal doors.
- Under the stairs.
- Behind heavy furniture or cabinets.
- In rooms with thick or metal walls.
- Near other electrical equipment, as it may generate electrical interference. • In the bathroom or other damp rooms.
These locations will reduce the optimum range between the base station and the attached handsets/Deskphones.
You will now need to register your Deskphone to a Diverse base unit.
Please see the chapter on Registering your Diverse Deskphone with a base station.
Registering your Diverse Deskphone with a base station
Registering with Diverse 1010, 1015, 2010 and 2015 base stations
If your Diverse Deskphone has not been registered previously to other base stations, the display will show: REGISTER? If REGISTER? is not displayed, firstly select the REGISTER option from the SETTINGS menu, then select the base station number you wish to register it with, then follow the instructions below:
At the Deskphone
Press keypad buttons in order shown
OK
Press OK.
CODE
Enter the base station code (default 0000).
At the base station
Press the green or grey PAGER button on the base station (for about 10 seconds) until you hear a beep. You now have up to 1 minute to register your Deskphone.
At the Deskphone
OK
Press OK. After a short while all available telephone extension numbers will be displayed.
KEYPAD
Enter one of the extension numbers using the keypad. The telephone is now registered as the extension number you have chosen. The Deskphone will beep once and briefly flash INT plus its extension number on the display. To confirm successful registration, check that the base number, eg. Base 1, has stopped flashing.
If you experience any problems registering your new phone, please call the Diverse Helpline on 0845 798070.
Registering with Diverse 2-Line and ISDN base stations
If your Diverse Deskphone has not been registered previously to other base stations, the display will show: REGISTER? If REGISTER? is not displayed, firstly select the REGISTER option from the SETTINGS menu, then select the base station number you wish to register it with, then follow the instructions below:
At the Deskphone
OK
Press OK.
CODE
Enter the base station code (default 0000).
At the base station
Press and release the small green LED button on the front of the base station (using a pencil tip). This will flash during registration. You now have up to 1 minute to register your Deskphone.
At the Deskphone
OK
Press OK. After a short while all available telephone extension numbers will be displayed.
KEYPAD
Enter one of the extension numbers using the keypad.
The telephone is now registered as the extension number you have chosen. The Deskphone will beep once and briefly flash INT plus its extension number on the display. To confirm successful registration, check that the base number, eg. Base 1, has stopped flashing.
To de-register a base from the handset
Press keypad buttons in order shown
This de-registers the Deskphone from a selected base station.
Press the MENU button and use DOWN to highlight SETTINGS.
Press OK. Display shows a list of menu options.
Press DOWN to highlight BASE SETTINGS.
Press OK. Display lists the base stations to which you have registered your Deskphone.
Press UP or DOWN to select the base station from which you want to de-register your Deskphone.
Press ACTIVATE.
Press DOWN to highlight DE-REGISTER BASE.
Press OK. Display asks you to enter your Deskphone PIN number. Enter your Deskphone PIN (default 0000).
Press OK.
Confirm the de-registration by pressing YES. (The telephone beeps and is de-registered.)
Or
Press NO to cancel the procedure.
The procedure opposite de-registers the Diverse Deskphone from your base station. However, on completing this procedure it is also necessary to de-register the telephone from the base station using the base station PIN code.
Please refer to your base station user guide for instructions.


Your Diverse Deskphone Menu Display
Your Deskphone offers a menu-driven display. You enter the menu lists by using the MENU button. The option buttons below the display allow you to select the options within each menu and make adjustments to their settings.
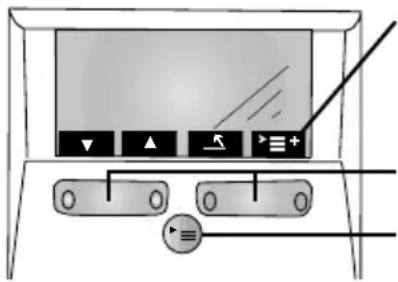
Soft key options Use the Option button below to select.
Option buttons
Menu button
The options shown on the display are indicated by symbols.
INT INT Sets up an internal connection.
→→ REDIAL Redials numbers.
GO BACK Cancels procedures and goes back to a previous menu.
≡+ ACTIVATE Calls up supplementary menu.
▲ UP Moves up through a menu.
▼ DOWN Moves down through a menu.
< LEFT Moves to left.
RIGHT Moves to right.
DELETE Deletes characters.
OK OK Confirms actions.
NEXT NEXT When used on the Diverse 2-Line and Diverse ISDN bases.
SET SET When used on the 1010, 1015, 2010 and 2015.
To Exit from the menu

You can leave a menu without saving any changes or settings by simply lifting (or replacing) the handset. Alternatively, press the LOUDSPEAKER button twice.

To return to a previous screen, press the GO BACK option button.
Please note
When you are using the menu to create new settings or change the set-up (using the SERVICE option), the loudspeaker button lights to indicate that the phone is in use. If someone tries to call you whilst you are changing the settings/service options, the Deskphone will not ring, but all other extensions will ring instead. If the Deskphone is the only phone registered with the base station, the caller will hear an engaged tone.
Please note
Once a selection in the menu has been made, and no other selection is made within c. 25 seconds, the Deskphone will return to idle state.
![graph TD A["Menu Buttons"] --> B["Phone Lock"] B --> C["Handset Volume"] C --> D["Base 1"] D --> E["Change base name"] C --> F["Base 2"] F --> G["ISDN config"] C --> H["Base 3"] H --> I["De-register base"] B --> J["Baby Alarm"] J --> K["Select Base"] K --> L["Settings"] L --> M["Service"] M --> N["L…](/content/2026/06/1327547/images/f58f621639b35d49c24c8a2d34809157d872a13c361ab8e4e442823595c0a814.jpg)
Using the Diverse Deskphone
Making and receiving external calls
To make an external call
Press keypad buttons in order shown
Lift the handset and dial the number.
Or,
KEYPAD
Enter the number on the keypad, check that it is correct and then lift the handset to dial.

If you make a mistake entering numbers, use DELETE to delete them.
Please note
If another handset or Deskphone is already in use and all available lines are in use, you will hear an engaged tone when attempting to dial out.
To end a call
Replace the handset on the cradle.
To use the loudspeaker
This allows you to talk without holding the handset.

Press LOUDSPEAKER before or after dialling the number.
Or during a call

Press and hold the LOUDSPEAKER button whilst replacing the handset on the base, then release the loudspeaker button.

You can adjust the loudspeaker/handset volume during a call with +/- buttons on the Deskphone.
Please note
If you wish to switch to loudspeaker during a call, press and hold down the
Press and hold the LOUDSPEAKER button until you have placed the handset in the cradle.
If you fail to hold down the LOUDSPEAKER button, the call will be disconnected.
To accept an incoming call
Press keypad buttons in the order shown.
Lift the handset.
Or

Press the LOUDSPEAKER button.
To redial numbers
You can redial the last five numbers dialed from your Deskphone.
The handset must be on the Deskphone.

Press REDIAL.

Press DOWN to find the number you want.
When the number is highlighted, lift the handset to dial.
To redial the last dialed number
Lift the handset.

Press REDIAL.
To store a redial number in the directory
With the Deskphone in idle state it is possible to store any redial number into its phonebook.

Press REDIAL. Use the UP or

DOWN option to highlight the

required number.

Press ACTIVATE.

Press DOWN to select
COPY NUMBER

Press OK. The display shows NAME and the redial telephone number. The cursor flashes for you to input a name.

Using the alphabet letters on the keypad (press once for the first letter, twice for the second letter, three times for the third letter and four times for the fourth letter) input the name of the person whose number you wish to store. (Press BACK and

FORWARD to move through the characters on the display and

DELETE to cancel mistakes.)
To enter a blank space between two names, press the 0 button.

Press ACTIVATE. The menu will show SAVE ENTRY highlighted.

Press OK to save the entry.
Making internal calls
To make an internal call
Your handset must be in the cradle.
INT
Press INT. Dial the internal extension you want.
You can still use the loudspeaker during internal calls but INT must be pressed first.
To find out your own extension number
Your handset must be in the cradle.
INT
Press INT. Your extension number will be displayed.
To call all other telephones registered to the same base
Your handset must be in the cradle.
INT
Press INT.
*
Press *. All telephones are called. You can speak to the first person who answers.
INT
You can also call all other telephones by pressing INT and then selecting COLL.CALL.
Transferring external calls
You can easily transfer calls between handsets. On most Diverse handsets this is done by pressing INT followed by the extension number you wish to call. Generally, you can replace your receiver either before or after the transferred call has been picked up. For more information please see your base station guide.
To transfer a call with the Diverse 2010/2015

During an external call
Press the MENU button and select internal call.
Select the extension number to which you wish to transfer the call.
Replace the handset on the base.
To put a call on hold with the Diverse 2010/2015

Press the MENU button and select INT. Your caller will be on hold and will hear music.
INT

To return to your caller press the RCL button
To put an internal or external call on hold using the Diverse 2-Line
Press keypad buttons in order shown
While in a call:

Press the MENU button.

Press DOWN to highlight INTERNAL CALL

Press OK. The call is put on hold. External callers will hear music whilst internal callers will hear silence.

Press RESUME to return to the call.
Note. If you replace the handset whilst the call is on hold it will end an internal call but if it was an external call on hold the Diverse 2-Line will ring you back and reconnect you to the call if you answer it.
To put an external call on hold using the Diverse ISDN
While in a call:

Press INT. The call is put on hold. External callers will hear music whilst internal callers will hear silence.

Press RESUME to return to the call.
Note. If you replace the handset whilst the call is on hold the Diverse ISDN will ring you back and reconnect you to the call if you answer it.
To put an internal call on hold using the Diverse ISDN

While in a call:
Press the MENU button.

Press DOWN to highlight INTERNAL CALL.

Press OK. The call is put on hold. External callers will hear music whilst internal callers will hear silence.

Press RESUME to return to the call.
Note: If you replace the handset whilst the call is on hold, it will end an internal call, but if it was an external call on hold, the Diverse 2-Line will ring you back and reconnect you to the call if you answer it.
To transfer an external call with the Diverse 2-Line:

Press the MENU button.
NEXT
OK
Press NEXT to highlight INTERNAL CALL and press OK.
0-9
Either enter the internal number (0-9) of the handset or telephone to which you want to transfer the call, or press the * button to ring all handsets. When the call is answered, you can talk to the other handset without the outside caller hearing.

To transfer the call, press the END CALL button, or replace the handset on the cradle.
Quick call transfer:
After dialling the other handset, you can immediately press the END CALL button or place the handset back on the charger and the call will be transferred straight through. If the other handset is already engaged or does not answer the call within 30 seconds, the call will be returned to your handset.
To transfer an external call with the Diverse ISDN
INT
Press INT.
0-9
Enter the internal number (0-9) of the extension you want to call. When the extension answers, transfer the call by pressing the END CALL button.
END CALL
Quick call transfer
When the called extension rings, you can transfer the call immediately by pressing the END CALL button, but if it is not answered within 30 seconds it will be returned to your extension.
Using the Phonebook
Your Diverse Deskphone has a Phonebook which stores up to 100 names and numbers in the memory (the longer the name, the more memory will be used). In line 1 (Name) a maximum of 16 characters can be entered. In lines 2 and 3 (Tel. number) a maximum of 32 digits can be stored. You can use the Phonebook to look up numbers and then dial them directly.
When moving through the MENU options remember, if you wish to escape a MENU altogether, press the LOUDSPEAKER button twice or lift and replace the handset on the cradle. To return to a previous MENU press GO BACK.
To use an upper case letter press the ✠ button each time.
To add a number and name to the Phonebook
Press keypad buttons in order shown
Press PHONEBOOK.
Press ACTIVATE.
Use the DOWN option to highlight NEW ENTRY.
Press OK. The display shows NAME and TEL.NUMBER and the cursor flashes for you to input the name first.
Using the alphabet letters on the keypad (press once for the first letter, twice for the second letter, three times for the third letter and four times for the fourth letter) input the name of the person whose number you wish to store. (Press RIGHT and LEFT to move through the words on the display and DELETE to cancel mistakes.) To enter a blank space between two names, press the 0 button.
When you have finished writing the name, press the LEFT button. The display will ask you to enter the TEL.NUMBER. Use the keypad to input the telephone number.
Press ACTIVATE.
Press OK to SAVE THE ENTRY.
The name and number have now been saved in the Phonebook and the display briefly shows ENTRY STORED.
To dial a number stored in the Phonebook:

Press PHONEBOOK. The display shows a list of stored numbers.

Press UP or DOWN to highlight the name of the person you want to call.

To dial, lift your handset. Or
Press ACTIVATE and press UP or DOWN to select DIAL NUMBER.
Press OK to dial.
To quicksearch for a name in the Phonebook:

Press PHONEBOOK.
KEYPAD
Press the key with the first letter of the name you wish to call. The display will now highlight the first name listed which starts with the letter you keyed in (press the button twice for the second letter, press it three times for the third, and four times for the fourth letter on the button – eg. number 7 has 4 letters: PQRS, to search for names beginning with R, press the 7 button three times). If the name you want is highlighted, lift the handset and the number is automatically dialled.

Or

Press DOWN to find the name, and then lift the handset and the number is automatically dialled.


To change an entry in the Phonebook

Press PHONEBOOK.

Press UP or DOWN to select the entry you wish to change.

Press ACTIVATE.

Press UP or DOWN to highlight EDIT ENTRY

Press OK and the display takes you to the name/ number you want to change.

Use the LEFT, RIGHT and DELETE options and use the keypad to make your changes.

Press ACTIVATE when you have finished editing.
Either

Press UP or DOWN to highlight SAVE ENTRY

Press OK to confirm. Display will briefly confirm the entry has been stored.
Or

Press UP or DOWN to highlight CANCEL.

Press OK to exit from the procedure without saving any changes.

DELETE options and use the keypad to make your changes.

Press ACTIVATE when you have finished editing.

Either

Press UP or DOWN to highlight SAVE ENTRY

Press OK to confirm. Display will briefly confirm the entry has been stored.

Or

Press UP or DOWN to highlight CANCEL.

Press OK to exit from the procedure without saving any changes.
To delete individual entries

Press PHONEBOOK.

Press UP or DOWN to highlight the name/ number you want to delete and then press ACTIVATE.

Press UP or DOWN to highlight DELETE ENTRY.

Press OK. Display will confirm the deletion.
To delete all Phonebook entries

Press PHONEBOOK and then press ACTIVATE.

Press UP or DOWN to highlight DELETE DIRECTORY.

Press OK. The display will ask you to enter your telephone PIN (default 📞)

Enter the PIN number.

Press OK. The display will ask you if you want to DELETE ALL ENTRIES?

Press YES to confirm. Display will briefly confirm the deletion. All entries are now deleted.

Or

Press NO to cancel the procedure.
To find out how much free space is in the Phonebook memory
Press keypad buttons in order shown
Press PHONEBOOK and then press ACTIVATE.
Press UP or DOWN to highlight AVAILABLE MEMORY
Press OK. The amount of free space will be displayed briefly. For example, the display will show: MEMORY: 74% AVAILABLE
When COPY ENTRIES TO INTERNAL UNIT is displayed, enter the internal extension number of the telephone you wish to copy to.

Press ACTIVATE again and use the arrows to highlight COPY.

Press OK. The receiving telephone is dialled.
When the call is answered the called party is asked to enter their PIN number. Copying begins when the correct PIN number is entered
When used with the Diverse ISDN base station only
To copy your Phonebook entries to another telephone
Individually saved entries or the complete directory can be copied between any Diverse 2000 Deskphone, Diverse 2000 Executive Handset and Diverse 2000 Pocket Phone. This feature is only available when used with the Diverse ISDN.
Press PHONEBOOK and then press ACTIVATE.
Press UP or DOWN to highlight COPY DIRECTORY
Press OK.


To change the settings on your Diverse Deskphone
To display the SETTINGS menu options

Press the MENU button.
Use DOWN to highlight SETTINGS.
Press OK.
The following menu items will be displayed.
Handset Volume – for increasing/decreasing the earpiece volume.
Ringer Options – for adjusting the telephone ringer volume and tone.
Register – for registering the telephone (see page 8).
Base Settings – for changing base name (see page 35), ISDN config. (see Diverse ISDN user guide) or for de-registering a base from the Deskphone (see page 10).
Local Settings – for customising the Deskphone to your personal preferences such as switch auto backlight or various beeps/ tones on or off.

If you wish to escape a MENU press the LOUDSPEAKER button twice or lift and replace the handset on the cradle.
To return to a previous MENU press the GO BACK option.
To adjust the handset volume
You can set the handset volume to three different levels. The standard setting is 1.

Press the MENU button.
OK
Highlight SETTINGS and press OK.
▼
Highlight HANDSET VOLUME.
OK
Press OK. Display shows steps to indicate volume level and the volume number 1, 2 or 3.
<
Use the LEFT and RIGHT to highlight the volume required.
Press OK. The telephone beeps to show that the volume has been set.
<
Use LEFT and RIGHT to select desired level.
Press OK. The telephone will beep to confirm and move back to previous menu.
To adjust the ringer volume To adjust the ringer tone
Press keypad buttons in order shown
The ringer volume can be set to six different levels.

Press the MENU button.
OK
Highlight SETTINGS and press OK.
Highlight RINGER OPTIONS
OK
Press OK.
▼
Press DOWN to highlight RINGER VOLUME.
OK
Press OK. Display shows steps (6 levels and off) to indicate volume level, and rings that level to demonstrate.
There are 10 different ringer tones from which to choose.

Press the MENU button.
OK
Highlight SETTINGS and press OK.
▼
Highlight RINGER OPTIONS.
OK
Press OK.
▼
Press DOWN to highlight RINGER TONE
OK
Press OK. Display shows 10 musical notes, each one representing a different tone.
<
Use the LEFT and RIGHT arrows to move through the options and to hear a demonstration of each
OK
Press OK on the tone you prefer. The telephone beeps to confirm and returns to the previous menu.
To display the LOCAL SETTINGS menu options

Press the MENU button.
Use DOWN to highlight SETTINGS.
OK
Press OK.
Press OK. Display shows the following menu options.
Beeps – activates and removes advisory beeps and warnings (see below).
Auto Backlight – switches a light ON and OFF behind the display (page 24).
Change PIN – additional features (page 29).
Language – to change the display to read in different European languages (page 24).
Baby Alarm Level – changes the sensitivity of the baby alarm (page 25).
Initialization – resets the handset to standard settings (page 26).
The Beeps menu allows the following warning and advisory tones to be switched on or off. A tick in front of the menu item indicates it is switched on.
Key confirmation beep
Each time a key is pressed the beep sounds. Default setting is ON.
Range warning beep
Tells you when the telephone is too far from the base station during a call. Default setting is OFF.
Confirmation beep
Confirms that you have followed procedures successfully.
Default setting is ON.
Error beep
Lets you know that you have made a mistake when following a procedure.
Default setting is ON.
In range beep
Tells you the phone is back within range of the base station. Default setting is OFF.

If you wish to escape a MENU press the LOUDSPEAKER button twice or lift and replace the handset on the telephone unit. To return to a previous MENU press GO BACK.
To switch the advisory/warning tones on/off

Press the MENU button.

Press DOWN to highlight SETTINGS.

Press OK.

Press DOWN to highlight the beep you want to modify.
Press OK. The display will show the current setting and an ON or OFF button to change the setting.
Either - To change the setting.
Press ON (if current state is off) or OFF (if current state is on).
Or – To keep the current setting. Press OK.
To switch the automatic backlight feature on/off
Press keypad buttons in order shown
The light is activated by touching a button or by the detection of an incoming call. The standard setting is ON.
Press the MENU button.
Highlight SETTINGS. Press OK.
Switch the light OFF and ON by using the option buttons.
Press OK to confirm.
To change the language on the display
You can have the display in ENGLISH, GERMAN, FRENCH, ITALIAN, SPANISH, PORTUGUESE or DUTCH. The standard setting is English.

Press the MENU button.
OK
Highlight SETTINGS. Press OK.
OK
To change the language back to English

Press the MENU button.
▲
Press UP or DOWN until one of these words appear:
— SETTINGS - ADJUSTMENTS - SETTINGS - ADJUST - SETTINGS - PROGRAM
OK
Press OK.
Press UP or DOWN until one of these words appear:
- LOCAL SETTINGS
- COMBINE HARVESTER SETTINGS
- PHONE SETTINGS
- LOCAL ADJUST
- LOCAL PROGRAM
- LOCAL SETTINGS
Press OK.
Press UP or DOWN until one of these words appear:
- LANGUAGE
- LANGUAGE
- LANGUE
- LINGUA
- IDIOMA
- TAAL
Press OK.
The language menu is displayed and you can select English from the list (one of the following words).
Choose ‘ENGLISH’. One of the following choices:
- INGLES
- ENGLISH
- ENGELS
- INGLES
-INGLESE
- ANGLAIS
- ENGLISCH
Press OK.
To alter the sensitivity level of the baby alarm

Press the MENU button.
Highlight SETTINGS. Press OK.
Use LEFT and RIGHT to select
the level you want (1 = least sensitive, 3 = most sensitive).
Press OK. The sensitivity is set.
(See page 31 for a description of the baby alarm feature.)
To reset the Deskphone back to original standard settings
Press keypad buttons in order shown
This will not affect the PIN,
Phonebook or base system code.
The following settings will be restored:
Ringer volume 3
Ringer tone 1
Handset volume 1
Loudspeaker volume 3
Range warning OFF
In-range Beep OFF
Key Beep ON
Confirm Beep ON
Error Beep ON
Automatic Backlight ON
Language Setting English
Redial number list Deleted
ISDN Configuration ON

Press the MENU button.

Press UP or DOWN to select

SETTINGS.

Press OK.

Press UP or DOWN to select

LOCAL SETTINGS

Press OK.

Press UP or DOWN to select

INITIALISATION.

Press OK. The display will ask you to enter your Deskphone PIN number (default 0000).
CODE
Enter your PIN.

Press OK. Display reads:
'RESET SETTINGS TO DEFAULT'
Using the Diverse Deskphone with a switchboard
Your Diverse Deskphone can be connected to all compatible switchboards (PBXs). For a list of compatible switchboards call the Diverse Helpline on 0845 7908070.
See your Diverse base station user guide for more information on using your phone with a switchboard.
Inserting Pauses
When connected to some switchboards it may be necessary to insert a pause in the number string. The following procedures show how it can be done.
To insert a pause in a number using conventional dialling

Lift handset or press LOUDSPEAKER button.
Dial part of number up to where pause is required.

Press PAUSE.
Dial remainder of number.
To insert a pause in a number using preparatory dialling
Deskphone must be in idle state.
Enter part of number up to where pause is required.

Press ACTIVATE.

Press DOWN to highlight PAUSE.

Press OK. A P will be added to the end of the number.
KEYPAD
Enter remainder of number.

Lift handset or press LOUDSPEAKER button.
To insert a pause in a number stored in the phonebook
Press keypad buttons in order shown
Refer to the phonebook procedures on how to create, edit and save phonebook entries.
Either – when creating a new entry.
Enter the name and part of the number up to where the pause should go.
> 三+
Press ACTIVATE.
▼
Press DOWN to highlight INSERT FUNCTION.
OK
Press OK. Display will show PAUSE highlighted.
OK
Press OK. Display will now show a P at the end of the number you are entering. Enter the remainder of the number then save it in the normal way.
Or - when editing an entry.
Edit the number you want to add a pause to.
Move cursor along the number and position it immediately to the right of where the pause should go.
> 三+
Press ACTIVATE.
▼
Press DOWN to highlight PAUSE.
OK
Press OK. A P will be inserted to the left of the cursor position.
Save the entry in the normal way.
Additional Features
Security
Using and changing the Deskphone PIN code
As a digital phone system, your Diverse provides excellent security features against others ‘listening in’ to your calls. You can also prevent others from changing your Deskphone settings, and your phonebook entries. Each phone needs to be registered with the base station. To do this you need to know and use the system code.
The default setting for both the Deskphone PIN and system code is 0000.
To change the system code, please refer to your base station user guide.
To set or change the Deskphone PIN (personal identification number)
If you change your Diverse Deskphone PIN, please keep a note of it in the box provided at the front of this book.
PIN numbers can be up to eight digits long, and can consist of any combination of the numbers 0-9.
If you enter an incorrect PIN number while changing your PIN, the display returns to Handset Settings and you have to go through the process again.

Press the MENU button.

Highlight SETTINGS and then press OK.

Enter your current PIN number (default 0000). (If you make a mistake, use BACK, FORWARD, and DELETE to correct it.)

Press OK.

Enter your new PIN number and press OK.

Enter the new PIN again.

Press OK. A confirmation beep is sounded and the message 'NEW PIN STORED!' is displayed.

Try not to forget your PIN number because expert technical help will be needed to release the phone. If you do forget your PIN, contact the Diverse Helpline on 0845 7908070.

Press OK. A confirmation beep is sounded and the message 'NEW PIN STORED!' is displayed.

Phone Lock
To block the telephone from making outgoing calls
Press keypad buttons in order shown
The Diverse Deskphone offers call barring to prevent unauthorized use. Incoming calls can still be answered.

Press the MENU button.
OK
Select PHONE LOCK and press OK.
CODE
Enter your PIN number (default 0000).
OK
Press OK.
Highlight LOCK ON/OFF and press OK.
OK
Press ON to activate Phone Lock. The display will change to OFF and the lock symbol will show a closed lock.
OK
Press OK to confirm. The display shows PHONE LOCKED. If someone picks up the handset to make a call they will hear the engaged tone, and a key symbol will appear in the display to indicate the phone is locked.
OK
Or
Press GO BACK to come out of the menu without setting call barring.
<
To remove call barring, follow the procedure above and press OFF when it appears, then press OK.
OFF
OK
Quickdial Number
A Quickdial number can be stored in your Diverse Deskphone so that when you lift the handset, the Quickdial number is automatically dialled. This can be useful, for instance, if you wish a child or babysitter to be able to contact you immediately just by lifting the handset and pressing any key.
To store a Quickdial number

Press MENU.
OK
Select PHONE LOCK and press OK.
CODE
Enter PIN (default 0000) and press OK.
OK
Select DSS NUMBER from the menu and press OK. Display will show DSS NUMBER
OK
Enter the number you wish to store as your Quickdial number.
KEYPAD
Press ACTIVATE.
→ 三 +
Highlight SAVE ENTRY and press OK.
To operate the Quickdial function

Press the QUICKDIAL button on the keypad. The phone will automatically dial the stored number on handsfree operation. To switch from handsfree to use the handset, just pick up the handset.
To edit or cancel a stored Quickdial number

Press the MENU button.

Select PHONE LOCK and press OK.

Enter PIN (default 0000) and press OK.

Use UP or DOWN to select DSS NUMBER from the menu and press OK.

Use the RIGHT/ LEFT and DELETE buttons to change the number (or just use the DELETE button to remove the complete number if you wish to cancel the stored Quickdial number).

Press ACTIVATE once you have finished your alterations.

Press OK to save entry.
To contact emergency services when outgoing calls have been blocked
KEYPAD
In case of emergencies, you can still dial 999, even if the phone lock has been activated. To do this, the handset must be on the cradle. First dial 999 and then pick up the handset. If you are calling via a switchboard, you will need to dial the switchboard external dialling code (usually 0, 9 or R) before the 999.
Baby Alarm
To switch the baby alarm ON and OFF
The baby alarm sets up a connection between two telephones registered to the same base. When a noise registers in the first telephone, the second one rings. If the call to the second telephone is answered, conversation is possible. The standard setting for this service is OFF.
The standard setting for the sensitivity level of this alarm is 2. If you wish to change the sensitivity, see page 25.
The baby alarm will not work in conjunction with call barring. If one of the telephones you are using requires batteries, they must be fully charged and the handset in the ‘baby room’ must not be placed in a charger, as this will cover the microphone.
On the phone in the baby room
Press keypad buttons in order shown
Press the MENU button.
Using the DOWN option on the menu highlight BABY ALARM
Press OK.
Enter the extension number of the telephone you wish to ring as the alarm.
Press ACTIVATE. STORE will be highlighted on the display.
Press OK. Display will show BABY ALARM ACTIVATED INTERNAL plus the extension number of the telephone to be called.
To switch the baby alarm OFF
Press OFF.
Operating with additional base stations
You can register your Diverse Deskphone with up to three base stations.
If you are registering phones to more than one base we recommend that you:
- Ensure each base station has been assigned a different number.
- Ensure that each handset is given the same extension number at each base with which you register it.
To register your Diverse Deskphone to additional base stations
Either -
At a Diverse 1010/1015/2010/2015 base station

Press the GREEN or GREY PAGER button (for about 10 seconds) until it starts to beep then release the button. You now have up to 1 minute to complete the registration process.
Or -
At a Diverse 2-Line or ISDN base station
Press the GREEN registration light/ button then release it. The registration light should now start flashing. You now have up to 1 minute to complete the registration process.
Then -
At the Deskphone

Press the MENU button.

Press DOWN to highlight SETTINGS.

Press OK.

Press DOWN to highlight REGISTER.

Press OK.

Press DOWN to highlight which base name you want to register to (BASE 1, BASE 2, BASE 3).

Press OK.
| KEYPAD | Enter the system code for the base to which you are attempting to register. |
| OK | Press OK. After a few seconds the Deskphone will display all available internal numbers. |
| KEYPAD | Press a number button corresponding to one of the free internal numbers displayed. |
| OK | Press OK. |
| The Deskphone is now registered with the base station and the base station name displayed when in idle state. |
To set the Diverse Deskphone to select the best base station signal
Press keypad buttons in order shown
Once you have registered your Deskphone to additional base stations you can also set it to find the strongest base station signal automatically, each time you make a call.

Press the MENU button.
Highlight SELECT BASE
OK Press OK.
Use DOWN to highlight BEST BASE
Press OK. Automatic base selection is set.
To set the Diverse Deskphone to search for a specific base signal
If you are using your phone in an area where two base signals overlap, we recommend that you specify a preferred base signal for your telephone to search for first. If the phone does not find a clear signal from this base it will then resort to finding an alternative signal.

Press the MENU button.

Highlight SELECT BASE

Press OK.

Use DOWN to find the base station that you want as first choice (i.e. BASE).

Press ACTIVATE.
Select PRIORITY SELECTION

Press OK. Priority selection is set.
If you want your telephone to search for only one base, and not switch to searching for a better signal, select FIXED SELECTION instead of PRIORITY SELECT.
For instructions on how to use multibase operation with Diverse ISDN, please refer to your base stations user guide.
To change base station name/numbers on your Diverse Deskphone
You may decide to reassign base names/ numbers when building up your telephone system.

Press the MENU button.
Select SETTINGS and press OK.

Select BASE SETTINGS and press OK.
Highlight the base you wish to rename.

Press ACTIVATE. Display shows CHANGE BASE NAME

Press OK.

Use DELETE to remove the current name.
Use the keypad to write the new name.

Press ACTIVATE. SAVE ENTRY will be highlighted on display.

Press OK. Display shows ENTRY STORED.
The new base station name will now show on your Diverse Deskphone display.
For instructions on how to de-register a Deskphone which is registered on more than one base, please see page 10.
The procedure opposite removes the registration information from the Diverse Deskphone only. On completing these steps you will need to remove the information from the base station as well. See your base station user guide for instructions.
How to use the shortcut function
Shortcut function
Your Diverse 2000 Deskphone has a shortcut button which gives you access to a shortcut menu. In the shortcut menu you can store frequently used functions as shortcuts which can be accessed when the phone is in idle state or on-line.
Each shortcut corresponds to a button sequence which is saved under a shortcut name and can then be retrieved from the list of shortcut names, just like a directory entry.
Overview of shortcut functions.
- Start
- New entry
- Edit entry
- Delete entry
- Display entry
- Copy entry
- Delete memory
- Copy memory
- Default shortcuts • Available memory
How to create a new shortcut
Press keypad buttons in order shown

Press the SHORTCUT button (a list of names of previously created shortcuts will be displayed. If this is the first shortcut you are creating, the display will be empty).

Press the ACTIVATE button and highlight NEW ENTRY

Press OK. An edit screen will appear which has a name field and a shortcut field. The word NAME flashes as a prompt to enter a name for the shortcut.
Enter the name of the function and the contents using the keypad.

Press ACTIVATE.

Highlight SAVE ENTRY and press OK. The entry is stored.

Press the MENU button to return to idle state.
How to insert functions whilst creating a new shortcut
See list below of available functions.

Press the ACTIVATE button.

Press UP or DOWN to highlight INSERT FUNCTION

Press OK. A list of functions will be displayed.

Press UP or DOWN to highlight the desired function.

Press OK. The edit screen will now be shown with a character added in the shortcut field. The meaning of the characters is shown in the table below.

Repeat the last 5 steps to add more functions.
| Function Character Inserted Displayed | |
| Request PIN Code | C |
| Request Number | N |
| Insert Pause | P |
| Request Acknowled. | Q |
| Base Prompt (state) | B |
| INT button | I |
| SET button | S |
| Redial button | W |
| End Call | E |
| Temp Switch to Tone | M |
How to use a shortcut

Press the SHORTCUT button. A list of stored shortcuts will be displayed.

Use UP or DOWN to highlight the required shortcut.

Press the ACTIVATE button.

Highlight START and press OK.

The shortcut sequence will now start and will continue automatically through the sequence, prompting the user for input such as a PIN number or an internal number if required.
How to view, edit or delete an entry

Press the SHORTCUT button.

Press DOWN to highlight the required shortcut.

Press ACTIVATE.

Viewing

Press DOWN to highlight DISPLAY ENTRY.

Press OK. The shortcut name and content will be displayed.

Press the GO BACK button to return to the menu.
Editing
Highlight EDIT ENTRY
OK
Press OK. The shortcut name and content will be displayed.
The shortcut name will be flashing with the edit cursor at the end of the line.
<
Use LEFT and RIGHT to move the cursor,
>
LEFT to delete the character to the left of the cursor, the keypad buttons to insert
三+
digits and ACTIVATE button to go to another menu to allow inserting a function.
三
Press ACTIVATE.
OK
Saving
Highlight SAVE ENTRY and press OK, (or highlight CANCEL then press OK to abort editing and return to the screen listing the shortcuts.
OK
Deleting
Highlight DELETE ENTRY and press OK. The display will confirm the entry has been deleted.

Press the MENU button to return to idle state.
How to delete all shortcuts

Press keypad buttons in order shown

Press the SHORTCUT button. A list of the stored shortcuts will be displayed.
Press ACTIVATE.

Press UP or DOWN to highlight DELETE MEMORY.

Press OK. You will now be asked for the handset PIN number.
OK
Enter the handset PIN number.
CODE
Press OK. You will now be asked "Delete all entries".
OK
Either
YES
Press the YES button to delete all the entries. The deletion will be confirmed.
YES
Or
NO
Press the NO button to abort the deletion and return to the list of shortcut names.

Then
Press the MENU button to return to the idle menu.
To load the default shortcut list for Diverse 1010/1015/2010 and 2015

Press the SHORTCUT button.

Press ACTIVATE.

Highlight DEFAULTSHORTCUTS by using the UP or DOWN button.

Press OK. The screen will display CAUTION: USE ONLY WITH SPECIFIC BASES!. This is a reminder that the shortcut functions were written for use with the 1010, 1015, 2010 or 2015 base stations.

Either

Press LOAD to store the defaults in memory. The screen will display SYSTEM SHORT CUTS COPIED IN LIST

Or

Press CANCEL to abort and return to the screen listing the shortcuts.
Press MENU to return to the idle menu.
To check how much memory is free

Press the SHORTCUT button.

Press ACTIVATE.

Press UP or DOWN to highlight AVAILABLE MEMORY.

Press OK. The amount of memory will now be displayed for a few seconds before returning to the list of shortcut names.

Press the MENU button to return to idle menu.

Maintenance
General
Simply clean the telephone with a damp (not wet) cloth or antistatic wipe. Never use a dry cloth as this may cause static shock.
Service
Within the warranty period
If you experience a problem with your Diverse Deskphone you should contact the Diverse Helpline on 0845 7908070. Calls are charged at local call rates. If the problem is not remedied, you will be advised to contact your original point of purchase. Some suppliers offer extended warranty schemes for cover outside the initial 12-month period. Please ask them for details.
Outside the warranty period
If your Diverse Deskphone needs repair after the warranty period has ended, the repair must meet the approval requirements for connection to the telephone network. We recommend that you call the Diverse Helpline on 08457908070 for a list of our recommended repair agents.
If you have to return your Diverse Deskphone
Pack it securely, preferably in the original packaging. We cannot take responsibility for goods damaged in transit.
Emergency Calls
The emergency services can be contacted in the UK by dialling 999, or by dialling 112, which is valid in any country that is a member of the European Community. If your Diverse base station is connected to a switchboard, you can still dial the emergency services direct on 999. This number will connect you even if call barring has been set, but YOU MUST DIAL 999 BEFORE LIFTING YOUR HANDSET FROM THE TELEPHONE UNIT.
Please note: Some switchboards cannot dial out during a power failure.
If you have a problem, the following simple solutions may provide the answer.
No display appears
Check that the telephone is switched on. Check that the power unit is plugged in properly.
No dial tone
Check that the handset cord is plugged into the handset and the telephone unit. Check that the base station is switched on. If other telephones or handsets are registered on the same base, the outside line may already be in use. Wait until the call is finished and try again.
'Search Station' is flashing on the display or you cannot link up with the base station?
Check that your Deskphone is registered to a base station.
To register your Deskphone, see page 8. Check that the power cable is connected to the telephone unit and switched on at the wall socket.
Check that the phone is within range of a base station to which it is registered.
Also check that the base station is connected to the power point and switched on at the wall socket.
The telephone does not ring
The ringer volume may be set too low. Adjust the ringer volume by following the instructions on page 22.
Telephone beeps
If 'Search Station' is flashing, check that you are in range of your base station.
Buzzing noise on my radio, TV, answering machine or computer
Diverse is too close, causing interference. Move it another metre away.
The radio signals from the telephone to the base station may cause unpleasant interference for people with hearing aids.
Please note
Please read the Help section in your base station user guide and if you still cannot solve your problem, please call the Diverse Helpline on
0845 7908070
Technical Information
Environment
Your Diverse Deskphone should be kept free of dust, moisture, high temperature and vibration. It should not be exposed to direct sunlight. Do not stand it on carpets or other surfaces which generate fibres, or place it in locations which prevent the free flow of air over its surfaces.
Approval
This additional piece of equipment for Diverse base stations has been approved in accordance with the European directive 91/263/EEC Telecommunications Terminals. This telephone satisfies the requirements of the EU directive.
Warning
The apparatus is only designed to be operated in a normal office or domestic environment where the relative humidity does not exceed 75%. It should not be used in bathrooms or near water.
Connecting to switchboards
The Diverse Deskphone is only approved for use with a base which is compatible with switchboards, including those which do not provide secondary proceed indication. If you would like a list of suitable switchboards, contact the Diverse Helpline on 0845 7908070. If you do have a compatible switchboard, it cannot be guaranteed that the telephone will operate correctly under all possible conditions of connection. If you have any difficulties call the Diverse Helpline on 0845 7908070.
Generally, Diverse systems can be connected to any switchboard where a simple modern telephone can be used to make and receive calls. The Diverse system is suitable for connection to switchboards which return secondary proceed indication.
Index
Answer call 14 Baby alarm 25, 31 Backlight 24 Base name 35 Base selection 34 Base stations 33 Beeps 23, 41 Buzzing 41 DECT 4 Directory 14 Display symbols 11 Emergency calls 31, 41 Ending a call 13 Extension number 8, 9, 35 Handset 6 Help 41 Installation 6 Internal calls 15 Language 24 Lock 30 Loudspeaker 13 Mains power 6 Maintenance 40 Making and receiving calls 13 Menus 11 On-hold 15, 16 Outgoing call barring 30 Pause 27 Phonebook 17 capacity 20 change entries 19 copy entries 20 delete entries 19 PIN 29
Quickdial 30 Quick search 18 Range 6 Redial 14 Registering with base stations 8 Removing registration 10 Reset 26 Ringer tone 22 Ringer volume 21 Security 29 Settings 21 Shortcut 36 Store numbers 14 Switchboards 27,42 Technical information 42 Transferring calls 15, 17 Volume 21, 22 Warnings 42
Offices in Europe, North America, Japan and Asia Pacific.
The telecommunications services described in this publication are subject to availability and may be modified from time to time. Services and equipment are provided subject to British Telecommunications plc's respective standard conditions of contract. Nothing in this publication forms any part of any contract.
Touchtone™ is a registered trade mark of British Telecommunications plc in the UK.
© British Telecommunications plc 1998. Registered Office: 81 Newgate Street, London EC1A 7AJ. Registered in England No. 1800000. Siemens order number: A30852-X1104-B551-1-7619. Printed in Germany. Diverse Deskphone Issue 1 (11/98) 4. Designed by The Art & Design Partnership Limited.



- DIVERSE DESKPHONE
- USER GUIDE
- AT A GLANCE
- FOR YOUR RECORDS
- PERSONAL EMERGENCY NUMBERS
- IN THIS GUIDE
- INTRODUCTION
- DECT
- BUILDING UP A PHONE SYSTEM
- IMPORTANT INFORMATION
- UNPACKING YOUR DIVERSE DESKPHONE
- INSTALLATION
- PLAN THE LOCATION OF YOUR DIVERSE DESKPHONE
- 1 CONNECT THE HANDSET TO THE DESKPHONE
- 2 CONNECT THE DESKPHONE TO THE MAINS POWER SUPPLY
- YOU WILL NOW NEED TO REGISTER YOUR DESKPHONE TO A DIVERSE BASE UNIT
- REGISTERING YOUR DIVERSE DESKPHONE WITH A BASE STATION
- REGISTERING WITH DIVERSE 1010, 1015, 2010 AND 2015 BASE STATIONS
- AT THE DESKPHONE
- AT THE BASE STATION
- REGISTERING WITH DIVERSE 2-LINE AND ISDN BASE STATIONS
- TO DE-REGISTER A BASE FROM THE HANDSET
- YOUR DIVERSE DESKPHONE MENU DISPLAY
- TO EXIT FROM THE MENU
- PLEASE NOTE
- USING THE DIVERSE DESKPHONE
- MAKING AND RECEIVING EXTERNAL CALLS
- TO MAKE AN EXTERNAL CALL
- TO END A CALL
- TO USE THE LOUDSPEAKER
- TO ACCEPT AN INCOMING CALL
- TO REDIAL NUMBERS
- TO REDIAL THE LAST DIALED NUMBER
- TO STORE A REDIAL NUMBER IN THE DIRECTORY
- MAKING INTERNAL CALLS
- TO MAKE AN INTERNAL CALL
- INT
- TO FIND OUT YOUR OWN EXTENSION NUMBER
- TO CALL ALL OTHER TELEPHONES REGISTERED TO THE SAME BASE
- TRANSFERRING EXTERNAL CALLS
- TO TRANSFER A CALL WITH THE DIVERSE 2010/2015
- TO PUT A CALL ON HOLD WITH THE DIVERSE 2010/2015
- TO PUT AN INTERNAL OR EXTERNAL CALL ON HOLD USING THE DIVERSE 2-LINE
- TO PUT AN EXTERNAL CALL ON HOLD USING THE DIVERSE ISDN
- TO PUT AN INTERNAL CALL ON HOLD USING THE DIVERSE ISDN
- TO TRANSFER AN EXTERNAL CALL WITH THE DIVERSE 2-LINE
- QUICK CALL TRANSFER
- TO TRANSFER AN EXTERNAL CALL WITH THE DIVERSE ISDN
- USING THE PHONEBOOK
- TO ADD A NUMBER AND NAME TO THE PHONEBOOK
- TO DIAL A NUMBER STORED IN THE PHONEBOOK
- TO QUICKSEARCH FOR A NAME IN THE PHONEBOOK
- TO CHANGE AN ENTRY IN THE PHONEBOOK
- TO DELETE INDIVIDUAL ENTRIES
- TO DELETE ALL PHONEBOOK ENTRIES
- TO FIND OUT HOW MUCH FREE SPACE IS IN THE PHONEBOOK MEMORY
- WHEN USED WITH THE DIVERSE ISDN BASE STATION ONLY
- TO COPY YOUR PHONEBOOK ENTRIES TO ANOTHER TELEPHONE
- TO CHANGE THE SETTINGS ON YOUR DIVERSE DESKPHONE
- TO DISPLAY THE SETTINGS MENU OPTIONS
- TO ADJUST THE HANDSET VOLUME
- TO ADJUST THE RINGER VOLUME TO ADJUST THE RINGER TONE
- TO DISPLAY THE LOCAL SETTINGS MENU OPTIONS
- KEY CONFIRMATION BEEP
- RANGE WARNING BEEP
- CONFIRMATION BEEP
- ERROR BEEP
- IN RANGE BEEP
- TO SWITCH THE ADVISORY/WARNING TONES ON/OFF
- TO SWITCH THE AUTOMATIC BACKLIGHT FEATURE ON/OFF
- TO CHANGE THE LANGUAGE ON THE DISPLAY
- TO CHANGE THE LANGUAGE BACK TO ENGLISH
- TO ALTER THE SENSITIVITY LEVEL OF THE BABY ALARM
- TO RESET THE DESKPHONE BACK TO ORIGINAL STANDARD SETTINGS
- USING THE DIVERSE DESKPHONE WITH A SWITCHBOARD
- INSERTING PAUSES
- TO INSERT A PAUSE IN A NUMBER USING CONVENTIONAL DIALLING
- TO INSERT A PAUSE IN A NUMBER USING PREPARATORY DIALLING
- TO INSERT A PAUSE IN A NUMBER STORED IN THE PHONEBOOK
- 三
- ▼
- OK
- ADDITIONAL FEATURES
- SECURITY
- USING AND CHANGING THE DESKPHONE PIN CODE
- TO SET OR CHANGE THE DESKPHONE PIN (PERSONAL IDENTIFICATION NUMBER)
- PHONE LOCK
- TO BLOCK THE TELEPHONE FROM MAKING OUTGOING CALLS
- QUICKDIAL NUMBER
- TO STORE A QUICKDIAL NUMBER
- TO OPERATE THE QUICKDIAL FUNCTION
- TO EDIT OR CANCEL A STORED QUICKDIAL NUMBER
- TO CONTACT EMERGENCY SERVICES WHEN OUTGOING CALLS HAVE BEEN BLOCKED
- KEYPAD
- BABY ALARM
- TO SWITCH THE BABY ALARM ON AND OFF
- ON THE PHONE IN THE BABY ROOM
- TO SWITCH THE BABY ALARM OFF
- OPERATING WITH ADDITIONAL BASE STATIONS
- TO REGISTER YOUR DIVERSE DESKPHONE TO ADDITIONAL BASE STATIONS
- AT A DIVERSE 2-LINE OR ISDN BASE STATION
- TO SET THE DIVERSE DESKPHONE TO SELECT THE BEST BASE STATION SIGNAL
- TO SET THE DIVERSE DESKPHONE TO SEARCH FOR A SPECIFIC BASE SIGNAL
- TO CHANGE BASE STATION NAME/NUMBERS ON YOUR DIVERSE DESKPHONE
- HOW TO USE THE SHORTCUT FUNCTION
- SHORTCUT FUNCTION
- HOW TO CREATE A NEW SHORTCUT
- HOW TO INSERT FUNCTIONS WHILST CREATING A NEW SHORTCUT
- HOW TO USE A SHORTCUT
- HOW TO VIEW, EDIT OR DELETE AN ENTRY
- EDITING
- PRESS ACTIVATE
- SAVING
- DELETING
- HOW TO DELETE ALL SHORTCUTS
- CODE
- EITHER
- YES
- OR
- NO
- THEN
- TO LOAD THE DEFAULT SHORTCUT LIST FOR DIVERSE 1010/1015/2010 AND 2015
- TO CHECK HOW MUCH MEMORY IS FREE
- MAINTENANCE
- GENERAL
- SERVICE
- WITHIN THE WARRANTY PERIOD
- OUTSIDE THE WARRANTY PERIOD
- IF YOU HAVE TO RETURN YOUR DIVERSE DESKPHONE
- EMERGENCY CALLS
- NO DISPLAY APPEARS
- NO DIAL TONE
- SEARCH STATION' IS FLASHING ON THE DISPLAY OR YOU CANNOT LINK UP WITH THE BASE STATION
- THE TELEPHONE DOES NOT RING
- TELEPHONE BEEPS
- BUZZING NOISE ON MY RADIO, TV, ANSWERING MACHINE OR COMPUTER
- TECHNICAL INFORMATION
- ENVIRONMENT
- APPROVAL
- WARNING
- CONNECTING TO SWITCHBOARDS
- INDEX
- OFFICES IN EUROPE, NORTH AMERICA, JAPAN AND ASIA PACIFIC
Brand : BT
Model : Diverse Deskphone
Category : Telephone