Multifunction Tool WMW 300-2 - Multifunction tool Workzone - Free user manual and instructions
Find the device manual for free Multifunction Tool WMW 300-2 Workzone in PDF.


| Product Type | Multifunction Tool (Oscillating) |
| Brand | Workzone |
| Model | WMW 300-2 |
| Power Input | 300 W |
| Power Supply | Mains powered (230 V, 50 Hz) |
| No-Load Speed | 11,000 - 22,000 opm (oscillations per minute) |
| Oscillation Angle | 3.2° |
| Dimensions (L x W x H) | Approx. 310 x 75 x 100 mm |
| Weight | 1.5 kg |
| Main Functions | Sanding, Sawing, Scraping, Grinding, Cutting |
| Accessories Included | Sanding pad, saw blade, scraper, hex key, carrying case |
| Speed Control | Variable speed dial |
| Blade Change | Tool-free (quick-clamp system) |
| Vibration Control | Soft-grip handle |
| Safety Features | Lock-on switch, dust extraction port, double insulation |
| Maintenance | Clean after use, check carbon brushes regularly |
| Spare Parts Availability | Carbon brushes, sanding pads, blades |
| Repairability | Modular design; user-replaceable parts |
| Certifications | CE, RoHS |
| Warranty | 2 years |
Frequently Asked Questions - Multifunction Tool WMW 300-2 Workzone
User questions about Multifunction Tool WMW 300-2 Workzone
0 question about this device. Answer the ones you know or ask your own.
Ask a new question about this device
Download the instructions for your Multifunction tool in PDF format for free! Find your manual Multifunction Tool WMW 300-2 - Workzone and take your electronic device back in hand. On this page are published all the documents necessary for the use of your device. Multifunction Tool WMW 300-2 by Workzone.
USER MANUAL Multifunction Tool WMW 300-2 Workzone
English .....Page 06

QR codes take you where you want to go quickly and easily
Whether you require product information, spare parts or accessories, details on warranties or aftersales services, or if you want to watch a product demonstration video or 360° product view, our QR codes will take you there in no time at all.
What is a QR code?
A QR code (QR = Quick Response) is a type of matrix that can be read with a smartphone camera and that contains a link to a website or contact details, for example.
Advantage: You do not need to manually enter a website address or contact details.
How it works
To scan the QR code, all you need is a smartphone with QR code reader software and an internet connection.* This type of software can be downloaded for free from your smartphone's app store.
Try it out now
Just scan the QR code with your smartphone and find out more about the Aldi product you have purchased.*
Your Aldi Service Portal
All details mentioned above can also be found in the Aldi Service Portal at www.aldi.us.

*Depending on your tariff plan you may be charged for the connection.
Contents
Overview 4
Use....5
Pack contents/device parts 6
General information....7
Reading and storing the user manual 7
Explanation of symbols 7
Safety 8
Proper use....8
Residual risks....9
General power tool safety warnings 9
Operational safety instructions for your multifunction tool....12
Safety instructions for sanding paint....13
Safety instructions for dust extraction....13
Safety precaution for fire prevention....14
Special safety precautions for persons with medical implants ....14
Preparation 14
Checking the multifunction tool and pack contents .....14
Familiarizing yourself with the functional principle....15
Familiarizing yourself with permissible materials .....15
Preparing the multifunction tool....15
Operation....17
Getting started....17
Finishing work....17
Cleaning and maintenance....17
Storage and transport 19
Repair....19
Troubleshooting 20
Accessories 21
Technical data 22
Disposal....22
Disposing of the packaging 22
Disposing of old appliances 22
Service notes 22
Warranty card....25
Warranty conditions....26







Pack contents/device parts
1 On/Off switch
2 Left/right holding clip
3 Speed control
4 Connecting nozzle
5 Power cable including power plug
6 Handle
7 Dust extractor
8 Allen wrench
9 Allen head screw
10 Washer
11 Sanding plate
12 Sanding sheet, 20× (various grain sizes)
13 Segment saw blade
14 Scraper
15 Plunge-cut saw blade
16 Tool holder
17 Extractor line
18 Inside thread
19 Storage bag (not shown)
This user manual can be downloaded in PDF format from the website www.meister-werkzeuge.de.
General information
Reading and storing the user manual

This user manual accompanies this multifunction tool. It contains important information on setup and handling.
Before using the multifunction tool, read the user manual carefully.
This particularly applies to the safety instructions. Failure to comply
with this user manual may result in severe injury or damage to the multifunction tool.
Store the user manual for further use. Make sure to include this user manual when passing the multifunction tool on to third parties.
Explanation of symbols
The following symbols and signal words are used in this user manual, on the multifunction tool or on the packaging.

WARNING!
This signal symbol/word indicates a hazard with moderate risk, that may lead to death or severe injury if not avoided.

CAUTION!
This signal symbol/word indicates a hazard with low risk that may lead to minor or moderate injury if not avoided.
NOTICE!
This signal word warns against potential damages to property.

Intertek
5003501
Conforms to UL Std.
60745-1, 60745-2-4
The ETL Listed Mark indicates that this product has been tested by Intertek and found in compliance with accepted national standards.

Wear protective goggles.

Wear a dust mask.

Wear ear protection.

Wear protective gloves.

Read the user manual!

The multifunction tool complies with protection class 2.
Safety
Proper use
The multifunction tool is only designed for private users in connection with hobby and DIY projects for the following purposes:
- sawing, cutting, scraping and sanding various materials in hard-to-reach areas.
Any other applications are expressly prohibited and are deemed improper use.
Neither the manufacturer nor the retailer can accept any responsibility for injury, loss or damage caused by misuse of this product of any kind. Examples of misuse are given in the following non-exhaustive list:
- Using the multifunction tool for other than the intended purposes;
- Failure to observe the safety instructions and warnings as well as the assembly, operating, maintenance and cleaning instructions contained in this user manual;
- Failure to comply with any regulations relating to accident prevention, occupational medicine or safety, which specifically and/or generally apply to the use of this multifunction tool;
- Use of accessories and spare parts not intended for the multifunction tool;
-
Modifications to the multifunction tool;
-
Repairs of the multifunction tool performed by parties other than the manufacturer or a qualified professional;
- Use of the multifunction tool for commercial or industrial applications as well as in connection with the trades;
- Operation or maintenance of the multifunction tool by persons not familiar with how to handle the multifunction tool and/or who are not aware of the related risks.
Residual risks
Despite proper use, inconspicuous residual risks cannot be completely ruled out. The following risks may arise due to the nature of the multifunction tool:
- Projection of parts or breakage of the sanding surface, the fitted tool or the material being processed pose a risk of severe injury or blindness if the prescribed protective goggles are not worn,
- Contact with sharp or hot parts of the workpiece or the fitted tool during operation or while performing maintenance,
- Damage to hearing if the prescribed ear protection is not worn,
- Inhalation of particles produced whilst sanding the material as well as the surface being sanded or polished.
General power tool safety warnings
⚠ WARNING Read all safety warnings and all instructions.
Failure to follow the safety warnings and instructions may result in an electric shock, fire and/or serious injury.
Save all safety warnings and instructions for future reference.
The term “power tool” in the warnings refers to your mains-operated (corded) power tool or battery-operated (cordless) power tool.
Work area safety
a) Keep work area clean and well lit. Cluttered or dark areas invite accidents.
b) Do not operate power tools in explosive atmospheres, such as in the presence of flammable liquids, gases or dust. Power tools create sparks which may ignite the dust or fumes.
c) Keep children and bystanders away while operating a power tool. Distractions can cause you to lose control.
Electrical safety
a) Power tool plugs must match the outlet. Never modify the plug in any way. Do not use any adapter plugs with earthed (grounded) power tools. Unmodified plugs and matching outlets will reduce risk of electric shock.
b) Avoid body contact with earthed or grounded surfaces, such as pipes, radiators, ranges and refrigerators. There is an increased risk of electric shock if your body is earthed or grounded.
c) Do not expose power tools to rain or wet conditions. Water entering a power tool will increase the risk of electric shock.
d) Do not abuse the cord. Never use the cord for carrying, pulling or unplugging the power tool. Keep cord away from heat, oil, sharp edges or moving parts. Damaged or entangled cords increase the risk of electric shock.
e) When operating a power tool outdoors, use an extension cord suitable for outdoor use. Use of a cord suitable for outdoor use reduces the risk of electric shock.
f) If operating a power tool in a damp location is unavoidable, use a residual current device (RCD) protected supply. Use of an RCD reduces the risk of electric shock.
Personal safety
a) Stay alert, watch what you are doing and use common sense when operating a power tool. Do not use a power tool while you are tired or under the influence of drugs, alcohol or medication.
A moment of inattention while operating power tools may result in serious personal injury.
b) Use personal protective equipment. Always wear eye protection.
Protective equipment such as dust mask, non-skid safety shoes, hard hat, or hearing protection used for appropriate conditions will reduce personal injuries.
c) Prevent unintentional starting. Ensure the switch is in the off-position before connecting to power source and/or battery pack, picking up or carrying the tool. Carrying power tools with your finger on the switch or energizing power tools that have the switch on invites accidents.
d) Remove any adjusting key or wrench before turning the power tool on. A wrench or a key left attached to a rotating part of the power tool may result in personal injury.
e) Do not overreach. Keep proper footing and balance at all times.
This enables better control of the power tool in unexpected situations.
f) Dress properly. Do not wear loose clothing or jewelry. Keep your hair, clothing and gloves away from moving parts. Loose clothes, jewelry or long hair can be caught in moving parts.
g) If devices are provided for the connection of dust extraction and collection facilities, ensure these are connected and properly used. Use of dust collection can reduce dust-related hazards.
Power tool use and care
a) Do not force the power tool. Use the correct power tool for your application. The correct power tool will do the job better and safer at the rate for which it was designed.
b) Do not use the power tool if the switch does not turn it on and off. Any power tool that cannot be controlled with the switch is dangerous and must be repaired.
c) Disconnect the plug from the power source and/or the battery pack from the power tool before making any adjustments, changing accessories, or storing power tools. Such preventive safety measures reduce the risk of starting the power tool accidentally.
d) Store idle power tools out of the reach of children and do not allow persons unfamiliar with the power tool or these instructions to operate the power tool. Power tools are dangerous in the hands of untrained users.
e) Maintain power tools with care. Check for misalignment or binding of moving parts, breakage of parts and any other condition that may affect the power tool's operation. If damaged, have the power tool repaired before use. Many accidents are caused by poorly maintained power tools.
f) Keep cutting tools sharp and clean. Properly maintained cutting tools with sharp cutting edges are less likely to bind and are easier to control.
g) Use the power tool, accessories and fitted tools etc. in accordance with these instructions, taking into account the working conditions and the work to be performed. Use of the power tool for operations different from those intended could result in a hazardous situation.
Service
a) Have your power tool serviced by a qualified repair person using only identical replacement parts. This will ensure that the safety of the power tool is maintained.
Operational safety instructions for your multifunction tool
- Hold the multifunction tool by the insulated handles when performing work where there is a risk of the fitted tool being used coming into contact with hidden power lines. Contact with a live line could also energize metallic parts of the device and inflict an electric shock.
- Always wear protective goggles and a dust mask when sanding; especially when sanding overhead.
- Wear ear protection.
- Wear protective gloves when changing the fitted tools. Fitted tools become hot after prolonged use.
- Use the multifunction tool only for dry sanding.
- Only use sand paper of the length that you need. Any paper protruding from the sanding plate can cause serious injury.
- Only use the charger in dry indoor areas.
- Never expose the multifunction tool to high temperatures (heaters etc.) or to the effects of the weather (rain etc.).
- Keep your hands away from the work area. Do not reach under the workpiece. There is a risk of injury resulting from contact with the saw blade or scraper.
- Grip the multifunction tool with two hands and maintain a stable posture to avoid the risk of serious injury. When working with the multifunction tool, always hold it firmly with both hands and provide for a secure stance.
- Only scrape materials that have not been moistened (e.g. wallpaper) and do not scrape on a wet base.
- Adopt a stance that prevents injury in the event of slipping off the workpiece.
- Only use fitted tools that are in proper technical condition.
- Fitted tools may become extremely hot. After making a cut, do not touch the fitted tool and make sure that the multifunction tool is kept in a safe place once you have finished work.
- When working on masonry or ceilings, take note of the location of electric pipes as well as water and sewage pipes.
- Never place the multifunction tool or the accessories on or near hot surfaces (e.g. radiators).
Safety instructions for sanding paint
- Do not sand paints that contain lead. Determine whether the paint you intend to sand contains lead before beginning work. Dust from paints containing lead may cause lead poisoning.
- A special test or a commercial painting contractor can determine whether a paint contains lead.
If in doubt, you should wear a special dust mask to protect you from fine particles containing lead. Ask a qualified professional about this.
- Sanding coats of paint containing lead, various types of wood and metals could produce hazardous or poisonous dust. Coming into contact or inhaling the dust may pose a risk to the operator or nearby persons. Wear suitable protective equipment to protect yourself and nearby persons from coming into contact or inhaling this dust. Normal dust masks do not provide proper protection.
- Do not allow children or pregnant persons to enter the room or work area where you are sanding.
- Do not eat, drink or smoke while working. Clean your hands before you eat, drink or smoke. Do not leave any food or beverages exposed as there is a risk of dust accumulating in them.
- After sanding, thoroughly clean the surfaces of the work area.
Safety instructions for dust extraction
Dust from materials whose constituents include paint coats containing lead, some types of wood, minerals and metal could be harmful to health. Coming into contact or inhaling such dust could cause allergic reactions and/or respiratory illness on the part of the user or persons in the immediate vicinity. Certain dusts such as oak or beech dust are considered carcinogenic, particularly in combination with wood treatment additives (chromate, wood preservatives).
- Use a dust extractor.
- Use a special extractor to extract types of dust, which are particularly harmful to health, carcinogenic or dry.
- Make sure the work area is adequately ventilated.
- Wear a P2 dust mask (filter class) when performing work that produces dust. If the multifunction tool has a port for dust extractors and/or dust collectors, connect the dust extractor to it.
- Observe the regulations in your country that apply to the materials you intend to work on.
- When disposing of dust, be particularly careful as the dust of some materials may be explosive. Do not dispose of sanding dust in fire. Mixtures of dust particles containing oil or water could spontaneously ignite over time.
Safety precaution for fire prevention
Keep an extinguisher on hand.
In the event of wood and paper fires: powder fire extinguisher (fire class ABC) or foam fire extinguisher (fire class AB).
For electrical fires: carbon dioxide ( CO2 ) fire extinguisher (fire class B).
Special safety precautions for persons with medical implants
Every power tool generates an electromagnetic field during operation that may interfere with the functioning of medical implants (e.g. pacemakers) under unfavorable conditions.
Before working with the power tool:
- Consult a physician.
- Ask the manufacturer of your implant.
Preparation
Checking the multifunction tool and pack contents
NOTICE!
Risk of damage!
If you are not cautious when opening the packaging with a sharp knife or other pointed objects, you may damage the multifunction tool.
- Therefore, be careful when opening it.
- Remove the packaging material.
- Check whether the delivery is complete (see fig. A and B).
- Check whether the multifunction tool or the accessories exhibit damage. If this is the case, do not use the multifunction tool. Contact the manufacturer at the service address specified on the warranty card.
Familiarizing yourself with the functional principle
The multifunction tool does not rotate the fitted tool; instead, it oscillates it back and forth.
Familiarizing yourself with permissible materials
You can use the following tools to process the listed materials:
Plunge-cut saw blade
- Hard and soft woods
Scraper
- Layers of paint and lacquer
- Synthetic coatings
- Flexible floor coverings, e.g. carpets, linoleum
Segment saw blade
- Hard and soft woods
Sanding plate
• Hard and soft wood surfaces
- Layers of paint and lacquer
Preparing the multifunction tool

CAUTION!
Risk associated with oscillating moving parts!
If you accidentally switch the multifunction tool on, you could injure yourself on the moving parts that are oscillating.
- Before mounting accessories, disconnect the multifunction tool from the power supply.
Mounting the handle
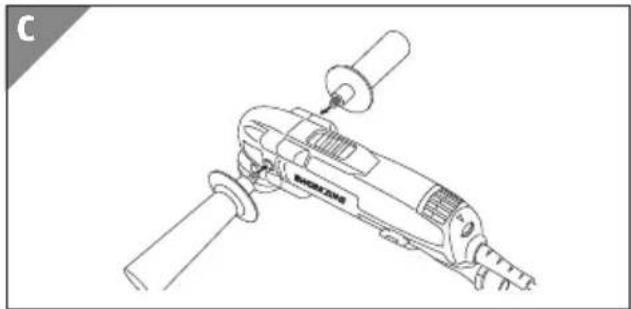
- Screw the handle 6 onto the multifunction tool (see fig. C). Make sure that you screw the handle onto the left side of the multifunction tool if you are right-handed and onto the right side if you are left-handed.
Connecting the dust extractor
-
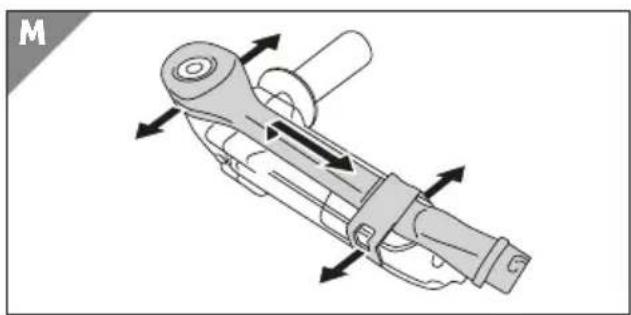
Mount the extractor line 17 with the holding clips 2 onto the back of the multifunction tool (see fig. B and M). Make sure that the extractor line is correctly positioned on the multifunction tool.
-
Mount the dust extractor 7 on the connecting nozzle 4 (see fig. A and D).
- Connect a suitable suction device to the dust extractor (e.g. shop vacuum cleaner).
Mounting tools
CAUTION!
Risk of injury!
If you mount the tools incorrectly and they are therefore able to come into contact with your hand during use, there is a risk of injury.
- Do not mount the tools such that there is a possibility of them coming into contact with your hand. For example: Ensure that the blades are not pointing towards your hand.
Depending on the application, mount the tools listed below:
Plunge-cut saw blade
Example of use: Sawing slots (see fig. G).
- Place the plunge-cut saw blade 15 on the tool holder at any angle 16 (see fig. K and fig. L).
- Place the washer 10 on the plunge-cut saw blade with the concavity up.
- Use the Allen wrench 8 to tighten the Allen head screw 9.
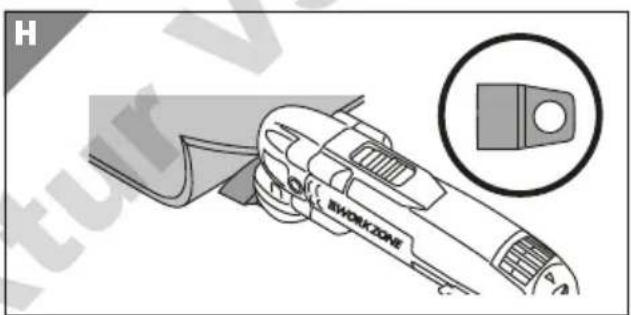
Scraper
Example of use: Removing coatings, lacquer coats or floor surfaces (see fig. H).
- Place the scraper 14 on the tool holder at any angle (see fig. K and fig. L).
- Place the washer on the top of the scraper with the concavity up.
- Use the Allen wrench to tighten the Allen head screw.
Segment saw blade
Example of use: Flush cutting fitted door frames to length. (see fig. I).
- Place the segment saw blade 13 on the tool holder at any angle (see fig. K and fig. L).
- Place the washer on the top of the segment saw blade with the concavity up.
- Use the Allen wrench to tighten the Allen head screw.
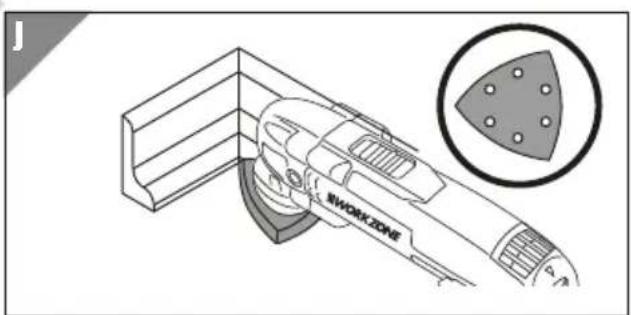
Sanding plate
Example of use: Grinding surfaces in inaccessible corners (see fig. J).
-
Place the sanding plate 11 on the tool holder at any angle (see fig. K and fig. L).
-
Use the Allen wrench to tighten the Allen head screw. The washer is not required to mount the sanding plate.
-
Place the sanding sheet 12 on the sanding plate so that they are aligned. Push firmly so that the Velcro backing holds in place.
Operation
Getting started
- Make sure that the multifunction tool has been properly prepared as described in the chapter "Preparing the multifunction tool".
- Connect the multifunction tool to a power supply plug.
- Switch the extractor on.
- Use the On/Off switch 1 to switch the multifunction tool on.
- Use the speed control 3 to adjust the speed (see fig. F).
Set the speed control to level 1 for low vibration (oscillation) and to level 6 for intense vibration (oscillation). Make sure that you use the correct speed for the work material or test various speeds on the work material to determine the correct one.
- Hold the multifunction tool up to the workpiece.
You can now process the workpiece.
Finishing work
- Take the multifunction tool out of the workpiece.
- Use the On/Off switch 1 to switch the multifunction tool off.
- Switch the extractor off.
- Pull the power plug 5.
Cleaning and maintenance

WARNING!
Burn hazard!
Some tools become hot during operation. You could burn yourself.
- Always let them cool off completely before cleaning!
NOTICE!
Risk of short circuit!
Water that has penetrated the housing may cause a short circuit.
- Never submerge the multifunction tool in water.
- Make sure that no water penetrates the housing.
NOTICE!
Risk of damage!
Improperly cleaning the multifunction tool and the tools may lead to damage.
- Do not use any aggressive cleaners, brushes with metal or nylon bristles or sharp or metallic cleaning utensils such as knives, hard scrapers and the like.
After every use
- Before cleaning, pull the power plug 5 out of the socket.
- Let the tool cool off completely.
- Unlock the extractor line 17 and take it off of the multifunction tool (see fig. M).
- Use a soft brush or compressed air to clean the extractor line, the housing and the inside thread 18.
- Wipe the housing off with a damp cloth if heavily soiled.
- Attach the extractor line to the multifunction tool again.
After every eight hours of operation
- Unlock the extractor line 17 and remove it.
- Use commercially-available universal oil to oil the moving parts of the tool holder 16.
- Attach the extractor line to the multifunction tool again.
Storage and transport
NOTICE!
Risk of damage!
Improper storage or transport of the multifunction tool could damage it.
- Store and transport the multifunction tool in a clean, dry and frost-free location. Always use the enclosed storage bag to store and transport the multifunction tool and the accessories. Other storage locations and transport possibilities do not adequately protect the multifunction tool.
-
Make sure that the multifunction tool and the accessories are completely dry. Fold up the power cable 5 so that it does not knot or kink.
-
Place all accessories and especially the washer 10, the Allen head screw 9 and the Allen wrench 8 back in the storage bag 19 to prevent the loss of accessory parts.
Repair

WARNING!
Risk of electric shock!
Repairs performed by the user or the use of unsuitable spare parts to repair the device poses an increased risk of electric shock.
- Do not open the housing. In the event of a defect, only have the multifunction tool repaired by authorized qualified professionals. For this, contact the manufacturer at the service address specified on the warranty card. Electric and mechanical parts, which are essential for providing protection against sources of danger, are contained in this multifunction tool.
- Do not attempt to perform any repairs by yourself.
- If the connection line is damaged, you must – in order to avoid risks – have it replaced by the manufacturer or its customer service representative.
Troubleshooting
Some malfunctions may be caused by minor faults, which you can resolve yourself. Follow the instructions in the following table for this.
If it is still not possible to resolve the problem with the multifunction tool, contact customer service.
| Problem Possible cause Troubleshooting | |||
| 1. | The handle 6 / multifunction tool cannot be mounted. | The inside thread 18 is dirty. | - Always keep the inside thread clean as described in the chapter “Cleaning and maintenance”. |
| The washer 10, the Allen head screw 9, the Allen wrench 8 or the multifunction tool is bent/damaged. | - Contact the customer service team of the manufacturer and have the damaged or defective part replaced. | ||
| 2. | The extractor line 17 /dust extractor 7 is loose/keeps falling off. | The extractor line/ dust extractor is not properly mounted. | - Use the holding clips 2 to secure the extractor line on the housing of the multifunction tool.- Push the dust extractor firmly onto the connecting nozzle of the extractor line and turn it counterclockwise to fix it in place. |
| 3. | The multifunction tool cannot be switched on. | The socket has no power. | - Check the socket by connecting another device. |
| The power plug 5 has not been inserted properly. | - Check to make sure that the power plug is properly seated. | ||
| The power plug is not connected to a socket. | - Insert the power plug in a socket. | ||
| The On/Off switch 1 is stuck. | - Keep the On/Off switch clean as described in the chapter “Cleaning and maintenance”. | ||
| The power plug/On/Off switch is defective. | - Contact the customer service team of the manufacturer. | ||
| 4. | The tool holder does not move after switching on the multifunction tool. | There is dirt, wood chips or other objects located in the gap of the tool holder. | - If necessary, pull the power plug out of the socket and clean the gap of the tool holder with a vacuum cleaner. |
| The multifunction tool is defective. | - Contact the customer service team of the manufacturer. | ||
| 5. | The oscillation/speed can not be increased or decreased. | The speed control 3 is dirty. | - If necessary, clean the speed control and the gap with a vacuum cleaner. |
Accessories
You can purchase suitable accessories such as sanding sheets from commercial outlets (e.g. Bosch).
Technical data
Product-specific data
Model/type: WMW 300-2
Model number: 5404136
Article number: 93730
Electrical data
Supply voltage: 120 V\~
Power frequency: 60 Hz
Power consumption: 2.5 A
Idle speed n0 : 15,000–23,000 min
Physical data
Dimensions without accessories and cords: 12.13" × 2.48" × 3.90"
(3 0 8 × 6 3 × 9 9 mm)
Weight without tools: 3.53 lbs (1.6 kg)
Disposal
Disposing of the packaging
- Sort the packaging before you dispose of it. Dispose of paperboard and cardboard with the recycled paper service and wrappers with appropriate collection service.
Disposing of old appliances
- Should the multifunction tool no longer be capable of being used at some point in time, dispose of it in accordance with the regulations in force in your state or country.
- Please ensure your recycling information does apply to the local regulations and the EPA recommendations (www.epa.gov).
Service notes
- Store the multifunction tool, the user manual and, if applicable, the accessories in the original packaging.
-
WORKZONE devices are largely maintenance-free. For notes on cleaning and maintenance, refer to the chapter “Cleaning and maintenance”.
-
WORKZONE devices undergo strict quality controls. If, however, the functioning of the device is disrupted, send the multifunction tool to the manufacturer as described in the chapter “Checking the multifunction tool and pack contents”.
- Provide a brief written description to shorten the troubleshooting process and repair time. During the warranty period, keep the warranty card and the proof of purchase with the multifunction tool.
- If the repair is not covered by warranty, you will be billed for the repair costs.
- IMPORTANT! Opening the multifunction tool voids your warranty claim!
- IMPORTANT! You are expressly advised that, pursuant to the German Product Liability Act, the manufacturer is not required to assume responsibility for damages caused by the multifunction tool of the manufacturer if this is attributed to improper repair or the use of replacement parts, which are not original parts from or parts approved by the manufacturer and the repair was not performed by the customer service team of Meister Werkzeuge GmbH or an authorized professional with corresponding qualifications! The same applies for the accessory parts.
- To prevent transport damages, securely pack the multifunction tool or use the original packaging.
- The manufacturer also guarantees the affordable performance of all repairs to WORKZONE devices that become necessary after the expiration of the warranty period.
WORKZONE
WARRANTY CARD
MULTIFUNCTION TOOL
Your details:
Name ____
Address

Date of purchase* ____
*We recommend you keep the receipt with this warranty card.
Location of purchase ____
Description of malfunction

Return your completed warranty card together with the faulty product to:
The ALDI warranty offers you extensive benefits compared to the statutory obligation arising from a warranty:
Warranty period: 3 years from date of purchase.
6 months for wear parts and consumables under normal and proper conditions of use (e.g. rechargeable batteries).
Costs: Free repair/exchange or refund.
No transport costs.
ADVICE: Please contact our service hotline by phone, e-mail or fax before sending in the device. This allows us to provide support in the event of possible operator errors.
In order to make a claim under the warranty, please send us:
- together with the faulty item, the original receipt and the warranty card properly completed.
- the faulty product with all components included in the packaging.
The warranty does not cover damage caused by:
- Accident or unanticipated events (e.g. lightning, water, fire).
- Improper use or transport.
- Disregard of the safety and maintenance instructions.
- Other improper treatment or modification.
After the expiry of the warranty period, you still have the possibility to have your product repaired at your own expense. If the repair or the estimate of costs is not free of charge you will be informed accordingly in advance.
This warranty does not limit the statutory obligation of the seller arising from a warranty. The period of warranty can only be extended in accordance with a legal standard. In countries where a (compulsory) warranty and/or spare part storage and/or a system for compensation are/is required by law, the statutory minimum conditions apply. In the event that a product is received for repair, neither the service company nor the seller will assume any liability for data or settings possibly stored on the product by the customer.
Contenido
Conjunto ....4
Uso 5


- QR CODES TAKE YOU WHERE YOU WANT TO GO QUICKLY AND EASILY
- WHAT IS A QR CODE
- HOW IT WORKS
- TRY IT OUT NOW
- YOUR ALDI SERVICE PORTAL
- CONTENTS
- OVERVIEW 4
- USE....5
- PACK CONTENTS/DEVICE PARTS 6
- GENERAL INFORMATION....7
- SAFETY 8
- PREPARATION 14
- OPERATION....17
- CLEANING AND MAINTENANCE....17
- STORAGE AND TRANSPORT 19
- REPAIR....19
- ACCESSORIES 21
- TECHNICAL DATA 22
- DISPOSAL....22
- SERVICE NOTES 22
- WARRANTY CARD....25
- WARRANTY CONDITIONS....26
- PACK CONTENTS/DEVICE PARTS
- GENERAL INFORMATION
- READING AND STORING THE USER MANUAL
- EXPLANATION OF SYMBOLS
- SAFETY
- PROPER USE
- RESIDUAL RISKS
- GENERAL POWER TOOL SAFETY WARNINGS
- WORK AREA SAFETY
- ELECTRICAL SAFETY
- PERSONAL SAFETY
- POWER TOOL USE AND CARE
- SERVICE
- OPERATIONAL SAFETY INSTRUCTIONS FOR YOUR MULTIFUNCTION TOOL
- SAFETY INSTRUCTIONS FOR SANDING PAINT
- SAFETY INSTRUCTIONS FOR DUST EXTRACTION
- SAFETY PRECAUTION FOR FIRE PREVENTION
- KEEP AN EXTINGUISHER ON HAND
- SPECIAL SAFETY PRECAUTIONS FOR PERSONS WITH MEDICAL IMPLANTS
- PREPARATION
- CHECKING THE MULTIFUNCTION TOOL AND PACK CONTENTS
- NOTICE
- RISK OF DAMAGE
- FAMILIARIZING YOURSELF WITH THE FUNCTIONAL PRINCIPLE
- FAMILIARIZING YOURSELF WITH PERMISSIBLE MATERIALS
- PLUNGE-CUT SAW BLADE
- SCRAPER
- SEGMENT SAW BLADE
- SANDING PLATE
- PREPARING THE MULTIFUNCTION TOOL
- CAUTION
- RISK ASSOCIATED WITH OSCILLATING MOVING PARTS
- MOUNTING THE HANDLE
- CONNECTING THE DUST EXTRACTOR
- MOUNTING TOOLS
- RISK OF INJURY
- OPERATION
- GETTING STARTED
- FINISHING WORK
- CLEANING AND MAINTENANCE
- WARNING
- BURN HAZARD
- RISK OF SHORT CIRCUIT
- AFTER EVERY USE
- AFTER EVERY EIGHT HOURS OF OPERATION
- STORAGE AND TRANSPORT
- REPAIR
- RISK OF ELECTRIC SHOCK
- TROUBLESHOOTING
- ACCESSORIES
- TECHNICAL DATA
- PRODUCT-SPECIFIC DATA
- ELECTRICAL DATA
- PHYSICAL DATA
- DISPOSAL
- DISPOSING OF THE PACKAGING
- DISPOSING OF OLD APPLIANCES
- SERVICE NOTES
- WORKZONE
- WARRANTY CARD
- MULTIFUNCTION TOOL
- IN ORDER TO MAKE A CLAIM UNDER THE WARRANTY, PLEASE SEND US
- CONTENIDO
Brand : Workzone
Model : Multifunction Tool WMW 300-2
Category : Multifunction tool