
PAINTMATE PLUS - Paint gun WAGNER - Free user manual and instructions
Find the device manual for free PAINTMATE PLUS WAGNER in PDF.
| Product Type | Manual Paint Gun |
| Brand | WAGNER |
| Model | PAINTMATE PLUS |
| Power Source | Manual (piston and trigger) |
| Tank Capacity | Approximately 1 liter (paint pot) |
| Weight | Approximately 0.5 kg |
| Dimensions (L x W x H) | Approximately 35 x 15 x 10 cm |
| Main Functions | Filling by suction (piston), application by Power Trigger®, use with oil or latex paints |
| Routine Maintenance | Cleaning parts with warm soapy water (latex) or mineral spirits (oil), lubricating seals with petroleum jelly |
| Safety | Protect floors and objects with drop cloths, avoid splattering, do not use aggressive solvents |
| Available Replacement Parts | Roller sleeve, arm, O-rings, valve, fill tube, cover, splash guard (complete list in the manual) |
| Warranty | 2 years for household use, 30 days for commercial use |
| Recommended Use | Oil-based or latex paints cleanable with water or mineral spirits |
| Available Accessories | Sleeves of different naps, adapter for 19 L pails, stain pad, Roller Washer™ |
Frequently Asked Questions - PAINTMATE PLUS WAGNER
User questions about PAINTMATE PLUS WAGNER
0 question about this device. Answer the ones you know or ask your own.
Ask a new question about this device
Download the instructions for your Paint gun in PDF format for free! Find your manual PAINTMATE PLUS - WAGNER and take your electronic device back in hand. On this page are published all the documents necessary for the use of your device. PAINTMATE PLUS by WAGNER.
USER MANUAL PAINTMATE PLUS WAGNER
OWNER'S MANUAL Read this manual for complete instructions
Push plunger until paint appears in roller cover
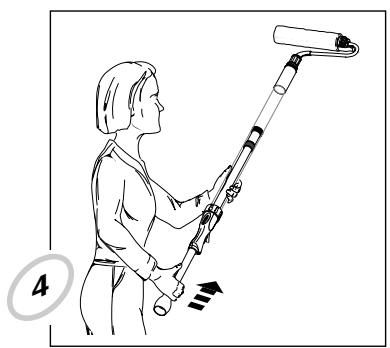
Set the switch to APPLY
Mettre le commutateur à la position APPLY
Cologne et interruptor en APPLY
It is a good idea to have drop cloths protecting your floors and anything else in the room that you do not want accidentally splattered with paint.
NOTE: Make sure the type of paint you use can be cleaned with either mineral spirits (for oil-based paints) or a warm water and soap solution (for latex paints).
CAUTION
Some oil-based paints require a stronger cleaning solution than mineral spirits and should not be used with the PaintMate® Plus. Using a cleaning solution stronger than mineral spirits may cause damage to the PaintMate® Plus. Check with your paint supplier to be sure the oil-based paint you have can be cleaned with mineral spirits.
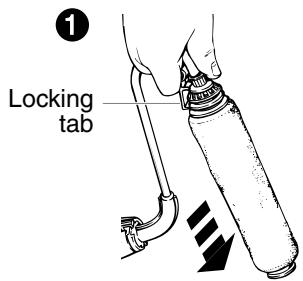
ASSEMBLING THE PAINTMATE® PLUS
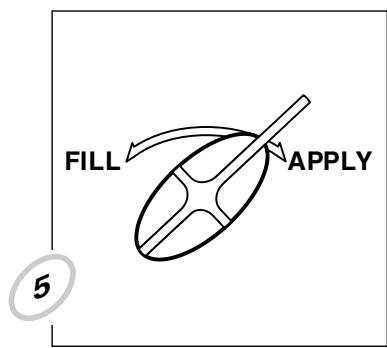
- Assemble core, roller cover and cap. Then attach assembly to the arm, making sure the roller assembly snaps into the locking tab.
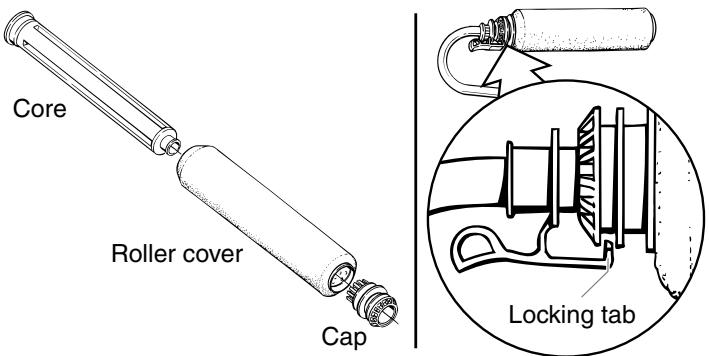
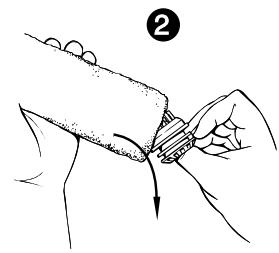
- Press the quick-release tabs on the unit and attach the arm to the handle.
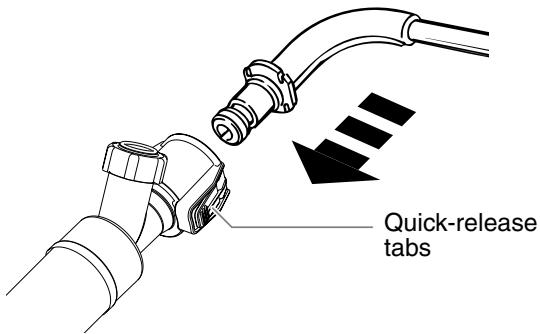
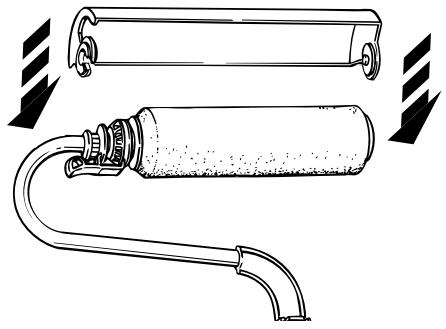
- If painting a ceiling, attach the spatter shield.
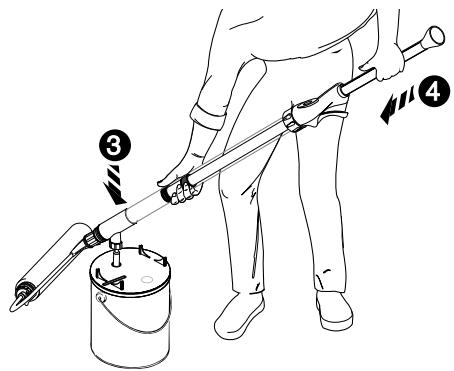
FILLING THE PAINTMATE® PLUS
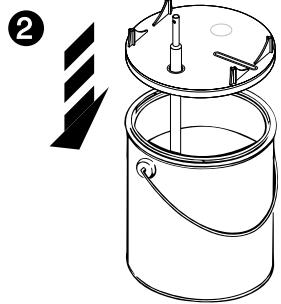
- Slide the small end of the fill tube through the hole in the can lid.
- Attach the can lid securely to the paint can.
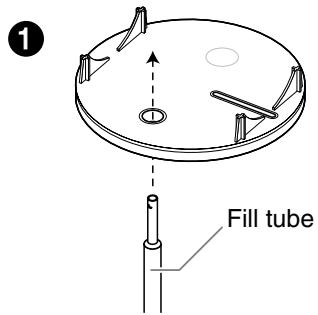
NOTE: Applying a thin coat of petroleum jelly to the end of the fill tube will help the PaintMate Plus slide easily off the fill tube.
- Turn the switch on the main handle to FILL.

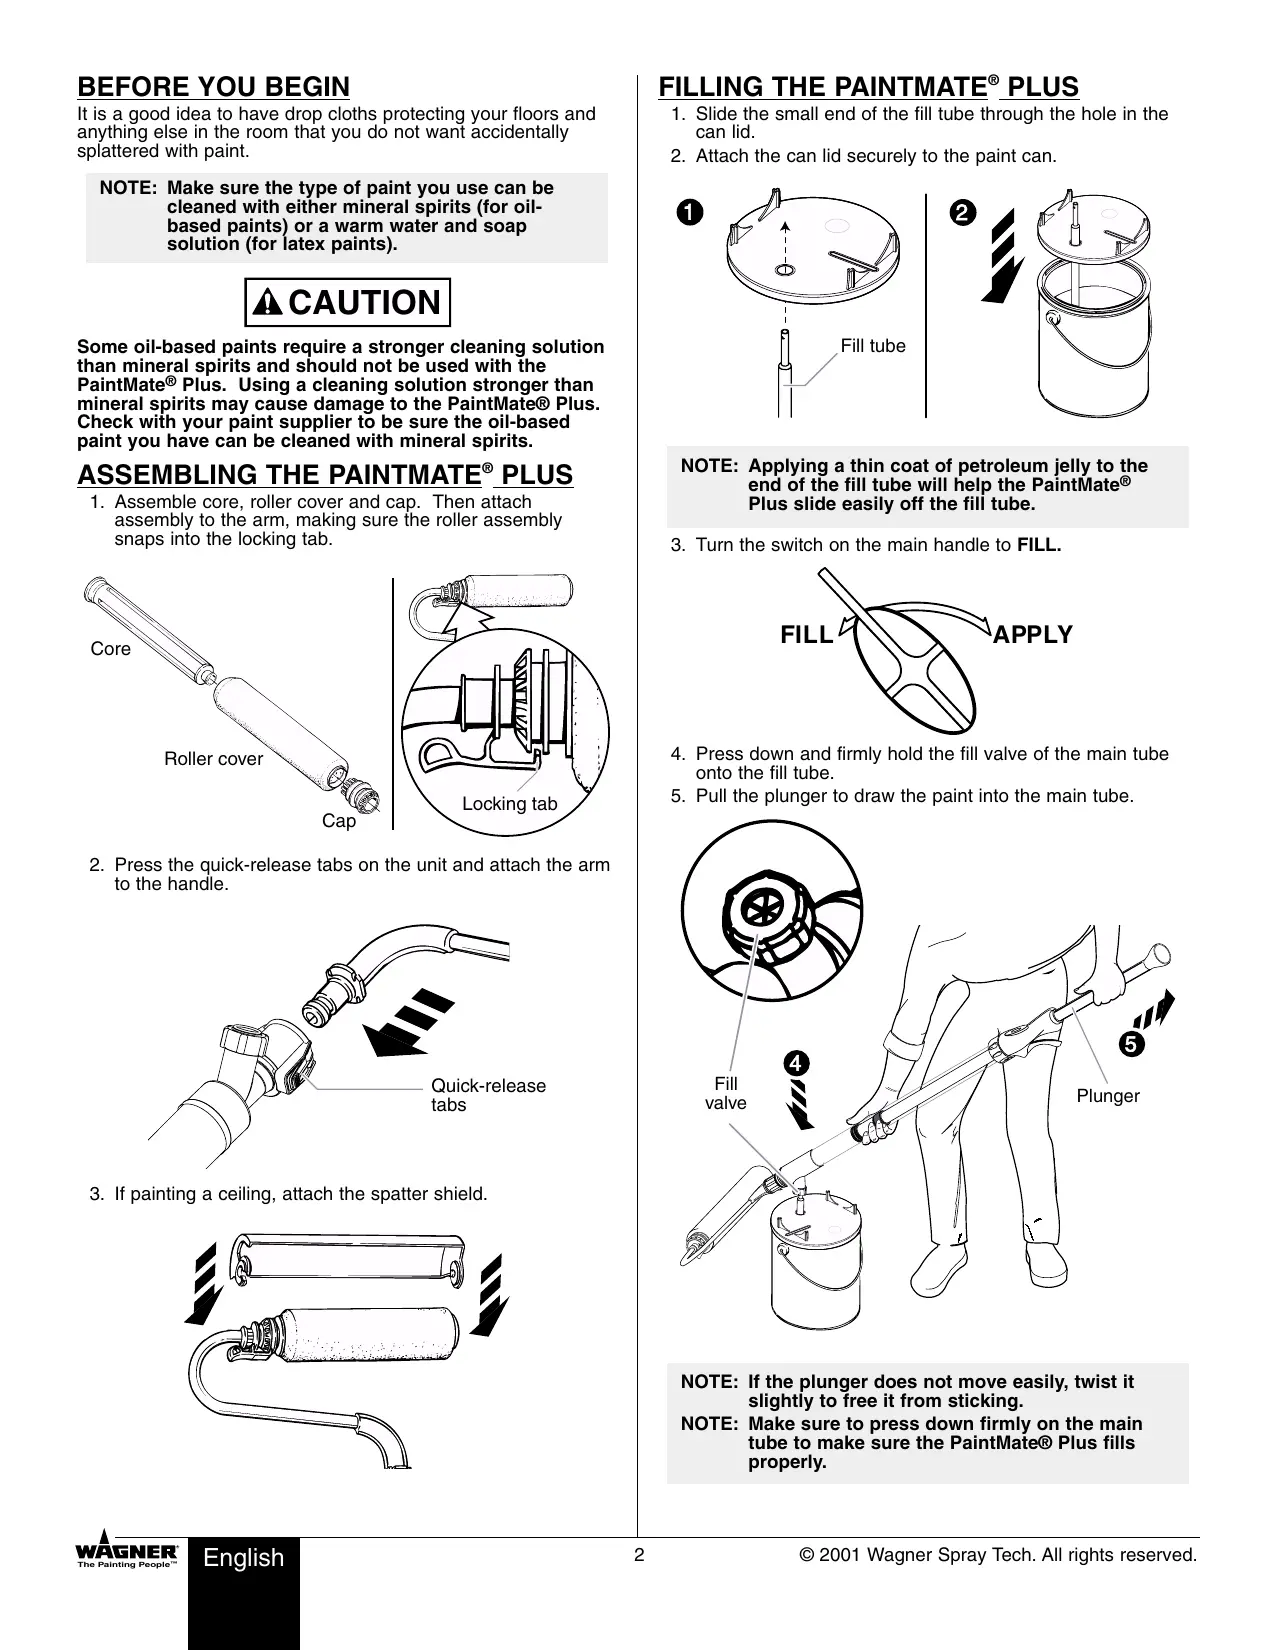
- Press down and firmly hold the fill valve of the main tube onto the fill tube.
- Pull the plunger to draw the paint into the main tube.
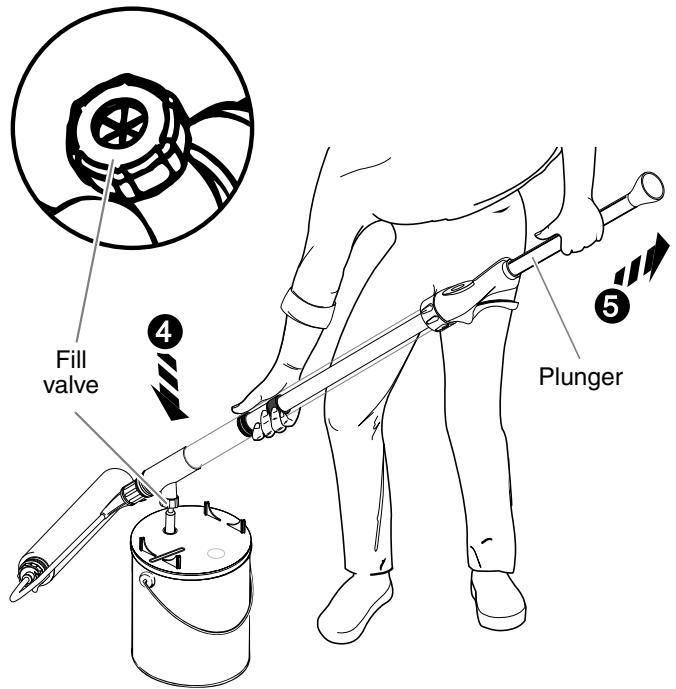
NOTE: If the plunger does not move easily, twist it slightly to free it from sticking.
NOTE: Make sure to press down firmly on the main tube to make sure the PaintMate® Plus fills properly.
PRIMING THE ROLLER
QUICK PRIMING METHOD
- Leave switch on FILL and push plunger tube forward until you see paint coming through the roller cover.
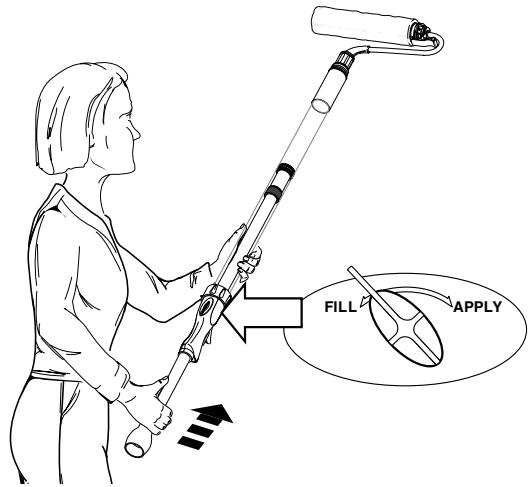
- Once paint appears, flip switch to APPLY and begin rolling. Squeeze Power Trigger® for additional paint as needed.

OPTIONAL PRIMING METHOD
- Move switch to APPLY, then squeeze the trigger on the main tube. It will take several squeezes of the trigger to fully saturate the roller cover.
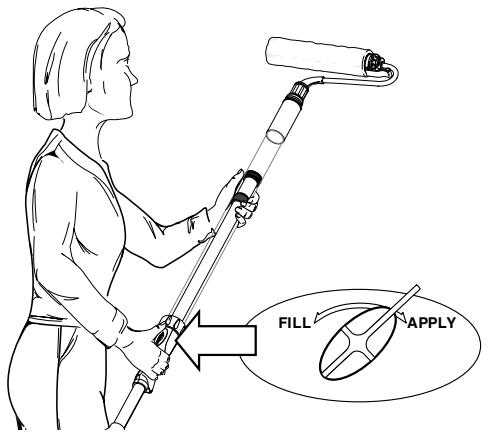
NOTE: When using either method, do not oversaturate the roller. An oversaturated roller will slide, drip, and spatter excessively.
APPLYING PAINT
Because priming the roller may use a lot of the paint in the main tube, you may need to refill the main tube after priming. Once paint appears through the roller cover, begin rolling. Keep paint flowing to the roller by squeezing the trigger as necessary.
Refill as necessary to complete project.
NOTE: When painting, make sure your floors and furnishings are sufficiently protected against drips or spatters.
GENERAL CLEANUP
NOTE: These steps can be followed when using oil-based and latex paints.
RETURNING EXCESS PAINT TO PAINT CAN
- Turn the switch on the main tube handle to FILL.
- Pull plunger back to draw remaining paint from roller arm into tube.
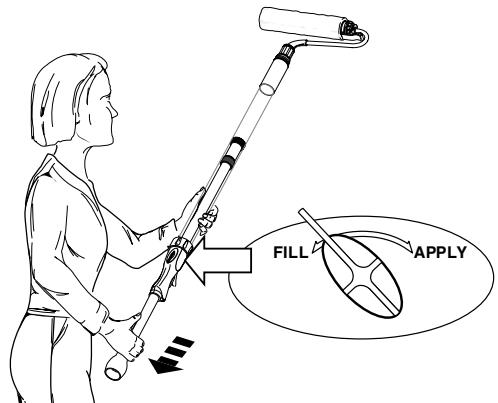
- Press fill valve of main tube onto fill tube.
- Push plunger forward to return excess paint to can.
CLEANING THE ROLLER ASSEMBLY
- Remove spatter shield. Press locking tab and remove roller cover assembly from arm.
- Insert thumb to first knuckle, PRY and PULL the cap from the roller cover. Once the cap is removed, PUSH the roller cover out the other end.
- Place spatter shield, roller cover, cap and core in a bucket with the appropriate cleaning solution.
NOTE: Make sure your floors and furnishings are protected from dripping paint when removing or disassembling the roller assembly.
NOTE: These steps should be followed for cleanup of latex paints ONLY.
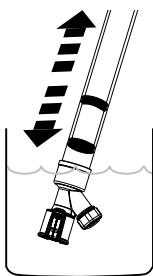
- Remove fill tube from lid and install it into the fill valve housing. Submerge the fill tube into warm, soapy water and pull the plunger in and out a minimum of 5 times.
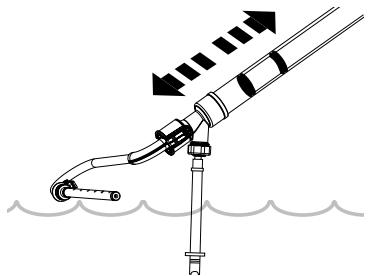
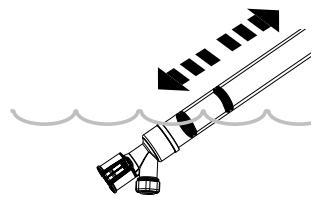
- Remove the fill tube, then submerge the fill valve and the roller arm and pull the plunger in and out a minimum of 5 times.
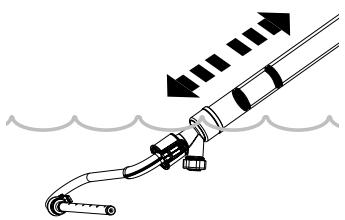
- Submerge the connecting area and the fill valve under warm, soapy water and pull the plunger in and out a minimum of 5 times.
- Rinse remaining parts under a faucet and drain all excess fluid.
CLEANUP FOR OIL-BASED PAINTS
NOTE: These steps should be followed for cleanup of oil-based paints ONLY.
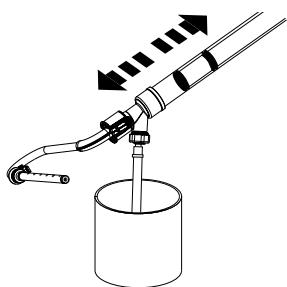
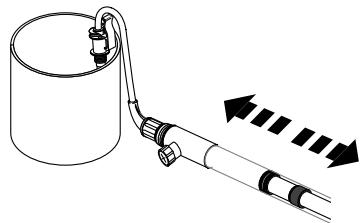
- Remove fill tube from lid and install it into the fill valve housing. Submerge fill tube into a gallon can of mineral spirits and pull plunger in and out a minimum of 5 times.
- Remove fill tube, then submerge roller arm into the same one gallon bucket of mineral spirits, making sure that ALL of the holes in the roller arm are submerged. Pull plunger in and
- Submerge the connecting area and valve housing under the solvent and pull the plunger in and out five a minimum of 5 times.
- Drain all excess fluid and clean remaining parts by hand.
EXTENDED STORAGE
NOTE: When storing your PaintMate® Plus, make sure the fill valve is pointing downward, and never store your unit with the fill tube inserted into the fill valve.
- Turn the locking collar next to the trigger counterclockwise until the main tube easily slides off the plunger.
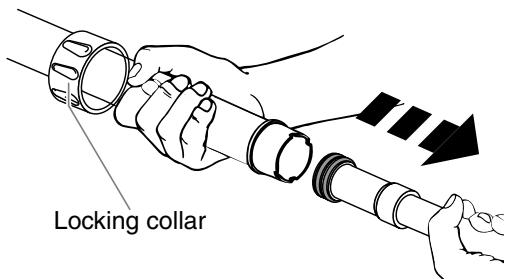
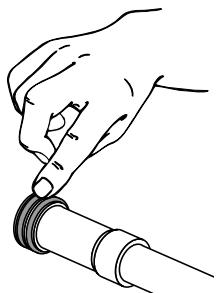
- Thoroughly pack a generous amount of petroleum jelly around and in between the O-rings on the plunger.
- Reassemble the main tube and plunger.
NOTE: When putting the plunger back into the main tube, make sure the O-rings do not twist or cut.
- Apply a thin layer of petroleum jelly to the valve housing on the main tube.
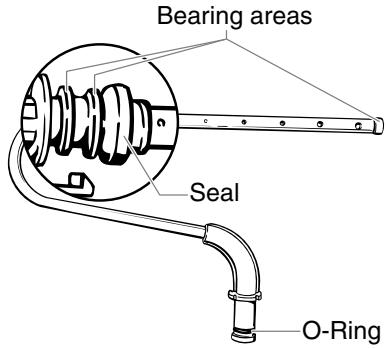
- CLEAN and LUBRICATE the areas on the arm indicated below. Use a thin layer of petroleum jelly to lubricate the indicated areas.
- Assemble the roller arm, core, and cover.
TROUBLESHOOTING
| PROBLEM | CAUSE | SOLUTION |
| There is paint leakage on the roller arm assembly | The seal on the arm is backwards | Turn the seal around |
| The seal and cap were not properly cleaned | Clean and properly lubricate | |
| The O-ring and the connecting area were not cleaned properly | Clean and properly lubricate | |
| Paint residue on connecting areas | Clean connecting areas | |
| The O-rings are damaged or missing | Replace the O-rings* | |
| The roller cover is worn or damaged | Replace the roller cover* | |
| The core or cap is worn or damaged | Replace the core or cap* | |
| The bearing areas are worn | Call Customer Service | |
| Plunger is difficult to pull/push | O-rings are not lubricated | Lubricate the O-rings on the plunger |
| The fill tube will not fill with paint or paint leaks from fill valve | Paint residue on fill valve components | A) Insert fill tube firmly into fill valve and twist fill tube several times to break up paint residue B) If the problem persists, refer to the steps below to clean the fill valve components |
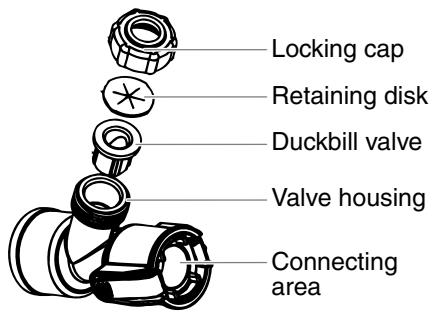
- Unscrew the locking cap on the valve housing by turning it counterclockwise.
- Remove the retaining disk and the duckbill from the valve housing.
- Clean these parts thoroughly using the appropriate cleaning solution.
- Replace the duckbill valve and retainer disk.
-
Screw the locking cap on the valve housing by turning it clockwise.
-
Replacement parts available by calling customer service

Have you tried the recommendations above and are still having problems? In the United States, to speak to a customer service representative, call our Customer Service at 1-763-519-3555 Monday through Friday between 8:00 AM and 4:30 PM Central time. An automated Self-Help option is also available at 1-800-328-8251, seven days a week, twenty-four hours a day.
PRODUCT REGISTRATION CARD
Send in your product registration card or register online at www.wagnerspraytech.com. Proper registration will serve as proof of purchase in the event your original receipt becomes misplaced or lost. Returning this card will expedite the processing of your warranty. Be sure you write your unit's date code on the card before sending it. The date code is located on the Power Trigger® of your unit (for example, T087A). The additional information will also help us to develop new products that best meet your needs and desires. If you have any questions or concerns regarding your registration card, please call our registration card center at 1-303-394-9077.
AVANT DE COMMENCER
APPLICATION DU PRODUIT
- Denotes parts that can only be purchased together and not individually.
Français
| Description | Part Number |
| 3/8” nap roller cover | .0155206 |
| 3/4” nap roller cover | .0155208 |
| GlassMask™ | .0284001 |
| Paint Trimmer™ | .0156130A |
| Roller Washer™ | .0156118A |
| Swivel stain pad | .0284055A |
| Replacement stain pad | .0284058A |
| 5-gallon adapter | .0284051 |
Accessories can be purchased by calling customer service.
Français
This product, manufactured by Wagner Spray Tech Corporation (Wagner) is warranted against defects in material and workmanship for two years following date of purchase if operated in accordance with Wagner's printed recommendations and instructions. This warranty does not cover damage resulting from improper use, accidents, user's negligence or normal wear. This warranty does not cover any defects or damages caused by service or repair performed by anyone other than a Wagner Authorized Service Center. ANY IMPLIED WARRANTY OF MERCHANTABILITY OR FITNESS FOR A PARTICULAR PURPOSE IS LIMITED TO TWO YEARS FOLLOWING DATE OF PURCHASE. THIS PRODUCT IS DESIGNED FOR HOME USAGE ONLY. IF USED FOR COMMERCIAL OR RENTAL PURPOSES, THIS WARRANTY APPLIES ONLY FOR 30 DAYS FROM DATE OF PURCHASE. WAGNER SHALL NOT IN ANY EVENT BE LIABLE FOR ANY INCIDENTAL OR CONSEQUENTIAL DAMAGES OF ANY KIND, WHETHER FOR BREACH OF THIS WARRANTY OR ANY OTHER REASON. THIS WARRANTY DOES NOT APPLY TO ACCESSORIES.
If any product is defective in material and/or workmanship during the applicable warranty period, return it with proof of purchase, transportation prepaid, to any Wagner Authorized Service Center. Call the Wagner Technical Service at 1-763-519-3555 Monday through Friday between 8:00 AM and 4:30 PM Central time. An automated Self-Help option is also available at 1-800-328-8251 and www.wagnerspraytech.com, seven days a week, twenty-four hours a day.