
FORMS PRINTER 4227 PLUS - Dot Matrix Printer LEXMARK - Free user manual and instructions
Find the device manual for free FORMS PRINTER 4227 PLUS LEXMARK in PDF.

| Product type | Impact dot matrix printer |
| Brand | Lexmark |
| Model | Forms Printer 4227 Plus |
| Print width | Up to 345.4 mm (13.6 inches) for continuous paper |
| Number of pins | 9 pins |
| Print speed | Up to 480 cps (characters per second) in draft mode |
| Resolution | 360 x 360 dpi maximum |
| Paper feed | Tractor-fed continuous paper (front/rear), single sheet via manual feed |
| Multi-part forms | Capacity: original + 5 copies (6 parts) |
| Interfaces | Parallel (Centronics), RS-232C serial (optional) |
| Dimensions (W x D x H) | 550 x 380 x 280 mm |
| Weight | Approximately 13 kg |
| Power supply | 100-127 / 220-240 V AC, 50-60 Hz, 0.6 A |
| Power consumption | Operating: approx. 50 W; standby: 15 W |
| Noise level | Approx. 55 dB(A) (according to ISO 7779) |
| Operating temperature | 10 to 32 °C |
| Relative humidity | 20 to 80% non-condensing |
| Ribbon | Cartridge ribbon (Lexmark 1380045 or equivalent) |
| Monthly duty cycle | Approximately 20,000 pages per month |
| Maintenance and cleaning | Clean the exterior with a soft, dry cloth. Clean the print head and paper path according to the manual instructions. |
| Safety | Power cable must be plugged into a grounded outlet; disconnect before any maintenance. Do not use in a humid environment. |
| Spare parts and repairability | Ribbons, sensors, print heads and circuits available through Lexmark or authorized dealers. Repairs by qualified personnel recommended. |
Frequently Asked Questions - FORMS PRINTER 4227 PLUS LEXMARK
User questions about FORMS PRINTER 4227 PLUS LEXMARK
0 question about this device. Answer the ones you know or ask your own.
Ask a new question about this device
Download the instructions for your Dot Matrix Printer in PDF format for free! Find your manual FORMS PRINTER 4227 PLUS - LEXMARK and take your electronic device back in hand. On this page are published all the documents necessary for the use of your device. FORMS PRINTER 4227 PLUS by LEXMARK.
USER MANUAL FORMS PRINTER 4227 PLUS LEXMARK
First Edition (June 1996)
The following paragraph does not apply to the United Kingdom or any country where such provisions are inconsistent with local law: LEXMARK INTERNATIONAL, INC. PROVIDES THIS PUBLICATION "AS IS" WITHOUT WARRANTY OF ANY KIND, EITHER EXPRESS OR IMPLIED, INCLUDING, BUT NOT LIMITED TO, THE IMPLIED WARRANTYES OF MERCHANTABILITY OR FITNESS FOR A PARTICULAR PURPOSE. Some states do not allow disclaimer of express or implied warranties in certain transactions, therefore, this statement may not apply to you.
This publication could include technical inaccuracies or typographical errors. Changes are periodically made to the information herein; these changes will be incorporated in later editions of the publication. Improvements and/or changes in the product(s) and/or the program(s) described in this publication may be made at any time.
Publications are not stocked at the address given below; requests for publications should be made to your point of purchase.
A form for reader's comments is provided at the back of this publication. If the form has been removed, comments may be addressed to Lexmark International, Inc., Department F95/035-3, 740 New Circle Road N.W., Lexington, Kentucky 40511-1876, U.S.A. In the United Kingdom and Eire, send to Lexmark International, Ltd., Marketing and Services Department, Westhorpe House, Westhorpe, Marlow Bucks SL73RQ. Lexmark may use or distribute any of the information you supply in any way it believes appropriate without incurring any obligation to you.
Lexmark is a trademark of Lexmark International, Inc.
Other trademarks are the property of their respective owners.
Copyright Lexmark International, Inc. 1996. All rights reserved.
UNITED STATES GOVERNMENT RESTRICTED RIGHTS
This software and documentation are provided with RESTRICTED RIGHTS. Use duplication or disclosure by the Government is subject to restrictions as set forth in subparagraph (c)(1)(ii) of the Rights in Technical Data and Computer Software clause at DFARS 252.227-7013 and in applicable FAR provisions: Lexmark International, Inc., Lexington, KY 40511.
Contents
Chapter 1 - Getting Started. 1
Unpacking 1
Installing the Ribbon Cartridge 4
Connecting the Power Cord 9
Connecting the Parallel Cable 10
Connecting the Serial Cable 12
Changing the Serial Settings 14
Verifying Serial Interface Settings 15
Printing the Demonstration Page 16
Setting the Language of the Operator Panel Messages 21
Installing Your Application Software 23
PPDS Mode 23
Epson Emulation Mode 24
What to do Next 24
Chapter 2 - Features and Functions 25
Front View of Printer 27
Rear View of Printer 29
Supplies 30
Chapter 3 - Using the Operator Panel 31
Buttons 32
Lights 34
Using the Function Menus 35
Overview of Function Menus. 36
Menu Options 38
Setting the Printer Online or Offline 46
Stopping the Printer 46
Advancing the Paper 46
Using Tear-Off 47
Auto Tear-Off Set to On. 47
One Second Tear-Off 48
Manual Tear-Off (Auto Tear-Off Set to Off) 48
Setting AutoGap 48
AutoGap Set to On 48
Manual AutoGap (AutoGap Set to Off) 49
AutoGap Set to Single 50
Selecting or Locking a Font or Pitch 51
Setting and Using a Macro 52
Disabling/Enabling the Operator Panel 53
Chapter 4 - Selecting and Loading Paper. 55
Paper Types and Sizes 55
Single Sheets 56
Multiple Part Single Sheets 56
Single Continuous Forms 57
Multiple Part Continuous Forms 57
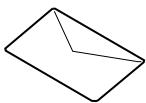
Envelopes 58
Multiple Part Forms 58
Loading a Single Sheet or Envelope 59
Loading a Single Sheet or Envelope into the Manual Feed . . . 59
Setting Auto Cut Sheet Load. 64
Loading a Single Sheet or Envelope With Continuous Forms
Already Loaded 65
Loading Continuous Forms 70
Aligning the Left Margin 74
Top-Of-Form (TOF) 76
Setting TOF for Continuous Forms 76
Setting TOF for Single Sheets and Envelopes. 78
Setting TOF in a Macro 78
Auto Tear-Off (Set to On) 79
Auto Tear-Off (Set to Off) 80
Auto Tear-Off (Set to One Second). 80
Adjusting Bidirectional Alignment 81
Chapter 5 - Printer Options 83
Auto Sheet Feeder 85
Installing the Auto Sheet Feeder 87
Loading Paper in the Auto Sheet Feeder. 90
Tractor 2 Feeder 96
Installing the Tractor 2 Feeder 97
Loading Paper in the Tractor 2 Feeder 102
Parking Continuous Forms and Changing Tractor Feeders. 111
Removing the Tractor 2 Feeder. 113
Chapter 6 - Solving Printer Problems 115
Testing the Printer 116
Clearing Paper Jams 117
Problem Conditions 118
Problems Indicated by Error Codes or Messages 118
Paper Feed Problems 121
Printing and Print Quality Problems 122
Alarm and Abnormal Noise 124
Power Problems 125
Operator Panel Button Problem 125
Display Messages 126
Chapter 7 - Maintaining Your Printer. 129
Cleaning the Printer 129
Cleaning the Auto Sheet Feeder Rollers 130
Removing the Ribbon Cartridge 131
Appendix A - Notices 133
Appendix B - Statement of Limited Warranty. 141
Glossary. 145
Index. 149
Getting Started
Chapter
1
Unpacking
1 Remove the printer from the carton.
Caution: Do not lift the printer by yourself; it weighs 21 kilograms (46 pounds).
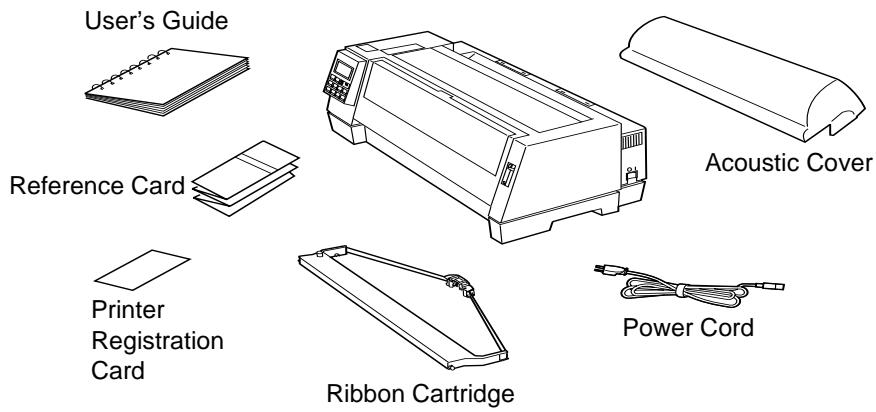
If any items are missing or damaged, contact your point of purchase.
If you need to purchase a parallel printer cable, we recommend Lexmark part number 1329605 (3.05 m or 10 ft.) or 1427498 (6.1 m or 20 ft.).
If you need to purchase an RS-232 serial cable, we recommend Lexmark part number 1180786 (6.1 m or 20 ft.).
2 Place the printer so that the front of the printer aligns with the edge of the desk or table.
Note: If you want to print more than 100 forms, make sure they stack up below the printer (on the floor) when they are finished printing in order to prevent jams.
3 Remove all packing tape from the printer.
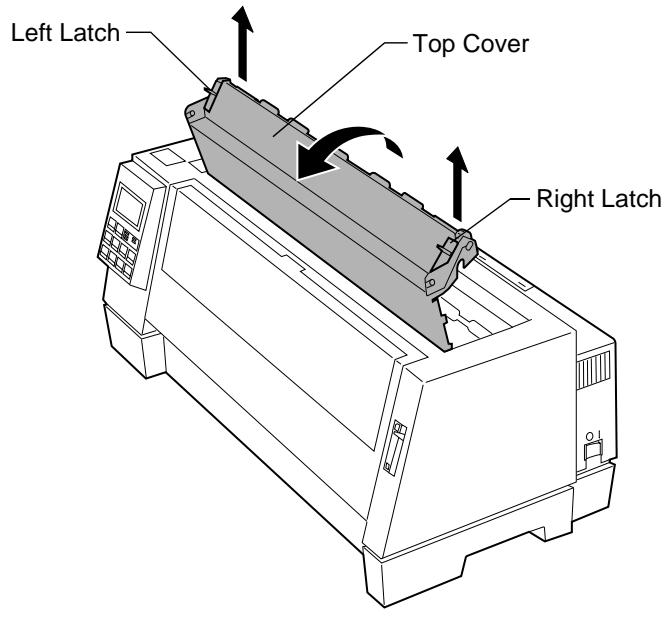
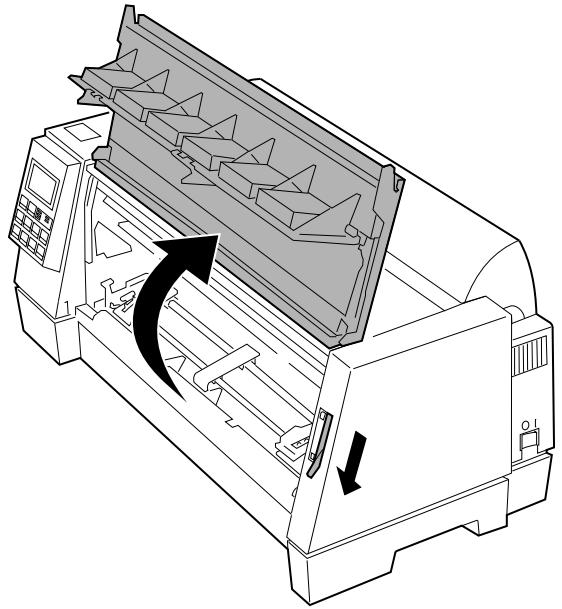
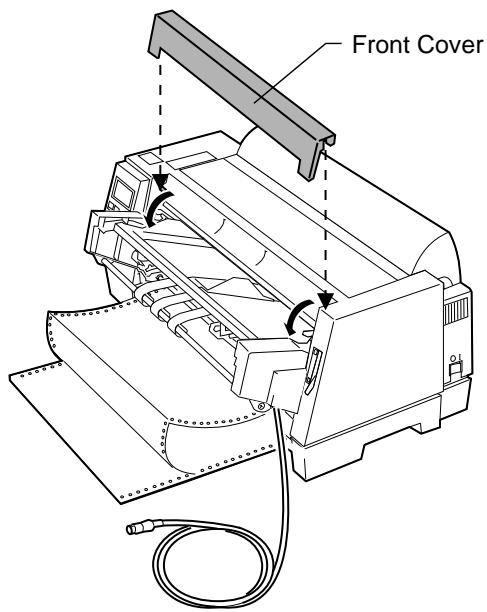
4 Pull up the left and right latches on the top cover and lift the top cover to remove it.
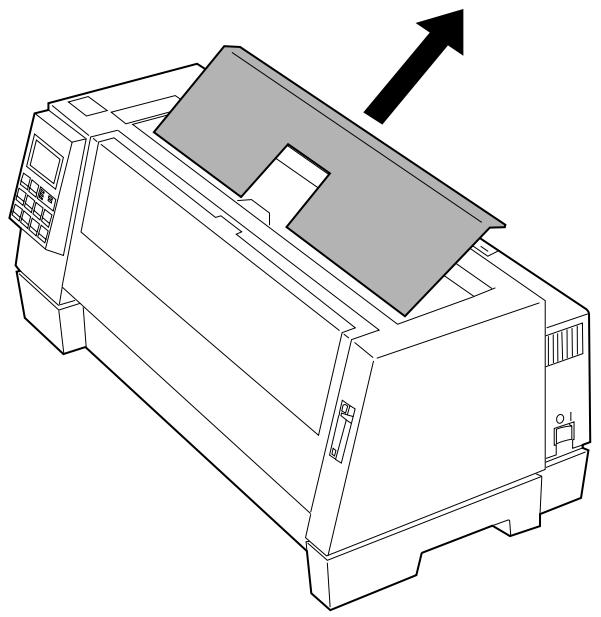
5 Remove the protective cardboard.
Installing the Ribbon Cartridge
1 Make sure the printer is Off.
2 Make sure the top cover is removed. If you need help, see step 4 on page 2.
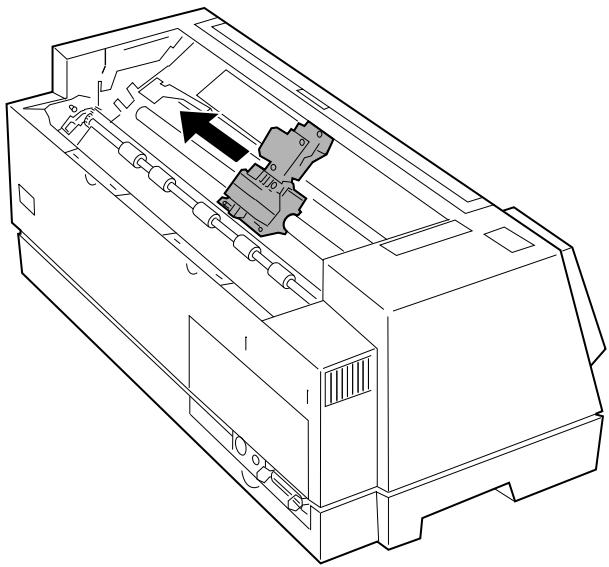
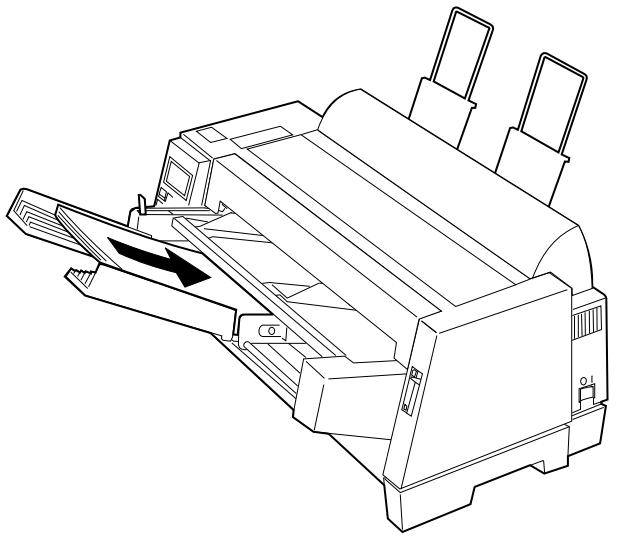
3 Manually move the printhead to the far side of the printer.
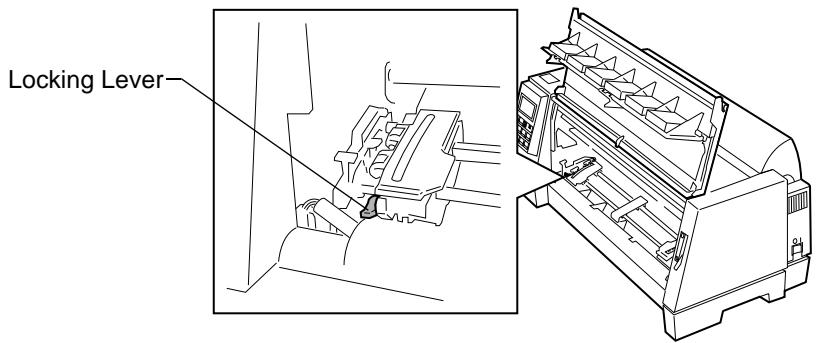
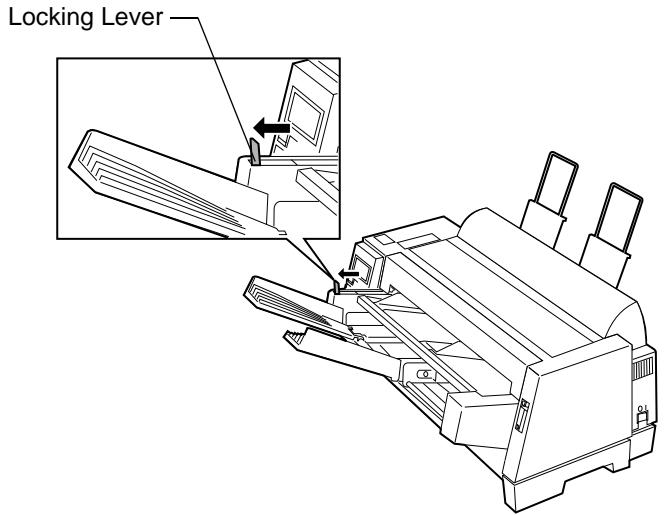
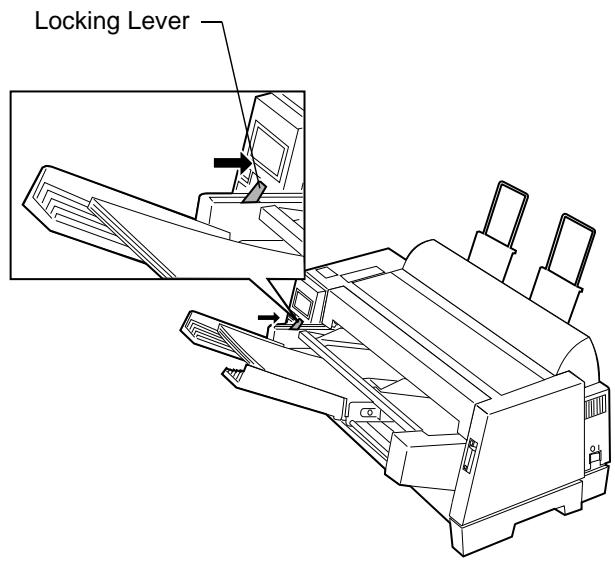
4 Rotate the ribbon advance knob on the ribbon cartridge counterclockwise to ensure that the ribbon feeds smoothly. If necessary, untwist the ribbon.
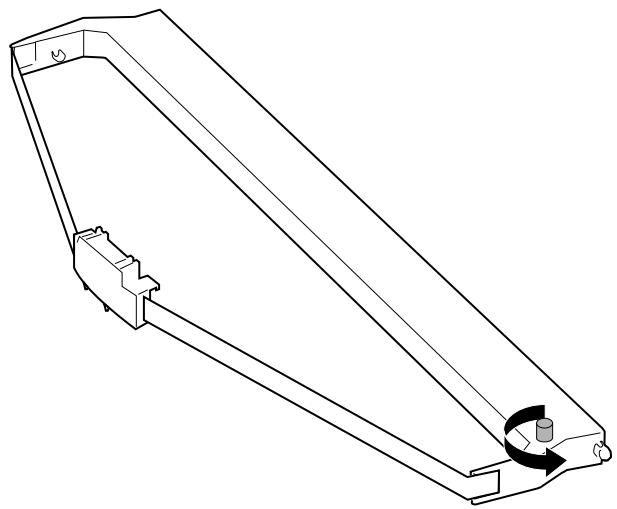
5 Manually move the ribbon guide to the far side of the cartridge, as shown below, then rotate the ribbon advance knob to take up any slack in the ribbon.

6 Insert the ribbon guide over the metal pins on each side of the printhead.
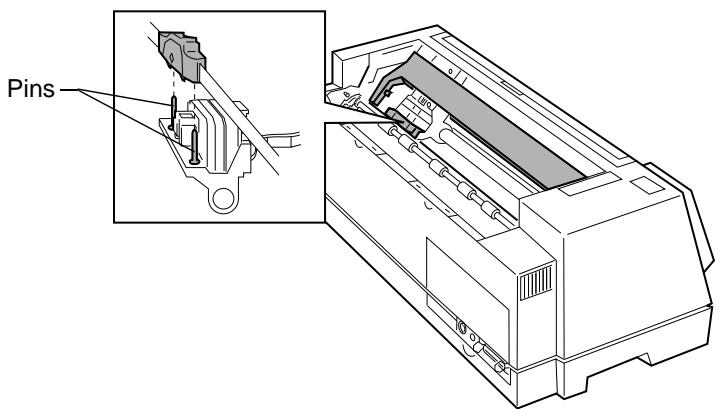
7 Manually move the printhead to the center position.
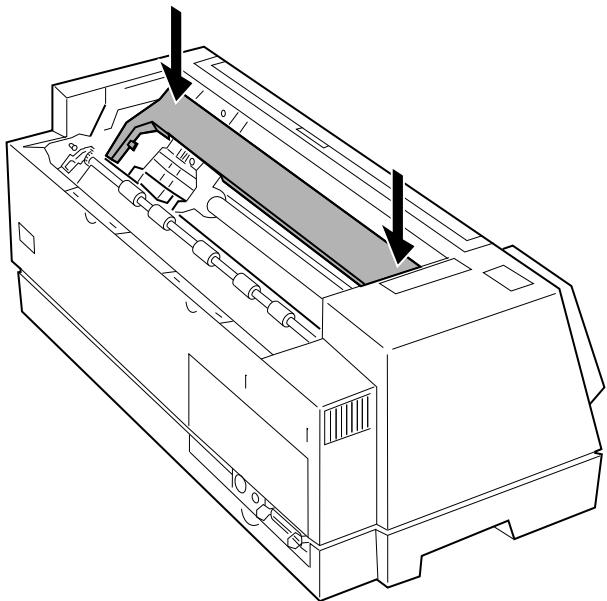
Align and insert the left and right side tabs of the ribbon cartridge into the slots in the side frames.
Press down firmly on the ribbon cartridge to snap it into place.
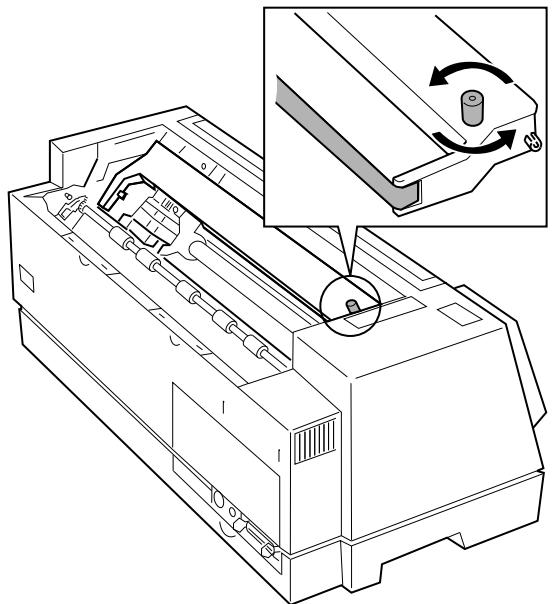
9 Make sure the ribbon feeds smoothly by rotating the ribbon advance knob counterclockwise.
10 Replace the top cover.

11 Attach the acoustic cover.
a Align the notches on the acoustic cover with the slots on the top cover.
b Snap the acoustic cover into place.

C Close the acoustic cover.
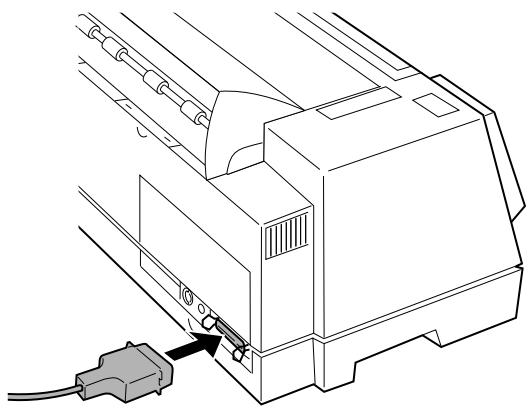
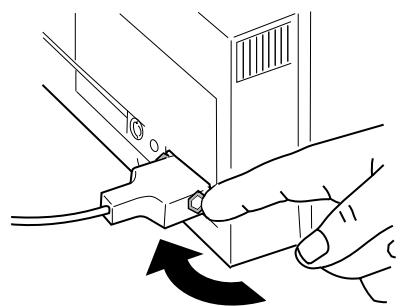
Connecting the Power Cord
1 Make sure the printer is Off.
2 Connect the smaller end of the power cord to the printer.
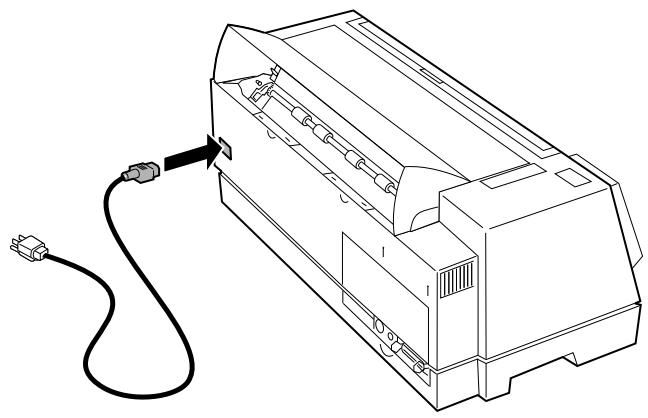
3 Connect the other end of the power cord to a properly grounded electrical outlet.
Connecting the Parallel Cable
You will either need to connect a parallel cable or a serial cable to the printer. If you are installing a serial cable, see "Connecting the Serial Cable" on page 12 for help.
1 Make sure the printer is Off.
2 Turn off the power on your computer.
3 Connect the parallel cable. This cable is not supplied with your printer. An IEEE 1284-compliant parallel cable such as Lexmark part number 1329605 (3.05 m or 10 ft.) or 1427498 (6.1 m or 20 ft.) is recommended.
Note: You do not need to attach a grounding wire to the computer.
4 Fasten the clip wires to the parallel cable. You will hear a click.
5 Connect the other end of the parallel cable to your computer.
6 Turn the printer On.
7 Continue with "Printing the Demonstration Page" on page 16.
Connecting the Serial Cable
1 Turn the printer Off.
2 Turn off the power on your computer.
3 Connect the serial cable and adapter. The cable and adapter are not supplied with your printer. We recommend either one of Lexmark's null modem RS 232 (DB 25 Female to DB 25 Male) serial cables, part numbers 1180786 (20 ft.) or 1038693 (50 ft.) along with the Serial Interface Adapter, part number 1319143 (DB 25 Female to Centronics 36 pin Male).
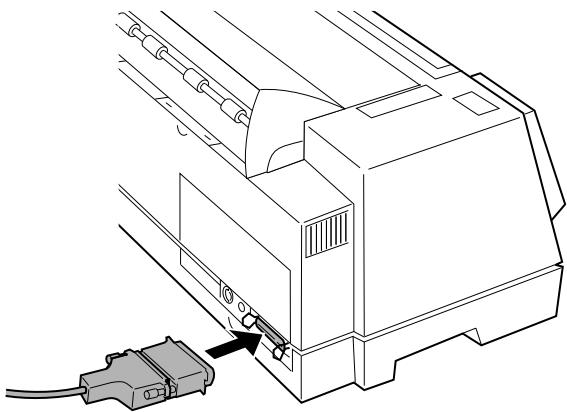
If you do not wish to use our recommended DB 25 to DB 25 null modem cables, or if you already have a similar RS 232 null modem cable, you may only need to attach Lexmark's DB 25 to Centronics 36 Serial Adapter (part number 1319143) to your existing cable.
Note: You do not need to attach a grounding wire to the computer.
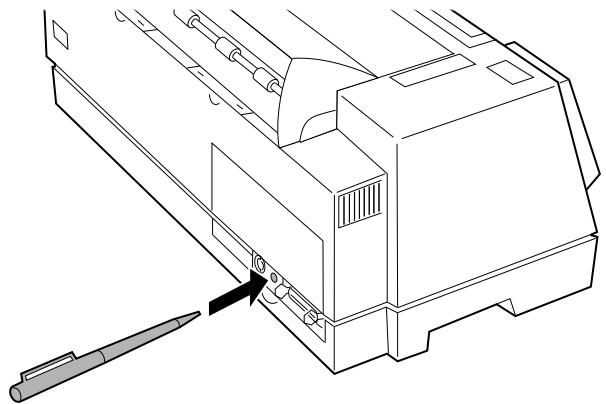
4 If needed, use a ballpoint pen to push the interface mode switch to the On position for RS-422 interface. The default is RS-232 interface.
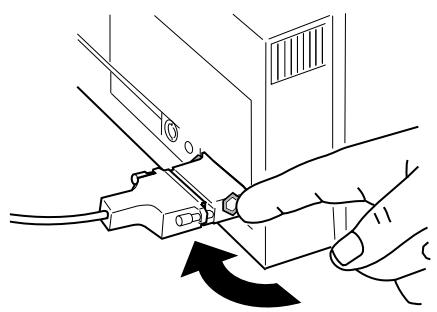
5 Fasten the clip wires to the serial cable. You will hear a click.
6 Connect the other end of the serial cable to your computer.
Changing the Serial Settings
1 Turn the printer On.
2 Press Menu to enter the function menu.
3 Press Item until Interface Opt. appears on the display.
4 Press Next and the default interface setting appears.
5 To change the default, press Next and then Item until the interface option you want appears. Press Store.
6 Press Prev. to go back to the interface level.
7 To change the serial settings:
a Press Item until Data speed (baud rate) appears.
b Press Next
C Press Item until the appropriate data speed setting appears.
d Press Store to save the setting. An asterisk (*) appears next to the setting you selected.
e Repeat steps a through d for each serial setting.
8 Press Quit to exit the function menu.
Verifying Serial Interface Settings
1 On the operator panel, press Menu.
2 Press Item or Item until Print Settings appears.
3 Make sure that forms are loaded.
4 Press Start to print the current printer-function settings.
5 Press Item or Item until the menu item you want appears.
6 Press Next or Prev. until the setting value you want appears.
7 Press Store to save the selected value. An asterisk (*) appears next to the selected value.
8 Press Quit to exit the function menu.
Printing the Demonstration Page
The following steps explain how to load a single sheet of paper so you can print the demonstration page. If you want to load continuous forms, see “Loading Continuous Forms” on page 70.
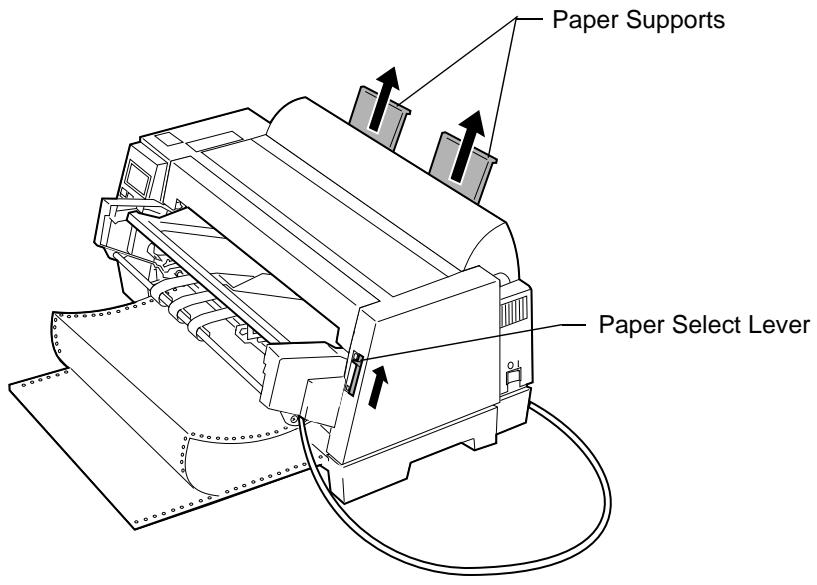
1 Turn the printer On.
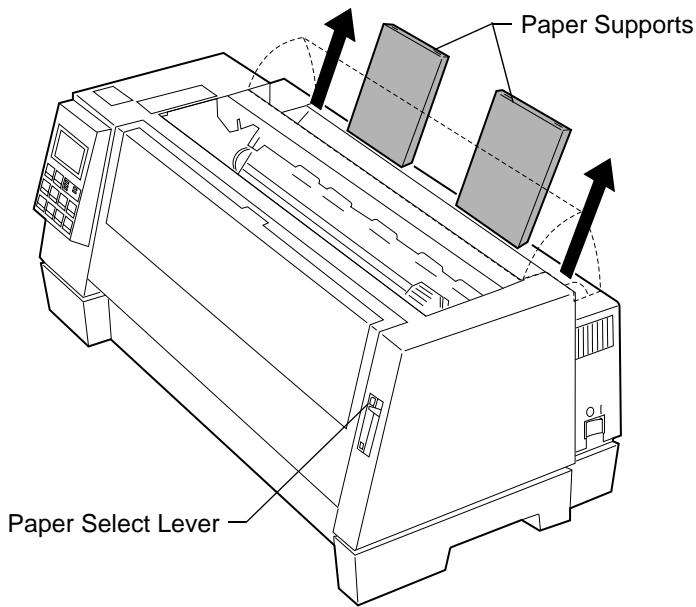
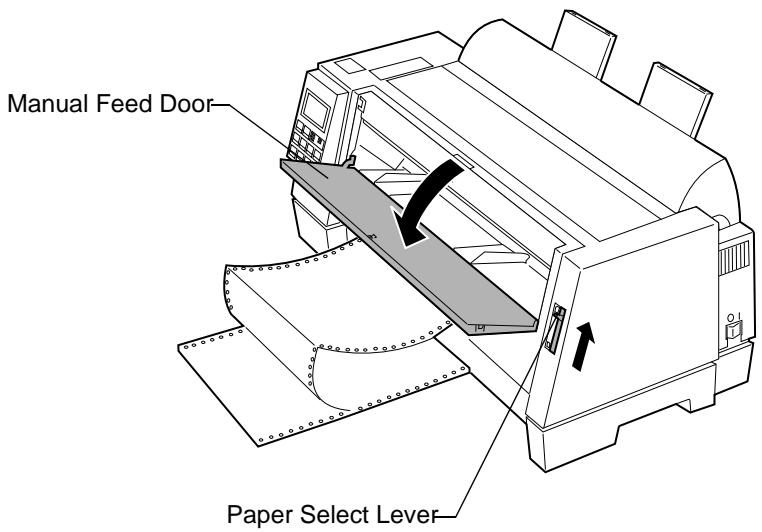
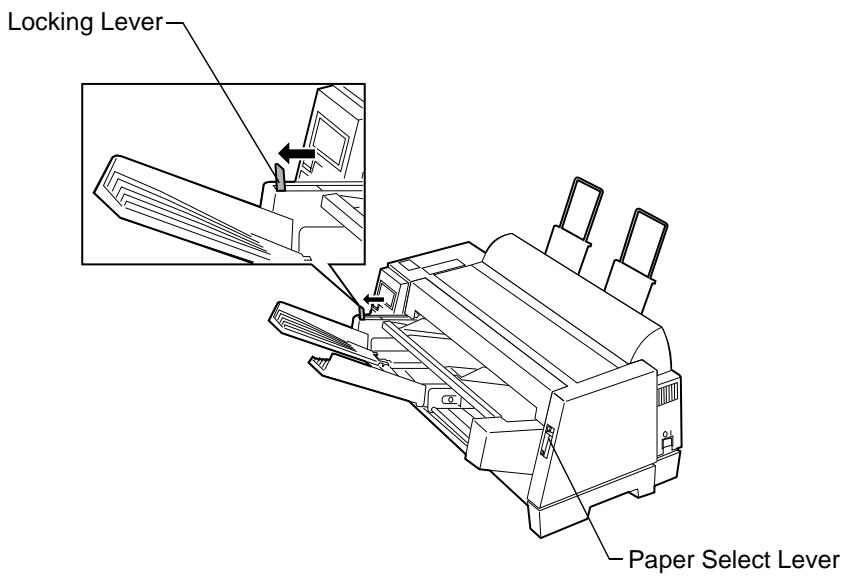
2 Move the paper select lever up to the single sheets position.
3 Pull the paper supports up.
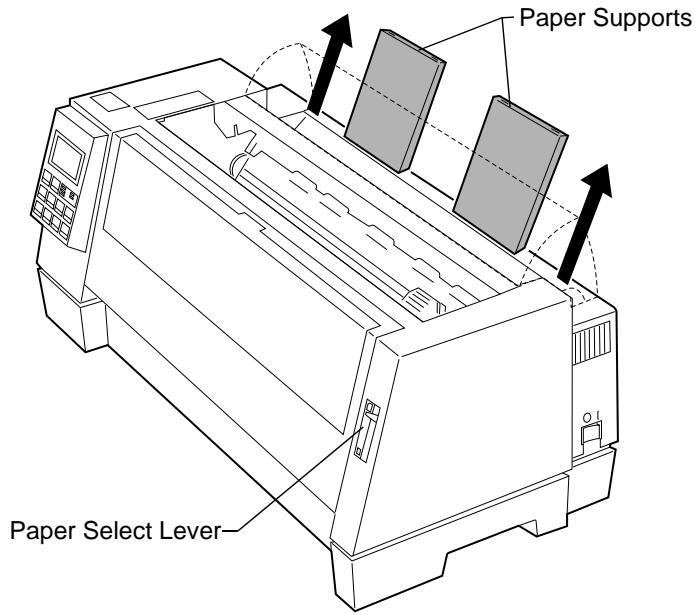
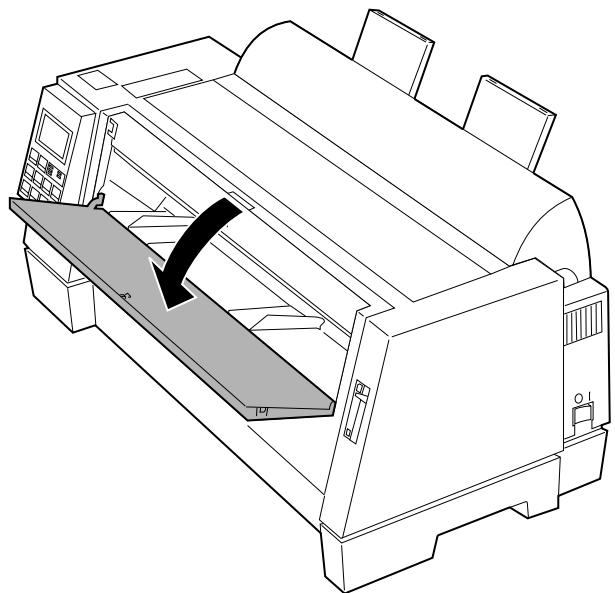
4 Open the manual feed door.
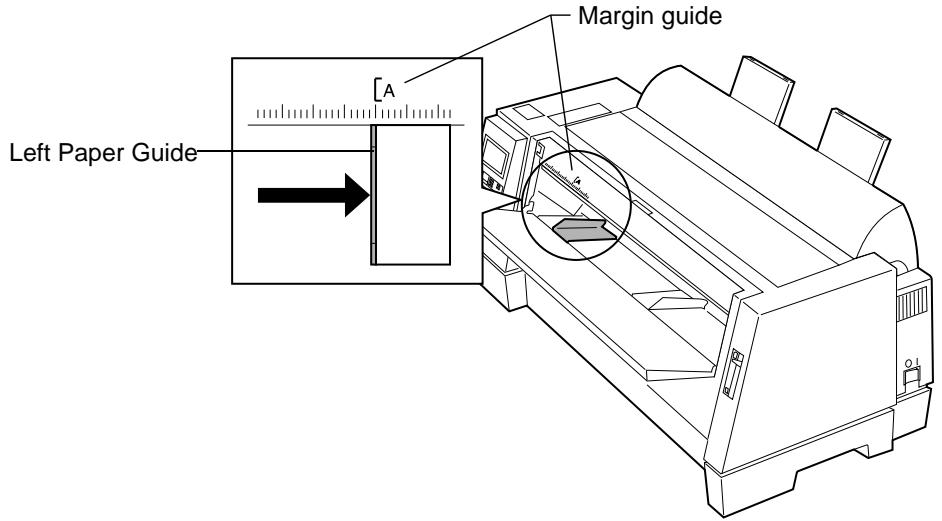
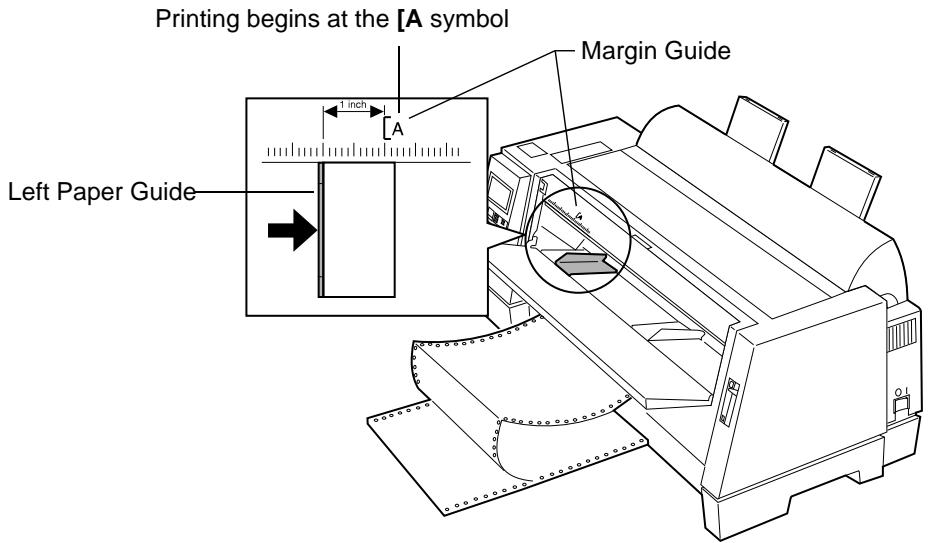
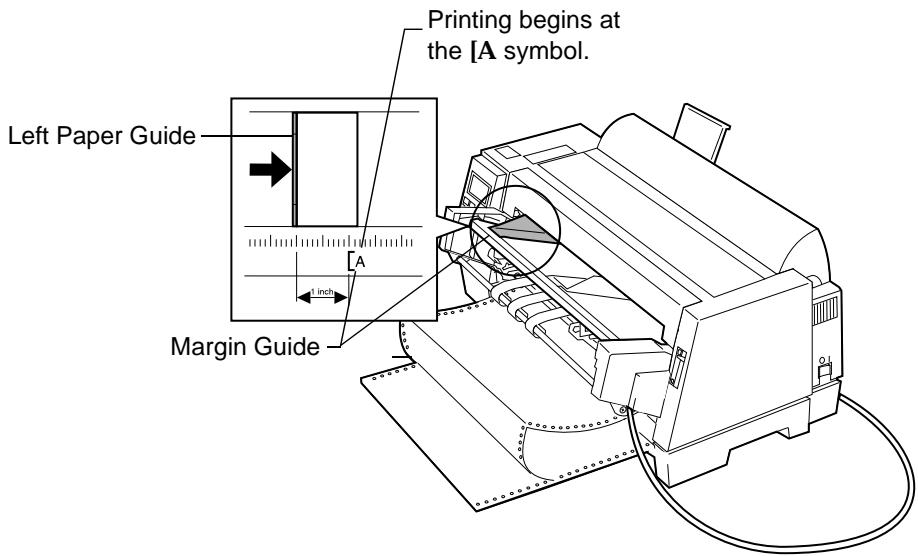
5 Set the left margin. For help, see "Aligning the Left Margin" on page 74.
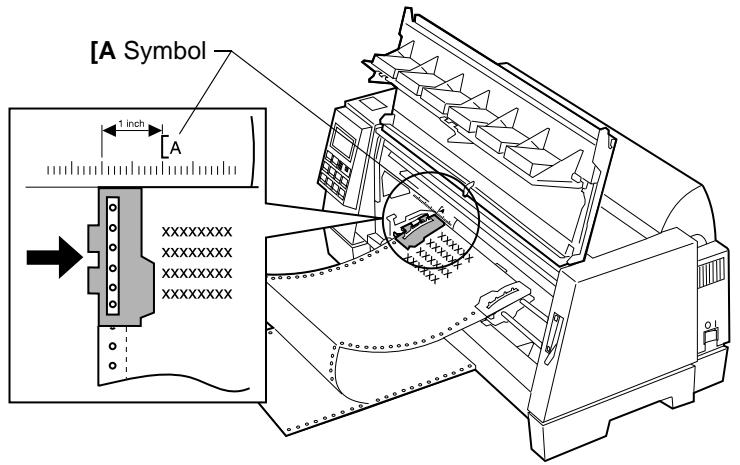
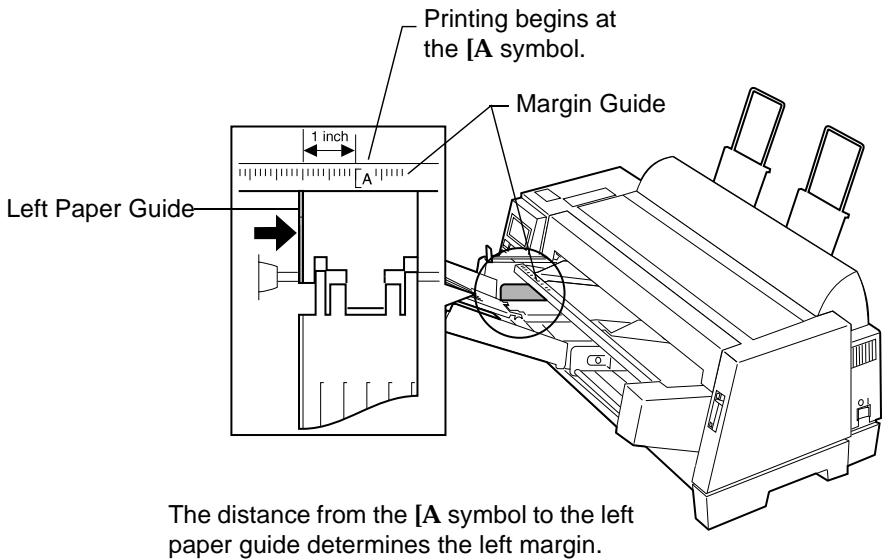
Before inserting paper, make sure that the left paper guide is aligned flush with the [A symbol printed on the margin guide. If the paper guide is not properly aligned, the Demo page prints incorrectly.
6 Place a single sheet against the left paper guide. Move the right paper guide so that the guide aligns with the right edge of the paper.
The Paper Empty/Add Paper message disappears.
a If Auto Cut Sheet Load is On (factory default), the paper feeds automatically to the Top-Of-Form (TOF). For more information about setting TOF, see “Setting TOF for Single Sheets and Envelopes” on page 78.
b If Auto Cut Sheet Load is Off, press FormFeed.
7 Make sure the printer is online (Ready light is on solid). If it is not, press Start/Stop until the Ready light is on solid. You are now ready to print.
8 Press Menu to enter the function menu.
9 Press Item until Print Demo is displayed.
10 Press Start to start print demo. One demo page prints.
11 Press Quit to exit the function menu.
Setting the Language of the Operator Panel Messages
To set up your printer in a language other than English:
1 Turn the printer On.
2 Press Menu to enter the function menu.
3 Press Item or Item until Control Options appears on the display.
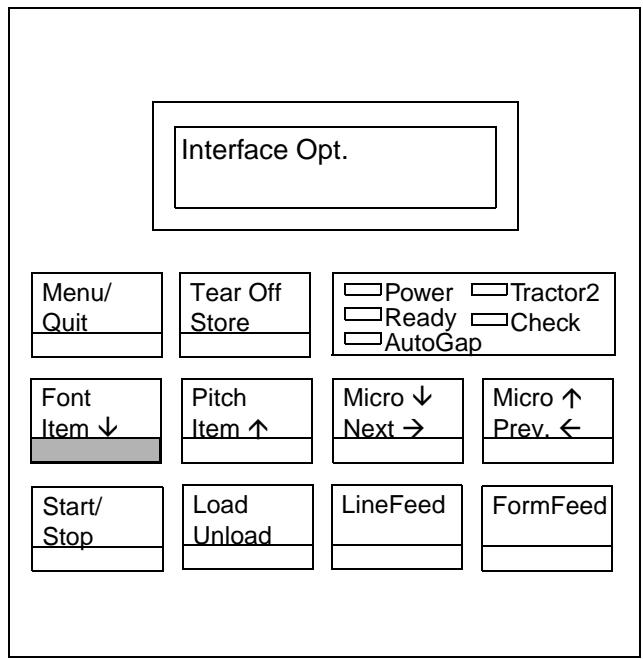
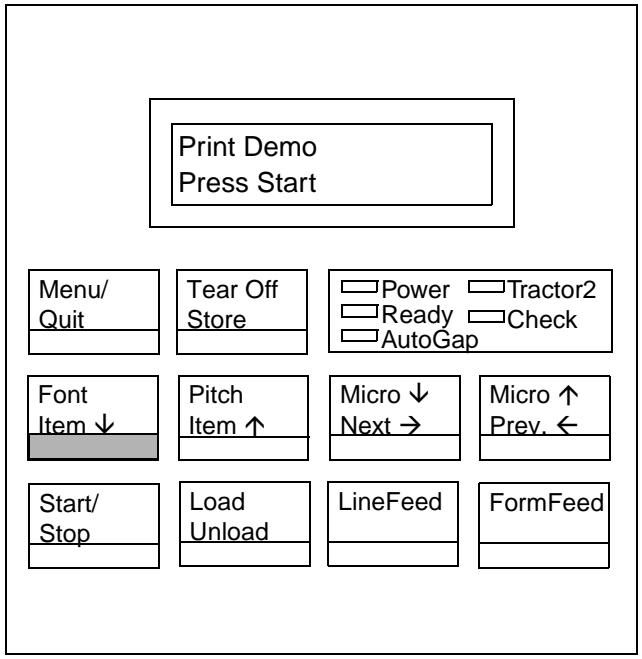
Control Options
Menu/Quit
Tear Off Store
Power Tractor2 Ready Check AutoGap
Font Item
Pitch Item
Micro↓ Next→ Micro↑ Prev.
Start/ Stop
Load Unload
LineFeed FormFeed
4 Press Next
5 Press Item or Item until Menu Language appears on the display.
6 Press Next
7 Press Item or Item until the desired language appears on the display.
Note: The message displayed appears in English until the selected language is saved. The following figure provides the corresponding language to help you.
Displayed Language
English (English) French (Francais) German (Deutsch) Italian (Italiano) Spanish (Espanol)
8 Press Store to save the selected language. The selected language is displayed with an asterisk (*) and the message on the display changes to the selected language.
To change the selected language, repeat steps 2-8.
9 Press Quit to exit the function menu.
Installing Your Application Software
Now that you have set up your printer, make sure that it works with the application software (program) you want to use. Most application software programs let you specify the type of printer you are using so the program can take full advantage of the printer's features.
Follow the instructions that came with your application software to see what printer drivers are available with that specific program.
PPDS Mode
If your printer is configured for PPDS Mode (the factory default), select a printer from the printer selection menu of your application software, in the following preferred order.
1 4227
2 Forms Printer 2381 Plus
3 2381 Plus
4 2381
5 4226
6 IBM Proprinter III XL
The printer driver you select in your software application must match the emulation mode you select for your printer. If your software does not allow you to select the 4227 Printer driver, you may need to customize your printer for the Epson emulation mode.
Epson Emulation Mode
If your printer is configured for Epson mode, select the Epson FX-1050 or DFX-5000 printer from the printer selection menu of your application software.
See your application's user documentation for more information.
What to do Next
You have completed printer setup. To learn more about your printer, continue with "Using the Operator Panel" on page 31.
Features and Functions
Chapter 2
Your printer has many features to help you perform your work efficiently. The printer combines excellent print quality along with the ability to print several print styles and graphics.
The following table describes the features and functions of your printer.
| Feature | Function |
| Multi-speed Printing | FastDraft—533 characters per second (cps) Draft—400 cps Courier and Gothic (near-letter quality)—100 cps |
| Character Spacing | Prints in 10, 12, 15, 17.1, and 20 pitch characters per inch (cpi), as well as proportional spacing. |
| Line Spacing | Increments of 1/144 inch (n/216" increments emulation) |
| Resident Fonts | FastDraft, Draft, Courier, and Gothic |
| Forms Handling | • Forms (straight paper path) • Automatic tear-off • Automatic paper loading/unloading |
| Form Width | Maximum 16 inches |
| Print Width | Maximum 13.6 inches |
| Multiple-part Forms Printing | 6-part forms (carbon and carbonless) |
| Code Pages | Your printer supports the following code pages: 437, 437G, 813, 850, 851, 853T, 857, 860, 861, 863, 865, 869, 920, 1004, and 1053. |
| Software Compatibility | Compatible with all IBM and IBM-compatible computers. |
| Interface Connection | For Parallel, RS-422, and RS-232 cables |
| AutoGap | When AutoGap is set to On, the printer automatically adjusts to the thickness of the paper you are using. |
Front View of Printer
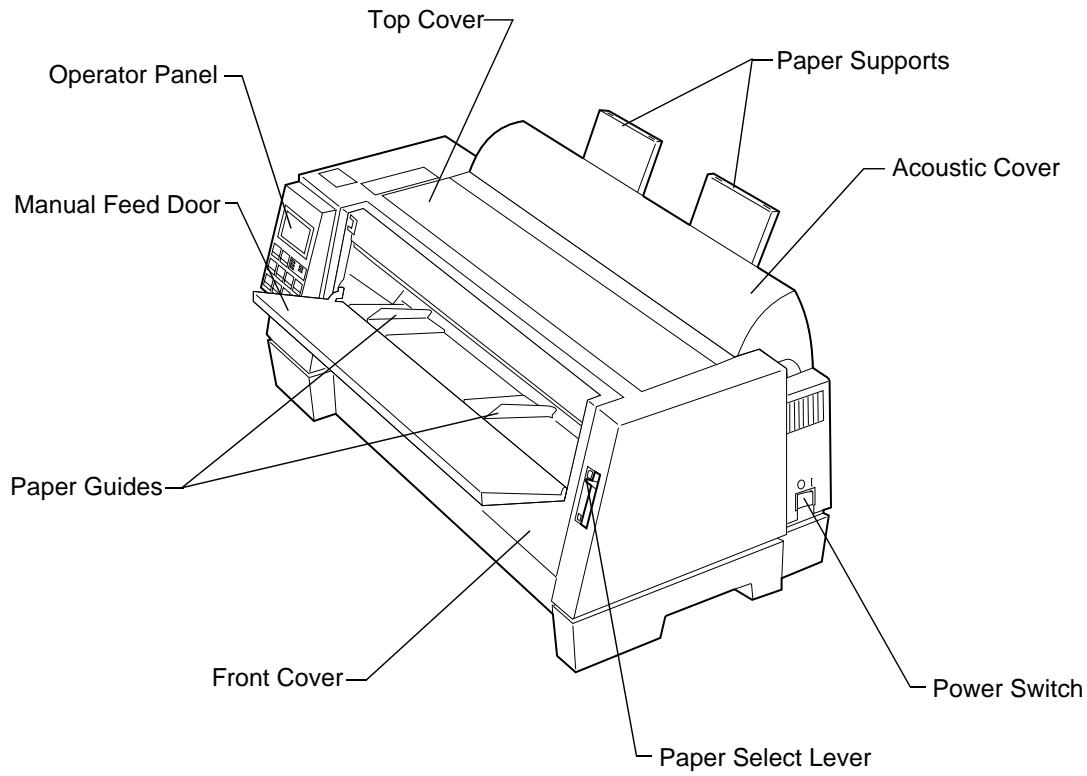
| Part Name | Function |
| Acoustic cover | Lowers noise level produced by the printer. |
| Front cover | Covers the continuous forms tractor. |
| Manual feed door | Manual feed of cut forms. |
| Operator panel | Indicates printer status and makes control of printer functions simple and convenient. |
| Paper guides | Aligns the margins of a cut form sheet. |
| Paper select lever | Selects the paper type: • Cut form sheets (¨) • Continuous forms (¨) |
| Paper supports | Supports cut forms when they are ejected from the printer. |
| Power switch | Switches power On or Off. |
| Top cover | Covers the ribbon cartridge and internal components. |
Rear View of Printer
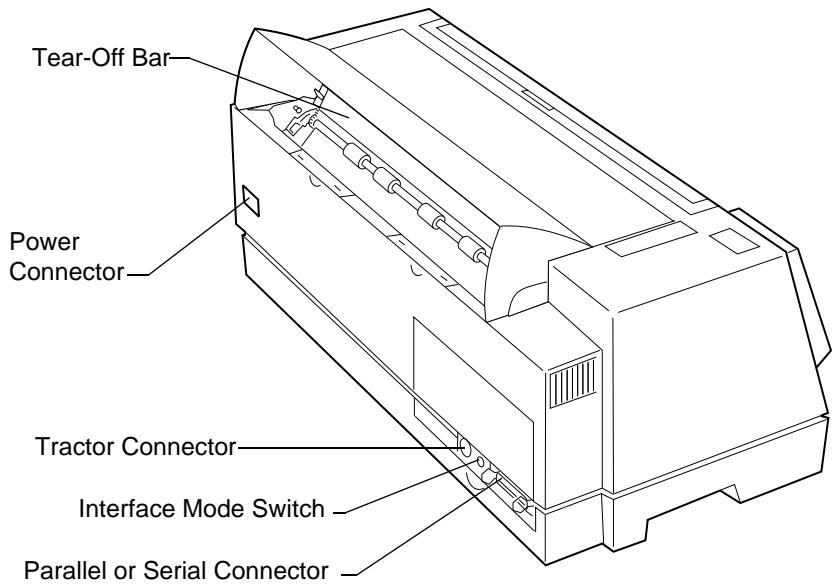
| Part Name | Function |
| Parallel or serial connector | Connects the parallel or serial cable. |
| Interface mode switch | Switches to RS-232c or RS-422 mode. |
| Tear-Off bar | Allows you to tear off continuous forms. |
| Tractor connector | Supplies power to the optional Tractor 2 Feeder. |
| Power connector | Connects power from the power cord to the printer. |
Supplies
A parallel or serial cable, ribbon cartridges, and paper are the only supplies you need for your printer.
You can order a parallel cable from Lexmark. Order part number 1329605 (3.05 m or 10 ft.) or part number 1427498 (6.1 m or 20 ft.).
When you need a new ribbon cartridge, order Lexmark part number 11A6150.
You can order a serial cable from Lexmark. Order Lexmark part number 1180786 (6.1 m or 20 ft.) and part number 1319143.
See "Paper Types and Sizes" on page 55 for the types and sizes of paper you can use with your printer.
Using the Operator Panel
Chapter 3
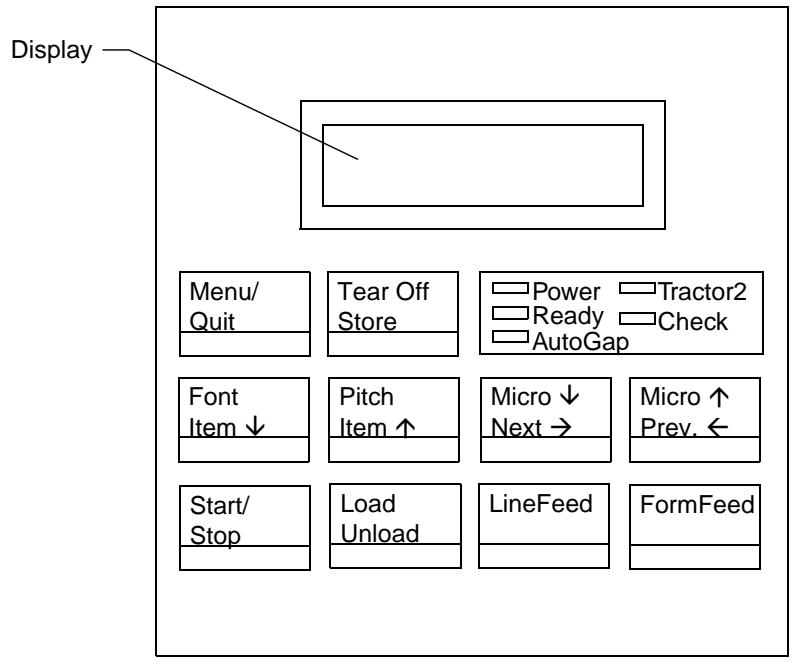
This section describes the basic functions of the operator panel buttons, lights, and the function menus.
Your application software may allow you to operate your printer from your computer. You may not need to use the operator panel very often, although, you will need to check the operator panel for messages if you have printer problems.
Changes made to printer settings from your application software override settings made from the operator panel, with the exception of the Font and Pitch Lock features.
Buttons
When using the function menus, press Item or Item to scroll through the menu items. Press Next or Prev. to move to the next previous menu level.
| Press this button: | When you want to: |
| Menu | ·Enter the function menu. The printer goes offline. |
| Quit | ·Exit the function menus. ·Run a Power-On Self Test (POST). |
| Tear Off | ·Advance the forms to the tear-off position. ·Retract the forms to the Top-of-Form (TOF) position when the forms are at the tear-off position. |
| Store | ·Save the values you selected in the menus. |
| Font | ·Select a font. See “Character Options” on page 40 for a list of fonts available for your printer. When you press Font, the printer goes offline and displays the current pitch and font. Note: When a pitch conflicts with a selected font, the Invalid Pitch message appears on the display. |
| Item ↓ | ·Scroll down to display the selection you want. |
| Pitch | ·Select a pitch. See “Character Options” on page 40 for the pitches available for your printer. When you press Pitch, the printer goes offline and displays the current pitch and font. Note: When a font conflicts with a selected pitch, the Invalid Pitch message appears on the display. |
| Item ↑ | ·Scroll up to display the selection you want. |
| Micro↓ | ·Advance the forms down 0.35 mm (1/72 in.). When you hold this button for more than one second, the forms move continuously until you release it. |
| Next → | ·Scroll forward to display the value you want in the function menu. |
| Micro ↑ | ·Advance the forms up 0.35 mm (1/72 in.). When you hold this button for more than one second, the forms move continuously until you release it. |
| Prev. ← | ·Return to the previous function menu selection. |
| Start/Stop | ·Make sure the printer is online (ready state). The printer must be online to accept data. This is the only active button when the printer is printing. Press this button to stop a print job. Printing continues until the current line is completed. To resume printing, press Start/Stop until the Ready light is on. ·Load the forms to TOF position with the ready light on. |
| Load/Unload | ·Load paper (cut or continuous forms) to the TOF position. ·Retract the forms to the tractor position. When the printer detects that it is at the end of a form, a message appears on the operator panel. Press this button to eject the forms from the printer. |
| LineFeed | ·Advance the paper to the next line. To move the paper continuously (while the printer is offline) hold LineFeed for more than one second. |
| FormFeed | ·Advance the paper to the TOF position on the next page. ·Load the forms to the TOF position. |
Lights
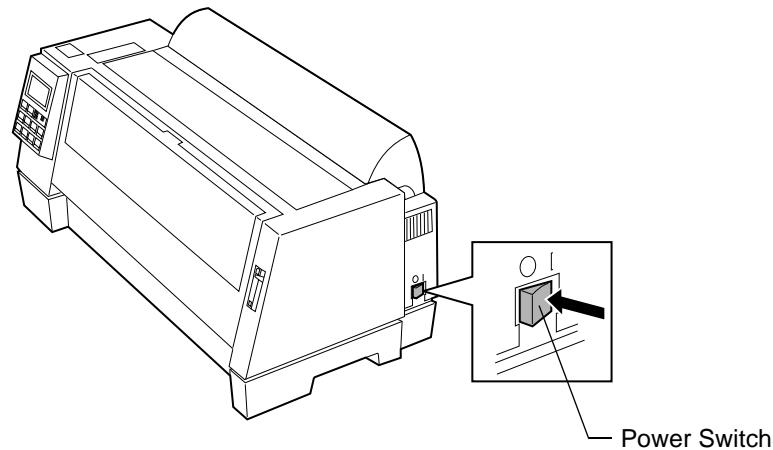
| Light | When you see this light... |
| Power (Green) | The printer power is on. |
| Ready (Green) | The printer is online and ready to print. The following conditions cause the Ready light to turn off: • Pressing Start/Stop • Detecting an end-of-form (EOF) • Detecting a paper jam • Detecting a cover open • Detecting a hardware error • Detecting a Power-On Self Test (POST) failure. • The printer is offline. |
| Check (Yellow) | Any of the following conditions may have occurred: • Detecting an end-of-form (EOF) • Detecting a paper jam • Detecting a cover open • Detecting a hardware error • Detecting a data transmission error • Detecting an interface mode error • Detecting a Power-On Self Test (POST) failure. |
| AutoGap (Green) | AutoGap is on. AutoGap automatically adjusts the printer according to the thickness of the paper you are using. |
| Tractor2 (Green) | The Tractor 2 Feeder is selected. (The Tractor 2 Feeder option must be installed.) |
Using the Function Menus
This section describes the function menus and how to set them. To set functions:
1 Press Start/Stop.
2 Press Menu to enter the function menu.
3 Press Item or Item until the function menu you want appears on the display.
Note: The selectable function menu is different depending on the selected data stream mode (IBM PPDS or Epson emulation) and the Interface mode (Parallel, RS-232 or RS-422).
4 Press Next to enter that menu item.
5 Press Item or Item until the value you want appears on the display.
6 Press Store to save the selected value.
Note: The currently selected default value is displayed with an asterisk () .
If you have to change the optional value in another function menu, repeat steps 3 through 5. Otherwise, go to the next step.
7 To print the function setting, press Item or Item until the Print Settings message appears on the display.
8 Press Start/Stop to print the current setting values.
9 Press Quit to exit the function menus.
Note: If you have changed any settings, the printer performs a Power-On Self Test. If you did not change any settings, the printer enters the not-ready state.
Overview of Function Menus
Use the Item and Item buttons to move through the menu and option directories. Press Next to move away from the Main Menu to the subordinate directories and choices. Press Prev. if you want to go back in a menu or return to the Main Menu.
Menu Options
The following table provides information on where to find specific functions on the operator panel of the printer. Those selections in italics may or may not appear on the panel, depending on the printer settings or what printer options are installed.
Navigating Through the Function Menus
| Press: | When you want to move: |
| Item ↑ | Up through the Main, Primary, or Secondary levels. For example, if the operator panel displays Control Options and you want Data Options, press Item ↑. |
| Item ↓ | Down through the Main, Primary, or Secondary levels. For example, if the operator panel displays Print Demo and you want Print Settings, press Item ↓. |
| Next → | To the Primary or Secondary level of options. For example, if the operator panel displays Paper Hand Opt. and you want to select Auto Tear-Off, press Next →. |
| Prev. ← | Back to a Main or Primary level of options. For example, if you are in the Secondary Options level and you want to go back to the Primary level, press Prev. ←. |
| Main Menu | Primary Options | Secondary Options |
| Set Top of Form | — | — |
| Select Tractor Allows you to specify which tractor you would like to use. Does not appear unless the Tractor 2 Option is installed. | • Tractor 1 • Tractor 2 | — |
| Print Demo | — | — |
| Print Settings | — | — |
| Load Macro Sets up a macro, for which you designate the settings. For example, if you are going to print many documents using Gothic 12pt with a one-inch margin, you can use this function to configure your printer to use those settings upon command. Does not appear if “Disable” is selected in “Default Macro”. | Macro x (x = 1 to 4) | — |
| Default Macro Allows you to turn a macro on or off. | • Macro x • Disable | — |
| Macro x Options (x = 1 to 4) Does not appear if “Disable” is selected in “Default Macro”. | Character Options | see below |
| Paper Handling Options | ||
| AutoGap | ||
| Copy Macro x Allows you to copy the settings of one macro to another. | Copy FM a TO xCopy FM b TO xCopy FM c TO x | |
| Character Options If “Enable” is selected in “Default Macro”, this item appears in the macro menu. | Default Font Changes the default font the printer uses. (Used if no font is designated in the application software). | FastDraft, Draft, Gothic, Courier, Download Asterisks (*) appear next to the default setting. |
| Default Pitch Changes the default pitch the printer uses. (Used if no font is designated in the application software). | 10, 12, 15, 17.1, 20, PS-Asterisks (*) appear next to the default setting.- Not all sizes available for all fonts. | |
| Code Page Changes the code page the printer uses for your print job. | 437, 437G, 813, 850, 851, 853T, 857, 860, 861, 863, 865, 869, 920, 1004, 1053 | |
| Character Set | 1, 2 | |
| 20-Pitch | Enable, Disable | |
| Paper Handling Options If “Enable” is selected in “Default Macro”, this item appears in the macro menu. | Auto Tear-Off If on, moves the top perforation of a continuous form to the tear bar. | On, Off, One Second |
| Auto Cut Sheet Load If on, automatically loads cut sheets into the printer. | On, Off | |
| Auto Sheet Feed Automatically feeds cut sheets if using Auto Sheet Feeder. Does not appear when the Tractor 2 Option is installed. | On, Off | |
| Tractor Select this option when you want to set the default tractor. Does not appear unless the Tractor 2 Option is installed. | Tractor 1, Tractor 2, Tractor 1 + 2 | |
| Form Length Allows you to specify the length of the paper you are using. | 1LPP/0.17” to 132LPP/22.00” | |
| Left Margin | 0", 1", 2", 3" | |
| Right Margin | 4", 5", 6", 7", 8", 13.6" | |
| Bottom Margin | 0", 1/2", 1", 2", 3" | |
| Lines Per Inch Adjusts the number of lines that print per inch. | 3, 4, 6, 8 | |
| Eject by FormFeed Automatically ejects your print job when it has finished printing. | On, Off | |
| AutoGap If “Enable” is selected in “Default Macro”, this item appears in the macro menu. | On - Automatically adjusts the printer to the thickness of the paper being printed upon. - Select this option when you want the printer to check for paper thickness every time paper is loaded. | — |
| Off - Allows you to manually specify the thickness of the paper being printed upon. - Select this option when you want to specify how thick the paper is. | Manual Position: 1, 2, 3, 4, 5, 6, 7 | |
| Single - Adjusts the printhead to the paper thickness: · when you turn the printer on, · when you change the paper select lever. - Select this option when you want to print several cut sheets with the same paper thickness when using the Auto Sheet Feeder. | Open, Fixed | |
| Data Options | Buffer Size Controls the size of the buffer between the computer and the printer. | Maximum, Minimum |
| Automatic LF Automatically performs a line feed (LF) when a carriage return (CR) is sent. | On, Off | |
| Automatic CR Automatically performs a carriage return (CR) when a line feed (LF) is sent. | On, Off | |
| Slashed Zero Prints all zeros with a slash through the center. | On, Off | |
| Control Options | Uni-Dir Print Tells the printer to print unidirectionally or bidirectionally. (Select On for high-quality, one-way printing, or select Off for fast, two-way printing). | On, Off |
| Auto Rdy Cut Sht (Auto Ready Cut Sheet) - When set to On, the printer automatically loads a cut form. - When set to Off, you must press FormFeed or LineFeed to load a cut form. | On, Off | |
| Paper Out Alarm Sounds an alarm when the printer is out of paper. | Enable, Disable | |
| Control Options(continued) | TOF ReadTells the printer to check the TOF after each new sheet is loaded. | Enable, Disable |
| Menu LanguageChanges the language used on the operator panel. | English, French, German, Italian, Spanish | |
| Emulation Options | Emulation | IBM, EPSON |
| Character Table | Italics, Graphics | |
| International Character | U.S.A., France, Germany, U.K., Denmark I, Sweden, Italy, Spain I | |
| Interface Options | Interface Allows you to switch from parallel to serial protocols. If serial is chosen, you must also set the italicized options that follow to match those of your computer. | Parallel, Serial RS-232Switch between RS-232 or RS-422 serial interface using the interface mode switch (for help, see “Connecting the Serial Cable” on page 12). |
| Data SpeedDoes not appear if “Parallel” is selected for “Interface”. | 150, 300, 600, 1200, 2400, 4800, 9600, 19200 bps | |
| Data BitsDoes not appear if “Parallel” is selected for “Interface”. | 8, 7 | |
| ParityDoes not appear if “Parallel” is selected for “Interface”. | No, Ignore, Odd, Even | |
| Interface Options (continued) | Stop BitsDoes not appear if “Parallel” is selected for “Interface”. | 1, 2 |
| ProtocolDoes not appear if “Parallel” is selected for “Interface”. | XON/XOFF, DTR Pacing, Multi XON/XOFF | |
| Honor DSRDoes not appear if “Parallel” is selected for “Interface”. | On, Off | |
| Print Adjust Adjusts the horizontal alignment from line to line. When you select this function, a series of alignment patterns prints. | ||
| Trace ModePrints the hexadecimal values for all data sent to the printer. |
Setting the Printer Online or Offline
The printer must be online to accept data.
To set the printer:
- Online, press Start/Stop; the Ready light comes on. If paper is not loaded, the Check light blinks.
- Offline, press Start/Stop; the Ready light goes off.
Stopping the Printer
To temporarily stop printing, press Start/Stop until the Ready light is off. The printer finishes printing the current line and then stops printing.
To resume printing, press Start/Stop until the Ready light is on.
Advancing the Paper
You can use the operator panel to advance the paper when the printer is not printing.
To advance the paper:
- Press FormFeed to advance the paper to the Top-Of-Form (TOF) on the next page or to eject the cut form.
- Press LineFeed to advance the paper to the next line.
- Press Micro or Micro lightly once for fine alignment, or press and hold to scroll the paper up or down.
Using Tear-Off
The Tear-Off function advances the perforation of a continuous form to the tear bar position. Tear-Off can be set to move a continuous form automatically to the tear-off position when Auto
Tear-Off is set to On, or it can be set so you can move a continuous form manually to the tear-off position when Auto Tear-Off is set to Off. To set Auto Tear-Off, see page 41.
Auto Tear-Off Set to On
When Auto Tear-Off is set to On, continuous form paper automatically advances to the tear-off position when:
- the paper has advanced to the Top-Of-Form (TOF)
the paper has advanced to the load position on the next page - no data, printer control codes, or escape codes have been sent to the printer after advancing to the TOF position
The continuous form remains at the tear-off position until the printer receives the next print request. At that time, the continuous form moves from the tear-off position to the TOF (load position) to prepare for printing.
One Second Tear-Off
When Auto Tear-Off is set to one second, continuous form paper automatically advances to the tear-off position if a print job ends and no data is received within one second of the last data transmission. For more information, see "Auto Tear-Off (Set to One Second)" on page 80.
Manual Tear-Off (Auto Tear-Off Set to Off)
When Auto Tear-Off is set to Off, you can manually advance the perforation of a continuous form to the tear-off position by pressing Tear Off, assuming the print position is still on the same page. To set Auto Tear-Off to Off, see “Auto Tear-Off (Set to Off)” on page 80.
Setting AutoGap
The AutoGap function determines the amount of space that the printer places between the printhead and the paper. You can select On, Off, or Single AutoGap from the function menu.
AutoGap Set to On
When AutoGap is set to On, the printer automatically sets itself to the thickness of the paper you are using. To set AutoGap On, press:
1 Menu.
2 Item until AutoGap appears.
3 Next
4 Item or Item until On appears.
5 Store to save the setting.
6 Quit to exit the function menu.
Manual AutoGap (AutoGap Set to Off)
When AutoGap is Off, you can manually adjust the gap position between the printhead and the paper. To manually set AutoGap, press:
1 Menu.
2 Item until AutoGap appears.
3 Next
4 Item or Item until Off appears.
5 Store.
6 Next
7 Item or Item to select the manual position you want.
8 Store to save the setting.
9 Quit to exit the function menu.
The following table gives the manual setting choices and the information needed to make the appropriate choice for your paper type.
Manual AutoGap Settings
| Paper Type | Paper Thickness | Weight of Paper | Manual Setting |
| Single Forms (Single Sheets or Continuous Forms) | Thin | 45.1 g/m2(12 lb) 56.25 g/m2(15 lb) | 1 |
| Normal | 67.5 g/m2(18 lb) 75 g/m2(20 lb) | 1 or 2 | |
| Thick | 90 g/m2(24 lb) | 2 | |
| Multiple-Part Forms When the setting is 4 or higher, printing speed becomes slower. | — | 2 Part Form | 2 or 3 |
| 3 Part Form | 3 or 4 | ||
| 4 Part Form | 4 or 5 | ||
| 5 Part Form | 5 or 6 | ||
| 6 Part Form | 5, 6, or 7 | ||
| Envelopes | 4, 5, or 6 | ||
AutoGap Set to Single
When AutoGap is set to Single, the printer sets the gap between the printhead and the paper only once. This should only be used when printing on several cut sheets of the same thickness while using the Auto Sheet Feeder. The printer adjusts the printhead to the paper's thickness when you turn the printer on or when the paper select lever is changed.
There are two Single AutoGap options:
- Open (factory default) means that the printhead moves out of the way as each sheet of paper is loaded. This setting reduces paper jams.
- Fixed means that once the gap is set, the printhead does not move.
Selecting or Locking a Font or Pitch
When you select a temporary font or pitch, the printer uses it unless the document software specifies a different one. The printer reverts to the default font/pitch when you turn the power off.
If a font or pitch is locked, the printer uses the selected font/pitch regardless of the font/pitch selection in the document software. The printer reverts to the default font/pitch when you turn the power off.
To select a font or pitch temporarily, press:
1 Start/Stop. The printer goes offline and the operator panel displays the current font and pitch.
2 Font or Pitch until you reach the selection you want.
3 Start/Stop. The printer goes online.
To lock a font or pitch, press:
1 Start/Stop. The printer goes offline and the operator panel displays the current font and pitch.
2 Font or Pitch until the lock symbol, , appears next to the font/ pitch you want.
3 Start/Stop. The printer goes online.
If you want to change the default font or pitch, you must go through the function menus. The default font and pitch are indicated with asterisks () . For help, see "Menu Options" on page 38.
Note: Not all pitches are available for all fonts.
Setting and Using a Macro
You can use up to four macros to store your settings permanently. To set a macro, follow these steps:
1 Press Menu.
2 Press Item until Default Macro appears.
3 Press Next and then Item until Macro x ( x = 1 to 4) appears.
4 Press Store to save the setting.
5 Press Prev. and then Item until Macro x Options appears.
6 Set and store your settings (see "Macro x Options" on page 40 for a list of items you can set in your macro).
7 Press Quit.
To use a macro:
1 Press Menu.
2 Press Item until Load Macro appears.
3 Press Next until Macro x ( x = 1 to 4) appears.
4 Press Store to save the setting.
5 Press Quit.
Disabling/Enabling the Operator Panel
All buttons except the Start/Stop, FormFeed, and Load/Unload buttons on the operator panel can be disabled. To disable the operator panel:
1 Turn the printer Off.
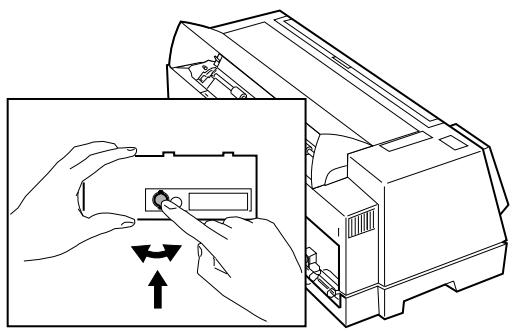
2 Press and hold Micro and Micro and then turn the printer On.
Note: When any button except Start/Stop, FormFeed, or Load/Unload is pressed while the printer is disabled, the Operator Panel Disabled message appears on the display for approximately 2 seconds.
To enable the operator panel, repeat the above procedure.
Selecting and Loading Paper
Chapter 4
Paper Types and Sizes
Below is an illustration of the types of paper you can use with your printer.
Single Sheets
Continuous Forms
Envelope
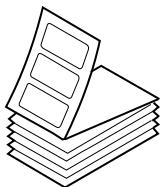
Labels
Single Sheets
| Page Width | Page Length | Weight | |
| Maximum | 420 mm (16.5 in.) | 558.8 mm (22.0 in.) | 90 g/m² (24 lb.) |
| Minimum | 76 mm (3.0 in.) | 76 mm (3.0 in.) | 56 g/m² (15 lb.) |
Multiple Part Single Sheets
| Page Width | Page Length | |
| Maximum | 420 mm (16.5 in.) | 558.8 mm (22.0 in.) |
| Minimum | 76 mm (3.0 in.) | 76 mm (3.0 in.) |
Single Continuous Forms
| Page Width | Page Length | Weight | |
| Maximum | 406 mm (16.0 in.) | N/A | 90 g/m2(24 lb.) |
| Minimum | 76 mm (3.0 in.) | 76 mm (3.0 in.) | 56 g/m2(15 lb.) |
| Maximum Hole to Hole | 393 mm (15.5 in.) | N/A | N/A |
| Minimum Hole to Hole | 63 mm (2.5 in.) | N/A | N/A |
Multiple Part Continuous Forms
| Page Width | Page Length | Weight | |
| Maximum | 406 mm (16.0 in.) | N/A | 90 g/m2(24 lb.) |
| Minimum | 76 mm (3.0 in.) | 76 mm (3.0 in.) | 56 g/m2(15 lb.) |
| Maximum Hole to Hole | 393 mm (15.5 in.) | N/A | N/A |
| Minimum Hole to Hole | 63 mm (2.5 in.) | N/A | N/A |
Envelopes
| Width | Length | Weight | |
| Maximum | 420 mm (16.5 in.) | 558.8 mm (22.0 in.) | 90 g/m² (24 lb.) |
| Minimum | 76 mm (3.0 in.) | 76 mm (3.0 in.) | 56 g/m² (15 lb.) |
Multiple Part Forms
(45 g/m ^2 or 12 lb) - Thickness
| Single | Multiple part | |
| Single Sheets | 0.058-0.114 mm (0.0023-0.0045 in.) | 0.512 mm (0.0202 in.) |
| Continuous Forms | 0.058-0.114 mm (0.0023-0.0045 in.) | 0.512 mm (0.0202 in.) |
| Envelopes | 0.053 mm (0.021 in.) | |
Loading a Single Sheet or Envelope
Single sheets or multi-part forms can be loaded one at a time into the manual feed.
Note: If you have installed the optional Auto Sheet Feeder or Tractor 2 Feeder, see “Auto Sheet Feeder” on page 85 or “Tractor 2 Feeder” on page 96 for paper loading instructions.
Loading a Single Sheet or Envelope into the Manual Feed
1 Turn the printer On.
2 Make sure the paper path is clear.
If continuous forms are currently loaded, park them by pressing Load/Unload.
3 Make sure AutoGap is set to On or Single AutoGap. For help, see "Setting AutoGap" on page 48.
4 Move the paper select lever up to the single sheets position.
5 Pull the paper supports up.
6 Open the manual feed door.

7 Set the left margin.
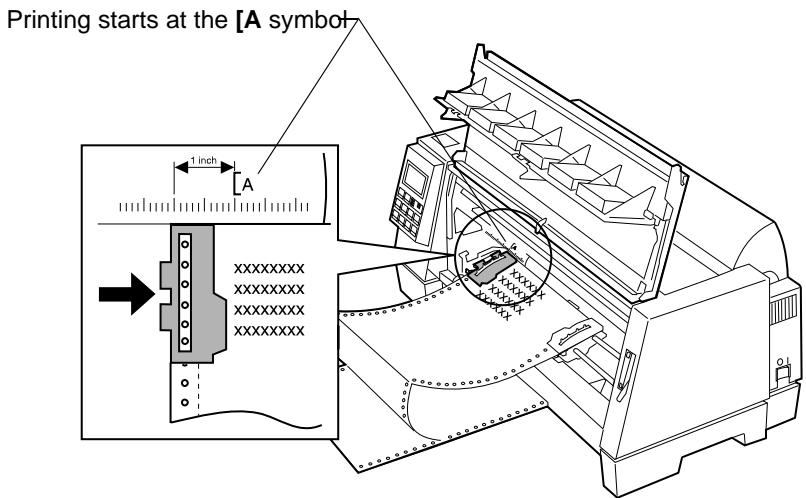
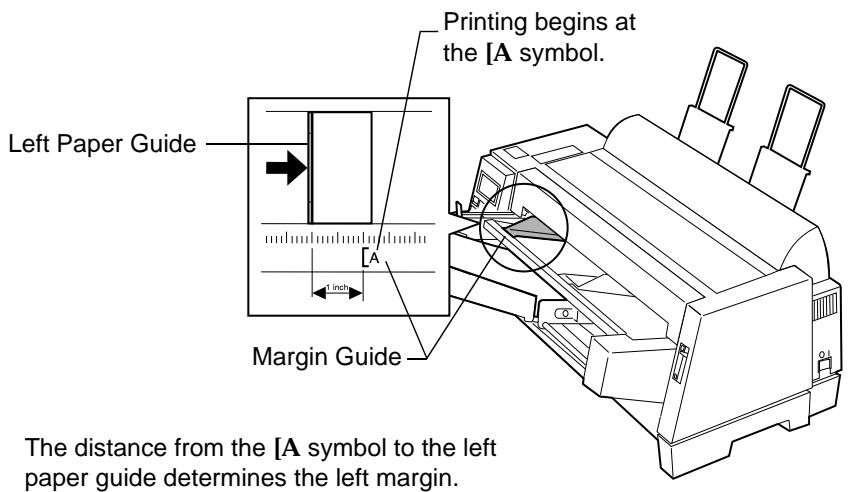
Before inserting paper, move the left paper guide so that the print start position you want aligns with the symbol [A printed on the margin guide.
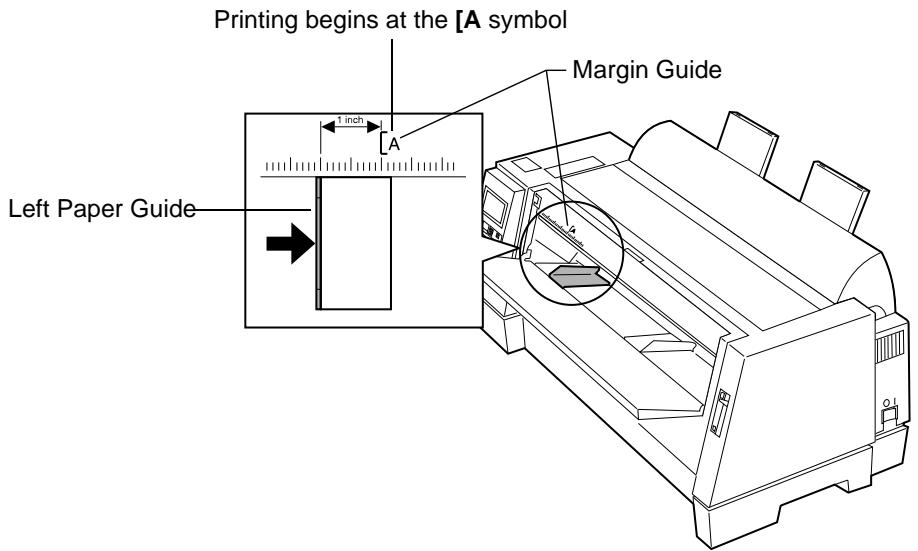
The distance from the left paper guide to the [A symbol determines the width of the left margin.
Note: If you make a left margin setting in your application software, it is added to the left margin setting on the printer.
For example, if you set the left margin at 2.54cm (1 in.) on the printer, and also have the left margin set at 2.54 cm (1 in.) in your application software, the printer begins printing 5.08cm (2 in.) from the left edge of the page.
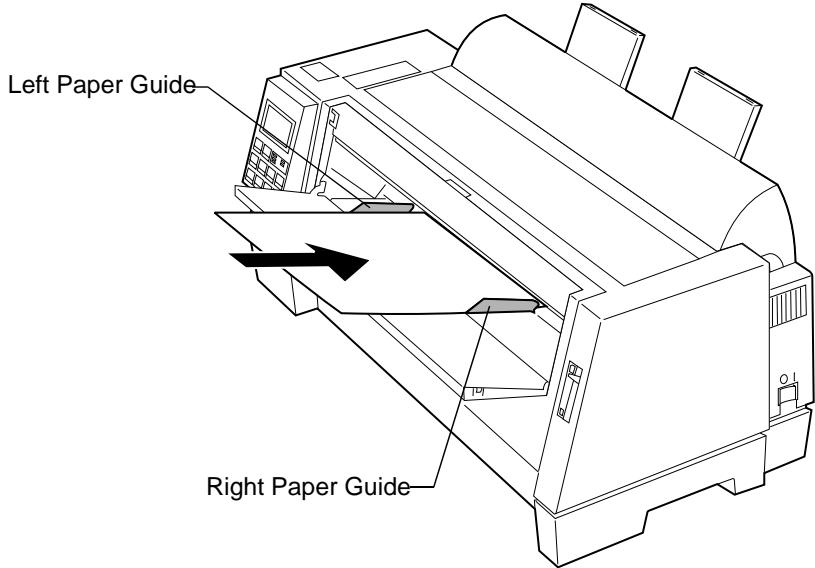
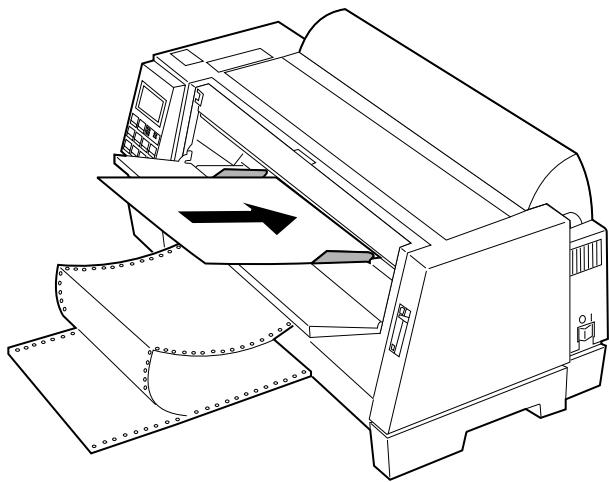
8 To load a single sheet:
a Place a single sheet against the left paper guide.
b Move the right paper guide so that it aligns with the right edge of the paper.
When you load preprinted forms, put the top of the form in first, printed side up.
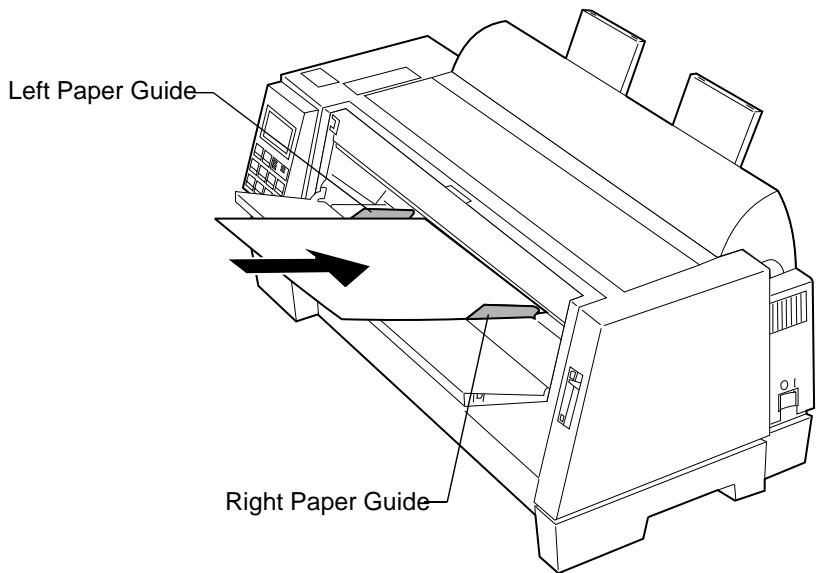
The Paper Empty/Add Paper message disappears.
- If Auto Cut Sheet Load is On (factory default), the paper feeds automatically to the TOF. To turn Auto Cut Sheet Load On, see “Setting Auto Cut Sheet Load” on page 64. For more information about setting TOF, see “Setting TOF for Single Sheets and Envelopes” on page 78.
- If Auto Cut Sheet Load is Off, press FormFeed.
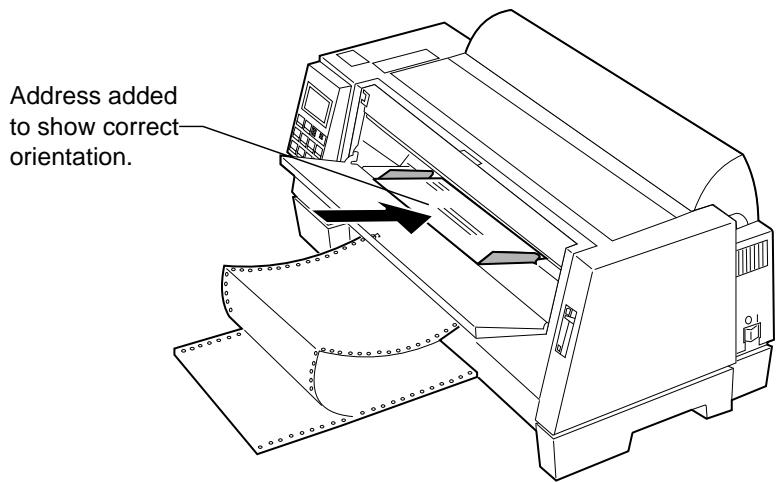
To load an envelope:
a Place a single envelope against the left paper guide, with the top edge first, print side up.
b Move the right paper guide so that it aligns with the right edge of the envelope.
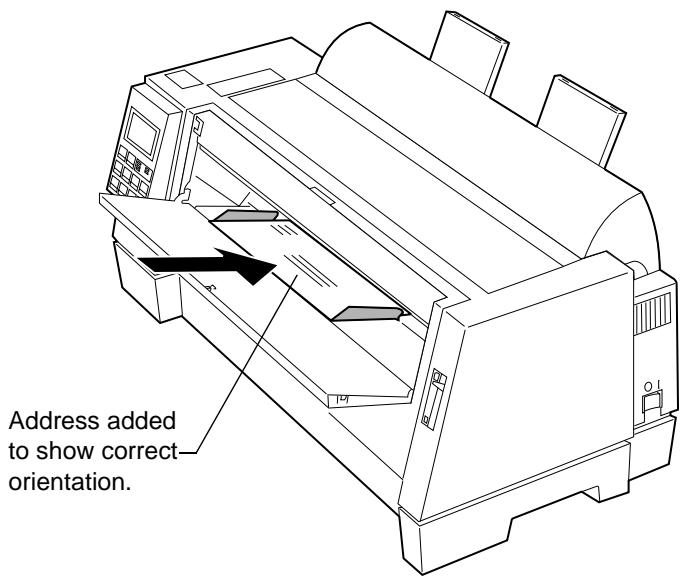
The Paper Empty/Add Paper message disappears.
- If Auto Cut Sheet Load is On (factory default), the paper feeds automatically to the TOF. To turn Auto Cut Sheet Load On, see “Setting Auto Cut Sheet Load” on page 64.
For more information about setting TOF, see "Setting TOF for Single Sheets and Envelopes" on page 78. - If Auto Cut Sheet Load is Off, press FormFeed.
9 Make sure the printer is online (Ready light is on solid). If it is not, press Start/Stop until the Ready light is on solid. You are now ready to print.
Setting Auto Cut Sheet Load
When set to On, the printer automatically loads a cut form.
When set to Off, you must press FormFeed or LineFeed to load a cut form.
To turn Auto Cut Sheet Load On, press:
1 Menu.
2 Item until Paper Hand Opt. appears.
3 Next
4 Item or Item until Auto Cut Sheet Load appears.
5 Next
6 Item or Item until On appears.
7 Store to save the setting.
8 Quit to exit the function menu.
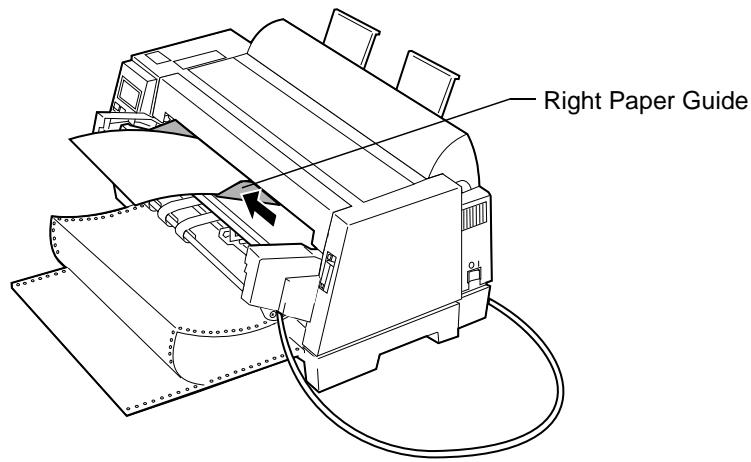
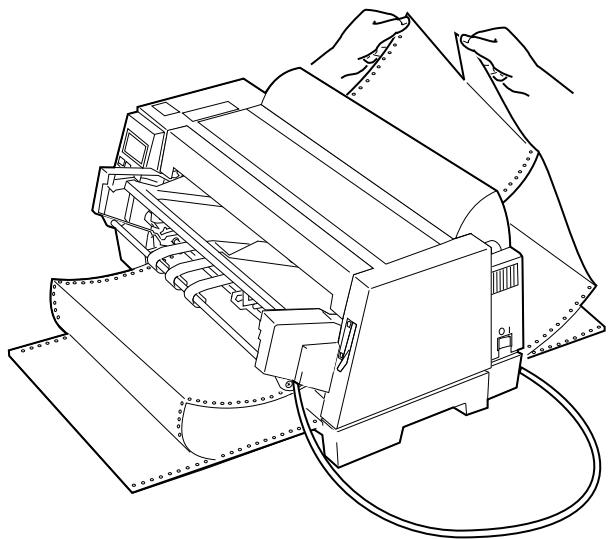
Loading a Single Sheet or Envelope With Continuous Forms Already Loaded
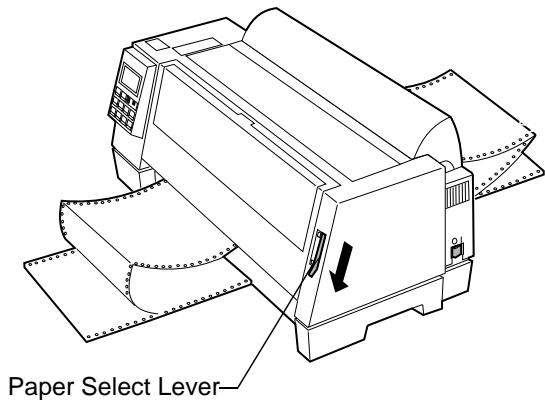
1 Move the paper select lever down to the continuous forms position.
2 Turn the printer On.
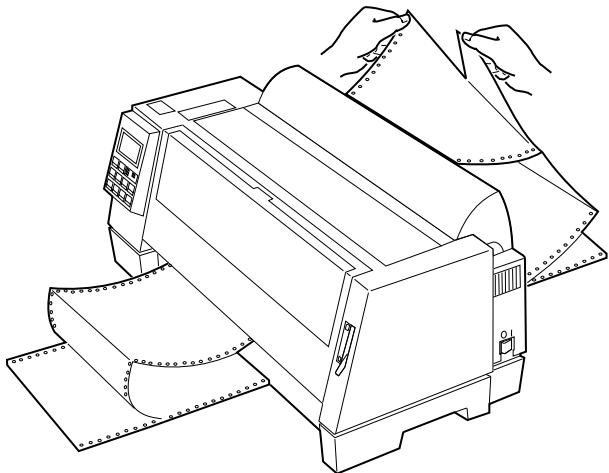
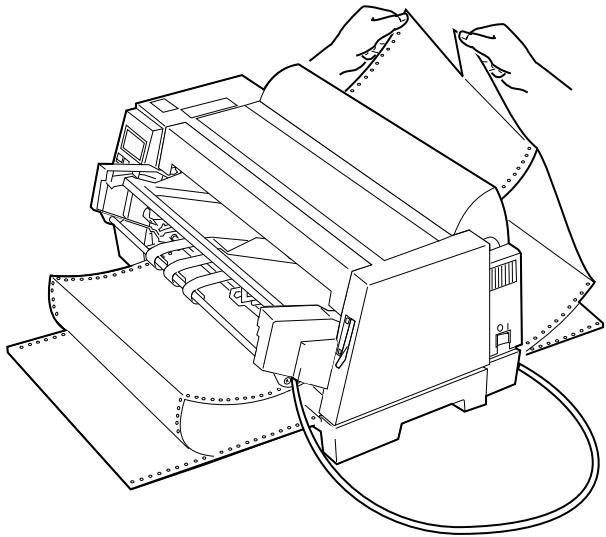
3 To clear the paper path, tear off the leading edge of the continuous form, as shown.
4 Park the continuous forms by pressing Load/Unload.
5 Make sure AutoGap is set to On or Single AutoGap. For help, see "Setting AutoGap" on page 48.
6 Open the manual feed door.
7 Move the paper select lever up to the single sheets position.
8 Set the left margin.
Before inserting paper, move the left paper guide so that the print start position you want aligns with the [A symbol printed on the margin guide.
The distance from the left paper guide to the [A symbol determines the width of the left margin.
Note: If you make a left margin setting in your application software, it is added to the left margin setting on the printer.
For example, if you set the left margin at 1 inch (2.54 cm) on the printer, and also have the left margin set at 1 inch in your application software, the printer begins printing 2 inches from the left edge of the page.
9 To load a single sheet:
a Place a single sheet against the left paper guide.
b Move the right paper guide so that it aligns with the right edge of the paper.
When you load preprinted forms, put the top of the form in first, printed side up.
The Paper Empty/Add Paper message disappears.
- If Auto Cut Sheet Load is On (factory default), the paper feeds automatically to the TOF position. For help, see "Setting Auto Cut Sheet Load" on page 64.
- If Auto Cut Sheet Load is Off, press FormFeed.
To load an envelope:
a Place a single envelope against the left paper guide, with the top edge first, print side up.
b Move the right paper guide so that it aligns with the right edge of the envelope.
The Paper Empty/Add Paper message disappears.
- If Auto Cut Sheet Load is On (factory default), the paper feeds automatically to the TOF position. For help, see "Setting Auto Cut Sheet Load" on page 64.
- If Auto Cut Sheet Load is Off, press FormFeed.
10 Make sure the printer is online (Ready light is on solid). If it is not, press Start/Stop until the Ready light is on solid. You are now ready to print.
Loading Continuous Forms
The printer offers one paper path for continuous forms.
Note: If you have installed the optional Auto Sheet Feeder or Tractor 2 Feeder, see "Printer Options" beginning on page 83 for paper loading instructions.
To load continuous forms:
1 Turn the printer On.
2 Make sure the paper path is clear. If a single sheet or envelope is loaded in the printer, press FormFeed to remove it.
3 Make sure AutoGap is On. (This is the default setting.) For help, see "AutoGap Set to On" on page 48.
4 Move the paper select lever down to the continuous forms position.
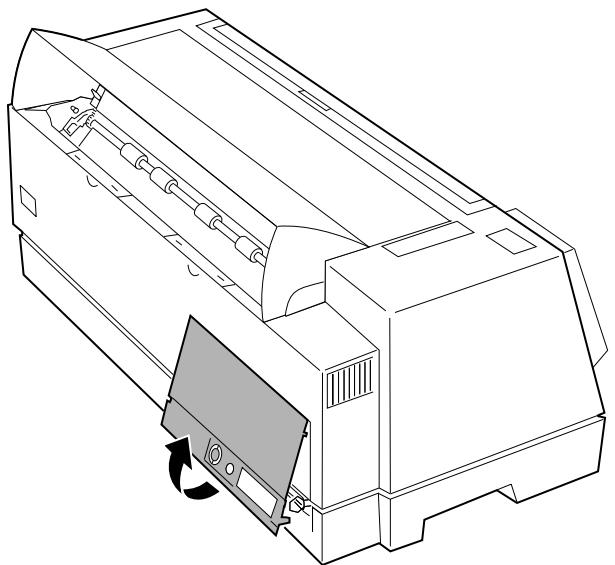
5 Pull up the bottom front of the printer to open the front cover.
6 Pull up the left and right tractor locking levers to unlock the tractors.
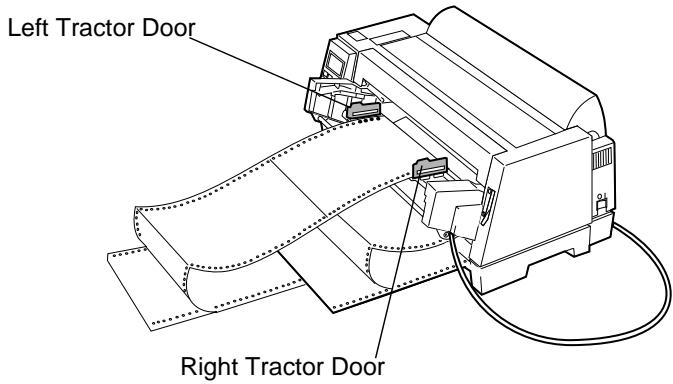
7 Open the left and right tractor doors.
8 Place the paper pinfeed holes over the second or third pins of the tractor unit.
If necessary, move the left or right tractor to adjust the tractor to the paper width.
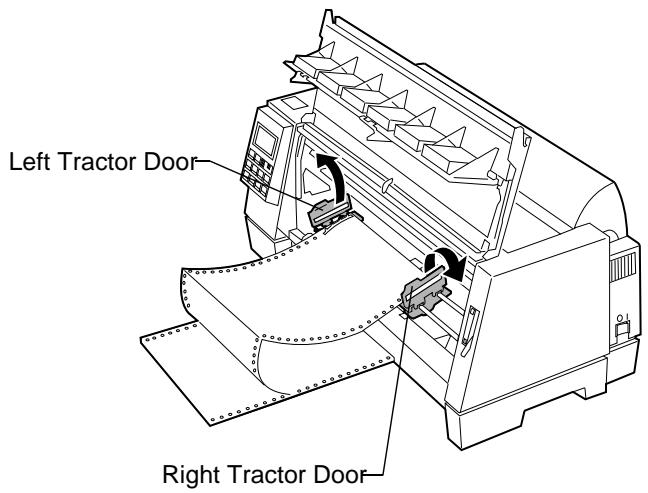
9 Close the left and right tractor doors.
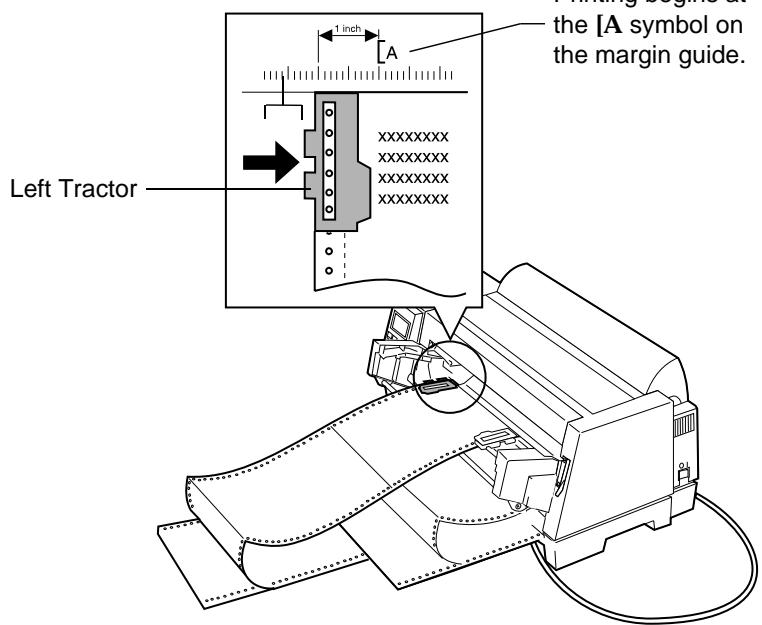
10 Set the left margin. Adjust the tractors so that the print start position you want aligns with the symbol [A printed on the rear plate.
The distance from the [A symbol to the left edge of the paper determines the width of the left margin.
Note: If you make a left margin setting in your application software, it is added to the left margin setting on the printer.
For example, if you set the left margin at 1 inch (2.54 cm) on the printer, and also have the left margin set at 1 inch (2.54 cm) in your application software, the printer begins printing 2 inches from the left edge of the page.
11 Push down the left tractor locking lever to lock the tractor in place. Remove slack from the paper and lock the right lever.
12 Close the front cover.
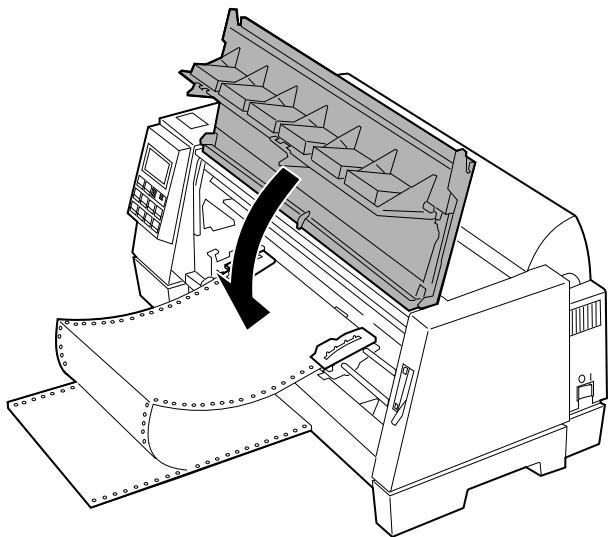
13 Press Start/Stop. The paper loads to the first print position, on tear-off position if Auto Tear-Off is On.
14 Make sure the printer is online (Ready light is on solid). If not, press Start/Stop until the Ready light is on solid. You are now ready to print.
When printing on continuous forms, the first 1 12 inches of the first page may have unequal line spacing. This occurs because the top of the paper is not yet being held by the upper feed rollers.
Aligning the Left Margin
You can manually change the first print position at the left margin. The first print position is indicated by the [A symbol. You can also set the left margin from your application software.
Manually-Loaded Single Sheets or Envelopes
To set the left margin for single sheets or envelopes, move the left paper guide to the left of the [A symbol, located above the left paper guide.
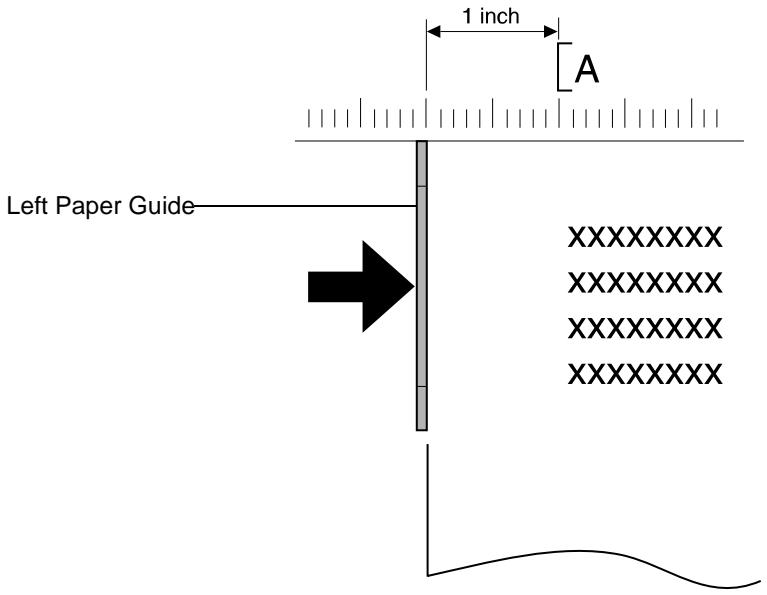
After doing this, you may need to adjust the right paper guide to fit flush against the right edge of the page.
If you make a left margin setting in your application software, it is added to the left margin setting on the printer. For example, if you set the left margin at 1 inch (2.54 cm) on the printer, and also have the left margin set at 1 inch (2.54 cm) in your application software, the printer begins printing 2 inches from the left edge of the page.
Continuous Forms
To set the left margin for continuous forms, first locate the [A symbol on the printer (see figure below).
Pull up the left and right tractor locking levers to unlock the tractors.

Move the left tractor to the left or right of the [A symbol. Push down the left tractor locking lever to lock it in place. Remove slack from the paper and lock the right lever.
Top-Of-Form (TOF)
Top-Of-Form (TOF) sets the first line of print. You can set and save TOF from the operator panel for single sheets, continuous forms, and for each macro that is enabled.
Setting TOF for Continuous Forms
TOF can range from minus 2.54 cm (1 in.) to plus 35.56 cm (14 in.) from the top of continuous form paper.
Note: Use this method to set TOF for continuous forms loaded in the optional Tractor 2 Feeder.
To set and save TOF:
1 Turn the printer On.
2 Make sure the paper path is clear.
3 Move the paper select lever down to the continuous forms position.
4 Load continuous form paper on the feed pins (or Tractor 2 feeder pins if you are using the Tractor 2 Feeder option).
5 Press Start.
The paper moves to the current TOF.
6 Press Menu. Set Top of Form appears on the display.
7 Press any paper movement key (Micro , Micro , or LineFeed) to move the paper to the position you want.
The following illustration shows the printer without the ribbon cartridge installed. When the cartridge is not installed, you can easily see the position of the two horizontal white lines on either end of the metal platen bar. Use these lines as your reference point when lining up your TOF. The bottom of a printed character will be even with the white lines.
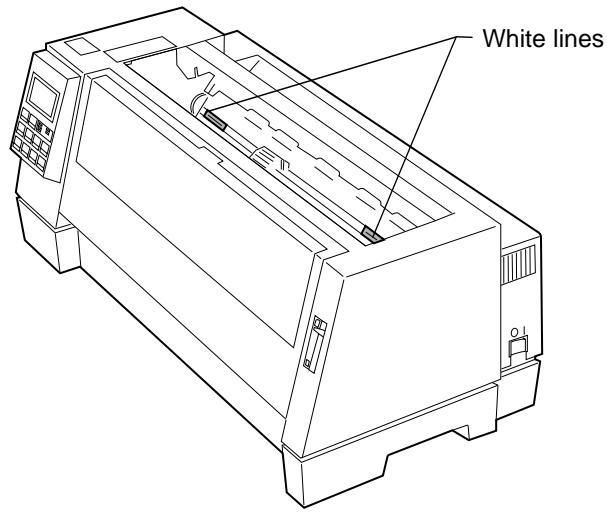
Note: When the ribbon cartridge is installed and the top edge of the paper is even with the top edge of the ribbon, the TOF is set to one line, or 1/6 inch.
8 Press Store to save the position you want. The Ready light comes on solid.
Whenever you change the TOF setting, tear off excess continuous forms, then unload and reload the paper by pressing Load/Unload. This ensures the printer goes to the current TOF setting.
Note: When Auto Tear-Off is set to On, the paper advances to the current tear off position. If the tear off position is not correct, see “Auto Tear-Off (Set to On)” on page 79.
Setting TOF for Single Sheets and Envelopes
TOF can range from minus 2.54 cm (1 in.) to plus 55.88 cm (22 in.) from the top of cut sheet paper. To set and save TOF:
1 Turn the printer On.
2 Make sure continuous forms are parked (press Load/Unload.) The operator panel displays a Paper Empty/Add Paper message.
3 Move the paper select lever up to the single sheets position.
4 Load a cut sheet of paper or envelope through the manual feed. The printer moves the paper or envelope to the current TOF.
5 Press Menu. Set Top Of Form appears.
6 Press any paper movement key (Micro , Micro , or LineFeed) to move the paper or envelope to the appropriate position.
7 Press Store to save the position you want. The Ready light comes on solid.
When you reload paper at a later time, press Start/Stop. The paper moves to the TOF.
Setting TOF in a Macro
Each macro has a separate TOF setting. To set TOF in a macro:
1 Select the macro you want to use. For help selecting a macro, see “Setting and Using a Macro” on page 52.
2 Set Top of Form. For help, see "Setting TOF for Continuous Forms" on page 76 or "Setting TOF for Single Sheets and Envelopes" on page 78.
3 Press Store to save the settings in the currently selected macro.
Auto Tear-Off (Set to On)
When Auto Tear-Off is on, it moves the top perforation of a continuous form to the tear bar (tear-off position) when:
the printer has finished printing;
the paper has advanced to the TOF on the next page;
- no data, printer control codes, or escape codes have been sent to the printer after advancing to the TOF; and
- the print buffer has not received data for one second.
If you have already set your TOF and now want to change the Auto Tear-Off setting, complete the following steps:
1 Press Start/Stop to take the printer offline.
2 Press Micro or Micro to move the paper to the appropriate position on the tear bar. The printer beeps if you go out of range.
3 Press Start/Stop to set and save the tear-off position. The printer beeps twice. The paper rolls backward, then goes to the new tear-off position. The Ready light goes on.
The paper remains at the current tear-off position until you send another job to the printer. The paper then moves from the tear-off position to the TOF and begins printing.
Tip: To print labels, set Auto Tear-Off to "Off". For help, see "Auto Tear-Off (Set to Off)" on page 80.
Auto Tear-Off (Set to Off)
When Auto Tear-Off is off, press Tear Off/Store to manually move the continuous form paper to the tear-off position.
1 When your print job has finished, press Tear Off.
The continuous form moves to the tear-off position.
2 Press Micro or Micro to move the paper to the position you want on the tear bar.
3 Press Start/Stop to set the tear-off position.
The printer beeps twice. The paper rolls backward, then goes to the new tear-off position.
Auto Tear-Off (Set to One Second)
When the print buffer has not received data for one second, Auto Tear-Off automatically moves the continuous form paper to the tear-off bar. The print line can be anywhere on the page for Auto Tear-Off to function in this mode.
To change the Auto Tear-Off setting in One-Second mode:
1 Press Start/Stop to take the printer offline.
2 Press Micro or Micro to move the paper to the appropriate position on the tear bar. The printer beeps if the paper is out of range.
3 Press Start/Stop to set and save the tear-off position.
The printer beeps twice. The paper rolls backward, then advances to the new tear-off position. The Ready light comes on.
If your application software has delays between data transmissions while Auto Tear-Off is set to one second, partial pages may print. To prevent this, set Auto Tear-Off to on.
Adjusting Bidirectional Alignment
If your print job looks fuzzy or blurry, you may wish to adjust the character alignment (also called bidirectional alignment) on your printer. The following steps illustrate how to adjust the alignment of the print wires.
1 Load continuous forms.
2 Press Menu.
3 Press Item until Print Adjust appears on the display.
4 Press Next
5 Press Item or Item to choose Draft or Courier.
Draft prints each alignment pattern once (uni-directional).
Courier prints each alignment pattern twice (bidirectional).
6 Press Start/Stop to print the alignment pattern.
The following example shows a printer that needs alignment.
The message Choose the Best Alignment appears on the display.
7 Press Next or Prev. to adjust the alignment.
Lines 2 and 4 move to align with lines 1 and 3. The printer is aligned correctly when lines 2 and 4 are vertically aligned with lines 1 and 3.
Press Item to move lines 2 and 4 to the right. Press Item to move lines 2 and 4 to the left. In the example below, press Item to correct the alignment.

8 Press Store to save the selected value.
9 Press Start/Stop to print the alignment pattern. The example below shows proper alignment.
10 Press Quit to exit the menu.
Printer Options
Chapter 5
The following options are available for your printer:
| Available Options | Part Number |
| Auto Sheet Feeder | 79F4841 |
| Extended Cut Sheet Paper Guides | 1333163 |
| Parallel Cable | 1329605 (3.05 m [10 ft.]), 1427498 (6.1 m [20 ft.]), or equivalent |
| Printer Stand | 1368001 |
| Serial Cable | 1180786 |
| Tractor 2 Feeder | 11A6196 |
This section also describes how to install the Auto Sheet Feeder and Tractor 2 Feeder. Paper loading instructions for the options are also included.
| For information about the: | See page |
| Auto Sheet Feeder | 85 |
| Tractor 2 Feeder | 96 |
Auto Sheet Feeder
Read this section to install the Auto Sheet Feeder, change the Auto Sheet Feeder setting on the printer, and load paper in the Auto Sheet Feeder.
The Auto Sheet Feeder attaches to the front of your printer and automatically feeds single sheets of paper into the printer. With the Auto Sheet Feeder installed, you can print from single sheets of paper stacked in a tray instead of manually feeding each sheet.
You can also print on continuous forms loaded in the printer's tractor feeder while the Auto Sheet Feeder is installed. If you need to manually feed a single sheet, a convenient manual feed tray is located on top of the feeder.
The paper you use in the Auto Sheet Feeder must meet the following specifications.
| Automatic Feed Mode (Single-part Form) | |
| Length | 139.7 mm (5.5 in.) minimum 355.6 mm (14.0 in.) maximum 1 558.8 mm (22 in.)2 |
| Width | 105 mm (4.13 in.) minimum 364 mm (14.3 in.) maximum |
| 1 Paper width greater than 215.9 mm (8.5 in). 2 For 215.9 mm (8.5 in.) paper width or less. | |
| Manual Insertion Mode (Single-/Multi-part Form) | |
| Length | 139.7 mm (5.5 in.) minimum 355.6 mm (14.0 in.) maximum¹ 558.8 mm (22 in.)² |
| Width | 76.2 mm (3.0 in.) minimum 420 mm (16.5 in.) maximum |
| Paper Weight | 60 ~ 90 g/m² (16 ~ 24 lbs) |
| ¹ Paper width greater than 215.9 mm (8.5 in). ² For 215.9 mm (8.5 in.) paper width or less. | |
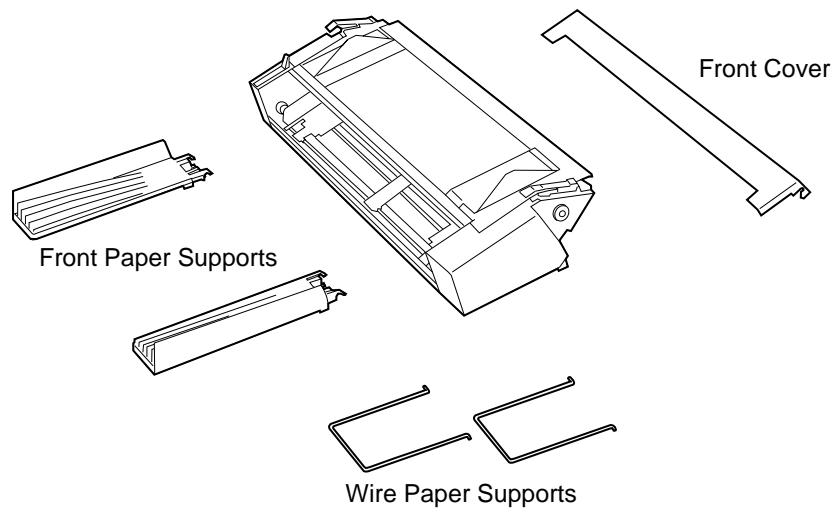
Installing the Auto Sheet Feeder
The Auto Sheet Feeder is easy to install and remove. You will not need to make electrical connections or require special training or tools.
1 Make sure the printer is Off.
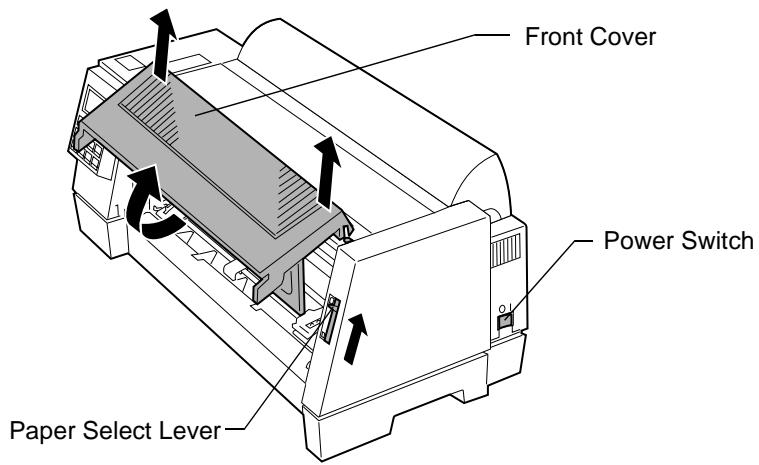
2 Open, pull up, and remove the front cover.
3 Push up the paper select lever.
4 Insert the tabs on both sides of the Auto Sheet Feeder into the grooves on the printer.
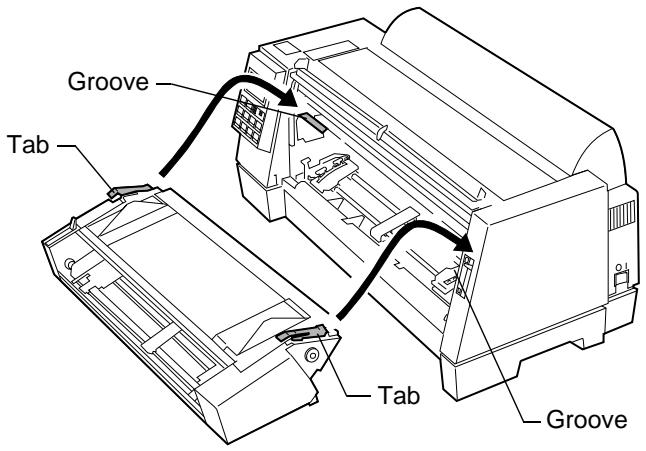
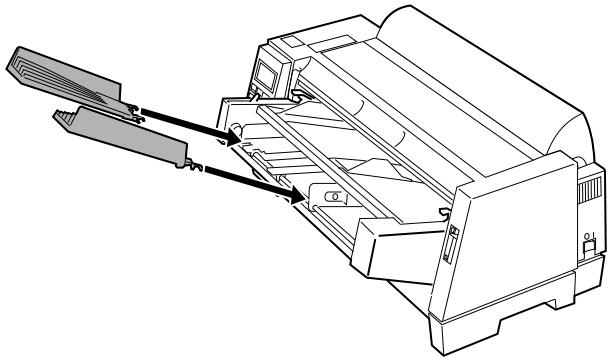
5 Attach the front paper supports to the Auto Sheet Feeder.
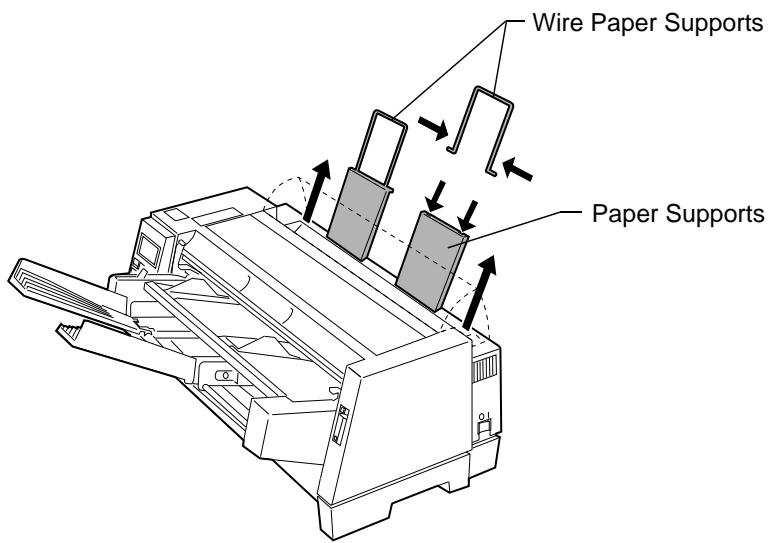
6 Pull the paper supports to the upright position and attach the wire paper supports to them.
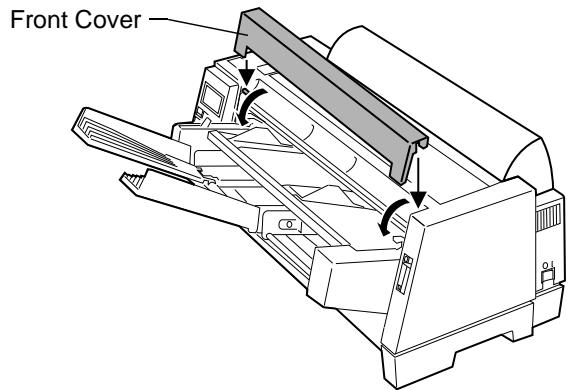
7 Attach the front cover that came with the Auto Sheet Feeder.
8 Turn the printer on.
9 Select Auto Sheet Feed On from the function menu. To turn Auto Sheet Feed on, press:
a Menu.
b Item until Paper Hand Opt. appears.
C Next
d Item until Auto Sheet Feed appears.
e Next to see the printer's setting.
f Item until On appears.
g Store to save the setting.
h Quit to exit the function menus.
Loading Paper in the Auto Sheet Feeder
The Auto Sheet Feeder lets you print from single sheets of paper stacked in the feeder. The option also includes a manual feed tray that lets you manually feed a single sheet of paper.
This section includes instructions for loading paper in the automatic sheet feeder and the automatic sheet feeder's manual feed tray.
Loading Paper for Automatic Feed
1 If continuous forms are loaded, park them.
For help parking continuous forms, see step 1 of “Parking Continuous Forms and Changing Tractor Feeders” on page 111.
2 Make sure AutoGap is set to On. For help, see "Setting AutoGap" on page 48.
3 Move the paper select lever up to the single sheet position.
4 Pull the paper supports to the upright position.
5 Pull the locking lever forward to allow paper to be loaded.
6 Place single sheets into the Auto Sheet Feeder.
Note:
- Place letterhead paper with the letterhead facing up and toward the printer.
- The paper level should not exceed the markings on the label located on the inside of the paper holder.
7 Move the paper guide so the print start position you want aligns with the symbol [A printed on the margin guide of the Auto Sheet Feeder.
8 Move the right paper guide to match the paper width you are using.
9 Push the locking lever in toward the printer.
10 Press Start/Stop. The Ready light comes on and you are ready to print.
Loading Paper for Auto Sheet Feeder Manual Feed
If continuous forms are currently loaded on the printer, park the continuous forms before performing these steps. For help parking continuous forms, see steps 1 and 2 of "Parking Continuous Forms and Changing Tractor Feeders" on page 111.
1 Push the paper select lever up to the single sheet position.
2 Pull the locking lever forward.
Note: After you finish printing on manual insertion paper, move the locking lever back to let paper feed automatically.
3 Set the left margin.
Move the paper guides so that the print start position you want aligns with the symbol [A printed on the margin guide.
Note: If you make a left margin setting in your application software, it is added to the left margin setting on the printer.
For example, if you set the left margin at 1 inch (2.54 cm) on the printer, and also have the left margin set at 1 inch (2.54 cm) in your application software, the printer begins printing 2 inches from the left edge of the page.
4 Insert paper all the way into the printer.
The paper feeds automatically to the Top-Of-Form (TOF) when the Auto Sheet Feeder option is on. The Ready light comes on and you are ready to print.
Note: After you finish printing on manually inserted paper, move the locking lever back to let paper feed automatically.
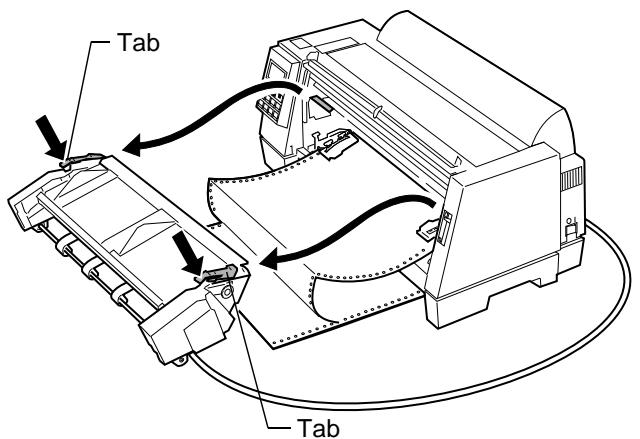
Tractor 2 Feeder
The Tractor 2 Feeder attaches to the front of your printer and provides dual tractor capability with a second tractor feed for continuous forms. This option lets you have two different types of continuous forms loaded on your printer at the same time. (A convenient manual feed tray on top of the feeder allows you to manually feed cut sheets or envelopes while the feeder is installed.)

Installing the Tractor 2 Feeder
The Tractor 2 Feeder is easy to install. No special tools or training are needed.
Note: Before installing the Tractor 2 Feeder, make sure continuous forms are loaded on the other tractor feeder. (When Tractor 2 is installed, you must remove it from the printer to load continuous forms on the other tractor feeder.) For help loading continuous forms on the other tractor feeder, see "To load continuous forms:" on page 70.
1 Make sure the printer is Off.
2 Open, pull up, and remove the front cover.
3 If necessary, push the paper select lever down to the continuous forms position.
4 Remove all tape from the Tractor 2 Feeder including the tape that holds the Tractor 2 Feeder cable to the Tractor 2 Feeder.
5 Grasp the Tractor 2 Feeder using the right and left side panels.
6 Insert the tabs on both sides of the Tractor 2 Feeder into the grooves on the printer.
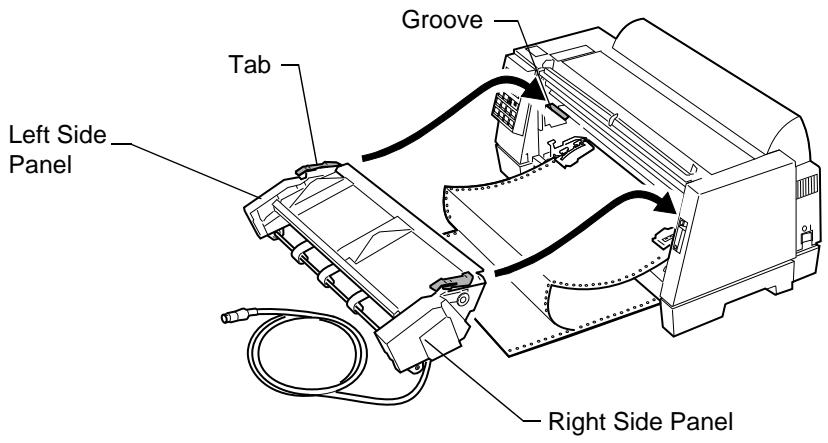
7 Attach the front cover that came with the Tractor 2 Feeder.
8 Remove the system board cover from the back of the printer. Lift the cover while prying at the bottom center.
9 On the system board cover, twist the knockout plug to remove it.
10 Replace the system board cover.
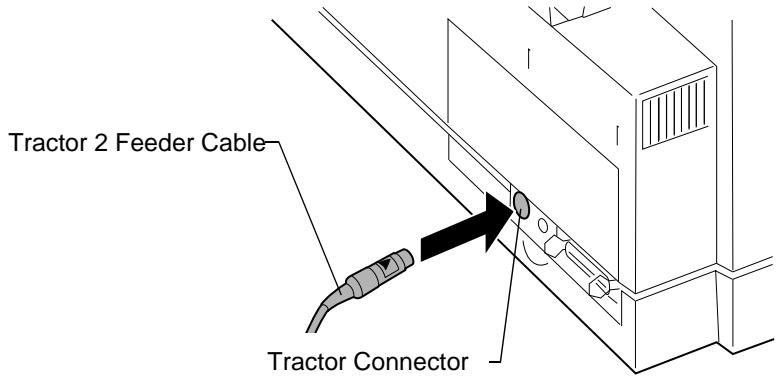
11 Plug the Tractor 2 Feeder cable into the tractor connector on the back of the printer.
Make sure the symbol () on the Tractor 2 Feeder cable faces up. Align the symbol () on the cable with the () symbol on the back of the printer above the tractor connector.
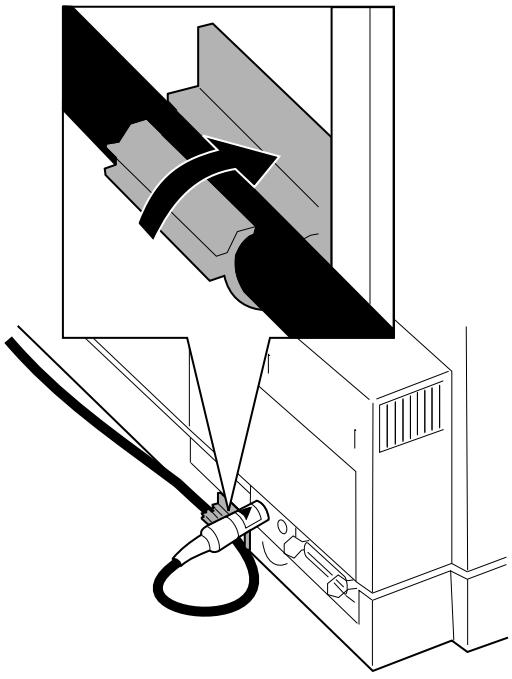
12 Position the cable clamp flush with the bottom edge of the printer and against the embossed edge, with the open section facing upward.
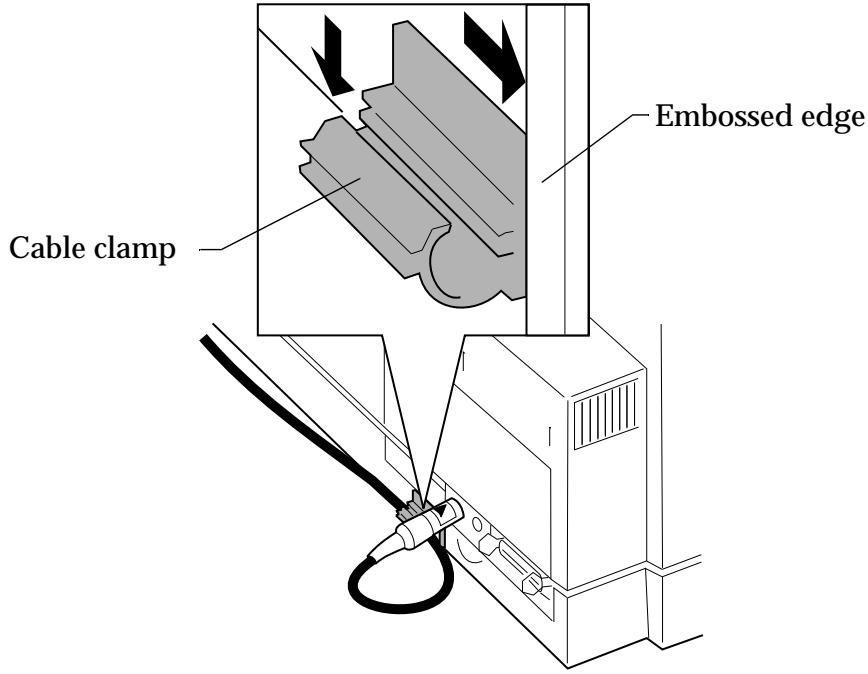
13 Insert the Tractor 2 Feeder cable into the clamp, as shown, and snap the clamp shut.
14 Turn the printer On.
See "Loading Paper in the Tractor 2 Feeder" on page 102 for information on how to load the Tractor 2 Feeder.
Loading Paper in the Tractor 2 Feeder
The Tractor 2 Feeder has a tractor feeder for continuous forms and a manual feed tray for single sheets and single-part forms.
This section includes directions for loading both continuous forms in the Tractor 2 Feeder and single sheet or envelopes in the manual feed tray.
Loading Continuous Forms in the Tractor 2 Feeder
1 Turn the printer On.
2 Make sure the paper path is clear. If a single sheet or envelope is loaded in the printer, remove it.
3 Make sure AutoGap is set to On or Single AutoGap. For help, see "Setting AutoGap" on page 48.
4 Make sure the paper select lever is pushed down in the continuous forms position.
5 Notice how the manual feed tray fits onto the Tractor 2 Feeder. You will need to remember this when you replace the tray later.
6 Lift up and pull out the manual feed tray to remove it from the Tractor 2 Feeder.
7 Pull up the left and right tractor locking levers to unlock the tractors.

8 Open the left and right tractor doors.
9 Place the paper holes over the second or third pins on the tractors. If necessary, move the left or right tractor to adjust the tractor to the paper width.
10 Close the left and right tractor doors.
11 Set the left margin.
Move the tractors so the print start position you want aligns with the symbol [A printed on the margin guide.
Moving the paper all the way to the left creates the widest left margin. Moving the paper all the way right creates the narrowest left margin.
The distance from the [A symbol to the left paper guide determines the left margin.
Note: If you make a left margin setting in your application software, it is added to the left margin setting on the printer.
For example, if you set the left margin at 1 inch (2.54 cm) on the printer, and also have the left margin set at 1 inch (2.54 cm) in your application software, the printer begins printing 2 inches from the left edge of the page.
12 Push down the left tractor locking lever to lock it in place. Remove slack from the paper and lock the right lever.
13 Replace the manual feed tray.
14 Press Start/Stop. The paper loads to the print position or the tear-off position if Auto Tear-Off is On.
15 Make sure the printer is online (Ready light is on solid). If it is not, press Start/Stop until the Ready light is on solid. You are now ready to print.
16 Read "Parking Continuous Forms and Changing Tractor Feeders" to learn how to switch from one tractor feeder to the other.
When printing the first page on continuous forms, line spacing within the first 1 12 inches of the form may not be uniform.
Loading Cut Sheets in the Tractor 2 Feeder
Use the manual feed tray on the Tractor 2 Feeder to load single sheets. Use only single sheets of paper or single-part forms.
1 Turn the printer On.
2 Make sure the paper path is clear. If continuous forms are loaded in the printer, park them:
a Tear off the leading edge of the continuous forms.
b Press Load/Unload to park the continuous forms.
3 Push the paper select lever up to the single sheet position.
4 Pull the paper supports to the upright position.
5 Set the left margin.
Move the paper guides so that the print start position you want aligns with the symbol [A printed on the margin guide.
The distance between the [A symbol and the left paper guide determines the left margin.
Note: If you make a left margin setting in your application software, it is added to the left margin setting on the printer.
For example, if you set the left margin at 1 inch (2.54 cm) on the printer, and also have the left margin set at 1 inch (2.54 cm) in your application software, the printer begins printing 2 inches from the left edge of the page.
6 Place a single sheet against the left paper guide. Move the right paper guide so that the guide aligns with the right edge of the paper.
The Paper Empty/Add Paper message disappears.
a If Auto Cut Sheet Load is On (factory default), the paper feeds automatically to the top of the form. For help, see "Setting Auto Cut Sheet Load" on page 64.
b If Auto Cut Sheet Load is Off, press FormFeed.
7 Make sure the printer is online (Ready light is on solid). If it is not, press Start/Stop until the Ready light is on solid. You are now ready to print.
Parking Continuous Forms and Changing Tractor Feeders
The Tractor 2 light on the operator panel shows you which tractor feeder is selected. The Tractor 2 light is On when the Tractor 2 Feeder is selected.
To park continuous forms on the currently selected tractor feeder and switch to the other tractor feeder:
1 Tear off the leading edge of the continuous forms loaded on the tractor feeder.
2 You can either change tractors temporarily (switch for current print job only) or change the default tractor.
To change tractors temporarily, press:
a Menu.
b Item until Select Tractor appears.
C Next
d Item until Tractor 2 appears.
Store to save the setting.
f Quit to exit the functions menu.
To change the default tractor, press:
a Menu.
b Item until Paper Hand Opt. appears.
C Next
d Item until Tractor appears.
e Next
f Item until Tractor 2 appears.
g Store to save the setting.
h Quit to exit the functions menu.
Removing the Tractor 2 Feeder
To remove the Tractor 2 Feeder and load continuous forms on the normal tractor feeder:
1 Turn the printer Off.
2 If continuous forms are loaded on the Tractor 2 Feeder, remove the continuous forms.
3 Press down on the tabs on both sides of the Tractor 2 Feeder. While holding the tabs down, pull the Tractor 2 Feeder straight out of the printer.
4 Load continuous forms on the normal tractor feeder. For help, see "To load continuous forms:" on page 70.
5 Replace the Tractor 2 Feeder. For help, see "Installing the Tractor 2 Feeder" on page 97.
6 Reload forms on the Tractor 2 Feeder. For help, see "Loading Paper in the Tractor 2 Feeder" on page 102.
7 Turn the printer On.
8 Choose the tractor feeder you want to use as the paper source. For help, see "Parking Continuous Forms and Changing Tractor Feeders" on page 111.
Solving Printer Problems
Chapter
6
This section helps you identify printer conditions and problems you can often correct yourself. When you first recognize a problem, determine whether it is located within the printer, the software program, or an option. After you've determined where the problem is located, then follow the steps in this chapter to solve the problem.
For additional assistance and answers to your questions, contact your point of purchase, or see the printer registration card for the number appropriate for your country.
Notes:
1 If you continuously use the printer for a long period of time, the printhead becomes hot and will automatically stop at a specified threshold temperature. When the temperature falls below a certain value, the printer will restart normal printing operations.
2 If the print pattern is dense, the printer slows down its print speed.
Testing the Printer
Each time you turn the printer on, it performs an internal check, or Power-On Self Test, of its settings.
The printer can also perform a printer test. You can run this test even if your printer is not connected to your computer. If the printer is connected to your computer, make sure the computer is turned on.
Before you test the printer, make sure paper and ribbon are installed.
To run a printer test:
1 Turn the printer On.
2 Press Menu.
3 Press Item until Print Settings appears.
4 Press Start. The menu settings print.
If the menu settings do not print, contact your point of purchase or see the printer registration card for the number appropriate for your country.
Clearing Paper Jams
Use the following procedures to remove paper jams from your printer.
When jams occur, the Check light is on and the 002 Paper Jam message appears on the display. If this happens, follow these steps to clear the jam:
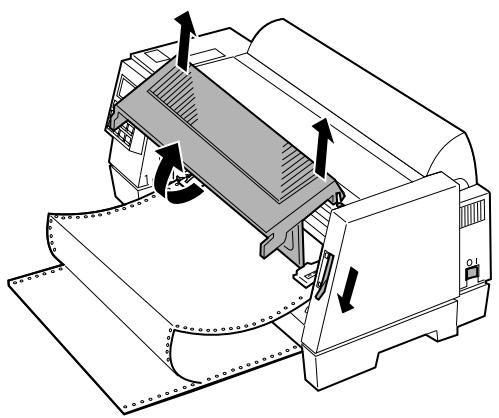
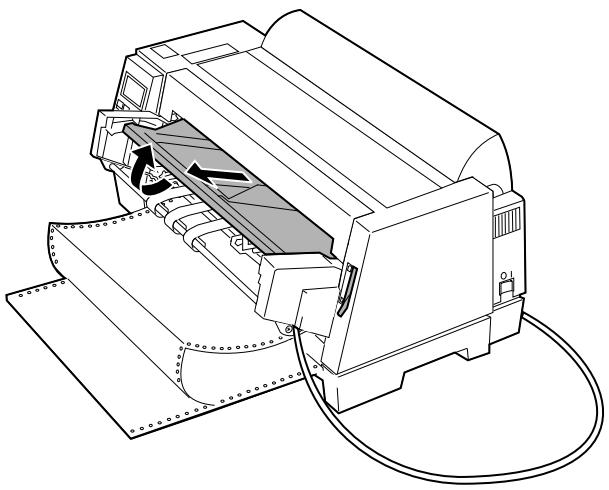
1 Open the top cover and tear off the forms at the tear bar and front bottom openings of the printer.
2 Open the front cover and open the left and right forms tractor doors and remove the forms from both tractors.
- If the jam occurred below the printhead, go to step 4.
- If the jam occurred above the printhead, go to step 5.
3 Remove the remaining forms by pulling them slowly toward you. Go to step 6.
4 Remove the remaining forms by pulling them slowly toward the back of the printer. If the forms are blocked by the ribbon, remove the ribbon cartridge before attempting to remove the forms. For instructions on removing and loading the ribbon cartridge, see “Removing the Ribbon Cartridge” on page 131 or “Installing the Ribbon Cartridge” on page 4.
5 Make sure all paper is removed from inside the printer, then close the top cover.
6 Reload the forms (see "Loading Continuous Forms" on page 70).
Problem Conditions
Perform the steps listed for each condition to correct the problem.
Problems Indicated by Error Codes or Messages
| Symptom | Probable Causes and Actions |
| 001 Paper Out | End-of-form (EOF) condition. Action: Load forms or paper in the printer and press Start/Stop. Forms are loaded incorrectly. Action: Check that the forms are loaded correctly. For help, see “Loading Continuous Forms” on page 70. |
| 002 Paper Jam | Paper jam condition. Action: Turn off the printer and remove the jammed paper from the printer (see “Clearing Paper Jams” on page 117). Forms used do not meet specifications. Action: Use forms that meet specifications. See “Paper Types and Sizes” beginning on page 55. Ribbon guide is broken. Action: Change the ribbon cartridge. For help, see “Installing the Ribbon Cartridge” on page 4. |
| 005 Cover Open | ·Top cover is open or not properly closed. Top cover Action: Close the top cover properly. Tip: Even if the top cover seems to be closed, there may be paper caught between the top cover and the printer unit. |
| 007 Data Error | ·Data is not transmitted correctly and the printer prints Ⓞ, Ⓞ, or Ⓞ. Action: Turn off the printer. Check that the serial settings of the serial interface are correct. (see “Verifying Serial Interface Settings” on page 15). ·Printer cable is disconnected or is not connected correctly. Action: Turn off the computer and printer. Check that the printer cable is connected correctly at both ends. |
| 00D I/F Error | ·Interface mode switch on the back of the printer has been changed after the printer was turned on. Action: Turn off the printer. Check that the interface mode switch of the printer matches the interface of the system unit (see “Connecting the Parallel Cable” on page 10 or “Connecting the Serial Cable” on page 12). |
| 6xx Machine Chk | • Paper Jam Condition Action: Turn off the printer. Remove the jammed paper from the printer. • A Hardware error occurred. Action: Turn off the printer. Wait 30 seconds, then turn the printer on. If the error still occurs, contact your point of purchase, or see the printer registration card for the number appropriate for your country. |
| Feed Lever Error | • The paper select lever is not in the correct position. Action: Move the paper select lever to the other position. |
| Paper Load Error | • An error occurred while loading paper. Action: Remove any paper in the feeder and reload it. |
Paper Feed Problems
| Symptom | Probable Causes and Actions |
| Paper does not feed.Paper is jammed.Paper is torn. | Obstruction in the printer.Tip: Even if the printer does not detect a paper jam, a piece of paper may remain in the printer, or adhesive tape or glue stuck to the platen may prevent the paper from feeding properly.Pinfeed holes are not aligned.Action: Align the pinfeed holes of the forms with the tractor pins.Forms tractor doors are not closed properly or the tractor locking levers are not locked properly Action: Check that the forms tractor doors are properly closed and that the tractor locking levers are properly locked.Ribbon cartridge is not set correctly.Action: Reset the ribbon cartridge correctly. For help, see “Installing the Ribbon Cartridge” on page 4.AutoGap is set incorrectly.Action: Adjust AutoGap (see page 42).Top of the form is curled up or folded.Action: Straighten or use new forms.Formshave debris in the pinfeed holes.Action: Use forms with no debris in the pinfeed holes.Pinfeed holes of multi-part forms do not align with each other.Action: Avoid using such multi-part forms. |
Printing and Print Quality Problems
| Symptom | Probable Causes and Actions |
| Printer does not print. | • Printer is not in the ready state. (Ready light is off.) Action: Press Start/Stop. (Ready light comes on.) • Printer cable is disconnected or not connected correctly. Action: Turn off the computer and the printer. Check that the printer cable is connected correctly at both ends. Turn the computer and printer on. • Interface mode setting is not correct. Action: Reset the interface mode setting (see “Connecting the Parallel Cable” on page 10 or “Connecting the Serial Cable” on page 12). Action 2: If you are using a parallel cable or RS-232, make sure the interface mode switch is Off (in the out position) • Ribbon cartridge is not installed. Action: Install the ribbon cartridge (see “Installing the Ribbon Cartridge” on page 4). |
| Wrong characters are printed. | • Function setting is not correct. Action: Reset the function setting (see “Using the Function Menu” on page 35). • Wrong printer driver selected. Action: See “Installing Your Application Software” on page 23. • Software is sending the wrong printer command. Action: Check your software user documentation. |
| Printing is too light or blurred. | ·Ribbon is worn or dry. Action:Replace the ribbon cartridge. For help, see “Installing the Ribbon Cartridge” on page 4. ·AutoGap is set incorrectly. Action:Adjust AutoGap (see page 42). Tip:Mark the date of ribbon cartridge replacement. This may help to remind you of the next replacement date. |
| Dots are missing. | ·Ribbon cartridge is not set correctly. Action:Reset the ribbon cartridge correctly. For help, see “Installing the Ribbon Cartridge” on page 4. ·Ribbon is twisted or ribbon edge is folded. Action:Replace the ribbon cartridge. For help, see “Installing the Ribbon Cartridge” on page 4. ·Printhead is not working. Action:The printer needs repair. |
| Forms are smudged. | ·Ribbon cartridge is not set correctly. Action:Reset the ribbon cartridge correctly. For help, see “Installing the Ribbon Cartridge” on page 4. ·AutoGap is set incorrectly. Action:Adjust AutoGap (see page 42). |
| Nothing is printed on page. | ·Auto Sheet Feeder is installed and AutoGap is set incorrectly. Action:Adjust AutoGap (see page 42). |
| Bidirectional alignment is not properly aligned. | • AutoGap is set incorrectly. Action: Adjust AutoGap (see page 42). • Setting of the Print Adjust value is not correct. Action: Adjust the value (see “Adjusting Bidirectional Alignment” on page 81). |
| Printer slows down or stops intermittently. | • Printer is used continuously for a long time. Action: Normal operation. • Dense pattern is printed. Action: Normal operation. |
Alarm and Abnormal Noise
| Symptom | Probable Causes and Actions |
| Alarm sounds. | ·The alarm sounds to indicate the following error conditions: — EOF condition. — Paper jam condition. Action: See “Problems Indicated by Error Codes or Messages” on page 118. |
| Printer makes abnormal noise. | ·Printer is not placed on a sturdy level surface. Action: Place the printer on a desk or table. Check that no objects are touching the printer. ·Ribbon cartridge is not snapped in place correctly. For help, see “Installing the Ribbon Cartridge” on page 4. Action: Reset the ribbon cartridge correctly. |
Power Problems
| Symptom | Probable Causes and Actions |
| Printer is turned on, but the Power light is off. | •Power cord is unplugged or not plugged in correctly. Action:Check that the power cord is correctly connected at both ends. •No electricity at the power source. Action:Check the power source by connecting another electrical appliance. |
Operator Panel Button Problem
| Symptom | Probable Causes and Actions |
| All buttons except Start/Stop, Load/Unload, and FormFeed do not work. | Operator panel is disabled. Action: Normal operation. Note: If you want to change the operator panel to the enable mode, see “Disabling/Enabling the Operator Panel” on page 53. |
Display Messages
| Message | Description |
| Ready (IBM) | The printer is online and ready to accept data, and IBM PPDS mode is selected. |
| Ready (EPSON) | The printer is online and ready to accept data, and Epson emulation mode is selected. |
| 001 Paper Empty/Add Paper | The printer is out of paper or the paper is not loaded properly. Load paper in the printer. For help, see “Selecting and Loading Paper” on page 55. |
| 002 Paper Jam Remove Paper | Clear paper jam. Remove any debris from inside the printer. |
| 005 Cover Open Close Cover | Top Cover is open or not properly closed. Close the top cover. |
| 007 Data Error | Data transmission error in Serial Interface. Check the serial settings on the function menu to make sure they are correct. Check that the serial cable is properly connected at both ends. |
| 00D I/F Error | Interface mode switch was changed after the printer was turned on. Return the printer to the appropriate interface mode (RS-232 or RS-422). |
| 6XX Machine Chk | A Hardware error occurred. If this happens, turn off the printer, fix the paper jam or other problem, then turn the printer back on. If the error occurs again, contact your point of purchase, or see the printer registration card for the number appropriate for your country. |
| FastDraft | FastDraft font is selected. |
| Draft | Draft font is selected. |
| Gothic | Gothic font is selected. |
| Courier | Courier font is selected. |
| Draft (Normal) | Normal Draft font is selected in Epson Emulation mode. |
| Draft (Fast) | FastDraft font is selected in Epson Emulation mode. |
| XXCPI | XX pitch is selected. |
| PS | Proportional Spacing is selected. |
| Return to TOFPress Start | The perforation is at the tear-off position. Tear off the paper, then press Start/Stop. The paper retracts to the TOF position. |
| Auto Tear Off | The perforations automatically move to the tear off position. |
| Press Start | The printer is waiting for you to press Start/Stop. |
| Printing... | The printer is printing a demo or adjustment pattern. |
| Press Font/Pitch | Press Font or Pitch. |
| Press Store | Press Store to save your selection. |
| Press Tear Off | The printer is waiting for you to press Tear Off. |
| Press Load | Press Load/Unload to load or unload paper or to park continuous forms. |
| Invalid Pitch | The pitch setting conflicts with the selected pitch. |
| Operator Panel Disable | The operator panel is disabled. To enable the operator panel, see “Disabling/Enabling the Operator Panel” on page 53. |
| Paper Load Error | The printer paper is incorrectly loaded. Remove the paper and reload it. For help, see “Selecting and Loading Paper” on page 55. |
| Feed Lever Error | The paper select lever is in the incorrect position. |
Maintaining Your Printer
Chapter 7
This section describes how to clean the printer and remove the ribbon cartridge.
Cleaning the Printer
Before you clean the printer:
1 Turn the printer Off.
2 Unplug the power cord.
3 Wait until the printhead is cool.
Cleaning the inside of the Printer: Every few months, use a soft brush and a vacuum to remove dust, ribbon lint, and pieces of paper. Remove the ribbon cartridge to prevent the ribbon from going into the vacuum. Vacuum any dust from around the printhead and in the printer cavity.
Cleaning the Cover: Clean the outside of the printer with a damp cloth and mild soap. Do not use any spray-type or chemical cleaners anywhere on your printer. Do not put any liquids or spray near the air vents. For stubborn ink stains on the cover, use a commercial mechanic's hand cleaner.
Cleaning the Auto Sheet Feeder Rollers
1 Remove all paper from the printer.
2 Turn the Auto Sheet Feeder upside down and place it on a flat surface.
3 Clean the two paper-guide wheels located inside the bottom of the Auto Sheet Feeder using isopropyl alcohol and a clean cloth.
You can rotate one roller while applying the cleaning cloth to the other roller.
Removing the Ribbon Cartridge
1 Turn the printer Off.
2 Remove the top cover.
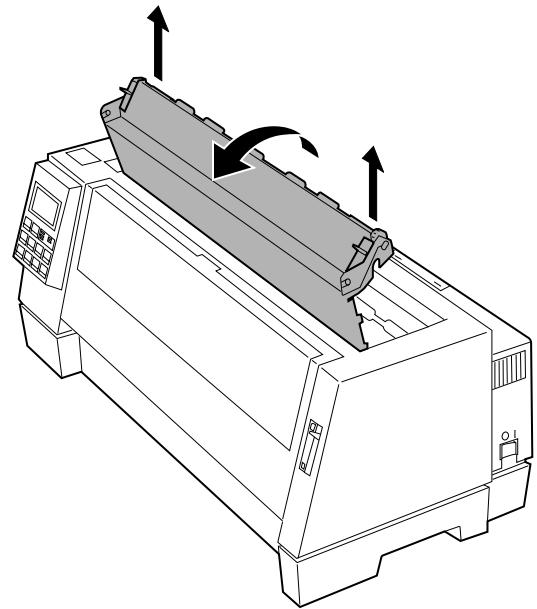
3 Carefully pull up on the ribbon guide while also pulling up on the ribbon cartridge. The cartridge unlatches from the printer.
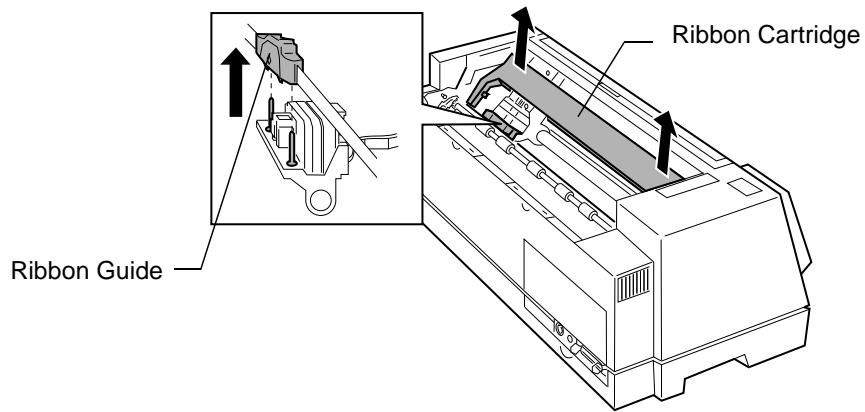
For help installing a ribbon cartridge, see "Installing the Ribbon Cartridge" on page 4.
Electronic Emission Notices
Federal Communications Commission (FCC) Statement
The Lexmark 4227 Printer has been tested and found to comply with the limits for a Class B digital device, pursuant to Part 15 of the FCC Rules. These limits are designed to provide reasonable protection against harmful interference in a residential installation. This equipment generates, uses, and can radiate radio frequency energy and, if not installed and used in accordance with the instructions, may cause harmful interference to radio communications. However, there is no guarantee that interference will not occur in a particular installation. If this equipment does cause harmful interference to radio or television reception, which can be determined by turning the equipment off and on, the user is encouraged to try to correct the interference by one or more of the following measures:
Reorient or relocate the receiving antenna.
- Increase the separation between the equipment and receiver.
- Connect the equipment into an outlet on a circuit different from that to which the receiver is connected.
- Consult the place where you bought your printer or a service representative for additional suggestions.
The manufacturer is not responsible for any radio or television interference caused by using other than recommended cables or by unauthorized changes or modifications to this equipment.
Unauthorized changes or modifications could void the user's authority to operate the equipment.
To assure compliance with FCC regulations for a Class B computing device, use a properly shielded and grounded parallel interface cable, such as Lexmark part number 1329605.
Use of a substitute cable not properly shielded and grounded may result in violation of FCC regulations.
European Community (EC) Electromagnetic Compatibility Directive
This product is in conformity with the protection requirements of EC Council directive 89/336/EEC on the approximation of the laws of the Member States relating to electromagnetic compatibility.
A declaration of conformity with the requirements of the Directive has been signed by the Director of Manufacturing and Technical Support, Lexmark International, S.A., Boigny, France.
This product satisfies the Class B limits of EN 55022.
Industry Canada Compliance Statement
This Class B digital apparatus meets all requirements of the Canadian Interference-Caising Equipment Regulations.
The United Kingdom Telecommunications Act 1984
This apparatus is approved under the approval number NS/G/1234/J/100003 for the indirect connections to the public telecommunications systems in the United Kingdom.
Japanese VCCI Notice
The EPA ENERGY STAR Computers program is a partnership effort with computer manufacturers to promote the introduction of energy-efficient products and to reduce air pollution caused by power generation.
Companies participating in this program introduce personal computers, printers, monitors, or fax machines that power down when they are not being used. This feature will cut the energy used by up to 50 percent. Lexmark is proud to be a participant in this program.
As an Energy Star Partner, Lexmark International, Inc. has determined that this product meets the Energy Star guidelines for energy efficiency.
Safety Information
- If your product is NOT marked with this symbol, , it MUST be connected to an electrical outlet that is properly grounded.
- The power cord must be connected to an electrical outlet that is near the product and easily accessible.
Refer service or repairs, other than those described in the operating instructions, to a professional service person.
Sicherheitshinweise
Japanese Safety Information
安全のたものご案内
Chinese Safety Information
安全资讯
Korean Safety Information
千言
Statement of Limited Warranty
Appendix B
Lexmark International, Inc., Lexington, KY
Lexmark 4227 Forms Printer
This Statement of Limited Warranty applies to this machine if it was originally purchased for your use, and not for resale, from Lexmark or a Lexmark authorizedremarketer, referred to in this statement as "Remarketer." This machine is subject to these terms only if located in the country of the seller from whom the machine was purchased.
Warranty
Lexmark warrants that this machine:
- Is manufactured from new parts, or new and serviceable used parts which perform like new parts,
- Is free from defects in material and workmanship,
- Conforms to Lexmark's Official Published Specifications, and
- Is in good working order.
If this machine does not function as warranted during the warranty period, contact a Remarketer or Lexmark, who is responsible for its repair without charge.
The warranty period is 12 months and starts on the date of original purchase as shown on the purchase receipt.
If this machine is a feature or accessory, this statement applies only when that feature or accessory is used with the machine for which it was designed. To obtain warranty service, you may be required to present the feature or accessory with such machine.
If you transfer this machine to another user, warranty service under the terms of this statement is available to that user for the remainder of the warranty period. You should transfer proof of original purchase and this statement to that user.
Warranty Service
To obtain warranty service you may be required to present proof of original purchase. Warranty service will be provided at your location.
When warranty service involves the exchange of a machine or part, the item replaced becomes the property of the Remarketer or Lexmark. The replacement may be a new or repaired item. The replacement item assumes the remaining warranty period of the original machine.
Replacement is not available to you if the machine you present for exchange is defaced, altered, in need of a repair not included in warranty service, or damaged beyond repair. Also, such machine must be free of any legal obligation or restrictions that prevent its exchange.
Before you present this machine for warranty service, remove all programs, data, and removable storage media.
Extent of Warranty
We do not warrant uninterrupted or error-free operation of a machine.
Warranty service does not include repair of failures caused by misuse, accident, modification, unsuitable physical or operating environment, operation in other than the Specified Operating Environment, improper maintenance by you, failure caused by service of the machine by those other than a Remarketer or Lexmark, or failure caused by a product, including supplies, for which we are not responsible.
ALL EXPRESS AND IMPLIED WARRANTYES, INCLUDING THE IMPLIED WARRANTYES OF MERCHANTABILITY AND FITNESS FOR A PARTICULAR PURPOSE, ARE LIMITED IN DURATION TO THE WARRANTY PERIOD. NO WARRANTYES, EXPRESS OR IMPLIED, WILL APPLY AFTER THIS PERIOD.
Limitation of Liability
Your sole remedy under this Statement of Limited Warranty is set forth in this section. For any claim concerning performance or nonperformance of Lexmark or a Remarketer for this machine under this Statement of Limited Warranty, you may recover actual damages up to the limit set forth in the following paragraph.
Lexmark's liability for actual damages from any cause whatsoever will be limited to the greater of 1) $5,000 or 2) the amount you paid for the machine which caused the damages. This limitation of liability will not apply to claims by you for bodily injury or damage to real property or tangible personal property for which Lexmark is legally liable. In no event will Lexmark be liable for any lost profits, lost savings, incidental damage, or other economic consequential damages. This is true even if you advise Lexmark or a Remarketer of the possibility of such damages. Lexmark is not liable for any claim by you based on a third party claim.
This limitation of remedies also applies to any developer of materials supplied to Lexmark. Lexmark's and the developer's limitations of remedies are not cumulative. Such developer is an intended beneficiary of this limitation.
Additional Rights
Some states do not allow limitations on how long an implied warranty lasts, or do not allow the exclusion or limitation of incidental or consequential damages. If such laws apply, the limitations or exclusions contained in this statement may not apply to you.
This warranty gives you specific legal rights. You may also have other rights which vary from state to state.
A
A4 paper. Paper size that is 210 × 297 mm (8.27 x 11.7 in.)
all-points-addressable (APA). The ability to address and print or not print each picture element on a display surface.
application software. Software products such as spreadsheets and word-processing programs designed for use on a personal computer.
audible alarm. An alarm that is activated when an event occurs that may require operator attention or intervention for printer operation. For example, an out-of-paper condition. Also called a beeper.
B
bidirectional. Printing in either direction, left-to-right or right-to-left.
bold. A heavy-faced type; also called boldface or emphasized.
bps. Bits per second.
buffer. Temporary storage area for holding input or output data.
C
characters-per-inch (cpi). The number of characters printed within an inch horizontally across a page. Used to measure the character spacing of a printer.
characters-per-second (cps). The number of characters that are printed in 1 second. Used to measure the printing speed of a printer.
code page. A set of 256 graphic designs (characters) associated with unique code values from 0 through 255. Code page 437 is U.S.A. font and code page 850 is multilingual font.
condensed print mode. A print mode in which character spacing is 17.1 characters per inch. Also called compressed print mode.
continuous forms. Connected paper forms that feed continuously through the printer, and are perforated to allow you to tear them apart.
control code. A control character used for print operations, such as line spacing or carriage return.
D
data. Information entered into or used by a computer.
data bits. The number of data bits sent in each transmission frame using the serial interface.
default. A value, parameter, or attribute that the printer uses when none is specified.
document-on-demand. Your printer's capability to automatically move paper from the print line to the tear off bar upon completion of a print job.
dot-matrix printer. A printer that forms characters by a pattern of dots.
dots-per-inch (dpi). The number of dots printed within an inch horizontally across the page.
double-high printing. Printing in which the characters are twice as high as the default characters.
double-strike. Characters are printed twice on the same page location.
double-wide printing. Printing in which the characters are twice as wide as the default characters. This results in half as many characters per inch.
draft-print (DP). A style of print used for draft material. Compare with letter quality.
DTR protocol. Hardware handshaking protocol for RS-232 serial interface.
E
emphasized print type. A print type in which characters are made bolder.
F
font. A set of type of a given size and style.
forms length. Also known as page length, this is the length of a page. It can be set from one line to a maximum of 22 inches.
G
g / m^2 .Grams per square meter. Metric measurement for paper weight.
1
interface. Defines the method of communication between the printer and the terminal or computer. The two common types of interface are parallel and serial.
italic. A type style with characters that slant to the right.
K
KB/Kbyte. Kilobyte. The number of bytes of storage. Equal to 1024 bytes.
L
letter quality. A denser print mode that enhances the quality of print characters. Compare with draft-print.
lines per inch (lpi). Number of lines of text printed in a vertical inch.
lines per page (LPP). Unit of measure used with lines per inch to set form length.
load position. The line position of the paper where the first line prints. Also referred to as the Top-Of-Form (TOF).
M
macro. Printer setting to store document formats.
mode. A style of printer output.
0
offline. Mode in which the printer is not communicating with the computer.
online. Mode in which the printer is communicating with the computer.
overscore. A line printed over a character.
P
parallel interface. A type of connection that links a printer to a computer, by which all 8 bits of a character are sent at the same time.
park. A means to disable the continuous forms operation while single sheets or envelopes are printed.
pinfeed. A device that guides and feeds paper by means of pins that engage perforations in the paper.
pitch. A unit of type width based on the number of characters that can be placed in a linear inch. For example, 10 pitch type prints 10 characters-per-inch.
point size. A unit of size of characters equal to 1/72 inch vertically.
PPDS. Personal printer data stream.
printer driver. A file that allows an application program to communicate with a printer.
printer functions setting. The settings that determine how the printer operates.
proportional spacing. Spacing of characters according to their natural width.
R
RAM. Random access memory.
resident font. A font stored in the printer.
s
sans serif. Letters printed without short lines stemming from the upper and lower ends.
serial interface. A type of connection that links a printer to a computer, by which the 8 bits of a character are sent one bit at a time.
serial. A short line stemming from, and at an angle to, the upper and lower ends of the strokes of a letter.
single sheets. A single form or sheet of paper that is not connected to other sheets. The sheet can have more than one part, such as an original and one or more copies.
standard-carriage printer. Printer that has the ability to print on forms up to 279.4mm (11 in.) wide.
start. Mode in which the printer is communicating with the computer.
stop. Mode in which the printer is not communicating with the computer.
subscript. One or more characters printed in the bottom half of the normal printing line.
superscript. One or more characters printed in the top half of the normal printing line.
system board. The main circuit board that supports a variety of basic system devices.
T
Top-Of-Form (TOF). The line position of the paper where the first line prints. Also referred to as the load position.
tractor feed. A device that automatically feeds continuous forms.
U
underscore. A line printed under a character.
unidirectional printing. Printing from left to right.
V
variable forms length. The variable forms length feature lets you set your form length from a range of one line to a maximum of 22 inches.
A
adjusting bidirectional alignment 81
advancing paper 46
aligning left margin 74
application software, installing 23
auto sheet feeder
described 85
installing 87
loading paper
automatic feed 90
manual feed 94
rollers, cleaning 130
setting left margin 95
Auto Tear-Off
One Second 80
Set to Off 80
Set to On 79
AutoGap 42, 48
Off (manual) 49
On 48
Single 50
B
bidirectional alignment 81
buttons, operator panel 32
C
changing tractor feeders 111
cleaning
auto sheet feeder rollers 130
printer 129
clearing jams 117
configuring the printer 23
connecting
parallel cable 10
power cord 9
serial cable 12
continuous forms
aligning the left margin 75
Auto Tear-Off 79,80
loading 70
setting Top-Of-Form 76
Control Options 43
cut sheets. see single sheets
D
Data Options 43
Default Macro 39
demonstration page, printing 16
disabling/enabling the operator panel 53
display messages 126
E
electronic emissions notices 133
Emulation Options 44
Energy Star 135
envelopes, loading
manual feed 59
with continuous forms 65
F
features and functions 25
Federal Communications Commission (FCC) Statement 133
font,selecting or locking 51
function menus
overview 36-37
table 38-45
1
installing
application software 23
auto sheet feeder 87
ribbon cartridge 4-7
Interface Options 44
J
jams,clearing 117
L
language, setting 21
left margin, aligning
continuous forms 75
envelopes 74
single sheets 74
Load Macro 39
loading
continuous forms
tractor 70
tractor 2 feeder 102
envelopes
manual feed 59
with continuous forms 65
single sheets
manual feed 59
tractor 2 feeder 107
with continuous forms 65
locking
font 51
pitch 51
M
Macro x Options 40
macros, setting and using 52
maintenance
cleaning printer 129
ribbon cartridge 131
Manual AutoGap settings 50
margins, aligning 74
0
operator panel
advancing paper 46
buttons 32
disabling/enabling 53
function menus
overview 36-37
table 38-45
lights 34
messages 126
setting
language 21
primer online or offline 46
Top-Of-Form 76
stopping the printer 46
using Tear-Off 47-48
options
auto sheet feeder 83, 85
extended paper guides 83
parallel cable 83
prinsterstand 83
serial cable 83
tractor 2 feeder 83, 96
P
paper
advancing 46
loading
auto sheet feeder 90
tractor 2 feeder 102
sizes 56-58
types
continuous forms 57
envelopes 58
labels 55
single sheets 56
Paper Hand Options 41
paper jams 117
parallel cable, connecting 10
pitch,selecting or locking 51
power cord, connecting 9
Print Adjust 45
Print Demo 39
Print Settings 39
primer
driver 23
features and functions 25
function menus
options
AutoGap 42
Control Opt. 43
Data Opt. 43
Default Macro 39
Emulation Opt. 44
Interface Opt. 44
Load Macro 39
Macro x Opt. 40
Paper Hand Opt. 41
Print Adjust 45
Print Demo 39
Print Settings 39
Select Tractor 39
Set Top of Form 39
Trace Mode 45
overview 36
setting 35
options 83
parts 27, 29
problems. see solving problems
R
removing
ribbon cartridge 131
top cover 2
tractor 2 feeder 113
ribbon cartridge, installing 4
s
safety information 136
Select Tractor 39
selecting
font 51
paper 55
pitch 51
serial cable, connecting 12
Set Top of Form 39
setting
AutoGap 48
operator panel language 21
primer online or offline 46
Top-Of-Form in a Macro 78
setting macros 52
single sheets, loading 59
software, installing 23
solving problems
alarm and abnormal noise 124
clearing paper jams 117
display message list 126
error codes or messages 118
operator panel buttons 125
paper feed 121
power 125
primer test 116
printing and print quality 122
stopping the printer 46
supplies 30
T
Tear-Off. see Auto Tear-Off
test page. see demonstration page
Top-Of-Form (TOF)
setting
continuous form 76
in a macro 78
single sheets and envelopes 78
Trace Mode 45
tractor 2 feeder
changing tractor feeds 111
installing 97
loading paper
continuous forms 102
cut sheets 107
manual feed 107
parking continuous forms 111
removing 113
setting left margin 105
troubleshooting 129
U
unpacking 1
using macros 52
4227 Forms Printer
User's Guide
Part Number 11A6030
June 1996
You may use this form to communicate your comments about this publication, with the understanding that Lexmark may use or distribute whatever information you supply in any way it believes appropriate without incurring any obligation to you.
- Did you find the book well organized?
Yes No
- Was the content of the book accurate and complete?
Yes No
- Was the book easy to use?
Yes No
-
What can we do to improve the book?
-
What is your job title?
Questions or comments about supplies, service, applications, and so on will slow response time considerably. Please refer those questions or comments to your authorized dealer or point of purchase.
Note: Please direct all requests for copies of publications to your point of purchase. Publications are not stocked at the location to which this form is addressed.
Fold and Tape
Please Do Not Staple
Fold and Tape
BUSINESS
REPLY
FIRSTCLASSMAIL
PERMIT NO. 2659
LEXINGTON, KY
POSTAGE WILL BE PAID BY ADDRESSEE
Lexmark International Inc.
Department F95, Building 035-3
740 NEW CIRCLE ROAD NW
LEXINGTON KY 40511-9954
NO POSTAGE
NECESSARY
IF MAILED
IN THE
UNITED STATES

Fold and Tape
Please Do Not Staple
Fold and Tape
- First Edition (June 1996)
- UNITED STATES GOVERNMENT RESTRICTED RIGHTS
- Contents
- Chapter 1 - Getting Started. 1
- Chapter 2 - Features and Functions 25
- Chapter 3 - Using the Operator Panel 31
- Chapter 4 - Selecting and Loading Paper. 55
- Chapter 5 - Printer Options 83
- Chapter 6 - Solving Printer Problems 115
- Chapter 7 - Maintaining Your Printer. 129
- Appendix A - Notices 133
- Appendix B - Statement of Limited Warranty. 141
- Getting Started
- Unpacking
- Remove the protective cardboard.
- Installing the Ribbon Cartridge
- Attach the acoustic cover.
- Connecting the Power Cord
- Connecting the Parallel Cable
- Connecting the Serial Cable
- Changing the Serial Settings
- Verifying Serial Interface Settings
- Printing the Demonstration Page
- Open the manual feed door.
- Press Item until Print Demo is displayed.
- Setting the Language of the Operator Panel Messages
- Displayed Language
- Installing Your Application Software
- PPDS Mode
- Epson Emulation Mode
- What to do Next
- Features and Functions
- Front View of Printer
- Rear View of Printer
- Supplies
- Using the Operator Panel
- Buttons
- Using the Function Menus
- Overview of Function Menus
- Menu Options
- Navigating Through the Function Menus
- Setting the Printer Online or Offline
- Stopping the Printer
- Advancing the Paper
- Using Tear-Off
- Auto Tear-Off Set to On
- One Second Tear-Off
- Manual Tear-Off (Auto Tear-Off Set to Off)
- Setting AutoGap
- AutoGap Set to On
- Manual AutoGap (AutoGap Set to Off)
- Manual AutoGap Settings
- AutoGap Set to Single
- Selecting or Locking a Font or Pitch
- Setting and Using a Macro
- Disabling/Enabling the Operator Panel
- Selecting and Loading Paper
- Paper Types and Sizes
- Single Sheets
- Multiple Part Single Sheets
- Single Continuous Forms
- Multiple Part Continuous Forms
- Envelopes
- Multiple Part Forms
- Loading a Single Sheet or Envelope
- Loading a Single Sheet or Envelope into the Manual Feed
- Pull the paper supports up.
- Open the manual feed door.
- Set the left margin.
- To load a single sheet:
- To load an envelope:
- Setting Auto Cut Sheet Load
- Loading a Single Sheet or Envelope With Continuous Forms Already Loaded
- Set the left margin.
- To load a single sheet:
- Loading Continuous Forms
- To load continuous forms:
- Close the front cover.
- Aligning the Left Margin
- Manually-Loaded Single Sheets or Envelopes
- Continuous Forms
- Top-Of-Form (TOF)
- Setting TOF for Continuous Forms
- Setting TOF for Single Sheets and Envelopes
- Setting TOF in a Macro
- Auto Tear-Off (Set to On)
- Auto Tear-Off (Set to Off)
- Auto Tear-Off (Set to One Second)
- Adjusting Bidirectional Alignment
- Printer Options
- Chapter 5
- Auto Sheet Feeder
- Installing the Auto Sheet Feeder
- Loading Paper in the Auto Sheet Feeder
- Loading Paper for Automatic Feed
- Place single sheets into the Auto Sheet Feeder.
- Note:
- Push the locking lever in toward the printer.
- Loading Paper for Auto Sheet Feeder Manual Feed
- Set the left margin.
- Insert paper all the way into the printer.
- Tractor 2 Feeder
- Installing the Tractor 2 Feeder
- Loading Paper in the Tractor 2 Feeder
- Loading Continuous Forms in the Tractor 2 Feeder
- Set the left margin.
- Loading Cut Sheets in the Tractor 2 Feeder
- Pull the paper supports to the upright position.
- Set the left margin.
- Parking Continuous Forms and Changing Tractor Feeders
- Removing the Tractor 2 Feeder
- Solving Printer Problems
- Notes:
- Testing the Printer
- Clearing Paper Jams
- Problem Conditions
- Problems Indicated by Error Codes or Messages
- Paper Feed Problems
- Printing and Print Quality Problems
- Alarm and Abnormal Noise
- Power Problems
- Operator Panel Button Problem
- Maintaining Your Printer
- Cleaning the Printer
- Cleaning the Auto Sheet Feeder Rollers
- Removing the Ribbon Cartridge
- Electronic Emission Notices
- Federal Communications Commission (FCC) Statement
- European Community (EC) Electromagnetic Compatibility Directive
- Industry Canada Compliance Statement
- The United Kingdom Telecommunications Act 1984
- Japanese VCCI Notice
- Safety Information
- Sicherheitshinweise
- Japanese Safety Information
- 安全のたものご案内
- Chinese Safety Information
- 安全资讯
- Korean Safety Information
- Statement of Limited Warranty
- Lexmark 4227 Forms Printer
- Warranty
- Warranty Service
- Extent of Warranty
- Limitation of Liability
- Additional Rights
- A
- B
- C
- D
- E
- F
- G
- 1
- K
- L
- M
- 0
- P
- R
- s
- T
- U
- V
- J
- BUSINESS
- REPLY
Brand : LEXMARK
Model : FORMS PRINTER 4227 PLUS
Category : Dot Matrix Printer