
Series 3000 PT719 - Razor PHILIPS - Free user manual and instructions
Find the device manual for free Series 3000 PT719 PHILIPS in PDF.


| Product Type | Electric Shaver |
| Brand | Philips |
| Model | Series 3000 PT719 |
| Power Source | Rechargeable Li-ion battery |
| Charging Time | 8 hours |
| Run Time | 35 minutes |
| Shaving System | Rotary (three heads) |
| Floating Heads | Yes, 3D contour follow |
| Washable | Yes, waterproof under running water |
| Wet & Dry Use | Yes, with foam or gel |
| Pop-up Trimmer | Yes, for sideburns and moustache |
| Display | LED battery indicator |
| Dimensions (approx.) | 15 × 5 × 5 cm |
| Weight (approx.) | 180 g |
| Cordless Operation | Yes |
| Voltage | 100-240 V, 50/60 Hz |
| Cleaning | Rinse heads under tap |
| Replacement Heads | Philips SH50 or compatible |
| Included Accessories | Protective cap, cleaning brush, charging cable |
| Warranty | 2 years manufacturer |
Frequently Asked Questions - Series 3000 PT719 PHILIPS
User questions about Series 3000 PT719 PHILIPS
0 question about this device. Answer the ones you know or ask your own.
Ask a new question about this device
Download the instructions for your Razor in PDF format for free! Find your manual Series 3000 PT719 - PHILIPS and take your electronic device back in hand. On this page are published all the documents necessary for the use of your device. Series 3000 PT719 by PHILIPS.
USER MANUAL Series 3000 PT719 PHILIPS
Always here to help you
Register your product and get support at
www.philips.com/welcome

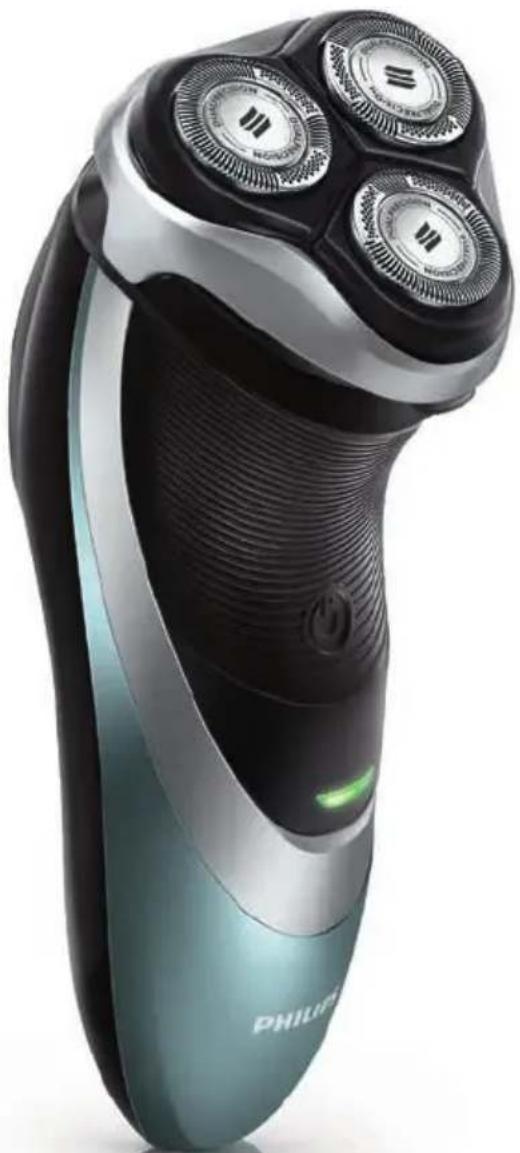
PT919
PT866
PT860
PT845
PT739
PT737
PT731
PT730
PT727
PT726
PT725
PT723
PT721
PT720
PT719
User manual
PHILIPS
ENGLISH 4
INDONESIA 15
한국어 26
BAHASA MELAYU 37
ภาษาไทย 48
TIÊNG VIÊT 59
繁體中文 70
简体中文 81
Introduction
Congratulations on your purchase and welcome to Philips!
To fully benefit from the support that Philips offers, register your product at www.philips.com/welcome.
Please read this user manual, as it contains information about the wonderful features of this shaver as well as some tips to make shaving easier and more enjoyable.
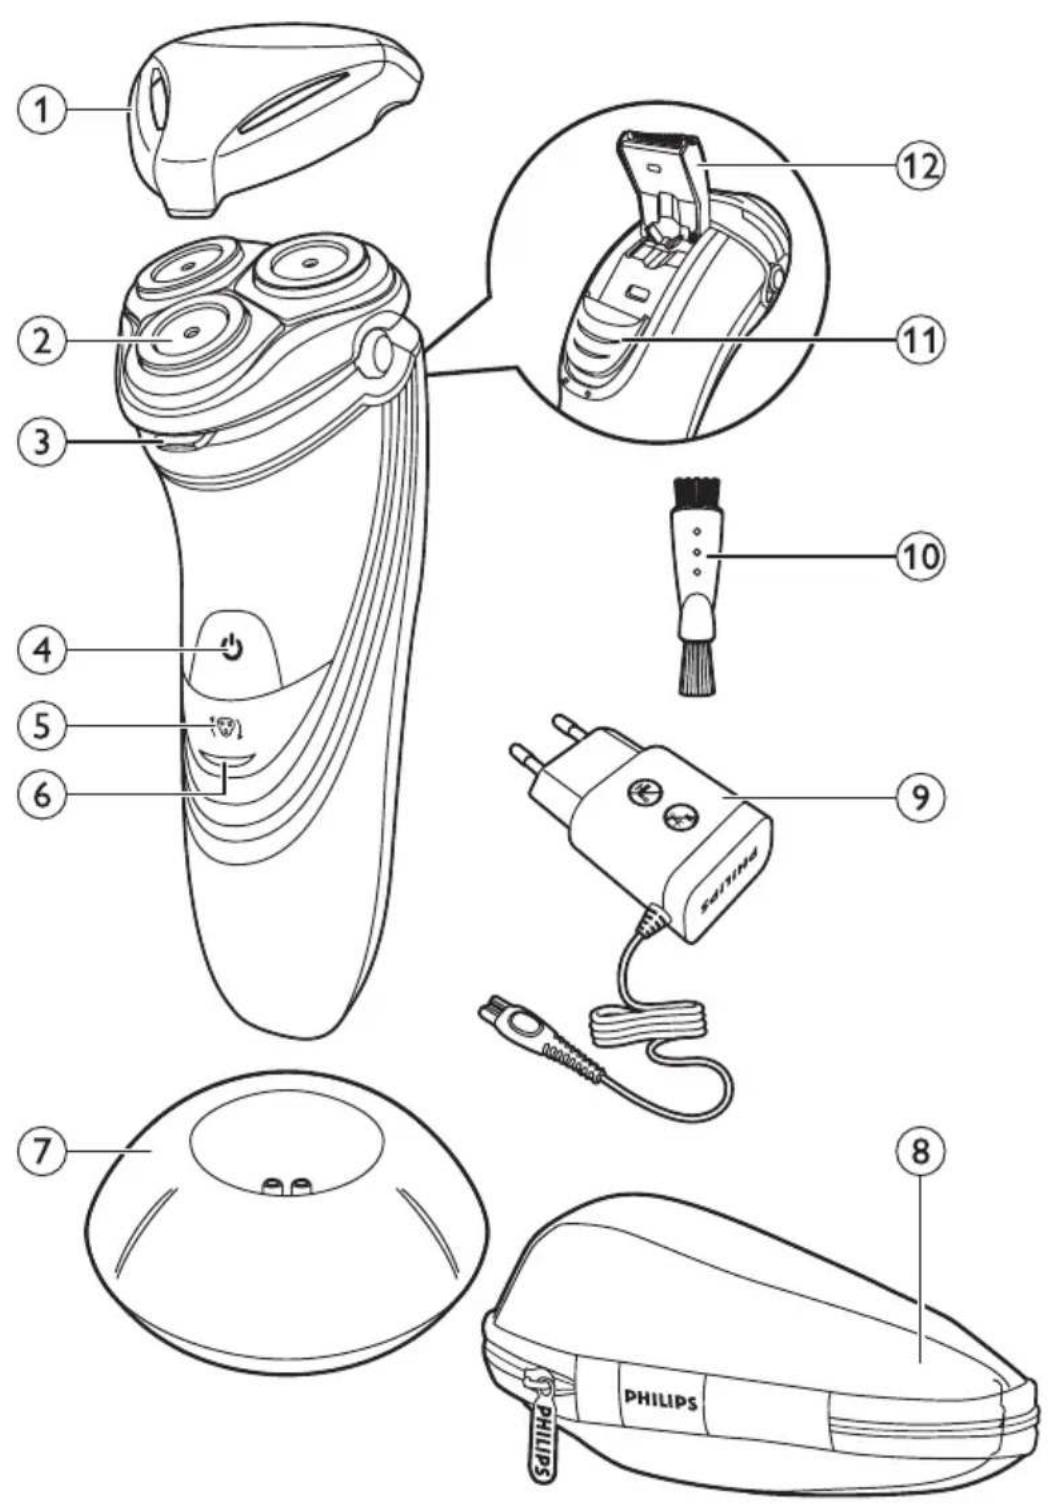
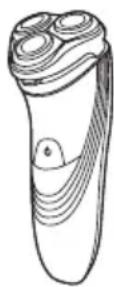
General description (Fig. 1)
1 Protection cap
2 Shaving unit
3 Shaving unit release button
4 Shaver on/off button
5 Shaving head symbol
6 Charging light
7 Charging stand (PT866*/PT739*)
8 Pouch (PT866*)
9 Adapter
10 Cleaning brush
11 Trimmer release slide (PT919/PT866/PT860/PT845/PT739/PT737/PT731 only)
12 Trimmer (PT919/PT866/PT860/PT845/PT739/PT737/PT731 only)
Note: You can find the type number on the back of the shaver.
* only for UK, Holland, Germany, France, Turkey, Sweden, Finland, Norwegia, Denmark, Italy, Portugal, Spain and Greece.
Important
Read this user manual carefully before you use the appliance and save it for future reference.
Danger
- Keep the adapter dry.
Warning
- The adapter contains a transformer. Do not cut off the adapter to replace it with another plug, as this causes a hazardous situation.
- The appliance is not intended for use by persons (including children) with reduced physical, sensory or mental capabilities, or lack of experience and knowledge, unless they have been given supervision or instruction concerning use of the appliance by a person responsible for their safety.
- Children should be supervised to ensure that they do not play with the appliance.
- Always unplug the shaver before you clean it under the tap.


Caution
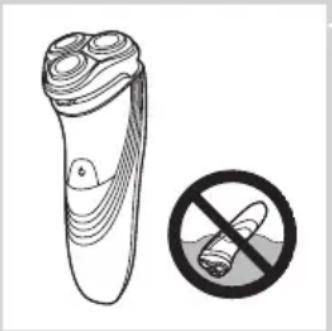
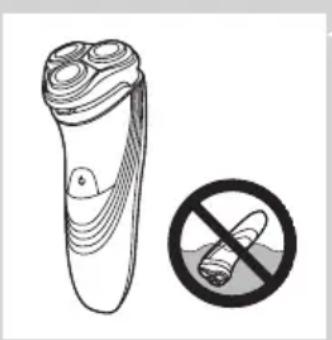
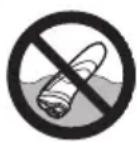
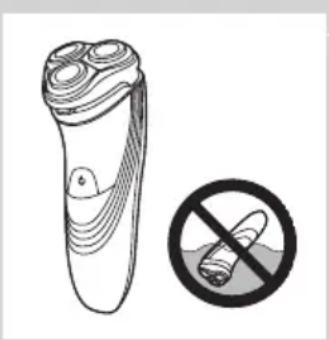
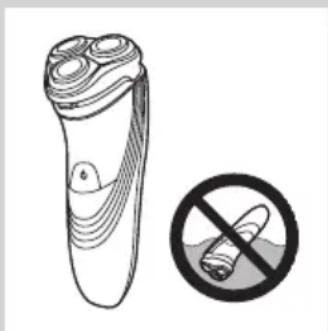
- Never immerse the shaver in water.
- Do not use the shaver in the bath or in the shower.
- Never use water hotter than 80° C to rinse the shaver.
- Be careful with hot water. Always check if the water is not too hot, to prevent your hands from getting burnt.
- The shaver is not dishwasher-proof.
- Water may leak from the socket at the bottom of the shaver when you rinse it. This is normal and not dangerous because all electronics are enclosed in a sealed power unit inside the shaver.
- Do not use the shaver, adapter or any other part if it is damaged, as this may cause injury. Always replace a damaged adapter, charger or part with one of the original type.
- Use, charge and store the appliance at a temperature between 10° C and 35° C.
- Always place and use the shaver on a surface that is fluid-resistant.
- Only use the adapter, charger and accessories supplied.
- Always put the protection cap on the shaver to prevent damage and to avoid dirt accumulation in the shaving heads.

Compliance with standards
- This Philips appliance complies with all standards and regulations regarding exposure to electromagnetic fields (EMF) and can be safely cleaned under the tap.
General
- The appliance is equipped with an automatic voltage selector and is suitable for mains voltages ranging from 100 to 240 volts.
- The adapter transforms 100-240 volts to a safe low voltage of less than 24 volts.
Charging
PT919/PT866/PT860: It takes approx. 1 hour to fully charge the shaver. PT845/PT739/PT737/PT731/PT730//PT727/PT726/PT725/PT721/PT720/ PT719: It takes approx. 8 hours to fully charge the shaver. When you charge the shaver for the first time or after a long period of disuse, let it charge until the charging light lights up continuously. A fully charged shaver provides up to 50 (PT919/PT866/PT860) or up to 45 shaving minutes (PT845/PT739/PT737/PT731/PT730//PT727/PT726/ PT725/PT721/PT720/PT719). The shaving time may be less than 50 (PT919/PT866/PT860) or 45 shaving minutes (PT845/PT739/PT737/PT731/PT730//PT727/PT726/PT725/ PT721/PT720/PT719) as a result of your shaving behaviour, your cleaning habits or your beard type.
Charge indications
Battery low
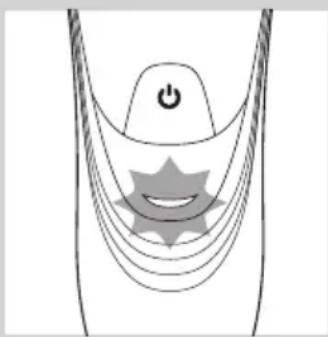
- When the battery is almost empty (when there are only 5 or fewer shaving minutes left), the charging light starts to flash orange.
- When you switch off the shaver, the charging light continues to flash orange for a few seconds.
Quick charging
- When you start charging the empty battery, the charging light alternately flashes orange and green. After approx. 3 minutes, the charging light continues to flash green. The shaver now contains enough energy for a 5-minute shave.
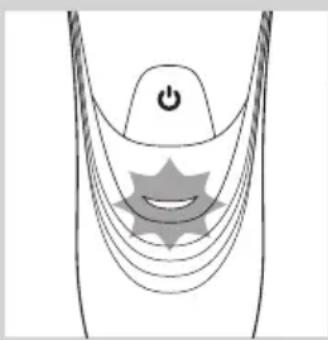
Charging
- When the shaver is charging, the charging light flashes green.
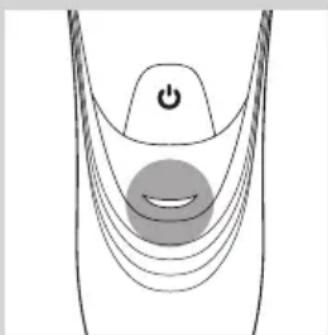
Battery fully charged
- When the battery is fully charged, the charging light lights up green continuously.
Note: After approx. 30 minutes, the charging light goes out to save energy.
Charging with the adapter
1 Put the small plug in the shaver.
2 Put the adapter in the wall socket.
The charging light shows the charging status of the shaver (see section ‘Charge indications’ in this chapter).
Charging in the charging stand (PT866/PT739 only)
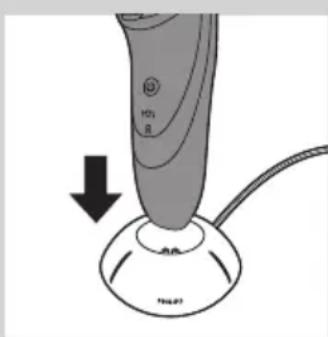
1 Put the small plug in the charging stand.
2 Put the adapter in the wall socket.
3 Place the shaver in the charging stand.
The charging light shows the charging status of the shaver (see section ‘Charge indications’ in this chapter).
Using the shaver
Note: You can also use the shaver directly from the mains. Simply connect the shaver to the mains.
Shaving

1 Press the on/off button once to switch on the shaver.
2 Move the shaving heads over your skin. Make circular movements.
- Your skin may need 2 or 3 weeks to get accustomed to the Philips shaving system.
3 Press the on/off button once to switch off the shaver.
4 Clean the shaver (see chapter ‘Cleaning and maintenance’).
Trimming (PT919/PT866/PT860/PT845/PT739/PT737/PT731 only)
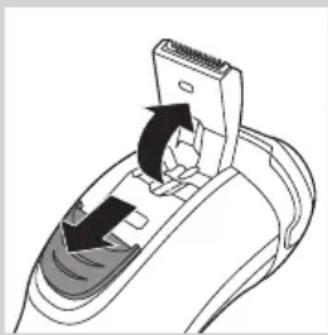
You can use the trimmer to groom your sideburns and moustache.
1 Press the on/off button once to switch on the shaver.
2 Push the trimmer slide downwards to open the trimmer.
▶You can now start trimming.
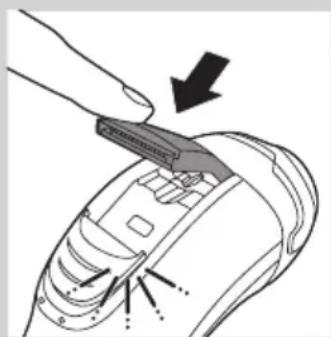
3 After trimming, close the trimmer and switch off the shaver.
Cleaning and maintenance
Never use compressed air, scouring pads, abrasive cleaning agents or aggressive liquids such as petrol or acetone to clean the appliance.
- Clean the shaver after every shave for optimal shaving performance.
- Regular cleaning guarantees better shaving performance.
- For the best cleaning results, we advise you to use the Philips Cleaning spray (HQ110).
- Be careful with hot water. Always check if the water is not too hot, to prevent your hands from getting burnt.
Note: Water may leak from the socket at the bottom of the shaver when you rinse it. This is normal and not dangerous because all electronics are enclosed in a sealed power unit inside the shaver.
Cleaning the shaving unit under the tap
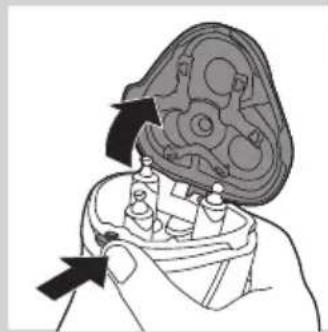
1 Switch off the shaver and disconnect it from the mains.
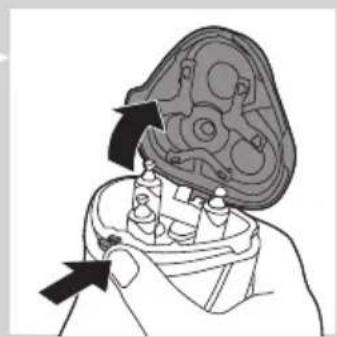
2 Press the release button to open the shaving unit.
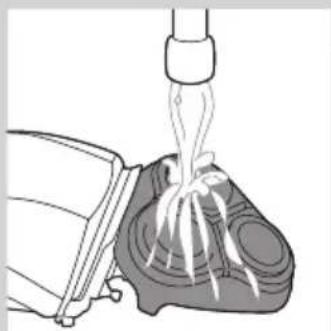
3 Rinse the shaving unit and hair chamber under a hot tap for 30 seconds.
Be careful with hot water. Always check if the water is not too hot, to prevent your hands from getting burnt.
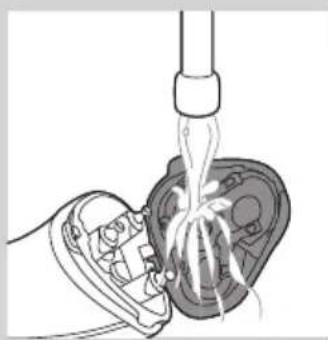
- Rinse the hair chamber and the inside of the shaving unit.
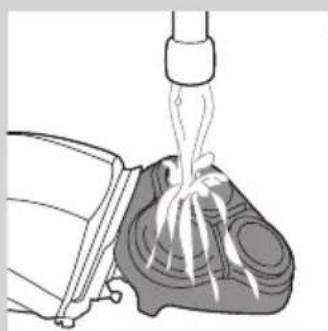
- Rinse the outside of the shaving unit.
4 Close the shaving unit and shake off excess water.
Be careful not to hit the shaving unit against anything while shaking off excess water.
Never dry the shaving unit and the hair chamber with a towel or tissue, as this may damage the shaving heads and the coupling spindles.
5 Open the shaving unit again and leave it open to let the shaver dry completely.
Cleaning the shaving unit with the cleaning brush
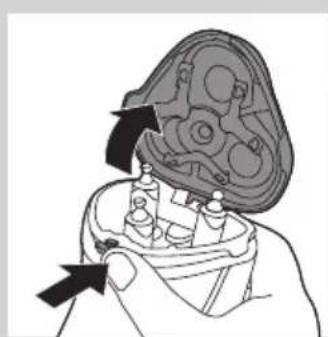
1 Switch off the shaver and disconnect it from the mains.
2 Press the release button to open the shaving unit.
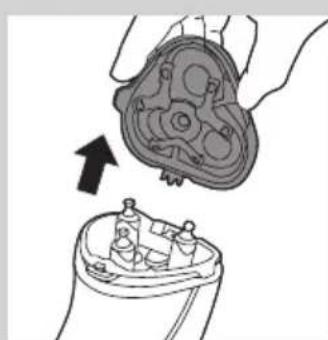
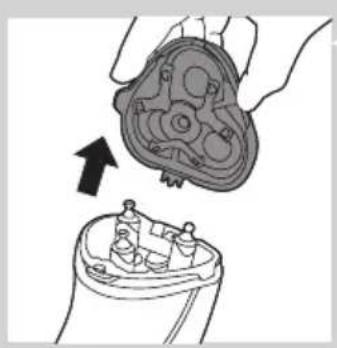
3 Pull the shaving unit off the shaver.

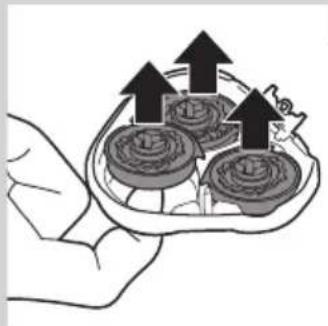
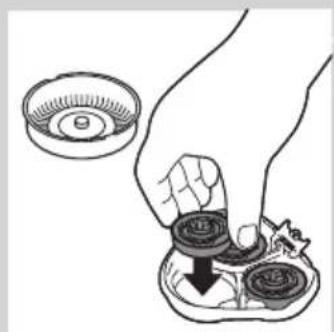
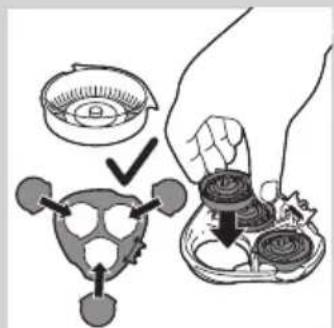
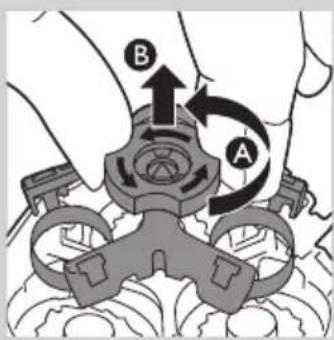
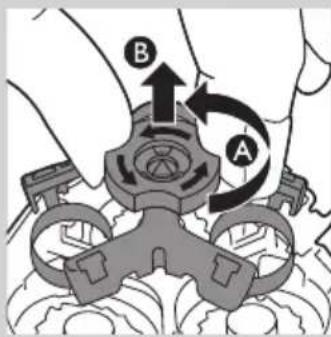
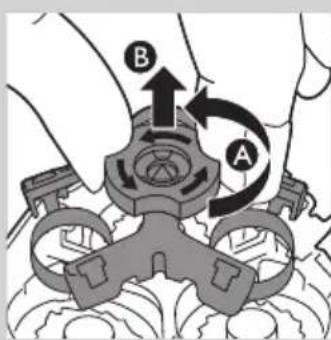
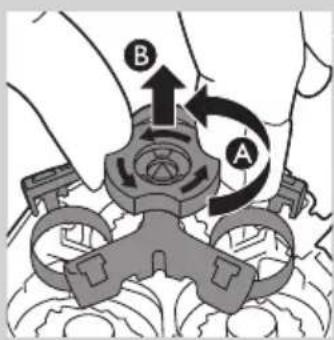
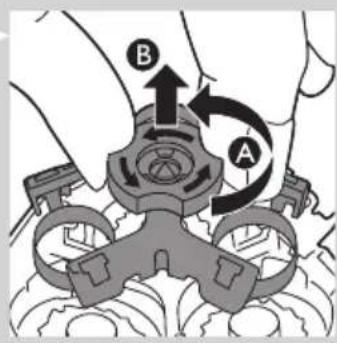
4 Turn the lock anticlockwise (A) and remove the retaining frame (B).
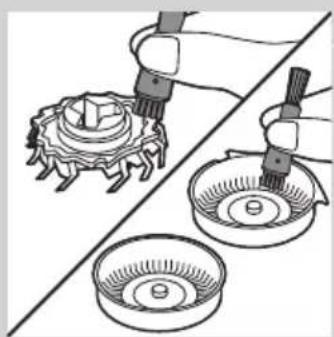
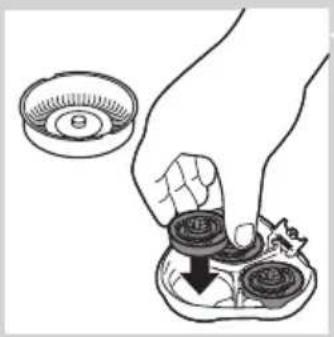
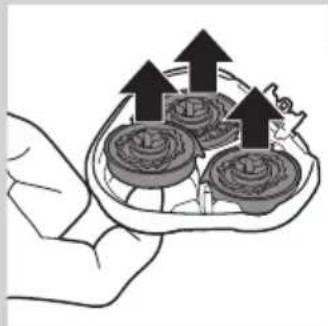
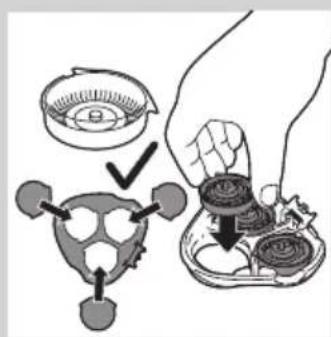
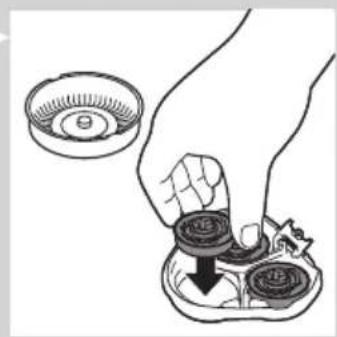
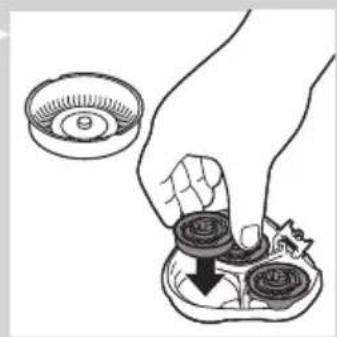
5 Remove and clean one shaving head at a time. Each shaving head consists of a cutter and a guard.
Note: Do not clean more than one cutter and guard at a time, since they are all matching sets. If you accidentally mix up the cutters and guards, it may take several weeks before optimal shaving performance is restored.
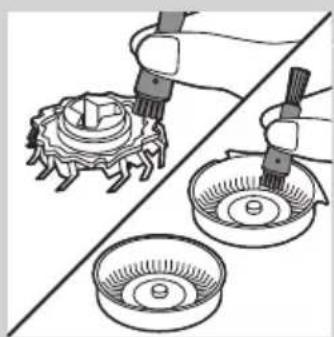
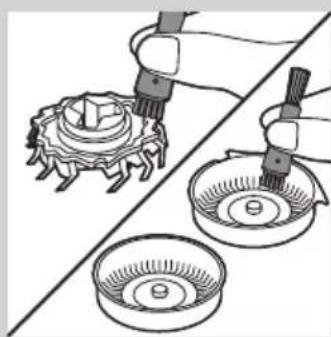
- Remove the cutter from the shaving guard and clean it with the brush.
- Clean the inside and outside of the shaving guard with the brush.
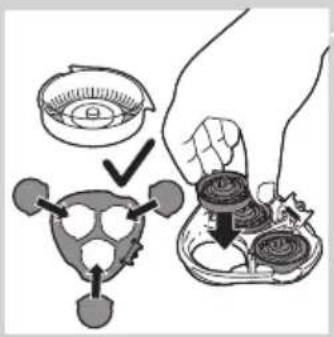
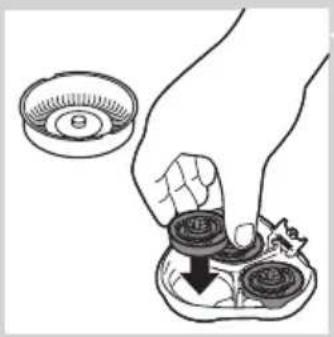
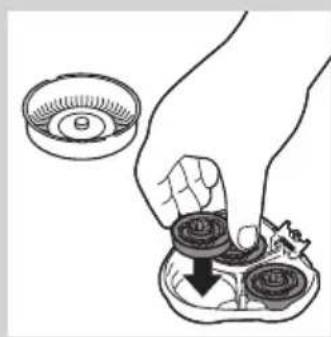
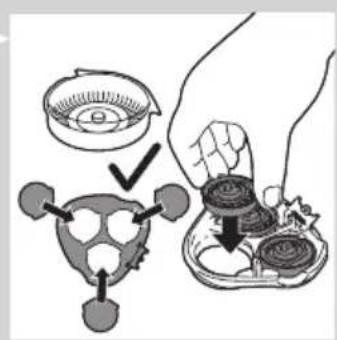
6 Put the shaving heads back into the shaving unit.
Note: Make sure that the projections of the shaving heads fit exactly into the recesses.
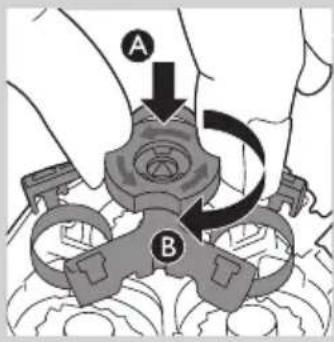
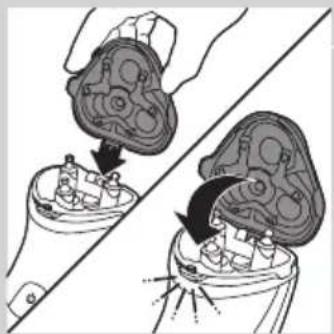
7 Put the retaining frame back into the shaving unit (A) and turn the lock clockwise (B).
8 Insert the lug of the shaving unit into the slot in the top of the shaver. Then close the shaving unit.
Note: If the shaving unit does not close smoothly, check if you have inserted the shaving heads properly and if the retaining frame is locked.
Cleaning the trimmer with the cleaning brush (PT919/PT866/PT860/PT845/PT739/PT737/PT731 only)

Clean the trimmer every time you have used it.
1 Switch off the shaver and disconnect it from the mains.
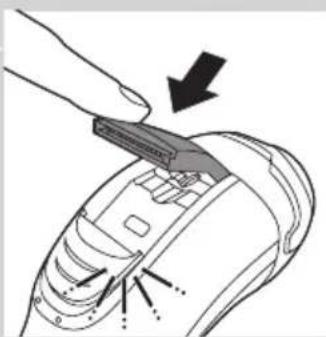
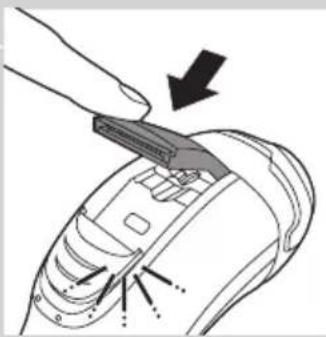
2 Push the trimmer slide downwards to open the trimmer.

3 Clean the trimmer with the short-bristled side of the cleaning brush. Brush up and down along the trimmer teeth.
4 Close the trimmer ('click').

Tip: For optimal trimming performance, lubricate the trimmer teeth with a drop of sewing machine oil every six months.
Storage
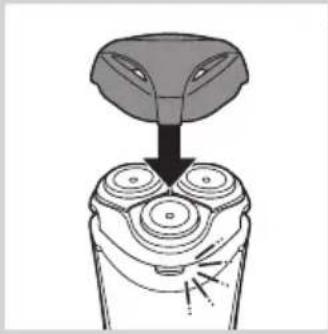
- Put the protection cap on the shaver after use to prevent damage and to avoid dirt accumulation in the shaving heads.
- PT866 only: Store the appliance and the accessories in the pouch.
Replacement
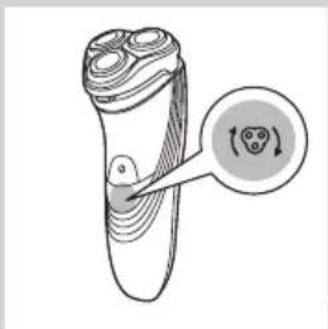
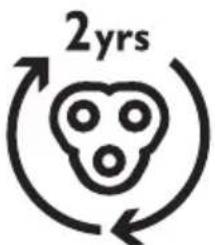
For maximum shaving performance, we advise you to replace the shaving heads every two years.
Replacement reminder
The shaving head symbol will light up to indicate that the shaving heads need to be replaced. Replace damaged shaving heads right away. Only replace the shaving heads with original HQ8 or HQ9 (PT919 only) Philips Shaving Heads.

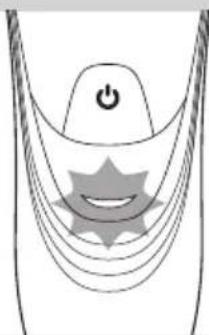
1 The shaving head symbol lights up orange continuously.
2 Switch off the shaver. Disconnect the shaver from the mains.
3 Press the release button to open the shaving unit.
4 Pull the shaving unit off the shaver.

5 Turn the lock anticlockwise (A) and remove the retaining frame (B).
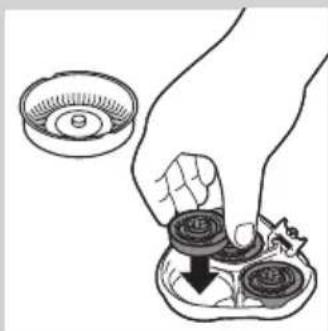
6 Remove the shaving heads and place new ones in the shaving unit.
ENGLISH12
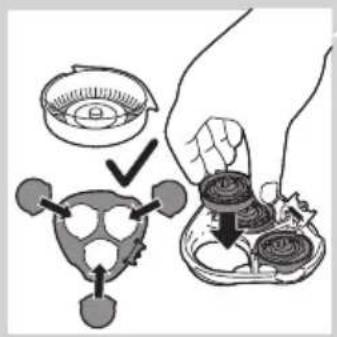
Note: Make sure that the projections of the shaving heads fit exactly into the recesses.

7 Put the retaining frame back into the shaving unit (A) and turn the lock clockwise (B).
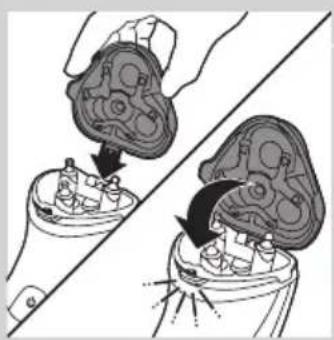
8 Insert the lug of the new shaving unit into the slot in the top of the shaver. Then close the shaving unit.
Note: If the shaving unit does not close smoothly, check if you have inserted the shaving heads properly and if the retaining frame is locked.
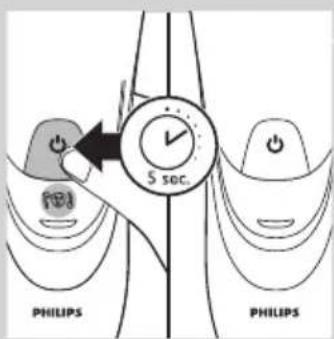
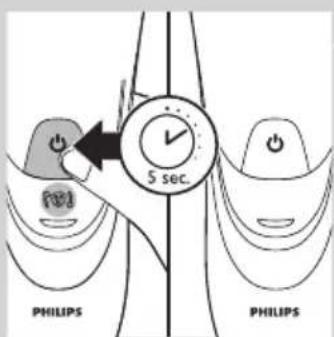
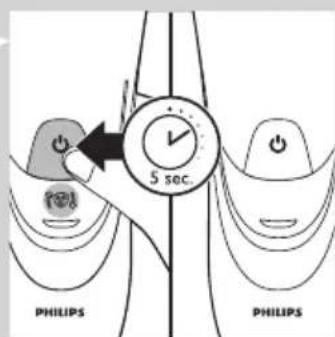
9 Press and hold the on/off button for 5 seconds to reset the replacement reminder on the shaver. The orange light goes out.
Accessories
To retain the top performance of your shaver, make sure you clean it regularly and replace its shaving heads at the recommended time.
Shaving heads
- We advise you to replace your shaving heads every two years. Always replace with HQ8 or HQ9 (PT919 only) Philips Shaving Heads
Cleaning
- Use Cleaning spray (HQ110) to clean the shaving heads thoroughly.
Environment

- Do not throw away the appliance with the normal household waste at the end of their life, but hand them in at an official collection point for recycling. By doing this, you help to preserve the environment.

- The built-in rechargeable shaver battery contains substances that may pollute the environment. Always remove the battery before you discard or hand in the shaver at an official collection point. Dispose of the battery at an official collection point for batteries. If you have trouble removing the battery, you can also take the appliance to a Philips service centre. The staff of this centre will remove the battery for you and will dispose of it in an environmentally safe way.
Removing the rechargeable shaver battery
Only remove the rechargeable battery when you discard the shaver. Make sure the rechargeable battery is completely empty when you remove it.
1 Disconnect the shaver from the mains.
2 Let the shaver run until it stops.
3 Undo the screws in the back of the shaver and in the hair chamber.
4 Remove the front panel and the back panel.
5 Bend the 6 hooks aside and take out the power unit.
Be careful, the hooks are sharp.
6 Remove the battery.
Be careful, the battery strips are sharp.
Do not connect the shaver to the mains again after you have removed the rechargeable battery.
Guarantee and support
If you need information or support, please visit www.philips.com/support or read the separate worldwide guarantee leaflet. If there is no Consumer Care Centre in your country, go to your local Philips dealer.
Guarantee restrictions
The shaving heads (cutters and guards) are not covered by the terms of the international guarantee because they are subject to wear.
Troubleshooting
This chapter summarises the most common problems you could encounter with the appliance. If you are unable to solve the problem with the information below, contact the Consumer Care Centre in your country.
Problem Possible cause Solution
| The shaver does not shave as well as it used to. | The shaving heads are damaged or worn. | Replace the shaving heads (see chapter ‘Replacement’). |
| Long hairs obstruct the shaving heads. | Clean the shaving heads one by one (see chapter ‘Cleaning and maintenance’). | |
| You have not inserted the shaving heads properly. | Make sure that the projections of the shaving heads fit exactly into the recesses (see chapter ‘Cleaning and maintenance’). | |
| The shaver does not work when I press the on/off button. | The rechargeable battery is empty. | Recharge the battery (see chapter ‘Charging’) or connect the shaver to the mains. |
| The temperature of the shaver is too high. In this case, the shaver does not work. | As soon as the temperature of the shaver has dropped sufficiently, you can switch on the shaver again. | |
| Water leaks from the shaver after cleaning. | This is normal and not dangerous. | During rinsing some water may collect between the power unit and the housing. After rinsing this water flows out through the socket. The power unit is completely watertight so water cannot reach the electronic parts of the shaver. Your shaver continues to be absolutely safe. |
Pendahuluan


Perhatian

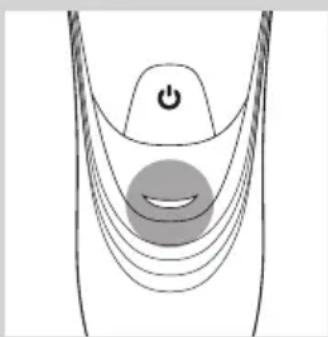
4 Putar kunci berlawanan arah jarum jam (A) lalu lepaskan bingkai penahannya (B).

6 Kembalikan kepala cukur ke dalam unit cukur.
5 Putar kunci berlawanan arah jarum jam (A) lalu lepaskan bingkai penahannya (B).
주의
기준 준수
충전
배터리 완전 충전




Awas
3 Selepas merapi, tutup perapi dan matikan pencukur.
4 Pusingkan kunci ke arah lawan jam (A) dan tanggalkan rangka penahan (B).

8 Masukkan cuping unit pencukur ke dalam ruang di bahagian atas pencukur. Kemudian tutup unit pencukur.
5 Pusingkan kunci ke arah lawan jam (A) dan tanggalkan rangka penahan (B).
8 Masukkan cuping unit pencukur baru ke dalam ruang di bahagian atas pencukur. Kemudian tutup unit pencukur.

แบตเตอรี่เหลือน้อย
การชาร์จแบตเตอรี่

Chú y
Pin đã được sạc đây





PT845/PT739/PT737/PT731/PT730//PT727/PT726/PT725/PT721/
電量不足
充電
- 電鬍刀充電時,充電指示燈閃爍綠光。
繁體中文72

電池充滿電
1 按一下開/關 (On/Off) 按鈕,開啟電鬍刀電源。
2 將鬢角刀開關往下推即可開啟鬢角刀。
這時即可開始修整。

- 清洗電鬍刀組的鬍渣室及內部。

- 沖洗電鬍刀組的外側。
4 蓋上電鬍刀組,並將多餘的水甩乾。
3 將電鬍刀組從電鬍刀抽出。
6 將電鬍刀刀頭裝回電鬍刀組。

每次使用鬢角刀後,請進行清潔。
注意
PT845/PT739/PT737/PT731/PT730//PT727/PT726/PT725/PT721/
电池电量不足
充电
电池已完全充满
您可使用修剪器修剪鬓角和小胡子。
- 冲洗胡茬储藏室和剃须刀头部件内部。
- 冲洗剃须刀头部件外侧。
4 关闭剃须刀头部件并甩掉多余的水份。
3 将剃须刀头部件拉出剃须刀。
- 用清洁刷里里外外清洁网罩。
6 将剃须刀头重新放入剃须刀头部件。
每次使用后都要清洁修剪器。
1 剃须刀头符号会呈橙色持续亮起。
2 关闭剃须刀。断开剃须刀的电源。
3 按下释放按钮,打开剃须刀头部件。
4 将剃须刀头部件拉出剃须刀。


(PT737/PT739/PT845/PT860/PT866/PT919/PT731) مردیک (FT737/PT739/PT845/PT860/PT866/PT919/PT731) مردیک (FT737/PT739/PT845/PT860/PT866/PT919/PT731) مردیک (FT737/PT739/PT845/PT860/HT919/PT731) مردیک (FT737/PT739/PT845/PT860/PT866/PT919/PT731) مردیک (FT737/PT739/PT845/PT860/PT866/PT919/PT731) مردیک (FT737/FT739/PT845/PT860/PT866/PT919/PT731) مردیک (FT737/FT739/PT845/PT860/PT866/PT919/PT731) مردیک (FT737/FT739/PT845/PT860/PT866/HT919/PT731) مردیک (FT737/FT739/PT845/PT860/PT866/PT919/PT731) مردیک (FT737/FT739/PT845/PT860/PT866/PT919/PT731) مردیک (FT737/PT739/PT845/PT860/PT866/PT919/PT731) مردیک (FT737/FT739/PT845/PT860/PT866/HT919/PT731) مردیک (FT737/FT739/PT845/PT860/PT866/HT919/PT731) مردیک (FT737/FT739/PT845/PT860/PT866/HT919/PT731) مردیک (FT737/ FT739 / PT845 / PT860 / PT866 / PT919 / PT731) مردیک (FT737 / PT845 / PT845 / PT860 / PT866 / PT919 / PT731) مردیک (FT737 / PT845 / PT845 / PT860 / PT866 / PT919 / PT731) مردیک (FT737 / PT845 / PT845 / PT860 / PT866 / PT91 9 / PT731) مردیک (FT737 / PT845 / PT845 / PT860 / PT866 / PT919 / PT731) مردیک (FT737 / PT845 / PT845 / PT860 / PT866 / PT919 / PT731) مردیک (FT737 / PT8 45 / PT845 / PT845 / PT860 / PT866 / PT919 / PT731) مردیک (FT737 / PT845 / PT845 / PT860 / PT866 / PT919 / PT731) مردیک (FT737 / PT845 / PT845 / PT860 / PT86 ) مردیک (FT737 / PT845 / PT845 / PT860 / PT866 / PT919 / PT731) مردیک (FT737 / PT845 / PT845 / PT860 / PT866 / PT919 / PT731) مردیک (FT737 / PT845 / PT845 | PT845 | PT845 | PT860 | PT866 | PT919 | PT731)
تميزکردن و نگهداری
استفاده ازريش تراش
شارژکردن
مقدمه
The image is too blurry to recognize any text content.


الملحقات



التنظيف والصيانة
(FT737/PT739/PT845/PT860/PT866/PT919/PT731) (FT737/PT739/PT845/PT860/PT866/PT919/PT731)
الشحن
:PT720/PT721/PT725/PT726/PT727/PT730/PT731/PT737/PT739/PT845;pr
.(PT720/PT721/PT725/PT726/PT727/PT730/PT731/PT737/PT739/PT845)
مقدمة
تنبيه
- ALWAYS HERE TO HELP YOU
- USER MANUAL
- PHILIPS
- INTRODUCTION
- GENERAL DESCRIPTION (FIG. 1)
- IMPORTANT
- DANGER
- WARNING
- CAUTION
- COMPLIANCE WITH STANDARDS
- GENERAL
- CHARGING
- CHARGE INDICATIONS
- BATTERY LOW
- QUICK CHARGING
- BATTERY FULLY CHARGED
- CHARGING WITH THE ADAPTER
- CHARGING IN THE CHARGING STAND (PT866/PT739 ONLY)
- USING THE SHAVER
- SHAVING
- TRIMMING (PT919/PT866/PT860/PT845/PT739/PT737/PT731 ONLY)
- CLEANING AND MAINTENANCE
- CLEANING THE SHAVING UNIT UNDER THE TAP
- CLEANING THE SHAVING UNIT WITH THE CLEANING BRUSH
- CLEANING THE TRIMMER WITH THE CLEANING BRUSH (PT919/PT866/PT860/PT845/PT739/PT737/PT731 ONLY)
- STORAGE
- REPLACEMENT
- REPLACEMENT REMINDER
- ENGLISH12
- ACCESSORIES
- SHAVING HEADS
- CLEANING
- ENVIRONMENT
- REMOVING THE RECHARGEABLE SHAVER BATTERY
- GUARANTEE AND SUPPORT
- GUARANTEE RESTRICTIONS
- TROUBLESHOOTING
- PENDAHULUAN
- PERHATIAN
- 주의
- 기준 준수
- 충전
- 배터리 완전 충전
- AWAS
- แบตเตอรี่เหลือน้อย
- การชาร์จแบตเตอรี่
- CHÚ Y
- PIN ĐÃ ĐƯỢC SẠC ĐÂY
- 電量不足
- 充電
- 繁體中文72
- 電池充滿電
- 注意
- 电池电量不足
- 充电
- 电池已完全充满
- (PT737/PT739/PT845/PT860/PT866/PT919/PT731) مردیک (FT737/PT739/PT845/PT860/PT866/PT919/PT731) مردیک (FT737/PT739/PT845/PT860/PT866/PT919/PT731) مردیک (FT737/PT739/PT845/PT860/HT919/PT731) مردیک (FT737/PT739/PT845/PT860/PT866/PT919/PT731) مردیک (FT737/PT739/PT845/PT860/PT866/PT919/PT731) مردیک (FT737/FT739/PT845/PT860/PT866/PT919/PT731) مردیک (FT737/FT739/PT845/PT860/PT866/PT919/PT731) مردیک (FT737/FT739/PT845/PT860/PT866/HT919/PT731) مردیک (FT737/FT739/PT845/PT860/PT866/PT919/PT731) مردیک (FT737/FT739/PT845/PT860/PT866/PT919/PT731) مردیک (FT737/PT739/PT845/PT860/PT866/PT919/PT731) مردیک (FT737/FT739/PT845/PT860/PT866/HT919/PT731) مردیک (FT737/FT739/PT845/PT860/PT866/HT919/PT731) مردیک (FT737/FT739/PT845/PT860/PT866/HT919/PT731) مردیک (FT737/ FT739 / PT845 / PT860 / PT866 / PT919 / PT731) مردیک (FT737 / PT845 / PT845 / PT860 / PT866 / PT919 / PT731) مردیک (FT737 / PT845 / PT845 / PT860 / PT866 / PT919 / PT731) مردیک (FT737 / PT845 / PT845 / PT860 / PT866 / PT91 9 / PT731) مردیک (FT737 / PT845 / PT845 / PT860 / PT866 / PT919 / PT731) مردیک (FT737 / PT845 / PT845 / PT860 / PT866 / PT919 / PT731) مردیک (FT737 / PT8 45 / PT845 / PT845 / PT860 / PT866 / PT919 / PT731) مردیک (FT737 / PT845 / PT845 / PT860 / PT866 / PT919 / PT731) مردیک (FT737 / PT845 / PT845 / PT860 / PT86 ) مردیک (FT737 / PT845 / PT845 / PT860 / PT866 / PT919 / PT731) مردیک (FT737 / PT845 / PT845 / PT860 / PT866 / PT919 / PT731) مردیک (FT737 / PT845 / PT845 | PT845 | PT845 | PT860 | PT866 | PT919 | PT731)
- تميزکردن و نگهداری
- استفاده ازريش تراش
- شارژکردن
- مقدمه
- THE IMAGE IS TOO BLURRY TO RECOGNIZE ANY TEXT CONTENT
- الملحقات
- التنظيف والصيانة
- (FT737/PT739/PT845/PT860/PT866/PT919/PT731) (FT737/PT739/PT845/PT860/PT866/PT919/PT731)
- الشحن
- مقدمة
- تنبيه
Brand : PHILIPS
Model : Series 3000 PT719
Category : Razor