
Zenmuse X4S - Camera DJI - Free user manual and instructions
Find the device manual for free Zenmuse X4S DJI in PDF.


| Product Type | Camera Gimbal for Drones |
| Compatible Drone Models | DJI Inspire 2 |
| Sensor | 1-inch CMOS, 20 Megapixels |
| Max Video Resolution | 4K (4096x2160) at 60fps |
| Still Image Resolution | 5472 x 3648 (20 MP) |
| Lens | 24mm f/2.8-11 (35mm equivalent) |
| Field of View | 84° |
| ISO Range | 100-12800 (photo), 100-6400 (video) |
| Shutter Speed | 1/8000 - 8 seconds |
| Dimensions | 125 x 90 x 102 mm |
| Weight | 253 g |
| Power Supply | Powered by drone (via cable) |
| Operating Temperature | -20°C to 40°C |
| Storage Temperature | -20°C to 45°C |
| Gimbal Stabilization | 3-axis (pitch, roll, yaw) |
| Controllable Range | Pitch: -90° to +30°, Yaw: ±300° |
| Max Image Bitrate | 100 Mbps |
| Supported File Formats | JPEG, DNG (RAW), MP4, MOV |
| Maintenance | Clean lens with soft cloth, store in dry environment |
| Safety | Secure mounting before flight, avoid water exposure |
| Spare Parts | Available from DJI authorized dealers |
| Repairability | Professional repair recommended |
Frequently Asked Questions - Zenmuse X4S DJI
User questions about Zenmuse X4S DJI
0 question about this device. Answer the ones you know or ask your own.
Ask a new question about this device
Download the instructions for your Camera in PDF format for free! Find your manual Zenmuse X4S - DJI and take your electronic device back in hand. On this page are published all the documents necessary for the use of your device. Zenmuse X4S by DJI.
USER MANUAL Zenmuse X4S DJI

Searching for Keywords
Search for keywords such as "battery" and "install" to find a topic. If you are using Adobe Acrobat Reader to read this document, press Ctrl+F on Windows or Command+F on Mac to begin a search.

Navigating to a Topic
View a complete list of topics in the table of contents.

Printing this Document
This document supports high resolution printing.
Read Before the First Flight
Legends

Warning Important Hints and Tips Reference

Using this manual
Read the following documents before using the ZENMUSE™ X4S.
- Zenmuse X4S Quick Start Guide 2.Zenmuse X4S User Manual
We recommend reading the Zenmuse X4S Quick Start Guide, especially its Disclaimer and Safety sections, to get familiar with all parts of the Zenmuse X4S. Refer to this Zenmuse X4S User Manual for detailed information.
Getting more information
Visit the following webpage for more information about the Zenmuse X4S.
http://www.dji.com/zenmuse-x4s

Contents
Read Before the First Flight 2
Legends 2
Using this manual 2
Getting more information 2
Contents 3
Product Profile 4
Introduction 4
In the Box 4
Overview 4
Installation 5
Read the information below before setting up your Zenmuse X4S 5
Supported Devices 5
Mounting the Zenmuse X4S to the aircraft 5
Mounting the Zenmuse X4S to the Inspire 2
Mechanical Range
Using the Remote Controller
DJI GO 4 App
Downloading
Launching the DJI GO 4 app
Camera Operation
Touch Interface
Basic Shooting
Taking Photos
Recording
Advanced Settings
Exposure Mode
Photo Styles
White Balance
List of Settings 10
Managing your Photos and Videos 11
Playback 11
Update Firmware 12
Method 1: Using the DJI Assistant 2 12
Method 2: Using the DJI GO 4 App 12
Appendix 12
Specifications 12
Product Profile
Introduction
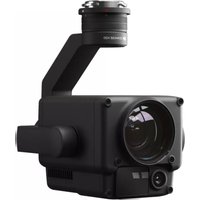
Featuring a 1-inch CMOS sensor and large pixels measuring 2.4μm per pixel, the Zenmuse X4S is capable of capturing 20 megapixel stills and capturing 11.6 stops of dynamic range. It can record 4K/60 H.264 and 4K/30 H.265 videos at a 100Mbps bitrate. A variety of shooting modes are available for a better shooting experience. 14 image Burst and AEB is available.
The Zenmuse X4S has an 8.8mm/F2.8-11 lens, which is compact with low distortion and a field of view of 84°.
When mounted on the INSPIRE™ 2, the 3-axis gimbal provides a stable platform for the camera to get clear shots even during rapid maneuvering. The gimbal tilts the camera across a -130° to +40° pitch angle and pans ±320° in both directions. Live HD video from the camera is streamed to the DJI GO™ 4 app.
In the Box
Check that all of the following items are in your package. If any item is missing, please contact DJI or your local dealer.
Zenmuse X4S ×1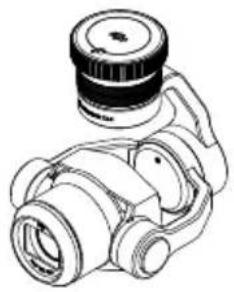
Carrying Case ×1
Document Quick Start Guide
Overview
Zenmuse X4S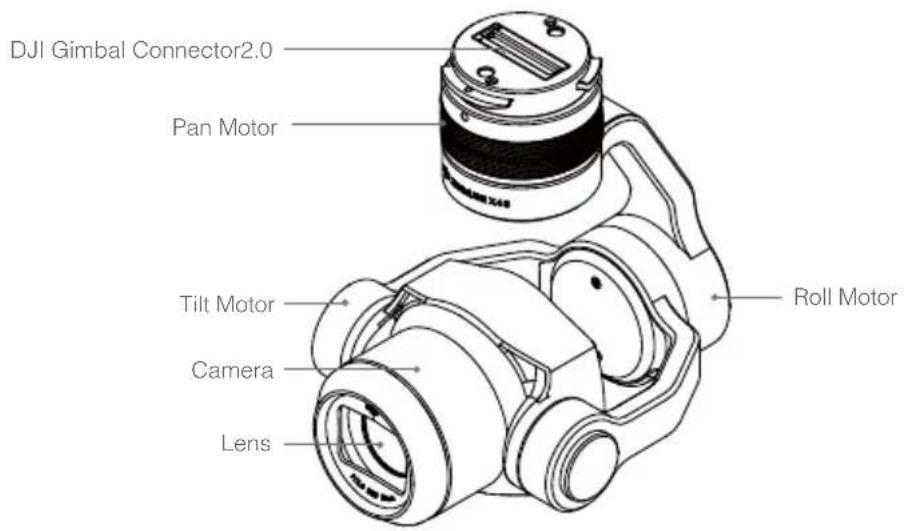
Installation
Read the information below before setting up your Zenmuse X4S.
Supported Devices
The Zenmuse X4S can be attached to the following device, and will be compatible with other DJI devices in the future.
DJI Inspire 2
Mounting the Zenmuse X4S to the aircraft
Mounting the Zenmuse X4S to the Inspire 2
Power off the aircraft before installation.
- Remove the camera body cap from the Zenmuse X4S.
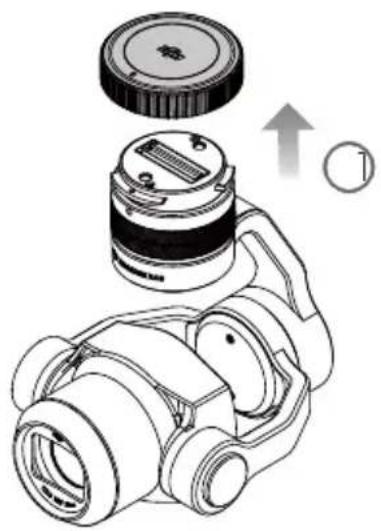
- Press the gimbal and the camera release button on the Inspire 2. Rotate to remove the Gimbal Cap from the Inspire 2.
- Align the white dot on the gimbal with the red dot on the Inspire 2 and insert the gimbal.
- Rotate the Gimbal Lock to the locked position (red dots aligned).

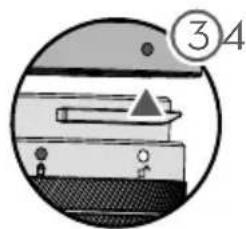
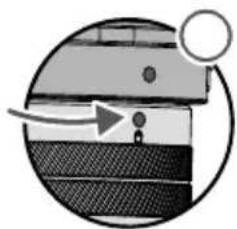


- Protect the Gimbal Connector 2.0 at all times.
- Always ensure that the Gimbal Connector 2.0 on the Inspire 2 is in the right position when mounting, otherwise the camera will not mount.
- DO NOT detach the Zenmuse X4S when the aircraft is powered on.
Mechanical Range
The 3-axis gimbal provides an incredibly stable and mobile platform for the camera system to capture completely smooth images and videos. The gimbal can tilt the camera up to 170 degrees, pan 320 degrees and roll 20 degrees in either direction.
Ground Level

• Take off from flat, open ground and protect the gimbal at all times.
Using the Remote Controller
Press the Shutter Button to capture photos or the Record Button to record videos. Adjust the camera's tilt using the left dial. Turn the right dial to adjust camera settings.
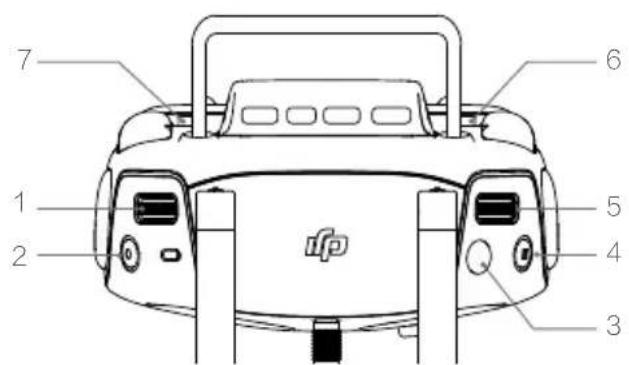
1. Left Dial
Scroll this dial to control tilt the gimbal. Scroll this dial while pressing C1 to control yaw the gimbal; Scroll this dial while pressing C2 to control tilt of the FPV.
2. Record Button
Press once to start video recording. Press again to stop recording.
3. Shutter Button
Press to take a photo. If burst mode is selected, the set number of photos will be taken with one press.
4. Intelligent Flight Pause Button
Press once to exit from TapFly™, ActiveTrack™ and Advanced modes.
5. Right Dial
Press once and then scroll to set camera settings. Re-activate this function after 10 seconds of no operation.
6. C2 Button
Set in DJI GO 4 app.
7. C1 Button
Set in DJI GO 4 app.
DJI GO 4 App
Downloading
Search for "DJI GO 4" in the App Store, or download at www.dji.com.
Launching the DJI GO 4 app
- Power on the remote controller and the aircraft.
- Connect the remote controller and your mobile device via a USB cable.

- Launch the DJI GO 4 app after connecting, and the live HD video stream will begin.
Camera Operation
Touch Interface
The touch interface can be used for capturing photos, recording videos and playback. Professional photography configurations are also available.

- Live HD Video
- Current Camera Settings
- Spot Metering/ Focus Switch
- AF/MF
- AE Lock
- Shutter/Record Switch
- MF Adjustment (in MF mode)
- Shutter/Record
- Gimbal Slider
- Photography Configurations and Parameter Settings
- Playback
- FPV (Tablets only)
Basic Shooting
Insert a supported Micro SD card into the Inspire 2 to activate still capturing and video recording. Refer to the Specifications for detailed information on supported Micro SD cards.
Taking Photos
You can start capturing in the following two ways:
DJI GO 4 App: Tap the Shutter/Record Switch to select Shutter 🔒. Tap the button 🔒 to take photos.
Remote Controller: Press the Shutter Button on the Remote Controller.
Single shooting is set by default. Choose from one of the shooting modes via the DJI GO 4 app. Tap "-> Photo
1. Multiple Mode
Take 3, 5, 7, 10, or 14 shots in a row.
2. AEB (Auto Exposure Bracketing)
Take 3 or 5 bracketed frames with ±0.7 EV steps for exposure compensation.
3. Timed Shot
Take photos in 2, 3, 5, 7, 10, 15, 20, 30 or 60 second intervals.
Recording
You can start recording in the following two ways:
DJI GO 4 App: Tap Shutter/Record Switch button to activate video recording mode ⚙, and then tap the button ●. Tap once to start recording video, then tap again to stop recording. The recording time length will be displayed below the Shutter/Record button.
Remote Controller: You can also press the Video Recording Button on the remote controller, which has the same function.
Advanced Settings
Exposure Mode
Tap → to choose from the exposure modes, including: Auto, Aperture Priority(A), Shutter Priority(S) M(Manual Exposure). By setting different EV values, a variety of exposure can be achieved in AUTO, S and A mode. ISO values can be set in all modes. When the aircraft is in P/S/A mode, you can choose to set the ISO automatically or manually.
1. Auto
The shutter speed and aperture are set automatically to obtain the correct exposure.
2. S(Shutter Priority)
Tap ➞ -● S. Set your desired shutter speed, while the camera chooses the aperture automatically. This mode is ideal for freezing action, creating motion blur or low-light shots.
3. A(Aperture Priority)
Tap ➞ - A. Set your required aperture, while the camera chooses the shutter speed automatically. This mode provides a wider depth of field and can be used to blur out backgrounds.
4. M (Manual Exposure)
In manual mode, set aperture, shutter speed, and ISO based on actual needs.
Photo Styles
Select different styles to capture photos with different sharpness, contrast levels, and saturation.
Tap “≡” -> ▶Style.
- Standard: A general-purpose style for most scenes.
- Landscape: The camera will focus on as much of the scene as possible using a large depth of field.
- Soft: Suitable for scenes with natural or soft colors.
- Custom: Sharpness, contrast, and saturation can be set separately. Sharpness: The photos will be softer with lower values and clearer with higher values. Contrast: Increasing the value will make images more dramatic. Saturation: Colors will lighten at lower values and darken at higher values.
White Balance
White balance (WB) is the process of removing unrealistic color casts. Correcting white balance can help avoid color casts, thereby improving photos under a wider range of lighting conditions. White balance can be set to a fixed value or a dynamic value automatically. Tap “≡” -> ▶White Balance.
1. Auto (AWB)
The camera adjusts the white balance automatically.
2. Sunny / Cloudy / Incandescent / Neon
Choose one of these modes if natural-looking colors cannot be achieved through photo styles.
3. Custom
Set a value to compensate for a specific light source.
List of Settings
| Photo | |
| Still Photography Modes | Single Shot, Multiple(3/5/7/10/14frames), AEB(3/5bracketed frames at 0.7EV bias), Timed Shot(2/3/5/7/10/15/20/30/60s) |
| Image Size 3:2, 4:3, 16:9 | |
| Image Format DNG,JPEG,DNG+JEPG | |
| White Balance | Auto(AWB), Sunny, Cloudy, Incandescent, Neon, Custom(2000K~10000K) |
| Style Standard, Landscape, Soft, Custom (Sharpness/Contrast/ Saturation) | |
| Color Ordinary, TrueColor, D-Cinelike, D-Log, Film Looks. | |
| Video | |
| Video Recording Modes | H.264C4K: 4096×2160 23.976/24/25/29.97/47.95/50/59.94p @100Mbps4K: 3840×2160 23.976/24/25/29.97/47.95/50/59.94p @100Mbps2.7K: 2720×1530 23.976/24/25/29.97p @80Mbps47.95/50/59.94p @100MbpsFHD: 1920×1080 23.976/24/25/29.97p @60Mbps47.95/50/59.94p @80Mbps 119.88p @100MbpsH.265C4K: 4096×2160 23.976/24/25/29.97p @100Mbps4K: 3840×2160 23.976/24/25/29.97p @100Mbps2.7K: 2720×1530 23.976/24/25/29.97p @65Mbps47.95/50/59.94p @80MbpsFHD: 1920×1080 23.976/24/25/29.97p @50Mbps47.95/50/59.94p @65Mbps 119.88p @100Mbps |
| Video Format MP4/ MOV (H.264/ H.265) | |
| NTSC/PAL PAL, NTSC | |
| White Balance | Auto(AWB), Sunny, Cloudy, Incandescent, Neon, Custom(2000K~10000K) |
| Style Standard, Landscape, Soft, Custom (Sharpness/Contrast/ Saturation) | |
Specifications
| Center Point | None, Circle, Cross, Narrow Cross, Square (No Center Point), Square (w.Center Point), Bracket(No Center Point), Bracket (w. Center Point) |
| Anti-Flicker Auto, 50Hz,60Hz | |
| Grid None, Grid Lines, Grid+Diagonals | |
| File Index Mode Reset, Continuous | |
| Smart Arm LEDs Off, Front LEDs Auto Turn Off, Turn off Back LEDs, Turn off Arm LEDs | |
| Other | Histogram, Video Caption, Over Exposure Warning, AF Focus Assistant, MF Focus Assistant, Lens Profile, Calibration*, Reset Camera Settings, Format SD Card |
* Manual lens calibration is required when used for the first time. Incorrect calibration will result in an inability to focus to infinity. Calibrate the camera in the camera setting page in the DJI GO app.
Managing your Photos and Videos
Playback
You can playback your videos and photos in the following ways:
DJI GO 4 App: Tap the playback button in the DJI GO 4 app ▶ to review photos and videos that you have captured. Press the same button again to return to capture images.

Photos and videos are saved in the Micro SD card.
Update Firmware
The firmware of the Zenmuse X4S should be updated together with the Inspire 2. Using an Inspire 2 with the Zenmuse X4S mounted as an example.
Method 1: Using the DJI Assistant™ 2
- Power on the Intelligent Flight Battery, and toggle the USB Mode Switch down.
- Connect the Inspire 2 and the PC via the USB cable (with double A ports).
- Launch DJI Assistant 2 and log in with a DJI account.
- Click Inspire 2 and then the firmware update button.
- Select the required firmware version.
- DJI Assistant 2 will download and upgrade the firmware automatically.
- Restart the aircraft after the firmware upgrade is complete.
Method 2: Using the DJI GO 4 App
- Power on the Intelligent Flight Battery and toggle the USB Mode Switch up.
- Connect the aircraft and your mobile device using an appropriate USB cable.
- Follow the on-screen instructions in the DJI GO 4 app to upgrade. Connect to the Internet when downloading firmware.
- Restart the aircraft after the firmware upgrade is complete.

- During the update, the aircraft will beep steadily. Then the beep will alternate between a longer beep and a quick double beep once the update is complete. Restart the aircraft after the firmware update is complete.
- If the warning sound turns into a long beep, retry the update.
- The battery level should be above 30% for the firmware update process.
- When using the DJI GO 4 app to update, you may disconnect the aircraft and the mobile device once the update is more than 30% completed. No Internet connection is required.
Appendix
Specifications
General
Name Zenmuse X4S
Dimensions 125 mm (W) × 100 mm (H) × 80 mm (D)
Weight Approx. 253 g
Operating Temperature Range -4° to 104°F (-20° to 40°C)
Storage Temperature -4° to 140°F (-20° to 60°C)
Camera
Lens F/2.8-11, 8.8mm (35mm format equivalent: 24mm)
Sensors 1 inch CMOS Sensor
| Effective Pixels 20MP | |
| Image Size 3:2, 4:3, 16:9 | |
| ISO Range | Photo:100-25600Video:100-6400 |
| Shutter Speed* | Mechanical Shutter Speed: 8 – 1/2000 sElectric Shutter Speed: 1/2000 s -1/8000 s |
| FOV 84° | |
| Still Photography Modes | Single Shot, Multiple(3/5/7/10/14frames), AEB(3/5bracketed frames at 0.7EV bias), Timed Shot(2/3/5/7/10/15/20/30/60s) |
| Video Recording Modes | H.264C4K: 4096×2160 23.976/24/25/29.97/47.95/50/59.94p @100Mbps4K: 3840×2160 23.976/24/25/29.97/47.95/50/59.94p @100Mbps2.7K: 2720×1530 23.976/24/25/29.97p @80Mbps47.95/50/59.94p @100MbpsFHD: 1920×1080 23.976/24/25/29.97p @60Mbps47.95/50/59.94p @80Mbps 119.88p @100MbpsH.265C4K: 4096×2160 23.976/24/25/29.97p @100Mbps4K: 3840×2160 23.976/24/25/29.97p @100Mbps2.7K: 2720×1530 23.976/24/25/29.97p @65Mbps47.95/50/59.94p @80MbpsFHD: 1920×1080 23.976/24/25/29.97p @50Mbps47.95/50/59.94p @65Mbps 119.88p @100Mbps |
| Max. Bitrate 100 Mpbs | |
| Image Format DNG, JPEG, DNG+JEPG | |
| Video Format MP4/ MOV (H.264/ H.265) | |
| Supported Micro SD Cards(Insert into the aircraft) | Sandisk Extreme 32GB UHS-3 MICROSDHC Sandisk Extreme 64GB UHS-3 MICROSDXC Panasonic 32GB UHS-3 MicroSDHC Panasonic 64GB UHS-3 MicroSDXC Samsung PRO 32GB UHS-3 MicroSDHC Samsung PRO 64GB UHS-3 MicroSDXC Samsung PRO 128GB UHS-3 MicroSDXC |
| Gimbal | |
| Angular Vibration Range ±0.01° | |
| Mount Detachable | |
| Controllable Range Tilt: -130° to +40°;Pan: ±320° ;Roll: ±20° | |
| Max Controllable Speed Tilt: 180° / s;Pan: 270° / s;Roll: 180° / s | |
* Users may disable the mechanical shutter inside DJI GO 4 app. When the mechanical shutter is disabled, the electric shutter speed range will be from 1/8000s to 8s.
Zenmuse X4S does not support file storage. Please save your photos and videos in the Micro SD card inserted in the aircraft.
This content is subject to change.
Download the latest version from
http://www.dji.com/zenmuse-x4s
If you have any questions about this document, please contact DJI by sending a message to DocSupport@dji.com.

- SEARCHING FOR KEYWORDS
- NAVIGATING TO A TOPIC
- PRINTING THIS DOCUMENT
- READ BEFORE THE FIRST FLIGHT
- LEGENDS
- USING THIS MANUAL
- GETTING MORE INFORMATION
- CONTENTS
- PRODUCT PROFILE
- INSTALLATION
- DJI GO 4 APP
- CAMERA OPERATION
- APPENDIX
- INTRODUCTION
- IN THE BOX
- OVERVIEW
- SUPPORTED DEVICES
- MOUNTING THE ZENMUSE X4S TO THE INSPIRE
- MECHANICAL RANGE
- USING THE REMOTE CONTROLLER
- LEFT DIAL
- RECORD BUTTON
- SHUTTER BUTTON
- INTELLIGENT FLIGHT PAUSE BUTTON
- RIGHT DIAL
- C2 BUTTON
- C1 BUTTON
- DOWNLOADING
- LAUNCHING THE DJI GO 4 APP
- TOUCH INTERFACE
- BASIC SHOOTING
- TAKING PHOTOS
- MULTIPLE MODE
- AEB (AUTO EXPOSURE BRACKETING)
- TIMED SHOT
- RECORDING
- ADVANCED SETTINGS
- EXPOSURE MODE
- AUTO
- S(SHUTTER PRIORITY)
- A(APERTURE PRIORITY)
- M (MANUAL EXPOSURE)
- PHOTO STYLES
- WHITE BALANCE
- AUTO (AWB)
- SUNNY / CLOUDY / INCANDESCENT / NEON
- CUSTOM
- MANAGING YOUR PHOTOS AND VIDEOS
- PLAYBACK
- UPDATE FIRMWARE
- METHOD 1: USING THE DJI ASSISTANT™
- METHOD 2: USING THE DJI GO 4 APP
- SPECIFICATIONS
- GENERAL
- CAMERA
Brand : DJI
Model : Zenmuse X4S
Category : Camera