
TR 60 LCD - Glue gun Reka - Free user manual and instructions
Find the device manual for free TR 60 LCD Reka in PDF.


| Product Type | Hot Glue Gun with LCD Display |
| Brand | Reka |
| Model | TR 60 LCD |
| Power Supply | 100-240V AC, 50/60Hz |
| Power Consumption | 60 W |
| Temperature Range | 80°C – 200°C (176°F – 392°F) |
| Temperature Control | Adjustable with LCD display |
| Glue Stick Diameter | 11 mm (0.43 inches) |
| Glue Stick Length | Up to 200 mm (7.9 inches) |
| Preheat Time | Approximately 3-5 minutes |
| Flow Rate | 10-20 g/min (adjustable) |
| Stand | Integrated folding stand |
| Nozzle Type | Precision tip, interchangeable |
| Dimensions (L x W x H) | 200 x 50 x 180 mm (7.9 x 2.0 x 7.1 inches) |
| Weight | 350 g (12.3 oz) |
| Cable Length | 1.5 m (4.9 ft) |
| Safety Features | Overheat protection, silicone nozzle cover, auto shut-off after 30 min idle |
| Maintenance | Clean nozzle with a damp cloth when hot; allow to cool before storage |
| Spare Parts Available | Nozzles, heating element, fuse |
| Repairability | Replaceable heating element and fuse; user-serviceable |
| Certifications | CE, RoHS |
Frequently Asked Questions - TR 60 LCD Reka
User questions about TR 60 LCD Reka
0 question about this device. Answer the ones you know or ask your own.
Ask a new question about this device
Download the instructions for your Glue gun in PDF format for free! Find your manual TR 60 LCD - Reka and take your electronic device back in hand. On this page are published all the documents necessary for the use of your device. TR 60 LCD by Reka.
USER MANUAL TR 60 LCD Reka
Product Manual for Pneumatic Reka Glue Guns

Table of Contents
Product Description 1
General Safety Instructions 2
Safety Measures during Operation 3
Start-up and Control 4
Cleaning and Maintenance 8
Trouble-Shooting 10
Environmental Protection 11
Additional Information 11
EU Declaration of Conformity 12
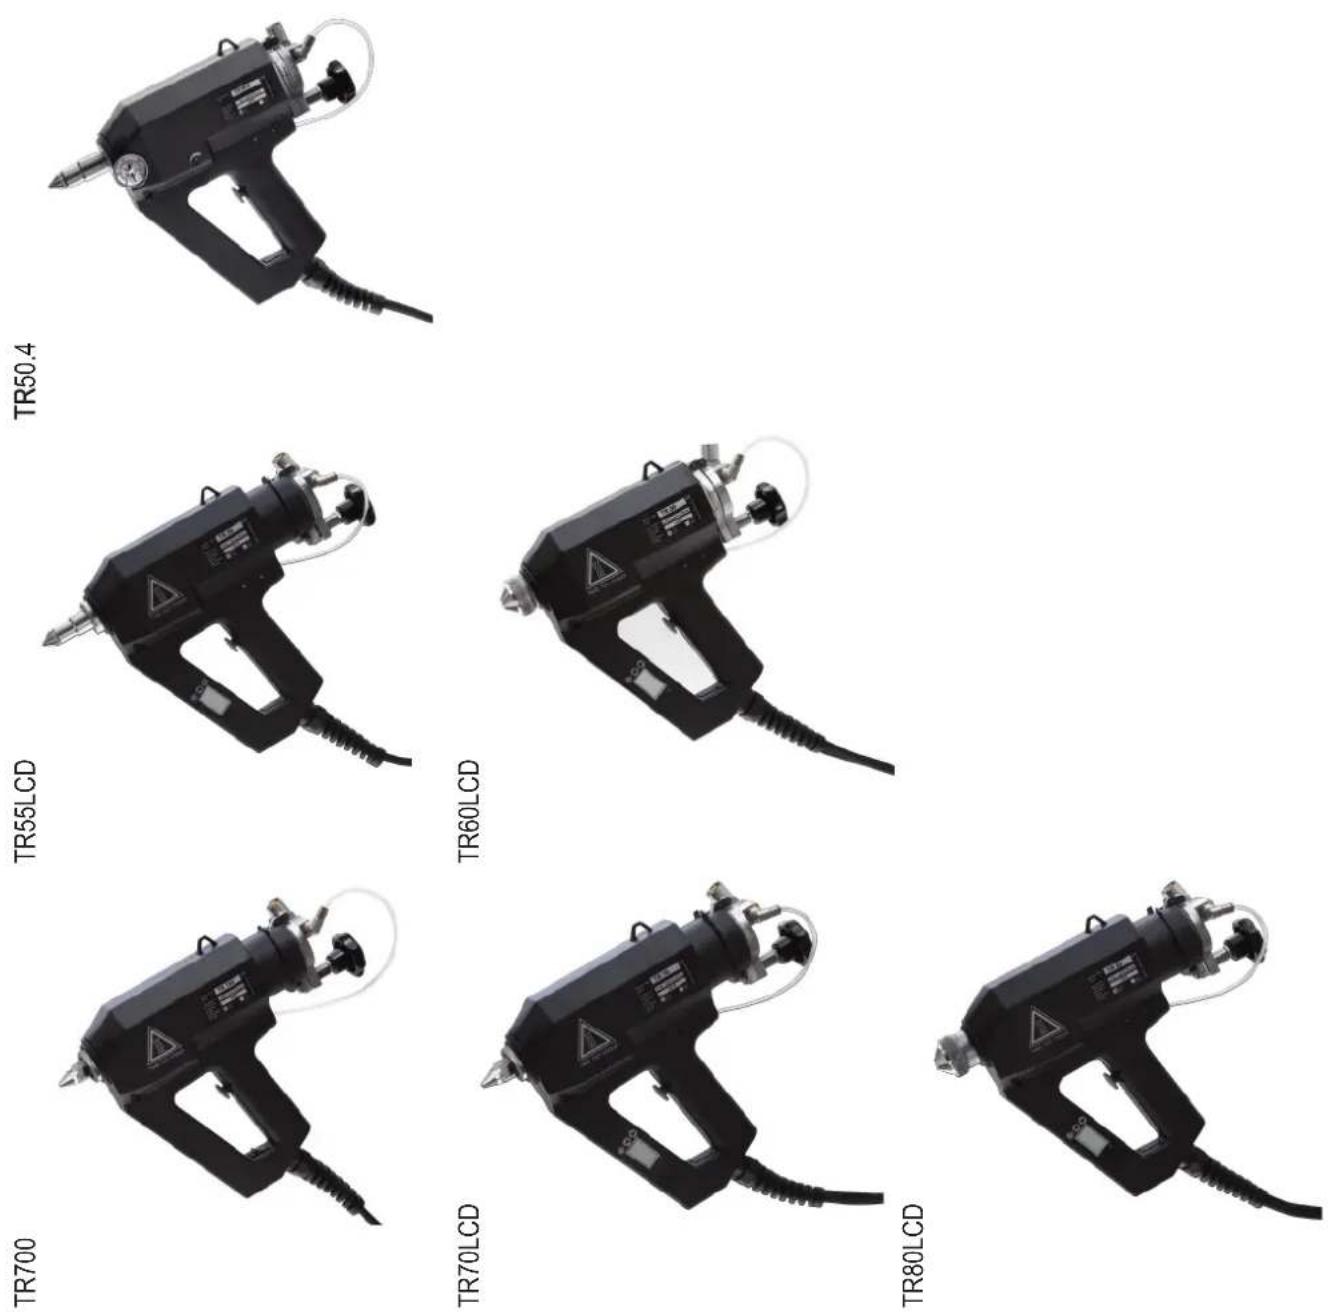
Spare Parts | Technical Specifications | Accessories
TR50.414
TR55LCD/HT16
TR60LCD/HT18
TR700
20
TR70LCD/HT22
TR80LCD/HT24
Product Description
Dear customer,
The glue applicator you purchased will help you to glue parts together more easily and more rapidly. To ensure optimum usage of the glue applicator, we recommend that you read these instructions thoroughly before using the applicator for the first time.
The type of your applicator can be taken from the nameplate fitted to the side of the casing.

Eggenstein-Leopoldshafen, March 1st 2016
Intended Use
The applicator works with hot glue which is dispensed by a pneumatic conveying system. It is suitable for hotmelt from 2.000 - 15.000 mPas*. The glue applicator should only be used by trained, instructed and authorized persons who have been familiarized with its proper use and the safety precautions. Handling the applicator properly will avoid unnecessary accident hazards and problems. Bodily injury or material damage caused by not using the glue applicator as intended shall not be the manufacturer's, but the user's responsibility.
*less than 2.000 and more than 15.000 mPas possible with limitations.
General Safety Instructions
Care and Diligence of the User
The glues applied to the design and fabricated conformity with the applicable harmonized standards and additional technical specifications. So, it is state of the art and ensures maximum safety. This safety, however, can only be achieved in the operational practice, if all then necessary measures are taken. The user of the equipment shall be obliged to plan these measures and to make sure that they are taken.
In particular, the user shall ensure that
- the applicator to be used is in good working condition.
- the personal protective equipment (protective gloves, safety goggles) required for the operating personnel is available and used.
- the operating instructions are in legible condition and available to the operator.
- only sufficiently qualified and authorized personnel operates and maintains the applicator.
- this personnel is regularly instructed in the applicable regulations of operational safety and environmental protection and knows the operating instructions and, in particular, the safety instructions.
Making the Information Available
This operating manual shall always be kept at the place of operation of the applicator. Be sure that all persons handling the applicator can consult the instructions at any time. In addition to this operating manual, there must be available instructions regarding legal and other mandatory regulations relating to accident prevention and to relevant requirements of the employers' liability insurance association.
Safety Symbols
This operating manual gives concrete safety instructions to alert the user to remaining unavoidable hazards.
These hazards imply dangers to
- persons
- product and equipment
Meaning of the Symbols used in the Manual

This symbol indicates that there is, above all, danger to persons, but also to equipment and material.
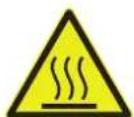
Caution: hot surface! Accident Prevention Regulation / BCG 25-25 - W26. Hot surfaces, such as machine parts, tanks, or materials, but also hot liquids, cannot always be perceived. The utmost caution is advised when this symbol is attached to a component. Wear protective gloves whenever you have to touch hot surfaces.

To avoid accidents, lay the cables so that they will not cause any risk of stumbling.

Wear protective gloves and safety goggles whenever you work with the applicator. If the safety glove sign is not clearly visible or not at all on the glue applicator, please contact Reka Klebetechnik GmbH & Co. KG.

Safety Measures to be taken during Operation
The applicator must only be used by trained, instructed, and authorized persons. These persons must have read the operating instructions and be able to work accordingly. Before using the applicator, check it for visible damage and make sure that it is used only when in proper and safe condition. Notify detected defects to the appropriate person immediately.
Safety Instructions for the Operation of the Hot-Melt Applicator

Wear protective gloves and safety goggles whenever you work with the applicator.

Avoid accidents by stumbling – Lay all cables, hoses, and conduits so that they will not cause any risk of stumbling. For this, install cable ducts and bridges.
Only fill the tank up to 1.5 cm under the upper rim.

Never exceed the operating temperature of hot melt.
This temperature is indicated in the technical specification of the glue. Overheating may lead to decomposition which may affect the health of the user as well as the operability of the applicator.
Once the glue applicator has warmed up, nozzle and lid are very hot.
Do not start working before fitting a nozzle first.
Only replace nozzle when applicator is warm.
Unplug the connecting cable before replacing a nozzle. Warning: risk of burns! When a nozzle is replaced, liquid glue might leak out.
Never bring the hot nozzle into contact with the cable.
Never direct the glue jet towards people.

If hot glue comes into contact with the skin, cool it with cold water immediately. Do not try to remove the hot-melt from the skin first. If necessary, consult a doctor. If hot glue comes into contact with the eyes, immediately cool them under running water for about 15 minutes and consult your doctor at once.
Always deposit the glue applicator on the wire stand or the respective plate destined for this purpose.
Do not lay the applicator on its side.

Never hold nozzle top upward. Otherwise hot-melt may reach the lid. This causes the venting mechanism to get clogged or also lets hot-melt leak out of the applicator when the lid is opened.
Do not carry out overhead work.
Stop using the equipment immediately, if the casing is damaged due to shock, breakage or heavy wear.
Do not feed solvent, benzine, benzene, toluene, acetone, turpentine or other flammable material. Risk of explosion!
Start-up and Control

Wear protective gloves and safety goggles wherever you work with the applicator.

Avoid accidents by stumbling lay all cables, hoses and conduits so that they will not cause any risk of stumbling. For this, install cableducts and bridges.

Never direct the glue jet towards people!
Do not lay the applicator on its side.

Never hold nozzle top upward.
Do not carry out overhead work.

Never start working before fitting a nozzle first.
Change nozzles only when the applicator is warmed up.
Open lid only when the application is related up.
Do not overcharge the applicator; only fill it up to max. 1.5cm below upper rim.
The heating temperatures should be lowered during longer work breaks to preserve the hot-melt. Ongoing heating makes the hot-melt coke and may also change its characteristics.
Stop using the equipment immediately, if the casing is damaged due to shock, breakage or heavy wear.
The glue application only be used/applied for its intended purpose. Please read the chapter, General Safety Instructions".
If it is not used as intended, this may cause personal injuries or equipment damages. Disregard of the safety instructions for the use of the applicator may lead to serious burns.
Before you use the applicator perform functionality test according to the following list:
- Is compressed air supplied to the glue applicator?
- Is the applicator connected to a compressor with oil mist separator?
- Is the pressure max. 6 bars and min. 2 bars?
- Is the applicator connected to 230 volts (or 120 volts, if required by the specific applicator)?
- Is the applicator switched on?
- Is the nozzle clean and free of foreign matters?
- Has the heat-up time of approx. 10 minutes (depending on glue type) been kept?
- Is hot-melt glue in the melting tank?
Setting the hot-melt working temperature (all LCD types)
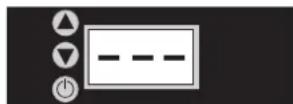
Switching the temperature control on and off: Press the button to
switch the temperature control on or off. If the temperature control is switched off, three hyphens (---) will be on the display.

Raising the temperature: Press the button until the desired temperature is
indicated. Press the button once to confirm the setting. As long as the circuit board is in temperature adjustment mode, two dots will appear behind the first two digits.
Reducing the temperature:
Press the button until the desired temperature is indicated. Press the button once to confirm the setting. As long as the circuit board is in temperature adjustment mode, two dots will appear behind the first two digits.
While the applicator is heating up to the set temperature, the numbers on the display are flashing.
Setting the Working Temperature of the Hot-Melt (TR 50.4)
After having started the application for approx. 10 minutes, check the working temperature at the thermometer. If necessary, correct the temperature at the thermostat.
- Clockwise = higher temperature
- Anti-clockwise = lower temperature
Minor leaking out of the nozzle during the heat-up phase is due to the hot-melt expanding in the nozzle/heating chamber. As soon as the working temperature is reached, the hot-melt will stop leaking.
General Notice on Hot-Melt Working Temperature (all Applicators)
Please note:
The temperature regulation is not calibrated!! If an exact temperature is required, use a calibrated thermometer to check the temperature. Please also note that the outside temperature of the melting tank differs from the actual temperature inside the melting tank.

The heating temperatures should be lowered during longer work breaks to preserve the hot-melt. Ongoing heating makes the hot-melt coke and may also change its characteristics.
Working with a Balancer (Suspender) (Accessories)
If the glue applicator is fixed to a balancer (suspender), it is recommended to set the suspension #10436. Thereby it is avoided that by an positioning, glue gets into the ventralve.
This applies to glue applicators TR50.4, TR55, TR60, TR700, TR70, TR80.

Stand including Pressure Regulator and Manometer (Accessories)
The precision adjustment for the compressed air regulates your gauge application to the set pressure may be read from the indication of the manometer.
- When you use the stand for depositing the applicator, remove the wire stand.
- Connect the compressed-air hose to the rear side of the stand. Connect the glue applicator and the stand with the compressed-air hose which is firmly fitted to the glue applicator. (TR50.4/55/700/70)
- Pressure controller on the right = air for glue output 1-6 bars* (Stand for Storing 2770 and TR60/80)
- Pressure controller on the left = air for spray air discharge 1-6 bars* (TR60/80)
Working with Stationary Equipment (in connection with pneumatic foot switch) (Accessories)

Warning:
Risk of burns! When, in the stationary mode of operation, workpieces are passed below the glue applicator by hand, there is a risk of burns; so, it is absolutely necessary that you wear protective gloves.
First, mount the pneumatic foot switch and the stationary equipment. The relevant instructions are supplied together with the respective accessories. To connect the system, proceed as follows:
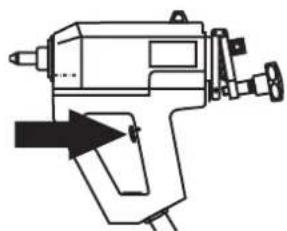
- Press the trigger down and hold it.
- Put the enclosed plug into the borehole provided for this purpose at one side of the casing handle.
- Release the trigger.
- The trigger is locked.

Start-up and Control
Loading Hot-Melt Glue (TR 50.4 / 55 / 60)
- As soon as the application is warmed up, turn the star grip (106) anti-clockwise and open the lid upward (TR50.4/60: item 3; TR55: item 4). Now you can load the desired non-reactive glue.
- Only fill the tank up to approx. 1.5 cm below its upper rim. Turn the star grip clockwise to close the lid.
- It takes the applicator approx. 3–10 minutes to melt the glue, depending on quantity and type of the glue as well as the processing temperature.
- To apply glue, push the trigger. The dispensed amount is controlled by the trigger, the pressure applied to the glue gun as well as the nozzle diameter. The longer the trigger is pushed and the bigger the nozzle diameter is, the more glue is dispensed.
Using PUR Hot-Melt Cartridges (TR 700 / 70 / 80)
Cartridges may only be inserted or exchanged when the applicator is warm or heated up. Do not use cartridges in perfect condition, that is without dents, etc., so that the piston may move freely in the cartridge.

Wear protective gloves and safety goggles whenever you work with the applicator.

When the applicator has warmed up, there is a risk of burns!

If, when changing the cartridge, another type of glue is used, the nozzle must be rinsed thoroughly (see chapter, "Cleaning of the Nozzle/Nozzle Adapter").
The heating temperature should be lowered during longer work breaks to preserve the hot-melt. Ongoing heating makes the hot-melt coke and may also change its characteristics.
Preparation of the Cartridge
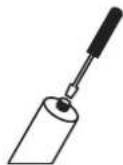
To open the cartridge, pierce the outlet using a pointed tool.

Screw nozzle adapter and nozzle onto the cartridge.
Preheating the Cartridge
To ensure optimal operation, it is recommended to use Reka cartridge preheater (article 5398 (230 V); article 5399 (120 V). Cartridges in the cartridge preheater should always be fitted with nozzle adapter and nozzle.
Loading the Hot-Melt Cartridge
As soon as the applicator has warmed up, turn the star grip (item 6) anti-clockwise and open the lid (item 5) upward.
Be sure that the cartridge outlet has been opened and an adapter and nozzle are fitted (see "Preparation of the Cartridge").

Insert the cartridge into the cartridge applicator.

Allow approx. 20 minutes for the applicator to warm up (depending on the type of glue). Warming-up will not take as long if the cartridge has been preheated.
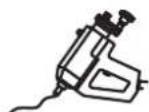
Apply the hot-melt glue.
If an empty cartridge is replaced by a full one containing a different type of glue, the nozzle and adapter must be cleaned. For this, please read "Cleaning the Nozzle/Nozzle Adapter after working with PUR Hot-Melt Glue Cartridges" in chapter "Cleaning and Maintenance" (Page 8).
Applying Hot-Melt Glue

Wear protective gloves and safety goggles whenever you work with the applicator.

Never start working before fitting a nozzle first.
Never direct the glue jet towards people!
If hot glue comes into contact with the skin, cool it with cold water immediately. Do not try to remove the hot-melt from the skin first. If necessary, consult a doctor. If hot glue comes into contact with the eyes, immediately cool them under running water for about 15 minutes and consult your doctor at once.
Make yourself familiar with the instrument first. Apply a little glue in varying forms on a piece of paper or cardboard. For example, lines, small or big spray or glue points. Try to find out the correct quantity and the ideal pattern by adjusting the air and glue quantities by means of the pressure regulator at the stand (TR60/80), always observing the correct working temperatures of the specific hot-melt. This temperature is indicated in the technical datasheet of the respective hot-melt.
Spraying Hot-Melt Glues (TR 60 / 80)
The supplied hot-spray systems TR60/80 are designed for spraying pressure-sensitive adhesives and PUR hot-melt glues. Please check whether the complete spray head (drawing Detail Front) is fitted to the applicator; if this is not the case, attach it. The spray cap (#3088) must be screwed on slightly by hand; never use any tools. You are advised to wear protective gloves. Do not
turn off the spray air as long as a spray cap is fitted to the glue gun.
Modification for Dot and Line Application (TR 60 / 80)
For this, the complete spray head must be exchanged. Please read the following chapter, "Replacement of Nozzles" (see below). The nozzle-adapter-assembly is shown on page 19 for TR60 and page 25 for TR80. To apply dots and lines, the pressure regulator for the spray air on the stand must be set to zero pressure.
Replacement of Nozzles

Warning: risk of burns! If hot glue comes into contact with the skin, cool it with cold water immediately. Do not try to remove the hot-melt from the skin first. If necessary, consult a doctor. If hot glue comes into contact with the eyes, immediately cool them under running water for about 15 minutes and consult your doctor at once.

For your own safety, wear protective gloves and safety goggles whenever you work with the applicator.

Unplug the connecting cable before replacing nozzles!
Only replace nozzles when the applicator is warm (applicator temperature 60-80°C) and the glue tank is empty. Replacing a nozzle when the applicator is cold may damage the applicator. If the nozzle is replaced when the applicator is too hot, liquid glue may leak out. For the melting range and the melting point of the used glue, please see the technical datasheet of the respective glue.
After Work
Please unplug the device after working with it. Do not unplug it by pulling the cord, pull the plug instead.
Cleaning and Maintenance
The applicator is to be maintained by skilled personnel on a regular basis. The frequency of maintenance depends on wear and the hot melt in use.
Never fill soiled glue into the melting tank. The heating temperatures should be lowered during longer work breaks to preserve the hot-melt. Ongoing heating makes the hot-melt coke and may also change its characteristics. If you follow all advices given in the operating manual, the glue applicator does normally not need cleaning. Then on reactive glue contained in the applicator will remelt and can be used for gluing again. The working temperature of these respective glue may be taken from the technical datasheet which can be procured from the producer of the glue. This temperature must not be exceeded, otherwise the glue may coke in the glue applicator. Hot-melts on a polyamide basis are particularly sensitive. If the glue has coked, the applicator should be cleaned. If a special cleaning agent is needed, information on this cleaning agent is available at your glue supplier.
Never clean the applicator with solvent, benzine, benzene, toluene, acetone, turpentine or other flammable material. Risk of explosion!
When reactive PUR hot-melt glues are used, the adapter and the nozzles must be flushed thoroughly. For this, use a special cleaning agent in 310ml cartridges. Please ask your glue supplier for the cleaning agent suited for the hot-melt used by you.
Cleaning the Nozzle/Nozzle Adapter after having applied PUR Hot-Melt Cartridges (TR 700 / 70 / 80)
When the application will not be used for a longer time, we recommend that you clean them to the adapter because PUR hot-melts may harden with a short time and cannot melt anymore.

Warning: risk of burns!

For your own safety you are advised to wear protective gloves and safety goggles.
Proceed as follows:
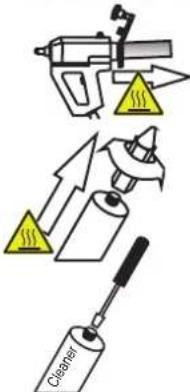
Remove the PDBabridge from the applicator.
Unscrew the nozzle head from the warm glue cartridge.
Use a pointed tool to open the outlet of the PUR cleaner cartridge.

Screw the nozzle adapter onto the screw thread of the cleaner cartridge.

Insert the cleaner cartridge in the applicator. Please ask the glue producer for the cleaning agent suited for the glue used by you.

20 min.
Allow about 20 minutes for the applicator to warm up the cleaner.

Flush the nozzle head with cleaner until you see cleaning agent come out steadily.
Remove the cleaner cartridge from the applicator and unscrew the nozzle adapter and nozzle from the cleaner cartridge while it is still warm.
Caution: Hot cleaning agent may flow out! Allow the cleaner cartridge to cool and keep it for further use.
Cleaning the Vent Valve
Each time the trigger (item 7) has been pulled, the applicator must audibly vent through the vent valve ("SEV"). If the sound absorber (item 8) got stuck, the glue tank may be under pressure.

Warning:
With this hot glue might come out of the sound absorber!

If the vent valve is clogged, hot-melt can exit the glue gun through the nozzle even when the device is switched off!
Prevent liquid glue from getting into the sound absorber, when the applicator is ready for operation by...
- depositing the glue applicator on a level plane, using its wire bracket;
- depositing the glue applicator on the stand (#2770, included in TR60/TR80);
- suspending the glue applicator at a spring balancer (#3544);
- filling the glue applicator only up to approx. 1.5 cm below the upper rim;

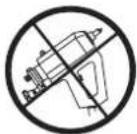
always pointing the nozzle downwards.
If nevertheless glue got into the vent valve, replace it or clean it if possible and when the glue gun is warmed up. Replacement or cleaning of the vent valve when the glue gun is cold may lead to damaging the device.
Trouble-Shooting
List of possible fault indications and assistance in trouble-shooting
In case of damage, send the glue applicator to Reka, indicating type and serial no. of your applicator. Self-made repairs void the warranty.
| Fault | Possible Cause | Measures to be taken |
| No or too little glue output, though the heat-up time has been observed exactly | ·Foreign objects in nozzle? | ·Replace nozzle |
| ·Low air pressure | ·Check pressure settings and check air pressure supply if applicable | |
| ·Low hot-melt temperature | ·Check temperature setting | |
| ·Cartridge devices TR 700 / 70 / 80: The piston in the cartridge can't move freely | ·Replace cartridge | |
| Hot-melt is too thin or too | ·Temperature either too high or too low | ·Check the temperature |
| Hot-melt contains brown flakes | ·Hot-melt was heated over recommended temperature | ·Lower the heating temperature |
| ·Hot-melt was heated for too long and is coked | ·Lower the heating temperature during work breaks | |
| Leaking nozzle | ·Silencer / Vent Valve is clogged | ·Clean the vent valve and replace silencer |
| ·Foreign objects in nozzle? | ·Replace nozzle | |
| ·Cartridge devices TR 700 / 70 / 80: The piston in the cartridge can't move freely | ·Replace cartridge | |
| Applicator doesn't heat up | ·Device is switched off | ·Check power supply·Turn on applicator, if applicable (LCD-Models).·TR 700: Turn on on-/off-switch. |
| Spray pattern is not as desired (TR 60 / 80) | ·Setting of pressure on air / hot-melt needs to be adjusted | Check air-pressure:·Set pressure regulator of hot-melt to zero at stand·Set pressure regulator of spray air to maximum (max. 6 bar) at stand·Set temperature to 200 °C·Hot-air must exit the spray cap after about 30 seconds |
| ·Hot-melt is not suitable for spray application | ·Use suitable hot-melt |
Environmental Protection
Never throw electric tools into domestic waste. According to the European Directive 2002/96/EC for use of electric and electronic devices and according to national regulations, used electric tools must be collected separately and treated in an environmentally compatible way.
Packing material used by Reka Klebetechnik can be recycled completely.
Please take instructions for the disposal of hot-melt glues and hot-melt cartridges from the respective safety specifications.

Additional Information
Do you have any more questions or requests? We will be glad to help you.
Please contact us by:
Telephone sales +49 721 97078-30
Telephone reception +49 721 97078-0
Telefax +49 721 705069
EU Declaration of Conformity
Product: Hot Melt Glue Applicators
Type: TR50.4
TR55LCD
TR55LCDHT
TR60LCD
TR60LCDHT
TR700
TR70LCD
TR70LCDHT
TR80LCD
TR80LCDHT
This is to certify that the above applicators in the design marketed by us are in conformity with the following EC directives:
until 15-01-2007: 73/23/EEC, from 16-01-2007: 2006/95/EC
until 19-07-2009: 91/368/EEC, from 20-09-2009: 2004/108/EC
until 28-12-2009: 89/336/EEC, from 29-12-2009: 2006/42/EC
2002/95/EC
The following standards have been applied:
IEC CISPR 14
IEC 60335
IEC 60204
IEC 61000
This declaration of conformity shall become invalid if the product is modified, extended, or otherwise changed without express approval of Reka Klebetechnik
- and/or other components than accessories of Reka Klebetechnik are fitted,
- and if the product is not connected or used as intended.
Eggenstein-Leopoldshafen, 1 March 2016
Christa Armbruster
Management Purchasing and Production
Spare Parts Technical Specifications Accessories
Spare Parts TR 50.4
| No. | Art.No. | nameofarticle |
| 1 | 2518 | Thermometer |
| 2 | 2517 | Thermostat |
| 3 | 3657 | Lid"A"forTR50.4/60 |
| 4 | 3661 | Lid"D"forTR55 |
| 5 | 3660 | Lid"C"forTR70/700/80 |
| 6 | 2613 | StarGrip |
| 7 | 2711 | Trigger |
| 12 | 3074 | NozzleM14forTR50.4/55 |
| 13 | 1143 | NozzleM10forTR70/700 |
| 25 | 2884 | LockNutforLidRelease |
| 28 | 2911 | Coversafetyscrew |
| 35 | 2958 | Adapter |
| 38 | 2918 | Switchon/off |
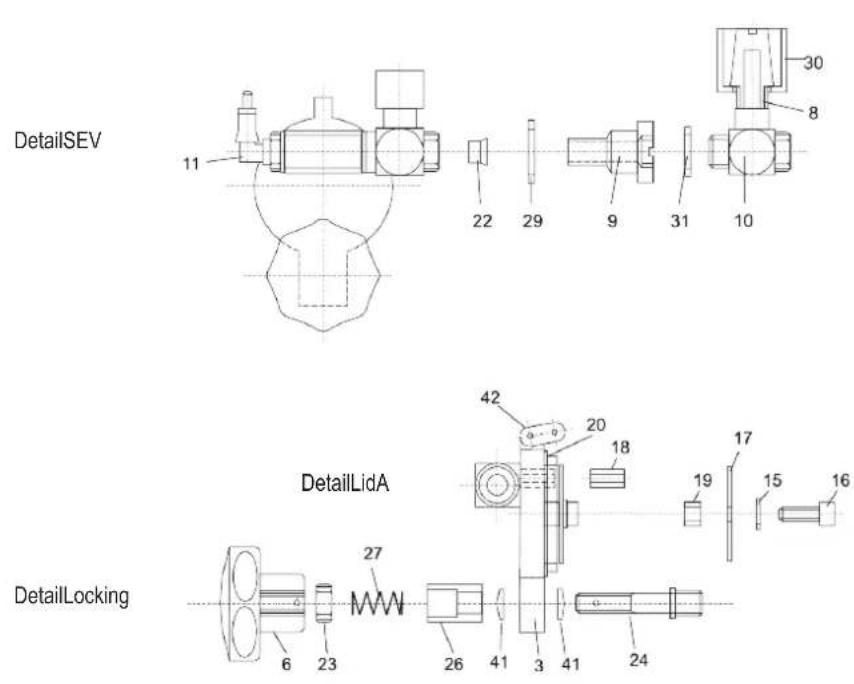
| No. | Art.No. | nameofarticle |
| 3 | 3657 | LidAforTR50.4/60 |
| 4 | 3661 | LidDforTR55 |
| 5 | 3660 | LidCforTR70/700/80 |
| 6 | 2613 | StarGrip |
| 8 | 2683 | SoundAbsorberSEV |
| 9 | 2693 | DT-SEV |
| 10 | 3016 | L-Screwing |
| 11 | 2697 | 90°-Screwing |
| 14 | 3051 | SprayNozzle |
| 15 | 2800 | Disc |
| 16 | 2801 | ScrewM6x16 |
| 17 | 2819 | Plate |
| 18 | 2820 | Spacer |
| 19 | 2802 | Intensification |
| 20 | 2603 | O-RingD40x3forTR50.4/60 |
| 22 | 2696 | Membrane |
| 23 | 3665 | LocknutM8 |
| 24 | 2883 | Lidreleaseshaft |
| 26 | 2885 | Spacerbush |
| 27 | 2718 | Spring |
| 29 | 2692 | O-RingSEV |
| 30 | 2694 | CapSEVD18 |
| 31 | 2695 | O-RingDTSEV |
| 32 | 3088 | SprayCap |
| 33 | 2616 | Spacer25x2 |
| 36 | 2955 | FlatSealGasket |
| 37 | 2953 | Cartridgepiercer |
| 41 | 2124 | DiscSpring |
| 42 | 2617 | Hingelink |
| 43 | 2533 | O-Ring40x4 |
| 2621 | Repairing-SetSEV | |
| 2882 | Lockingcomplete |
Technical Data Glue Gun TR 50.4
| TR5040 | ||
| ArticleNumber | 5327(230V)5333(120V) | 5327 (230 |
| Weight1200g | ||
| PowerSupply230V/50Hz120V/60Hz | ||
| PowerConsumption550Watt(230V)400Watt(120V) | ||
| CurrentConsumption | 2,2A | 3,3A |
| Degreeofprotection | IP30 | |
| Classofprotection | I | |
| Temperaturecontrol | Thermostat | |
| Temperaturelimitation | Temperaturemonitor | |
| Operatingtemperature | 50-200°C | |
| Consistencyoftemperature | ±5°C | |
| Temperatureindication | analog | |
| Heat-uptime | approx.3-10min. | |
| GrossTankCapacity | 250ml | |
| Conveyingsystem | Airpressure | |
| Operatingpressure | 0,5-6bar | |
| Lengthofelectriccord | 8,5m | |
| Lengthofairtube | 3m | |
| Lengthofconnectionkit | 3m | |
| Recommendedmelts | Hot-meltgranulate,pillowsand43mmsticks/slugs | |
Accessories (optional)
3466 Nozzle Set M10 Professional
3544 S8 speed (B Bar)
2770 Stand for Storing
3746 Stationary Equipment
3518 Footswitch
5563 Premelter VSB40 (230V)
5567 Premelter VSB40 (120V)
Inquire about our nozzle range
Spare Parts TR 55 LCD / HT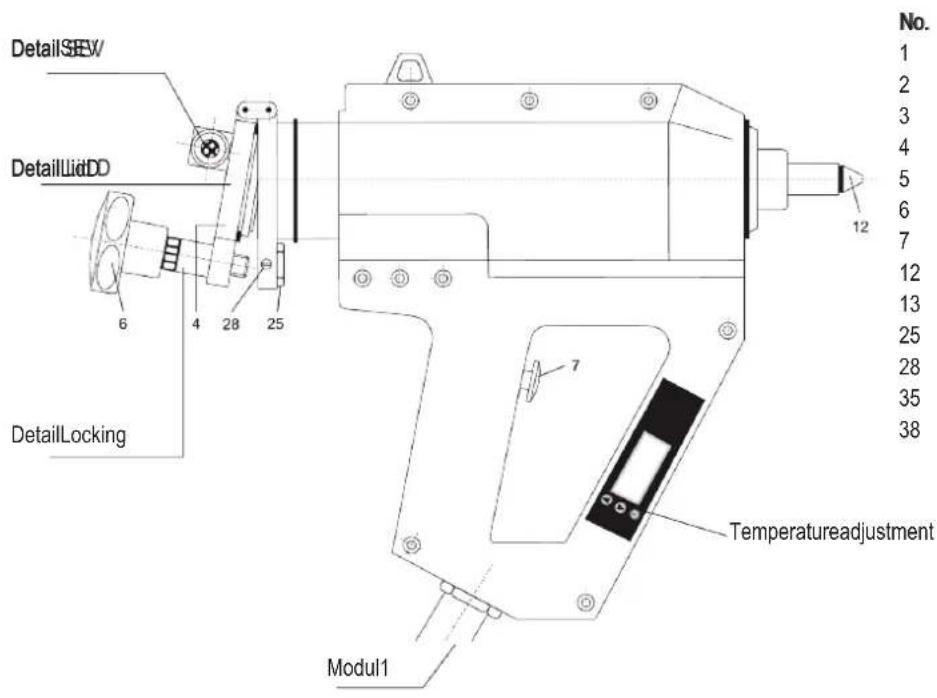
| No. | Art.No. | nameofarticle |
| 1 | 2518 | Thermometer |
| 2 | 2517 | Thermostat |
| 3 | 3657 | Lid"A"forTR50.4/60 |
| 4 | 3661 | Lid"D"forTR55 |
| 5 | 3660 | Lid"C"forTR70/700/80 |
| 6 | 2613 | StarGrip |
| 7 | 2711 | Trigger |
| 12 | 3074 | NozzleM14forTR50.4/55 |
| 13 | 1143 | NozzleM10forTR70/700 |
| 25 | 2884 | LockNutforLidRelease |
| 28 | 2911 | Coversafetyscrew |
| 35 | 2958 | Adapter |
| 38 | 2918 | Switchon/off |
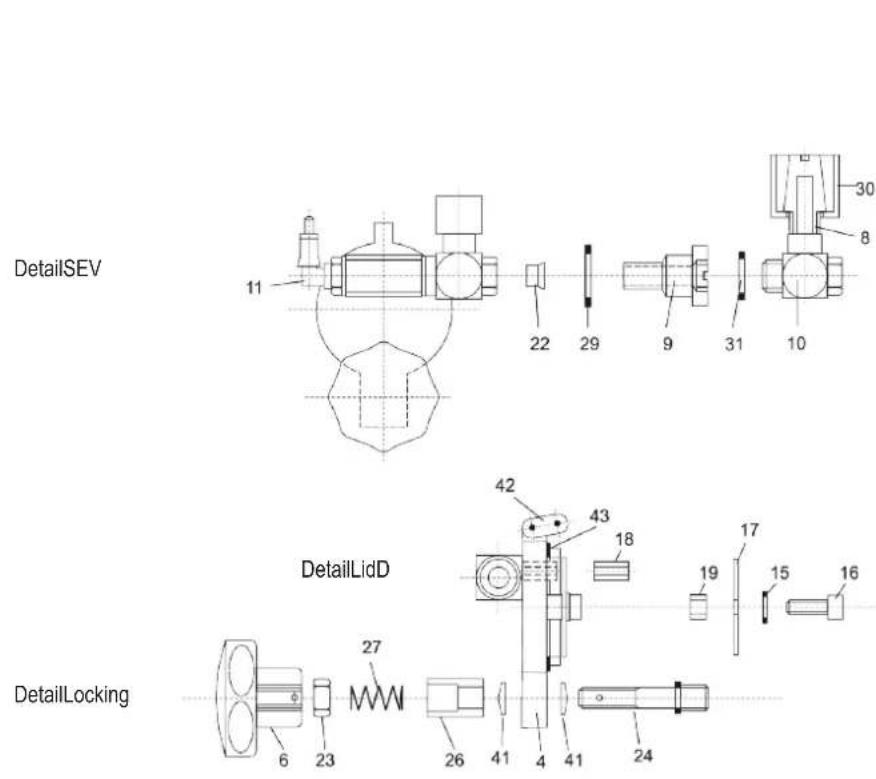
| No. | Art.No. | nameofarticle |
| 3 | 3657 | LidAforTR50.4/60 |
| 4 | 3661 | LidDforTR55 |
| 5 | 3660 | LidCforTR70/700/80 |
| 6 | 2613 | StarGrip |
| 8 | 2683 | SoundAbsorberSEV |
| 9 | 2693 | DT-SEV |
| 10 | 3016 | L-Screwing |
| 11 | 2697 | 90°-Screwing |
| 14 | 3051 | SprayNozzle |
| 15 | 2800 | Disc |
| 16 | 2801 | ScrewM6x16 |
| 17 | 2819 | Plate |
| 18 | 2820 | Spacer |
| 19 | 2802 | Intensification |
| 20 | 2603 | O-RingD40x3forTR50.4/60 |
| 22 | 2696 | Membrane |
| 23 | 3665 | LocknutM8 |
| 24 | 2883 | Lidreleaseshaft |
| 26 | 2885 | Spacerbush |
| 27 | 2718 | Spring |
| 29 | 2692 | O-RingSEV |
| 30 | 2694 | CapSEVD18 |
| 31 | 2695 | O-RingDTSEV |
| 32 | 3088 | SprayCap |
| 33 | 2616 | Spacer25x2 |
| 36 | 2955 | FlatSealGasket |
| 37 | 2953 | Cartridgepiercer |
| 41 | 2124 | DiscSpring |
| 42 | 2617 | Hingelink |
| 43 | 2533 | O-Ring40x4 |
| 2621 | Repairing-SetSEV | |
| 2882 | Lockingcomplete |
3544 Suspender (Balancer)
2770 Stand for Storing
3746 Stationary Equipment
3518 Footswitch
5563 Premelter VSB40 (230V)
5567 Premelter VSB40 (120V)
Inquire about our nozzle range
Spare Parts TR 60 LCD / HT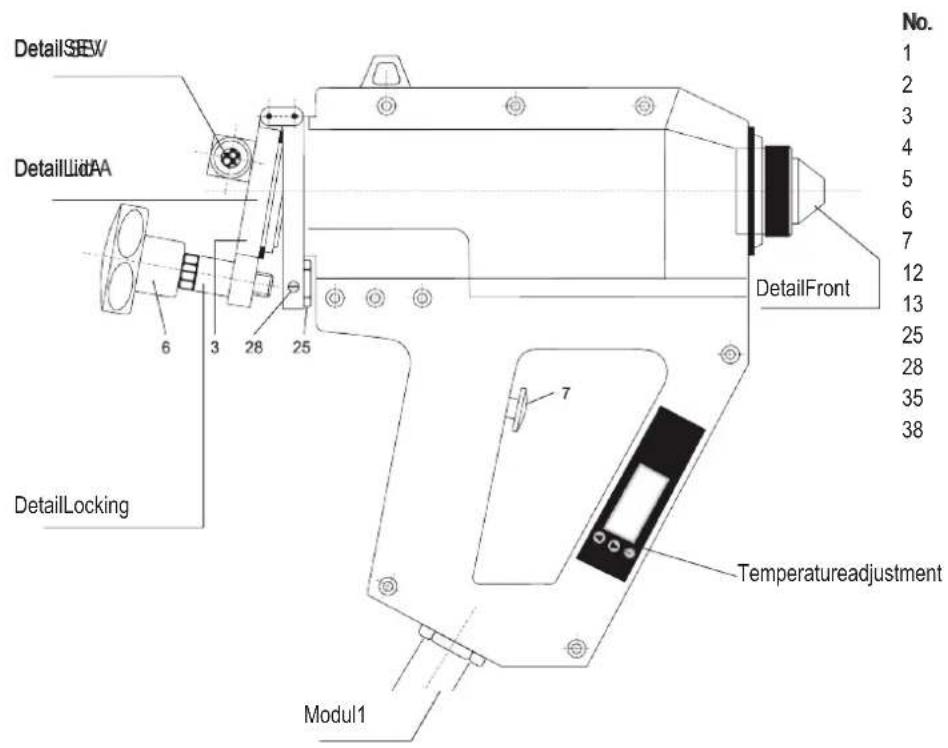
| No. | Art.No. | nameofarticle |
| 1 | 2518 | Thermometer |
| 2 | 2517 | Thermostat |
| 3 | 3657 | Lid"A"forTR50.4/60 |
| 4 | 3661 | Lid"D"forTR55 |
| 5 | 3660 | Lid"C"forTR70/700/80 |
| 6 | 2613 | StarGrip |
| 7 | 2711 | Trigger |
| 12 | 3074 | NozzleM14forTR50.4/55 |
| 13 | 1143 | NozzleM10forTR70/700 |
| 25 | 2884 | LockNutforLidRelease |
| 28 | 2911 | Coversafetyscrew |
| 35 | 2958 | Adapter |
| 38 | 2918 | Switchon/off |
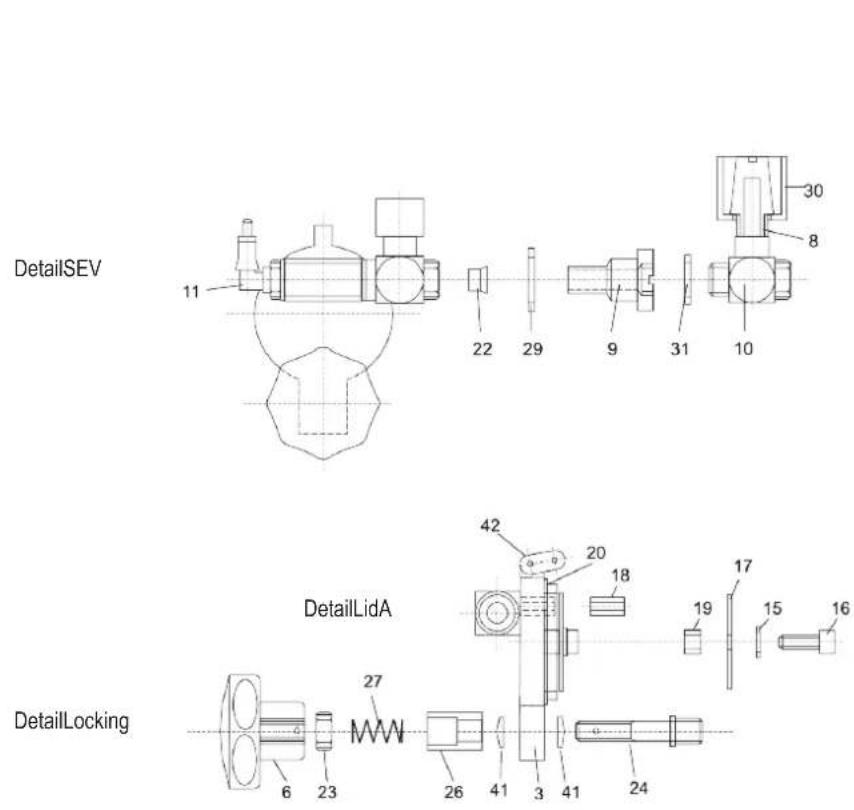
| No. | Art.No. | nameofarticle |
| 3 | 3657 | LidAforTR50.4/60 |
| 4 | 3661 | LidDforTR55 |
| 5 | 3660 | LidCforTR70/700/80 |
| 6 | 2613 | StarGrip |
| 8 | 2683 | SoundAbsorberSEV |
| 9 | 2693 | DT-SEV |
| 10 | 3016 | L-Screwing |
| 11 | 2697 | 90°-Screwing |
| 14 | 3051 | SprayNozzle |
| 15 | 2800 | Disc |
| 16 | 2801 | ScrewM6x16 |
| 17 | 2819 | Plate |
| 18 | 2820 | Spacer |
| 19 | 2802 | Intensification |
| 20 | 2603 | O-RingD40x3forTR50.4/60 |
| 22 | 2696 | Membrane |
| 23 | 3665 | LocknutM8 |
| 24 | 2883 | Lidreleaseshaft |
| 26 | 2885 | Spacerbush |
| 27 | 2718 | Spring |
| 29 | 2692 | O-RingSEV |
| 30 | 2694 | CapSEVD18 |
| 31 | 2695 | O-RingDTSEV |
| 32 | 3088 | SprayCap |
| 33 | 2616 | Spacer25x2 |
| 36 | 2955 | FlatSealGasket |
| 37 | 2953 | Cartridgepiercer |
| 41 | 2124 | DiscSpring |
| 42 | 2617 | Hingelink |
| 43 | 2533 | O-Ring40x4 |
| 2621 | Repairing-SetSEV | |
| 2882 | Lockingcomplete |
TR60 LD, DR60 LCD, TR60 LCB, TR60 LCD HT, TR 60 LCD HT. Article Number: 5461 (230V), 5462 (120V), 5382 (230V), 120V upon request
| Weight1200g | |||
| Power Supply | 230 V / 50 Hz | 120 V / 60 Hz | 230 V / 50 Hz |
| Power Consumption | 480 Watt (230 V) | 400 Watt (120 V) | 480 Watt (230 V) |
| CurrentConsumption | 2,6A | 3,3A | 2,6A |
| Degreeofprotection | IP30 | ||
| Classofprotection | I | ||
| Temperaturecontrol | Electronic | ||
| Temperaturelimitation | Temperaturemonitor | ||
| Operating temperature | 50 – 210 °C | 50 – 210 °C | 50 – 235 °C(250°CConrequest) |
| Consistencyoftemperature | ±2°C | ||
| Temperatureindication | digital | ||
| Heat-uptime | approx.3–10min. | ||
| GrossTankCapacity | 250ml | ||
| Conveyingsystem | Airpressure | ||
| Operatingpressure | 0,5–6bar | ||
| Lengthofelectriccord | 4m | ||
| Lengthofconnections(standtohandgun) | 4,5m | ||
| Lengthofconnectionkit | 3m | ||
| Recommendedmelts | Hot-meltgranulate,pillowsand43mmsticks/slugs | ||
Accessories (optional)
3466 Nozzle Set M10 Professional
3522 Point-/Line-Adapter for TR60 60
3544S Suspender (Balancer)
3746 Stationary Equipment
3518 Footswitch
5563 Premelter VS B40 (230V)
5567 Premelter VS B40 (120V)
Inquire about our nozzle range
TR 60 LCD – Detail Front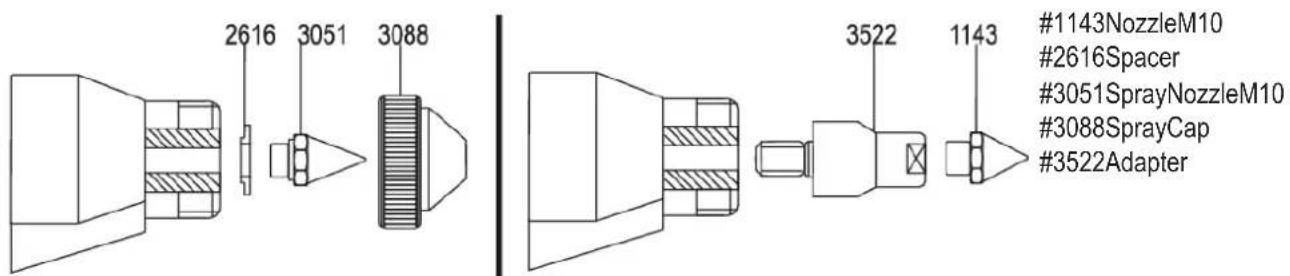
Spare Parts TR 700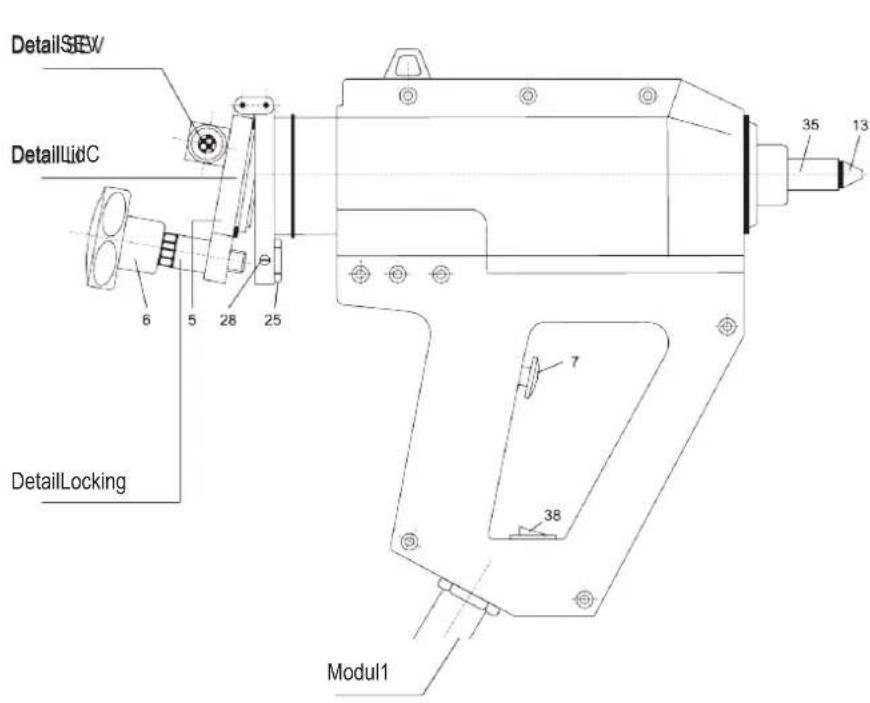
| No. | Art.No. | nameofarticle |
| 1 | 2518 | Thermometer |
| 2 | 2517 | Thermostat |
| 3 | 3657 | Lid"A"forTR50.4/60 |
| 4 | 3661 | Lid"D"forTR55 |
| 5 | 3660 | Lid"C"forTR70/700/80 |
| 6 | 2613 | StarGrip |
| 7 | 2711 | Trigger |
| 12 | 3074 | NozzleM14forTR50.4/55 |
| 13 | 1143 | NozzleM10forTR70/700 |
| 25 | 2884 | LockNutforLidRelease |
| 28 | 2911 | Coversafetyscrew |
| 35 | 2958 | Adapter |
| 38 | 2918 | Switchon/off |
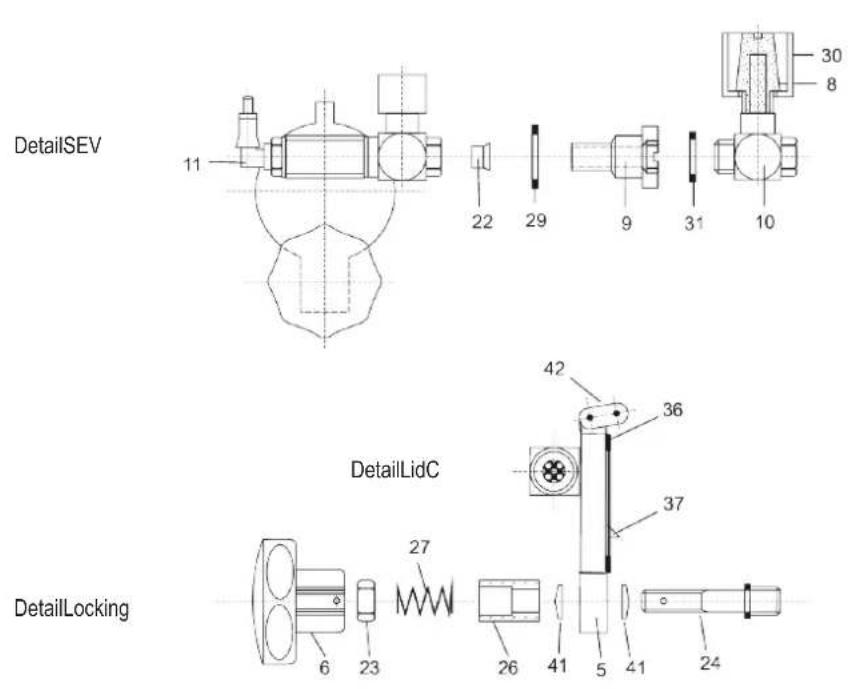
| No. | Art.No. | nameofarticle |
| 3 | 3657 | LidAforTR50.4/60 |
| 4 | 3661 | LidDforTR55 |
| 5 | 3660 | LidCforTR70/700/80 |
| 6 | 2613 | StarGrip |
| 8 | 2683 | SoundAbsorberSEV |
| 9 | 2693 | DT-SEV |
| 10 | 3016 | L-Screwing |
| 11 | 2697 | 90°-Screwing |
| 14 | 3051 | SprayNozzle |
| 15 | 2800 | Disc |
| 16 | 2801 | ScrewM6x16 |
| 17 | 2819 | Plate |
| 18 | 2820 | Spacer |
| 19 | 2802 | Intensification |
| 20 | 2603 | O-RingD40x3forTR50.4/60 |
| 22 | 2696 | Membrane |
| 23 | 3665 | LocknutM8 |
| 24 | 2883 | Lidreleaseshaft |
| 26 | 2885 | Spacerbush |
| 27 | 2718 | Spring |
| 29 | 2692 | O-RingSEV |
| 30 | 2694 | CapSEVD18 |
| 31 | 2695 | O-RingDTSEV |
| 32 | 3088 | SprayCap |
| 33 | 2616 | Spacer25x2 |
| 36 | 2955 | FlatSealGasket |
| 37 | 2953 | Cartridgepiercer |
| 41 | 2124 | DiscSpring |
| 42 | 2617 | Hingelink |
| 43 | 2533 | O-Ring40x4 |
| 2621 | Repairing-SetSEV | |
| 2882 | Lockingcomplete |
Technical Data Glue Gun TR 700
TR7000
| ArticleNumber5385(230V)5370(120V) | 5385 (230 V) | |
| Weight1400g | ||
| PowerSupply230V/50Hz120V/60Hz | ||
| PowerConsumption400Watt(230V)400Watt(120V) | ||
| Current Consumption | 1,75 A | 3,3 A |
| Degreeofprotection | IP30 | |
| Classofprotection | I | |
| Temperaturecontrol | Thermostat | |
| Temperaturelimitation | Temperaturemonitor | |
| Operatingtemperature | 120°C | |
| Consistencyoftemperature | ±5°C | |
| Heat-uptime | approx.3–10min. | |
| GrossTankCapacity | 310ml | |
| Conveyingsystem | Airpressure | |
| Operatingpressure | 0,5–6bar | |
| Lengthofelectriccord | 8,5m | |
| Lengthofairtube | 3m | |
| Lengthofconnectionkit | 3m | |
| Recommendedmelts | 310mlhot-meltcartridges | |
Accessories (optional)
3466 Nozzle Set M10 Professional
29580 Cartridge adapter for dot/line application
7099 Blank cartridge incl. piston
3544 Suspender (Balancer)
2770 Stand for Storing
3746 Stationary Equipment
3518 Footswitch
5398 Cartridge Preheater
Inquire about our nozzle range
Spare Parts TR 70 LCD / HT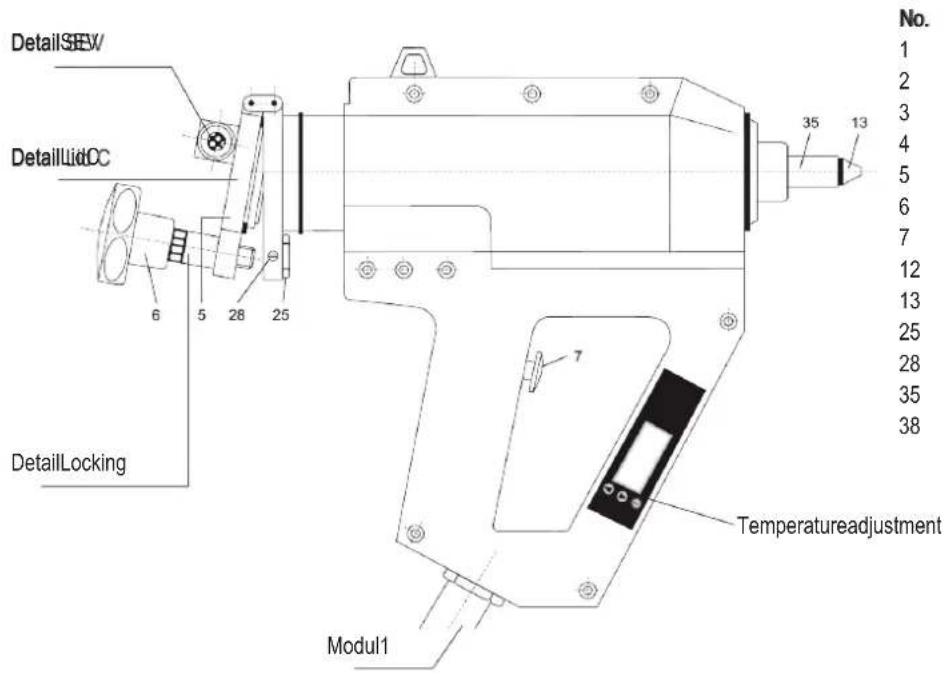
| No. | Art.No. | nameofarticle |
| 1 | 2518 | Thermometer |
| 2 | 2517 | Thermostat |
| 3 | 3657 | Lid"A"forTR50.4/60 |
| 4 | 3661 | Lid"D"forTR55 |
| 5 | 3660 | Lid"C"forTR70/700/80 |
| 6 | 2613 | StarGrip |
| 7 | 2711 | Trigger |
| 12 | 3074 | NozzleM14forTR50.4/55 |
| 13 | 1143 | NozzleM10forTR70/700 |
| 25 | 2884 | LockNutforLidRelease |
| 28 | 2911 | Coversafetyscrew |
| 35 | 2958 | Adapter |
| 38 | 2918 | Switchon/off |

| No. | Art.No. | nameofarticle |
| 3 | 3657 | LidAforTR50.4/60 |
| 4 | 3661 | LidDforTR55 |
| 5 | 3660 | LidCforTR70/700/80 |
| 6 | 2613 | StarGrip |
| 8 | 2683 | SoundAbsorberSEV |
| 9 | 2693 | DT-SEV |
| 10 | 3016 | L-Screwing |
| 11 | 2697 | 90°-Screwing |
| 14 | 3051 | SprayNozzle |
| 15 | 2800 | Disc |
| 16 | 2801 | ScrewM6x16 |
| 17 | 2819 | Plate |
| 18 | 2820 | Spacer |
| 19 | 2802 | Intensification |
| 20 | 2603 | O-RingD40x3forTR50.4/60 |
| 22 | 2696 | Membrane |
| 23 | 3665 | LocknutM8 |
| 24 | 2883 | Lidreleaseshaft |
| 26 | 2885 | Spacerbush |
| 27 | 2718 | Spring |
| 29 | 2692 | O-RingSEV |
| 30 | 2694 | CapSEVD18 |
| 31 | 2695 | O-RingDTSEV |
| 32 | 3088 | SprayCap |
| 33 | 2616 | Spacer25x2 |
| 36 | 2955 | FlatSealGasket |
| 37 | 2953 | Cartridgepiercer |
| 41 | 2124 | DiscSpring |
| 42 | 2617 | Hingelink |
| 43 | 2533 | O-Ring40x4 |
| 2621 | Repairing-SetSEV | |
| 2882 | Lockingcomplete |
TR 70 LCD, TR 70 LCD, TR 70 LCD HT, TR 70 LCD HT
| ArticleNumber5422(230V)5423(120V)5386(230V)120Vuponrequest | |||
| Weight1400g | |||
| PowerSupply230V/50Hz | 120V/60Hz | 230V/50Hz | |
| Power Consumption | 600 Watt (230V) | 400 Watt (120 V) 600 Watt (230 V) | |
| Current Consumption | 2,6 A | 3,3 A 2,6 A | |
| Degreeofprotection | IP30 | ||
| Classofprotection | I | ||
| Temperaturecontrol | Electronic | ||
| Temperaturelimitation | Temperaturemonitor | ||
| Temperatureindication | digital | ||
| Operating temperature | 50 – 210 °C | 50 – 210 °C | 50 – 235 °C(250°C on request) |
| Consistencyoftemperature | ±2°C | ||
| Heat-uptime | approx.3–10min. | ||
| GrossTankCapacity | 310ml | ||
| Conveyingsystem | Airpressure | ||
| Operatingpressure | 0,5–6bar | ||
| Lengthofelectriccord | 8,5m | ||
| Lengthofairtube | 5m | ||
| Lengthofconnectionkit | 3m | ||
| Recommendedmelts | 310mlhot-meltcartridges | ||
Accessories (optional)
3466 Nozzle Set M10 Professional
29580 Cartridge adapter for dot/line application
7099 Blank cartridge incl. piston
3544 Suspender (Balancer)
2770 Stand for Storing
3746 Stationary Equipment
3518 Footswitch
5398 Cartridge Preheater
Inquire about our nozzle range
Spare Parts TR 80 LCD / HT
No. Art.No. Name of Article
1 2518 Thermometer
2 2517 Thermostat
3 3657 Lid "A" for TR50.4/60
4 3661 Lid "D" for TR55
5 3660 Lid "C" for TR70/700/80
6 2613 Star Grip
7 2711 Trigger
12 3074 Nozzle M14 for TR50.4/55
13 1143 Nozzle M10 for TR70/700
25 2884 Lock Nut for Lid Release
28 2911 Cover Safety Screw
35 2958 Adapter
38 2918 Switch On/Off
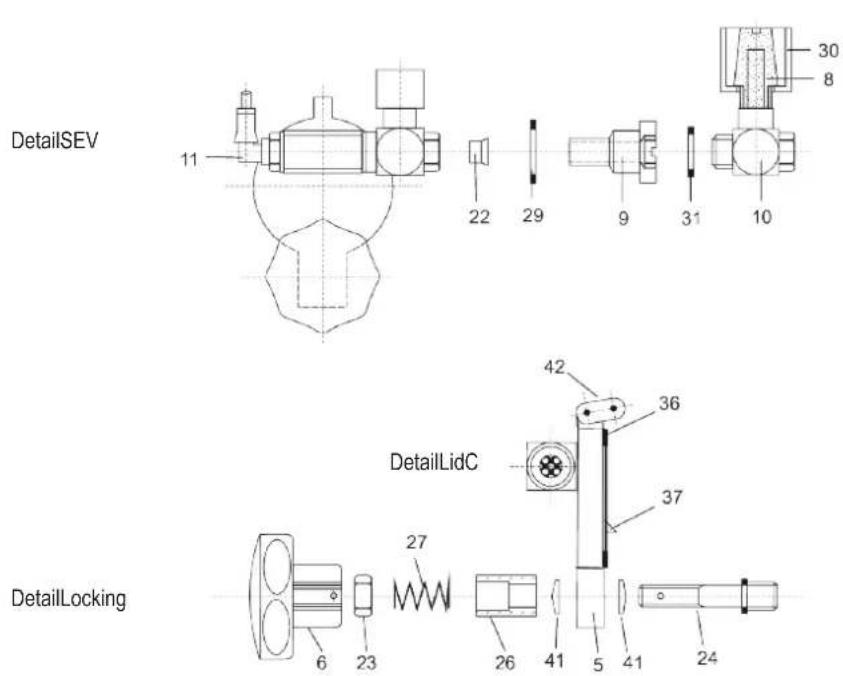
No. Art. No. Name of article
3 3657 Lid A for TR50.4/60
4 3661 Lid D for TR55
5 3660 Lid C for TR70/700/80
6 2613 Star Grip
8 2683 Sound Absorber SEV
9 2693 DT-SEV
10 3016 L-Screwing
11 2697 90°-Screwing
14 3051 Spray Nozzle
15 2800 Disc
16 2801 Screw M6x16
17 2819 Plate
18 2820 Spacer
19 2802 Intensification
20 2603 O-Ring D40x3 for TR50.4/60
22 2696 Membrane
23 3665 Locknut M8
24 2883 Lid release shaft
26 2885 Spacer bush
27 2718 Spring
29 2692 O-Ring SEV
30 2694 Cap SEV D18
31 2695 O-Ring DT SEV
32 3088 Spray Cap
33 2616 Spacer 25x2
36 2955 Flat Seal Gasket
37 2953 Cartridge piercer
41 2124 Disc Spring
42 2617 Hinge link
43 2533 O-Ring 40x4
2621 Repairing-Set SEV
2882 Locking complete
TR80LD DR80LCD TR80LCBHTR80LCDHTR 80 LCD HT TR 80 LCD HT
| ArticleNumber5454(230V)5463(120V)5408(230V)120Vuponrequest | |||
| Weight1400g | |||
| PowerSupply230V/50Hz | 120V/60Hz | 230V/50Hz | |
| Power Consumption | 650 Watt (230 V) | 400 Watt (120 V) 650 Watt (230 V) | |
| Current Consumption | 2,8 A | 3,3 A 2,8 A | |
| Degreeofprotection | IP30 | ||
| Classofprotection | I | ||
| Temperaturecontrol | Electronic | ||
| Temperaturelimitation | Temperaturemonitor | ||
| Operating temperature | 50 – 210 °C | 50 – 210 °C 50 – 235 °C(250°C on request) | |
| Consistencyoftemperature | ±2°C | ||
| Temperatureindication | digital | ||
| Heat-uptime | approx.3–10min. | ||
| GrossTankCapacity | 310ml | ||
| Conveyingsystem | Airpressure | ||
| Operatingpressure | 0,5–6bar | ||
| Lengthofelectriccord | 4m | ||
| Lengthofconnections(standtohandgun) | 4,5m | ||
| Lengthofconnectionkit | 3m | ||
| Recommendedmelts | 310mlhot-meltcartridges | ||
Accessories (optional)
3466 Nozzle Set M10 Professional
29580 Acrtldgedaptet for bot dintel application
7099 Blank cartridge incl. piston
3544 Suspender (Balancer)
3746 Stationary Equipment
3518 Footswitch
5398 Cartridge Preheater
Inquire about our nozzle range
TR 80 LCD – Detail Front




- PRODUCT MANUAL FOR PNEUMATIC REKA GLUE GUNS
- TABLE OF CONTENTS
- PRODUCT DESCRIPTION
- DEAR CUSTOMER
- INTENDED USE
- GENERAL SAFETY INSTRUCTIONS
- CARE AND DILIGENCE OF THE USER
- IN PARTICULAR, THE USER SHALL ENSURE THAT
- MAKING THE INFORMATION AVAILABLE
- SAFETY SYMBOLS
- MEANING OF THE SYMBOLS USED IN THE MANUAL
- SAFETY MEASURES TO BE TAKEN DURING OPERATION
- SAFETY INSTRUCTIONS FOR THE OPERATION OF THE HOT-MELT APPLICATOR
- START-UP AND CONTROL
- BEFORE YOU USE THE APPLICATOR PERFORM FUNCTIONALITY TEST ACCORDING TO THE FOLLOWING LIST
- SETTING THE HOT-MELT WORKING TEMPERATURE (ALL LCD TYPES)
- SETTING THE WORKING TEMPERATURE OF THE HOT-MELT (TR 50.4)
- GENERAL NOTICE ON HOT-MELT WORKING TEMPERATURE (ALL APPLICATORS)
- WORKING WITH A BALANCER (SUSPENDER) (ACCESSORIES)
- STAND INCLUDING PRESSURE REGULATOR AND MANOMETER (ACCESSORIES)
- WORKING WITH STATIONARY EQUIPMENT (IN CONNECTION WITH PNEUMATIC FOOT SWITCH) (ACCESSORIES)
- LOADING HOT-MELT GLUE (TR 50.4 / 55 / 60)
- USING PUR HOT-MELT CARTRIDGES (TR 700 / 70 / 80)
- PREPARATION OF THE CARTRIDGE
- PREHEATING THE CARTRIDGE
- LOADING THE HOT-MELT CARTRIDGE
- APPLYING HOT-MELT GLUE
- SPRAYING HOT-MELT GLUES (TR 60 / 80)
- MODIFICATION FOR DOT AND LINE APPLICATION (TR 60 / 80)
- REPLACEMENT OF NOZZLES
- AFTER WORK
- CLEANING AND MAINTENANCE
- CLEANING THE NOZZLE/NOZZLE ADAPTER AFTER HAVING APPLIED PUR HOT-MELT CARTRIDGES (TR 700 / 70 / 80)
- PROCEED AS FOLLOWS
- CLEANING THE VENT VALVE
- TROUBLE-SHOOTING
- LIST OF POSSIBLE FAULT INDICATIONS AND ASSISTANCE IN TROUBLE-SHOOTING
- ENVIRONMENTAL PROTECTION
- ADDITIONAL INFORMATION
- EU DECLARATION OF CONFORMITY
- SPARE PARTS TECHNICAL SPECIFICATIONS ACCESSORIES
- TECHNICAL DATA GLUE GUN TR 50.4
- ACCESSORIES (OPTIONAL)
- 3466 NOZZLE SET M10 PROFESSIONAL
- 3544 S8 SPEED (B BAR)
- 2770 STAND FOR STORING
- 3746 STATIONARY EQUIPMENT
- 3518 FOOTSWITCH
- 5563 PREMELTER VSB40 (230V)
- 5567 PREMELTER VSB40 (120V)
- 3544 SUSPENDER (BALANCER)
- 3522 POINT-/LINE-ADAPTER FOR TR60 60
- 3544S SUSPENDER (BALANCER)
- 5563 PREMELTER VS B40 (230V)
- 5567 PREMELTER VS B40 (120V)
- TECHNICAL DATA GLUE GUN TR 700
- TR7000
- 29580 CARTRIDGE ADAPTER FOR DOT/LINE APPLICATION
- 7099 BLANK CARTRIDGE INCL. PISTON
- 5398 CARTRIDGE PREHEATER
- 29580 ACRTLDGEDAPTET FOR BOT DINTEL APPLICATION
Brand : Reka
Model : TR 60 LCD
Category : Glue gun