
TR 700 - Glue gun Reka - Free user manual and instructions
Find the device manual for free TR 700 Reka in PDF.


| Product Type | Glue gun |
| Brand | Reka |
| Model | TR 700 |
| Power Consumption | 60 W |
| Operating Temperature | 200°C (392°F) |
| Glue Stick Diameter | 7 mm (0.28 in) |
| Glue Stick Length | 200 mm (7.9 in) |
| Warm-up Time | Approx. 3-5 minutes |
| Flow Rate | Approx. 10 g/min |
| Dimensions (H x W x D) | 200 x 150 x 80 mm (7.9 x 5.9 x 3.1 in) |
| Weight | 300 g (10.6 oz) |
| Power Supply | 220-240 V AC, 50/60 Hz |
| Included Accessories | Stand, 2 glue sticks |
| Nozzle Type | Precision tip, replaceable |
| Safety Features | Overheat protection, non-slip grip |
| Maintenance | Clean nozzle with isopropyl alcohol; let cool before storage |
| Repairability | Replaceable nozzle and heating element; user-serviceable |
Frequently Asked Questions - TR 700 Reka
User questions about TR 700 Reka
0 question about this device. Answer the ones you know or ask your own.
Ask a new question about this device
Download the instructions for your Glue gun in PDF format for free! Find your manual TR 700 - Reka and take your electronic device back in hand. On this page are published all the documents necessary for the use of your device. TR 700 by Reka.
USER MANUAL TR 700 Reka
Product Manual for Pneumatic Reka Glue Guns

Table of Contents
ProductDescription1
GeneralSafetyInstructions2
SafetyMeasuresduringOperation3
Start-upandControl4
CleaningandMaintenance8
Trouble-Shooting10
EnvironmentalProtection11
AdditionalInformation11
EUDeclarationofConformity12
SpareParts|TechnicalSpecifications|Accessories
TR50.414
TR55LCD/HT16
TR60LCD/HT18
TR700
20
TR70LCD/HT22
TR80LCD/HT24
Product Description
Dear customer,
theglueapplicatoryoupurchasedwillhelpyoutogluepartstogethermoreeasilyandmorerapidly.Toensureoptimum usageoftheglueapplicatorwerecommendthatyoureadtheseinstructionsthoroughlybeforeusingtheapplicatorfor thefirsttime.
Thetypeofyourapplicatorcanbetakenfromthenameplatefittedtothesideofthecasing.

Eggenstein-Leopoldshafen, March 1st 2016
Indended Use
The applicator works with hot glue which is dispensed by a pneumatic conveying system. It is suitable for hotmelt from 2.000 - 15.000 mPas*. The glue applicator should only be used by trained, instructed and authorized persons who have been familiarized with its proper use and the safety precautions. Handling the applicator properly will avoid unnecessary accident hazards and problems. Bodily injury or material damage caused by not using the glue applicator as intended shall not be the manufacturer's,buttheuser'sresponsibility.
*lessthan2.000andmorethan15.000mPaspossiblewithlimitations.
General Safety Instructions
Care and Diligence of the User
The glues applied to the design and fabricated conformity with the applicable harmonized standards and additional technical specifications. So, it is state of the art and ensures maximum safety. This safety, however, can only be achieved in the operational practice, if all then necessary measures are taken. The user of the equipment shall be obliged to plan these measures and to make sure that they are taken.
In particular, the user shall ensure that
- theapplicatortobeusedisingoodworkingcondition.
- the personal protective equipment (protective gloves, safety goggles) required for the operating personnel is available and used.
- theoperatinginstructionsareinlegibleconditionand availabletotheoperator.
- onlysufficientlyqualifiedandauthorizedpersonnel operatesandmaintainstheapplicator.
- thispersonnelisregularlyinstructedintheapplicable regulationsofoperationalsafetyandenvironmental protectionandknowstheoperatinginstructionsand, inparticular,thesafetyinstructions.
Making the Information Available
Thisoperatingmanualshallalwaysbekeptattheplace ofoperationoftheapplicator.Besurethatallpersopersons handlingtheapplicator can consulttheinstructions atanytime.Inadditiontothisoperatingmanual,there mustbeavailableinstructionsregardinglegalandother mandatoryregulationsrelatingtoaccidentprevention andtorelevantrequirementsoftheemployers'liability insuranceassociation.
Safety Symbols
Thisoperatingmanualgivesconcretesafetyinstructions toalerttheusertoremainingunavoidablehazards.
Thesehazardsimplydangerets to
- persons
- productandequipment
Meaning of the Symbols used in the Manual

This symbol indicates that there is, above all, dangertopersons, but also to equipment and material.
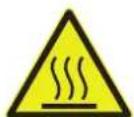
Caution:hotsurface! AccidentPreventionRegulation/BCG25-25 - W26Hots surface, such as machine parts, tanksormaterials, but also hot liquids cannot always be perceived. Theutmost cautionis advised when this symbol is attached to a component. Wearprotective gloves whenever you have to touch hot surfaces.

To avoid accidents lay the cablesso that they will not cause any risk of stumbling.

Wearprotectiveglovesandsafetygoggles wheneveryouworkwiththeapplicator.If thesafetyglovesignisn'tclearlyvisibleor notatallontheglueapplicatorplease contactRekaKlebetechnikGmbH&Co. KG.

Safety Measures to be taken during Operation
The applicator must only be used by trained, instructed and authorized persons. These persons must have read the operating instructions and be able to work accordingly. Before using the applicator, check it for visible damage and make sure that it is only used when in proper and safe condition. Notify detected defect to the appropriate person immediately.
Safety Instructions for the Operation of the Hot-Melt Applicator

Wearprotectiveglovesandsafety goggleswheneveryouworkwiththe applicator.

Avoidaccidentsbystumbling-Layall cables, hosesandconduitssothatthey willnotcauseanyriskofstumbling. For this, installcableductsandbridges.
Onlyfillthetankupto1.5cmundertheupperrim. m.

Neverexcess the operating temperature of the test melt. This temperature is indicated in the technical specification of the glue. Overheating may lead to decomposition which may affect the health of the user as well as the operability of the applicator.
Oncetheglueapplicatorhaswarmedup,nozzleand lidareveryhot.
Donotstartworkingbeforefittinganozzlefirst.
Onlyreplacenozzlewhenapplicatoriswarm.
Unplugtheconnectingcablebeforereplacinga nozzle. Warning:riskofburns!Whenanozzleis replaced,liquidgluemightleakout.
Neverbringthehotnozzleintocontactwiththecable.
Neverdirectthegluejettowardspeople.

Ifhotgluecomesintocontactwiththe skin,coolitwithcoldwaterimmediately. Donottrytoremovethehot-meltfromthe skinfirst.Ifnecessary,consultadoctor.If hotgluecomesintocontactwiththeeyes, immediatelycoolthemunderrunning waterforabout15minutesandconsult yourdoctoratonce.
Alwaysdeposittheglueapplicatoronthewirestandor therespectiveplatedestinedforthispurpose.
Donotlaytheapplicatoronitsside.

Neverholdnozzletopupward. Otherwise hot-meltmayreachthelid. This causes theventingmechanismtogetcloggedor alsoletshot-meltleakoutofthe applicatorwhenthelidisopened.
Donotcarryoutoverheadwork.
Stopusingtheequipmentimmediately,ifthecasingis damagedduetoshock,breakageorheavywear.
Donotfeedsolvent, benzine, benzene, toluene, acetone, turpentine or other flammable material. Riskofexplosion!
Start-up and Control

Wearprotective gloves and safety goggles whenever you work with the applicator.

Avoid accidents by stumbling lay all cables, hoses and conduits so that they will not cause any risk of stumbling. For this, install cableducts and bridges.

Neverdirectthegluejettowardspeople!
Donotlaytheapplicatoronitsside.

Neverholdnozzletopupward.
Donotcarryoutoverheadwork.

Neverstartworkingbeforefittinganozzle first.
Changenozzlesonlywhentheapplicatoriswarmedup.d up.
Open lid only when the application is treated up.
Domotoverchargetheapplicator;onlyfillituptomax. 1.5cmbelowupperrim.
The heating temperatures should beloweredduring longerworkbreakstopreservethehot-melt. Ongoing heating make the hot-melt coke and may also change its characteristics.
Stopusingtheequipmentimmediately,ifthecasingis damagedduetoshock,breakageorheavywear.
The glue application only be used/ applied for its intended purpose. Pleaseread the chapter, General Safety Instructions.
If it is not used as intended, this may cause personal injuries or equipment damages. Disregard of the safety instructions for the use of the applicator may lead to serious burns.
Before you use the applicator perform functionality test according to the following list:
• Iscompressedairsuppliedtotheglueapplicator?
- Istheapplicatorconnectedtoacompressorwithoil mistseperator?
- Isthepressuremax.6barsandmin.2bars?
- Istheapplicatorconnectedto230volts(or120volts, ifrequiredbythespecificapplicator)?
- Istheapplicatorswitchedon?
- Isthenozzlecleanandfreeofforeignmatters?
- Hastheheat-uptimeofapprox.10minutes (dependingongluetype)beenkept?
- Ishot-meltglueinthemeltingtank?
Setting the hot-melt working temperature (all LCD types)

Switchingthetemperature controlonandoff: Pressthebuttonto
switch the temperature control on or off. If the temperature control is switched off, three hyphens(---) will be on the display.

Raising the temperature: Pressthebuttonuntilthe desiredtemperatureis
indicated.Pressthebuttononcetoconfirmthe setting.Aslongasthecircuitboardisintemperature adjustmentmodetwodotswillappearbehindthefirst twodigits.
Reducing the temperature: Pressthebutton until the desired temperature is indicated. Pressthebutton on ceto confirm the setting. As long asthe circuit board disintemperature adjustment modet wodotswill aprear behind the first two digits.
While the applicator is heating up to the set temperature, then number on the display are flashing.
Setting the Working Temperature of the Hot-Melt (TR 50.4)
After having stated the application water for approx. 10 minutes and check the working temperature at the thermometer. If necessary, correct the temperature at the thermostat.
- Clockwise=highertemperature
- Anti-clockwise=lowertemperature
Minorleakingoutofthenozzleduringtheheat-upphase isduetothehot-meltexpandinginthenozzle/heating chamber.Assoonastheworkingtemperatureis reached,thehot-meltwillstopleaking.
General Notice on Hot-Melt Working Temperature (all Applicators)
Pleasenote:
Thetemperatureregulationisnotcalibrated!!fanexact temperatureisrequired,useacalibratedthermometerto checkthetemperature.Pleasealsonotethattheoutside temperatureofthemeltingtankdiffersfromtheactual temperatureinsidethemeltingtgrtank.
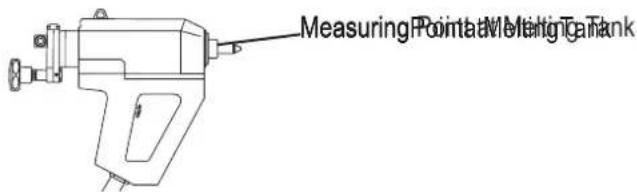
Theheatingtemperatures should below erdduringlonger workbreakstopreservethehot-melt. Ongoingheating makesthehot-meltcokeandmayalsochangeits' characteristics.
Working with a Balancer (Suspender) (Accessories)
If the glue applicator is fixed to a balancer (suspender), it is recommended to set the suspension #10436. Thereby it is avoided that by an positioning, glue gets into the ventralve.
ThisappliestoglueapplicatorsTR50.4, TR55, TR60, TR700, TR70, TR80.

Stand including Pressure Regulator and Manometer (Accessories)
The precision adjustment for the compressed air regulates your gauge application to the set pressure may be read from the indication of the manometer.
- Whenyouusethestandfordepositingtheapplicator, removethewirestand.
- Connectthecompressed-airhosetotherearsideof thestand. Connecttheglueapplicatorandthestand withthecompressed-airhosewhichisfirmlyfittedto theglueapplicator.(TR50.4/55/700/70)
- Pressurecontrollerontheright=airforglueoutput 1-6bars*(StandforStoring2770andTR60/80)
- Pressurecontrollerontheleft=airforsprayair discharge1-6bars*(TR60/80)
Working with Stationary Equipment (in connection with pneumatic foot switch) (Accessories)

Warning:
Riskofburns!When,inthestationary modeofoperation,workpiecesare passedbelowtheglueapplicatorby hand,thereisariskofburns;so,itis absolutelynecessarythatyouwear protective gloves.
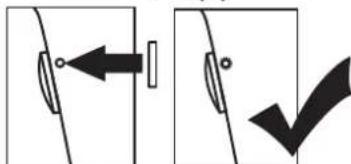
First,mount the preneumatic foot switch and the stationary equipment. Therelevant instructions are supplied together with the respective accessories. To connect the system, proceeds as follows:
- Pressthetriggerdownand holdit.
- Puttheenclosedplugintothe boreholeprovidedforthispurpose atonesideofthecasinghandle.
- Releasethetrigger.
- Thetriggerislocked.

Start-up and Control
Loading Hot-Melt Glue (TR 50.4 / 55 / 60)
- As soon as the application is warmed up, then the starch (106) anti-clockwise and openthelidupward (TR50.4/60: item3; TR55: item4). Now you can load the desired non-reactive glue.
- Onlyfillthetankuptoapprox.1.5cmbelowitsupper rim.Turnthestargripclockwisetoclosethelid.
- Ittakestheapplicatorapprox.3–10minutestomelt theglue,dependingonquantityandtypeoftheglueas wellastheprocessingtemperature.
- Toapplyglue, pushthetrigger. Thedispensedamount iscontrolledbythetrigger, thepressureappliedtothe gluegunaswellasthenozzlediameter. Thelongerthe triggerispushedandthebiggerthenozzlediameteris, themoreglueisdispensed.
Using PUR Hot-Melt Cartridges (TR 700 / 70 / 80)
Cartridgesmayonlybeinsertedorexchanged,when theapplicatoriswarmoratedupDopDyusely use cartridgesinperfectcondition,thatiswithoutdents,etc., sothatthepistonmaymovefreelyinthecartridge.

Wearprotectiveglovesandsafety goggleswheneveryouworkwiththe applicator.

Whentheapplicatorhaswarmedup, thereisariskofburns!

If,whenchangingthecartridge,another typeofglueisused,thenozzlemustbe rinsedthoroughly(seechapter,Cleaning oftheNozzle/NozzleAdapter").
Theheatingtemperatureshouldbelowered duringlongerworkbreakstopreservethehot-melt. Ongoingheatingmakesthehot-meltcoke andmayalsochangeits'characteristics.
Preparation of the Cartridge
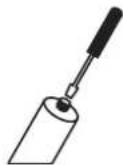
Toopenthecartridgepiercetheoutlet, usingapointedtool.

Screwnozzleadapterandnozzleonto thecartridge.
Preheating the Cartridge
To ensure optimal operation is recommended to use Reka cartridge preheater (article 5398 (230 V); article 5399(120V). Cartridges in the cartridge preheater should always be fitted with nozzle adapter and nozzle.
Loading the Hot-Melt Cartridge
Assoonastheapplicatorhaswarmedup,turnthestargrip(item6)anti-clockwiseandopentheliid(item5) upward.
Besurethatthecartridge getlethas been opened and a adapter and hozzla refitted (see „Preparationofthe Cartridge“).
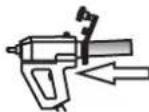
Insertthecartridgeintothe cartridgeapplicator.

Allowapprox.20minutesforthe applicatortowarmup(depending onthetypeofglue).Warming-up willnottakeaslong,ifthecartridge hasbeenpreheated.

Applythehot-meltglue.
Ifanemptycartridgeisreplacedbyafullonecontaining adifferenttypeofglue, nozzleandadaptermustbe cleaned. For this, pleaseread, Cleaningthe Nozzle/NozzleAdapterafterworkingwithPURHot-Melt GlueCartridges"inchapter,CleaningandMaintenance". (Page8).
Applying Hot-Melt Glue

Wearprotective gloves and safety goggles whenever you work with the applicator.

Neverstartworkingbeforefittinganozzle first.
Neverdirectthegluejettowardspeople!
Ifhotgluecomesintocontactwiththe skin,coolitwithcoldwaterimmediately. Donottrytoremovethehot-meltfromthe skinfirst.Ifnecessary,consultadoctor.If hotgluecomesintocontactwiththeeyes, immediatelycoolthemunderrunning waterforabout15minutesandconsult yourdoctoratonce.
Makeyourselffamiliarwiththeinstrumentfirst.Apply alittleglueinvaryingformsonapieceofpaperor cardboard.Forexample,lines,smallorbigsprayorglue points.Trytofindoutthecorrectquantityandtheideal patternbyadjustingtheairandgluequantitiesbymeans ofthepressureregulatoratthestand(TR60/80), alwaysobservingthecorrectworkingtemperaturesofthe specifichot-melt.Thistemperatureisindicatedinthe technicaldatasheetoftherespectivehot-melt.
Spraying Hot-Melt Glues (TR 60 / 80)
Thesuppliedhot-spraysystesTRO/80are designed for spraying pressure-sensitive adhesives and PURhot-meltglues. Please check, whether the completes spray head(drawingDetailFront) is fitted to the applicator; if this is not the case, attach it. Thespraycap(#3088) must bescrewed on slightly by hand; never use any tools. You are advised to wear protective gloves. Donot
turnoffthesprayairaslongasaspraycapisfittedto thegluegun.
Modification for Dot and Line Application (TR 60 / 80)
Forthis, the completes spray head must be exchanged. Pleaseread the following chapter, Re: Racement of Nozzles" (see below). Thenozzle-adapter-assembly is shown on page 19 for TR60 and page 25 for TR80. To apply dots and lines, the pressureregulator for the spray air on the stand must be set to zero pressure.
Replacement of Nozzles
Warning:riskofburns! Ifhotgluecomesintocontactwiththe skin,coolitwithcoldwaterimmediately. Donottrytoterwarethe hot-meltfrom the skinfirst.Ifnecessary,consultadoctor.If hotgluecomesintocontactwiththeeyes, immediatelycoolthemunderrunning waterforabout15minutesandconsult yourdoctoratonce.

Foryouwnsafetywearprotective glovesandsafetygoggleswheneveryou workwiththeapplicator.

Unplugtheconnectingcablebefore replacingnozzles!
Only replacenozzleswhentheapplicatoriswarm (applicatortemperature60-80°C) and the gluetankis empty. Replacinganozzlewhentheapplicatoriscold, may damage the applicator. If thenozzle is replaced when the applicatoristoohot, liquid gluemayleakout. For themeltingrange and themeltingpointofthe used glue, please seethetechnical datasheet of the respective glue.
After Work
Pleaseunplugthedeviceafterworkingwithit.Donot unplugitbypullingthecord,pullthepluginstead.
Cleaning and Maintenance
Theapplicatoristobemaintainedbyskilledpersonnel onaregularbasis. Thefrequencyofmaintainance dependsonwearandthehotmeltinuse.
Neverfillsoiledglueintothemeltingtank. The heating temperatures should beloweredduringlongerwork breakstopreservethehot-melt. Ongoingheatingmakes thehot-meltcokeandmayalsochangeits' characteristics. If you follow all advices given in the operating manual, the glue applicator does normally not need cleaning. Then on reactive glue contained in the applicator will remelt and can be used for glue ing again. The working temperature of these respective glue may be taken from the technical datasheet which can be procured from the producer of the glue. This temperature must not be exceeded, otherwise the glue may coke in the glue applicator. Hot-meltson apolyamide basis are particularly sensitive. If the glue has coked, the applicator should be cleaned. If a special cleaning agent is needed, information on this cleaning agent is available at your gluesupplier.
Nevercleantheapplicatorwithsolvent,benzine, benzene,toluene,acetone,turpentineorotherflamable material.Riskofexplosion!
WhenreactivePURhot-meltgluesareused, theadapter and thenozzlesmustbeflushedthoroughly. For this, use aspecialcleaningagentin310mlcartridges. Please ask yourgluesupplierforthecleaningagentsuitedforthe hot-meltusedbyyou.
Cleaning the Nozzle/Nozzle Adapter after having applied PUR Hot-Melt Cartridges (TR 700 / 70 / 80)
When the application will not be used for a longer time, were recommend that you clean them to the adapter because PURhot-melts may harden within a short time and cannot melt anymore.

Warning:riskofburns!

Foryourownsafetyyouareadvised towearprotectiveglovesandsafety goggleswhirnmeptaleicigogozzizes.
Proceed as follows:

Removethe PDBabridge from the applicator.
Unscrewthenozzleaderfrom thewarmgluecartridge.
Useapointedtooltoopentheoutletof thePUR-cleanercartridge.

Screwthenozzleadapteronthe screwthreadofthecleanercartridge.

Insertthecleanercartridgeinthe applicator.Pleaseasktheglue producerforthecleaningagent suitedfortheglueusedbyyou.

20min.
Allowabout20minutesforthe applicatortowarmupthecleaner.
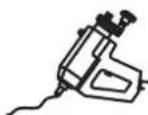
Flushthenozzleaderwith cleaneruntilyouseecleaning agentcomeoutsteadily.
Removethecleanercartridgefromtheapplicatorand unscrewthenozzleadapterandnozzlefromthecleaner cartridgewhileitisstillwarm.
Caution: Hotcleaningagentmayflowout! Allowthecleanercartridgetocoolandkeepitforfurther use.
Cleaning the Vent Valve
Eachtimethetrigger(item7)hasbeenpulled,the applicatormustaudiblyventthroughtheventvalve ("SEV").Ifthesoundabsorber(item8)gotstuck,the gluetankmaybeunderpressure.

Warning:
With this hot gemight come out of the sound absorber!

Iftheventvalveisclogged, hot-meltcan exitthegluegunthroughthenozzleeven whenthedeviceisswitchedoff!
Preventliquidgluefromgettingintothesoundabsorber, whentheapplicatorisreadyforoperationby...
- depositing the glue applicator on a level plane, using its wire bracket;
- depositing the glue applicator on the stand (#2770, included in TR60/TR80);
- suspending the glue applicator at a spring balancer (#3544);
- fillingtheglueapplicatoronlyuptoapprox.1.5cm belowtheupperrim;
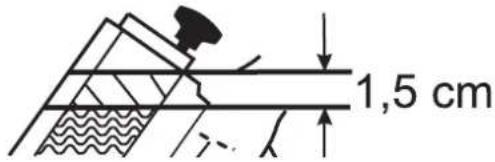
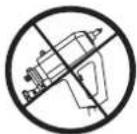
• alwayspointingthenozzledownwards.
Ifneverthelessgluegotintotheventvalve,replaceitor cleanitifpossibleandwhentheglueguniswarmedup. Replacementorcleaningoftheventvalvewhentheglue guniscoldmayleadtodamagingthedevice.
Trouble-Shooting
List of possible fault indications and assistance in trouble-shooting
In case of damage, send the glue applicator to Reka, indicating type and serial no. of your applicator. Self-made repairs void the warranty.
| Fault | Possible Cause | Measures to be taken |
| No or too little glue output, though the heat-up time has been observed exactly | ·Foreign objects in nozzle? | ·Replace nozzle |
| ·Low air pressure | ·Check pressure settings and check air pressure supply if applicable | |
| ·Low hot-melt temperature | ·Check temperature setting | |
| ·Cartridge devices TR 700 / 70 / 80: The piston in the cartridge can't move freely | ·Replace cartridge | |
| Hot-melt is too thin or too | ·Temperature either too high or too low | ·Check the temperature |
| Hot-melt contains brown flakes | ·Hot-melt was heated over recommended temperature | ·Lower the heating temperature |
| ·Hot-melt was heated for too long and is coked | ·Lower the heating temperature during work breaks | |
| Leaking nozzle | ·Silencer / Vent Valve is clogged | ·Clean the vent valve and replace silencer |
| ·Foreign objects in nozzle? | ·Replace nozzle | |
| ·Cartridge devices TR 700 / 70 / 80: The piston in the cartridge can't move freely | ·Replace cartridge | |
| Applicator doesn't heat up | ·Device is switched off | ·Check power supply·Turn on applicator, if applicable (LCD-Models).·TR 700: Turn on on-/off-switch. |
| Spray pattern is not as desired (TR 60 / 80) | ·Setting of pressure on air / hot-melt needs to be adjusted | Check air-pressure:·Set pressure regulator of hot-melt to zero at stand·Set pressure regulator of spray air to maximum (max. 6 bar) at stand·Set temperature to 200 °C·Hot-air must exit the spray cap after about 30 seconds |
| ·Hot-melt is not suitable for spray application | ·Use suitable hot-melt |
Environmental Protection
Neverthroveelectrictoolsistredomesticwaste. According to the Europe and Directive 2002/96/EC for use electricic and electronic devices and according to national regulations, use electric tools must be collected separately and treated in an environmentally compatible way for use.
PackingmaterialusedbyRekaKlebetechnikcanberecycledcompletely.
Pleasetakeinstructionsforthedisposalofhot-meltgluesandhot-meltcartridgesfromtherespective safetyspecifications.

Additional Information
Doyouhaveanymorequestionsorrequests?We will beglache helpyou.
Pleasecontactusby:
Telephonesales+4972197078-30
Telephonereception+4972197078-0
Telefax+49721705069
EU Declaration of Conformity
Product: HotMeltGleAppliators
Type:TR50.4
TR55LCD
TR55LCDHT
TR60LCD
TR60LCDHT
TR700
TR70LCD
TR70LCDHT
TR80LCD
TR80LCDHT
This is to certify that the above applicators in the design marketed by us are in conformity with the following EC directives:
until 15-01-2007:73/23/EEC, from 16-01-2007: 2006/95 EC
until19-07-2009:91/368EEC, from20-09-2009:2004/108EC
until28-12-2009:89/336EEC, from29-12-2009:2006/42EC
2002/95/EC
The following standards have been applied:
IECCISPR14
IEC60335
IEC60204
IEC61000
This declaration of conformity shall get invalid, if the product is modified, extended, or otherwise changed without express approval of RekaKlebetechnik
- and/or other components than accessories of Reka Klebetechnik are fitted,
- andiftheproductisnotconnectedorusedasintended.
Eggenstein-Leopoldshafen, 1. March 2016
Chinda Aocu drust
ChristaArmbruster
ManagementPurchasingandProduction
Spare Parts Technical Specifications Accessories

Spare Parts TR 50.4

| No. | Art.No. | nameofarticle |
| 1 | 2518 | Thermometer |
| 2 | 2517 | Thermostat |
| 3 | 3657 | Lid"A"forTR50.4/60 |
| 4 | 3661 | Lid"D"forTR55 |
| 5 | 3660 | Lid"C"forTR70/700/80 |
| 6 | 2613 | StarGrip |
| 7 | 2711 | Trigger |
| 12 | 3074 | NozzleM14forTR50.4/55 |
| 13 | 1143 | NozzleM10forTR70/700 |
| 25 | 2884 | LockNutforLidRelease |
| 28 | 2911 | Coversafetyscrew |
| 35 | 2958 | Adapter |
| 38 | 2918 | Switchon/off |
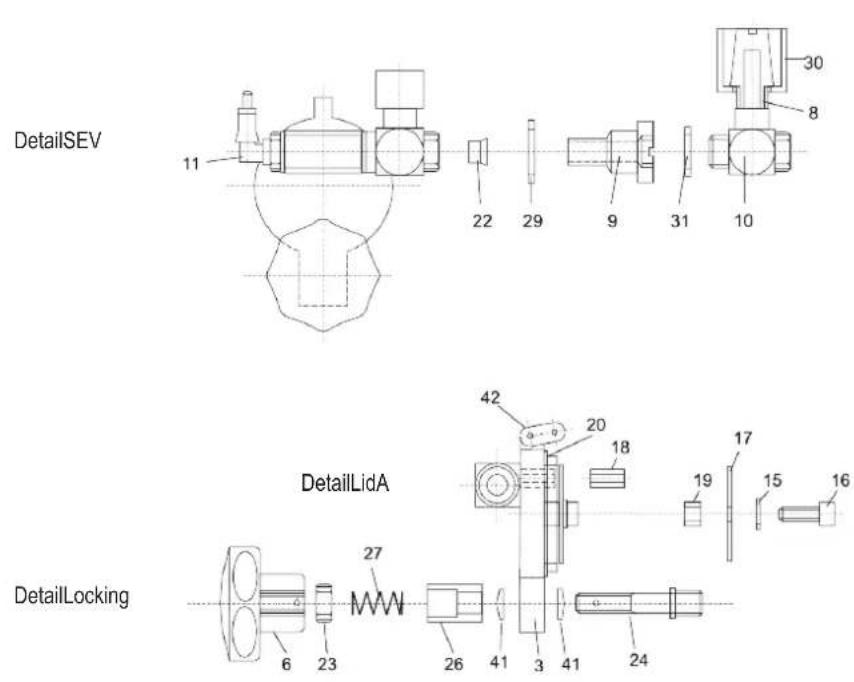
| No. | Art.No. | nameofarticle |
| 3 | 3657 | LidAforTR50.4/60 |
| 4 | 3661 | LidDforTR55 |
| 5 | 3660 | LidCforTR70/700/80 |
| 6 | 2613 | StarGrip |
| 8 | 2683 | SoundAbsorberSEV |
| 9 | 2693 | DT-SEV |
| 10 | 3016 | L-Screwing |
| 11 | 2697 | 90°-Screwing |
| 14 | 3051 | SprayNozzle |
| 15 | 2800 | Disc |
| 16 | 2801 | ScrewM6x16 |
| 17 | 2819 | Plate |
| 18 | 2820 | Spacer |
| 19 | 2802 | Intensification |
| 20 | 2603 | O-RingD40x3forTR50.4/60 |
| 22 | 2696 | Membrane |
| 23 | 3665 | LocknutM8 |
| 24 | 2883 | Lidreleaseshaft |
| 26 | 2885 | Spacerbush |
| 27 | 2718 | Spring |
| 29 | 2692 | O-RingSEV |
| 30 | 2694 | CapSEVD18 |
| 31 | 2695 | O-RingDTSEV |
| 32 | 3088 | SprayCap |
| 33 | 2616 | Spacer25x2 |
| 36 | 2955 | FlatSealGasket |
| 37 | 2953 | Cartridgepiercer |
| 41 | 2124 | DiscSpring |
| 42 | 2617 | Hingelink |
| 43 | 2533 | O-Ring40x4 |
| 2621 | Repairing-SetSEV | |
| 2882 | Lockingcomplete |
Technical Data Glue Gun TR 50.4
| TR5040 | ||
| ArticleNumber | 5327(230V)5333(120V) | 5327 (230 |
| Weight1200g | ||
| PowerSupply230V/50Hz120V/60Hz | ||
| PowerConsumption550Watt(230V)400Watt(120V) | ||
| CurrentConsumption | 2,2A | 3,3A |
| Degreeofprotection | IP30 | |
| Classofprotection | I | |
| Temperaturecontrol | Thermostat | |
| Temperaturelimitation | Temperaturemonitor | |
| Operatingtemperature | 50-200°C | |
| Consistencyoftemperature | ±5°C | |
| Temperatureindication | analog | |
| Heat-uptime | approx.3-10min. | |
| GrossTankCapacity | 250ml | |
| Conveyingsystem | Airpressure | |
| Operatingpressure | 0,5-6bar | |
| Lengthofelectriccord | 8,5m | |
| Lengthofairtube | 3m | |
| Lengthofconnectionkit | 3m | |
| Recommendedmelts | Hot-meltgranulate,pillowsand43mmsticks/slugs | |
Accessories (optional)
3466NozzleSetM10Professional
3544S8sppede(BBaher)
2770StandforStoring
3746StationaryEquipment
3518Footswitch
5563PremelterVSB40(230V)
5567PremelterVSB40(120V)
Inquireaboutournozzlerange
Spare Parts TR 55 LCD / HT
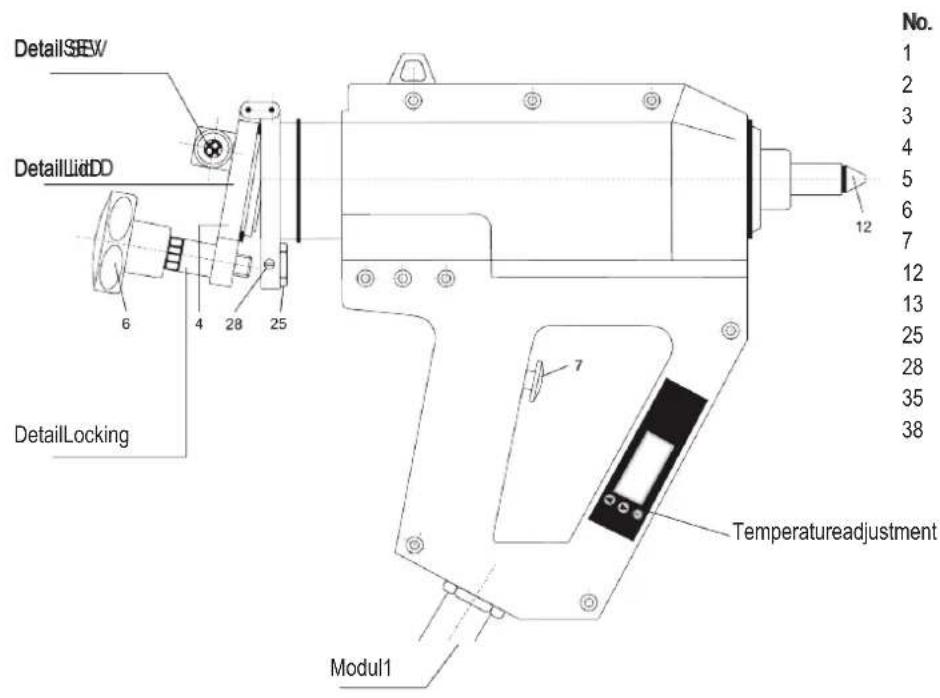
| No. | Art.No. | nameofarticle |
| 1 | 2518 | Thermometer |
| 2 | 2517 | Thermostat |
| 3 | 3657 | Lid"A"forTR50.4/60 |
| 4 | 3661 | Lid"D"forTR55 |
| 5 | 3660 | Lid"C"forTR70/700/80 |
| 6 | 2613 | StarGrip |
| 7 | 2711 | Trigger |
| 12 | 3074 | NozzleM14forTR50.4/55 |
| 13 | 1143 | NozzleM10forTR70/700 |
| 25 | 2884 | LockNutforLidRelease |
| 28 | 2911 | Coversafetyscrew |
| 35 | 2958 | Adapter |
| 38 | 2918 | Switchon/off |
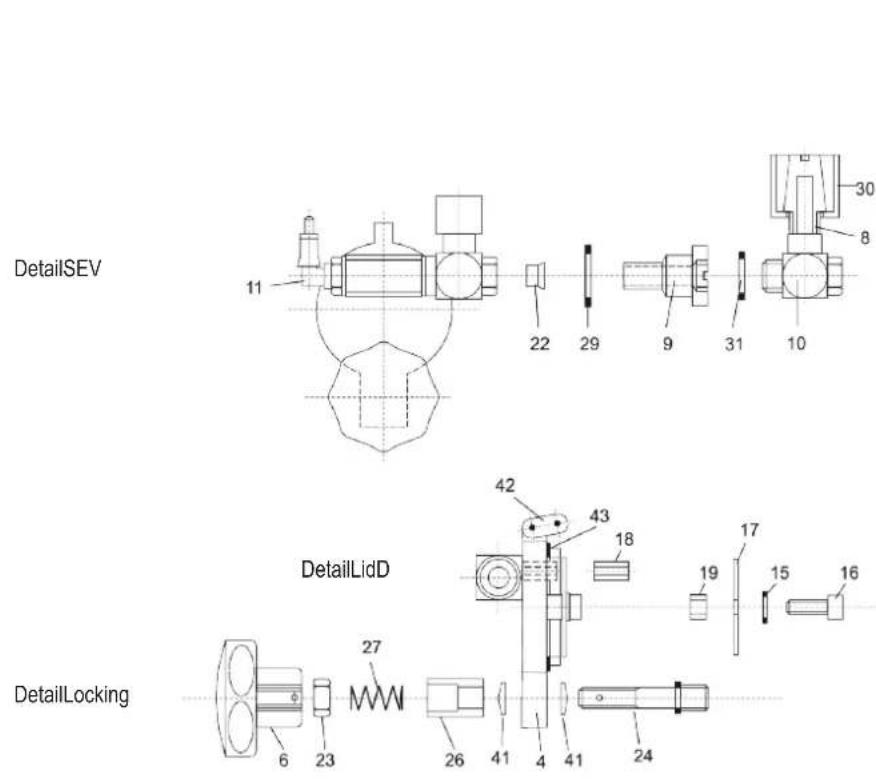
| No. | Art.No. | nameofarticle |
| 3 | 3657 | LidAforTR50.4/60 |
| 4 | 3661 | LidDforTR55 |
| 5 | 3660 | LidCforTR70/700/80 |
| 6 | 2613 | StarGrip |
| 8 | 2683 | SoundAbsorberSEV |
| 9 | 2693 | DT-SEV |
| 10 | 3016 | L-Screwing |
| 11 | 2697 | 90°-Screwing |
| 14 | 3051 | SprayNozzle |
| 15 | 2800 | Disc |
| 16 | 2801 | ScrewM6x16 |
| 17 | 2819 | Plate |
| 18 | 2820 | Spacer |
| 19 | 2802 | Intensification |
| 20 | 2603 | O-RingD40x3forTR50.4/60 |
| 22 | 2696 | Membrane |
| 23 | 3665 | LocknutM8 |
| 24 | 2883 | Lidreleaseshaft |
| 26 | 2885 | Spacerbush |
| 27 | 2718 | Spring |
| 29 | 2692 | O-RingSEV |
| 30 | 2694 | CapSEVD18 |
| 31 | 2695 | O-RingDTSEV |
| 32 | 3088 | SprayCap |
| 33 | 2616 | Spacer25x2 |
| 36 | 2955 | FlatSealGasket |
| 37 | 2953 | Cartridgepiercer |
| 41 | 2124 | DiscSpring |
| 42 | 2617 | Hingelink |
| 43 | 2533 | O-Ring40x4 |
| 2621 | Repairing-SetSEV | |
| 2882 | Lockingcomplete |
TR55LDDR55LCDTR55LCBH5TR55LCDHTR 55 LCD HT TR 55 LCD HT
| ArticleNumber5424(230V)5427(120V)5384(230V)5388(120V) | ||||
| Weight1400g | ||||
| Power Supply | 230 V / 50 Hz | 120 V / 60 Hz | 230 V / 50 Hz | 120 V / 60 Hz |
| Power Consumption | 600 Watt (230 V) | 400 Watt (120 V) | 600 Watt (230 V) | 400 Watt (120 V) |
| Current Consumption | 2,6 A | 3,3 A | 2,6 A | 3,3 A |
| Degreeofprotection | IP30 | |||
| Classofprotection | I | |||
| Temperaturecontrol | Electronic | |||
| Temperaturelimitation | Temperaturemonitor | |||
| Operating temperature | 50 – 210 °C | 50 – 210 °C | 50 – 235 °C(250°CConrequest) | 50 – 235 °C(250°CConrequest) |
| Consistencyoftemperature | ±2°C | |||
| Temperatureindication | digital | |||
| Heat-uptime | approx.3–10min. | |||
| GrossTankCapacity | 330ml | |||
| Conveyingsystem | Airpressure | |||
| Operatingpressure | 0,5–6bar | |||
| Lengthofelectriccord | 8,5m | |||
| Lengthofairtube | 5m | |||
| Lengthofconnectionkit | 3m | |||
| Recommendedmelts | Hot-meltgranulate,pillowsand43mmsticks/slugs | |||
Accessories (optional)
3465NozzleSetM14Professional
3544S8sppede(BaHocer)
2770StandforStoring
3746StationaryEquipment
3518Footswitch
5563PremelterVSB40(230V)
5567PremelterVSB40(120V)
Inquireaboutournozzlerange
Spare Parts TR 60 LCD / HT
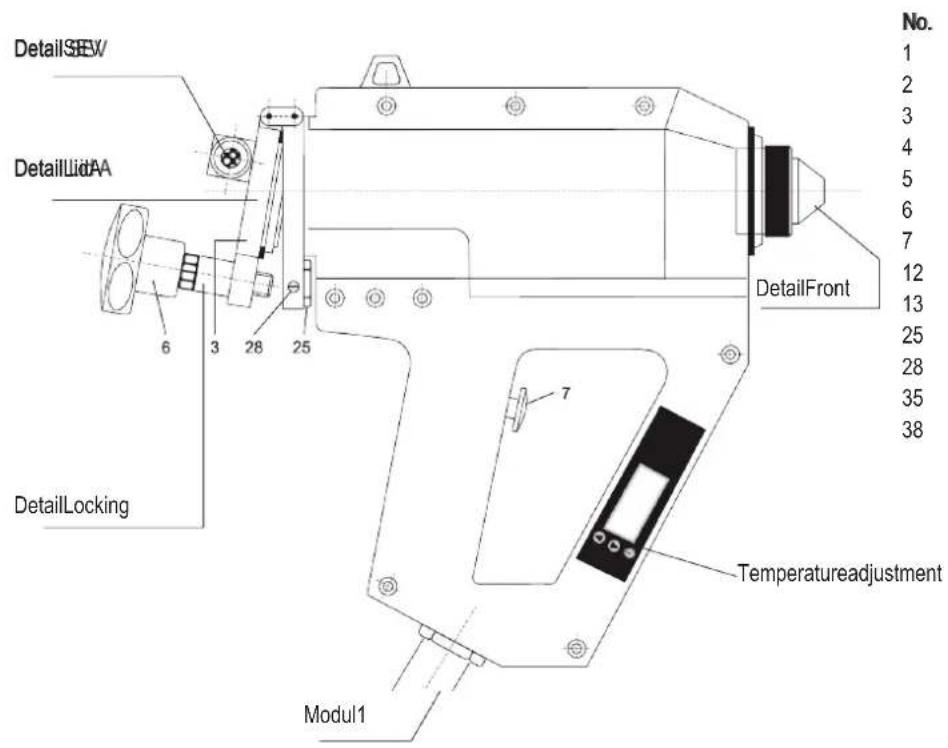
| No. | Art.No. | nameofarticle |
| 1 | 2518 | Thermometer |
| 2 | 2517 | Thermostat |
| 3 | 3657 | Lid"A"forTR50.4/60 |
| 4 | 3661 | Lid"D"forTR55 |
| 5 | 3660 | Lid"C"forTR70/700/80 |
| 6 | 2613 | StarGrip |
| 7 | 2711 | Trigger |
| 12 | 3074 | NozzleM14forTR50.4/55 |
| 13 | 1143 | NozzleM10forTR70/700 |
| 25 | 2884 | LockNutforLidRelease |
| 28 | 2911 | Coversafetyscrew |
| 35 | 2958 | Adapter |
| 38 | 2918 | Switchon/off |

| No. | Art.No. | nameofarticle |
| 3 | 3657 | LidAforTR50.4/60 |
| 4 | 3661 | LidDforTR55 |
| 5 | 3660 | LidCforTR70/700/80 |
| 6 | 2613 | StarGrip |
| 8 | 2683 | SoundAbsorberSEV |
| 9 | 2693 | DT-SEV |
| 10 | 3016 | L-Screwing |
| 11 | 2697 | 90°-Screwing |
| 14 | 3051 | SprayNozzle |
| 15 | 2800 | Disc |
| 16 | 2801 | ScrewM6x16 |
| 17 | 2819 | Plate |
| 18 | 2820 | Spacer |
| 19 | 2802 | Intensification |
| 20 | 2603 | O-RingD40x3forTR50.4/60 |
| 22 | 2696 | Membrane |
| 23 | 3665 | LocknutM8 |
| 24 | 2883 | Lidreleaseshaft |
| 26 | 2885 | Spacerbush |
| 27 | 2718 | Spring |
| 29 | 2692 | O-RingSEV |
| 30 | 2694 | CapSEVD18 |
| 31 | 2695 | O-RingDTSEV |
| 32 | 3088 | SprayCap |
| 33 | 2616 | Spacer25x2 |
| 36 | 2955 | FlatSealGasket |
| 37 | 2953 | Cartridgepiercer |
| 41 | 2124 | DiscSpring |
| 42 | 2617 | Hingelink |
| 43 | 2533 | O-Ring40x4 |
| 2621 | Repairing-SetSEV | |
| 2882 | Lockingcomplete |
TR60LDDR60LCDTR60LCBHTR60LCDHTR 60 LCD HT TR 60 LCD HT
ArticleNumber5461(230V)5462(120V)5382(230V)120Vuponrequest
| Weight1200g | |||
| Power Supply | 230 V / 50 Hz | 120 V / 60 Hz | 230 V / 50 Hz |
| Power Consumption | 480 Watt (230 V) | 400 Watt (120 V) | 480 Watt (230 V) |
| CurrentConsumption | 2,6A | 3,3A | 2,6A |
| Degreeofprotection | IP30 | ||
| Classofprotection | I | ||
| Temperaturecontrol | Electronic | ||
| Temperaturelimitation | Temperaturemonitor | ||
| Operating temperature | 50 – 210 °C | 50 – 210 °C | 50 – 235 °C(250°CConrequest) |
| Consistencyoftemperature | ±2°C | ||
| Temperatureindication | digital | ||
| Heat-uptime | approx.3–10min. | ||
| GrossTankCapacity | 250ml | ||
| Conveyingsystem | Airpressure | ||
| Operatingpressure | 0,5–6bar | ||
| Lengthofelectriccord | 4m | ||
| Lengthofconnections(standtohandgun) | 4,5m | ||
| Lengthofconnectionkit | 3m | ||
| Recommendedmelts | Hot-meltgranulate,pillowsand43mmsticks/slugs | ||
Accessories (optional)
3466NozzleSetM10Professional
3522Point-/Line-AdapterforTR60 60
3544SSuppender(Balancer)
3746StationaryEquipment
3518Footswitch
5563PremelterVSB40(230V)
5567PremelterVSB40(120V)
Inquireaboutournozzlerange
TR 60 LCD – Detail Front

Spare Parts TR 700
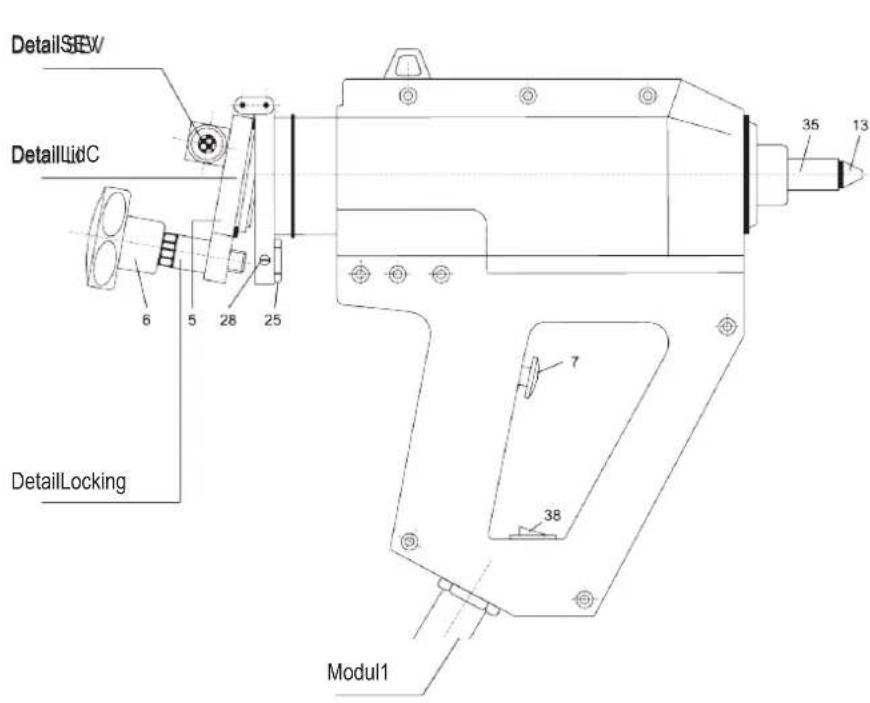
| No. | Art.No. | nameofarticle |
| 1 | 2518 | Thermometer |
| 2 | 2517 | Thermostat |
| 3 | 3657 | Lid"A"forTR50.4/60 |
| 4 | 3661 | Lid"D"forTR55 |
| 5 | 3660 | Lid"C"forTR70/700/80 |
| 6 | 2613 | StarGrip |
| 7 | 2711 | Trigger |
| 12 | 3074 | NozzleM14forTR50.4/55 |
| 13 | 1143 | NozzleM10forTR70/700 |
| 25 | 2884 | LockNutforLidRelease |
| 28 | 2911 | Coversafetyscrew |
| 35 | 2958 | Adapter |
| 38 | 2918 | Switchon/off |

| No. | Art.No. | nameofarticle |
| 3 | 3657 | LidAforTR50.4/60 |
| 4 | 3661 | LidDforTR55 |
| 5 | 3660 | LidCforTR70/700/80 |
| 6 | 2613 | StarGrip |
| 8 | 2683 | SoundAbsorberSEV |
| 9 | 2693 | DT-SEV |
| 10 | 3016 | L-Screwing |
| 11 | 2697 | 90°-Screwing |
| 14 | 3051 | SprayNozzle |
| 15 | 2800 | Disc |
| 16 | 2801 | ScrewM6x16 |
| 17 | 2819 | Plate |
| 18 | 2820 | Spacer |
| 19 | 2802 | Intensification |
| 20 | 2603 | O-RingD40x3forTR50.4/60 |
| 22 | 2696 | Membrane |
| 23 | 3665 | LocknutM8 |
| 24 | 2883 | Lidreleaseshaft |
| 26 | 2885 | Spacerbush |
| 27 | 2718 | Spring |
| 29 | 2692 | O-RingSEV |
| 30 | 2694 | CapSEVD18 |
| 31 | 2695 | O-RingDTSEV |
| 32 | 3088 | SprayCap |
| 33 | 2616 | Spacer25x2 |
| 36 | 2955 | FlatSealGasket |
| 37 | 2953 | Cartridgepiercer |
| 41 | 2124 | DiscSpring |
| 42 | 2617 | Hingelink |
| 43 | 2533 | O-Ring40x4 |
| 2621 | Repairing-SetSEV | |
| 2882 | Lockingcomplete |
Technical Data Glue Gun TR 700
TR7000
| ArticleNumber5385(230V)5370(120V) | 5385 (230 V) | |
| Weight1400g | ||
| PowerSupply230V/50Hz120V/60Hz | ||
| PowerConsumption400Watt(230V)400Watt(120V) | ||
| Current Consumption | 1,75 A | 3,3 A |
| Degreeofprotection | IP30 | |
| Classofprotection | I | |
| Temperaturecontrol | Thermostat | |
| Temperaturelimitation | Temperaturemonitor | |
| Operatingtemperature | 120°C | |
| Consistencyoftemperature | ±5°C | |
| Heat-uptime | approx.3–10min. | |
| GrossTankCapacity | 310ml | |
| Conveyingsystem | Airpressure | |
| Operatingpressure | 0,5–6bar | |
| Lengthofelectriccord | 8,5m | |
| Lengthofairtube | 3m | |
| Lengthofconnectionkit | 3m | |
| Recommendedmelts | 310mlhot-meltcartridges | |
Accessories (optional)
3466NozzleSetM10Professional al
29580 Cartridgeadapterfordot/lineapplication
7099Blankcartridgeincl.piston
3544Suspender(Balancer)
2770StandforStoring
3746StationaryEquipment
3518Footswitch
5398CartridgePreheater
Inquireaboutournozzlerange
Spare Parts TR 70 LCD / HT
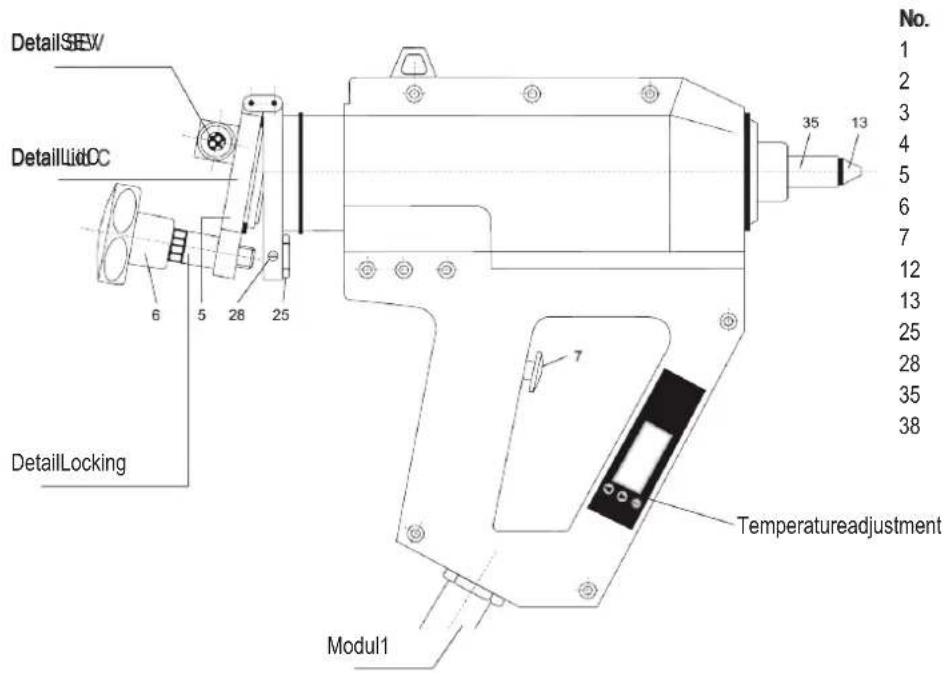
| No. | Art.No. | nameofarticle |
| 1 | 2518 | Thermometer |
| 2 | 2517 | Thermostat |
| 3 | 3657 | Lid"A"forTR50.4/60 |
| 4 | 3661 | Lid"D"forTR55 |
| 5 | 3660 | Lid"C"forTR70/700/80 |
| 6 | 2613 | StarGrip |
| 7 | 2711 | Trigger |
| 12 | 3074 | NozzleM14forTR50.4/55 |
| 13 | 1143 | NozzleM10forTR70/700 |
| 25 | 2884 | LockNutforLidRelease |
| 28 | 2911 | Coversafetyscrew |
| 35 | 2958 | Adapter |
| 38 | 2918 | Switchon/off |
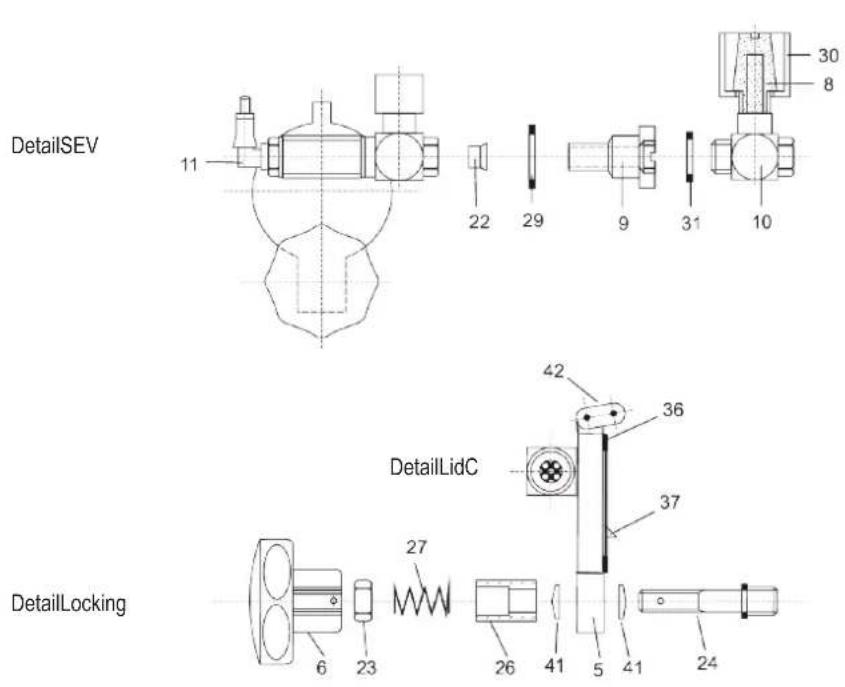
| No. | Art.No. | nameofarticle |
| 3 | 3657 | LidAforTR50.4/60 |
| 4 | 3661 | LidDforTR55 |
| 5 | 3660 | LidCforTR70/700/80 |
| 6 | 2613 | StarGrip |
| 8 | 2683 | SoundAbsorberSEV |
| 9 | 2693 | DT-SEV |
| 10 | 3016 | L-Screwing |
| 11 | 2697 | 90°-Screwing |
| 14 | 3051 | SprayNozzle |
| 15 | 2800 | Disc |
| 16 | 2801 | ScrewM6x16 |
| 17 | 2819 | Plate |
| 18 | 2820 | Spacer |
| 19 | 2802 | Intensification |
| 20 | 2603 | O-RingD40x3forTR50.4/60 |
| 22 | 2696 | Membrane |
| 23 | 3665 | LocknutM8 |
| 24 | 2883 | Lidreleaseshaft |
| 26 | 2885 | Spacerbush |
| 27 | 2718 | Spring |
| 29 | 2692 | O-RingSEV |
| 30 | 2694 | CapSEVD18 |
| 31 | 2695 | O-RingDTSEV |
| 32 | 3088 | SprayCap |
| 33 | 2616 | Spacer25x2 |
| 36 | 2955 | FlatSealGasket |
| 37 | 2953 | Cartridgepiercer |
| 41 | 2124 | DiscSpring |
| 42 | 2617 | Hingelink |
| 43 | 2533 | O-Ring40x4 |
| 2621 | Repairing-SetSEV | |
| 2882 | Lockingcomplete |
TR70LCDTR70LCDTR70LCBHTTR70LCDHTR 70 LCD HT TR 70 LCD HT
| ArticleNumber5422(230V)5423(120V)5386(230V)120Vuponrequest | |||
| Weight1400g | |||
| PowerSupply230V/50Hz | 120V/60Hz | 230V/50Hz | |
| Power Consumption | 600 Watt (230V) | 400 Watt (120 V) 600 Watt (230 V) | |
| Current Consumption | 2,6 A | 3,3 A 2,6 A | |
| Degreeofprotection | IP30 | ||
| Classofprotection | I | ||
| Temperaturecontrol | Electronic | ||
| Temperaturelimitation | Temperaturemonitor | ||
| Temperatureindication | digital | ||
| Operating temperature | 50 – 210 °C | 50 – 210 °C | 50 – 235 °C(250°C on request) |
| Consistencyoftemperature | ±2°C | ||
| Heat-uptime | approx.3–10min. | ||
| GrossTankCapacity | 310ml | ||
| Conveyingsystem | Airpressure | ||
| Operatingpressure | 0,5–6bar | ||
| Lengthofelectriccord | 8,5m | ||
| Lengthofairtube | 5m | ||
| Lengthofconnectionkit | 3m | ||
| Recommendedmelts | 310mlhot-meltcartridges | ||
Accessories (optional)
3466NozzleSetM10Professional
29580 Cartridge adapter for dot/line application
7099Blankcartridgeincl.piston
3544Suspender(Balancer)
2770StandforStoring
3746StationaryEquipment
3518Footswitch
5398CartridgePreheater
Inquireaboutournozzlerange
Spare Parts TR 80 LCD / HT
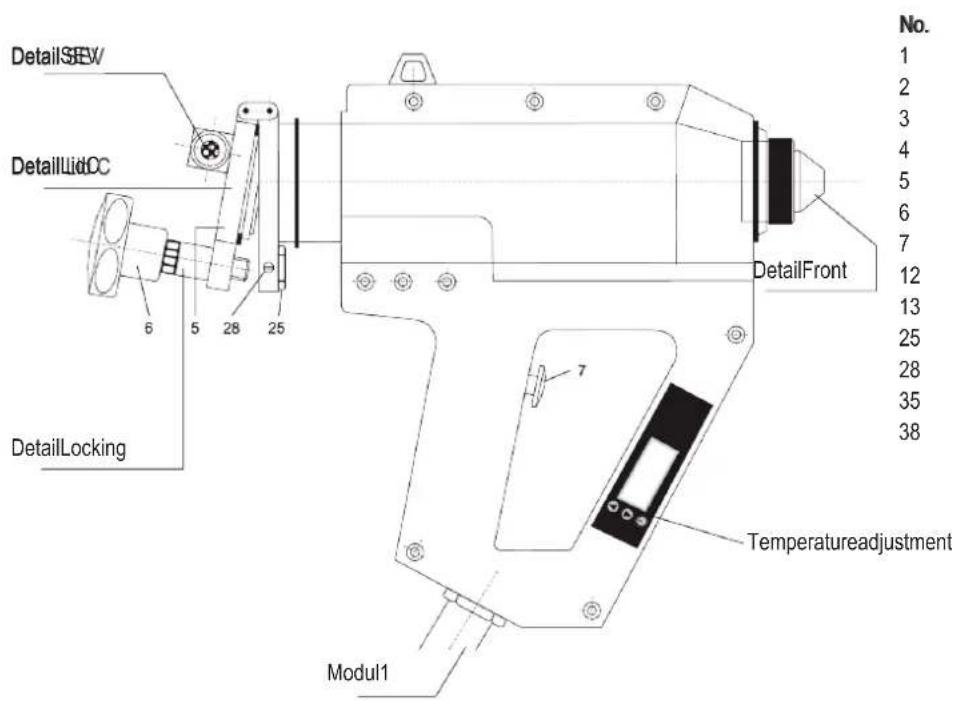
No. Art.No. nameofarticle
1 2518 Thermometer
2 2517 Thermostat
3 3657 Lid"A"forTR50.4/60
4 3661 Lid"D"forTR55
5 3660 Lid"C"forTR70/700/80
6 2613 StarGrip
7 2711 Trigger
12 3074 NozzleM14forTR50.4/55
13 1143 NozzleM10forTR70/700
25 2884 LockNutforLidRelease
28 2911 Coversafetyscrew
35 2958 Adapter
38 2918 Switchon/off

No. Art.No. nameofarticle
3 3657 LidAforTR50.4/60
4 3661 LidDforTR55
5 3660 LidCforTR70/700/80
6 2613 StarGrip
8 2683 SoundAbsorberSEV
9 2693 DT-SEV
10 3016 L-Screwing
11 2697 90°-Screwing
14 3051 SprayNozzle
15 2800 Disc
16 2801 ScrewM6x16
17 2819 Plate
18 2820 Spacer
19 2802 Intensification
20 2603 O-RingD40x3forTR50.4/60
22 2696 Membrane
23 3665 LocknutM8
24 2883 Lidreleaseshaft
26 2885 Spacerbush
27 2718 Spring
29 2692 O-RingSEV
30 2694 CapSEVD18
31 2695 O-RingDTSEV
32 3088 SprayCap
33 2616 Spacer25x2
36 2955 FlatSealGasket
37 2953 Cartridgepiercer
41 2124 DiscSpring
42 2617 Hingelink
43 2533 O-Ring40x4
2621 Repairing-SetSEV
2882 Lockingcomplete
TR80LDDR80LCDTR80LCBHTR80LCDHTR 80 LCD HT TR 80 LCD HT
| ArticleNumber5454(230V)5463(120V)5408(230V)120Vuponrequest | |||
| Weight1400g | |||
| PowerSupply230V/50Hz | 120V/60Hz | 230V/50Hz | |
| Power Consumption | 650 Watt (230 V) | 400 Watt (120 V) 650 Watt (230 V) | |
| Current Consumption | 2,8 A | 3,3 A 2,8 A | |
| Degreeofprotection | IP30 | ||
| Classofprotection | I | ||
| Temperaturecontrol | Electronic | ||
| Temperaturelimitation | Temperaturemonitor | ||
| Operating temperature | 50 – 210 °C | 50 – 210 °C 50 – 235 °C(250°C on request) | |
| Consistencyoftemperature | ±2°C | ||
| Temperatureindication | digital | ||
| Heat-uptime | approx.3–10min. | ||
| GrossTankCapacity | 310ml | ||
| Conveyingsystem | Airpressure | ||
| Operatingpressure | 0,5–6bar | ||
| Lengthofelectriccord | 4m | ||
| Lengthofconnections(standtohandgun) | 4,5m | ||
| Lengthofconnectionkit | 3m | ||
| Recommendedmelts | 310mlhot-meltcartridges | ||
Accessories (optional)
3466NozzleSetM10Professional
29580Acrtldgedaptetforbotdintelapplication
7099Blankcartridgeincl.piston
3544Suspender(Balancer)
3746StationaryEquipment
3518Footswitch
5398CartridgePreheater
Inquireaboutournozzlerange
TR 80 LCD – Detail Front





- PRODUCT MANUAL FOR PNEUMATIC REKA GLUE GUNS
- TABLE OF CONTENTS
- PRODUCT DESCRIPTION
- DEAR CUSTOMER
- INDENDED USE
- GENERAL SAFETY INSTRUCTIONS
- CARE AND DILIGENCE OF THE USER
- IN PARTICULAR, THE USER SHALL ENSURE THAT
- MAKING THE INFORMATION AVAILABLE
- SAFETY SYMBOLS
- MEANING OF THE SYMBOLS USED IN THE MANUAL
- SAFETY MEASURES TO BE TAKEN DURING OPERATION
- SAFETY INSTRUCTIONS FOR THE OPERATION OF THE HOT-MELT APPLICATOR
- START-UP AND CONTROL
- BEFORE YOU USE THE APPLICATOR PERFORM FUNCTIONALITY TEST ACCORDING TO THE FOLLOWING LIST
- SETTING THE HOT-MELT WORKING TEMPERATURE (ALL LCD TYPES)
- SETTING THE WORKING TEMPERATURE OF THE HOT-MELT (TR 50.4)
- GENERAL NOTICE ON HOT-MELT WORKING TEMPERATURE (ALL APPLICATORS)
- WORKING WITH A BALANCER (SUSPENDER) (ACCESSORIES)
- STAND INCLUDING PRESSURE REGULATOR AND MANOMETER (ACCESSORIES)
- WORKING WITH STATIONARY EQUIPMENT (IN CONNECTION WITH PNEUMATIC FOOT SWITCH) (ACCESSORIES)
- LOADING HOT-MELT GLUE (TR 50.4 / 55 / 60)
- USING PUR HOT-MELT CARTRIDGES (TR 700 / 70 / 80)
- PREPARATION OF THE CARTRIDGE
- PREHEATING THE CARTRIDGE
- LOADING THE HOT-MELT CARTRIDGE
- APPLYING HOT-MELT GLUE
- SPRAYING HOT-MELT GLUES (TR 60 / 80)
- MODIFICATION FOR DOT AND LINE APPLICATION (TR 60 / 80)
- REPLACEMENT OF NOZZLES
- AFTER WORK
- CLEANING AND MAINTENANCE
- CLEANING THE NOZZLE/NOZZLE ADAPTER AFTER HAVING APPLIED PUR HOT-MELT CARTRIDGES (TR 700 / 70 / 80)
- PROCEED AS FOLLOWS
- CLEANING THE VENT VALVE
- TROUBLE-SHOOTING
- LIST OF POSSIBLE FAULT INDICATIONS AND ASSISTANCE IN TROUBLE-SHOOTING
- ENVIRONMENTAL PROTECTION
- ADDITIONAL INFORMATION
- EU DECLARATION OF CONFORMITY
- SPARE PARTS TECHNICAL SPECIFICATIONS ACCESSORIES
- TECHNICAL DATA GLUE GUN TR 50.4
- ACCESSORIES (OPTIONAL)
- 3466NOZZLESETM10PROFESSIONAL
- 3544S8SPPEDE(BBAHER)
- 2770STANDFORSTORING
- 3746STATIONARYEQUIPMENT
- 3518FOOTSWITCH
- 5563PREMELTERVSB40(230V)
- 5567PREMELTERVSB40(120V)
- 3465NOZZLESETM14PROFESSIONAL
- 3544S8SPPEDE(BAHOCER)
- 3522POINT-/LINE-ADAPTERFORTR60 60
- 3544SSUPPENDER(BALANCER)
- TECHNICAL DATA GLUE GUN TR 700
- TR7000
- 3466NOZZLESETM10PROFESSIONAL AL
- 29580 CARTRIDGEADAPTERFORDOT/LINEAPPLICATION
- 7099BLANKCARTRIDGEINCL.PISTON
- 3544SUSPENDER(BALANCER)
- 5398CARTRIDGEPREHEATER
- 29580 CARTRIDGE ADAPTER FOR DOT/LINE APPLICATION
- 29580ACRTLDGEDAPTETFORBOTDINTELAPPLICATION
Brand : Reka
Model : TR 700
Category : Glue gun