
T41P - Telephone BT - Free user manual and instructions
Find the device manual for free T41P BT in PDF.


| Product Type | Cordless Phone |
| Brand | BT |
| Model | T41P |
| Dimensions (Handset) | 160 x 50 x 30 mm |
| Weight (Handset) | 120 g |
| Power Supply | AC Adapter (included) for base |
| Display | Backlit LCD |
| Keypad | Alphanumeric with navigation keys |
| Phonebook | Up to 50 names and numbers |
| Caller ID | Yes |
| Call Waiting | Yes |
| Redial | Last 10 numbers |
| Speakerphone | Yes |
| Mute | Yes |
| Ringer Volume Control | Yes (multiple levels) |
| Intercom | Yes (if multiple handsets registered) |
| Range (Indoor) | Up to 50 m |
| Range (Outdoor) | Up to 300 m |
| Battery Type | 2 x AAA NiMH rechargeable |
| Battery Life | Up to 10 hours talk time / 100 hours standby |
| Package Contents | Handset, Base, Power adapter, Phone line cord, Wall mount bracket |
| Installation | Plug and play |
| Usage | Landline connection |
Frequently Asked Questions - T41P BT
User questions about T41P BT
0 question about this device. Answer the ones you know or ask your own.
Ask a new question about this device
Download the instructions for your Telephone in PDF format for free! Find your manual T41P - BT and take your electronic device back in hand. On this page are published all the documents necessary for the use of your device. T41P by BT.
USER MANUAL T41P BT

WHAT'S IN THIS GUIDE.

Set up
Got everything? 3
Phone installation
Attaching the stand 4
Connecting the handset and optional headset 4
Connecting the network and power 5
Provisioning your BT Cloud Voice service 6
Getting to know your phone
Hardware component instructions 7
Icon instructions 8
Phone display (views) 9
Basic call features
Making calls 10
Answering calls 10
Transferring calls 11
Ending calls 12
Conference calls 12
Do Not Disturb (DND) 12
History 12
Contact Directory 13
Voicemail 13
General information 14

If you have any problems setting up or using your BT IP Phone, contact the IP Comms Service Hub on 0800 389 0537.

999 or 112 emergency calls.
Your BT Cloud Voice phone number is registered to a specific address, so when you make a 999 or 112 call from your phone number, that's the address the emergency services will see. If you use your BT Cloud Voice service at a different address, the registered address does not automatically change. So if your work location changes let your BT Cloud Voice service administrator know as they might also need to change your registered address.
You might not be able to make 999 or 112 calls when there's a power or network failure or if using the service through an app on a mobile device.
SET UP.
This guide will tell you everything you need to know about your phone. To get started follow the simple instructions in this user guide or use the quick start guide that came with your phone. It's quick and simple.
Got everything?
IP Phone
- Handset
- Handset cord
- Ethernet cable
- Phone stand
- Quick start guide
• Power adapter (optional)
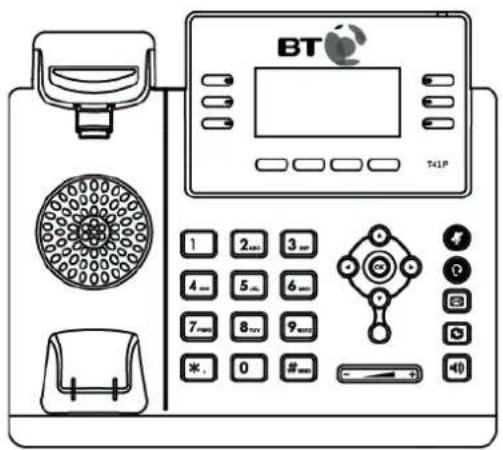
IP Phone

Handset

Handset Cord

Quick Start Guide
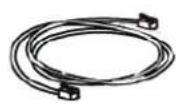
Ethernet Cable

Stand
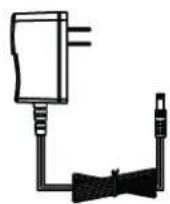
Power Adapter
PHONE INSTALLATION.
Attaching the stand.

A
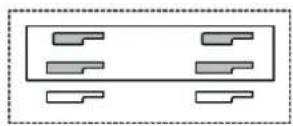
→

B

→
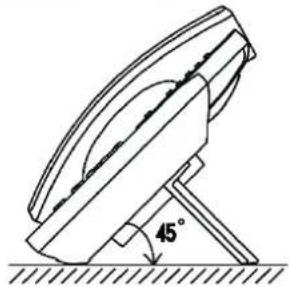
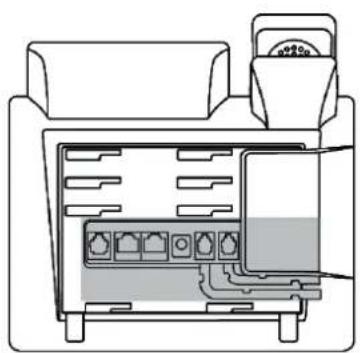
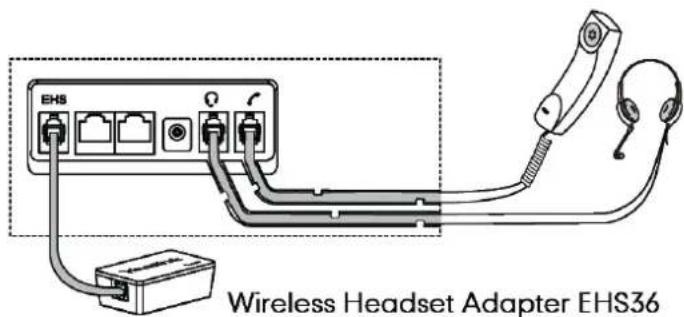
Connecting the handset and optional headset.

PHONE INSTALLATION.
Connecting the network and power.
There are two options for power and network connections. Your system administrator will let you know which one to use.
AC power (optional)
To connect the AC power you need to:
-
Connect the DC plug on the power adapter to the DC5V port on the phone, then connect the other end of the power adapter into an electrical power outlet.
-
Connect a standard Ethernet cable (included) between the Internet port on the phone and the one on the wall or switch/hub device port.
![graph TD A["PC Connection (Optional)"] --> B["Power Adapter (DC 5V)"] B --> C["External Network"] C --> D["PC Internet"] D --> E["External Components"] style A fill:#f9f,stroke:#333 style B fill:#ccf,stroke:#333 style C fill:#cfc,stroke:#333 style D fill:#fcc,stroke:#333 style E fill:#ffc,stroke:#33…](/content/2026/06/1316368/images/a912d8c18570c05a60270bf5c82b8fd43a9038fcc94bd62f9ce5c59172353c85.jpg)
Note:
If an in-line power switch/hub has been provided, you won't need to connect the phone to the power adapter. Just make sure the switch/hub is PoE-compliant. The phone can also share the network with another network device such as a PC. It's an optional connection. Important! Don't unplug or remove power to the phone while it is updating firmware and configurations.
Power over Ethernet (PoE)
Using a standard Ethernet cable (included), the BT T41P IP Phone can be powered from both a PoE-compliant switch or hub. Simply connect the Ethernet cable between the Internet port on the phone and an available port on the in-line power switch/hub.

PHONE INSTALLATION.
Provisioning your BT Cloud Voice service.
When all the connections are made, your BT T41P IP Phone is pre-loaded with everything it needs to provision the BT Cloud Voice service automatically.
- When the phone is connected to the network port giving it network access, it'll carry out a series of firmware updates (you'll need to allow it time to do this).
- Your phone has provisioned correctly if this symbol the phones line key.
is showing against
- Your phone has not provisioned correctly if this symbol against the phones line key.
is showing
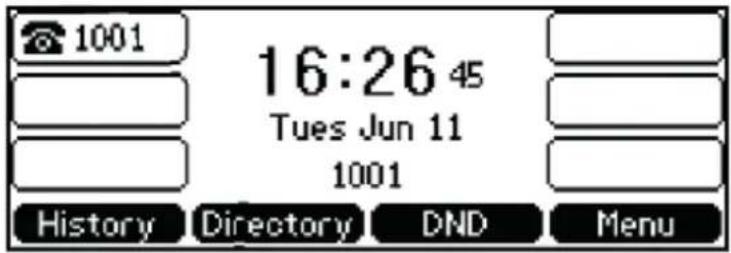
- Once complete, the phone will now show the line number against a line key.
Note:
If the handset doesn't provision, contact the IP Comms Service Hub on 0800 389 0537 for help.
GETTING TO KNOW YOUR PHONE.
Hardware component instructions.
The main hardware components of the BT T41P IP Phone are the LCD screen and the keypad.

| Item Description | ||
| 1 | LCD Screen | Shows information about calls, messages, soft keys, time, date and other relevant data:Call information—caller ID, call duration.Icons (for example,DND).Missed call text or second incoming caller information.Prompt text (for example, “Saving file, please wait”).Time and date. |
| 2 | Power Indicator LED Tells you both the phone power and the status of some features. | |
| 3 | Line Keys Use these keys to activate up to three accounts and assign various features. | |
| 4 | Mute Key Toggles and provides a mute feature. | |
| Headset Key Toggles and tells you the headset mode. | ||
| Message Key Takes you to your voicemail. | ||
| Redial Key Redials a previously dialled number. | ||
| 5 | Speakerphone Key Toggles the hands-free speakerphone mode. | |
| 6 | Volume Key Adjusts the volume of the handset, headset, speaker, and ringer. | |
| 7 | Keypad | Provides the digits, letters, and special characters in context-sensitive applications. |
| 8 | Scroll through the displayed information. | |
| Confirms actions or answers incoming calls. | ||
| Cancels actions or rejects incoming calls. | ||
| 9 | Soft Keys Label automatically to identify their context-sensitive features. | |
GETTING TO KNOW YOUR PHONE.
Icon instructions.
Icons appearing on the LCD screen are described in the following table:
| Icon Description | |
 | Network is unavailable |
 | Registered successfully |
 | Register failed |
 | Registering |
 | Hands-free speakerphone mode |
 | Handset mode |
 | Headset mode |
 | Voicemail |
 | Auto Answer |
 | Do Not Disturb |
 | Call Hold |
 | Call Mute |
 | Ringer volume is 0 |
 | Keypad Lock |
 | Alphanumeric input mode |
 | Numeric input mode |
 | Multi-lingual lowercase letters input mode |
 | Multi-lingual uppercase letters input mode |
 | Multi-lingual uppercase and lowercase letters input mode |
 | Call Forward/Forwarded Calls |
 | Missed Calls |
 | Received Calls |
 | Placed Calls |
 | Recording box is full |
 | A call can’t be recorded |
| ZW7T] | Recording starts successfully |
 | Recording can’t be started |
 | Recording can’t be stopped |
GETTING TO KNOW YOUR PHONE
Phone display (views).
| Idle status |  The idle screen displays the label of current account, time and date, and four soft keys. The idle screen displays the label of current account, time and date, and four soft keys. |
| Phone status | You can view your phone status using either the phone user interface or web user interface. In phone status you can see these three things:Network status (e.g., IPv4 status, IP address mode, MAC address, LAN type, LAN IP and LAN mask).Phone status (e.g., device model, hardware version, firmware version and product ID).Account status (e.g., register status of SIP accounts).To view the phone status using the phone user interface:1. Press , or press Menu->Status.2. Press ▲ or ▼ to scroll through the list and view the specific information.1.IPv4 Address: 10.3.6.2022.MAC: 00:15:65:43:ec:8f3.Firmware: 36.71.0.404.More...Back |
| Time and date | The time and date is set by the BT Cloud Voice service but you can easily change the format in the phone preferences found in basic settings. |
BASIC CALL FEATURES.
Making calls.
There're three ways to make a call using your BT T41P IP Phone:
• Using the handset.
• Using the speakerphone.
• Using the headset.
You can dial the number first, and then choose the way you want to speak to the other party or, you can also search and dial a contact from the call history, local directory or remote phone book.
While you are on a call, you can alternate between the Speakerphone, Headset, or Handset mode by pressing the Speakerphone key, the Headset key, or picking up the handset.
To make a call using the handset:
- Pick up the handset.
- Enter the desired number using the keypad.
- Then press OK, #, or the Send soft key.
To make a call using the speakerphone:
- With the handset on-hook, press 📋 or the line key to get a dial tone.
- Enter the number you want using the keypad.
- Then press OK, #or the Send soft key.
Or you can:
- With the handset on-hook, enter the number you want using the keypad.
- Then press OK, #or the Send soft key.
To make a call using the headset:
With the optional headset connected, press 🔒 to activate the headset mode.
- Press the line key to get a dial tone.
- Enter the number you want using the keypad.
- Then press OK, #_send, or the Send soft key.
Or you can:
- Enter the number you want using the keypad.
- Then press OK, #, or the Send soft key.
Answering calls.
To answer a call using the handset:
- Pick up the handset.
To answer a call using the hands-free speakerphone mode:
-
Press
-
With the handset on-hook and the headset mode deactivated, either press the Answer soft key or the line key (the line key LED flashes green).
To answer a call using the headset:
-
Press
-
With the headset mode activated, either press the Answer soft key or the line key (the line key LED flashes green).
BASIC CALL FEATURES.
Transferring calls.
You can transfer a call to another person in one of three ways:
- Blind Transfer: This means transferring a call directly to another person without consulting them.
- Semi-Attended Transfer: This means transferring a call while the target phone is ringing.
- Attended Transfer: This means transferring a call having spoken to the person first.
To make a blind transfer:
- Press the Tran soft key during a call.
- Enter the number you want to transfer the call to.
- Press the Tran soft key to complete the transfer.
The call will then be connected to the number you want to transfer to.
To make a semi-attended transfer:
- Press the Tran soft key during a call.
- Do one of the following:
• Either enter the number you want to transfer the call to. -
Or, press the Directory soft key to find the number in the directory or history.
-
Now press OK or #to dial out.
-
Finally, press the Tran soft key to complete the transfer when receiving ringback.
To make an attended transfer:
- Press the Tran soft key during a call.
- Then do one of the following:
• Either enter the number you want to transfer the call to. -
Or, press the Directory soft key to find the number of directory or history.
-
Press OK or #HNO to dial out.
-
Finally, after the party answers the call, press the Tran soft key to complete the transfer.
If you're using a handset, you can finish the transfer by hanging up the handset or you can cancel the transfer before the call is connected by pressing the Cancel soft key.
Ending calls.
- If you're using the handset, press the Cancel soft key or hang up the handset.
- If you're using the headset, press the Cancel soft key.
- If you're using the speakerphone, press 📷 or the Cancel soft key.
BASIC CALL FEATURES.
Conference calls.
- Call the first person and when they answer, press the Conf soft key to place a new call.
- The first person will be placed on hold.
- Now, enter the number of the second party and press OK, #_and, or the Send soft key.
- When the second party answers the call, press the Conf soft key again.
- Repeat to join all parties in the conference.
During the conference call, you can:
- Press the Hold soft key to place the conference on hold.
- Press the Split soft key to split the conference call into two individual calls.
- Press the New Call soft key to make a new call.
- Press the Back soft key to return to the previous interface.
- Press 📄 to mute the conference call.
- Press the Cancel soft key to drop the conference call.
Do Not Disturb (DND).
Press the DND soft key when the phone is idle.
The DND icon on the idle screen indicates that DND is on.
Incoming calls will be rejected automatically and "n Missed Call(s)" ("n" indicates the number of the missed calls) will prompt on the LCD screen.
History.
To view the call history:
- Press the History soft key. The LCD screen shows all call records.
- Press ◆ or ▶ to switch between All, Placed, Received, Missed and Forwarded call lists.
- Press ▲ or ▼ to select the entry you want.
- Press the Option soft key, and then select Detail from the prompt list.
The detailed information of the entry appears on the LCD screen.
To place a call from the call history list:
- Press the History soft key.
- Press ◆ or ▶ to switch between All, Placed, Received, Missed and Forwarded call lists.
- Press ▲ or ▼ to select the desired entry.
- Press the Send soft key.
BASIC CALL FEATURES.
Contact Directory.
You can add local contacts, search for a contact, or simply dial a contact number from the corporate directory.
To access your corporate directory:
- Press the Directory soft key.
- Select the remote group you are looking for, and then press the Enter soft key.
- The phone will then connect to load the corporate directory and the corporate contact list will appear on the LCD screen.
- Press the Back soft key to go back to the previous interface.
To search for a contact in the corporate directory:
- Press the Directory soft key.
- Select the remote group you are looking for, and then press the Enter soft key to load the corporate directory.
- Now press the Search soft key.
- Finally, enter a few continuous characters of the contact name or continuous numbers of the contact number using the keypad. The contacts whose name or phone number matches the characters entered will appear on the LCD screen. You can place a call from the result list.
Voicemail.
When you get a new voicemail, the phone will play a warning tone, and the power indicator LED will slow flash red. The LCD screen will display a prompt message and show an icon.
- When the phone user interface shows a new voicemail and the power indicator LED slow flashes red, press 📋 or the Connect soft key to dial out the voicemail access code.
- Follow the voice instructions to listen to your voicemail.
GENERAL INFORMATION
999 or 112 emergency calls
- Your BT Cloud Voice phone number is registered to a specific address, so when you make a 999 or 112 call from your phone number, that's the address the emergency services will see. If you use your BT Cloud Voice service at a different address, the registered address does not automatically change. So if your work location changes let your BT Cloud Voice service administrator know as they might also need to change your registered address.
- You might not be able to make 999 or 112 calls when there's a power or network failure or if using the service through an app on a mobile device.
Safety information
- Please don't try to open the handset or the base, it could expose you to high voltages or other risks. Contact the IP Comms Service Hub on 0800 389 0537 for all repairs.
Cleaning
- Clean the handset and base with a damp (not wet) cloth, or an anti-static wipe. Never use household polish as this will damage the product. Never use a dry cloth as this may cause a static shock.
Environmental
- Don't expose to direct sunlight.
- Don't stand your product on carpets or other surfaces which generate fibres, or place it in locations preventing the free flow of air over its surfaces.
- Don't submerge any part of your product in water or use it in damp or humid conditions, such as bathrooms.
- Don't expose your product to fire, explosive or other hazardous conditions.
- There's a slight chance your phone could be damaged by an electrical storm.
Product disposal instructions
The symbol shown here and on the product means that it is classed as Electrical or Electronic Equipment and shouldn't be disposed of with other household or commercial waste at the end of its working life.

The Waste of Electrical and Electronic Equipment (WEEE) Directive (2002/96/EC) has been put in place to recycle products using best available recovery and recycling techniques to minimise the impact on the environment, treat any hazardous substances and avoid the increasing landfill.
Business users should contact their suppliers and check the terms and conditions of the purchase contract and ensure that this product is not mixed with other commercial waste for disposal.
Guarantee
Your IP Phone is guaranteed for a period of 12 months from the date of purchase.
Subject to the terms listed below, the guarantee will provide for the repair of, or at BT's or its agent's discretion, the option to replace the Phone or any component thereof, (other than batteries), which is identified as faulty or below standard, or as a result of inferior workmanship or materials. Products over 28 days old from the date of purchase may be replaced with a refurbished or repaired product.
The conditions of this guarantee are:
- The guarantee shall only apply to defects that occur within the 12-month guarantee period.
• Proof of purchase is provided.
• The equipment is returned to BT or its agent as instructed. - This guarantee does not cover any faults or defects caused by accidents, misuse, fair wear and tear, neglect, tampering with the equipment, or any attempt at adjustment or repair other than through approved agents.
• This guarantee does not affect your statutory rights.
Offices Worldwide
The services described in this publication are subject to availability and may be modified from time to time. Services and equipment are provided subject to British Telecommunications plc's respective standard conditions of contract. Nothing in this publication forms any part of any contract. © British Telecommunications plc 2015. Registered office: 81 Newgate Street, London EC1A 7AJ. Registered in England No. 1800000.


- WHAT'S IN THIS GUIDE
- SET UP
- PHONE INSTALLATION
- GETTING TO KNOW YOUR PHONE
- BASIC CALL FEATURES
- 999 OR 112 EMERGENCY CALLS
- GOT EVERYTHING
- CONNECTING THE NETWORK AND POWER
- AC POWER (OPTIONAL)
- NOTE
- POWER OVER ETHERNET (POE)
- PROVISIONING YOUR BT CLOUD VOICE SERVICE
- HARDWARE COMPONENT INSTRUCTIONS
- ICON INSTRUCTIONS
- PHONE DISPLAY (VIEWS)
- MAKING CALLS
- TO MAKE A CALL USING THE HANDSET
- TO MAKE A CALL USING THE SPEAKERPHONE
- TO MAKE A CALL USING THE HEADSET
- ANSWERING CALLS
- TO ANSWER A CALL USING THE HANDSET
- TO ANSWER A CALL USING THE HANDS-FREE SPEAKERPHONE MODE
- TO ANSWER A CALL USING THE HEADSET
- TRANSFERRING CALLS
- TO MAKE A BLIND TRANSFER
- TO MAKE A SEMI-ATTENDED TRANSFER
- TO MAKE AN ATTENDED TRANSFER
- ENDING CALLS
- CONFERENCE CALLS
- DURING THE CONFERENCE CALL, YOU CAN
- DO NOT DISTURB (DND)
- HISTORY
- TO VIEW THE CALL HISTORY
- TO PLACE A CALL FROM THE CALL HISTORY LIST
- CONTACT DIRECTORY
- TO ACCESS YOUR CORPORATE DIRECTORY
- TO SEARCH FOR A CONTACT IN THE CORPORATE DIRECTORY
- VOICEMAIL
- GENERAL INFORMATION
- SAFETY INFORMATION
- CLEANING
- ENVIRONMENTAL
- PRODUCT DISPOSAL INSTRUCTIONS
- GUARANTEE
- THE CONDITIONS OF THIS GUARANTEE ARE
Brand : BT
Model : T41P
Category : Telephone