
FMW 250 SM G XS - Microwave FRANKE - Free user manual and instructions
Find the device manual for free FMW 250 SM G XS FRANKE in PDF.


| Product Type | Built-in Microwave Oven |
| Brand | Franke |
| Model | FMW 250 SM G XS |
| Microwave Power | 900 W |
| Grill Power | 1000 W |
| Capacity | 25 L |
| Dimensions (H x W x D) | 388 x 595 x 400 mm |
| Net Weight | Approx. 16 kg |
| Power Supply | 230 V, 50 Hz, 10 A |
| Cavity Material | Stainless steel |
| Control Type | Touch control + rotary dial |
| Display | Digital LED |
| Number of Power Levels | 5 |
| Defrost Function | Yes, by weight or time |
| Auto Cook Programs | 8 preset programs |
| Grill Function | Yes, with microwave combination |
| Interior Light | Yes |
| Safety Features | Child lock, door interlock, overheat protection |
| Cleaning | Easy-clean enamel interior; wipe with damp cloth |
| Spare Parts Availability | Yes, via Franke customer service |
| Repairability Index | 8.0 / 10 |
| Energy Efficiency Class | A+ |
| Noise Level | ~52 dB |
Frequently Asked Questions - FMW 250 SM G XS FRANKE
User questions about FMW 250 SM G XS FRANKE
0 question about this device. Answer the ones you know or ask your own.
Ask a new question about this device
Download the instructions for your Microwave in PDF format for free! Find your manual FMW 250 SM G XS - FRANKE and take your electronic device back in hand. On this page are published all the documents necessary for the use of your device. FMW 250 SM G XS by FRANKE.
USER MANUAL FMW 250 SM G XS FRANKE
Installation and operating instructions 32
Built-in multifunction electronic oven with 8 programmes

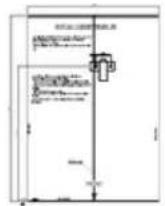
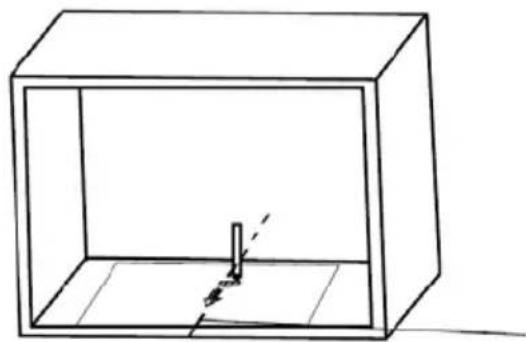

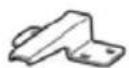
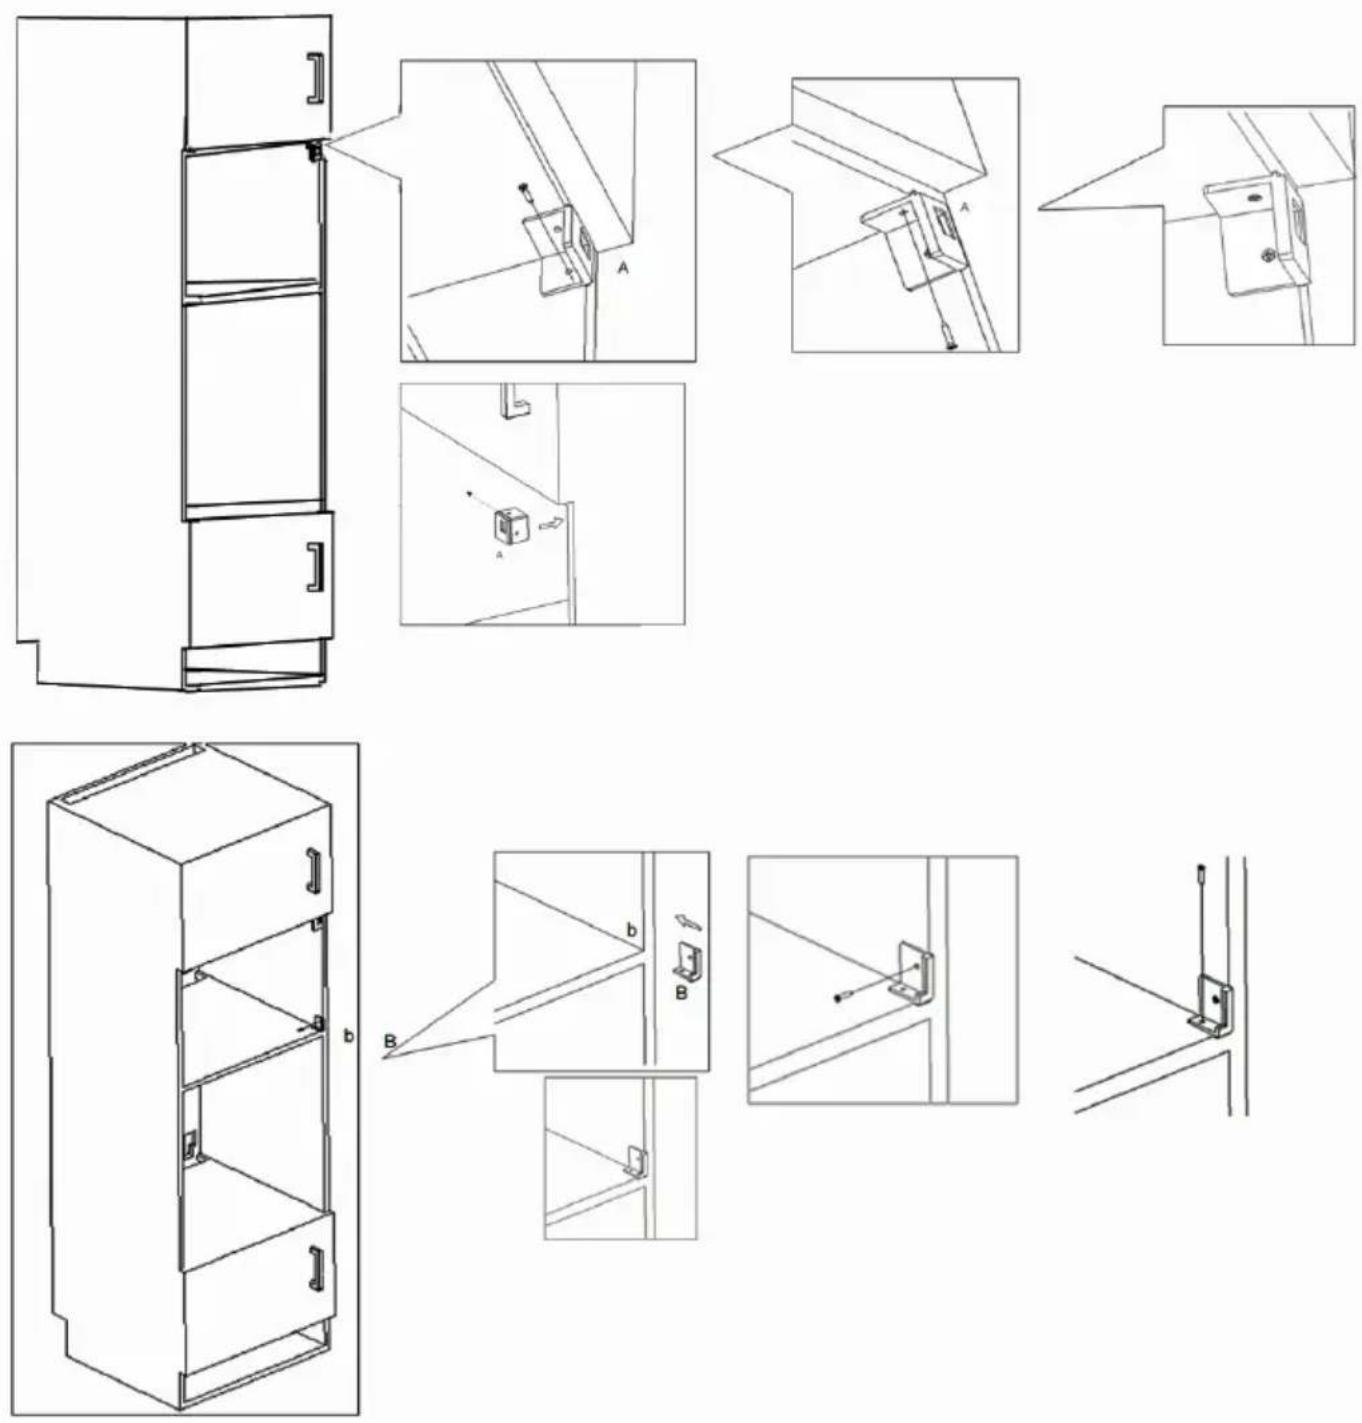
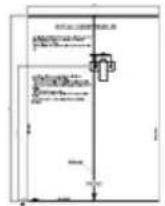
DIMENSIONS DIAGRAM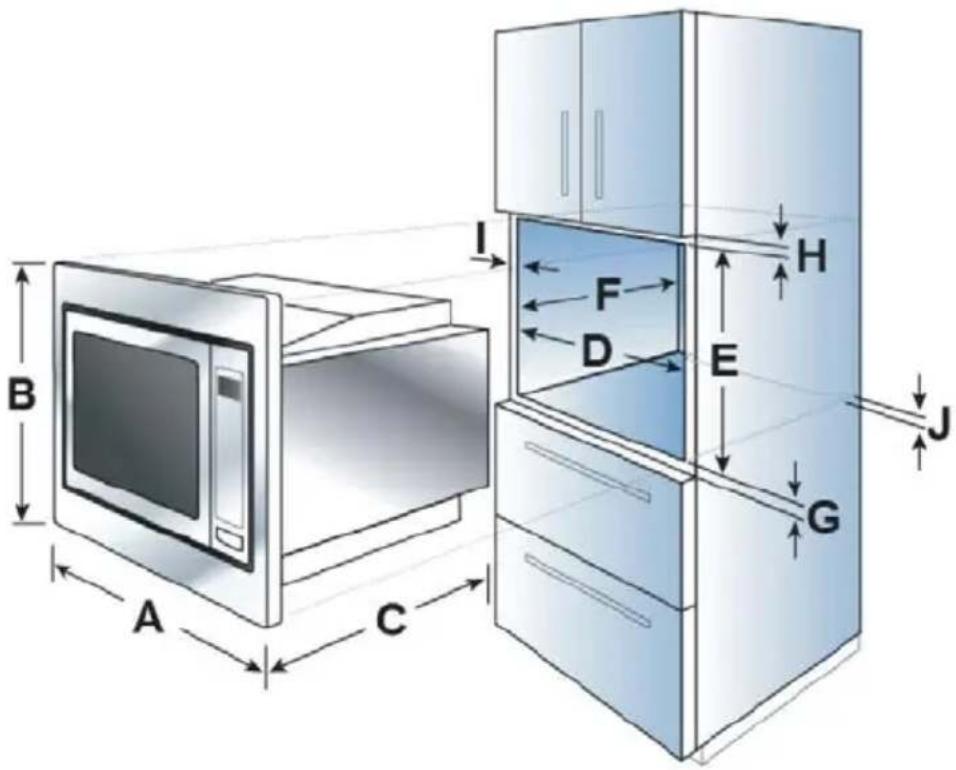
| A | 595mm |
| B | 388mm |
| C | 400mm |
| D | 560mm |
| E | 380mm |
| F | Min 500mm |
| G | 10mm |
| H | 10mm |
| I | 20mm |
| J | 45mm |
Instructions for use
Technical specifications 33
Important safety instructions 34
Cleaning 35
Cooking utensils – guide to crockery 37
Materials safe for use in microwave ovens 37
Materials not safe for use in microwave 38
ovens
Microwave cooking advice 39
A close-up view 40
Installation and connection 41
Dimensions diagram 45
Operating instructions 46
Setting the clock 46
Microwave cooking 47
Grill or combi cooking in the microwave 49
Quick start cooking 51
Timer with sound alert 52
Stopping the cooking cycle 52
Defrosting on the basis of weight 53
Defrosting on the basis of time 54
Automatic menu cooking 55
Automatic menu table of foods 56
Cooking in several programming phases 57
Safety lock function 58
Troubleshooting suggestions 59
Support 60
Please read these instructions carefully before using the microwave oven, and keep them in a safe place for future reference. Follow the instructions carefully to keep the microwave oven in perfect working order for many years.
KEEP THESE INSTRUCTIONS IN A SAFE PLACE
PRECAUTIONS FOR AVOIDING POTENTIAL EXCESSIVE EXPOSURE TO MICROWAVE ENERGY
(a) Do not attempt to use the oven while the door is open, as operation with the door open may produce dangerous leakage of microwaves. The safety lock must not be decommissioned or tampered with. (b) Do not place anything between the front part of the oven and the door, and do not allow detergent residue or dirt to build up on the seals. (c) IMPORTANT: if the door or the door seals are damaged, contact an authorized Franke support center to request repair work before using the oven again.
If the appliance is not kept clean, its surface may become tarnished and its lifespan shortened as a result, causing a potentially hazardous situation.
Technical specifications
| Model: | 250 SM G XS FMW 250 G XS |
| Microwave frequency: 2450 MHz | |
| Nominal voltage: 230 V~50 Hz | |
| Nominal absorbed input voltage (microwave): | 1,450 W |
| Nominal output power (microwave): | 900 W |
| Nominal input power (grill): | 1,000 W |
| Oven capacity: 25 litres | |
| Turntable diameter: ∅315 mm | |
| External dimensions: 594x410x388 mm | |
| Internal dimensions: 328x226x354 mm | |
| Net weight: 19.3 kg | |
| Cord length: 1000 mm |
IMPORTANT SAFETY INSTRUCTIONS
IMPORTANT: To reduce the risk of fire, electrocution, incidents, or excessive exposure to microwaves during appliance operation, simply take a few basic precautions, including the following:
- Important: liquids or other foodstuffs should not be heated in closed containers, as they may explode.
- Important: it is dangerous for anyone, except authorized Franke technicians, to carry out any maintenance or repair procedures involving the removal of the protective covers which act as a shield against exposure to microwaves.
- Important: do not allow children to use the oven without adult supervision.
- Only use utensils which are suitable for use in the microwave.
- The oven must be cleaned regularly and all built-up food residue carefully removed.
- Read and observe the specifications: "PRECAUTIONS TO AVOID POSSIBLE EXPOSURE TO EXCESSIVE MICROWAVE ENERGY".
- When heating food in plastic or paper containers, check the oven frequently to minimize the risk of ignition.
- If smoke appears, switch off or unplug the appliance and keep the door closed to smother any flames.
- Do not overcook food.
- Before placing containers, recipients, paper, or plastic bags in the oven, make sure you have removed any crockery with decorations or metal handles.
- Install or position the oven in strict compliance with the installation instructions supplied.
- Eggs in their shells and whole boiled eggs should not be heated in the microwave oven as they may explode, even after the set heating time has elapsed.
- Only use this appliance for the purpose it was designed for, as described in the manual. Do not expose the appliance surface to chemical substances or corrosive vapors. This oven is designed specifically to heat food. It is not designed for industrial or laboratory use. If the power cord is damaged, contact an authorized Franke support center in order to prevent potentially hazardous situations from developing.
- Do not keep or use the appliance outdoors.
- Do not use this oven near water, in damp basements, or next to swimming pools.
- Some surfaces accessible to the user can reach high temperatures when the appliance is running. During use, the appliance surfaces can become very hot. Keep the cord away from hot surfaces, and do not place anything on top of the oven.
- If the oven is not kept clean, its outer surface could become damaged and its lifespan shortened as a result, causing a potentially hazardous situation.
- Shake or stir the contents of baby bottles or food jars and check its temperature before consumption, in order to prevent burns.
- Heating beverages in the microwave can cause delayed boiling and result in the liquid overflowing; you should therefore take care when handling the container. Note: This appliance is not suitable for use by persons (including children) with compromised physical, sensory or mental capacities. Users lacking the experience and knowledge of the appliance, or who have not been instructed in appliance operation,
must be supervised by an individual who is responsible for their safety. Children must be supervised to ensure that they do not play with the appliance.
- The appliances are not designed to operate in accordance with an external timer or a separate remote control system.
- IMPORTANT: to replace the lamp, contact an authorised Franke technical support centre.
- Do not use steam cleaners.
- Do not use abrasive or corrosive detergents or sharp metal scrapers to clean the oven door glass, as they may scratch its surface and cause it to shatter.
- The appliance becomes hot during operation. Take care not to touch the heating elements inside the oven.
- The rear of the appliance must be placed against a wall.
Note: The oven cannot be used if:
- the door is not closed properly;
- the door hinges are damaged;
- the contact surfaces between the door and the front of the oven are damaged;
- the window in the door is damaged;
- electric arcs occur frequently inside the oven, despite the fact that no metal objects are inside;
The oven may only be used again after it has been duly repaired by a technician from the Support service.
- Do not switch the oven on if there is no turntable support, turntable ring, or corresponding plate in place.
- Never switch the microwave on while it is empty; if there is no food in the oven, an electric overload may occur, which may damage the oven.
- Do not cover or obstruct the ventilation openings.
- Before placing plates and containers in the microwave, make sure they are suitable (refer to the paragraph on plate types).
- Do not remove the "mica" sheet on the right-hand side of the oven! This sheet captures grease and food particles which could damage the microwave generator.
- Do not place any flammable item inside the oven as, when it is switched on, it may start burning.
- Do not use the oven as a larder.
- Do not use the oven to fry food, because it is impossible to adjust the temperature of the oil heated in a microwave.
- To avoid the risk of burns, always wear oven gloves while holding plates and containers and touching the oven.
- Do not lean on the open oven door. The oven may be damaged, around the hinged area in particular.
CLEANING:
- Note: Clean the microwave oven regularly. Remove any food residue (refer to the paragraph on Cleaning the oven). If the microwave oven is not kept clean, its surface may be damaged and the oven lifespan shortened as a result, causing a potentially hazardous situation.
- The door contact surfaces (the front of the cavity and the inside of the door) must be kept extremely clean in order to guarantee correct oven operation.
- DO NOT CLEAN THE OVEN DOOR GLASS USING HARD ABRASIVE DETERGENTS OR SHARP METAL SCRAPERS WHICH COULD DAMAGE THE SURFACE AND CAUSE THE GLASS TO BREAK.
To reduce the risk of accidents, connect the appliance to an earthed socket.
DANGER.
Do not disassemble the appliance.
Risk of electrocution. Contact with some of the components inside the appliance may cause serious personal injury or even death.
WARNING
Risk of injury
It is dangerous for anyone, except qualified individuals, to carry out any maintenance or repair procedures involving the removal of the protective covers which act as a shield against exposure to microwaves.
IMPORTANT
Risk of electrocution. Incorrect use of the earthing system can cause electrocution.
Only plug the appliance in after it has been correctly installed, and after making sure an earthing system is fitted.
CLEANING
Make sure the appliance has been disconnected from the electricity supply before carrying out any cleaning procedures.
- After use, clean the inside of the oven with a slightly damp cloth.
- Clean the accessories as normal, with soapy water.
- Use a damp cloth to carefully clean the door and its frame and seals, as well as the surrounding parts, when dirt needs to be removed.
Plug with two round pins
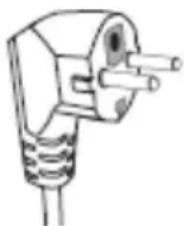
This appliance is fitted with an earthed power cord and an earthed plug. It must be connected to an earthed socket. If an electrical short circuit occurs, the earthing system provides a direct path allowing the electric current to be discharged to earth, thus reducing the risk of electrocution.
If it is necessary to use a kit with a longer power cord, or an extension cable:
- Make sure that the cross-section of the long cord provided in the kit or the extension cable is the same or greater than that of the cord supplied.
- The extension cable must have 3 wires to allow connection to an earthing system.
- The long cord must be positioned so that it cannot hang from the surface on which the appliance is placed, to prevent the appliance from falling to the ground if the cord is inadvertently knocked or if it is pulled by children.
COOKING UTENSILS - GUIDE TO CROCKERY
Some non-metal utensils may be suitable for use in microwave ovens. If you are not sure, the utensil in question may be tested in line with the procedure below.
Utensil test:
- Pour 1 cup of cold water (250 ml) into a microwaveable container, and place the utensil in question inside.
- Cook at maximum power for 1 minute.
- Touch the utensil carefully. If the utensil is hot, it must not be used for microwave cooking.
- Do not exceed a cooking time of 1 minute.
Materials safe for use in microwave ovens.
Important: follow the manufacturer's instructions for all materials.
| Utensils | Notes |
| Aluminium foil | As protection only. Small, evenly sized strips of aluminium foil can be used to protect thin pieces of beef or game, preventing them from overcooking. Make sure the aluminium sheet is kept well away from the oven walls, as this could generate electric arcs. The aluminium foil must be at least 2.5 cm (1 inch) away from the oven walls. |
| Crisp plate (accessory) | The bottom of the crisp plate must be at least 5 mm (3/16 inches) above the turntable. Incorrect use can cause the turntable to break. |
| Plates and crockery | Only if microwave safe. Follow the manufacturer's instructions. Do not use cracked or chipped crockery. |
| Glass jars | Always remove the lid. Only use them to heat food, so that the contents are just hot enough all the way through. Most glass jars or bottles are not heat-resistant and may break. |
| Glass items | Only heat-resistant glass ovenware. Make sure there are no metal applications. Do not use cracked or chipped crockery. |
| Oven cooking bags | Do not use metal clips to seal them. Create some slits to allow steam to escape. |
| Paper plates and cups | Only for short cooking/heating periods. Do not leave the oven unattended during cooking. |
| Paper napkins | May be used to reheat food and to absorb oil and fat. Only for short cooking periods, supervising the process carefully. |
| Baking paper | Use as protection to prevent spraying or as a cover when steam cooking. |
| Plastic materials | Follow the manufacturer's instructions. The label “Microwave safe” must be applied. Some plastic containers become soft when the food inside heats up. Make holes, slits or air vents in “boiling bags” and airtight plastic bags, in accordance with the instructions on the packaging. |
| Plastic film | Use to cover food to prevent residual moisture from being lost during cooking. Make sure the plastic film does not come into contact withthe food. |
| Waxed paper | Use as protection against spraying and to retain moisture. |
| Materials not safe for use in microwave ovens | |
| Utensils | Notes |
| Aluminium tray | May cause an electric arc to form. Transfer food to a microwaveable plate. |
| Cardboard food containers with metal handles | May cause an electric arc to form. Transfer food to a microwaveable plate. |
| Metal utensils or metal-finish utensils | Metal protects food against microwaves. Metal finishes can cause an electric arc to form. |
| Metal sealing clips | They may cause an electric arc to form, which in turn may result in a fire starting inside the oven. |
| Paper bags | May cause a fire to start inside the oven. |
| Expanded plastic foam | Expanded plastic foam may melt or contaminate the liquid inside it when exposed to high temperatures. |
| Wood | As wood dries after it has been used in a microwave oven, it may split or crack. |
Advice for microwave cooking, observe the following recommendations:
- Before heating or cooking food with peel or skin (e.g. apples, tomatoes, potatoes, sausages), prick them so they do not burn. Dice food before starting to prepare it.
- Before using a container or plate, make sure it is microwave safe (see paragraph on cooking utensil types).
- When cooking foods with a low level of moisture (e.g. defrosting bread, making popcorn, etc.), evaporation takes place extremely quickly.
The oven then functions as if it is empty, which puts the food at risk of burning. The oven and the container may be damaged. We therefore recommend setting the time for no longer than is necessary, and keeping the process under strict supervision.
- The microwave cannot be used to heat large quantities of oil (for frying).
- Remove pre-cooked food from its container, as this type of container is not always heat-resistant. Observe the instructions supplied by the manufacturer.
- If using various containers, e.g. cups, arrange them evenly on top of the turntable.
- Do not seal plastic bags with metal clips. Use plastic clips. Pierce the bags several times so that steam can escape easily.
- Steam may build up on the oven door during cooking and may then begin to drip. This situation is normal and may also not be so evident in low room temperatures. This situation does not influence correct and safe oven operation. When cooking is complete, remove the water which has formed through condensation.
- When heating liquids, use containers with a wide opening, so that steam can evaporate easily.
Prepare food in accordance with the instructions, and observe the cooking times and power levels in the automatic mode food cooking tables. Bear in mind that the figures provided are purely indicative and may vary depending on the food, plus its initial status, temperature and moisture level. We recommend adjusting the cooking times and power levels in line with each individual situation. Depending on the characteristics of the food, it may be necessary to increase or reduce cooking times or power levels.
When cooking in the microwave, bear the following in mind:
- The lower the temperature, the longer the cooking time will be.
- Food containing a lot of liquid will heat up more quickly.
- Cooking will take place more evenly if the food is distributed on top of the turntable in a uniform manner. By placing denser foods around the outside of the plate and less dense foods in the centre, different types of food can be heated at the same time.
- The oven door may be opened at any time. When it is opened, the oven will switch off automatically. The microwave oven will only resume operation after the door has been closed and the power button pressed.
- Covered food requires a shorter cooking time and retains more of its properties. Lids must allow microwaves to pass through and have small holes which let steam evaporate.
A CLOSE-UP VIEW
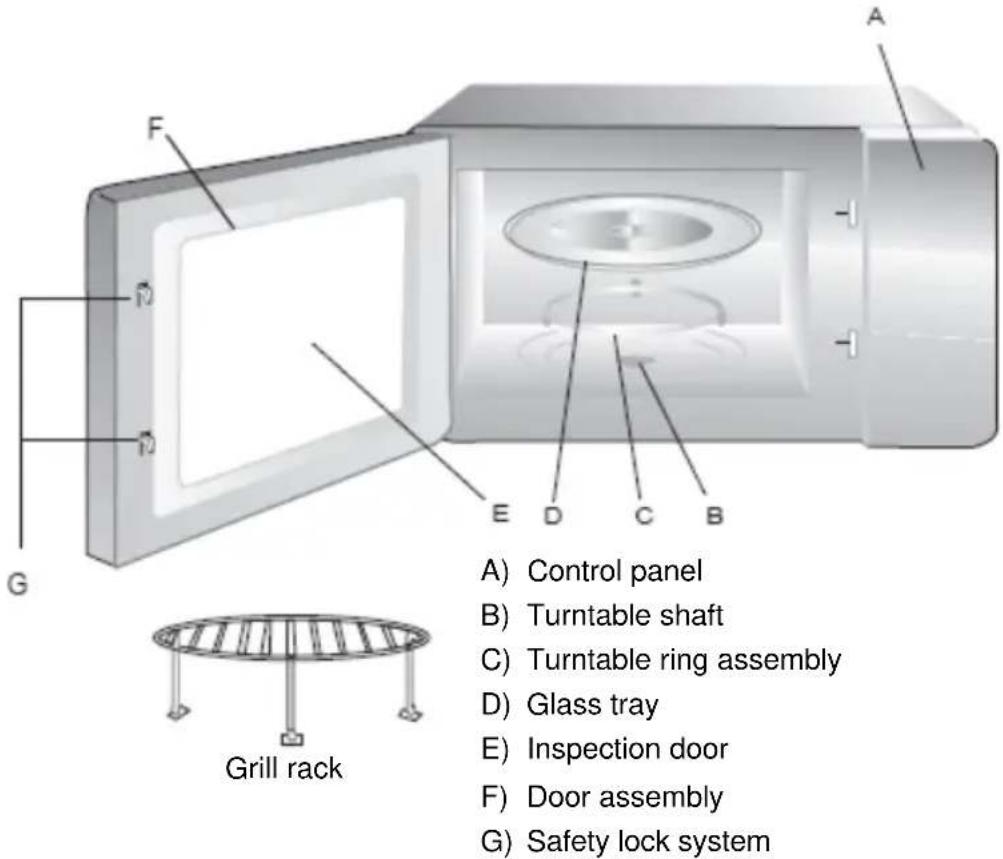
Oven component and accessory names
Remove the oven from the box and all materials from the oven cavity. The oven comes complete with the following accessories:
Glass tray D
Turntable ring assembly C
Instruction manual
Installing the turntable
Hub (underside)
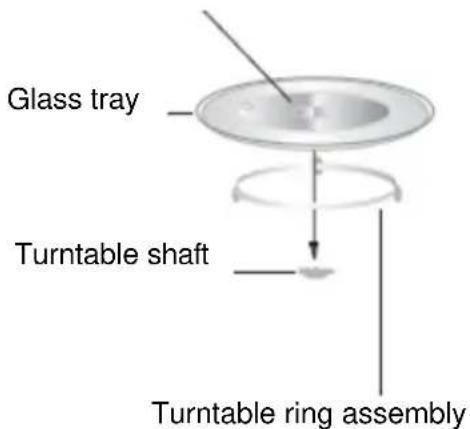
Never position the glass tray upside down. Glass tray movement should never be obstructed.
Always use both the glass tray and turntable ring assembly during cooking.
All food and food containers should always be placed on the glass tray during cooking.
If the glass tray or turntable ring assembly cracks or breaks, contact your local authorised support centre.
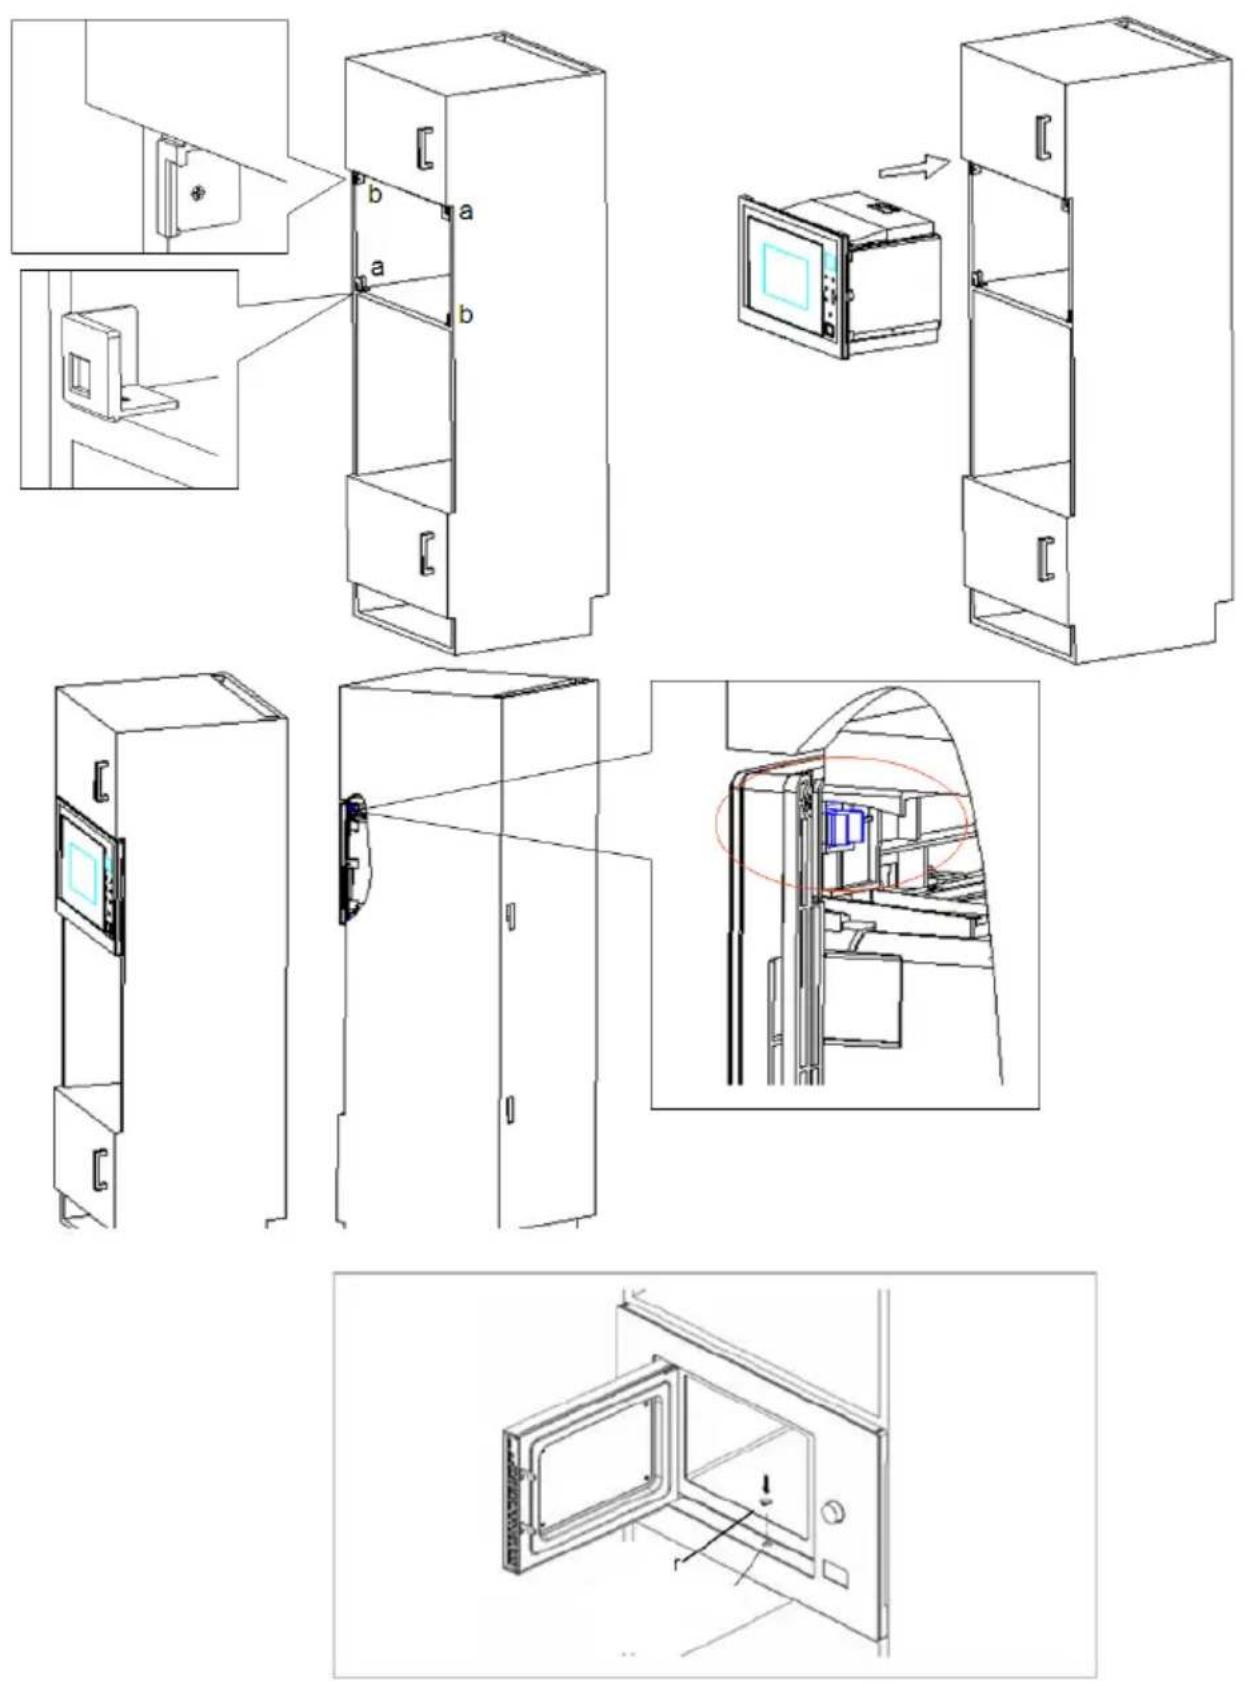
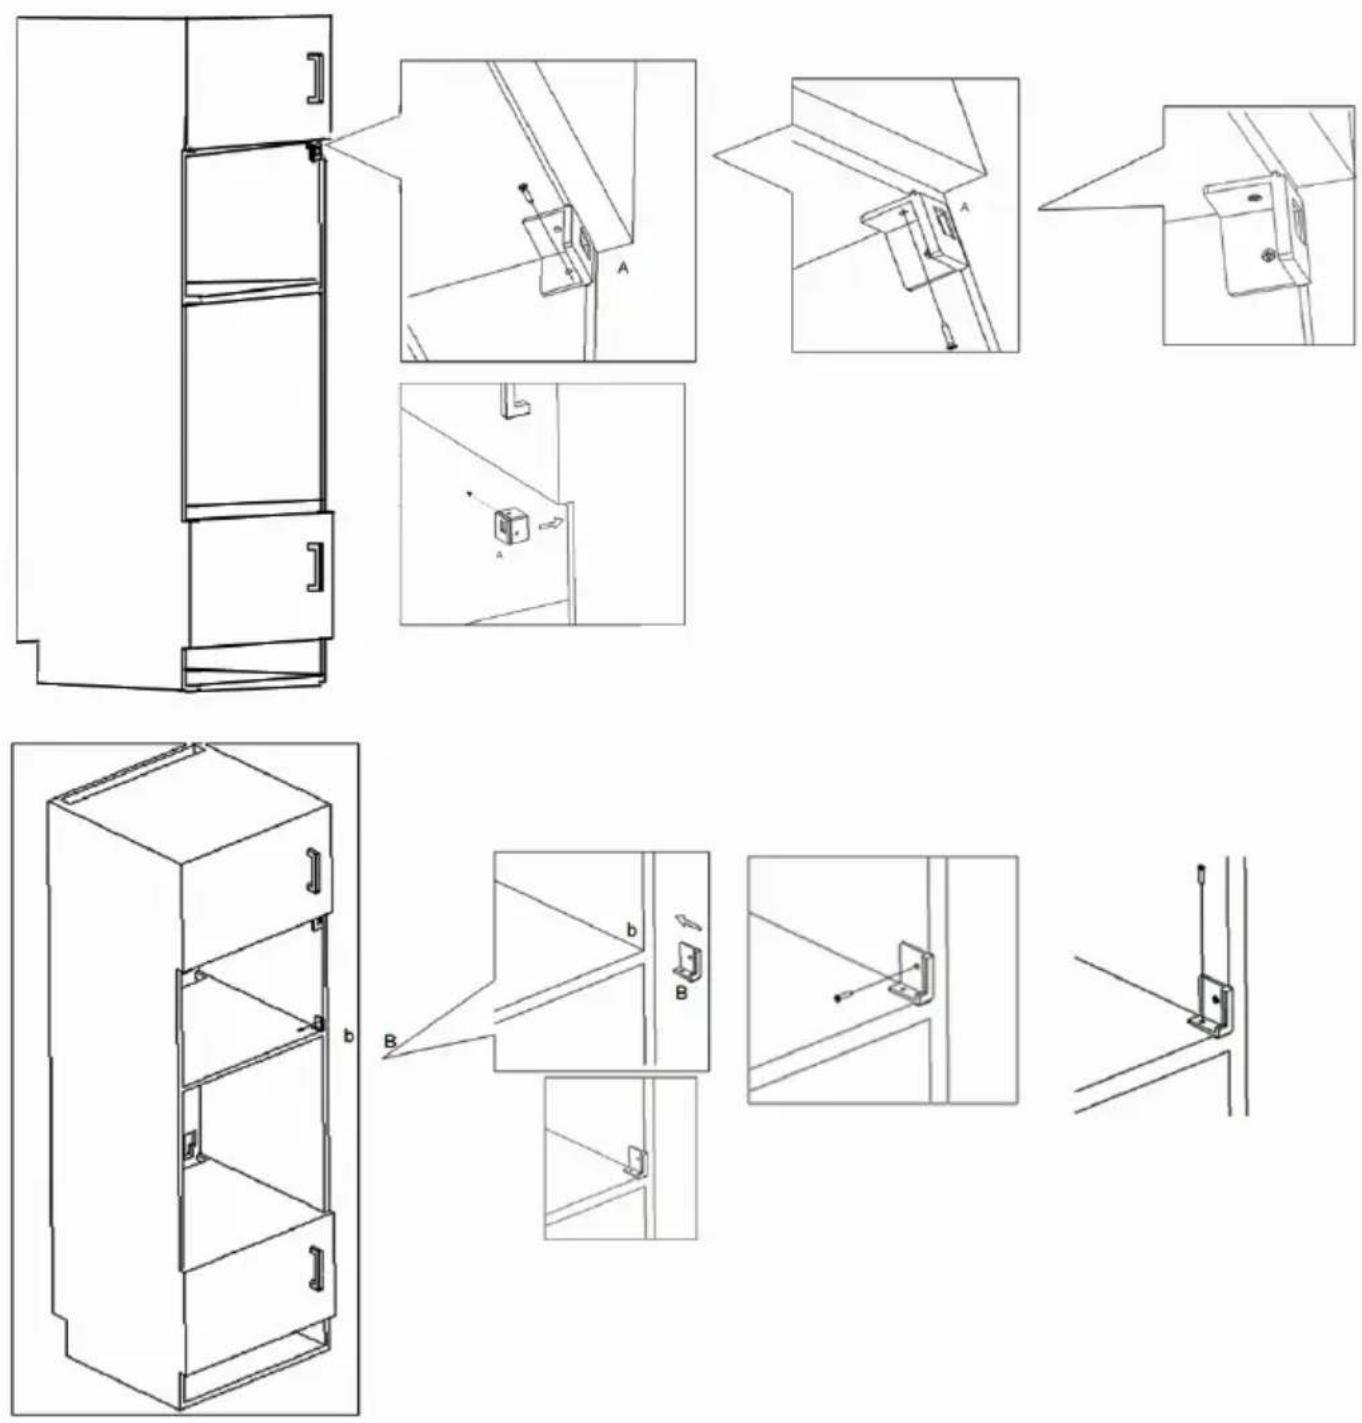
Installation and connection
- This appliance was designed exclusively for domestic use.
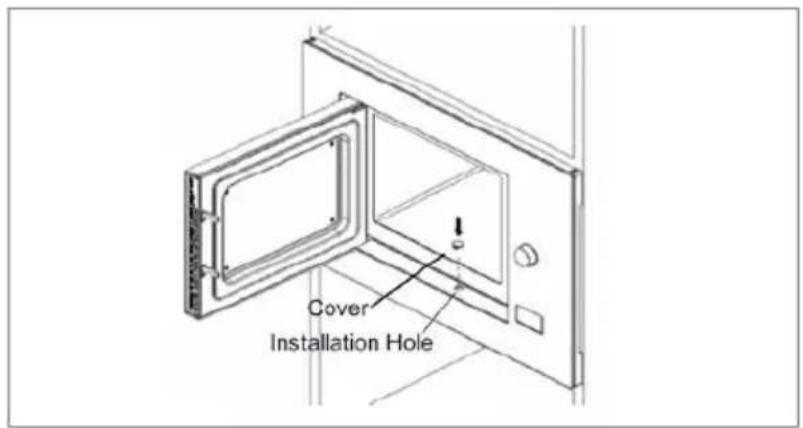
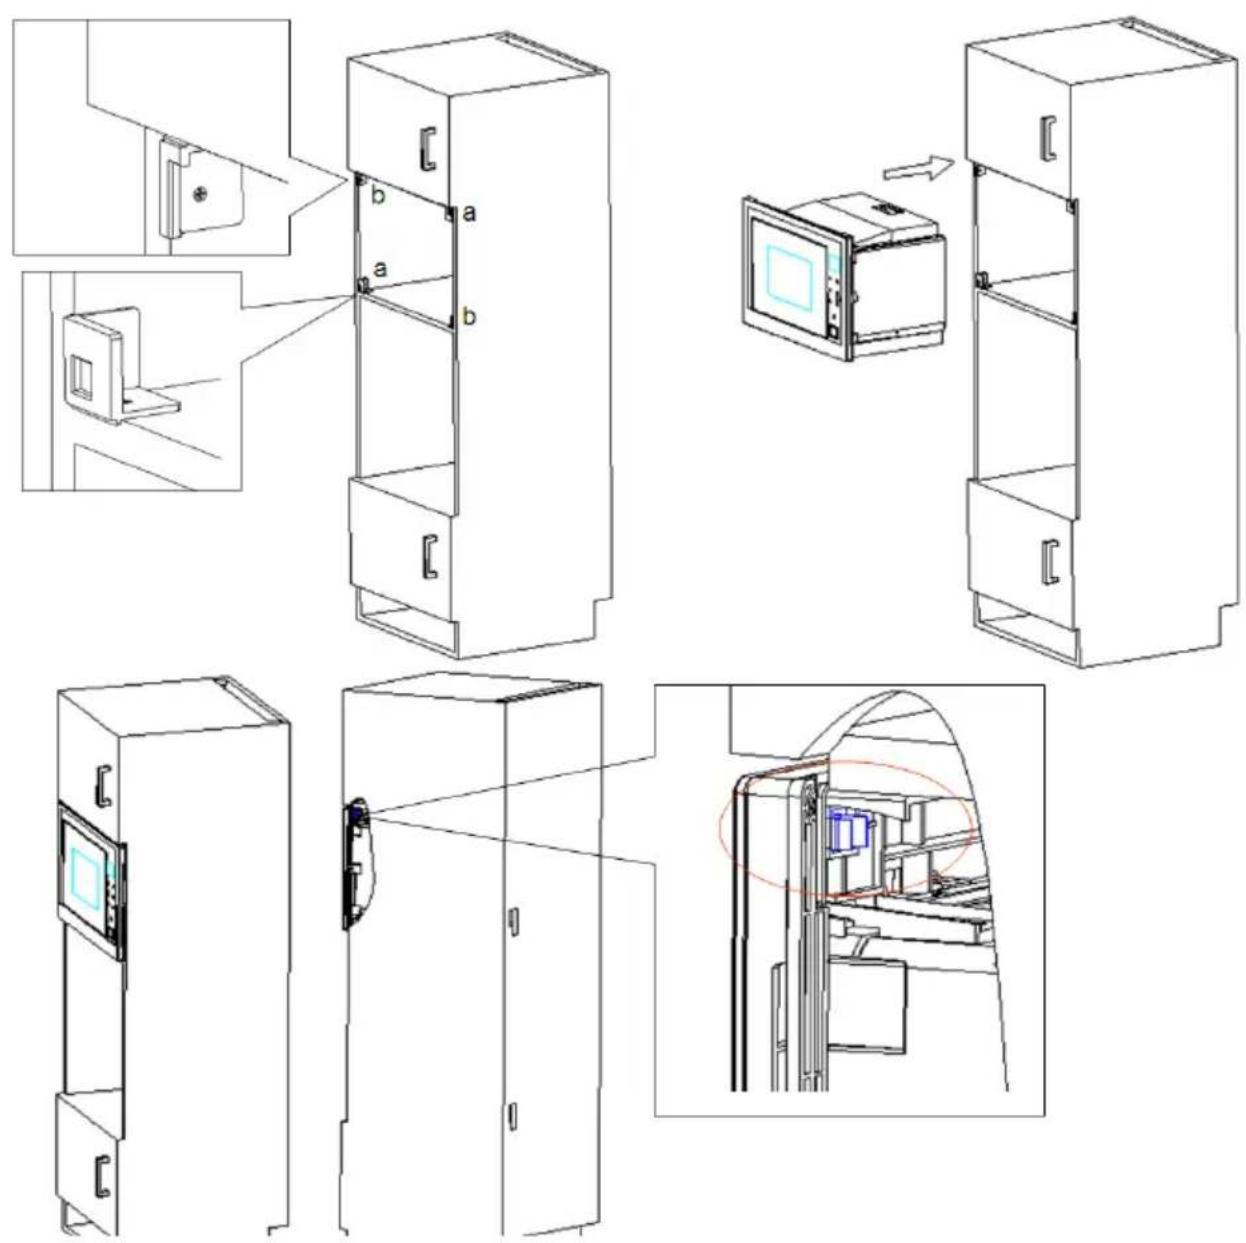
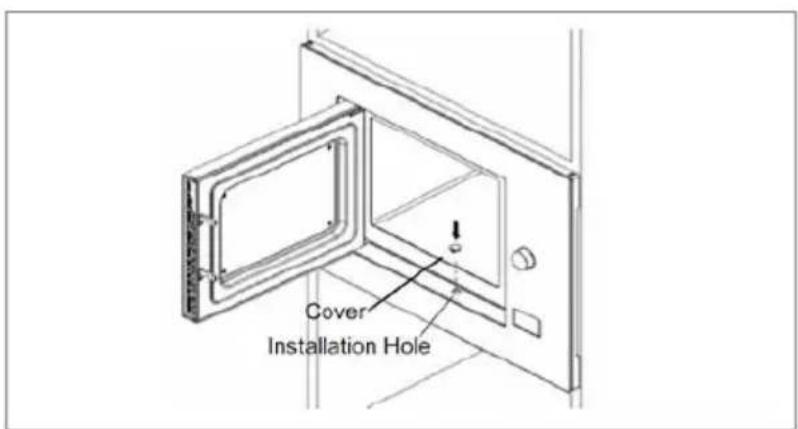
- The oven in question was designed to be a fitted appliance.
- Observe the special installation instructions.
- The appliance can be installed in a wall-mounted cupboard in heat-resistant material, with a width of 60 cm (at least 55 cm deep and at least 85 cm from the floor).
- The appliance is fitted with a plug and simply needs to be connected to correctly installed socket, which in turn should be fitted with an earthing system.
- The mains voltage must correspond to the voltage specified on the appliance rating plate.
- Socket installation and connection cord replacement procedures must be carried out exclusively by a specialised electrician. If, after installation, the plug is no longer accessible, an omnipolar disconnection device should be fitted on the side on which the appliance is installed, which guarantees a free space for the contacts of at least 3 mm.
- Use of adapters, multi-socket power strips and extension cables is absolutely prohibited. Any current overloads could, in fact, cause fires to start.
Accessible surfaces can become very hot during use.
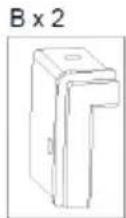
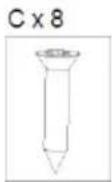

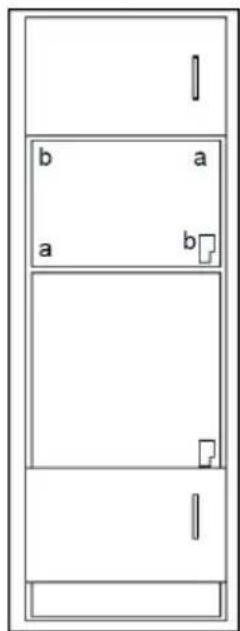
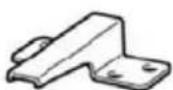

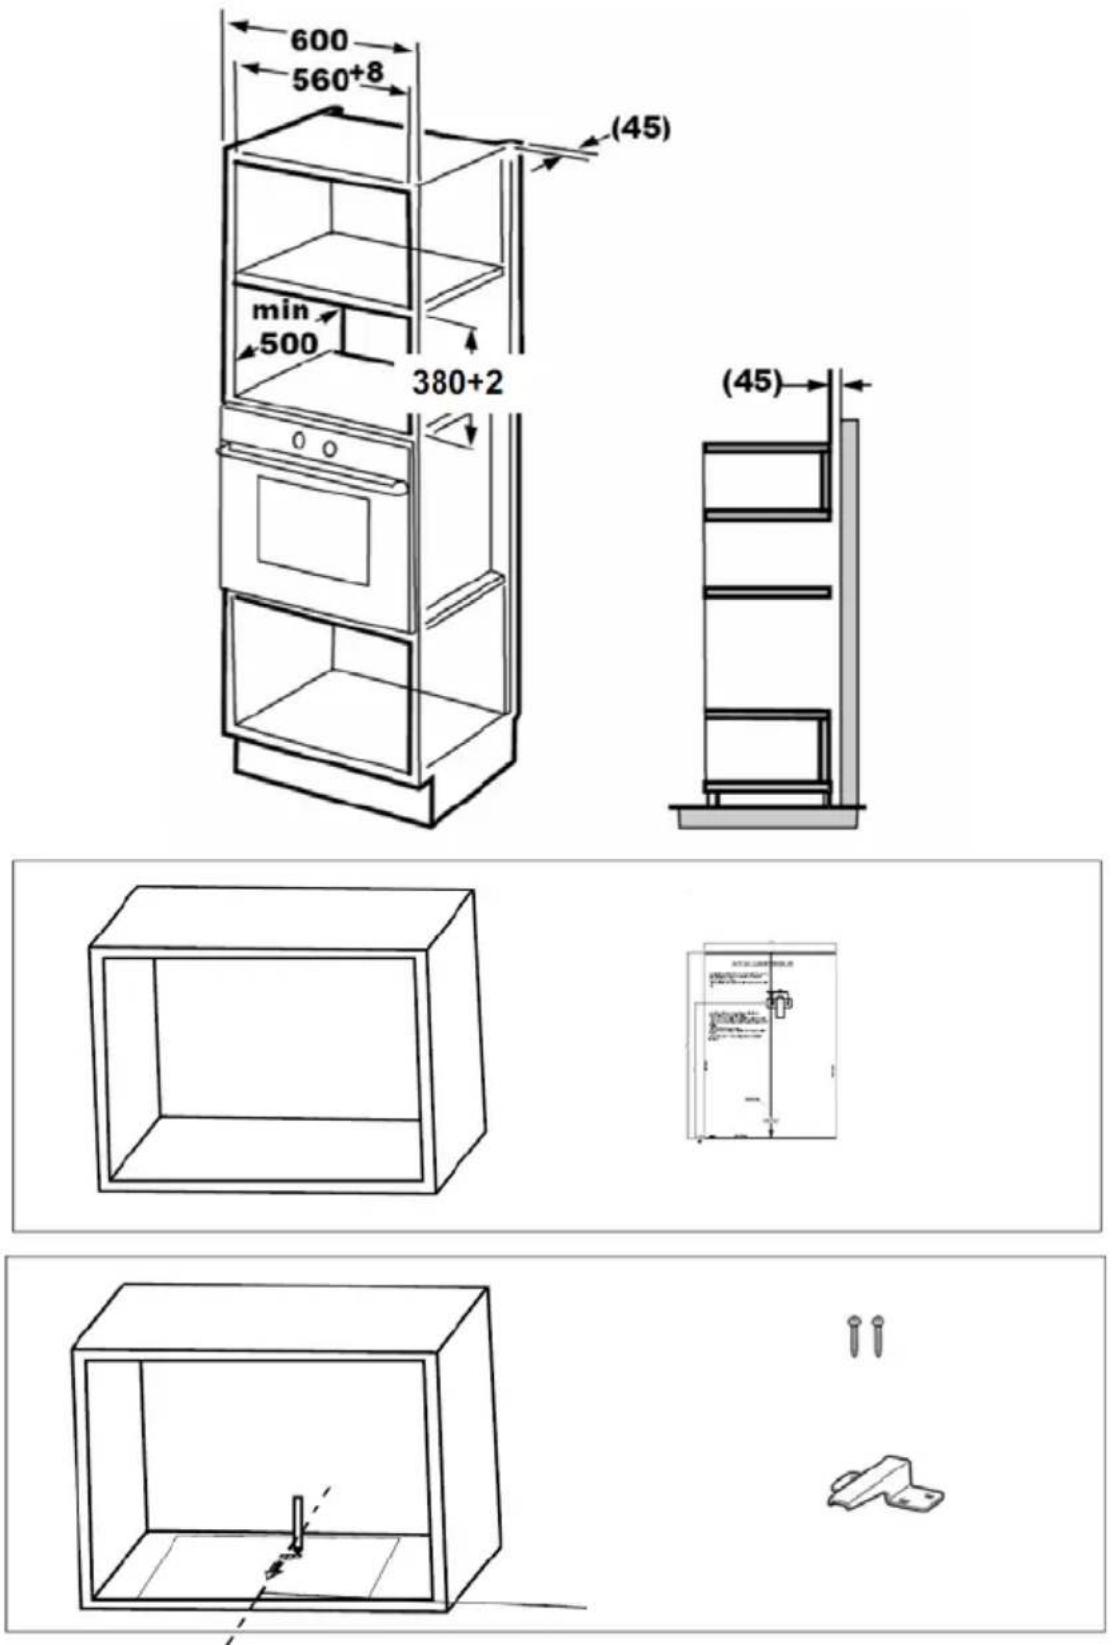
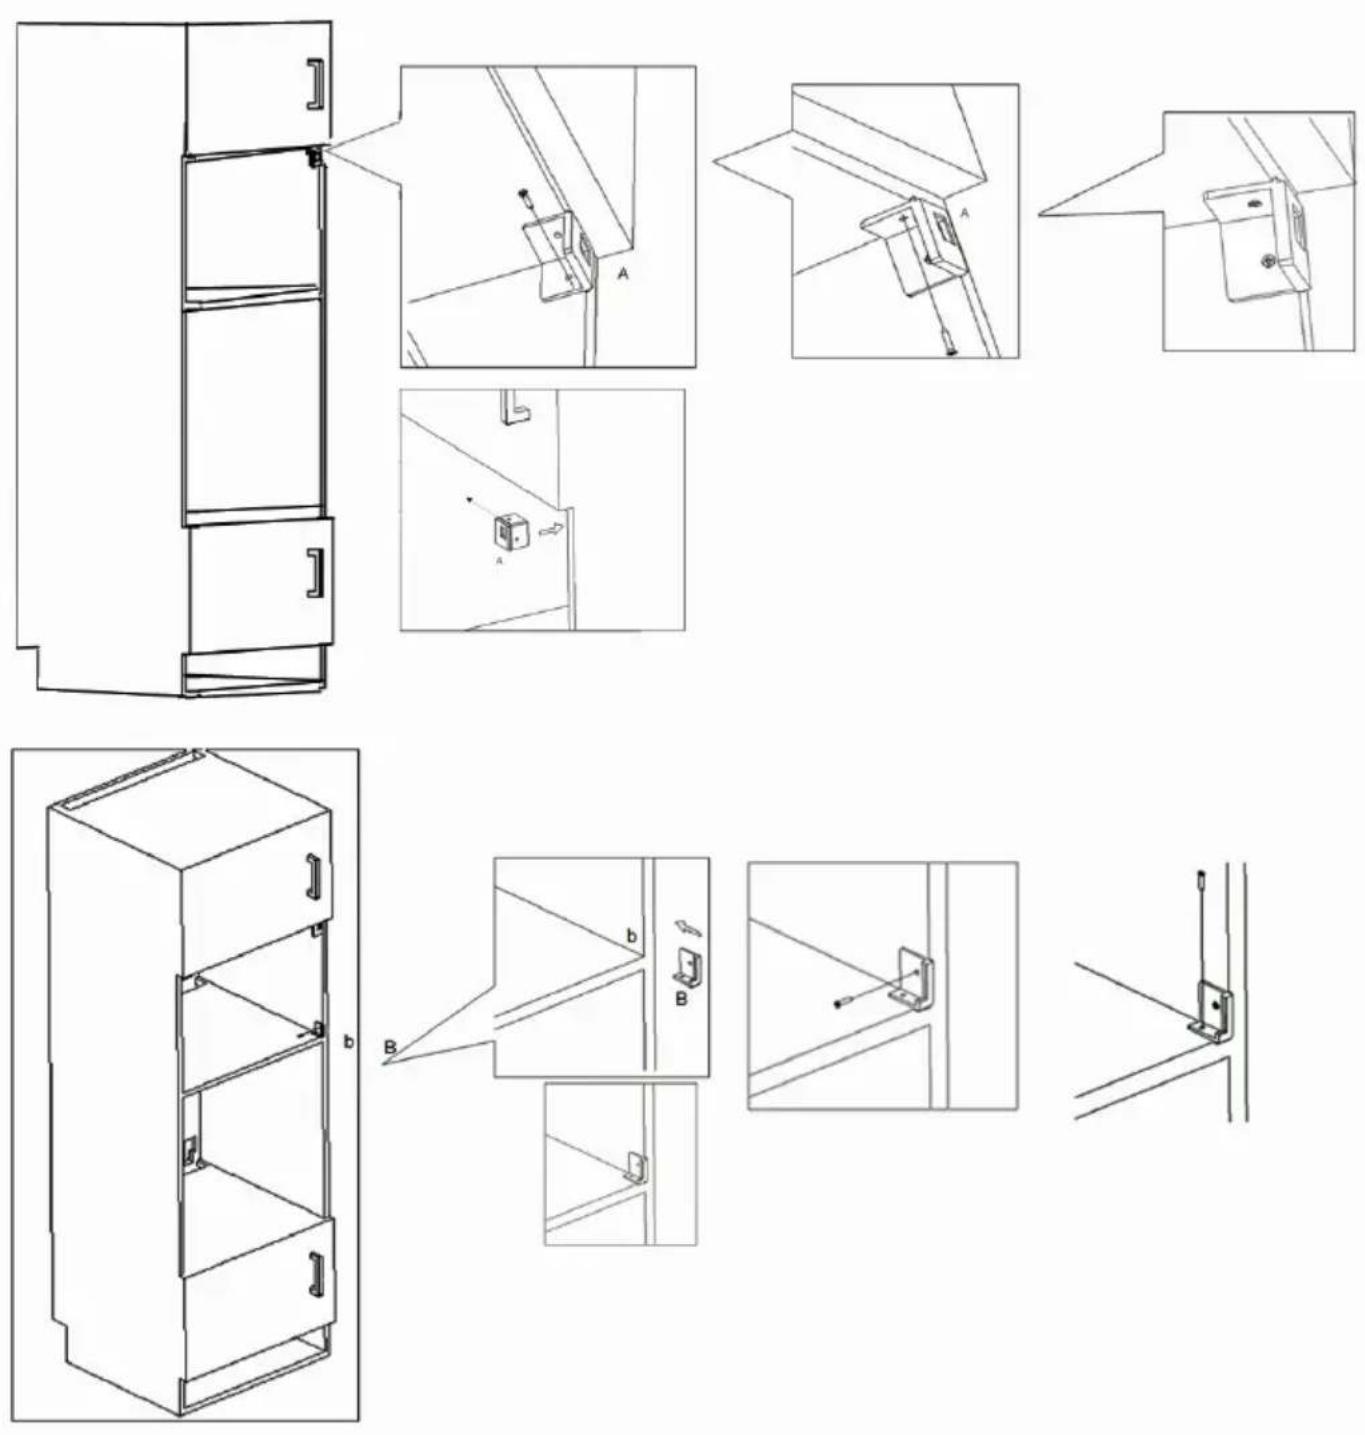
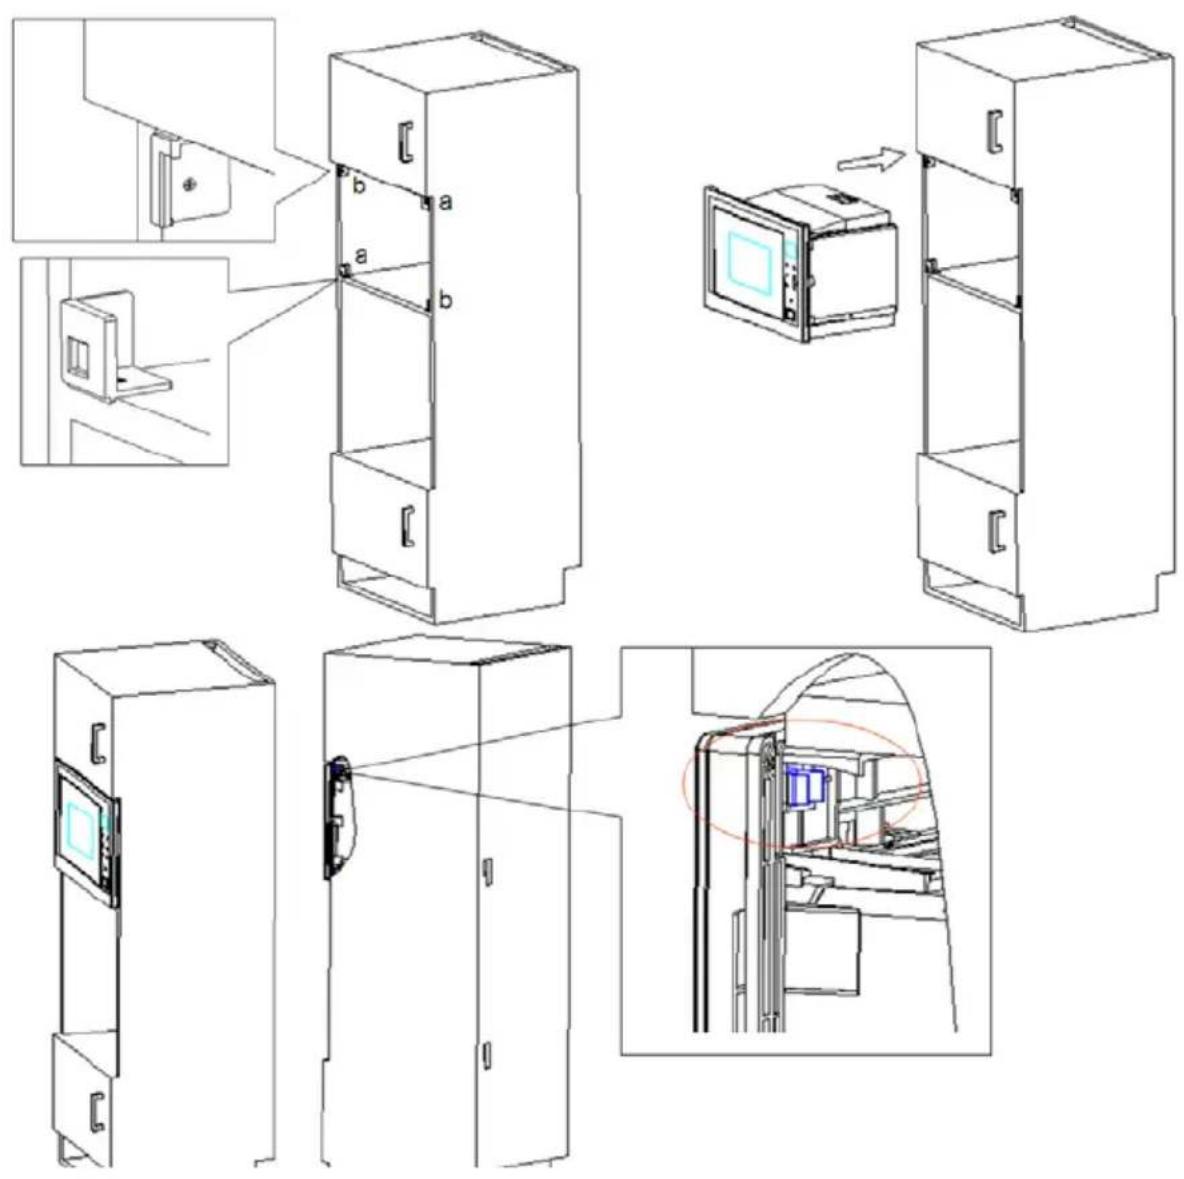
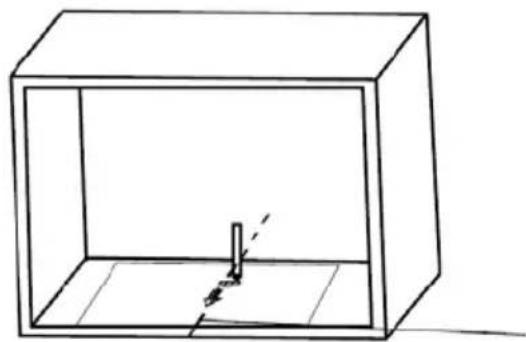
DIMENSIONS DIAGRAM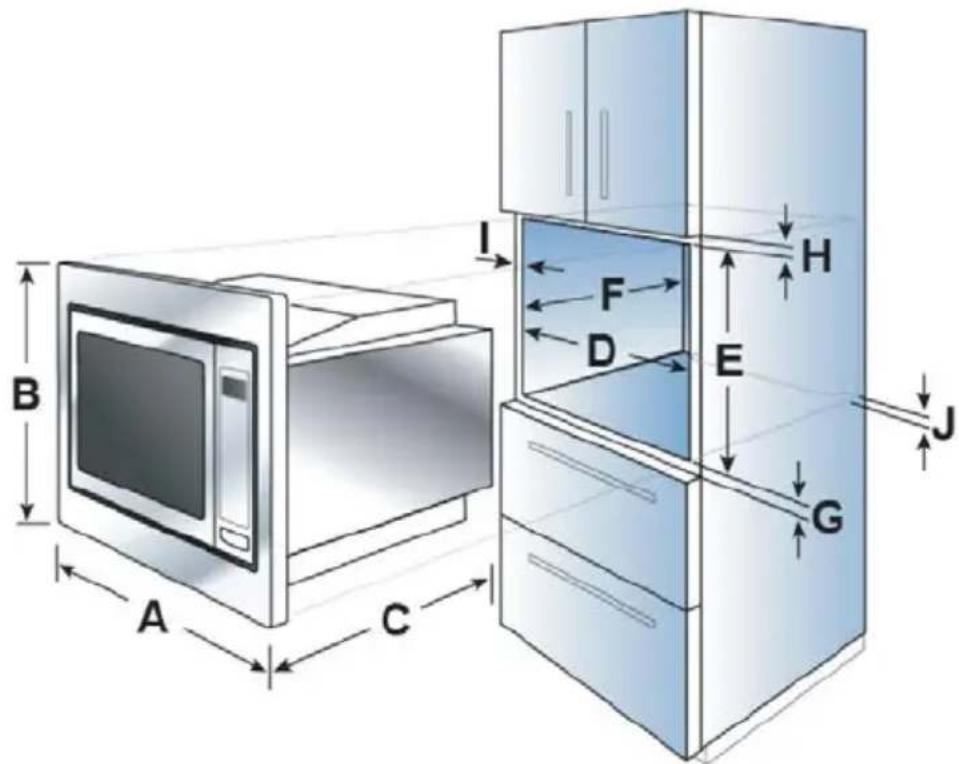
| A | 595mm |
| B | 388mm |
| C | 400mm |
| D | 560mm |
| E | 380mm |
| F | Min 500mm |
| G | 10mm |
| H | 10mm |
| I | 20mm |
| J | 45mm |
Operating instructions
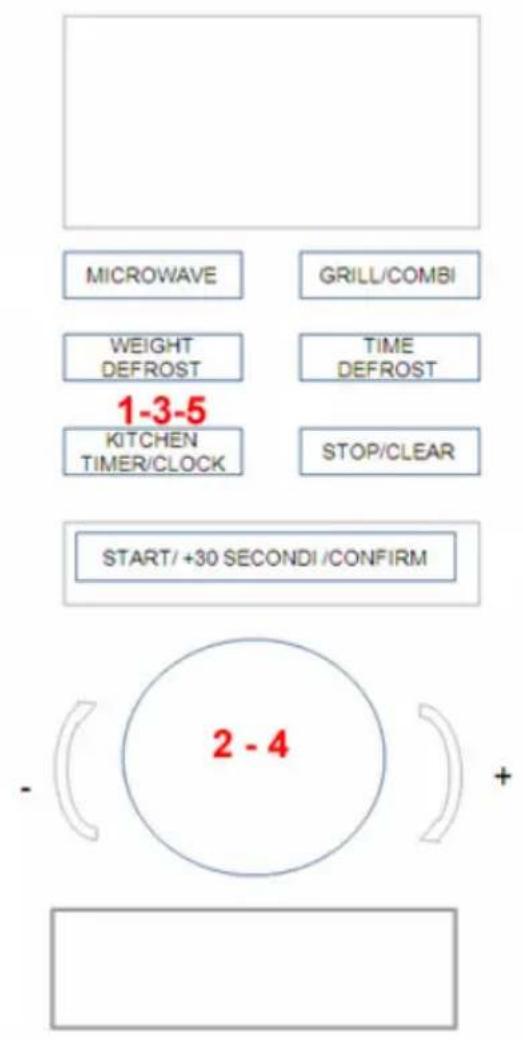
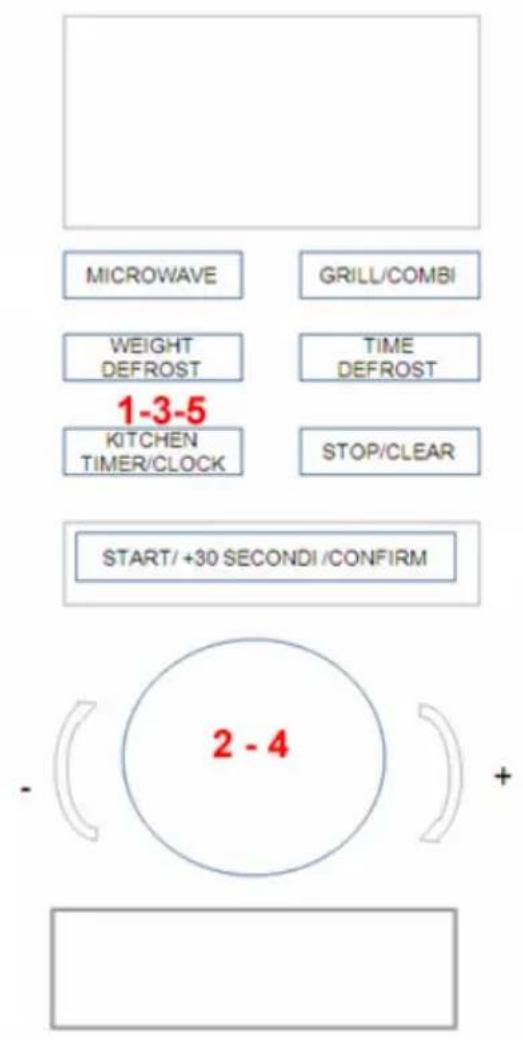
1. Setting the clock
When the microwave oven is on, the text "0:00" appears on the LED, and the buzzer sounds.
- Press "Kitchen Timer/Clock" twice to select the clock setting function; the hour digits on the clock will begin to flash.
- Press "🎨" to adjust the hour digits, making sure the value entered falls between 0-23.
- Press "Kitchen Timer/Clock" once; the minute digits on the clock will begin to flash.
- Press "🍴" to adjust the minute digits, making sure the value entered falls between 0-59.
- Press "Kitchen Timer/Clock" once to finish setting the clock. ":" will begin to flash, and the time will light up.
Note: 1. If the clock is not set, the time will not be displayed.
- During the clock setting procedure, if "Stop/Clear" is pressed, the oven automatically reverts to its previous status.
2. MICROWAVE cooking
- Press "Microwave"; the text "P100" will appear on the LED.
- Turn the knob to select the desired power level: "P100", "P80", "P50", "P30" or "P10" will appear consecutively, in correspondence with each press of the button.
- Next press "Start+30Sec./Confirm" to confirm.
- Use "🔥" to set cooking times from 0:05 to 95:00.
- Press "Start/+30 Sec./Confirm" again to start cooking.
Example: To use the microwave at 80% of its power and cook the food in question for 20 minutes, operate the oven as indicated below.
- Press "Microwave" once; the text "P100" will appear on the display.
- Use " 🔵" to select 80% microwave oven power.
- Press "Start+30Sec./Confirm" to confirm; the text "P 80" will appear on the display.
- Use “💡” to adjust the cooking time until the text “20:00” appears on the oven.
- Press "Start+30Sec./Confirm" to start cooking.
"Microwave" BUTTON PERCENTAGE VALUES
| Display | Microwave power | |
| P100 100% - 900 WATTS | ||
| P80 80% - 720 WATTS | ||
| P50 50% - 450 WATTS | ||
| P30 30% - 270 W | ||
| P10 10% - 90 W |
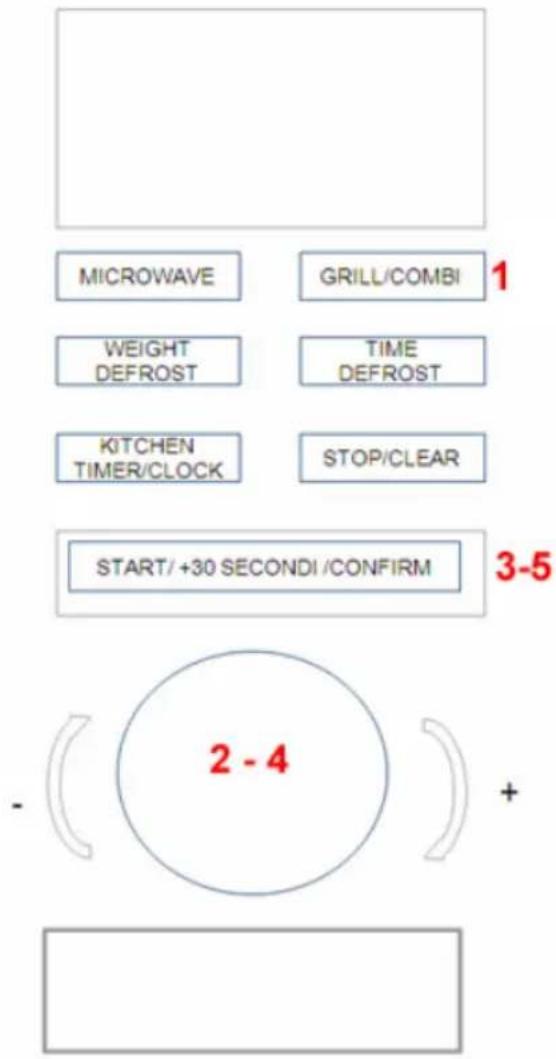
3. Grill or Combi cooking
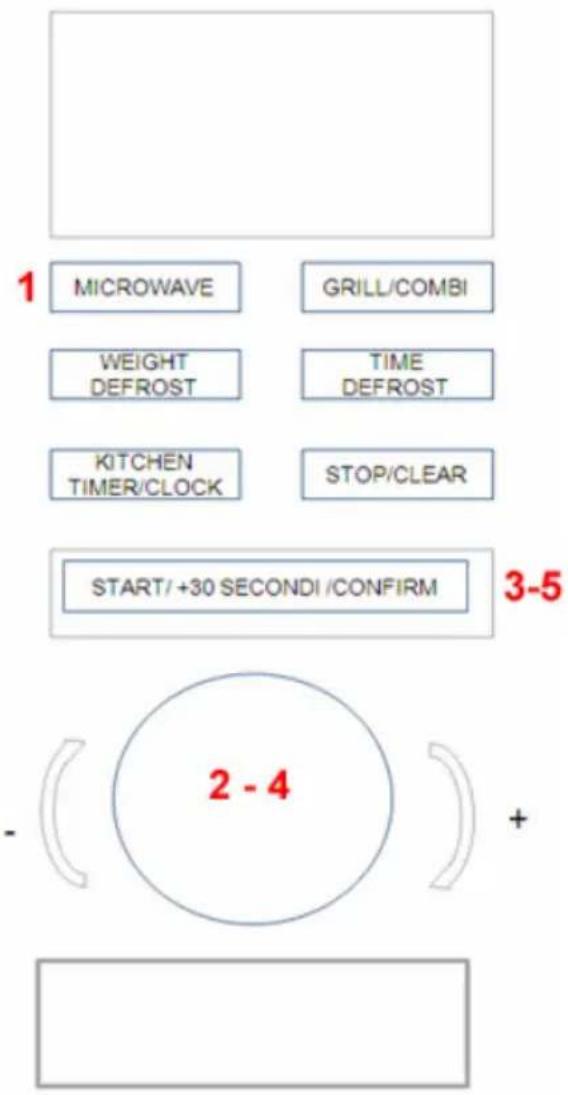
Press "Grill/Combi." 1 the text "G" will appear on the LED; at this point, press
"Grill/Combi." several times or use "

2 to select the desired power level: every time the button is pressed, the values "G", "C-1" or "C-2" will appear consecutively. Next, press "Start+30Sec./
Confirm 3 to confirm, and use “ 📋 ” 4 to set a cooking time from 0:05 to 95:00.
Press "Start+30Sec./Confirm" 5 again to start cooking.
Example: To use the microwave at 55% power and the grill (C-1) at 45% power, cooking the food in question for 10 minutes, run the oven as indicated below.
- Press "Grill/Combi." once only: the text "G" will appear on the display.
- Press "Grill/Combi." again or use " " to select the combi option. Mode 1.
- Press "Start+30Sec./Confirm" to confirm: the text "C-1" will appear on the display.
- Use " " to adjust the cooking time until the text "10:00" appears on the oven.
- Press "Start+30Sec./Confirm" to start cooking.
Grill/Combi keypad instructions
| Display | Microwave power | Grill power |
| G | 0% | 100% |
| C-1 | 55% | 45% |
| C-2 | 36% | 64% |
Note: when the oven reaches the halfway point of the set grill cooking time, the buzzer sounds twice as an alert. To achieve optimal results with this type of cooking, turn the food halfway through, close the door, and press "START/+30SEC./ Confirm" (Start+30Sec./Conferma) to continue cooking. Alternatively, the oven will continue cooking until the set time has elapsed.
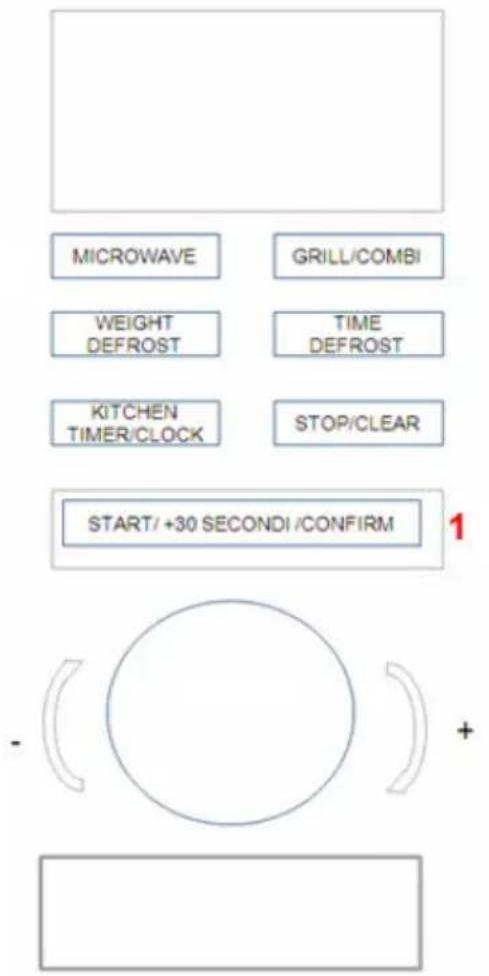
4. Quick start
- Press "Start+30Sec./Confirm" 1 to start cooking at 100% power; press the button several times to increase the cooking time by 30-second intervals, up to a maximum of 95 minutes.
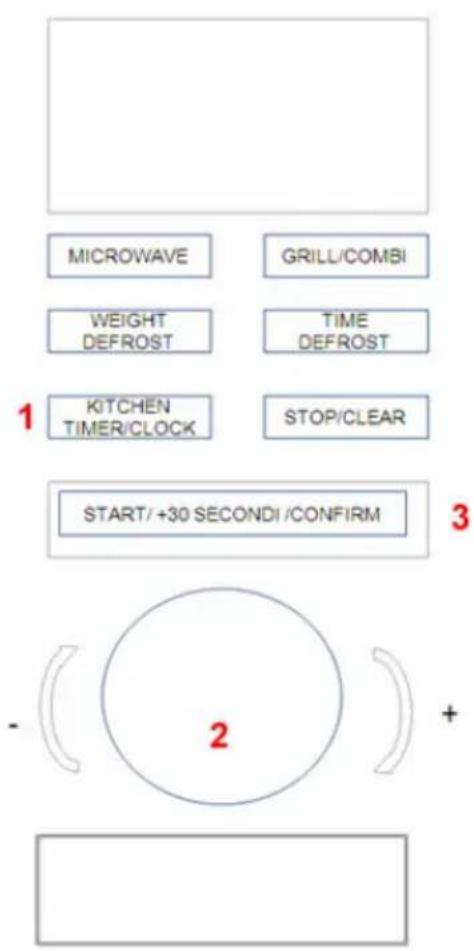
Timer with sound alert (does not stop cooking)
- Press "Kitchen Timer/Clock" (1): the figure 00:00 appears on the LED, and the clock indicator lights up.
- Turn the dial (2) to enter the correct time. (Maximum cooking time is 95 minutes).
- Press "Start+30Sec./Confirm" (3) to confirm the setting; the clock indicator lights up and flashes.
- When the previously set time has elapsed, the clock indicator switches off. The buzzer sounds 5 times. If the clock has been set (24-hour system), the LED shows the current time.
Note: the time is shown by the Timer in a different format compared with the 24-hour time display format, as it is an actual timer.
Stopping the cooking cycle
The cooking process can be stopped at any time by pressing the STOP/CLEAR button once and opening the oven door.
In both cases:
The emission of microwaves will be stopped immediately.
To restart the process, close the door and press the STOP/CLEAR button.
To cancel the cooking process, press the STOP/CLEAR button again.
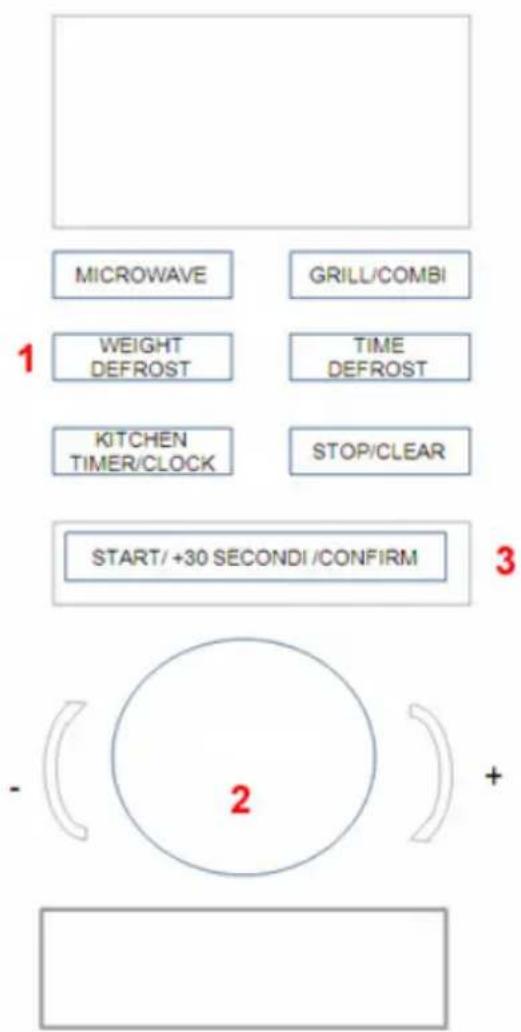
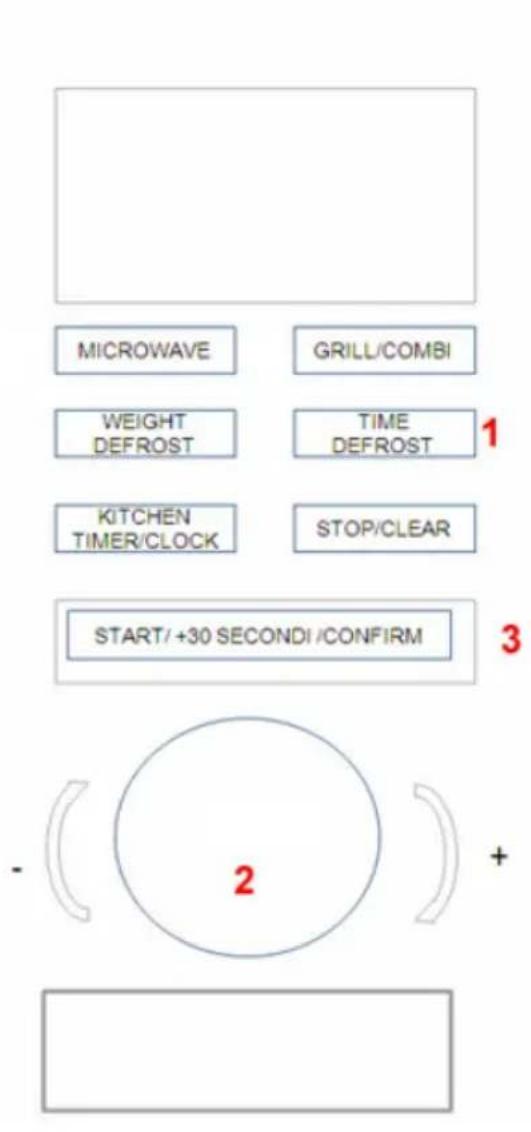
5. Defrosting on the basis of weight
- Press "Weight Defrost" (1) once; the text "dEF1" will appear on the oven.
- Turn the dial (2) to select the weight of the food in question, choosing a weight from 100 to 2000 g.
- Turn "Start+30Sec./Confirm" (3) to start defrosting.
6. Defrosting on the basis of time
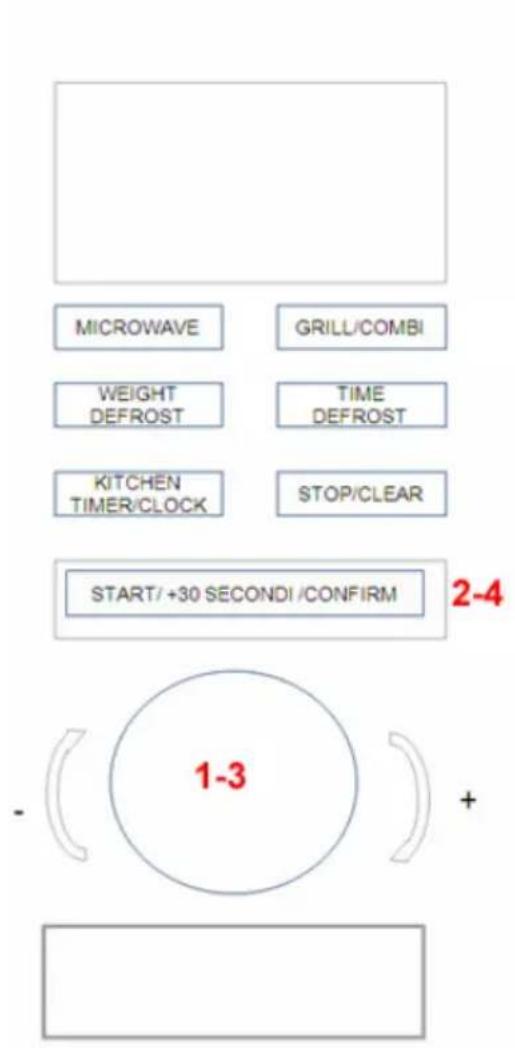
- Press "Time Defrost" (1) once; the text "dEF2" will appear on the oven.
- Turn " " 2 to select the defrost time. The MAX time is 95 minutes.
- Turn "Start+30Sec./Confirm" (3) to start defrosting.
8. Automatic menu
- Turn " " 1 to the right to select the menu: options "A-1" to "A-8" will appear, indicating pizza, meat, vegetables, pasta, potatoes, fish, beverages and popcorn.
- Press "Start+30Sec./Confirm" (2) to confirm.
- Turn " " 3 to select the default weight in accordance with the menu table.
- Press "Start+30Sec./Confirm" (4) to start cooking. Example: If you want to use the "Auto Menu" option to cook 350 g of fish, proceed as follows.
- Turn " " 1 clockwise until the text "A-5" appears.
- Press "Start+30Sec./Confirm" (2) to confirm.
- Turn " " 3 to select the weight of the fish you wish to cook, so that the text "350" appears.
- Press "Start+30Sec./Confirm" (4) to start cooking.
AUTOMATIC MENU table of foods:
| Menu | Weight | Display |
| A-1Pizza-Desserts | 200 g | 200 |
| 400 g | 400 | |
| A-2Meat | 250 g | 250 |
| 350 g | 350 | |
| 450 g | 450 | |
| A-3Vegetables | 200 g | 200 |
| 300 g | 300 | |
| 400 g | 400 | |
| A-4Pasta | 50 g(with 450 ml cold water) | 50 |
| 100 g(with 800 ml cold water) | 100 | |
| A-5Potatoes | 200 g | 200 |
| 400 g | 400 | |
| 600 g | 600 | |
| A-6Fish | 250 g | 250 |
| 350 g | 350 | |
| 450 g | 450 | |
| A-7Hot beverages | 1 cup (120 ml) | 1 |
| 2 cups (240 ml) | 2 | |
| 3 cups (360 ml) | 3 | |
| A-8Popcorn | 50 g | 50 |
| 100 g | 100 |
9. Cooking in several phases Programming two different types of cooking together
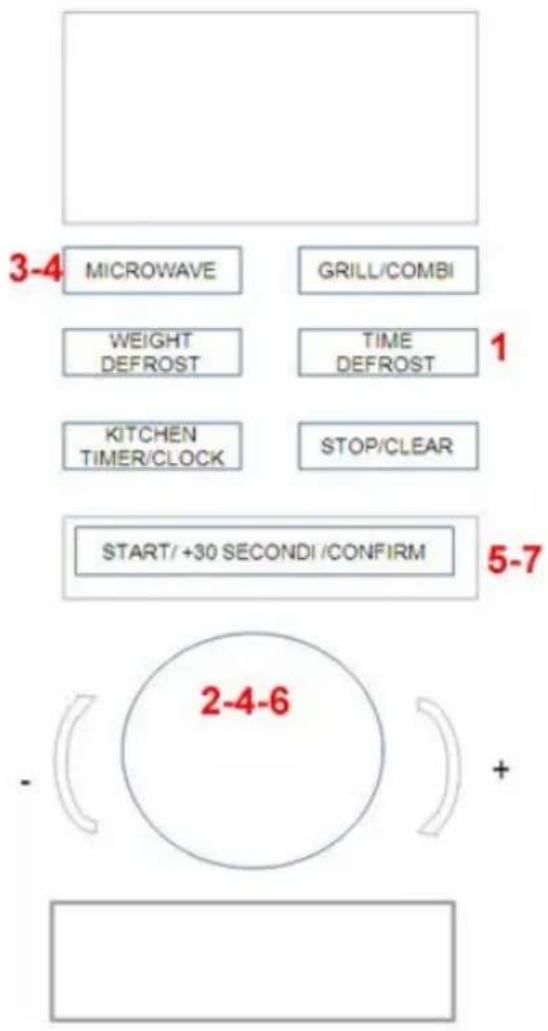
At least 2 cooking phases can be set. When cooking in several phases, if one is defrosting, this process will be carried out as the first phase. The available programmes are: MICROWAVE+GRILL/COMBI GRILL/COMBI+MICROWAVE DEFROST/WEIGHT+MICROWAVE DEFROST/TIME+MICROWAVE DEFROST/TIME+GRILL/COMBI
Example: If you want to defrost a food for 5 minutes, then cook at 80% microwave oven power for 7 minutes, proceed as follows:
- Press "Time Defrost" (1) once; the text "dEF2" will appear on the oven.
- Press " " 2 to select the defrost time, so that the text "5:00" appears.
- Press "Microwave" (3), once; the text "P100" will appear on the display.
- Press "Microwave" (4) again or use "☐" 4 to select 80% microwave oven power.
- Press "Start+30Sec./Confirm" (5) to confirm; the text "P 80" will appear on the display.
- Use " " 6 to adjust the cooking times until the text "7:00" appears on the oven.
- Press "Start+30Sec./Confirm" (7) to start cooking: the buzzer will sound once to signal the start of the first phase and the defrost time will begin counting down; the buzzer will sound a second time as soon as the second cooking phase has begun. When cooking is complete the buzzer will sound five times.
10. Displaying information
- In microwave cooking, grill cooking and combi cooking, press "Microwave" to display the current oven power level for 3 seconds. After 3 seconds, the oven returns to its previous status.
- During cooking, press "Kitchen Timer/Clock" to display the current time for 3 seconds.
11. Child safety lock function
Safety lock:
In standby mode, press "Stop/Clear" for 3 seconds; a long beep sounds to indicate that the child safety lock mode is enabled; at this point the current time will also appear, as long as the time has been set, otherwise the LED will show the text "[---]".
Cancelling the safety lock:
When the safety lock is enabled, press "Stop/Clear" for 3 seconds; a long "beep" will sound to signal that the lock has been disabled.
Troubleshooting
| Microwave oven interferes with television reception | Optimal radio and television reception may be affected while the microwave oven is in use. This interference is similar to that caused by small domestic electric appliances, such as blenders, vacuum cleaners and fans. This is an entirely normal effect. |
| Dim oven light | During microwave cooking at low power, the oven light may become dim. This is an entirely normal effect. |
| Build-up of steam on the door, hot air escaping from the air vents | During cooking, food may release steam. In particular, hot air may escape from the ventilation openings. A little steam may build up on the oven door. This is an entirely normal effect. |
| Accidental oven activation with no food inside. | It is prohibited to run the oven with no food inside. This is actually very dangerous. |
| Malfunction | Possible cause | |
| Impossible to start the oven. | Power plug not inserted correctly.Make sure the oven power supply is enabled. | |
| The oven does not heat up. | Door not closed correctly.Make sure there is no foreign material trapped between the door and the front of the cavity. | |
| The glass tray makes noise when the microwave oven is running. | Build-up of dirt in the roller seat and on the bottom of the oven. | |
| Sparks and crackling in the oven (electric arcs) | Plates with metal decorations are being used.There is a fork or metal utensil in the oven.Too much aluminium foil is being used.A bag clasp with a metal core is being used. |
Support
If the problem persists even after the above information is taken into account, contact the Technical Support Centre as per the attached list.
Never use the services of technicians not authorised by Franke.
Specify:
– the type of fault; – the appliance model (Art.); – the serial number (S.N.).
This information is given on the appliance data plate, on the warranty certificate.
The label listing the technical data, serial number and brand is applied in a visible position on the oven door frame.
Never remove the data label.
In compliance with the Directive on waste electrical and electronic equipment (WEEE), this WEEE must be collected and processed separately. If in future it becomes necessary to dispose of this product, please DO NOT do so using the normal domestic waste channels. Take the product to a suitable waste electrical and electronic equipment (WEEE) collection point.
INSTRUCTIONS FOR DISPOSAL - OUR POLICY FOR SAFEGUARDING
Our products are usually packaged using recyclable non-polluting materials which are not harmful to the environment. We would ask that users do their part by disposing of the packaging in a suitable manner. Contact your dealer or the relevant local organisations for details of your nearest collection, recycling and disposal centres.
Never dump all or part of the packaging in the environment. Packaging components, in particular plastic bags, present a suffocation hazard for children.
You should also dispose of your old appliance in the same way.
Important: take the appliance to your local organisation authorised to collect appliances for scrapping. Correct disposal allows intelligent recovery of valuable materials.
Before scrapping your appliance, it is important to remove the door and leave any shelves in their normal position, to make sure that children cannot get involuntarily trapped inside while playing.
You should also disable the power supply, removing the cord and plug.
CONTENTS

DIMENSION DRAWING
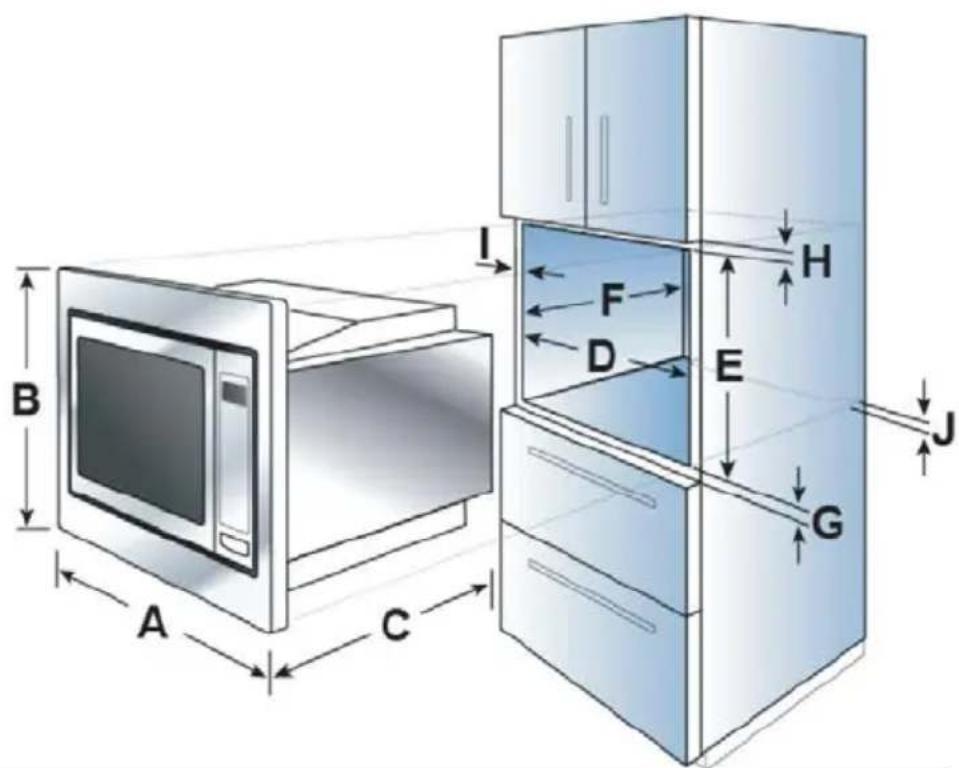
| A | 595mm |
| B | 388mm |
| C | 400mm |
| D | 560mm |
| E | 380mm |
| F | Min 500mm |
| G | 10mm |
| H | 10mm |
| I | 20mm |
| J | 45mm |
- INSTRUCTIONS FOR USE
- PRECAUTIONS FOR AVOIDING POTENTIAL EXCESSIVE EXPOSURE TO MICROWAVE ENERGY
- IMPORTANT SAFETY INSTRUCTIONS
- CLEANING
- DANGER
- WARNING
- IMPORTANT
- COOKING UTENSILS - GUIDE TO CROCKERY
- UTENSIL TEST
- MATERIALS SAFE FOR USE IN MICROWAVE OVENS
- IMPORTANT: FOLLOW THE MANUFACTURER'S INSTRUCTIONS FOR ALL MATERIALS
- ADVICE FOR MICROWAVE COOKING, OBSERVE THE FOLLOWING RECOMMENDATIONS
- WHEN COOKING IN THE MICROWAVE, BEAR THE FOLLOWING IN MIND
- A CLOSE-UP VIEW
- INSTALLING THE TURNTABLE
- INSTALLATION AND CONNECTION
- OPERATING INSTRUCTIONS
- SETTING THE CLOCK
- MICROWAVE COOKING
- GRILL OR COMBI COOKING
- QUICK START
- TIMER WITH SOUND ALERT (DOES NOT STOP COOKING)
- STOPPING THE COOKING CYCLE
- DEFROSTING ON THE BASIS OF WEIGHT
- DEFROSTING ON THE BASIS OF TIME
- AUTOMATIC MENU
- COOKING IN SEVERAL PHASES PROGRAMMING TWO DIFFERENT TYPES OF COOKING TOGETHER
- DISPLAYING INFORMATION
- CHILD SAFETY LOCK FUNCTION
- SUPPORT
- SPECIFY
- INSTRUCTIONS FOR DISPOSAL - OUR POLICY FOR SAFEGUARDING
- CONTENTS
- DIMENSION DRAWING
Brand : FRANKE
Model : FMW 250 SM G XS
Category : Microwave