
Freestyle 6100 - Telephone BT - Free user manual and instructions
Find the device manual for free Freestyle 6100 BT in PDF.


| Type de produit | Cordless Telephone |
| Marque | BT |
| Modèle | Freestyle 6100 |
| Dimensions du combiné | 170 x 50 x 30 mm |
| Poids du combiné | 130 g |
| Alimentation | Base: 230V AC, Batteries rechargeables NiMH 2x AAA |
| Type d'affichage | LCD rétroéclairé |
| Répertoire | Jusqu'à 100 noms et numéros |
| Identification de l'appelant | Oui, avec journal des appels |
| Appel mains-libres | Oui, haut-parleur intégré |
| Fonctions de messagerie | SMS (selon réseau) |
| Portée | Jusqu'à 50 m à l'intérieur, 300 m à l'extérieur |
| Température de fonctionnement | 5°C à 45°C |
| Nettoyage et entretien | Nettoyer avec un chiffon doux et sec. Ne pas utiliser de solvants. |
| Sécurité | Ne pas exposer à l'humidité. Débrancher en cas d'orage. |
| Pièces détachées | Batteries de rechange disponibles. Contacter le service client. |
| Réparabilité | Indice de réparabilité: 7.5/10 (estimation) |
| Garantie | 2 ans |
Frequently Asked Questions - Freestyle 6100 BT
User questions about Freestyle 6100 BT
0 question about this device. Answer the ones you know or ask your own.
Ask a new question about this device
Download the instructions for your Telephone in PDF format for free! Find your manual Freestyle 6100 - BT and take your electronic device back in hand. On this page are published all the documents necessary for the use of your device. Freestyle 6100 by BT.
USER MANUAL Freestyle 6100 BT
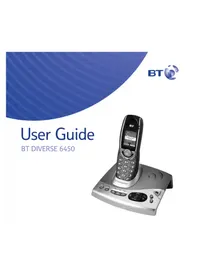
to your BT Freestyle 6100 Digital Cordless Telephone
■ Digital call quality with a range of up to 300 metres outdoors and up to 50 metres indoors.
■ The 100 name and number directory makes it simple to store and dial your most frequently used numbers.
- Caller Display* lets you see who is calling and keep track of unanswered calls.
- Call Waiting* lets you know, during a call, that another caller is waiting to get through.
■ Redial any of the last 20 numbers dialled from the redial list.
■ Use up to 5 handsets with your base without the need for additional wiring, creating a complete phone system on a single telephone line.
This User Guide provides you with all the information you need to get the most from your phone.
Before you make your first call you'll need to set up your phone. This doesn't take long and is easy to do. Just follow the simple instructions on the next few pages.
- Need help?
If you have any problems setting up or using your BT Freestyle 6100 please contact the Helpline on 0870 605 8047.
Alternatively, you may find the answer in 'Help' at the back of this guide.
Got everything?
■ BT Freestyle 6100 base
■ BT Freestyle 6100 handset
■ 2 x NiMH AAA rechargeable batteries
■ Mains power adaptor (Item code: 872260)
- Telephone line cord
If you have purchased a BT Freestyle 6100 multiple pack you will also receive the following for each additional handset:
■ BT Freestyle 6000 handset
■ BT Freestyle 6000 charger
■ Mains power adaptor for charger (Item code: 021299)
■ 2 x NiMH AAA rechargeable batteries
this guide
Getting started
Location 6
Setting up 6
Getting to know your phone
Handset buttons 8
Handset display icons .....9
Navigating the menus .....10
Menu map....11
Base 12
Using the phone
Make an external call .....13
Preparatory dialling .....13
End a call....13
Receiving calls .....13
Earpiece volume .....14
Amplify your caller's voice .....14
Secrecy 14
Switch to handsfree during a call .....15
Paging 15
Keypad lock....16
Redial a number from the redial list . . .16
Save a number from the redial list to the directory .....17
Delete a number from the redial list . .17
Delete all numbers from the redial list ....17
Using the directory
Add a new directory entry .....18
Entering names/Character map .....19
View and dial a directory entry .....20
Edit an entry .....20
Delete an entry .....21
Assign a ringer melody to a directory entry .....21
Copy a directory entry to another handset....22
Copy the entire directory to another handset....23
BT Calling Features & the Calls list
View and dial an entry in the Calls list....24
Save a Calls list entry to the directory .....25
Delete a Calls list entry .....26
Delete all numbers from the Calls list....26
To use Call Waiting .....27
Handset settings
Handset ringer volume .....28
Handset ringer melody .....28
Key beeps .....29
Auto talk 29
Handset language .....30
Set the time ....30
Set the date .....31
Set the alarm ....31
Switch a set alarm off .....32
Change the time format .....32
Base settings
Base ringer volume .....33
Base ringer melody .....33
Set the dial mode .....34
Change the system PIN .....34
Restore default settings .....35
Additional handsets & bases
Register a handset to a base .....36
Select a base .....37
De-register a handset .....37
Make an internal call
to another handset ....38
Transferring calls ....38
3-Way conference call .....39
Help 40
General information
Safety 44
Cleaning 45
Environmental 45
BT Accessories and replacement items . .46
Guarantee 47
Returning your phone .....48
Technical information
How many telephones
can you have? 49
Connecting to a switchboard .....49
Access code and entering a pause . . . .50
Recall 50
R&TTE 50
Declaration of Conformance .....50
Getting started
WARNING
Do not place your BT Freestyle 6100 in the bathroom or other humid areas.
Handset range
The BT Freestyle 6100 has a range of 300 metres outdoors when there is a clear line of sight between the base and handset. When there is no clear line of sight between the base and handset, e.g. base indoors and handset either indoors or outdoors, the range could be reduced to 50 metres. Thick stone walls will severely affect the range.
Range indicator
The symbol on your handset display indicates when you are in range of the base. If the symbol flashes and you hear a warning beep, you are out of range and will need to move closer to the base.
IMPORTANT
Do not connect the telephone line until your handset is fully charged.
The base must be plugged into the mains power at all times.
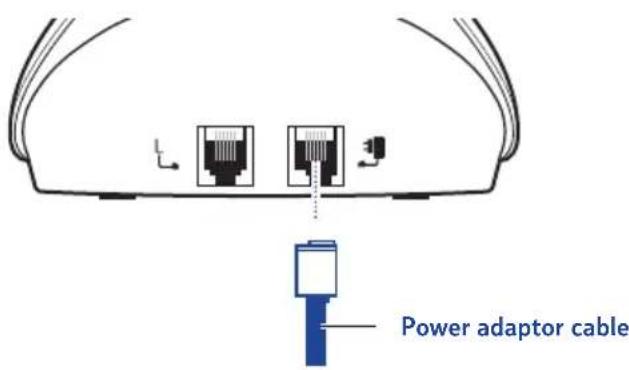
Which socket?

Power socket

Telephone line socket
Location
You need to place your BT Freestyle 6100 within 2 metres of a mains power and telephone socket so that the cables will reach.
Make sure it is at least 1 metre away from other electrical appliances to avoid interference.
Your BT Freestyle 6100 works by sending radio signals between the handset and base. The strength of the signal depends on where you site the base. Putting it as high as possible can help to provide the best signal.
Setting up
- Plug the mains power cable into the base. Then plug the power adaptor into the wall socket and switch the power on. The Power/In use indicator on the base lights up.
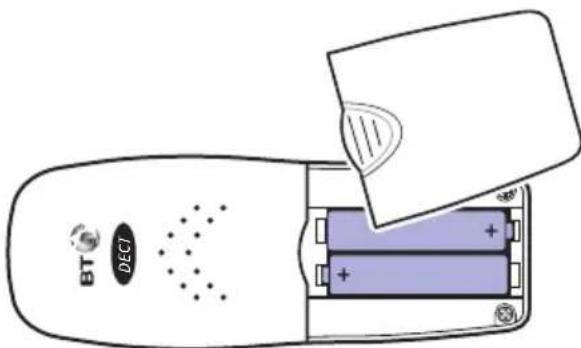
- Remove the battery compartment cover and insert the 2 x AAA NiMH batteries (supplied) into the handset. Slide the battery compartment cover back into place.
- Charge the handset for at least 16 hours by placing it on the base. The red Charging indicator on the base lights up and remains lit while the handset in on the base (even when the battery is fully charged). When the handset is fully charged the display will show the full battery) icon.
- After 16 hours, plug the telephone line cord into your BT Freestyle 6100 base and the other end into the wall socket.
Your BT Freestyle 6100 is now ready for use.
Talk/Standby time
Under ideal conditions, fully charged handset batteries should provide up to 10 hours talk time or 100 hours standby on a single charge.
Battery performance
Please note that new NiMH batteries do not reach full capacity until they have been in normal use for several days.
To keep the batteries in the best condition, leave the handset off the charger for a few hours at a time (after the initial 16 hour charge). Running the batteries right down at least once a week will help them last as long as possible.
The charge capacity of rechargeable batteries will reduce with time as they wear out, so reducing the talk/standby time of the handset. Eventually they will need to be replaced. New batteries can be obtained from the BT Freestyle Helpline 0870 605 8047.
Battery low warning
When the battery charge is low the display will show Battery Low and an empty battery icon □You will also hear the battery low warning beep. Place the handset back on the base to recharge.
Getting to know your phone
Handset buttons
Amplify
Press to increase the volume of the incoming caller, page 14.
On-screen option button
Opens the main menu, page 10.
Selects the option shown on the display, page 10.
Scroll/Redial list/Volume
Scroll through menu options.
Press up to open redial list, page 16.
During a call, press to increase earpiece volume.
Talk/Handsfree
Press to make and receive calls, page 13.
During a call, press to switch between handset and handsfree, page 15.
Recall/Call Waiting
For use with a switchboard and BT Calling Features.
For use with Call Waiting, page 27.
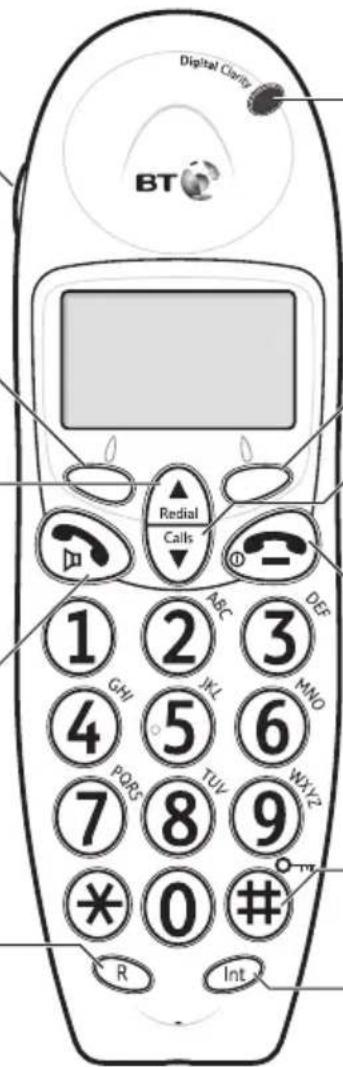
Incoming call indicator
Flashes to indicate an incoming call.
On-screen option button
Open the directory, page 18.
Selects the option shown on the display, page 10.
Scroll/Calls list/Volume
Scroll through menu options.
Press down to open calls list, page 24.
During a call, press to decrease earpiece volume.
End/Clear/Exit/Power on/off
Press to end a call, page 13.
Use to delete characters/digits.
Exit menus, page 10.
Press to switch the power on or off.
# button
Press and hold to activate keypad lock, page 16.
Int
Make calls between handsets registered to the base, page 38.
Handset display icons – These are the symbols you will see on your handset's screen.
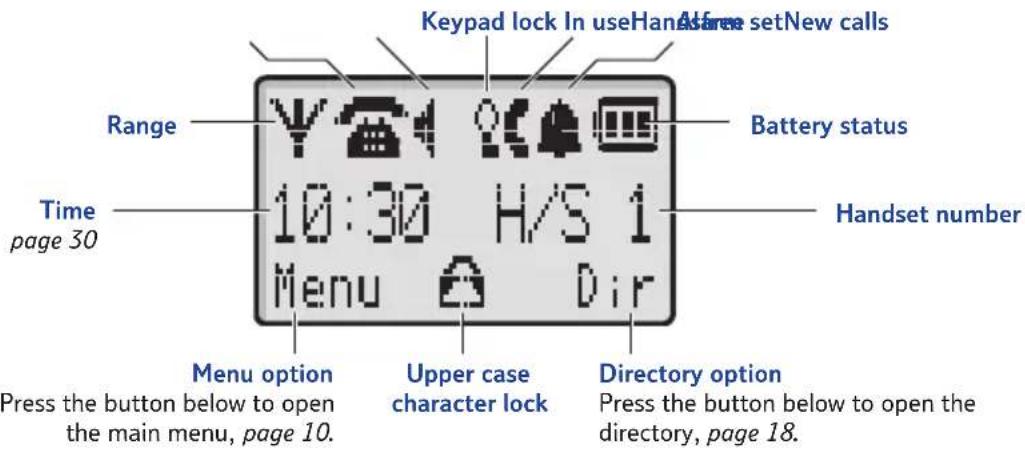

Range indicator
Indicates that the handset is registered and you are in range of the base.
Flashes when the base is out of range.

New calls indicator*
Displayed when you have new (unread) entries in the Calls list, page 24. The icon will continue to flash until you have viewed all new calls.

Handsfree
Indicates when handsfree is switched on, page 15.

Keypad locked
Indicates the keypad is locked, page 16.

Alarm set
Indicates an alarm is set, page 31.

In use
Displayed when making or receiving a call, page 13.
Battery status
Shows the battery charge level.
A 'scrolling' battery icon is displayed when the handset is on charge.

Fully charged.

Half charged.

Battery low.

Empty.

Upper case selected
Displayed when you have upper case character lock on, page 19.
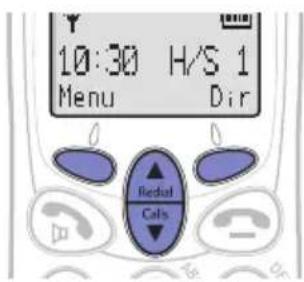
Select the option displayed by pressing the button underneath it.
For example, press the left-hand option button to select Menu and open the main menu, or press the right-hand option button to open the directory.
Navigating the menus
Your BT Freestyle 6100 has a menu system which is easy to use. Each menu leads to a list of options. Take a look at the menu map on the following page.
When the handset is in standby, press the option button under Menu to open the main menu.
Use the 📁 and buttons to scroll to the menu option you want. Then select OK for further options or confirm the setting displayed.
The option buttons and 📐 and buttons are also used when viewing the calls list and directory.
Exit or go back one level in the menu
To go to the previous level in the menu, select Back.
To cancel an operation and/or return to standby at any time, press 🔒
If no button is pressed for 20 seconds the display will automatically return to standby.
Menu map
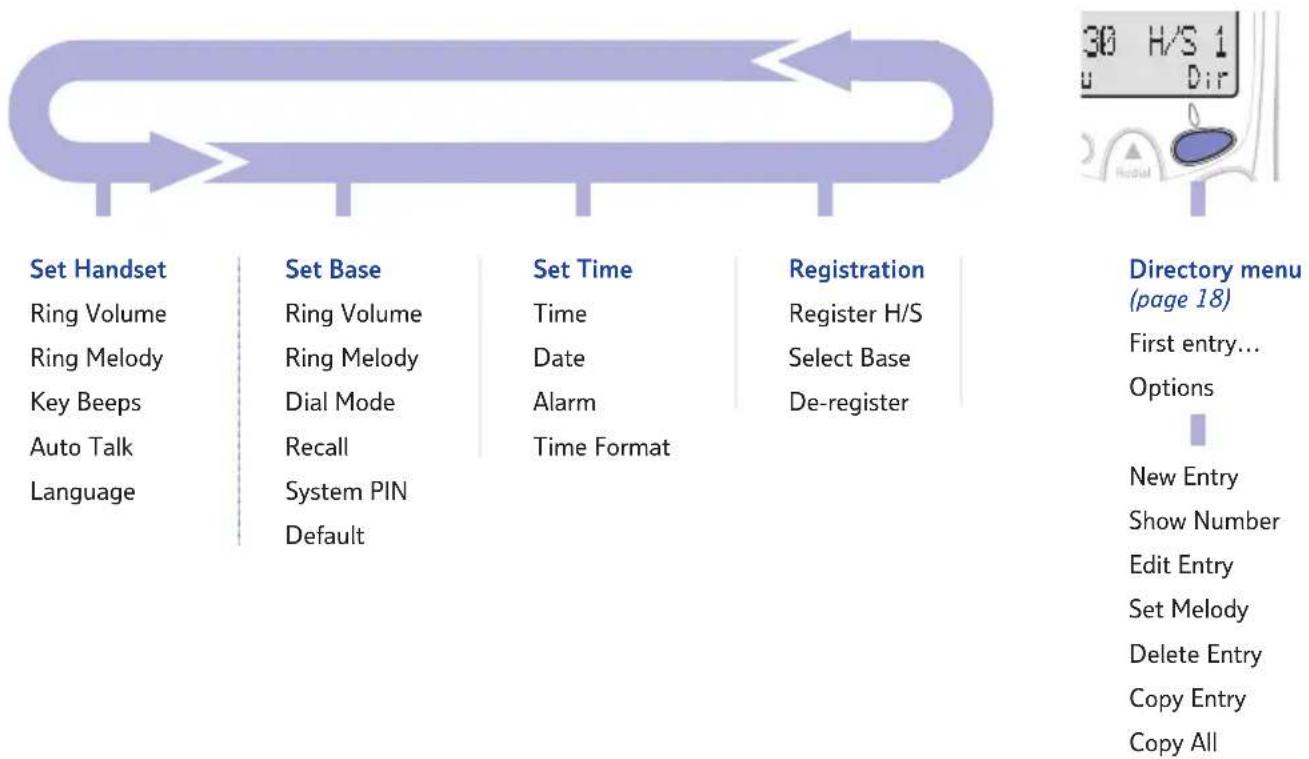
Set Handset
Ring Volume
Ring Melody
Key Beeps
Auto Talk
Language
Set Base
Ring Volume
Ring Melody
Dial Mode
Recall
System PIN
Default
Set Time
Time
Date
Alarm
Time Format
Registration
Register H/S
Select Base
De-register
Directory menu
(page 18)
First entry...
Options
New Entry
Show Number
Edit Entry
Set Melody
Delete Entry
Copy Entry
Copy All
Base
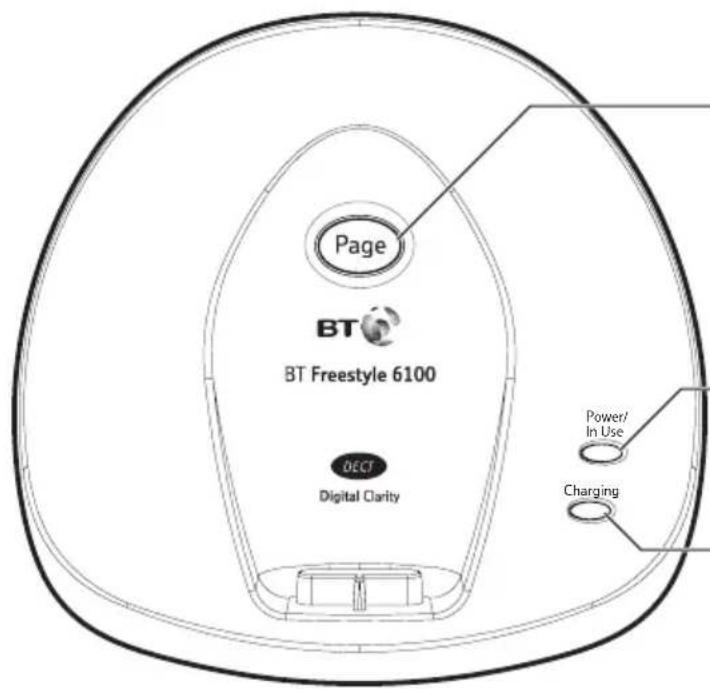
Page button
Press to page the handset(s), page 15.
Also used when registering additional handsets, page 36.
Power/In use indicator
Lights up when the power is on.
Flashes when making or receiving calls.
Charging light
Lights up when the handset is on the base.
Using the phone
Make an external call
- Press 📋When you hear the dialling tone, dial the telephone number.
The green In Use light on the base flashes and the icon is displayed.
Preparatory dialling
- Enter the number first. If you make a mistake as you dial, select Clear to delete the last digit. Press dial the number.
End a call
- Press or place the handset back on the base.
Receiving calls
Providing you have subscribed to your network's Caller Display service, the caller's number (or name if stored in the directory) is displayed. See page 24.
- Press if the handset is on the base, simply lift it up and speak.
Dialling numbers quickly
Numbers can also be dialled direct from the directory (page 18), the dialled numbers list (page 16), or the calls list (page 24).
Call timer
The duration of your call is shown during and for a short while after your call has ended.
Auto Talk
If you would rather press receive a call when the handset is on the base, you need to switch Auto Talk off, see page 29.
The new earpiece volume level remains set until changed again.
Amplification is switched off automatically at the end of the call.
With amplification on, the earpiece volume can still be increased or decreased accordingly.
Earpiece volume
During a call you can adjust the volume of your caller's voice in the earpiece.
- During a call, press 🔒 to increase or decrease the volume. The volume level is shown in the display, i.e. minimum = maximum = .
Amplify your caller's voice
In addition to the earpiece volume settings, during a call you can amplify the incoming caller's voice.
-
During a call, press , the side of the handset. The display flashes Amplify and boosts the volume of the incoming caller's voice.
-
Press again to switch amplification off.
Secrecy
During a call, you can talk to someone nearby without your caller hearing.
-
During a call, select Secrecy. The display shows Secrecy and flashes. Your caller cannot hear you.
-
Select Off to return to your caller.
Switch to handsfree during a call
Handsfree lets you talk to your caller without holding the handset. It also enables other people in the room to listen to your conversation over the loudspeaker.
During a call:
- Press and release until the call is transferred to the loudspeaker. The display shows the icon.
Press and release 📋 again if you want to switch from handsfree back to the handset.
- Press to end the call.
Paging
You can use the Perleton on the base to alert handset users that they are wanted or locate a missing handset.
- Press and release the base. All registered handsets ring.
Press and release iags top the handsets ringing, or press any button on the handset.
The paging ring will stop automatically after 30 seconds if no button is pressed.
IMPORTANT
Emergency calls cannot be made while the keypad is locked. You will need to unlock the keypad before you can dial out.
If a call is made to a number already in the list, the previous occurrence will be deleted.
If a call is made to a number which is stored in the directory, the name will be displayed instead, see 'Directory', on page 18.
Keypad lock
Lock the keypad to prevent any accidental button presses or dialling of numbers. You can still answer calls while the keypad is locked; the keypad will remain unlocked for the duration of the call.
- Press and hold to lock the keypad. The display shows Keypad Locked and the Icon.
- To unlock the keypad select Unlock, then press # within 2 seconds.
Redial
The last 20 phone numbers you have dialled are saved to the redial list. You can select any of the numbers to redial, delete or copy to the directory. Once the list is full and a new call is made, the oldest call is replaced.
Redial a number from the redial list
- Press enter the redial list. The most recently dialled number is displayed.
- Use 🔒 to scroll through the list until the number you want to redial is displayed.
- Press to redial the number.
Save a number from the redial list to the directory
- Press 📄 then scroll or 🔍 the number you want to save.
- Select Options. Save Number is displayed. Select OK.
- Enter Name is displayed. Enter a name using the keypad. Then select Save.
- The number you want to save is displayed. Select Save to store the number, he display shows Saved then the name.
- Press to exit.
Delete a number from the redial list
- Press 📂 then scroll or 📋 the number you want to delete.
- Select Options and scroll to Delete Call. Select OK. The display returns to the newest call in redial list.
- Pr to exit.
Delete all numbers from the redial list
- Press 🔒 then select Options and scroll 🔑 to Delete All Calls. Select OK.
- The phone emits a confirmation tone and the display shows Empty, then returns to standby.
See 'Entering names' on page 19 for help with entering names.
If you need to edit the number, select Clear to delete the digits.
If the memory is full you will not know until you select Save.
If the name is displayed, select Options again.
Using the directory
Directory full
If the directory is full when you try to add or copy an entry, the display will show Directory Full.
If you make a mistake, select Clear to delete digits.
You can store up to 100 entries in the handset directory. Each entry contains a name and number. Names can be up to 12 characters long and numbers up to 20 digits.
Add a new directory entry
- From standby, select Dir to open the directory.
If there are already entries stored the first entry is shown. Select Options, New Entry is displayed. Select OK.
If the directory is empty, Enter Name is displayed. Select OK.
-
Enter Name is displayed. Enter a name using the keypad. Then select Save. See the following page for help on how to enter names in the directory.
-
Enter Number is displayed. Enter the telephone number.
If you subscribe to your network's Caller Display service and want names in your directory displayed instead of the phone numbers, you must store the full telephone number including the area code.
-
Select Save. The displays shows Entry Saved then the new added entry.
-
Add more entries or press to exit.
Entering names
To enter names, you use the letters on the keypad.
For example, press for the letter T, or three times for the letter 0. See the character map below.
If the next character you want to enter is on the same button as the last, wait a moment for the cursor to move right.
Character map
Each successive button press displays the characters shown.
Button Character
| 0 | 0 | 0 | & | |||||||
| 1 | . | , | : | ; | ! | ? | i | ¿ | ’ | ” 1 |
| 2 | A | B | C | 2 | ? | |||||
| 3 | D | E | F | 3 | % | |||||
| 4 | G | H | I | 4 | ||||||
| 5 | J | K | L | 5 | - | |||||
| 6 | M | N | O | 6 | ( | |||||
| 7 | P | Q | R | S | 7 | / | ||||
| 8 | T | U | V | 8 | : | |||||
| 9 | W | X | Y | Z | 9 | ) | ||||
| * | * | € | £ | $ | ¥ |
To change between UPPER and lower case
To change between upper and lower case, press the button.
The on is displayed when upper case is selected. Characters will remain in upper or lower case until changed again.
Even if lower case is selected, the first letter of every word will be displayed as a capital letter.
To insert a space
Press to insert a space.
To delete characters
If you make a mistake, select Clear to delete characters.
Quick-search a name
Press the keypad button with the first letter of the name you want. For example, press three times to search for names beginning with R.
View and dial a directory entry
- Select Dir to open the directory. The first directory entry is displayed.
- Use 🔒 to soll alphabetically through the directory and find the entry you want to dial.
- Press to dial the displayed entry.
If you wish, you can see the telephone number. Select Options, scroll Show Number and select OK.
Edit an entry
- Select Dir to open the directory and scroll 📄, or quick-search, to the entry you want to edit.
- Select Options, then scroll Edit Entry and select OK.
- Select Clear to delete any incorrect name characters, then enter new ones and select Save when you have finished. The telephone number is displayed.
-
Select Clear to delete any incorrect telephone number digits, then enter new ones and select Save to confirm. The display shows Entry Saved then shows the edited entry.
-
Press to exit.
Delete an entry
- Select Dir to open the directory and scroll, or quick-search, to the entry you want to delete.
- Select Options, then scroll 🔒 to ▼ Delete Entry and select OK.
- The displays shows Delete Entry?. Select Yes to confirm the deletion (or No to go back). The display shows Deleted and returns to the directory.
- Press to exit and return to standby.
Assign a ringer melody to a directory entry
You can assign a different ringer melody to selected entries in your directory, for example, family members or friends. When one of these people call, you will be able to identify them from the different ringer melody.
- Select Dir and scroll 🔒, or quick-search, to the entry you want to assign a melody.
- Select Options, then scroll 🔒 to 📋 Set Melody and select OK. The current setting is displayed and will be played (unless set to 'Off').
-
Scroll 🔒 to hear the choice of melodies available. When you have chosen one, select OK. The display shows Saved and returns to set melody.
-
Press to exit.
Choose from melodies 1–10 and 'Off'.
If the copy is refused or cannot be completed, the display will show Copy Failed.
If the directory entry is amended and then copied to another handset it does not overwrite the target phone's entry but creates an additional entry.
Copy a directory entry to another handset
If you have more than one handset registered to your Freestyle 6100 base you can copy entries, or the entire directory, between handsets.
- Select Dir to open the directory and scroll 📄, or quick-search, to the entry you want to copy.
- Select Options, then scroll 📋 Copy Entry and select OK.
- Scroll 🔒 to choose the handset to copy the entry to and select OK. The displays show Copying to Handset during the transfer.
- The receiving handset briefly shows Copying from Handset X (where X is the handset number that the copied entries are coming from). Once an entry has been successfully copied it shows the name of the entry for a few seconds. The display then returns to standby when the entry has been copied.
- At the first handset, choose another handset to copy the entry to or press 📄 exit.
Copy the entire directory to another handset
-
Select Dir then scroll to Copy All and select OK.
-
Scroll 🔒 to close the handset to copy the directory to and select OK. The displays show Copying to Handset x; during the transfer.
-
The receiving handset briefly shows Copying from Handset X(where X is the handset number that the copied entries are coming from). Once an entry has been successfully copied it shows the name of the entry for a few seconds. The display then returns to standby when the directory has been copied.
-
At the first handset, choose another handset to copy the directory to or press to exit.
When you copy the entire directory to another handset it will add to the entries already stored.
IMPORTANT
If you are trying to copy more entries into the list than there is space for (maximum 100 entries) then the directory entries to be copied will replace the existing entries on the destination handset.
BT Calling Features & the Calls list
IMPORTANT
To use Caller Display you must first subscribe to the service from your network provider. A quarterly fee is payable. (Although a quarterly fee is payable with BT as the network provider, other provider's may bill differently).
For more information, call BT free on 0800 800 150.
It may take a couple of seconds for the display to show the telephone number or name for an incoming call. The display will initially display External Callfollowed by the number.
Caller information not available
For some incoming calls, the telephone number of the caller is not available and so cannot be displayed.
In this case some explanatory information will be displayed.
Withheld
The number has been withheld or is unavailable.
Operator
The call has been made via the operator.
Rinsback
Ringback call.
Caller Display
If you have subscribed to a Caller Display service, your caller's number will be shown on your handset display (provided it is not withheld) prior to answering the call.
If the caller's number matches an entry stored in the directory, the name will be displayed as well.
Calls list
The Calls list stores detail of the last 30 calls in the order they were received. The caller's details are stored in the Calls list whether you answered the call or not. If a call is received when the list is full, the oldest entry will be deleted automatically.
When you have received new calls the 📞on will be displayed (flashing on the standby screen). When a new call is received on the Call list, the 📞on will flash on the display (in standby mode). 'New calls' are entries in the calls list that have not yet been viewed.
To stop the 📞 on flashing, you need to view all the new calls.
View and dial an entry in the Calls list
-
Press 📄 open the Calls list. The most recently received call is displayed. Now will be displayed on the title bar when a call is new (i.e. has not yet been viewed).
-
Use 📂d to view other entries in the list. To see the date and time of the call, select Options. The date and time of the call will be displayed.
-
Press to dial the displayed entry. The number will be dialled automatically. Or, press to exit the Calls list.
When all new calls in the list have been viewed, the icon on the standby screen will disappear.
Save a Calls list entry to the directory
- Press to open the Calls list. Then scroll or to the entry you want to save.
- Select Options. The date and time of the call is displayed. Select Options again and then scroll 🔔 to Save Number and select OK.
- Enter Name is displayed. Enter a name using the keypad. Then select Save.
- The display shows Entry Saved Press to exit.


See 'Entering names' on page 19 for help entering names in the directory.
If you make a mistake, select Clear to delete the last character/s.
Delete a Calls list entry
- Press ▼ then scroll or ▲ the ▼ try you want to delete.
- Select Options. The display shows the time and date of the most recent call (or the telephone number if it had been displayed as a directory name, in which case select Options again).
-
Select Options again and scroll Delete Call Select OK. The handset gives a confirmation tone as the call is deleted and the display returns to the most recent entry in the list.
-
Press to exit.
Delete all numbers from the Calls list
If the name is displayed, you need to select Options again.
- Press 📂 then select Options and scroll to Delete All Calls.
- Select OK. The handset gives a confirmation tone and the display flashes Empty before returning to standby.
Call Waiting
With Call Waiting, during a call, if another caller is trying to reach you, you will hear a soft beep every 5 seconds.
If you have also subscribed to a Caller Display service, the caller's number (or name if stored in the directory) will be displayed for 20 seconds, after this time the display will return to your first caller's details.
Instead of the engaged tone, the second caller will hear an announcement asking them to hold the line.
To use Call Waiting
To answer the second call, without disconnecting from your first caller:
- Press .The first caller will be put on hold and you will be connected to the second caller.
-
Press again to return to the first caller, and then press it each time you want to switch between the two callers.
To disconnect the first call: -
Press to end the first call. The handset will then ring.
- Press 📂I continue your conversation with the second caller.
IMPORTANT
To use Call Waiting you must first subscribe to the service from your network provider. A fee is payable.
For more information on BT Calling Features call BT free on 0800 800 150.
The Call Waiting beep is not audible to the person you are speaking to.
Handset settings
The default ringer volume is 5.
At each volume setting, a one second ringtone sample is played, to demonstrate the volume level.
The default ringer melody is Melody 5.
A sample of each melody is played.
Handset ringer volume
The handset has 5 ringer volume settings from 1 (low) to 5 (high) and Off.
-
Select Menu, Set Handsetis displayed. Press OK.
-
The displays shows Ring Volume Select OK.
-
The current setting is displayed. Use 📄 and to change the level, then select OK. The display shows Saved.
-
Press to exit.
Handset ringer melody
The handset has 10 ringer melodies to choose from; 5 normal (settings 1–5) and 5 polytones (settings 6–10). You also can set a different melody for internal and external calls.
-
Select Menu, the display shows Set Handset Select OK.
-
Scn Rina Melody and select OK.
-
U A to I b o nseal or External, then select OK. The current melody is displayed.
-
Scroll 🔒 to hear the choice of melodies available. When you have chosen one, select OK. The display shows Saved.
-
Pr to exit.
Key beeps
You can set your handset to beep with each button press.
- Select Menu, Set Handset is displayed. Select OK.
- Scr. Koo Beeps and select OK.
- U to ChooseOff, then select OK.
The display shows Saved.
- Press to exit.
Auto talk
When the handset it on the base, you can answer a call just by picking it up. When auto talk is switched off, you will have to press 📋answer a call.
- Select Menu, Set Handset is displayed. Select OK.
- Scr to Talk and select OK.
- U to ChooseOff, then select OK.
The display shows Saved.
- Press to exit.
The default key beeps setting is On.
The default Auto Talk setting is On.
Handset language
You can change the language shown on the display.
-
Select Menu, scroll 📄 Set Handset and select OK.
-
Sci Language and select OK.
-
Uf or to Ehebisch, Français, Deutsch, etc then select OK.
-
Press to exit.
Time, date and alarm
Set the time
Time & date auto-set
If you subscribe to your network's Caller Display service, the date and time are set automatically when your BT Freestyle 6100 receives its first call.
The time is always set in 24-hour clock, regardless of the time format setting.
The default time format is 24-hour. However, you can use the 12-hour clock if you wish.
-
Select Menu, scroll Get Time and select OK.
-
Time is displayed. Select OK. The current time format (24 H) and time are displayed.
-
Enter the correct time. As new digits are entered they will overwrite the existing time.
-
Select OK. The displays shows Saved.
-
Press to exit.
Set the date
- Select Menu, scr Set Time and select OK.
- Scr Note and select OK. The current date is displayed.
- Enter the correct date (day then month). As new digits are entered they will overwrite the existing date.
- Select OK. The displays shows Saved.
- Press to exit.
Set the alarm
-
Select Menu, scroll 📋 Set Time and select OK.
-
Scr Ctrl Abrm and select OK. The current setting is displayed.
-
U to Choose select OK.
-
Enter a new alarm time. As new digits are entered they will overwrite the existing time. Select OK. The display shows Alarm On
-
Pr to exit.
If you have more than one handset, you can set a different alarm time on each. The alarm will only go off on the handset on which it was set.
Alarm set
When the alarm is set the icon is displayed.
The alarm does not repeat, so once the alarm goes off you will need to switch it on again each time if you want the alarm to go off every day. The time of the last alarm is saved.
When the alarm sounds
Press any button to silence the alarm. If no button is pressed, the alarm will stop automatically after 60 seconds.
Changing the time format will not only alter the time display but also the format of the call times recorded in the Calls list.
If you have more than one handset, changing the time format will affect all handsets.
Switch off an alarm that has been set
-
Select Menu, scroll Set Time and select OK.
-
Scal or Alarm and select OK. Then use ▲ to display and select OK. The displays show Alarm Off.
-
Press to exit.
Change the time format
-
Select Menu, scroll Get Time and select OK.
-
Scal Time Format and select OK.
-
To 24 Hours and select OK. The displays shows Saved.
-
Press to exit.
Base settings
Base ringer volume
The base has 5 ringer volume settings from 1 (low) to 5 (high) and Off.
- Select Menu, scroll to Set Base and select OK.
- The displays shows Ring Volume Select OK.
- The current setting is displayed. Use 📂d to change the level, then select OK. The display shows Saved.
- Press to exit.
Base ringer melody
The base has 5 ringer melodies to choose from.
- Select Menu, scroll to Set Base and select OK.
- Scr Rings Melody and select OK.
- Scroll 🔒 to hear the choice of melodies available. When you have chosen one, select OK. The display shows Saved.
- Pr to exit.
The default ringer volume is 5.
The base does not ring when the handset in on the base.
A sample of the volume level played.
At each different setting a one second melody sample is played.
Your BT Freestyle 6100 is set to Tone dialling. This is suitable for most domestic use. It is unlikely you will need to change this setting unless you are connected to a switchboard which requires Pulse dialling.
IMPORTANT
If you change the system PIN, keep a record of the new number by writing in the space provided on page 47.
Set the dial mode
- Select Menu, scroll Get Base and select OK.
- Scen r Ital1 Mode and select OK.
- U to Chinese Pulse, then select OK.
Saved is briefly displayed.
- Press to exit.
Change the system PIN
The system PIN is required when registering additional handsets and bases with your BT Freestyle 6100 (see page 36). It acts as a security device to prevent unauthorised changes to your phone system. The default system PIN is 0000, so you may choose to change this to a more personal number.
- Select Menu, scroll 7 Set Base and select OK.
- Scn System PIN and select OK.
- The display shows Old PIN. Enter the current system PIN (default: 0000). The digits you enter are displayed as underscores (i.e. _ _ _ ). Select OK.
-
The display shows New PIN Enter your new system PIN, then select OK.
-
The display shows Confirm. Enter your new system PIN again, then select OK. The display will show System PIN Changed. If the PIN was entered incorrectly, New PIN Does Not Match is displayed and you are taken back to the beginning.
-
Press to exit.
-
Select Menu, scroll to Set Base and select OK.
-
Scr Default and select OK.
-
Display shows PIN? Enter the 4 digit PIN (default: 0000) and press OK.
The handset power switches off and the base will beep then the handset will return to the standby display.
Default settings
Earpiece volume ..... 3
Handset and base ringer volume ..... 5
Handset and base ringer melody ..... 5
PIN code ..... 0000
Handset name ..... HS1
Handset language ..... English
Keybeeps ..... ON
Low battery tone..... ON
Out of range tone ..... ON
Auto talk ..... ON
Dial mode..... Tone
Pause after dialling . . . . 3 seconds
Phonebook .... Empty
Redial list .... Empty
Calls list .... Empty
Additional handsets & bases
You can use up to four additional handsets with your BT Freestyle 6100 – all using the same phone line. This allows you to expand your phone system without the need to install telephone extension sockets for each new handset.
Your BT Freestyle 6100 handset can also be registered with up to 4 other bases. You can then select the base you would prefer to use.
Each additional handset is supplied with its own charger and user guide, but the following information will tell you how to register and use an additional handset with your BT Freestyle 6100.
IMPORTANT
Before registration, make sure the handset batteries are fully charged and that you are close to the base.
Register a handset to a base
- Select Menu, scroll Registration and select OK.
- The display shows Register H/S. Select OK.
- The display shows Base 1 2 3 4 Enter the base number you want to register the handset to, using the keypad.
- The display shows PIN?. Enter your system PIN (default: 0000), then select OK.
-
At the base you want to register to, press and hold Page approximately 10 seconds until you hear two confirmation beeps, then release Page display will show Search X (X being the number of the base selected) followed by a registration number.
-
Select OK to complete registration.
The handset will be automatically assigned the next available handset number, which is shown in the display.
Select a base
If your BT Freestyle 6100 handset is registered to more than one base, you can select which base to use.
-
Select Menu, scroll to Registration and select OK.
-
Scr ⚠️ Select Base and select OK. The base that your handset is currently connected to is displayed.
-
Scroll 🔒 through all the bases that the handset is registered to marked with a # symbol. Once you have chosen a base, select OK.
-
The displays show Registered to Base X(where X is the base number the handset is registered to).
De-register a handset
-
Select Menu, scroll to Registration and select OK.
-
Scr Register and select OK.
-
Enter your system PIN (default: 0000), then select OK.
-
Scroll 🔒 to choose a handset to de-register. Select OK. The display shows Handset X de-registered
You cannot de-register the handset you are using. To de-register this handset, another registered handset must be used.
As you cannot de-register the handset you are using it will not include its own number when in de-registration mode.
Using additional handsets
Make an internal call to another handset
If you have two or more handsets registered to your base, you can make internal calls between handsets.
Two handsets can be holding an internal call while a third is on an external call.
- Press the display shows Handset: then enter the handset number you want to call (e.g. 1-5).
- The receiving handset displays the number of the handset calling, eg. Handset 1. Press 📋 answer the internal call.
- Press ☑ either handset to end the call.
Transferring calls
You can transfer an external call to another handset registered to the base.
During your call:
The icon flashes to indicate your external caller is on hold.
-
Press in our external caller is put on hold and the display shows Handset: then enter the handset number you want to call (e.g. 1-5).
-
When the receiving handset answers, press the transfer the call. Your handset returns to standby. If the receiving handset does not answer, press return to the external call.
3-Way conference call
During an external call you can invite another handset to join the conversation.
During your call:
-
Press our external caller is put on hold. The display shows Handset: then enter the handset number you want to call (e.g.1-5).
-
When the receiving handset answers, press and hold the # to begin the conference call.
-
Press on either handset to leave the conference call. The second handset will remain connected to the external caller.
Switch between external and internal calls
When the receiving handset answers, you can press it to switch between the external and internal calls, before transferring.
Help
BT Freestyle Helpline 0870 605 8047
Call the dedicated BT Freestyle Helpline:
■ if you are having difficulties using your BT Freestyle 6100
■ if you need replacement batteries or mains power lead
Lines open 9am – 5.30pm, Monday to Friday and 9.30am – 2.30pm Saturday
New rechargeable batteries can be obtained from the BT Freestyle Helpline 0870 605 8047.
BT accepts no responsibility for damage caused to your BT Freestyle handset by using any other type of batteries.
WARNING
Do not immerse batteries in water or throw them into a fire. Dispose of old batteries responsibly; don't discard them with ordinary domestic refuse.
Many common problems are caused by the telephone and power cables being incorrectly connected, not connected at all, or the power being turned off.
Please check that your BT Freestyle 6100 has been correctly set up, see page 6, before ringing the BT Freestyle Helpline.
Replacing the handset batteries
After time, you may find that the handset batteries are running out of charge more quickly. This is a standard sign of wear and the batteries will need replacing. New batteries should be AAA size, Rechargeable Nickel Metal Hydride (NiMH), capacity 550mAh.
- Press down on the top of the battery compartment cover and slide it off. See illustration on page 7.
- Remove the old batteries and replace with 2 new ones, then replace the battery compartment cover.
No display
■ The batteries may be flat, dead or incorrectly inserted. Recharge or replace the batteries.
Cannot dial out or receive calls
■ The batteries may need recharging.
■ Has there been a power cut? If so, place the handset back on the base for 10 seconds and try again. If it still does not work disconnect the batteries and mains power for 10 minutes, then reconnect and try again.
You have a dial tone, but the phone will not dial out
■ You may need to change the dial mode from tone to pulse, see page 34.
If you are connected to a switchboard, check whether you need to dial an access code.
Handset does not ring
■ The ringer volume may be switched off, see page 28.
■ Make sure the handset is registered to the base, see page 36.
icon is flashing
■ Is the handset registered correctly to the base? See page 36.
■ Check that the handset is within range of the base.
□ icon is flashing
■ The batteries are low, place the handset on the base to recharge.
icon not scrolling/Base charging light not lit
■ Try cleaning the charging contacts.
You hear the busy tone when you press
■ Make sure the handset is in range of the base.
■ Another handset may be in use.
No Caller Display information is displayed
■ Have you subscribed to a Caller Display service from your network provider, see page 24.
■ The caller may have withheld their number.
■ An exact number match was not found in the Directory. Check that you have stored the full number, including the dialling code.
Cannot register a handset to a base
■ You can register a total of 5 handsets to your BT Freestyle 6100 base and you can register your BT Freestyle 6100 handset to up to 4 bases. Check that you have not exceeded these limits.
■ Check that you have entered the correct base security PIN (default: 0000). See page 34.
- Check that you are at least one metre away from other electrical equipment to avoid interference when registering.
Base unit does not ring, but the lights are on
■ Have you connected the telephone line correctly?
Is the base ringer set to off? See page 33.
■ You may have a faulty line or socket. Try using another socket or line.
Buzzing noise on my phone or on other electrical equipment nearby
■ Sometimes your BT Freestyle 6100 can interfere with other electrical equipment if it is placed too close. Move it at least one metre away from such appliances.
You can call BT on 151 if you suspect you may have a faulty line.
General information
IMPORTANT
This equipment is not designed for making emergency telephone calls when the power fails. Alternative arrangements should be made for access to emergency services.
Safety
General
■ Only use the power supply included with the product. Using an unauthorised power supply will invalidate your guarantee and may damage the telephone. The item code for the mains power supply is 872260. If you have purchased a BT Freestyle 6100 multiple pack, the item code for the charger mains power adaptor is 021299.
■ Only use approved AAA NiMH rechargeable batteries.
■ Do not open the handset or base. This could expose you to high voltages or other risks. Contact the BT Freestyle Helpline on 0870 605 8047 for all repairs.
■ Radio signals transmitted between the handset and base may cause interference to hearing aids.
It is recommended that advice from a qualified medical expert be sought before using this product in the vicinity of emergency/intensive care medical equipment.
■ It is recommended that if you have a pacemaker fitted you check with a medical expert before using this product.
- Your product may interfere with other electrical equipment, e.g. TV and radio sets, clock/alarms and computers if placed too close. It is recommended that you place your product at least one metre away from such appliances to minimise any risk of interference.
■ Never dispose of batteries in a fire. There is a serious risk of explosion and/or the release of highly toxic chemicals.
Cleaning
Simply clean the handset and base with a damp (not wet) cloth, or an anti-static wipe. Never use household polish as this will damage the product. Never use a dry cloth as this may cause a static shock.
Environmental
■ Do not expose to direct sunlight.
■ The product may heat up when the batteries are being recharged. This is normal. However, we recommend that you do not place the product on antique/veneered wood to avoid damage.

- Do not stand your product on carpets or other surfaces which generate fibres, or place it in locations preventing the free flow of air over its surfaces.
- Do not submerge any part of your product in water and do not use it in damp conditions, such as bathrooms.
■ Do not expose your product to fire, explosive or other hazardous conditions.
■ There is a slight chance that your phone could be damaged by an electrical storm. We recommend that you unplug the power and telephone line cord for the duration of the storm.
BT Accessories and replacement items
For a full range of accessories and replacement items for BT products, please call 0870 240 5522 or visit www.withandwithoutwires.com.
Guarantee
Your BT Freestyle 6100 is guaranteed for a period of 12 months from the date of purchase.
Subject to the terms listed below, the guarantee will provide for the repair of, or at BT's or its agent's discretion the option to replace the BT Freestyle 6100, or any component thereof, (other than batteries), which is identified as faulty or below standard, or as a result of inferior workmanship or materials. Products over 28 days old from the date of purchase may be replaced with a refurbished or repaired product.
The conditions of this guarantee are:
■ The guarantee shall only apply to defects that occur within the 12 month guarantee period.
■ Proof of purchase is required.
■ The equipment is returned to BT or its agent as instructed.
This guarantee does not cover any faults or defects caused by accidents, misuse, fair wear and tear, neglect, tampering with the equipment, or any attempt at adjustment or repair other than through approved agents.
■ This guarantee does not affect your statutory rights.
For your records
Date of purchase:
Place of purchase:
Serial number:
For guarantee purposes proof of purchase is required so please keep your receipt.
Enter your base PIN here:

(see page 34 for more information)
Within the 12 month guarantee period:
If you experience difficulty using the product, prior to returning it, please read the ‘Help’ section beginning on page 40, or contact the BT Freestyle Helpline on 0870 605 8047, 9am–5.30pm, Monday to Friday and 9.30am–2.30pm Saturday.
In the unlikely event of a defect occurring, please follow the Helpline's instructions for replacement or repair.
Outside of the 12 month guarantee period:
If your product needs repair after the guarantee period has ended, the repair must meet the approval requirements for connection to the telephone network. We recommend that you contact BT's approved repair agent, TecLogic on 01672 564444 or a local qualified repairer.
Returning your phone
If the Helpline is unable to remedy your problem they will ask you to return the product. Where possible, pack the product in its original packaging. Please remember to include all parts, including the line cords, power supply units and the original batteries. (Please note that we cannot take responsibility for goods damaged in transit.) Please obtain and keep proof of posting from the Post Office, or the carrier you use.
Technical information
How many telephones How many phones can you have?
All items of telephone equipment have a Ringer Equivalence Number (REN), which is used to calculate the number of items which may be connected to any one telephone line. Your BT Freestyle 6100 has a REN of 1. A total REN of 4 is allowed. If the total REN of 4 is exceeded, the telephones may not ring. With different telephone types there is no guarantee of ringing, even when the REN is less than 4.
Any additional handsets and chargers that you may register have a REN of 0.
■ Only use the approved base mains power adaptor supplied, item code: 872260. If you have purchased a BT Freestyle 6100 multiple pack the charger mains power adaptor is item code 021299.
■ Only use approved AAA NiMH rechargeable batteries.
Connecting to a switchboard
This product is intended for use within the UK for connection to Public Telephone Network and compatible switchboards, which support tone and pulse dialling and Timed Break Recall. If in doubt please consult your network service provider.
The stored number may appear like this:
9
Access code
P 08706058047
Pause Number
The Declaration of Conformance for the BT Freestyle 6100 is published on the website:
http://www.suncorptech.com/bt
Access code and entering a pause
With some switchboards, after dialling the access code you may have to wait for a moment while the switchboard picks up an outside line so you will need to enter a pause in the dialling sequence.
- When storing a number in the directory, at the point you want to insert a pause, press and hold down
Recall
The (recall) button is used when connected to certain switchboards (PBXs) and with some BT Calling Features, or equivalent services available via your Network Provider.
R&TTE
This equipment complies with the essential requirements for the Radio Equipment and Telecommunications Terminal Equipment Directive 1999/5/EC.
Declaration of Conformance
Hereby, Suncorp Technologies declares that this BT Freestyle 6100 is in compliance with the essential requirements and other relevant provisions of Directive 1999/5/EC.
Visit us at www.bt.com
BT

Offices worldwide
The telecommunications services described in this publication are subject to availability and may be modified from time to time. Services and equipment are provided subject to British Telecommunications plc's respective standard conditions of contract. Nothing in this publication forms any part of any contract.
© British Telecommunications plc 2004. Registered Office: 81 Newgate Street, London EC1A 7AJ. Registered in England No. 1800000. BT Freestyle 6100 (06/04) 2-1 Designed and produced by The Art & Design Partnership Ltd. Printed in China



- NEED HELP
- GOT EVERYTHING
- THIS GUIDE
- GETTING STARTED
- GETTING TO KNOW YOUR PHONE
- USING THE PHONE
- USING THE DIRECTORY
- BT CALLING FEATURES & THE CALLS LIST
- HANDSET SETTINGS
- BASE SETTINGS
- ADDITIONAL HANDSETS & BASES
- HELP 40
- GENERAL INFORMATION
- TECHNICAL INFORMATION
- WARNING
- HANDSET RANGE
- RANGE INDICATOR
- IMPORTANT
- WHICH SOCKET
- LOCATION
- SETTING UP
- TALK/STANDBY TIME
- BATTERY PERFORMANCE
- BATTERY LOW WARNING
- HANDSET BUTTONS
- AMPLIFY
- ON-SCREEN OPTION BUTTON
- SCROLL/REDIAL LIST/VOLUME
- TALK/HANDSFREE
- RECALL/CALL WAITING
- INCOMING CALL INDICATOR
- SCROLL/CALLS LIST/VOLUME
- END/CLEAR/EXIT/POWER ON/OFF
- BUTTON
- INT
- NEW CALLS INDICATOR
- HANDSFREE
- KEYPAD LOCKED
- ALARM SET
- IN USE
- BATTERY STATUS
- UPPER CASE SELECTED
- NAVIGATING THE MENUS
- EXIT OR GO BACK ONE LEVEL IN THE MENU
- MENU MAP
- SET HANDSET
- SET BASE
- SET TIME
- REGISTRATION
- DIRECTORY MENU
- BASE
- PAGE BUTTON
- POWER/IN USE INDICATOR
- CHARGING LIGHT
- MAKE AN EXTERNAL CALL
- PREPARATORY DIALLING
- END A CALL
- RECEIVING CALLS
- DIALLING NUMBERS QUICKLY
- CALL TIMER
- AUTO TALK
- EARPIECE VOLUME
- AMPLIFY YOUR CALLER'S VOICE
- SECRECY
- SWITCH TO HANDSFREE DURING A CALL
- PAGING
- KEYPAD LOCK
- REDIAL
- REDIAL A NUMBER FROM THE REDIAL LIST
- SAVE A NUMBER FROM THE REDIAL LIST TO THE DIRECTORY
- DELETE A NUMBER FROM THE REDIAL LIST
- DELETE ALL NUMBERS FROM THE REDIAL LIST
- DIRECTORY FULL
- ADD A NEW DIRECTORY ENTRY
- ENTERING NAMES
- CHARACTER MAP
- TO CHANGE BETWEEN UPPER AND LOWER CASE
- TO INSERT A SPACE
- TO DELETE CHARACTERS
- QUICK-SEARCH A NAME
- VIEW AND DIAL A DIRECTORY ENTRY
- EDIT AN ENTRY
- DELETE AN ENTRY
- ASSIGN A RINGER MELODY TO A DIRECTORY ENTRY
- COPY A DIRECTORY ENTRY TO ANOTHER HANDSET
- COPY THE ENTIRE DIRECTORY TO ANOTHER HANDSET
- CALLER INFORMATION NOT AVAILABLE
- CALLER DISPLAY
- CALLS LIST
- VIEW AND DIAL AN ENTRY IN THE CALLS LIST
- SAVE A CALLS LIST ENTRY TO THE DIRECTORY
- DELETE A CALLS LIST ENTRY
- DELETE ALL NUMBERS FROM THE CALLS LIST
- CALL WAITING
- TO USE CALL WAITING
- HANDSET RINGER VOLUME
- HANDSET RINGER MELODY
- KEY BEEPS
- HANDSET LANGUAGE
- TIME, DATE AND ALARM
- SET THE TIME
- TIME & DATE AUTO-SET
- SET THE DATE
- SET THE ALARM
- WHEN THE ALARM SOUNDS
- SWITCH OFF AN ALARM THAT HAS BEEN SET
- CHANGE THE TIME FORMAT
- BASE RINGER VOLUME
- BASE RINGER MELODY
- SET THE DIAL MODE
- CHANGE THE SYSTEM PIN
- DEFAULT SETTINGS
- REGISTER A HANDSET TO A BASE
- SELECT A BASE
- DE-REGISTER A HANDSET
- USING ADDITIONAL HANDSETS
- MAKE AN INTERNAL CALL TO ANOTHER HANDSET
- TRANSFERRING CALLS
- 3-WAY CONFERENCE CALL
- SWITCH BETWEEN EXTERNAL AND INTERNAL CALLS
- HELP
- BT FREESTYLE HELPLINE 0870 605 8047
- REPLACING THE HANDSET BATTERIES
- NO DISPLAY
- CANNOT DIAL OUT OR RECEIVE CALLS
- YOU HAVE A DIAL TONE, BUT THE PHONE WILL NOT DIAL OUT
- HANDSET DOES NOT RING
- ICON IS FLASHING
- YOU HEAR THE BUSY TONE WHEN YOU PRESS
- NO CALLER DISPLAY INFORMATION IS DISPLAYED
- CANNOT REGISTER A HANDSET TO A BASE
- BASE UNIT DOES NOT RING, BUT THE LIGHTS ARE ON
- BUZZING NOISE ON MY PHONE OR ON OTHER ELECTRICAL EQUIPMENT NEARBY
- SAFETY
- GENERAL
- CLEANING
- ENVIRONMENTAL
- BT ACCESSORIES AND REPLACEMENT ITEMS
- GUARANTEE
- THE CONDITIONS OF THIS GUARANTEE ARE
- FOR YOUR RECORDS
- WITHIN THE 12 MONTH GUARANTEE PERIOD
- OUTSIDE OF THE 12 MONTH GUARANTEE PERIOD
- RETURNING YOUR PHONE
- HOW MANY TELEPHONES HOW MANY PHONES CAN YOU HAVE
- CONNECTING TO A SWITCHBOARD
- ACCESS CODE AND ENTERING A PAUSE
- RECALL
- R&TTE
- DECLARATION OF CONFORMANCE
- OFFICES WORLDWIDE
Brand : BT
Model : Freestyle 6100
Category : Telephone