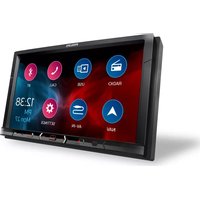
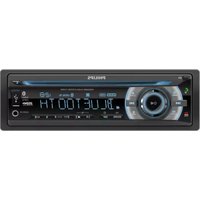
CE600N - Car radio PHILIPS - Free user manual and instructions
Find the device manual for free CE600N PHILIPS in PDF.


| Product Type | Car Stereo Receiver |
| Model | Philips CE600N |
| Dimensions (W x H x D) | 180 x 50 x 160 mm (1-DIN) |
| Weight | 1.4 kg |
| Power Supply | 12V DC (negative ground) |
| Maximum Output Power | 4 x 50 Watts |
| Playback Media | CD, CD-R, MP3 (CD-ROM) |
| Tuner Bands | FM (RDS), AM |
| Preset Stations | 30 (FM) + 15 (AM) |
| Audio Features | Dynamic Bass Boost, Treble/Bass Control, Loudness |
| Display Type | LCD with white backlight |
| Front Input | 3.5 mm AUX |
| USB Port | Front USB for MP3 playback |
| Remote Control | Included (wired or infrared, depending on version) |
| Detachable Faceplate | Yes, with security storage case |
| Installation Size | 1-DIN (standard) |
| Cleaning Instructions | Use a soft, dry cloth; avoid solvents |
| Safety Note | Disconnect battery negative terminal before installation |
| Spare Parts | Contact Philips support for replacement parts |
| Repair Information | Refer to authorized service center; no user-serviceable parts inside |
Frequently Asked Questions - CE600N PHILIPS
User questions about CE600N PHILIPS
0 question about this device. Answer the ones you know or ask your own.
Ask a new question about this device
Download the instructions for your Car radio in PDF format for free! Find your manual CE600N - PHILIPS and take your electronic device back in hand. On this page are published all the documents necessary for the use of your device. CE600N by PHILIPS.
USER MANUAL CE600N PHILIPS
2 Your car entertainment system 2
What's in the box 2
Overview 3
3 Setup 4
Connect wires 4
Mount into the dashboard 7
4 Basics 8
Switch on or off 8
Use the touch screen 8
Set the date and time 9
Adjust the screen 9
5 Radio 9
Tune in to radio stations 9
6 Play with RDS 10
Turn on RDS 10
Select program type 10
Select alternate frequencies 11
Receive traffic announcement 11
Set RDS clock 12
7 USB 12
Play music 12
Play videos 13
8 Navigation system 14
Insert the map data card 14
Navigate your road trip 14
9 Bluetooth 14
Connect your Bluetooth device 14
Enjoy music from your
Bluetooth device 15
Make phone calls 15
Voice Control 16
Answer phone calls 16
Use the Phonebook 16
10 AV-IN 17
11 Additional devices 17
Connect additional devices 17
12 Sound 18
Select the equalizer settings 18
Select the channel settings 18
Select the Bass settings 19
Select the Subwoofer settings 19
Select the crossover settings 19
13 Settings 20
System settings 20
Bluetooth settings 20
System information 20
14 Reset 21
15 Product information 21
16 Troubleshooting 22
General 22
Bluetooth 23
17 Notice 24
Care of the environment 24
Trademark notice 24
Copyright 24
1 Safety
Read and understand all instructions before you use the device. If damage is caused by failure to follow instructions, the warranty does not apply.
- The device is designed for negative ground (earth) 12 V DC operation only.
- Risk of car accidents! Never watch video or operate this system while driving.
• To ensure safe driving, adjust the volume to a safe and comfortable level. - Improper fuses can cause damage or fire. When you need to change the fuse, consult a professional.
- Use only the supplied mounting hardware for a safe and secure installation.
• To avoid short circuits, do not expose the device, remote control or remote control batteries to rain or water.
- The device shall not be exposed to dripping or splashing.
- Do not place any sources of danger on the device (e.g. liquid filled objects, lighted candles).
- Never insert objects into the ventilation slots or other openings on the device.
- Risk of damage to the screen! Never touch, push, rub or strike the screen with any object.
- Clean the device with soft, damp cloth. Never use substances such as alcohol, chemicals or household cleaners on the device.
2 Your car entertainment system
What's in the box
Check and identify the contents of the package:
①

natural_image
Line drawing of a rectangular electronic device with ventilation grilles and ports (no text or symbols)②

natural_image
Illustration of a cylindrical mechanical component with a central square head and multiple parallel grooves (no text or symbols)③

④

5

6

natural_image
Simple line drawing of a cable being inserted into a rectangular device (no text or symbols)⑦

⑧

natural_image
Blank white rectangular document with a thin black border (no text or symbols)① Main unit with Sleeve
② ISO male connector
③ Nut
④ Screw
⑤ Hexagon head screw
⑥ GPS Antenna
⑦ Trim Plate
⑧ Printed materials
Overview
Main unit

①
- Press to switch on.
- Press and hold to switch off.
- Press to mute or unmute.
② +/-
- Press to increase or decrease the volume.
③ / DISP
- Press to display the set clock.
- Press and hold to turn off display.
④ RES
- Press to reset the system.
⑤ MIC
- Microphone
⑥ Touch screen
⑦
- Press to enter the Home screen.
Home screen

Tap the icons to select functions:
•: Tune to FM/AM radio stations.
• Play music/videos from the connected USB storage device.
• Make/ answer phone calls from the connected mobile phone.
• ✗: Stream music from the connected Bluetooth device.
- ▲: Enter GPS navigation system or exit.
• S: Play music/videos from the external media player that is connected through audio/video cables.
• Enter the settings menu.
• ■: Enter the DVR operation function.

Note
•The DVR icon appears only when a DVR device connects to the DVR interface. Please check with your distributor to get a proper DVR for this unit.
3 Setup
Always follow the instructions in this chapter in sequence.
These instructions are for a typical installation. However, if your car has different requirements, make the adjustment accordingly. If you have any question regarding installation kits, consult your local retailer.

Note
•This system is designed for negative ground (earth) 12V DC operation only.
• Always install this system in the car dashboard. Other locations can be dangerous as the rear of the system heats up during use.
• To avoid short-circuit: before you connect, make sure that the ignition is off.
• Make sure that you connect the yellow and red power supply leads after all other leads are connected.
- Make sure that all loose leads are insulated with electrical tape.
- Make sure that the leads do not get caught under screws iron parts that will move (e.g. seat rail).
- Make sure that all ground (earth) leads are run to a common ground (earth) point.
- Use only the supplied mounting hardware for a safe and secure installation.
- Improper fuses can cause damage or fire. When you need to change the fuse, consult a professional.
- When you connect other devices to this system, make sure that the rating of the car circuit is higher than the total fuse value of all the connected devices.
- Never connect speaker wires to the metal body or chassis of the car.
- Never connect speaker wires with stripes to one another.
Connect wires

Note
• Make sure that all loose leads are insulated with electrical tape.
- Consult a professional to connect wires as instructed below.
- Before connection, check the car's wiring carefully.
1 Connect the ISO male connectors.

| ISO male connectors | Connect to | |
| a Green strip, black-edged green strip | Rear left speaker | |
| b White strip, black-edged white strip | Front left speaker | |
| c Gray strip, black-edged gray strip | Front right speaker | |
| d Purple strip, black-edged purple strip | Rear right speaker | |
| e Red strip Ignition key +12V DC when ON/ACC | ||
| f Blue strip Motor/electric antenna relay control lead | ||
| ISO male connectors | Connect to |
| g Blue strip, white strip | Amplifier relay control lead |
| h Black strip Ground | |
| i Yellow strip The +12V car battery which is energized at all times |
2 Connect other wires if necessary.
| Connectors and sockets on rear panel | External sockets or connectors | |
| 1 For ISO male connectors | As indicated above | |
| 2 | REAR OUT L(White socket) | Rear left speaker |
| REAR OUT R(Red socket) | Rear right speaker | |
| 3 | AV-IN L(White socket) | Left audio output of the external player |
| AV-IN R(Red socket) | Right audio output of the external player | |
| 4 | VIDEO IN(Yellow socket) | Video output of the external player |
| 5 | CAMERA IN(Yellow socket) | Video output socket of an external camera |
| 6 | VIDEO OUT(Yellow socket) | Video input of the external display device |
| 7 | GPS AERIAL(Black connector) | GPS smart antenna |
| 8 | FRONT OUT L(White socket) | Front left speaker |
| FRONT OUT R(Red socket) | Front right speaker | |
| Connectors and sockets on rear panel | External sockets or connectors | |
| 9 | SWC(Black/ brown wire) | SWC (Steering Wheel Control) |
| 10 | REVERSE(Purple wire) | Reverse camera (B+) |
| 11 | PARKING(Pink wire) | Parking brake (-) |
| 12 | MIC(Black socket) | External microphone |
| 13 | DVR(Black socket) | DVR In |
| 14 | RADIO ANTENNA(Black socket) | Radio antenna |
| 15 | SUB-W OUT(Black socket) | Subwoofer |
| 16 | USB(Black socket) | USB connector of the external USB storage device |

Tip
•The pin arrangement for the ISO connectors depends on the type of your vehicle. To avoid damage to the system, connect properly.
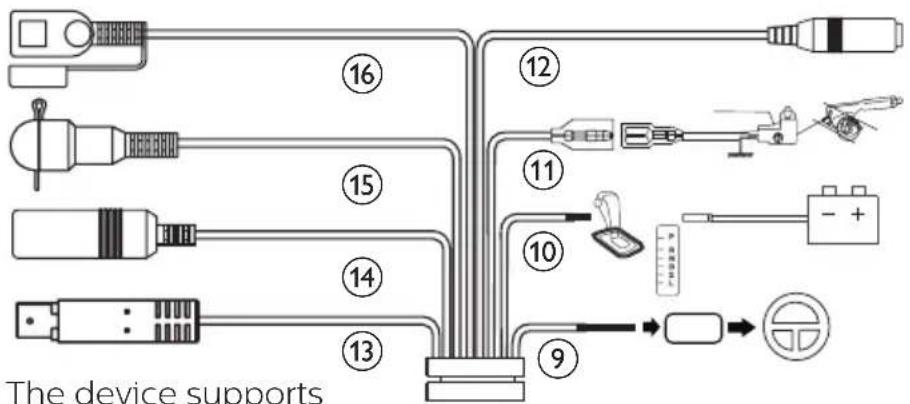
Remark: The device supports DVR Video In function. Contact the dealer for detailed operation!

Mount into the dashboard

Note
•Make sure that wires are correctly connected before you mount the main unit into a car.
- If preset radio stations are lost when the ignition key is turned OFF and then back ON, reconnect the red leads crosswise to the yellow ones.
1 If the car does not have an on-board drive or navigation computer, disconnect the negative terminal of the car battery.
- If you disconnect the car battery in a car that has an on-board drive or navigation computer, the computer may lose its memory.
- If the car battery is not disconnected, to avoid short-circuit, make sure that bare wires do not touch each other.
2 Make sure that the car dashboard opening is within these measurements:

- Since the unit cannot be used if the dashboard opening's slant angle is above 20 degrees, make sure that the horizontal slant of the car dashboard opening is between 0 and 20 degrees.
3 Remove the mounting sleeve with the supplied disassembly tools.

natural_image
Illustration of a toaster oven with two speakers and a tray, showing internal components and ventilation slots (no text or symbols)4 Install the sleeve into the dashboard and bend the tabs outward to fix the sleeve.

5 Slide the unit into the sleeve until you hear a "click".

natural_image
Technical line drawing showing a device inside a housing with an open panel and a separate box (no text or symbols)6
Attach the trim plate.

natural_image
Illustration of a device with an open panel and a screen, showing no text or symbols.4 Basics
Switch on or off
1 Press to switch on.
- For the first-time use, follow the onscreen instructions to complete the setup.
2 To switch off, press and hold ⚡x Ⓞ until the screen dims.
Use the touch screen


1 Press to enter the Home screen.
2 Tap the icon or menu item to select or enter the functional or options menu.
3 Tap to return to the previous screen.
Set the date and time


1 On the Home screen, tap [General].

2 In [Clock, Mode] [Date/Time] ◀, ▶, ▲, ▼ to select your options.
Adjust the screen
Adjust the screen brightness
1 On the Home screen, tap [Screen].

2 In [Dimmer], tap ◀, ▶ to select your options.
Calibrate the touch panel
1 On the Home screen, tap [Screen].

2 In [Panel Adjust], tap + to calibrate the positioning of your taps on the screen.
5 Radio
Press to enter the Home screen. Tap

Tune in to radio stations

Auto tune
The first time you tune in to the radio, start
Auto tune to search for stations.
1 Tap FM or AM to select a band.
FM bands: FM1, FM2, FM3
AM band: AM
2 Tap to start Auto Store.
→ For each band, up to 6 stations are stored as presets.
→ The preset stations are listed at the bottom of the screen.
3 Tap to select a preset station.

Tip
- When you move to a new place (such as a new city or country), restart auto tune for better reception.
Manual tune
Use Manual tune to search for a frequency or station.
1 On the play screen, tap and hold < or>.
→ You tune in to the next station from current frequency.
2 For fine tuning, press
Store preset stations
You can store up to 6 stations in each band.
1 Tune in to a radio station.
2 On the play screen, tap and hold a location in the list of presets.
→ Current station is saved to the location.
Select tuner region
You can select suitable country/region of the radio.
1 Tap [Area]
2 Tap ▶ to select:
• [USA] (United States)
• Latin
• [Europe] (Western Europe)
• [Russia] (Russia)
• [Mideast] (Middle East)
• [Asia] (Asia Pacific)
• Japan
• [Australia] (Australia)
Select radio range
Before you start to search for radio stations, you can select radio range.
1 Tap [Local]
2 Tap ▶ to select your options.
- [LOCAL ON] (local on): Only stations with strong signal can be broadcast.
- [LOCAL OFF] (local off): Stations with strong and weak signals can be broadcast.
6 Play with RDS
The RDS (Radio Data System) function operates only in areas with FM stations broadcasting RDS signals. If you tune to an RDS station, the station name is displayed.
Turn on RDS

Note
•The default setting for RDS is on.
1 Tap [RDS]
2 Tap ▶ to select RDS ON
→ The RDS function is turned on.
Select program type
Before tuning to RDS stations, you can select program types and let the unit search only for programs of the selected category.
1 Tap [PTY List]
2 Tap ✗ to display the list of program types.
3 Tap the name of a program type to start search.
Once an RDS station that transmits programs of the selected type is found, the RDS station is broadcast automatically.
| Item | Program type | Description |
| 1 | NEWS | News services |
| 2 | AFFAIRS | Politics and current affairs |
| 3 | INFO | Special information programs |
| 4 | SPORT | Sports |
| 5 | EDUCATE | Education and advanced training |
| 6 | DRAMA | Radio plays and literature |
| 7 | CULTURE | Culture, religion and society |
| 8 | SCIENCE | Science |
| 9 | VARIED | Entertainment programs |
| 10 | POP M | Pop music |
| 11 | ROCK M | Rock music |
| 12 | EASY M | Light music |
| 13 | LIGHT M | Light classical music |
| 14 | CLASSICS | Classical music |
| 15 | OTHER M | Special music programs |
| 16 | WEATHER | Weather |
| 17 | FINANCE | Finance |
| 18 | CHILDREN | Children's programs |
| 19 | SOCIAL | Social Affairs |
| 20 | RELIGION | Religion |
| 21 | PHONE IN | Phone In |
| 22 | TRAVEL | Travel |
| 23 | LEISURE | Leisure |
| 24 | JAZZ | Jazz Music |
| 25 | COUNTRY | Country Music |
| 26 | NATION M | National Music |
| Item | Program type | Description |
| 27 | OLDIES | Oldies Music |
| 28 | FOLK M | Folk Music |
| 29 | DOCUMENT | Documentary |
| 30 | TEST | Alarm Test |
| 31 | ALARM | Alarm |
Select alternate frequencies
If the radio signal is poor, turn on AF (Alternate Frequency) to search for another station with stronger signal.
1 Tap [AF]
2 Tap ▶ to select a setting:
• [AF ON]: Turn on the AF mode.
• [AF OFF]: Turn off the AF mode.
Receive traffic announcement
If you do not want to miss traffic announcement when enjoying music, turn on the TA (Traffic Announcement) function.
1 Tap [TA]
2 Tap ◀ to select a setting:
- [TA ON]: When there is traffic announcement, the unit switches to the tuner mode (regardless of the current mode) and begins to broadcast the traffic conditions. When the traffic announcement is over, it returns to the previous mode.
• [TA OFF]: Traffic announcement does not cut in.

Note
- If the currently received TA signal remains weak for over 120 seconds, the unit will activate TA Seek mode automatically to seek for other stations with better TA signal.

Tip
- When a traffic announcement cuts in, the user can press briefly to terminate the traffic announcement, and the unit will resume to the previous playback mode.
Set RDS clock
You can use time signal that is broadcast together with the RDS signal to set the clock of the unit automatically.
1 Tap

[RDS Clock Sync]
2 Tap
![PHILIPS CE600N - [RDS Clock Sync] - 1](/content/2026/06/1310878/images/520eebd51dd1939c41edb4b9ef8f8ac65e1a7e682275145adc686d29f63dc5d8.jpg)
![PHILIPS CE600N - [RDS Clock Sync] - 2](/content/2026/06/1310878/images/9b89d616c7843b3747ed54e3f5b3875c9a3baff1bca056b571ee239a0bf12e3a.jpg)
![PHILIPS CE600N - [RDS Clock Sync] - 3](/content/2026/06/1310878/images/56319b108850727fd7b7ed4d8c4dd65237b0a02323ecb4c37e5e31e16fe11ce3.jpg)
![PHILIPS CE600N - [RDS Clock Sync] - 4](/content/2026/06/1310878/images/d8e49620164b60dbb9da6853d4af5aae3db451f7e55d74198e9c77022f7a86eb.jpg)
![PHILIPS CE600N - [RDS Clock Sync] - 5](/content/2026/06/1310878/images/44e0451243d134952920f43e54aef5b923148763847bc5bd6605806346e2983a.jpg)
a setting:
• [ON]: Turn on the RDS clock. Time shown on the unit synchronizes with that on the RDS station.
• [OFF]: Turn off the RDS clock.
![PHILIPS CE600N - [RDS Clock Sync] - 6](/content/2026/06/1310878/images/381ea22f732ae3d829e9caf59c716fcc1faa4bbee75a3aa7ba946dc392c4db0d.jpg)
Tip
•The accuracy of the transmitted time depends on the RDS station that transmits the time signal.
7 USB
On the unit, you can play the media files that you have stored on a USB storage device.

1 Connect your USB storage device to the unit.
2 Press 🔔 to enter the Home screen. Tap 📋.
→ Media files are sorted as follows:
♪ : Display music files/ folders.
: Display picture files/ folders.
☐ : Display video files/ folders.
3 Select a file to start play.
Play music
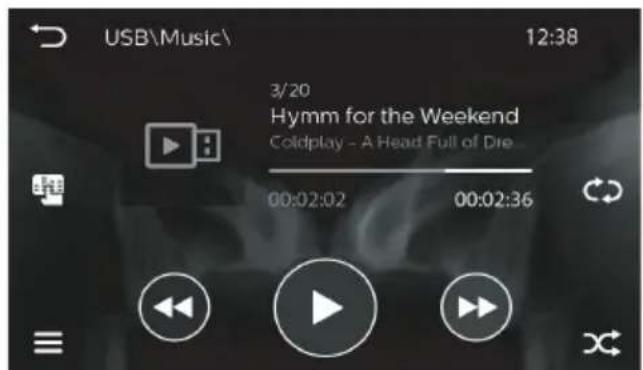
→ On the play screen, you can see the file information and play status.
Select play options
- II / ▶ Tap to start, pause, or resume play.
• / / : tap to select a repeat mode:
• Repeats all songs.
• c: Repeats current song.
- Repeats all songs in current folder.
- ✗: Tap to play all songs in random order ( ✗ highlighted) or in sequence ( ✗ in gray).
Search for files
• ◀◀/▶▶
- Tap to skip to the next/previous file.
- Tap and hold to fast forward or rewind within current file.
- Tap ☐ to go to the song list. Tap → to return to the previous level in the file directory.
Select sound settings
Tap to select sound settings.
Play videos

Select play options
- Ⅱ/▶Tap to start, pause, or resume play.
Select view options
• 16:9/4:3 Tap to select an aspect ratio.
• Tap to zoom in or out the scene. To pan through the enlarged scene, tap ◀, ▶, ▲ ▼
Search
• ◀◀/▶▶
- Tap to skip to the previous/next file.
- Tap and hold to fast forward or rewind within current file.
- Tap ☐ to go to the video list. Tap → to return to the previous level in the file directory.
8 Navigation system
Insert the map data card

Note
•The map data card is not included in the packaging.
- Before using the map data card, update the map data if necessary..

natural_image
Illustration of a device housing with an arrow indicating a component or connection (no text or symbols present)1 Flip up the protective cover.
2 Insert the map data card into the MAP slot until you hear a "click".
3 Close the protective cover.
Navigate your road trip

Note
- Risk of traffic accident! Never operate the navigation system during drive. Complete the setting of your destination and other navigation specifications before you drive.
1 Press ↗ enter the Home screen.
Tap ▲.
→ The navigation interface is displayed in a few seconds.
2 Follow the user manual of the navigation map to set navigation specifications.
9 Bluetooth
On the unit, you can enjoy music play that stream from a connected Bluetooth device.
Connect your Bluetooth device
1 On your unit, press ⚠ to enter the Home screen. Tap ⚙ > ⚣ to switch on Bluetooth.
2 On your Bluetooth device, search for and select Philips CE600N.
3 Follow the onscreen instructions to complete Bluetooth connection.
- If necessary, enter the passcode on your Bluetooth device (0000 by default).

Note
•The operational range between this system and a Bluetooth device is approximately 8 meters (24 feet).
- Any obstacle between this system and a Bluetooth device can reduce the operational range.
- Keep away from any other electronic device that may cause interference.
Enjoy music from your Bluetooth device

1 On your unit, press 📄 to enter the Home screen. Tap ✗.
2 Check that your Bluetooth device supports the Bluetooth profile A2DP and AVRCP.
3 On your Bluetooth device, start music play.
→ You can listen to music through the unit.
On the unit, the play screen shows file information, play status, and play controls for you to select options.
Select play options
• Ⅱ/▶ Tap to start, pause, or resume play.
• / / : Tap to select a repeat mode:
• Repeats all songs.
• c: Repeats current song.
• Repeats all songs in current folder.
- ✗: Tap to play all songs in random order ( ✗ highlighted) or in sequence ( ✗ in gray).
Search for files
• ◀◀/▶▶
- Tap to skip to the next/previous file.
- Tap and hold to fast forward or rewind within current file.
• : Tap to go to the song list.
Select sound settings
• Tap to select sound settings.
Make phone calls

Note
- Keep the Bluetooth connection active between the system and your mobile phone.
1 Press to enter the Home screen. Tap

2 Use the keypad to enter phone numbers. Tap ♦ to make the call.
- Tap ✕ to delete the last entry.
- Tap 📞 to end the call.
To transfer the phone call to your mobile phone
- Tap ① after the phone call gets through.

To dial the last called numer
- Tap
Voice Control
Once the smartphone and the device are paired, you can use the voice control function through the device.

- Tap to start voice control.
- Tap Cancel to exit voice control.
Answer phone calls
The incoming call can get through automatically when it is received on the connected mobile phone.

- Tap to answer the call.
• To reject or end the call, tap
Use the Phonebook
1 Tap to display the phone book interface.
2 Tap to start synchronizing the phone book with your mobile phone.
→ After the synchronization is complete, the contact list is displayed.

3 Tap the name of a contact from the list, and then send a call.
Call List

1 Tap 📋 display the call list interface.
2 Tap to start synchronizing the call list with your mobile phone.
→ The following options are displayed.
- Incoming call
:Outgoing Call
• : Missing Call
3 Tap one of the options and confirm.
10 AV-IN
On the unit, you can enjoy music/video that plays on an external media player that is connected through AV cables.
1 Check that you have properly connected your media player with the unit through AVcables (see "Connect wires" on page 4),
• one end to AV IN L, R, VIDEO IN on the unit
• the other end to the audio/video output on your media player.
2 On your unit, press to enter the Home screen. Tap S.
3 On your media player, start music/video play.
11 Additional devices
Through the audio/video output on the unit, you can allow the audio/video play on this unit to be enjoyed through additional devices.
Connect additional devices
Check that you have properly connected additional devices with the unit through AV cables (see “Connect wires” on page 4),
- one end to REAR OUT L and R (for the rear speakers), FRONT L and R (for the front speakers), VIDEO OUT on the unit
- the other end to the audio/video input on the additional devices.
12 Sound
In Radio / Media playback mode, tap to select your sound settings.
Select the equalizer settings

1 Tap to enter the option list of equalizer settings.
2 Tap <or to select a preset sound equalizer.
To set your equalizer settings as needed
1 Tap or to select or[Custom] RESET.
2 Tap the numbers to increase or decrease the value.
Select the channel settings


1 Tap to enter the option list of channel settings.
2 Tap [BASIC]ect your listening zone.
3 Tap [ADVANCE] the fader/balance.
Select the Bass settings

You can enable DBB (Dynamic Bass Boost) to enhance bass level.
1 Tap XBASSer the option list of Dynamic Bass Boost settings.
- [DBB] (highlighted): DBB sound effect is enabled.
- [DBB] (in black): DBB sound effect is disabled.
Select the Subwoofer settings

1 Tap (Sub) to enter the option list of Subwoofer settings.
• [ON] (highlighted): Tap to turn on the Subwoofer.
• [OFF] (in black): Tap to turn off the Subwoofer.
2 Tap or to select an option.
Select the crossover settings

1 Tap [HPF Switch] on or off the high pass filter of front speakers. Tap [HPF Rear] to switch on or off the high pass filter of rear speakers.
2 Tap or to select an option.
13 Settings

1 Press 🔗 enter the Home screen.
Tap 🔗 to enter the functional menu of settings.
2 Tap ⚙ or to enter the options list.
3 Tap to return to the previous screen.
System settings
Tap to enter the options list.
General
Beep On/Off
- Select if Beep sounds when you tap on the screen.
Clock Mode
- Select 12-hour or 24-hour clock for your time setting.
Date/Time
- Set the date and time.
OSD Language
- Select the language for the onscreen instructions.
DVR Voice
- Tap On or Off the DVR Voice.
Screen
See "Adjust the screen" on page 9.
Bluetooth settings
Tap *to enter the options list.
Pin Code
- Set the passcode for a Bluetooth device to connect with the unit.
Device Name
- Set the name of the unit that is displayed on your Bluetooth device when you search for the unit during Bluetooth connection.
Phone Name
• View the Bluetooth device that is connected with the unit.
Paired Device
- When (Clear Hall) is selected, all previously connected devices will be cleared. Next time you need to pair your device with the unit again.
System information
Tap ito enter the options list.
MPEG Version / MCU Version
- Check the firmware version.
Bluetooth version
- Check the Bluetooth version.
14 Reset
If the unit is not working properly or the display freezes, you can reset it.

15 Product information
Power
• Power supply: 12 V DC (11 V - 16 V), negative ground
- Fuse: 15 A
Operating temperature
-20°C\~70°C
Display
- Type: LCD Touch-sensitive screen
• Diagonal screen size (inch): 6.8
• Resolution: WVGA
Sound
- Suitable speaker impedance: 4 - 8 Ω
• Maximum power output: 50 W x 4 channels - Continuous power output: 21 W x 4 channels (4 Ω 10% T.H.D.)
• Pre-Amp output voltage: 2.5 V - Sub-woofer output voltage: 2.5 V
- Aux-in level: ≥ 1.5
Connectivity
- USB
- USB2.0 or USB1.1
-
Bluetooth
-
Profiles: A2DP, AVRCP 1.4 or above, HFP, HSP
- Version: 4.0
- Range: 8 m (free space)
- AV-IN
• Video output: Composite video out
- Preamp output
- Sub-woofer output
- Parking camera
Radio
• Frequency range - FM:
87.5 - 108.0 MHz (50 kHz per step)
• Frequency range - AM (MW): 522 - 1620 kHz (9 kHz per step)
- Usable sensitivity - FM: 2 uV
- Usable sensitivity - AM (MW): 25 uV
USB
• Output for power charging: 1 A
- File format: FAT16, FAT32
- Directory nesting up to a maximum of 8 levels
- Number of albums/folders: maximum 99
- Number of tracks/titles: maximum 999
- File name in Unicode UTF8 (maximum length: 128 bytes)
• Supported formats
- Video:
AVI (video codec: MP4V/ Xvid MPEG-1, audio codec: PCM/LPCM MPEG-Audio (MP1/MP2/MP3));
MPG (video codec: MPEG-1/MPEG-2, audio codec: LPCM, MPEG-Audio (MP1/MP2/MP3));
DAT (video codec: MPEG-1/MPEG-2, audio codec: LPCM, MPEG-Audio (MP1/MP2/MP3));
FLV (video codec: H.263, audio codec: LPCM/MP3));
MP4/MOV (video codec: Xvid, MP4V; audio codec: LPCM, MPEG-Audio (MP1/MP2/MP3), uLaw/aLaw));
Resolution: 720 X 480/576 (30fps)
- Audio:
MP3 (Bit rate: 16 kbps - 320 kbps; Sampling rate: 8 K - 48 KHz); ID3 tag v2.0 or later
- Picture: JPEG, BMP
16 Troubleshooting

Warning
- Never remove the casing of this product.
General
No power
• Car engine has not been started. Start the car engine.
- Connections are incorrect.
• The fuse has been damaged. Replace the fuse (15 A).

No sound
• Volume is too low. adjust the volume.
- Speaker connections are incorrect.
No image
- Parking wire connection is incorrect. Check the wiring.
Image flashes or is distorted.
• Video connection is improper. Check the connections.
Noise in broadcasts
• Signals are too weak. Select another station with stronger signals.
- Check the connection of the car antenna.
Preset stations are lost.
- Battery cable is not correctly connected. Connect the battery cable to the terminal that is always live.
The fuse is broken.
- The fuse type is incorrect. Replace it with a 15 A fuse.
- Speaker wire or power wire is grounded. Check the connections.
Bluetooth
Music playback is unavailable on the system even after successful Bluetooth connection.
- The device cannot be used with the system to play music.
The audio quality is poor after connection with a Bluetooth-enabled device.
- The Bluetooth reception is poor. Move the device closer to the system or remove any obstacle between the device and the system.
Cannot connect with the system.
- The device does not support the profiles required for the system.
- The Bluetooth function of the device is not enabled. Refer to the user manual of the device to find out how to enable the function.
- The system is not in the pairing mode.
- The system is already connected with another Bluetooth-enabled device. Disconnect that device or all other connected devices and then try again.
The paired mobile phone connects and disconnects constantly.
- The Bluetooth reception is poor. Move the mobile phone closer to
the system or remove any obstacle between the mobile phone and the system.
- Some mobile phones may connect and disconnect constantly when you make or end calls. This does not indicate any malfunction of the system.
- For some mobile phones, the Bluetooth connection may be deactivated automatically as a power-saving feature. This does not indicate any malfunction of the system.
17 Notice
Any changes or modifications made to this device that are not expressly approved by Gibson Innovations may void the user's authority to operate the equipment.
Hereby, Gibson Innovations declares that this product is in compliance with the essential requirements and other relevant provisions of Directive 2014/53/EU. You can find the Declaration of Conformity on www.philips.com/support.
Care of the environment
Environmental information
All unnecessary packaging has been omitted. We have tried to make the packaging easy to separate into three materials: cardboard (box), polystyrene foam (buffer) and polyethylene (bags, protective foam sheet.)
Your system consists of materials which can be recycled and reused if disassembled by a specialized company. Please observe the local regulations regarding the disposal of packaging materials, and old equipment.
Disposal of your old product

Your product is designed and manufactured with high quality materials and components, which can be recycled and reused.

This symbol on a product means that the product is covered by European Directive 2012/19/EU. Inform yourself about the local separate collection system for electrical and electronic products. Follow local rules and never dispose of the product with normal household waste. Correct disposal of old products helps prevent negative consequences for the environment and human health.
Trademark notice
Bluetooth
The Bluetooth® word mark and logos are registered trademarks owned by Bluetooth SIG, Inc. and any use of such marks by Gibson Innovations Limited is under license. Other trademarks and trade names are those of their respective owners.
Copyright
2017 © Gibson Innovations Limited. All rights reserved.
The Philips trademark and the Philips Shield Emblem are registered trademarks of Koninklijke Philips N.V. used under license.
Specifications are subject to change without notice. Gibson Innovations reserves the right to change products at any time without being obliged to adjust earlier supplies accordingly.

Specifications are subject to change without notice
Copyright © 2017 Gibson Innovations Limited.
This product has been manufactured by, and is sold under the responsibility of Gibson
Innovations Ltd., and Gibson Innovations Ltd. is the warrantor in relation to this product.
The Philips trademark and the Philips Shield Emblem are registered trademarks of Koninklijke Philips N.V. used under license.



- Your car entertainment system 2
- Setup 4
- Basics 8
- Radio 9
- Play with RDS 10
- USB 12
- Navigation system 14
- Bluetooth 14
- AV-IN 17
- Additional devices 17
- Sound 18
- Settings 20
- Reset 21
- Product information 21
- Troubleshooting 22
- Notice 24
- Safety
- Your car entertainment system
- What's in the box
- Overview
- Note
- Setup
- Connect wires
- Connect the ISO male connectors.
- Tip
- Mount into the dashboard
- Basics
- Switch on or off
- Set the date and time
- Adjust the screen
- Adjust the screen brightness
- Calibrate the touch panel
- Radio
- Tune in to radio stations
- Auto tune
- Manual tune
- Store preset stations
- Select tuner region
- Select radio range
- Play with RDS
- Turn on RDS
- Select program type
- Select alternate frequencies
- Receive traffic announcement
- Set RDS clock
- [RDS Clock Sync]
- USB
- Select play options
- Search for files
- Select sound settings
- Play videos
- Select view options
- Search
- Navigation system
- Insert the map data card
- Navigate your road trip
- Bluetooth
- Connect your Bluetooth device
- Enjoy music from your Bluetooth device
- Make phone calls
- To transfer the phone call to your mobile phone
- Voice Control
- Answer phone calls
- Use the Phonebook
- Call List
- AV-IN
- Additional devices
- Connect additional devices
- Sound
- Select the equalizer settings
- To set your equalizer settings as needed
- Select the channel settings
- Select the Bass settings
- Select the Subwoofer settings
- Select the crossover settings
- Settings
- System settings
- General
- Beep On/Off
- Clock Mode
- Date/Time
- OSD Language
- DVR Voice
- Screen
- Bluetooth settings
- Pin Code
- Device Name
- Phone Name
- Paired Device
- System information
- MPEG Version / MCU Version
- Bluetooth version
- Reset
- Product information
- Power
- Operating temperature
- Display
- Sound
- Connectivity
- Radio
- USB
- Troubleshooting
- Warning
- No power
- No sound
- No image
- Image flashes or is distorted.
- Noise in broadcasts
- Preset stations are lost.
- The fuse is broken.
- Bluetooth
- Music playback is unavailable on the system even after successful Bluetooth connection.
- The audio quality is poor after connection with a Bluetooth-enabled device.
- Cannot connect with the system.
- The paired mobile phone connects and disconnects constantly.
- Notice
- Care of the environment
- Environmental information
- Disposal of your old product
- Trademark notice
- Copyright
Brand : PHILIPS
Model : CE600N
Category : Car radio