
F920 - Coffee machine KRUPS - Free user manual and instructions
Find the device manual for free F920 KRUPS in PDF.
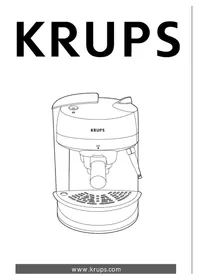


| Type | Coffee Machine |
| Brand | Krups |
| Model | F920 |
| Dimensions (W x D x H) | 18.5 x 23.0 x 28.5 cm |
| Weight | 2.3 kg |
| Power Supply | 220-240 V, 50/60 Hz |
| Power Consumption | 1200 W |
| Water Tank Capacity | 1.2 L |
| Max Cup Height | 10 cm |
| Brewing System | Drip filter |
| Anti-Drip Function | Yes |
| Auto Shut-Off | Yes, after 40 minutes |
| Water Level Indicator | Yes |
| Removable Filter Basket | Yes |
| Carafe | Glass, 1.2 L |
| Keep Warm Plate | Yes |
| Cleaning | Descaling recommended every 3 months |
| Safety | Auto shut-off, overheating protection |
| Spare Parts | Replacement carafe, filter basket, water tank |
| Manual | Free PDF download available |
Frequently Asked Questions - F920 KRUPS
User questions about F920 KRUPS
0 question about this device. Answer the ones you know or ask your own.
Ask a new question about this device
Download the instructions for your Coffee machine in PDF format for free! Find your manual F920 - KRUPS and take your electronic device back in hand. On this page are published all the documents necessary for the use of your device. F920 by KRUPS.
USER MANUAL F920 KRUPS




IMPORTANT SAFEGUARDS
When using electrical appliances, basic safety precautions should always be followed to reduce the risk of fire, electric shock and personal injury, including the following:
- Read all instructions carefully.
- Do not touch hot surfaces. Use handles or knobs. To protect against fire, electric shock and injury to persons, do not immerse cord, plugs, or appliance in water or other liquid.
- Close supervision is necessary when any appliance is used by or near children.
- Unplug from outlet when not in use and before cleaning. Allow to cool before putting on or taking off parts, and before cleaning the appliance.
- Do not operate any appliance with a damaged cord or plug or after the appliance malfunctions, or has been damaged in any manner. Return appliance to your nearest authorized KRUPS Service Center for examination, repair or adjustment (see Guarantee of Performance).
- The use of an accessory not evaluated for use with this appliance may cause injuries.
- Do not use outdoors.
- Do not let cord hang over edge of table or counter, or touch hot surfaces.
- Do not place on or near a hot gas or electric burner, or in a heated oven.
- To disconnect, turn switch to "OFF", then remove plug from wall outlet.
- Do not use appliance for other than intended use.
- Use extreme caution when dispensing hot steam.
SAVE THESE INSTRUCTIONS
CAUTION
- This appliance is for household use only. Any servicing other than routine cleaning and user maintenance should be performed by authorized KRUPS service personnel only (see Guarantee of Performance).
- Do not immerse base in water. • To reduce the risk of fire or electric shock, do not remove the base of the machine. There are no user serviceable parts inside. Repairs should be performed by authorized KRUPS service personnel only.
SPECIAL CORD SET INSTRUCTIONS
Regarding your Cord Set:
A. A short power-supply cord is provided to reduce risks resulting from entanglement in a longer cord. B. Longer extension cords are available and may be used if proper care is exercised in their use. C. If a long extension cord is used, (1) the marked electrical rating of the extension cord should meet or exceed the electrical rating of the appliance, (2) if the appliance is of the grounded type, the extension cord should be a grounding-type 3-wire cord, and (3) the longer cord should be arranged so that it will not drape over the counter top or table top where it can be accessed by small children or readily tripped over. D. This appliance has a polarized plug (one blade is wider than the other). To reduce the risk of electric shock, this plug is intended to fit into a polarized outlet only one way. If the plug does not fit fully in the outlet, reverse the plug. If it still does not fit, contact a qualified electrician. Do not attempt to modify the plug in any way.
Description
a Lid
b Removable swivelling water tank
c Function selector
d On /Off switch
d1 operating indicator light
e Temperature control indicator light
f Percolation head
g Filter holder
g1 filter for one cup (ground coffee)
g2 filter for two cups (ground coffee)
g3 filter for «ESE» measure
h Steam nozzle for heating liquids
h1 tip
h2 sliding part
h3 ring for screwing / unscrewing
i Grid
j Drip tray
k Measuring spoon
1 Auto cappuccino accessory
l1 screwing ring
12 steam tube
13 dial
l4 flexible tube
15 outlet nozzle
Safety recommendations

- Read the instructions for use carefully before using your appliance for the first time: any use which does not conform to these instructions will absolve KRUPS from any liability.
- Never leave the appliance within the reach of small children. The use of this appliance by young children or disabled persons must always be under close supervision.
- Check that the voltage rating of your appliance matches that of your household electrical wiring system.
Any connection error will render the guarantee null and void.
- Do not allow the power cord to hang down within reach of children.
- Do not remove the filter holder containing the coffee grounds while water is running through, as the appliance is then under pressure.
- Do not use the appliance when the drip tray and the grid are not in place.
- Never unplug the appliance by pulling on the cord.
- Make sure the filter holder is well tightened before starting to make coffee. Reset the selector to O before loosening the filter holder.
- All the appliances made by KRUPS are subjected to strict 100% inspection. Practical user tests are performed with a number of appliances taken at random, which explains any traces of utilisation.
Espresso coffee
Espresso coffee is richer in flavor and stronger than ordinary coffee. It is traditionally drunk from small espresso cups which have been pre-heated. Hot water and pressure combine to pass through ground coffee in order to obtain this delicious black, foamy coffee, which has an invigorating effect.
You can always recognize genuine espresso because of its characteristic flavor and rich, delicious foam (crema). This however requires both high pressure and your favorite espresso coffee (which has been well roasted and correctly ground). If you are unable to purchase ground espresso coffee, use a coffee grinder to grind the beans. The coffee must not be ground "too fine". It should be slightly grainy. If it is too fine, you run the risk of blocking the grids of the percolation head and the filter.
To guarantee complete success in making a good espresso, it is necessary to use fresh, clean, cold water—free of chlorine or other impurities that can ruin the taste of your coffee.
Before first use
- Clean the water heating system with one or two tanks of clean water, as follows:
- Remove the lid, lift out the tank and fill it with water (1).
- Replace the tank, positioning it firmly in such a way that the connecting valve situated beneath the tank opens, and replace the lid.
- Plug in the appliance.
- Set the switch (d) to «I». The indicator light (d1) will come on.
- Place one of the filters in the filter holder without any coffee. Then fit the assembly onto the percolation head. To position the filter holder correctly, point the handle to the left, press the filter holder onto the percolation head, then turn the handle to the right until it locks (click) (2).
- Place as large a container as possible under the filter holder.
- As soon as the appliance reaches the right temperature, the temperature control indicator light (e) will come on. Turn the function selector (c) to the position «UP» and allow all the water contained in the tank to run through the machine.
- If necessary, interrupt this operation by turning the function selector (c) to the position O to empty the container then resume the operation.
Using the various functions of your espresso
1. ESPRESSO FUNCTION
- For best results, preheat the accessories (filter holder, filter and cups) by running water directly into the cups (see «Before first use»).
- When the cups are full of hot water, reset the function selector (c) to the position O.
. Preparing an espresso:
Your appliance enables you to prepare an espresso either with ground coffee or with «ESE» ready-to-use pods.
- Fill the water tank and set the switch (d) to «|».
a. Preparing an espresso with ground coffee:
- Put the filter for one or two cups in the filter holder.
- Put some ground coffee in the filter, firmly pressing down the ground coffee with the back of the spoon (1 measuring spoon = 1 cup) (3).
- Clean the edges of the filter holder.
- Put the filter holder in place (2).
- Place one or two espresso cups under the filter holder.
As soon as the appliance reaches the correct temperature, the indicator light (e) comes on.
- Then turn the function selector (c) to the position «U».
- When the cups are full, reset the function selector (c) to the position O.
- Take the filter holder out of the appliance, and remove the ground coffee, holding the filter in place with the gripper clamp (4).
The filter can now be refilled to prepare more espressos.
b. Preparing an espresso with a measure of « ESE »
- Use only «ESE»-type pods.
The E.S.E system was designed for making espresso «ristretto» (pressed) in Italian for a quantity of coffee between 35 and 50 ml.
«ESE» stands for «Easy Serving Espresso». It is a pre-measured pod of coffee which has been selected, ground and compacted between two filter papers, rendering it ready-to-use. This system simplifies the preparation of an espresso by avoiding the need to measure and tamp ground coffee — making it significantly easier to clean and care for the appliance.
It is neither intended nor recommended that you make a long (larger) coffee with these pods.
We advise that you take care not to damage the «ESE» pods during handling and storage.
- Place the pod in the filter holder fitted with its «ESE» filter. In the case of a pod with a tongue, fold down the tongue towards the interior (5).
- Put the filter holder in place (2).
As soon as the appliance reaches the right temperature, the indicator light (e) comes on.
- Then turn the function selector (c) to the position «UP».
- Once the recommended quantity of coffee has been reached, turn the function selector (c) to the position O.
- Remove the filter holder and throw away the used measure, holding the filter in place with the gripper clamp (4).
2. STEAM FUNCTION
The thumping noise which occurs while steam is being produced comes from the intermittent regulation of the pump and has no effect on the proper working of the appliance.
Caution : during and after use of the machine, the metallic parts of the steam nozzle can become extremely hot.
. PREPARING FROTHED AND STEAMED MILK FOR A CAPPUCCINO, A LATTE OR HOT CHOCOLATE :
The steam function together with the Krups auto cappuccino accessory makes it easy to obtain milk with varying amounts of froth for making a cappuccino, a latte or hot chocolate.
These liquids are drawn in through the flexible tube (l4) and heated with the aid of steam before coming out via the outlet nozzle (l5) of the auto cappuccino accessory (l).
If the flexible tube (l4) is immersed directly in a carton of milk, a single cup is enough to prepare a cappuccino or a latte. You can adjust the amount of froth of the milk by using the dial (l3) of the auto cappuccino accessory (l).
It is best to use fresh, skim or low-fat milk, not boiled, and well chilled (kept in the refrigerator). The container must also be cold for optimal results (do not run the container under hot water before frothing the milk).
We recommend that you clean the auto cappuccino accessory immediately after use - please refer to the section "Cleaning the Machine".
If you are making a cappuccino or latte, you will need at least a 5 oz. cup (150 ml).
Cappuccino is made using 1/3 espresso, 1/3 hot steamed milk and 1/3 frothed milk.
Café latte is made using 1/2 espresso, 1/2 steamed milk, and topped with a bit of frothy milk.
Hot chocolate: immerse the flexible tube directly into the carton if the chocolate milk is ready-made, or heat the milk if you are using powdered chocolate. Then simply mix the powder in the heated milk.
Mounting of the Autocappuccino accessory (I):
- Move the steam nozzle (h) to the exterior of the appliance and unscrew his ring (h3).
- Mount the auto cappuccino accessory (l) in place of the steam nozzle (h).
- Screw the ring (l1) of the auto cappuccino accessory (l). Be careful not to dislodge the seal (13).
Using the auto cappuccino accessory (I):
Fill the water container with fresh, cold water (1) and put the «on/off» switch (d) on «l» position.
The operating light (d1) will come on.
- Turn the selector (c) to the setting «».
- Immerse the flexible tube (14) in the milk to be heated. The tube must touch the bottom of the container (12).
- Place a cup one third filled with freshly-made espresso (12) under the outlet nozzle (15).
- Turn the dial (l3) to the setting «☐». You will obtain a fine smooth froth.
- To obtain milk which is less frothy, turn the dial (I3) to the top of the user scale.
Once the appliance reaches the correct temperature, the temperature control indicator light (e) comes on.
- Turn the selector (c) to the setting «!!». Hot frothy milk will come out of the outlet nozzle.
- Once you have obtained the desired quantity of frothy milk, turn the selector (c) to the O setting.
- After use, remove the flexible tube (l4) from the container and clean the auto cappuccino accessory (see section "Cleaning the Machine").
. HEATING WATER (FOR TEA, FOR EXAMPLE) OR THICK LIQUIDS (SOUP, FOR EXAMPLE)
The steam function together with the steam nozzle (h) make it easy to heat water for a variety of instant foods and beverages.
. Mounting of the steam nozzle (h) :
- Move the auto cappuccino accessory (l) to the exterior of the appliance and unscrew his ring (l1).
- Mount the steam nozzle (h) in place of the auto cappuccino accessory (l).
- Screw the ring (h3) of the steam nozzle. Be careful with the seal.
- Move the steam nozzle to the interior of the appliance.
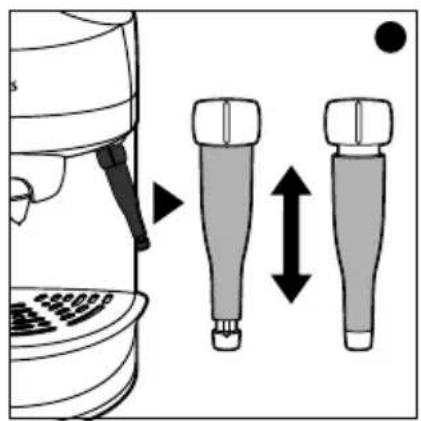
Please note: the sliding part (h2) of the nozzle must be in the raised position (6).
- Fill the water tank and set the switch (d) to «I». The indicator light (d1) comes on.
- Turn the function selector (c) to the position «».
- Move the nozzle towards the outside of the appliance.
As soon as the appliance reaches the appropriate temperature, the temperature control indicator light (e) will come on.
- Immerse the tip of the nozzle in the liquid to be heated (7). Return the nozzle to the inside and hold the container by its handle or place it on the grid (i) (7).
- Then turn the function selector (c) to the position «!!» until the liquid is hot enough, then reset it to the position O and remove the container.
- For liquids other than water, turn the function selector (c) to the position « » for the cleaning operation in order to prevent the nozzle from becoming blocked:
. place an empty container under the nozzle. . select the position « » again. . turn the function selector (c) to the position O. . clean the nozzle with a damp cloth. - For thorough cleaning of the nozzle, please refer to the paragraph «Maintenance».
Notes
If you wish to make an espresso immediately after steam, the appliance must first cool down until it reaches the right temperature for extraction.
- To do this, insert an empty filter holder (no coffee) in the machine and position a suitable container beneath it. Then turn the function selector (c) to the position «UP».
- Let the water run through until the indicator light (e) goes out. Then, turn the function selector (c) to the position O.
After this, the machine is now ready once more to make an espresso (see paragraph «espresso function»).
Please note: when the appliance is running, and also afterwards, the nozzle will be very hot. Allow time for the appliance to cool down to prevent scalding or burning.
Maintenance
- Unplug the appliance and allow it to cool.
- Never wash the accessories for your espresso in the dishwasher.
- Clean the body of the appliance with a damp cloth.
After use, the water tank must be emptied.
. The drip tray (j)
- Each time an espresso is prepared, the drip tray fills with water. This is perfectly normal. To prevent any overflow, remove the grid (8) and empty the drip tray regularly.
- If necessary, clean the drip tray and the grid with water and a little non-abrasive washing-up liquid, rinse and dry. When replacing, return the plastic block situated at the back of the tray (9).
. The percolation head, the filter holder and the filters
These must be cleaned after every use. Simply run a damp cloth over the percolation head and clean the other accessories with water and a small quantity of non-abrasive liquid cleanser. Rinse and dry.
- If the percolation head becomes heavily encrusted, unscrew its grid using a coin, clean it and replace, tightening it firmly (10).
. The seal for the percolation head
When you are not using your espresso, do not leave the filter holder in the appliance in order to prevent wear on the seal.
Clean the seal regularly using a damp cloth.
The steam nozzle (h) must be cleaned with a damp cloth after every use.
Please note: it may still be very hot!
For more thorough cleaning, the nozzle may be taken off (11):
- Unscrew the tip (h1), if necessary using a coin, before removing the nozzle from the appliance.
- Unscrew the nozzle from the appliance using the ring (h3). Separate the various components and clean them with hot water and a small quantity of non-abrasive liquid cleanser. Rinse and dry.
- If need be, unblock the tip (h1) using a fine needle.
- Be careful with the seal on the ring (h3) when you replace the nozzle.
The auto cappuccino accessory (I):
After each use, we recommend that you rinse the auto cappuccino accessory in the following manner:
- Turn the selector (c) to the position «».
- Turn the dial (I3) to the cleaning position «A».
- Immerse the flexible tube (I4) into a glass of water. (The minimum quantity necessary is 3.5 ounces/100 ml).
- Place an empty container below the outlet nozzle (I5).
Once the appliance reaches the correct temperature, the temperature control light (e) will come on.
- Then turn the selector (c) to the setting « ».
- When all the water has run through the auto cappuccino accessory (l), turn the selector (c) to the O position.
- After use, remove the flexible tube (I4) from the container.
- Once this operation is completed, clean the outlet nozzle (I5) with a damp cloth.
We recommend that you regularly dismantle the auto cappuccino accessory (I) and clean it with water, a little non-abrasive dishwashing liquid and a small brush. Rinse and dry before reassembling it (13).
Be careful to mount the flexible tube (l4) the right way: engage the straight cut end into the auto cappuccino accessory (l).
Following these maintenance guidelines will keep your appliance in optimal working condition and help you to produce great tasting beverages time after time.
Descaling
It is vital that you descale your espresso machine in order to guarantee its continued operation.
- Descale your espresso at regular intervals using citric or tartaric acid.
We do, however, advise you to use the Krups descaling accessory, reference 054, which is available from approved Krups service centres. This accessory includes, in addition to two doses of descaler, a water hardness test strip to evaluate the frequency of descaling for your appliance in normal use. The amount of scaling depends on the hardness of the water, but also on how often it is used. The frequency of descaling indicated by accessory 054 is thus given by way of indication only.
You must never, under any circumstances, use classic sulphuric acid or other products containing this acid as there is a risk of damaging the appliance. Carefully check the composition of the descaling products you intend to use.
- Then use the following method:
- Unscrew the grid of the percolation head and clean it (10).
- Dissolve 2 tablespoons of descaler or one packet of accessory 054 in half a litre (16 oz) of lukewarm water and pour the mixture into the empty water tank.
- Set the switch (d) to «I». The indicator light (d1) will come on.
Once the appliance reaches the appropriate temperature, the temperature control indicator light (e) comes on.
- Place a container under the percolation head. Run through about 1/3 of the mixture, setting the function selector (c) to the position «UP».
- Set the switch (d) to «0» and wait 10 to 15 minutes to allow the descaler to take effect.
- Then set the switch (d) to « I ».
- With the function selector (c) in the position «UP», allow the remainder of the mixture to run into the container placed under the percolation head.
- Then reset the function selector (c) to O.
- Run two tanks of fresh water through to rinse the percolation head. To do this:
Fill the tank.
Place a container under the percolation head, reset the function selector (c) to «» and allow the content of the tank to run through. Then set the function selector (c) to O and the switch (d) to «0». Replace the grid on the head of the appliance (see paragraph «Maintenance») (10).
Notes:
In the case of serious scaling, soak the grid of the percolation head for 5 minutes in 1/3 of the mixture obtained during the first run-through.
If necessary, this operation can also be performed with the steam nozzle:
To do this, dismantle the nozzle as instructed in the paragraph «Maintenance» and soak the scaled parts for 5 minutes in 1/3 of the mixture obtained during the first run-through. Rinse the various parts thoroughly before replacing them.
Problems, likely causes and corrective actions
| Problems Probable Corrective causes actions | ||
| Espresso not The ad accessories (cups, filter See the paragraph and filter holder). «Preparing an espresso». | ||
| Leaking coffee around the filter holder | The filter holder is not fitted correctly. | See paragraph «Preparing an espresso». |
| There is residual coffee on the edge the filter. | Clean around the filter and the seal. | |
| The seal of the percolation head is dirty. | Clean the seal with a damp cloth. | |
| The seal of the percolation head is defective. | Contact an approved KRUPS service centre. | |
| Very loud noise pump. | No water in the coming from the tank. | Fill the tank. |
| Tank incorrectly fitted. | Press firmly on the tank | |
| Ground coffee too old or dry. | Use freshly ground coffee. | |
| Water does not flow properly. | No water in the tank. | Fill the tank. |
| Tank badly Press firmly fitted. | on the tank. | |
| The filter is blocked-the ground coffee is too fine or head. See compacted paragraph too tightly. | Clean the filter and the grid of the percolation the «Maintenance» and try using a coarser ground coffee. | |
| Water does not Grid of the Put the grid to flow properly. percolation head soak in the is clogged. descaling | solution. See the paragraph «Descaling». | |
| Appliance scaled. See the paragraph «Descaling». | ||
| Water passes Ground coffee too Try a finer too quickly. coarse ground coffee. | Insufficient quan- Use the spoon tity of ground supplied to coffee. measure out the coffee. | |
| Ground coffee not Compact the compacted. ground coffee more. | ||
| The espresso has no head (crema too on the coffee) | Ground coffee coarse. ground coffee. | Try using a finer ground coffee. |
| Ground coffee not Compact the compacted enough. | Use a fresh ground coffee. | |
| Ground coffee old or too dry. | See paragraph maintenance. | |
| Insufficient foam on milk. | Steam /cappuccino nozzle blocked «Mai | Use fresh milk |
| Milk too old. | Cool milk in the refrigerator. | |
| Milk is lukewarm. | Position it correctly (See paragraph the filter holder. «Preparing an espresso with an «ESE» measure). | |
| When using E.S.E, coffee leaks around | Pod badly positioned. | Tighten filter holder until it locks (click). |
| Filter holder not tightened properly. | Tighten filter holder until it locks (click). | |
| Residual water in the ground suffic coffee. | Ground coffee not Compact the 1ently compac- grounded. | |
| Insufficient Increase the quantity of ground coffee. | the quantity of ground coffee. | |
| There is water around the appliance. | The drip tray is overflowing | Empty it regularly |
Accessories
You can personalize your appliance by obtaining the following accessories from your retailer or from an approved KRUPS service center:
. Filter cartridge: ref. 0880
. Descaling kit: ref. 054
Limited One Year Warranty
Your KRUPS #F920 is covered by the following warranty:
If within one year from the date of purchase this KRUPS product fails to function because of defects in materials or workmanship, KRUPS North America will, at its option, repair or replace the unit without charge, provided the owner has proof of date of purchase.
This warranty will be void if malfunction was caused by damage to the product by accident, misuse, use on frequency or voltage other than marked on the product and/or described in the instructions, abuse including tampering, damage in transit, or use for commercial purposes. This warranty gives you specific legal rights, and you may also have other rights which may vary from state to state.
GUARANTEE OF PERFORMANCE
This fine KRUPS product is manufactured according to a rigid code of quality standards, and, with minimum care, should give years of service. However, should the need arise for repairs or for replacement parts within or after the warranty period, please call our CONSUMER SERVICE DEPARTMENT:
USA: (800) 526-5377
24 hours a day, 7 days a week
Canada: (905) 669-0114
Monday-Friday 8:00 a.m. - 4:30 p.m.
You will be provided with specific instructions on how to get your product repaired.
The department will also be able to answer any general product questions you may have.
Before calling the Consumer Service Department, please have the type number of your KRUPS appliance available.
You must have this information before calling our Consumer Service Department so that we may better answer your questions. The type number can be located by looking at the bottom of your appliance.
This product is Type #F920
Any general correspondence can be addressed to:
USA : KRUPS North America, Inc.
P.O. Box 3900
Peoria, IL 61612
Canada : KRUPS Service
20 Caldari Rd
Concord, Ontario
L4K 4N8


- IMPORTANT SAFEGUARDS
- SAVE THESE INSTRUCTIONS
- CAUTION
- SPECIAL CORD SET INSTRUCTIONS
- DESCRIPTION
- SAFETY RECOMMENDATIONS
- ESPRESSO COFFEE
- BEFORE FIRST USE
- USING THE VARIOUS FUNCTIONS OF YOUR ESPRESSO
- ESPRESSO FUNCTION
- PREPARING AN ESPRESSO
- PREPARING AN ESPRESSO WITH GROUND COFFEE
- PREPARING AN ESPRESSO WITH A MEASURE OF « ESE
- IT IS NEITHER INTENDED NOR RECOMMENDED THAT YOU MAKE A LONG (LARGER) COFFEE WITH THESE PODS
- STEAM FUNCTION
- CAUTION : DURING AND AFTER USE OF THE MACHINE, THE METALLIC PARTS OF THE STEAM NOZZLE CAN BECOME EXTREMELY HOT
- PREPARING FROTHED AND STEAMED MILK FOR A CAPPUCCINO, A LATTE OR HOT CHOCOLATE
- MOUNTING OF THE AUTOCAPPUCCINO ACCESSORY (I)
- USING THE AUTO CAPPUCCINO ACCESSORY (I)
- HEATING WATER (FOR TEA, FOR EXAMPLE) OR THICK LIQUIDS (SOUP, FOR EXAMPLE)
- MOUNTING OF THE STEAM NOZZLE (H)
- NOTES
- MAINTENANCE
- THE DRIP TRAY (J)
- THE PERCOLATION HEAD, THE FILTER HOLDER AND THE FILTERS
- THE SEAL FOR THE PERCOLATION HEAD
- THE AUTO CAPPUCCINO ACCESSORY (I)
- BE CAREFUL TO MOUNT THE FLEXIBLE TUBE (L4) THE RIGHT WAY: ENGAGE THE STRAIGHT CUT END INTO THE AUTO CAPPUCCINO ACCESSORY (L)
- DESCALING
- THEN USE THE FOLLOWING METHOD
- ACCESSORIES
- LIMITED ONE YEAR WARRANTY
- GUARANTEE OF PERFORMANCE
Brand : KRUPS
Model : F920
Category : Coffee machine