
HQ7780 - Razor PHILIPS - Free user manual and instructions
Find the device manual for free HQ7780 PHILIPS in PDF.


| Product Type | Electric Rotary Shaver |
| Model | Philips HQ7780 |
| Shaving System | Triple rotary blades with lift & cut technology |
| Trimmer | Integrated pop-up trimmer for sideburns and moustache |
| Power Source | Rechargeable battery (Ni-MH) |
| Charging Time | Approximately 8 hours |
| Usage Time | Up to 45 minutes cordless |
| Voltage | 100-240 V, worldwide compatible |
| Dimensions (approx) | 150 x 60 x 40 mm |
| Weight (approx) | 200 g |
| Wet/Dry Use | Wet and dry, suitable for use with gel or foam |
| Cleaning | Removable shaving head, rinse under tap |
| Maintenance | Replace shaving heads every 2 years or as needed |
| Replacement Heads | Philips HQ4 series (check compatibility) |
| Display | LED charging indicator |
| Travel Lock | Yes, prevents accidental activation |
| Housing Material | Plastic with rubber grip |
| Accessories Included | Charger, protective cap, brush for cleaning |
Frequently Asked Questions - HQ7780 PHILIPS
User questions about HQ7780 PHILIPS
0 question about this device. Answer the ones you know or ask your own.
Ask a new question about this device
Download the instructions for your Razor in PDF format for free! Find your manual HQ7780 - PHILIPS and take your electronic device back in hand. On this page are published all the documents necessary for the use of your device. HQ7780 by PHILIPS.
USER MANUAL HQ7780 PHILIPS
The shaver comes with two different kinds of NIVEA FOR MEN cartridges: Extra Fresh Shaving Gel for a fresh sensation during and after shaving and Moisturising Shaving Lotion for sensitive skin. This gives you the opportunity to try them out and discover which one suits your skin type best.
Important
Read this user manual carefully before you use the appliance and save it for future reference.
- This appliance is not intended for use by persons (including children) with reduced physical, sensory or mental capabilities, or lack of experience and knowledge, unless they have been given supervision or instruction concerning use of the appliance by a person responsible for their safety.
- Children should be supervised to ensure that they do not play with the appliance.
- Only use the powerplug and the charging stand supplied.
- The powerplug transforms 100-240 volts to a safe low voltage of less than 24 volts.
- The powerplug contains a transformer. Do not cut off the powerplug to replace it with another plug, as this causes a hazardous situation.
- Do not use a damaged powerplug or charging stand.
- If the powerplug or charging stand is damaged, always have it replaced with one of the original type in order to avoid a hazard.
- Charge, store and use the appliance at a temperature between 5°C and 35°C.
- Make sure the powerplug does not get wet.

- Never immerse the charging stand in water nor rinse it under the tap.
- Do not leave the shaver in the plugged-in charging stand for more than 24 hours.
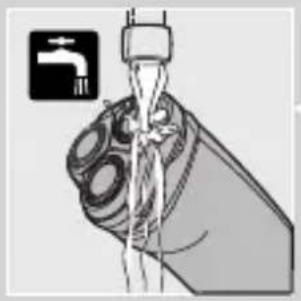
- The appliance is watertight and can be cleaned under the tap.
Be careful with hot water. Always check if the water is not too hot, to prevent your hands from getting burnt.
- The appliance complies with the internationally approved IEC safety regulations and can be safely used in the bath or shower.
- Check if the gel and lotion supplied with the appliance contain ingredients (see back of cartridge) to which you are allergic before you start using the appliance. Do not use the gel and/or lotion if you are allergic to one or more ingredients.
Electromagnetic fields (EMF)
This Philips appliance complies with all standards regarding electromagnetic fields (EMF). If handled properly and according to the instructions in this user manual, the appliance is safe to use based on scientific evidence available today.
The display
Living Light Display
This model features the unique Living Light display. This 3D colour LED display gives you all the information you need with special ‘living light’ effects.
Remove any sticker or protective foil from the Living Light Display.
Demonstration program
The appliance has a unique demonstration program.
1 Press the on/off button for 7 seconds.
The demonstration will start automatically.
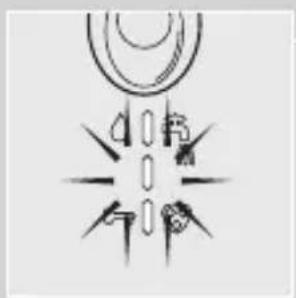
When the demonstration starts, all indications light up at the same time. Then all indications of the shaver are shown separately for 3 seconds in the following order:
Charging/Battery full indication
Shaving
Shaving gel indication
Cleaning reminder/ Battery capacity
Shaving
Shaving gel indication
Battery low indication
Cleaning reminder/ Battery low indication
Shaving head check indication
Travel lock indication
Note: The whole demonstration program lasts approx. 1 minute (including intervals).
2 You can stop the demonstration by pressing the on/off button.
Indications during use
All indications mentioned below are shown during every shaving session and they are always displayed in the same order, which makes it very easy for you to maintain a regular shaving ritual.
As a result, some symbols will light up even when you have already taken the appropriate action.
Note: When you switch the appliance on, the battery capacity indication appears briefly. After this, the shaving gel indication flashes three times. If you have
If you have already applied enough shaving gel or lotion, you can ignore this indication.
Note: When you switch the appliance off, the cleaning reminder is displayed. This cleaning reminder consists of a green tap (lights up) and a green water jet (flashes). If you have already cleaned the shaver before switching it off, you can ignore the cleaning reminder.
After the cleaning reminder has been displayed, the battery capacity indication appears briefly.
Charging
When you charge the shaver for the first time or after a long period of disuse, let it charge continuously for 4 hours. Charging normally takes approx. 1 hour.
Do not leave the shaver in the plugged-in charging stand for more than 24 hours.
Charge indications

Battery running low
When the battery is running low, the bottom battery light burns red during shaving. When you switch the shaver off while the battery is nearly empty, the bottom battery light flashes red twice. This will happen four times with brief pauses in between. When you start charging the shaver while the battery is running low, the bottom battery light flashes red for max. 3 minutes.
Battery fully charged
During charging the three battery lights flash green until the shaver is fully charged (approx. 1 hour).
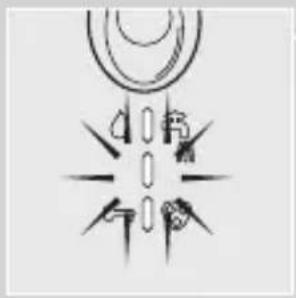
The three battery lights burn green continuously when the battery is fully charged.
Battery indications during shaving
The three battery lights show the remaining battery capacity for 5 seconds after you switch the shaver on or off.
- The lower two battery lights burn green: 66% of the entire battery capacity is left.
- The bottom battery light burns green: 33% of the battery capacity is left.
- The bottom battery light burns red: the battery is almost empty (see also section 'Battery running low').
Charging the appliance
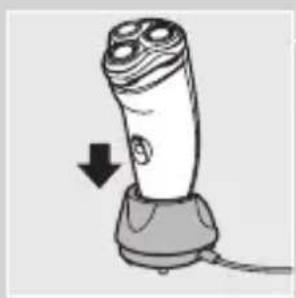
Charge the shaver before using it for the first time and when the shaver indicates that the battery is running low.
1 Insert the small plug into the charging stand and put the power plug in the wall socket. 2 Place the shaver in the charging stand.
The shaver automatically switches off when it is placed in the charging stand.
3 Remove the power plug from the wall socket and pull the small plug out of the charging stand when the battery has been fully charged. You can then leave the appliance in the charging stand.
Cordless shaving time
A fully charged shaver has a cordless shaving time of up to 55 minutes.
Cartridges
Cartridges with NIVEA FOR MEN shaving gel/lotion are available in boxes containing five cartridges and one small plastic pump.
The NIVEA FOR MEN shaving gel/lotion in the cartridges will keep for 32 months when stored at temperatures between 0°C and +40°C.
Only use Philips NIVEA FOR MEN Cool Skin (HQ170 and HQ171) cartridges.
One Philips NIVEA FOR MEN Cool Skin cartridge contains enough gel/lotion for approx. 10 shaves.
For hygienic reasons, we advise you to insert a new pump when you start using a new set of five cartridges.
Do not throw the pump away when you replace an empty cartridge. You will need it for all five cartridges.
Remove the shaving gel/lotion cartridge from the appliance when you are not going to use the shaver for more than one week.
When you have run out of shaving gel/lotion cartridges and you do not know where to buy them, contact the Customer Care Centre in your country (see 'Guarantee & service').
Inserting cartridges
1 When you start using a new set of cartridges, take the pump out of its bag and push it into a cartridge until it locks into position with a click.
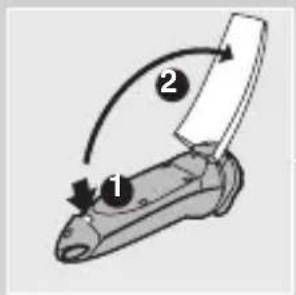
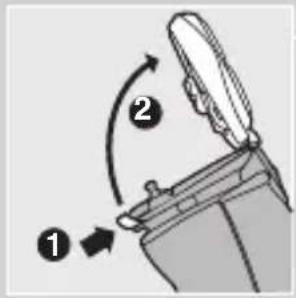
2 Press the release button (1) and open the cover of the cartridge compartment (2).
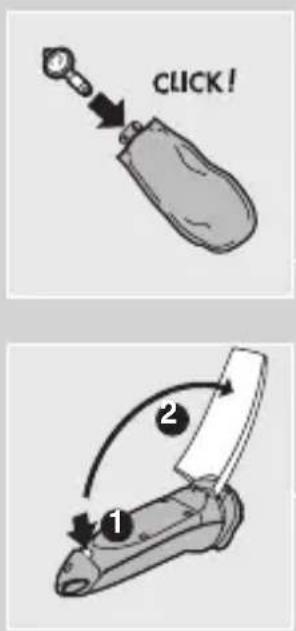

3 Slide the cartridge with the pump into the shaver. It only fits properly if the white side of the pump is pointing upwards. 4 Close the cover (you will hear a click). 5 Press the yellow pump button a few times until the NIVEA FOR MEN shaving gel/lotion appears. The shaver is now ready for use.
Replacing cartridges
Do not throw the pump away when you replace an empty cartridge. You will need it for the other cartridges.
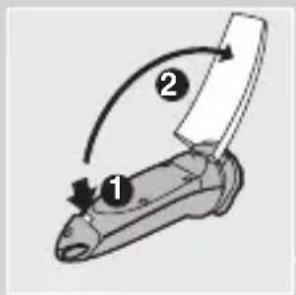
1 Press the release button (1) and open the cover of the cartridge compartment (2).
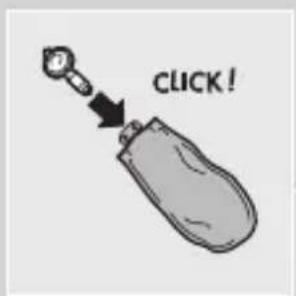
2 Remove the empty cartridge and pull out the pump.
3 Push the pump into a new cartridge until it locks into position with a click.
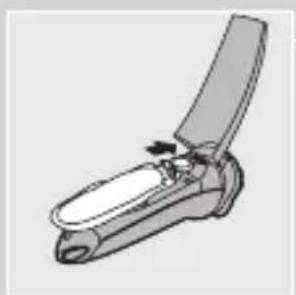
4 Slide the cartridge with the pump into the shaver. It only fits properly if the white side of the pump is pointing upwards. Close the cover.
Storing cartridges
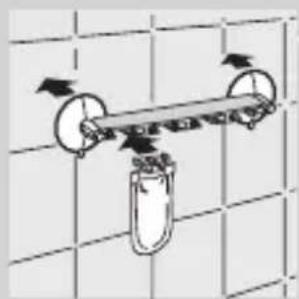
You can conveniently store the other cartridges by attaching them to the wall holder supplied. The holder has suction caps which allow you to attach it to the wall easily. In this way you always have the cartridges close at hand, which is very convenient, especially when you shave in the shower.
The wall holder is only suitable for storing cartridges. Never hang or place the shaver on the wall holder. If you do, the shaver may fall!
Using the appliance
Shaving
Switching on the shaver
1 Press the on/off button once to switch on the shaver.
After the battery capacity has been shown briefly, the yellow teardrop-shaped shaving gel light ◆ flashes 3 times to indicate that shaving gel/lotion can be applied.
If the shaver does not go on when you press the on/off button, the travel lock may have been activated. Deactivate the travel lock (see chapter 'Travel lock').

2 Press the yellow pump button to apply NIVEA FOR MEN shaving gel/lotion to your skin. 3 Move the shaving heads over your skin, making both straight and circular movements. 4 While shaving, press the pump button frequently to apply more NIVEA FOR MEN shaving gel/lotion so that the shaver keeps gliding smoothly over your face.
Do not press the shaver too hard against your skin while shaving. If you prefer, you can wet your face before shaving.
For the best shaving results, shaving gel/lotion should be pumped up frequently. The shaver will not perform optimally when used without shaving gel/lotion. Your skin may need 2 or 3 weeks to get accustomed to the Philips shaving system.
Switching off the shaver
1 Press the on/off button once to switch off the shaver.
The cleaning reminder (green tap symbol with flashing water jet) lights up for 6 seconds to indicate that the shaver should be cleaned.
After this, the remaining battery capacity is shown for 5 seconds.
2 Clean the shaver (see chapter 'Cleaning and maintenance').
Rinse the shaver after each shave. Remove the cartridge if you are not going to use the appliance for more than one week.
3 If necessary, check the remaining battery capacity by pressing the on/off button. One or more battery lights will go on for 5 seconds to indicate the remaining battery capacity.
4 Put the protection cap on the shaver every time you have used it, to prevent damage.
5 If necessary, activate the travel lock (see chapter 'Travel lock').
Trimming
For grooming sideburns and moustache.
Attaching the trimmer
1 Switch off the shaver.
Clean the shaver before you attach the trimmer (see chapter 'Cleaning and maintenance').

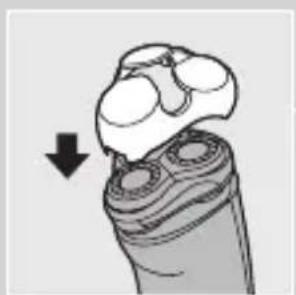
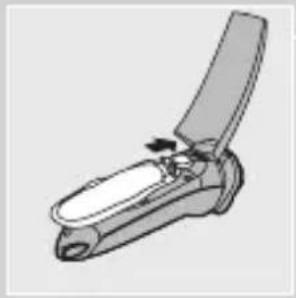
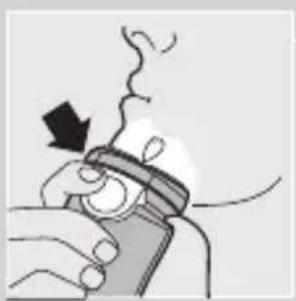
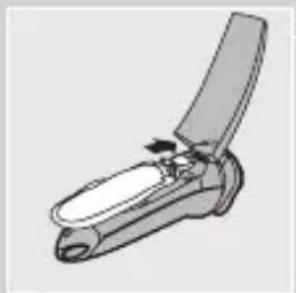
2 Press the release button (1) and pull the shaving unit off the shaver (2).

3 Tilt the trimmer slightly backwards.
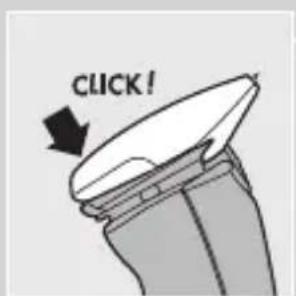
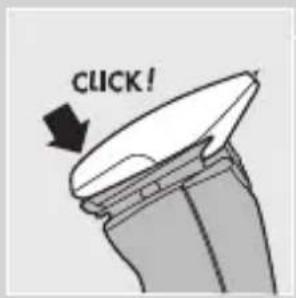
4 Fit the trimmer onto the shaver (you will hear a click). The trimmer is now ready for use. 5 Activate the trimmer by pressing the on/off button once.
Removing the trimmer
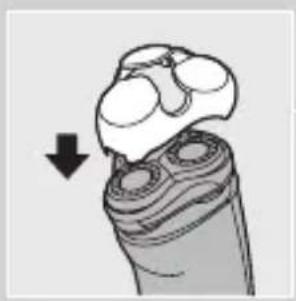
1 Switch off the shaver. 2 Remove the trimmer by pressing the release button again and pulling the trimmer off the shaver. 3 Put the shaving unit back onto the shaver.
Travel lock
If you are going to store the shaver for a longer period or if you are going to travel, it is possible to lock the shaver. The travel lock prevents the shaver from being switched on by accident.
Activating the travel lock
1 Press the on/off button for 3 seconds. The motor is switched off. 2 The travel lock indication ⚡, a yellow key symbol, flashes 3-4 times and then burns continuously for 4 seconds. The travel lock has now been activated. The yellow key symbol goes out.
Deactivating the travel lock
1 Press the on/off button for at least 3 seconds. The yellow key symbol lights up. 2 The yellow key symbol flashes 3-4 times. Then the motor starts running to indicate that the shaver has been unlocked. The shaver is now ready for use again.
The yellow key symbol goes out.
Note: The shaver unlocks automatically when you place the shaver in the plugged-in charging stand.
Checking if the appliance is locked
1 Press the on/off button briefly (less than 3 seconds). 2 The yellow key symbol lights up for 3 seconds to confirm that the travel lock is active.
Cleaning and maintenance
Regular cleaning guarantees better shaving performance.
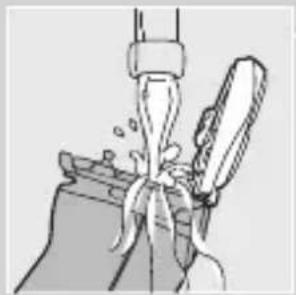
To maintain optimal shaving performance and to keep the shaver clean, you have to thoroughly rinse the shaving unit and hair chamber with hot water after every shave.
Be careful with hot water. Always check if the water is not too hot, to prevent your hands from getting burnt.
Cleaning reminder
When you have switched off the shaver, the cleaning reminder 📁 (green tap symbol with flashing water jet) lights up for 6 seconds to remind you that the shaver should be cleaned. If the red shaving unit symbol ⚙ and the cleaning reminder 🏠 light up together, the shaving heads have become so dirty or damaged that they might cause the motor to become blocked. If the shaving heads are dirty, you have to clean them. If the shaving heads are damaged, you have to replace them (see chapter ‘Replacement’).
Note: We advise you to avoid this situation by cleaning the shaving heads regularly.
Cleaning
The shaver reminds you that it needs to be cleaned by showing the cleaning reminder 🏠 after every shaving session.
Shaving unit: Quick Clean after every shave
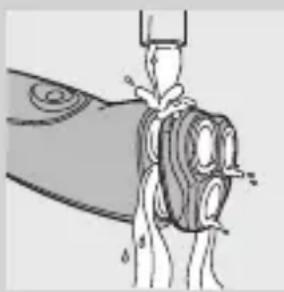
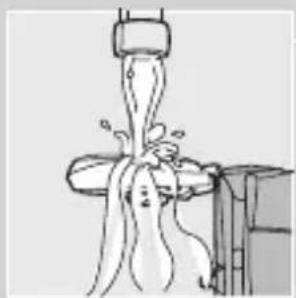
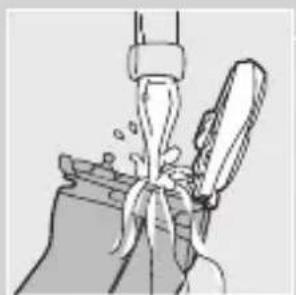
1 Make sure the appliance is switched on. 2 Keep the shaving unit closed. 3 Rinse the shaving unit and the hair chamber under a hot tap by letting the water run through the openings below the shaving unit for at least 30 seconds. 4 Shake off excess water.
Never dry the shaving unit with a towel or tissue, as this may damage the shaving heads.



Shaving unit and hair chamber: every week
We advise you to clean the appliance thoroughly at least once a week to maintain optimal shaving performance.
You can also follow this procedure when the shaving heads have to be cleaned.
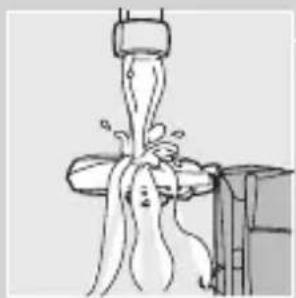
1 Switch off the shaver. 2 Press the release button to open the shaving unit. 3 Rinse the inside of the shaving unit.
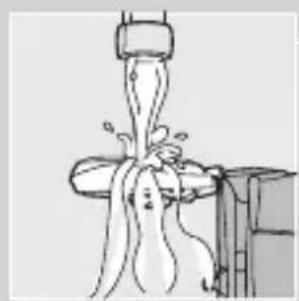
4 Rinse the outside of the shaving unit.
5 Rinse the hair chamber. 6 Make sure the inside of the shaving unit and the hair chamber have been cleaned properly. 7 Close the shaving unit and shake off excess water. 8 Open the shaving unit again and leave it open to let the appliance dry completely.
Charging stand
1 Unplug the charging stand. 2 Clean the charging stand with a moist cloth.

Trimmer
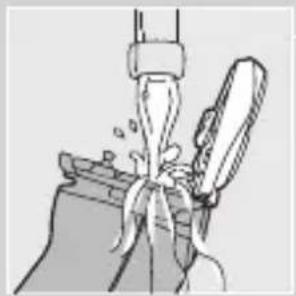
1 Clean the outside of the trimmer with the brush supplied after every use.
The trimmer can also be cleaned by rinsing it under the tap.
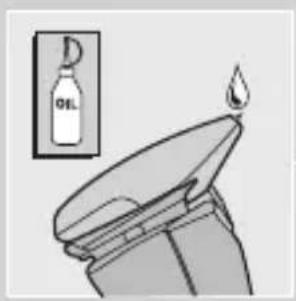
2 If the trimmer is used frequently, lubricate the trimmer teeth with a drop of sewing machine oil every six months.
Storage
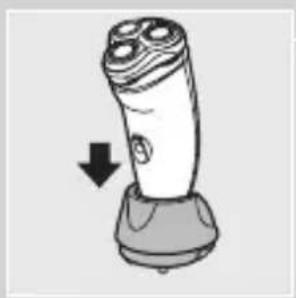
Charging stand
The shaver can be stored in the charging stand, even when it is wet.
Always unplug the charging stand before storing the wet or dry shaver in it.
Pouch
The shaver can be stored in the pouch supplied. There is also room for two NIVEA FOR MEN Cool Skin cartridges. The pouch will provide extra protection during travel.
Hanging cord
The shaver can also be stored by hanging it from the hanging cord supplied. Storing the shaver by means of the hanging cord ensures optimal drying conditions.
Replacement
Replace the shaving heads every two years for optimal shaving results.
Replace damaged or worn shaving heads with HQ177 Philips Cool Skin shaving heads only.
Shaving head check indication
After two years of use, the red shaving unit symbol will flash for 30 seconds during 7 shaves to indicate that you should check the condition of the shaving heads. This indication is based on an average shaving time of 3 minutes per shave. When the shaving head symbol flashes, all other symbols and lights are out. When the shaver is switched off, the shaving unit symbol disappears.
When the red shaving unit symbol starts flashing, you should check the shaving heads for possible damage. If the shaving heads are damaged in any way, they must be replaced in order to obtain optimal shaving results.
Replacing the shaving heads

1. Switch off the shaver.
2. Press the release button to open the shaving unit.
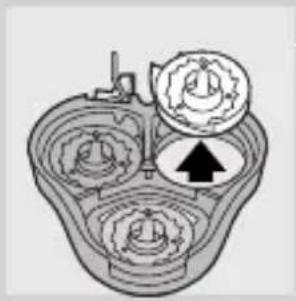
3. Turn the wheel anticlockwise (1) and remove the retaining frame (2).
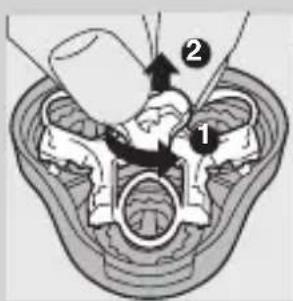
4. Remove the shaving heads and place new ones in the shaving unit.

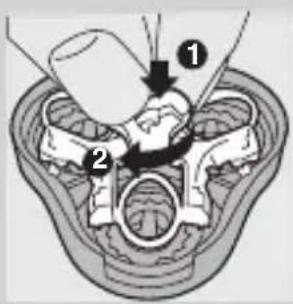
5. Put the retaining frame back into the shaving unit, press the wheel (1) and turn it clockwise (2).
Accessories
The following accessories are available:
- HQ8500/HQ8000 powerplug.
- HQ177 Philips Cool Skin shaving heads.
- HQ170 NIVEA FOR MEN Cool Skin Moisturising Shaving Lotion.
- HQ171 NIVEA FOR MEN Cool Skin Extra Fresh Shaving Gel.
Environment

- Do not throw away the appliance with the normal household waste at the end of its life, but hand it in at an official collection point for recycling. By doing this, you help to preserve the environment.
- The built-in rechargeable shaver battery contains substances that may pollute the environment. Always remove the battery before you discard and hand in the shaver at an official collection point. Dispose of the battery at an official collection point for batteries. If you have trouble removing the battery, you can also take the shaver to a Philips service centre. The staff of this centre will remove the battery for you and will dispose of it in an environmentally safe way.
Disposal of the battery
Only remove the battery if it is completely empty.

1 Let the shaver run until it stops, undo the screws and open the shaver. 2 Remove the battery.
Do not put the shaver back into the charging stand after the battery has been removed.
Guarantee & service
If you need information or if you have a problem, please visit the Philips website at www.philips.com or contact the Philips Customer Care Centre in your country (you find its phone number in the worldwide guarantee leaflet). If there is no Customer Care Centre in your country, go to your local Philips dealer or contact the Service Department of Philips Domestic Appliances and Personal Care BV.
Troubleshooting
1 The shaving heads do not move smoothly over the skin.
- Cause: not enough shaving gel/lotion has been applied.
Press the pump button a few times until sufficient NIVEA FOR MEN shaving gel/lotion has been released to allow the shaving heads to move smoothly over your face again.
2 Reduced shaving performance
- Cause 1: the shaving heads are dirty.
The shaver has not been cleaned immediately after use and/or has not been rinsed long enough and/or the water used to rinse the shaver was not hot enough.
Clean the shaver thoroughly before you continue shaving. See chapter ‘Cleaning and maintenance’.
- Cause 2: long hairs are obstructing the shaving heads.
Press the release button to open the shaving unit. Turn the wheel anticlockwise (1) and remove the retaining frame (2).
Clean the cutters and guards.
Do not clean more than one cutter and guard at a time, since they are all matching sets. If you accidentally mix up the cutters and guards, it may take several weeks before optimal shaving performance is restored.
Remove the hairs with the brush supplied.
Put the shaving heads back into the shaving unit. Put the retaining frame back into the shaving unit and turn the lock clockwise.
To prevent long hairs from obstructing the shaving heads, remove the shaving heads once a month and clean them with the brush supplied.
- Cause 3: the shaving heads are damaged or worn. Replace the shaving heads. See chapter 'Replacement'.
3 The shaver does not work when the on/off button is pressed.
- Cause 1: the battery is empty.
Recharge the battery. See chapter 'Charging'.
- Cause 2: dried-up shaving gel/lotion is blocking the shaving heads.
Clean the shaving heads thoroughly. See chapter 'Cleaning and maintenance'.
- Cause 3: the shaving heads are damaged. Replace the shaving heads. See chapter 'Replacement'.
4 The cover of the cartridge compartment cannot be closed
- Cause 1: the cartridge has not been inserted correctly.
Insert the cartridge correctly. It only fits properly into the shaver if the white side of the pump is pointing upwards.
- Cause 2: the cartridge has not been pushed far enough into the shaver.
Press the cartridge until it is properly seated.
5 The NIVEA FOR MEN shaving gel/lotion has changed colour or has turned watery.
- Cause: the NIVEA FOR MEN shaving gel/lotion has not been stored at the right temperature. Insert a new cartridge.
6 Skin irritation occurs
- Cause 1: your skin has not yet become accustomed to this shaving system.
Allow 2-3 weeks for your skin to get accustomed to this shaving system.
- Cause 2: the shaving gel/lotion irritates your skin. Try the other type of NIVEA FOR MEN cartridge.
Wet your face before shaving with the shaving gel/lotion.
If the irritation does not disappear within 24 hours, we advise you to stop using the shaving gel/lotion.

Battery low
Battery indicator while shaving
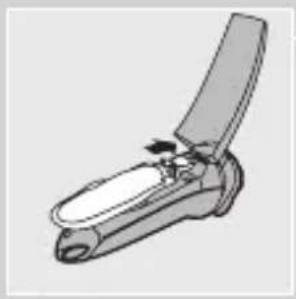
Storing the cartridge


Activating the travel lock


Charging stand
Lanyard
3 Turn the wheel counterclockwise (1) and remove the retaining frame (2).

Battery power low

Storing the cartridge



Shaving unit and beard trimmer: weekly
Shaving head replacement reminder
1 Switch off the shaver.


Battery low
When the battery is running low, the battery light below lights up red while shaving. When you switch off the shaver while the battery is almost empty, the battery light will blink red twice. This will happen four times with a pause in between. When you start charging the shaver while the battery is low, the battery light below will blink red for a maximum of 3 minutes.

Storing the cartridge
2 Press the yellow button on the pump to apply NIVEA FOR MEN shaving gel/lotion to your skin.
3 Tilt the trimmer slightly backwards.

4 Attach the trimmer to the shaver (you will hear a click). The trimmer is now ready for use. 5 Activate the trimmer by pressing the on/off button once.


Small pouch
- You can store the appliance in the supplied pouch. There is also space for two NIVEA FOR MEN Skin Cooling cartridges. The pouch provides extra protection while traveling.
Hanging cord
1 Switch off the shaver. 2 Press the release button to open the shaving unit.


Electromagnetic fields (EMF)
Battery low



Thai 90
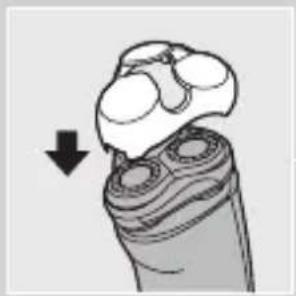

1 Switch off the shaver.
Charging
- Cause 1: The shaving head is dirty.

Charging pin.


Charging base
1 publicly may play to be a way, and you are going to play. 2 Remove the battery.
Battery low
Battery full
Store the refill
After that, the remaining battery level will be displayed for about 5 seconds.
Suitable for trimming sideburns and mustache.
Attach the sideburn trimmer
4 Slide the sideburn trimmer onto the shaver (you will hear a click). The sideburn trimmer is ready for use. 5 Press the on/off button to activate the sideburn trimmer.
Remove the sideburn trimmer
4 Rinse the outside of the shaving head.

Charging stand
Charging stand
- IMPORTANT
- ELECTROMAGNETIC FIELDS (EMF)
- THE DISPLAY
- LIVING LIGHT DISPLAY
- DEMONSTRATION PROGRAM
- INDICATIONS DURING USE
- CHARGING
- CHARGE INDICATIONS
- BATTERY RUNNING LOW
- BATTERY FULLY CHARGED
- BATTERY INDICATIONS DURING SHAVING
- CHARGING THE APPLIANCE
- CORDLESS SHAVING TIME
- CARTRIDGES
- INSERTING CARTRIDGES
- REPLACING CARTRIDGES
- STORING CARTRIDGES
- USING THE APPLIANCE
- SHAVING
- SWITCHING ON THE SHAVER
- SWITCHING OFF THE SHAVER
- TRIMMING
- ATTACHING THE TRIMMER
- REMOVING THE TRIMMER
- TRAVEL LOCK
- ACTIVATING THE TRAVEL LOCK
- DEACTIVATING THE TRAVEL LOCK
- CHECKING IF THE APPLIANCE IS LOCKED
- CLEANING AND MAINTENANCE
- CLEANING REMINDER
- CLEANING
- SHAVING UNIT: QUICK CLEAN AFTER EVERY SHAVE
- SHAVING UNIT AND HAIR CHAMBER: EVERY WEEK
- CHARGING STAND
- TRIMMER
- STORAGE
- POUCH
- HANGING CORD
- REPLACEMENT
- SHAVING HEAD CHECK INDICATION
- REPLACING THE SHAVING HEADS
- ACCESSORIES
- ENVIRONMENT
- DISPOSAL OF THE BATTERY
- GUARANTEE & SERVICE
- TROUBLESHOOTING
- THE COVER OF THE CARTRIDGE COMPARTMENT CANNOT BE CLOSED
- THE NIVEA FOR MEN SHAVING GEL/LOTION HAS CHANGED COLOUR OR HAS TURNED WATERY
- SKIN IRRITATION OCCURS
- BATTERY LOW
- BATTERY INDICATOR WHILE SHAVING
- STORING THE CARTRIDGE
- LANYARD
- BATTERY POWER LOW
- SHAVING UNIT AND BEARD TRIMMER: WEEKLY
- SHAVING HEAD REPLACEMENT REMINDER
- SMALL POUCH
- THAI
- CHARGING PIN
- CHARGING BASE
- BATTERY FULL
- STORE THE REFILL
- ATTACH THE SIDEBURN TRIMMER
- REMOVE THE SIDEBURN TRIMMER
Brand : PHILIPS
Model : HQ7780
Category : Razor