
MDR-RF880RK - Earphones SONY - Free user manual and instructions
Find the device manual for free MDR-RF880RK SONY in PDF.


| Product Type | Wireless RF Headphones |
| Brand | Sony |
| Model | MDR-RF880RK |
| Frequency Band | 900 MHz |
| Operating Range | Up to 100 m (330 ft) |
| Battery Type | Rechargeable Ni-MH |
| Battery Life | Approximately 20 hours |
| Charging Time | Approximately 15 hours |
| Driver Unit | 40 mm |
| Impedance | 32 Ω at 1 kHz |
| Sensitivity | 100 dB/mW |
| Frequency Response | 20 Hz – 20 kHz |
| Weight (Headphones) | Approx. 280 g (without battery) |
| Dimensions (Headphones) | Approx. 210 x 180 x 80 mm |
| Charging Base Dimensions | Approx. 150 x 110 x 60 mm |
| Included Accessories | Charging base, AC adapter, 3.5 mm audio cable, user manual |
| Color | Black with silver accents |
| Care Instructions | Clean with a soft, dry cloth. Do not use solvents. |
| Safety Warning | Do not disassemble. Keep away from water. |
Frequently Asked Questions - MDR-RF880RK SONY
User questions about MDR-RF880RK SONY
0 question about this device. Answer the ones you know or ask your own.
Ask a new question about this device
Download the instructions for your Earphones in PDF format for free! Find your manual MDR-RF880RK - SONY and take your electronic device back in hand. On this page are published all the documents necessary for the use of your device. MDR-RF880RK by SONY.
USER MANUAL MDR-RF880RK SONY
Wireless Stereo Headphone System
Operating Instructions
WARNING
To prevent fire or shock hazard, do not expose the unit to rain or moisture.
To prevent fire or shock hazard, do not place objects filled with liquids, such as vases, on the apparatus.
To avoid electrical shock, do not open the cabinet. Refer servicing to qualified personnel only.
Do not install the appliance in a confined space, such as a bookcase or built-in cabinet.
CE
Hereby, Sony Corp., declares that this equipment is in compliance with the essential requirements and other relevant provisions of Directive 1999/5/EC.
For details, please access the following URL: http://www.compliance.sony.de/

Disposal of Old Electrical & Electronic Equipment (Applicable in the European Union and other European countries with separate collection systems)
This symbol on the product or on its packaging indicates that this product shall not be
treated as household waste. Instead it shall be handed over to the applicable collection point for the recycling of electrical and electronic equipment. By ensuring this product is disposed of correctly, you will help prevent potential negative consequences for the environment and human health, which could otherwise be caused by inappropriate waste handling of this product. The recycling of materials will help to conserve natural resources. For more detailed information about recycling of this product, please contact your local city office, your household waste disposal service or the shop where you purchased the product.
Welcome!
Thank you for purchasing the Sony MDR-RF880RK Wireless Stereo Headphone System. Before operating the unit, please read this manual thoroughly and retain it for future reference.
Some features are:
- Wireless system that allows you to listen to a programme free from the restriction of a cord.
- High fidelity sound reproduction.
- A compact transmitter with an AC power adaptor (supplied) enables simple charging of the headphone batteries. Just by placing the headphones on the transmitter, headphone batteries can be charged.
- Auto power on/off function to automatically turn on the headphones when they are worn, and turns them off when they are taken off.
- Self-adjusting headband mechanism eliminating the need for headband adjustment.
- Single VOL control adjusts both the right and left volume of the headphones.
- Either rechargeable nickel-metal hydride batteries (supplied) or commercially available (size AAA) dry batteries can be used to power the headphones.
- Vibration function to vibrate the built-in vibration motor by detecting low frequency (approx. 100 Hz and lower) of audio signals.
- SRS headphone surround function* reproduces realistic surround sound through the headphones.
* is a trademark of SRS Labs Inc. SRS Headphone technology is incorporated under license from SRS Labs. Inc.
Notes on receiving performance
This system utilizes very high frequency signals in the 800 MHz band so the receiving performance may deteriorate due to the surroundings. The following examples illustrate conditions that may reduce the reception range or cause interference.
- Inside a building with walls containing steel beams.
- An area with many steel file cabinets, etc.
- An area with many electrical appliances capable of generating electromagnetic fields.
- The transmitter is placed on a metal instrument.
- An area facing a roadway.
- Noise or interfering signals exist in the surroundings due to radio transceivers in trucks, etc.
- Noise or interfering signals exist in the surroundings owing to wireless communication systems installed along roadways.
Table of contents
Getting started
Unpacking 4
Charging the supplied rechargeable batteries ....4
Setting up the transmitter 7
Operating the system
Listening to a programme ....9
The effective areas of the transmitter ..... 11
Replacing the ear pads ....11
Additional information
Precautions ......12
Troubleshooting 12
Specifications 14

Getting started
Unpacking
Check that you have the following items before using the headphones:
• The headphones MDR-RF880R (1)

• The transmitter TMR-RF850R (1)

- AC power adaptor (1)

- Unimatch plug adaptor (1) (stereo mini jack ↔ stereo phone plug)

- Connecting cord (1) (phono plugs ↔ stereo mini plug), 1 m (3.3 ft.)

• Rechargeable nickel-metal hydride batteries (2)

Charging the supplied rechargeable batteries
The supplied rechargeable nickel-metal hydride batteries are not charged from the first time you use them. Be sure to charge them before use. To charge the headphones, place them on the transmitter.
1 Press the button of the left housing to open the battery compartment lid.
The battery compartment lid comes off.

2 Insert the supplied rechargeable nickel-metal hydride batteries into the battery compartment, matching the ⊕ terminals on the batteries to the ⊕ marks in the compartment.
Do not use rechargeable batteries other than the supplied ones.

3 Close the battery compartment lid.

4 Connect the supplied AC power adaptor to the transmitter.
Transmitter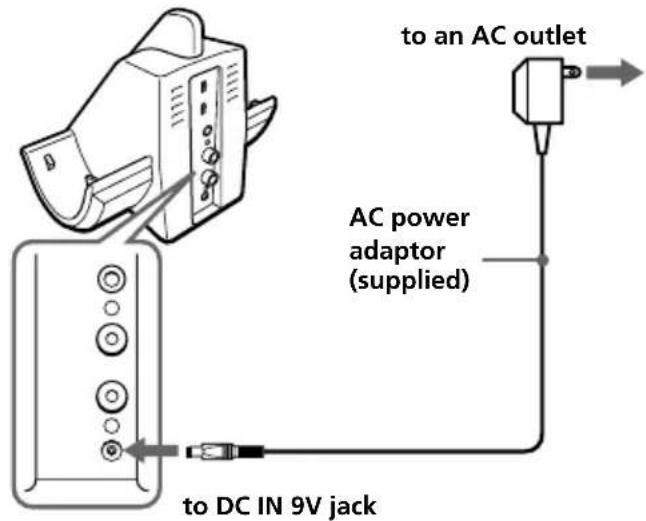
5 Rest the headphones on the transmitter so that the headphones' contact point meets the transmitter's contact pin while making sure that the charging indicator lights in green.
Charging is completed in about 16 hours and the charging indicator goes off.
When placing the headphones on the transmitter, be sure to hold them level with both hands and that the right and left housings are placed straight down on the transmitter, and then tilt them back as illustrated above.

When the indicator does not light in green
Check if the right and left headphones are rested on the transmitter correctly. The indicator will not light up if the headphones' contact point does not meet the transmitter's contact pin. Remove the headphones and replace them on the transmitter again so that the indicator lights in green.
To recharge the headphone battery after use
Place the headphones on the transmitter after use. Since the built-in timer recognizes when charging is complete, there is no need to remove the headphones from the transmitter after charging.
Notes
- The transmitter automatically turns off while charging the batteries.
- This system is designed to charge only the supplied rechargeable batteries type BP-HP550 for safety. Note that other types of rechargeable batteries cannot be charged with this system.
- If dry batteries are installed, they cannot be charged.
- Do not attempt to use the supplied BP-HP550 rechargeable batteries for other components. They are for use with this system only.
- Charge in an environmental temperature of between 0°C and 40°C (between 32°F and 104°F).
Charging and usage hours
| Approx. charging hours | Approx. usage time*1 |
| 1 hour | 50 minutes*3 |
| 16 hours*2 | 10 hours*3 |
*1 at 1 kHz, 1 mW+1 mW output when the VIBRATION switch is set to OFF
*2 hours required to fully charge empty batteries
*3 Time stated above may vary, depending on the temperature or conditions of use.
Using the headphones with dry batteries (sold separately)
Commercially available (size AAA) dry batteries can also be used to power the headphones. Install the batteries in the same manner as described in steps 1 through 3 of “Charging the supplied rechargeable batteries.”
When dry batteries are installed, the battery charge function is not activated.
Battery life
| Battery | Approx. hours*1 |
| Sony alkaline battery LR03/AM-4(N) | 17 hours*2 |
*1 at 1 kHz, 1 mW+1 mW output when the VIBRATION switch is set to OFF
*2 Time stated above may vary, depending on the temperature or conditions of use.
Notes on Batteries
- Do not charge a dry battery.
- Do not carry a dry battery together with coins or other metallic objects. It can generate heat if the positive and negative terminals of the battery accidentally come into contact with metallic objects.
- If you are not going to use the unit for a long time, remove the battery to avoid damage from battery leakage or corrosion.
Checking the remaining battery power
Pull up the self-adjusting band and check the power indicator located on the upper part of the right housing. The batteries are still serviceable when the indicator lights in red.
Charge the rechargeable batteries or install new dry batteries if the power indicator light dims, flashes, or the sound becomes distorted or noisy.
Note
The rechargeable nickel-metal hydride batteries should be replaced with new ones when they last only half the expected time after a proper recharging. The rechargeable batteries type BP-HP550 are not commercially available. You can order the batteries from the store where you purchased this system, or at your nearest Sony dealer.
Setting up the transmitter
1 Connect the transmitter to audio/video equipment.
Select one of the hookups below depending on the jack type:
Ⓐ To connect to a headphones jack![graph TD A["Transmitter"] --> B["Left channel (white)"] A --> C["Right channel (red)"] B --> D["Connecting cord (supplied)"] C --> D D --> E["Unimatch plug adaptor (supplied)"] D --> F["to headphones jack (stereo mini jack)"] E --> G["to headphones jack (stereo phone jack)"] F --> H["WALKMAN*, TV, V…](/content/2026/06/1304873/images/f15ae20246638f574005189f2607f80c17b5fcc8f047b31fe927e9d953819b47.jpg)
* WALKMAN is a registered trademark of Sony Corporation to represent Headphone Stereo products.
⑧ To connect to LINE OUT or REC OUT jacks
© To connect to TV, etc.
If noise occurs when the transmitter is connected to your TV or VCR, set the NOISE FILTER switch to ON.
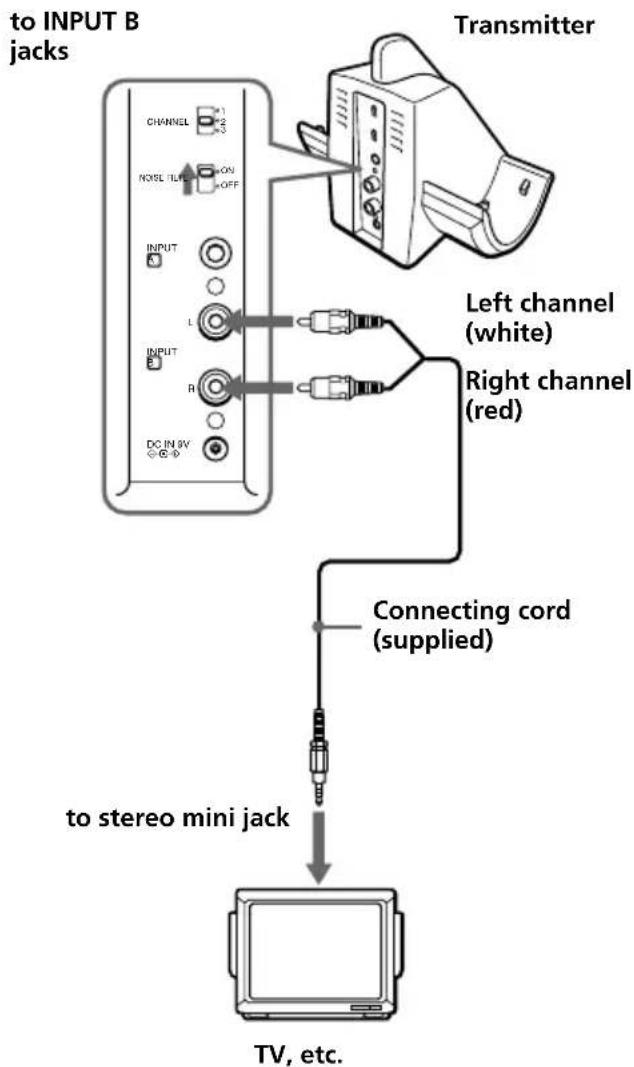
Notes
- If you connect the transmitter to LINE OUT or REC OUT jacks of an audio reproducer such as an MD player or CD player, do not set the NOISE FILTER switch to ON. Otherwise, volume will be limited.
- The NOISE FILTER switch is active only in the case of the connection shown in diagram A on page 7 and C. In diagram B, the switch has no effect.
- When the transmitter is placed on or near a TV, it may pick up a noise. In such case, place the transmitter away from the TV.
2 Connect the supplied AC power adaptor to the transmitter.

Notes
- Do not connect to the INPUT A jack and INPUT B jack at the same time. If you connect two audio/visual components to both jacks at the same time, both of the audio signals may result in mixed output.
- Use only the supplied AC power adaptor. Do not use any other AC power adaptor.

Polarity of the plug
- If the connected equipment has the AVLS (Automatic Volume Limiter System) function, be sure to turn the function off when using the transmitter. Otherwise, you will have to turn up the volume of the headphones, and that may cause noise.
- When you connect the connecting cord directly to an earphone jack (monaural mini jack), the audio signal may not be output through the right channel. In such a case, use the separately sold PC-236MS plug adaptor (stereo mini jack ↔ monaural mini plug) between the connecting cord and the earphone jack.
▶ Operating the system
Listening to a programme
Before listening
To prevent your ears from being damaged, first lower the volume.
1 Turn on the audio/video equipment connected to the transmitter.
If the transmitter is connected to the headphone jack, set the volume control of the audio source equipment as high as possible but not so high that the audio signal becomes distorted.
2 Remove the headphones from the transmitter.
The transmitter's power indicator will light in red.

3 Select the radio frequency with the CHANNEL selector switch.

4 Put on the headphones.
The power indicator on the upper part of the right housing glows red. Be sure to put the right housing (R) on your right ear and the left housing (L) on your left ear. Wear the headphones vertically on your head so that auto power on function is properly activated.

5 Turn up the volume to a moderate level with the VOL control.
Press the TUNE button briefly for automatic tuning of the headphones. If you do not receive a clear audio signal, press it again.

Follow steps 3 and 5 above until the receiving performance becomes better.
Sending RF signals from the transmitter
The transmitter starts sending RF signals automatically when it detects an audio signal from the equipment connected.
If it does not detect an audio signal for more than about four minutes, the transmitter will stop sending RF signals, and the power indicator will turn off.
When the transmitter receives an audio signal again, it starts sending the RF signals, and the power indicator will light in red again.
If the audio signal is very weak, the transmitter does not send RF signals. If the transmitter is connected to a headphone jack, make sure the volume of the equipment connected is set to 5 – 6 or higher.
You may not hear the beginning of the sound from the headphones until the transmitter starts sending the RF signals after detecting an audio signal.
The headphones automatically turn off when they are taken off.
— Auto power on/off function
Do not pull up the self-adjusting band when not in use, as this will consume the battery power.

Notes
- If hiss is heard, move closer to the transmitter.
- You may hear some noise when you disconnect the AC power adaptor from the transmitter before taking off the headphones.
Using the vibration function
Set the VIBRATION switch to ON and adjust the level of vibration using the vibration volume. You can enjoy powerful bass sound when you listen to movies or games through the headphones.

Using SRS surround function
Set the switch to ON to reproduce a wide surround sound field through the headphones.

The effective areas of the transmitter
The optimum distance is up to approximately 100 m (328.1 ft.) without the system picking up some interference. However, the distance may vary according to the surroundings and environment. If the system picks up some noise while using it within the above mentioned distance, reduce the distance between the transmitter unit and the headphones, or select another channel.
Notes
- When you use the headphones inside the effective areas of the transmitter, the transmitter can be placed in any direction from the listener.
- Even within the signal reception area, there are some spots (dead spots) where the RF signal cannot be received. This characteristic is inherent to RF signals and does not indicate malfunction. By slightly moving the transmitter, the location of the dead spot can be changed.
Replacing the ear pads
The ear pads are replaceable. If the ear pads become dirty or worn out, replace them as illustrated below.
The ear pad is not commercially available. You can order replacements from the store where you purchased this system, or at your nearest Sony dealer.
1. Remove the old ear pad by pulling it out of the groove on the housing.
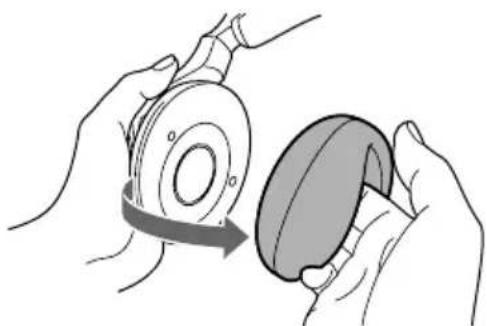
2. Place the new ear pad on the driver unit and insert the edge of the pad into the groove as illustrated.

Make sure that the entire edge of the ear pad is securely inserted into the groove.

Additional information
Precautions
- When the transmitter is not to be used for a long period of time, disconnect the AC power adaptor from the AC outlet holding the plug and remove the batteries to avoid damage caused by battery leakage and subsequent corrosion.
- Do not leave the wireless stereo headphones system in a location subject to direct sunlight, heat, or moisture (It is recommended to use the headphones at a temperature of between 5°C and 35°C (between 41°F and 95°F).)
- Do not drop, hit, or otherwise subject the transmitter or headphones to strong shocks of any kind. This could damage the product.
Notes on headphones
Preventing hearing damage
Avoid using headphones at high volume. Hearing experts advise against continuous, loud and extended play. If you experience a ringing in your ears, reduce the volume or discontinue use.
Caring for others
Keep the volume at a moderate level. This will allow you to hear outside sounds and to be considerate to the people around you.
If you have any questions or problems concerning the system that are not covered in this manual, please consult the nearest Sony dealer.
Be sure to bring the headphones and the transmitter to the Sony dealer when requiring repair work.
Troubleshooting
| Problem | Solution |
| No sound/Muffled sound | Turn on the transmitter first, and then put on the headphones. |
| Check the connection of the audio/video equipment or the AC power adaptor. | |
| Check that the audio/video equipment connected to the transmitter is turned on. | |
| If the transmitter is connected to the headphones jack, raise the volume of the audio/video equipment connected to the transmitter. | |
| Change the radio frequency with the CHANNEL selector on the transmitter, then press the TUNE button again. | |
| The mute function is activated. Use the headphones near the transmitter. | |
| The headphones' power indicator light dims, flashes or goes off.• Charge the rechargeable batteries if the headphones' batteries are weak, or replace dry batteries with new ones. If the power indicator is still off after charging the batteries, take the headphones to a Sony dealer. | |
| If you connect the transmitter to the LINE OUT or REC OUT jacks of an audio reproducer, make sure that the NOISE FILTER switch is set to OFF. | |
| Make sure that the NOISE FILTER switch is set to either ON or OFF (If the switch gets stuck between ON and OFF, the sound will be cut off). | |
| Distortion | If the transmitter is connected to the headphones jack, lower the volume of the audio/video equipment connected to the transmitter. |
| Change the radio frequency with the CHANNEL selector on the transmitter. | |
| The headphones' power indicator light dims, flashes or goes off.• Charge the rechargeable batteries if the headphones' batteries are weak, or replace dry batteries with new ones. If the power indicator is still off after charging the batteries, take the headphones to a Sony dealer. | |
| If you connect the transmitter to the LINE OUT or REC OUT jacks of an audio reproducer, make sure that the NOISE FILTER switch is set to OFF. | |
| Loud background noise | If the vibration switch is ON, you may hear vibration noise. This is not a malfunction. |
| Move closer to the transmitter. As you move away from the transmitter, more noise is likely to be heard. | |
| If the transmitter is connected to the headphones jack, raise the volume of the audio/video equipment connected to the transmitter. | |
| Change the radio frequency with the CHANNEL selector on the transmitter, then press the TUNE button again. | |
| The headphones' power indicator light dims, flashes or goes off.• Charge the rechargeable batteries if the headphones' batteries are weak, or replace dry batteries with new ones. If the power indicator is still off after charging the batteries, take the headphones to a Sony dealer. | |
| If you connect the transmitter to the LINE OUT or REC OUT jacks of an audio reproducer, make sure that the NOISE FILTER switch is set to OFF. |
| Problem | Solution |
| The batteries cannot be charged | Check if the charging indicator light is green. If not, put the headphones on the transmitter correctly so that the charging indicator light is green. |
| Dry batteries are installed. • Install the supplied rechargeable nickel-metal hydride batteries. | |
| Rechargeable batteries other than the supplied are installed. • Install the supplied rechargeable nickel-metal hydride batteries. |
Specifications
General
Carrier frequency
863.5 - 864.5 MHz
Channel Ch1, Ch2, Ch3
Modulation FM stereo
Frequency response
18 - 22,000 Hz
Transmitter TMR-RF850R
Power source DC 9 V: supplied AC power adaptor
Audio input phono jacks/stereo mini jack
Dimensions Approx. 133 × 124 × 136 mm
(5 1/4 × 5 × 5 3/8 in.)
(w/h/d)
Mass Approx. 195 g (7 oz.)
Headphones MDR-RF880R
Power source Supplied rechargeable nickel-metal hydride batteries BP-HP550 or commercially available (size AAA) dry batteries
Mass Approx. 285 g (11 oz.) incl. batteries
Supplied accessories
AC power adaptor (1)
Connecting cord (approx. 1m, stereo mini plug × 1 ↔ phono plug × 2) (1)
Rechargeable nickel-metal hydride batteries BP-HP550 (550 mAh) (2)
Unimatch plug adaptor (stereo mini jack ↔ stereo phone plug) (1)
Operating instructions (1)
Optional accessories
- If sound is not output through the right channel when the supplied connecting cord is connected to the earphone jack.
Plug adaptor PC-236MS
- If you have lost the supplied plug adaptor. Plug adaptor PC-234S
(stereo mini jack ↔ stereo phone plug)
- If you have lost the supplied connecting cord.
RK-G129
(1.5 m (4.9 ft.), stereo mini plug ↔ phono plug × 2)
Design and specifications are subject to change without notice.


- WIRELESS STEREO HEADPHONE SYSTEM
- WARNING
- CE
- DISPOSAL OF OLD ELECTRICAL & ELECTRONIC EQUIPMENT (APPLICABLE IN THE EUROPEAN UNION AND OTHER EUROPEAN COUNTRIES WITH SEPARATE COLLECTION SYSTEMS)
- WELCOME
- NOTES ON RECEIVING PERFORMANCE
- TABLE OF CONTENTS
- GETTING STARTED
- OPERATING THE SYSTEM
- ADDITIONAL INFORMATION
- UNPACKING
- CHARGING THE SUPPLIED RECHARGEABLE BATTERIES
- CLOSE THE BATTERY COMPARTMENT LID
- CONNECT THE SUPPLIED AC POWER ADAPTOR TO THE TRANSMITTER
- REST THE HEADPHONES ON THE TRANSMITTER SO THAT THE HEADPHONES' CONTACT POINT MEETS THE TRANSMITTER'S CONTACT PIN WHILE MAKING SURE THAT THE CHARGING INDICATOR LIGHTS IN GREEN
- WHEN THE INDICATOR DOES NOT LIGHT IN GREEN
- TO RECHARGE THE HEADPHONE BATTERY AFTER USE
- NOTES
- USING THE HEADPHONES WITH DRY BATTERIES (SOLD SEPARATELY)
- NOTES ON BATTERIES
- CHECKING THE REMAINING BATTERY POWER
- NOTE
- SETTING UP THE TRANSMITTER
- CONNECT THE TRANSMITTER TO AUDIO/VIDEO EQUIPMENT
- POLARITY OF THE PLUG
- LISTENING TO A PROGRAMME
- BEFORE LISTENING
- TURN ON THE AUDIO/VIDEO EQUIPMENT CONNECTED TO THE TRANSMITTER
- REMOVE THE HEADPHONES FROM THE TRANSMITTER
- SELECT THE RADIO FREQUENCY WITH THE CHANNEL SELECTOR SWITCH
- PUT ON THE HEADPHONES
- TURN UP THE VOLUME TO A MODERATE LEVEL WITH THE VOL CONTROL
- SENDING RF SIGNALS FROM THE TRANSMITTER
- THE HEADPHONES AUTOMATICALLY TURN OFF WHEN THEY ARE TAKEN OFF
- AUTO POWER ON/OFF FUNCTION
- USING THE VIBRATION FUNCTION
- USING SRS SURROUND FUNCTION
- THE EFFECTIVE AREAS OF THE TRANSMITTER
- REPLACING THE EAR PADS
- PRECAUTIONS
- NOTES ON HEADPHONES
- PREVENTING HEARING DAMAGE
- CARING FOR OTHERS
- TROUBLESHOOTING
- SPECIFICATIONS
- GENERAL
- TRANSMITTER TMR-RF850R
- HEADPHONES MDR-RF880R
- SUPPLIED ACCESSORIES
- OPTIONAL ACCESSORIES
Brand : SONY
Model : MDR-RF880RK
Category : Earphones