
Z 06439 - Vacuum Cleaner Cleanmaxx - Free user manual and instructions
Find the device manual for free Z 06439 Cleanmaxx in PDF.


| Product type | Canister vacuum cleaner |
| Brand | Cleanmaxx |
| Model | Z 06439 |
| Dimensions (L x W x H) | 40 x 25 x 25 cm |
| Weight | 5 kg |
| Power supply | 220-240 V ~ 50/60 Hz |
| Nominal power | 700 W |
| Dust container capacity | 2 L |
| Filter type | Washable HEPA |
| Operating radius | 8 m (5 m cable + 3 m hose) |
| Noise level | 75 dB(A) |
| Main functions | Vacuuming hard floors and carpets, electronic power adjustment, fill indicator |
| Included accessories | Floor nozzle, crevice tool, upholstery brush, fabric nozzle |
| Maintenance and cleaning | Empty container after each use, wash filter monthly, replace filter every 6 months |
| Safety | Automatic shut-off in case of overheating, motor protection |
| Spare parts and repairability | Filters and bags available separately, repair possible by a professional |
| General information | Domestic use, 2-year warranty |
Frequently Asked Questions - Z 06439 Cleanmaxx
User questions about Z 06439 Cleanmaxx
0 question about this device. Answer the ones you know or ask your own.
Ask a new question about this device
Download the instructions for your Vacuum Cleaner in PDF format for free! Find your manual Z 06439 - Cleanmaxx and take your electronic device back in hand. On this page are published all the documents necessary for the use of your device. Z 06439 by Cleanmaxx.
USER MANUAL Z 06439 Cleanmaxx
natural_image
Exterior view of a modern vacuum cleaner (no text or symbols visible)Z 06439
DE
Gebrauchsanleitung
ab Seite 3
EN
Instruction manual
starting on page 14
FR
Mode d'emploi
www.service-shopping.de
natural_image
Close-up of a kitchen blender with labeled parts A and B (no text or symbols on the device itself)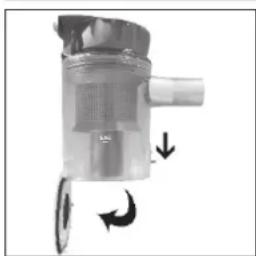
natural_image
Close-up of a mechanical device with directional arrows indicating motion or flow (no text or symbols)natural_image
Close-up of a kitchen blender with labeled parts A and B (no text or symbols on the device itself)natural_image
Close-up of a plastic filter or drain component with an arrow indicating upward motion (no text or symbols visible)natural_image
Close-up of a mechanical component with an arrow indicating a specific part (no visible text or symbols)Safety Instructions 15
Items Supplied 17
Device Overview 18
Before Initial Use 19
Attaching and Detaching Accessories 19
Use 20
Cleaning and Storing the Device 21
Troubleshooting 22
Technical Data 23
Disposal 23
Explanation Symbols
of

Safety instructions:
Please read these carefully and comply with them in order to prevent personal injury and damage to property.

Supplementary information
Dear Customer,
We are delighted that you have chosen this handheld vacuum cleaner.
Before using the device for the first time, please read the instructions through carefully and keep them for future reference. If the device is given to someone else, these instructions should also be handed over with it.
The manufacturer and importer do not accept any liability if the information in these instructions is not complied with.
If you have any questions about the device and about spare parts/accessories, contact the customer service department via our website:
www.service-shopping.de
Intended Use
- This device is only intended to be used for dry cleaning indoors.
- The device is for personal use only and is not intended for commercial applications.
- This device may be used by children aged 8 and over and by people with reduced physical, sensory or mental abilities or a lack of experience and/or knowledge if they are supervised or have received instruction on how to use the device safely and have understood the dangers resulting from this. Children may not play with the device. Cleaning and user maintenance may not be carried out by children.
15 EN
• Children younger than 8 years of age and animals must be kept away from the device and the connecting cable!
- Use the device only as described in the instructions. Any other use is deemed to be improper.
- The following are excluded from the warranty: all defects caused by improper handling, damage or unauthorised attempts at repair. This also applies to normal wear and tear.
Safety Instructions

Incorrect Use
- On no account should the device be used to suck up the following:
–Liquids or wet substances (e.g. wet carpet shampoo)
-Glowing ash, cigarettes, matches, etc.
– Inflammable or explosive substances
– Very fine dust (e.g. concrete dust), ash or toner
-Pointed, hard objects such as large pieces of broken glass

Dangers of Injury
- Keep children and animals away from the packaging film. There is a danger of suffocation!
- Keep hair, jewellery, wide clothing, fingers and all other body parts away from the nozzle of the device.
- Please take particular care when cleaning stairs so that you do not stumble and fall.
• Make sure you wear closed shoes when using this device! - Never hold the nozzle close to parts of your body or animals during use. They could become stuck to the device. Should the vacuum cleaner become stuck, switch the device off immediately.
- The device should be used and stored out of the reach of children and animals. Improper use can lead to injuries and electric shock. The mains cable must also be kept out of the reach of children and animals.

Proper Connection
- Only ever connect the device to a properly installed plug socket. The plug socket must also be readily accessible after connection. The mains voltage must match the technical data for the device (see the "Technical Data" chapter). Only use suitable extension cables whose technical data is the same as that of the device.
- Make sure that the connected mains cable does not present a trip hazard.
- Position the cable in such a way that it does not become squashed or bent and does not come into contact with hot surfaces.

Proper Use
- Use the device only in closed rooms. Do not operate it outdoors or in rooms with high humidity.
- If you wish to use the device as a handheld vacuum cleaner for cleaning a car, make sure that the device is not exposed to rain or moisture.
- Always check the device for damage before putting it into operation. If the device, cable and/or mains plug shows visible signs of damage, the device must not be used. Do not try to repair the device yourself or to replace any individual parts. In the event of any damage, contact our customer service department.
- Do not use the device if it has malfunctioned, sucked up liquids or objects or been dropped. Have the device checked by a specialist or contact the customer service department.
- The device should only be used when it is fully and correctly assembled. The dust container and filters must be inserted.
- Do not immerse the device, the cable or the plug in water or other liquids in order to avoid electric shocks.
- Never touch the device, the cable or the plug with wet hands.
- Do not expose the device to extreme temperatures, wide temperature fluctuations, open fire, direct sunlight, moisture or wet conditions.
- Do not drop the device or allow it to be knocked violently.
17 EN
- Do not suck up any liquids and do not pour any liquids into the dust container.
- Do not insert anything into the openings/nozzles of the device and make sure that these do not become clogged.
- Never leave the device unattended when it is switched on or connected to the mains.
- Switch the device off immediately and pull the mains plug from the mains socket
-if you stop working with the device for a period of time,
—when the device is not in use,
—before you change the nozzles and other accessories,
-if a fault or error occurs while the device is in operation,
– if liquids or foreign bodies have found their way into the device,
—before a thunderstorm,
—before you clean parts of the device and accessories.
- The device must be switched off when inserting or removing the mains plug.
- Always pull on the plug and never the cable to pull the mains plug out of the mains socket!
- Never carry the device by the cable. Use the handle to carry the device.
- Empty the dust container after each use. The filters must also be regularly cleaned in order to prevent overloading of the motor.
- The dust container and filters must be completely dry before you insert them again and use or store away the device.
- Store the device in a dry place that is not accessible to children and animals when it is not being used.
- Use only original manufacturer's accessories.
Items Supplied
- Handheld Vacuum Cleaner
• 2 extension suction tubes - 1 floor nozzle
- 1 crevice nozzle
- 1 brush nozzle
• 8-piece small accessory set - 1 Nozzle adapter
EN 18
Device Overview

1 Release button for dust container
2 On/Off switch
3 Handle
4 Bottom flap of dust container
5 Catch for bottom flap of dust container
6 Plastic filter (in the dust container)
7 Large upholstery brush nozzle
8 Nozzle adapter
9 Suction opening
10 Dust container lid
Accessories
- Floor nozzle: You can use the floor nozzle to use the handheld vacuum cleaner like a floor vacuum cleaner. The floor nozzle is suitable for both carpets and hard floors. Thanks to the flat design, even inaccessible places such as under the sofa, under radiators, etc. can be reached.
- Large crevice nozzle: The crevice nozzle is suitable for cleaning all nooks and crannies that cannot be reached with the other nozzles (e.g. between upholstery).
- Large upholstery brush nozzle: Use the brush nozzle for cleaning all uneven objects, furniture, lamps, profiles and skirting boards, window ledges, etc.
- Nozzle adapter and 8-piece accessory set:
19 EN

1 Nozzle adapter (is always plugged onto the suction opening first!)
2 Small round brush
3 Small long brush
4 Adapter for the 8 accessory nozzles (is plugged onto the nozzle adapter!)
5 Small suction tube (2x)
6 Narrow suction tube
7 Small crevice nozzle
8 Small angled nozzle
Before Initial Use

CAUTION!
- Keep children and animals away from the packaging material. There is a danger of suffocation!
- Unpack all parts and check the items supplied to make sure they are complete (see the "Items Supplied" chapter); also check for transport damage. If you find any damage to the components, do not use them (!), but contact our customer service department.
- Please note: Possible dirt residues in the dust container are attributable to the fact that this device is tested prior to delivery and do not represent any defect with the device!
Attaching and Detaching Accessories

CAUTION!
- Before you attach or detach any accessories, ensure that the device is not connected to the mains power.
- The nozzle adapter (1) (see the "Items Supplied" chapter, "Accessories" section, "Nozzle adapter and 8-piece accessory set" point) is always plugged onto the suction opening first, regardless of whether you are using one of the three large nozzles (or the extension suction tubes) or the small accessory nozzles! For the small accessory nozzles, the accessory nozzle adapter (4) is also plugged onto the nozzle adapter (1)!
Attaching/Detaching the Floor Nozzle, Brush Nozzle and Crevice Nozzle
- Plug the nozzle adapter onto the suction opening.
EN 20
- If you wish, plug the extension suction tubes onto the nozzle adapter.
- Plug the floor nozzle or the brush nozzle or the crevice nozzle onto the extension suction tube.

The nozzles can also be plugged directly onto the adapter without placing the extension suction tubes in between.
- When you want to detach the nozzles, simply pull them off the adapter or the extension suction tubes.
Attaching/Detaching the 8-Piece Accessory Set
- Plug the nozzle adapter onto the suction opening.
- Plug the accessory nozzle adapter onto the nozzle adapter.
- Select an accessory nozzle and plug it onto the accessory nozzle adapter.
- When you want to detach the accessory nozzles, simply pull them off the accessory nozzle adapter.
Use

CAUTION!
- The openings on the device must not be blocked to ensure that the motor does not overheat or suffer damage.
- Never hold the nozzles close to parts of your body or animals during use and do not place your hands inside the nozzles. They could become stuck to the device / injured. Should the vacuum cleaner become stuck, switch the device off immediately.
- Switch on the vacuum cleaner only when you have checked that all the parts have been fully attached and that the dust container and the filters are correctly inserted.
- Always switch the device off first and pull the mains plug from the mains socket before you replace the nozzles and any other accessories!
- On no account should the device be used to suck up the following:
–Liquids or wet substances (e.g. wet carpet shampoo)
-Glowing ash, cigarette ends, matches, etc.
- Inflammable or explosive substances
– Very fine dust (e.g. concrete dust), ash or toner
-Pointed, hard objects such as large pieces of broken glass
- Select a nozzle and attach it in the manner described in the "Attaching and Detaching Accessories" chapter.
- Unwind the mains cable to its full length and insert the mains plug into a properly installed mains socket that is easily accessible.
- Move the On/Off switch to the 1 position to switch on the vacuum cleaner.
- Guide the nozzle over the surface to be cleaned.
- After you have finished vacuuming, move the On/Off switch to 0 and pull the mains plug out of the plug socket.
- To ensure optimum performance of the device, you should empty the dust container and clean the filter (see the next "Cleaning and Storing the Device" chapter) after every use.

21 EN
Cleaning and Storing the Device

CAUTION!
• Always remove the mains plug from the plug socket before removing the dust container.
- Never immerse the motor housing in water or other liquids.
- Do not use any sharp or abrasive cleaning agents or cleaning pads to clean the device. These could damage the surfaces.
Emptying the Dust Container
The dust container should be emptied at regular intervals to maintain good suction force. You can look through the transparent housing to see how much dirt has accumulated inside.

natural_image
Close-up of a kitchen blender with labeled parts A and B (no text or symbols on the device itself)
natural_image
Close-up of a mechanical device with directional arrows indicating motion or force (no text or symbols)Cleaning the Filter

natural_image
Close-up of a mechanical device with labeled parts A and B (no text or symbols beyond labels)- Press down the release button for the dust container (A) and tip the dust container slightly forwards (B) to release it. Then remove the dust container upwards.
- Hold the dust container over a dustbin or similar outlet. Pull the catch for the bottom of the dust container downwards. The bottom of the dust container will flip open.
- Then flip the bottom of the dust container shut again until the catch correctly locks in place.
-
Insert the dust container back into the motor unit by first hooking the bottom part of the dust container onto the motor unit and then pressing it against the motor unit until the release button for the dust container engages.
-
Press down the release button for the dust container and tip it slightly forwards to release the dust container. Then remove it upwards.
-
Turn the dust container lid anticlockwise until you can pull it off.

natural_image
3D rendering of a mechanical component with an arrow indicating upward motion (no text or symbols)- Remove the fabric filter and tap it out or brush it down using a soft brush if necessary.

CAUTION! Under no circumstances should you rinse the fabric filter with water! The filter must not become wet or be immersed in liquids!
- Pull the catch for the bottom of the dust container downwards to open the dust container in the manner described in the "Emptying the Dust Container" section.
EN 22

natural_image
Mechanical component diagram showing a valve or pump assembly with an arrow indicating direction (no text or symbols present)- Reach into the dust container and press out the plastic dust fi Iter upwards.
- Rinse the dust container and the plastic dust filter as required with clear, hot water.

CAUTION! Never wash the dust container and the plastic dust fi liter in the dishwasher or in the washing machine!
- Allow the dust container and the plastic dust filter to dry fully in the air.

CAUTION! Under no circumstances should you use a hair dryer to dry the dust container or the plastic dust fi liter. Never reinsert the container and the fi liter if they are still damp!
-
When all parts are fully dry, insert the plastic dust filter back into the dust container.
-
Place the fabric filter back onto the plastic dust filter.
-
Place the dust container lid back onto the dust container and turn it tight.
-
Insert the dust container back into the motor unit by first hooking the bottom part of the dust container onto the motor unit and then pressing it against the motor unit until the release button for the dust container engages.
-
When all parts are fully dry, insert the plastic dust filter back into the dust container.
- Place the fabric filter back onto the plastic dust filter.
- Place the dust container lid back onto the dust container and turn it tight.
- Insert the dust container back into the motor unit by first hooking the bottom part of the dust container onto the motor unit and then pressing it against the motor unit until the release button for the dust container engages.
Cleaning the Housing, Nozzles and Extension Suction Tubes
- Clean the housing, the nozzles and the extension suction tubes if necessary using a damp, soft cloth. Dry them with a soft cloth.
- Remove hair and fluff from the nozzles at regular intervals.
Storage
Store the vacuum cleaner in a cool, dry place out of the reach of children and animals.
Troubleshooting
Should your device stop working properly at any time, exhibit signs of damage or require a spare part, please contact the customer service department. For your own safety, do not attempt to carry out repairs yourself. The following table contains tips on how you can remedy small problems yourself.
| Problem Possible cause/solution/tips | |
| The device does not work. | Is the plug not inserted in the mains socket correctly?Insert the plug correctly.Is the plug socket defective? Try another plug socket.Check the fuse of your mains connection. |
| The performance is weak. | Is the dust container too full? Empty the container.Are the dust fi Iters heavily clogged? Clean them.Are the nozzles blocked? Clean the nozzles. |
23 EN
| Problem Possible | cause/solution/tips |
| Dust escapes from the device during cleaning. | Is the dust container full? Empty the dust container.Are the dust filters not inserted correctly? Make sure that the plastic dust filter is fitted correctly in the dust container and the fabric filter is placed correctly on the plastic dust filter. |
| Unpleasant smell is detected. | Is the device being used for the first time? A smell often develops when new devices are first used. The smell should disappear after you have used the device several times. |
Technical Data
Model: GW906-S60
Article number: Z 06439
Voltage supply: 220-240 V \~ 50 Hz
Power: max. 600 W
Protection class: II, IP20
CE
Customer Service / Importer:
(Calls to German landlines are subject to charges. The cost varies depending on the service provider.)
Disposal

The packaging material is recyclable. Please dispose of it in an environmentally friendly manner and take it to a recycling centre.

Dispose of the device in an environmentally friendly manner. It should not be disposed of alongside general household waste. Dispose of it at a recycling centre for used electrical and electronic devices.
You can obtain more information from your local authorities.
All rights reserved.
Contenu
www.service-shopping.de
natural_image
Close-up of a handheld vacuum cleaner with labeled parts A and B (no text or symbols beyond labels)natural_image
Close-up of a mechanical component with directional arrows indicating motion or flow (no text or symbols)natural_image
Close-up of a mechanical device with labeled parts A and B, showing internal components (no text or symbols beyond labels)natural_image
Close-up of a transparent cylindrical device with a handle and internal components, no visible text or symbols.
natural_image
Close-up of a mechanical valve component with an arrow indicating a force or movement (no text or symbols visible)www.service-shopping.de
Doelmatig gebruik
natural_image
Close-up of a mechanical device with labeled parts A and B, showing internal components without any readable text or symbols.
natural_image
Close-up of a mechanical component with directional arrows indicating motion or flow (no text or symbols)natural_image
Close-up of a portable blender with labeled parts A and B (no text or symbols on the device itself)natural_image
3D rendering of a mechanical component with an arrow indicating upward motion (no text or symbols)natural_image
Close-up of a mechanical component with a black arrow pointing to a specific part (no visible text or symbols)


- Explanation Symbols
- of
- Intended Use
- EN
- Safety Instructions
- Incorrect Use
- Dangers of Injury
- Proper Connection
- Proper Use
- EN
- Items Supplied
- EN 18
- Accessories
- EN
- Before Initial Use
- CAUTION!
- Attaching and Detaching Accessories
- Attaching/Detaching the Floor Nozzle, Brush Nozzle and Crevice Nozzle
- EN 20
- Attaching/Detaching the 8-Piece Accessory Set
- Use
- EN
- Cleaning and Storing the Device
- Emptying the Dust Container
- EN 22
- Cleaning the Housing, Nozzles and Extension Suction Tubes
- Storage
- Troubleshooting
- EN
- Technical Data
- Customer Service / Importer:
- Disposal
- Contenu
- Doelmatig gebruik
Brand : Cleanmaxx
Model : Z 06439
Category : Vacuum Cleaner