
PCD615DEU - Cooker BOSCH - Free user manual and instructions
Find the device manual for free PCD615DEU BOSCH in PDF.


| Product type | Built-in cooktop |
| Brand | Bosch |
| Model | PCD615DEU |
| Dimensions (W x D x H) | approx. 60 x 51 x 5 cm |
| Net weight | Approx. 10 kg |
| Power supply | 230 V, 50 Hz, 7.2 kW |
| Number of cooking zones | 4 zones including one with booster |
| Cooking type | Induction |
| Main functions | PowerBoost, automatic shut-off, child lock, pan detection |
| Cleaning and maintenance | Clean with a soft cloth and a little vinegar or special ceramic glass cleaner |
| Safety | Child lock, automatic shut-off, residual heat indicator |
| Repairability index | 8.1/10 |
| Availability of spare parts | At least 15 years after purchase |
| General information | User manual in PDF format available in 20 languages |
Frequently Asked Questions - PCD615DEU BOSCH
User questions about PCD615DEU BOSCH
0 question about this device. Answer the ones you know or ask your own.
Ask a new question about this device
Download the instructions for your Cooker in PDF format for free! Find your manual PCD615DEU - BOSCH and take your electronic device back in hand. On this page are published all the documents necessary for the use of your device. PCD615DEU by BOSCH.
USER MANUAL PCD615DEU BOSCH

Operating instructions de Gebrauchsanweisung fr Mode d'emploi it Awertenze per l'uso es Instrucciones de funcionamiento pt Manual de utilização nl Gebruiksaanwijzing tr Kullanma Kilavuzu

BOSCH
We would like to thank and congratulate you for your choice.
This practical modern appliance has been made using materials of the highest quality, which have been put through the strictest of Quality Controls during manufacture and meticulously tested to ensure that they meet all of your cooking demands. To make life easier, this instructions booklet is divided up into two sections: instructions of use and installation instructions.
We kindly ask you to read and follow these simple instructions in order to guarantee first-class results from the very start. This booklet contains important information not only concerning use, but also concerning your own personal safety and maintenance of the appliance.
Our products need to be carefully packed to protect them during transportation. All the material used for packing is considered essential for this purpose and is also completely recyclable. You too can contribute towards protecting the environment by disposing of this material at your nearest recyclable refuse collection point.
Do not dispose of used cooking oil down the kitchen sink. Oil may seriously damage the environment. Dispose of it in a closed container at your nearest collection point or, failing this, dispose of it in your rubbish bin. Although this last solution is far from perfect, your oil will be taken to a controlled refuse dump where it will not be allowed to pollute water. You and your children will appreciate it.
Render your old appliance useless before disposing of it at your nearest recyclable refuse collection centre.
Your local authority will be pleased to inform you where your nearest centre is.
IMPORTANT:
In the unlikely event that the appliance should arrive damaged or not meet your expectations in terms of quality, please inform us as soon as possible. For the warranty to be valid, the appliance must not have been tampered with, or used inappropriately.
Packaging and old appliances
If the symbol

appears on the specifications plate, follow these instructions:
Disposing in an environmentally-responsible manner
Unpack the appliance and dispose of the packaging in an environmentally responsible manner.

This appliance is labelled in accordance with European Directive 2002/96/EC concerning used electrical and electronic appliances (waste electrical and electronic equipment – WEEE).
The guideline determines the framework for the return and recycling of used appliances as applicable.
CONTENTS
Safety Warnings 3
Your new hob 5
Gas Burners 6
Recommended receptacle diameters 7
Cooking recommendations 8....
Electric plates 8
With continuous energy setting 9.
With conventional knob 10
Warnings of use 11
Cooking 1.1
Cleaning and maintenance 12
Troubleshooting 13
Conditions of warranty 14
Safety warnings
Read this manual carefully in order to cook efficiently and safely. All installation, regulation and adaptation to other types of gas must be carried out by an authorised installation technician, respecting all applicable regulations, standards and the country's electrical and gas supply companies' specifications. It is recommended that you call our Technical Assistance Service for adaptation to other types of gas.
Check all measurements before proceeding to install your new hob.
These instructions are only valid for the countries indicated on the appliance. Refer to the technical instructions to adapt the appliance to the conditions of use for the relevant country.
This appliance has been designed for home use only, not for commercial or professional use. This appliance cannot be installed on yachts or in caravans. The warranty will only be valid if the appliance is used for the purpose for which it was designed.
This appliance must be installed in a position with the proper level of ventilation.
The appliance should not be exposed to strong draughts, as these may blow the burners out.
This appliance leaves the factory set for the gas supply indicated on the characteristics plate. Call the Service Centre if it needs to be altered.
Do not tamper inside the appliance. If necessary, call your local Service Centre.
Look after these instructions of use and installation so as to be able to produce them should the appliance ever change hands.
If your hob is supplied with a glass cover, do not subject it to excessive force. If the glass should become detached from the hob, call the Service Centre immediately for them to repair or replace it.
Do not use a damaged appliance.
The surfaces on heating and cooking appliances get hot when in use. Be careful. Keep children away from the appliance. Only use your appliance for the preparation of food and never for room-heating purposes. Overheated fat or oil can easily catch fire. Never leave the appliance unattended when cooking food with fat or oil, e.g., chips. Never pour water on burning fat or oil. DANGER OF BURNS! Cover the receptacle to smother the flames and turn the hob off. In the event of a fault, cut the gas and electricity supplies to the appliance. Call our Service Centre to repair the fault. Do not use unstable or uneven-based receptacles on cooking plates or burners. They may accidentally tip over. If a gas supply knob/valve jams, do not force it. Call your official Service Centre immediately for them to repair or replace it. Do not use steam cleaning machines to clean the hotplate, as there is risk of electrocution. This appliance is not intended for use by persons (including children) with reduced physical, sensory or mental capabilities, or lack of experience and knowledge, unless they have been given supervision or instruction concerning use of the appliance by a person responsible for their safety. Never leave the appliance unattended during operation. The illustrations used in this booklet are only intended as a guide.
IF THESE INSTRUCTIONS ARE NOT FOLLOWED, THE MANUFACTURER ACCEPTS NO RESPONSIBILITY.
Your New Hob:
Gas burners
fig 1.
Each control knob indicates which burner it controls. fig 1.
To light a burner, push in the knob for the burner you wish to use and turn it in an anti-clockwise direction to the lighting position. Hold the knob at the maximum position for a few seconds until the burner ignites and then release and set the knob to the desired setting. If the burner does not light at the first attempt, repeat the operation.
If your hob does not come with any kind of automatic ignition system, then light the burners with a naked flame (cigarette lighter, matches, etc.).
If the spark plugs are dirty, then a fault may occur in the ignition system. Keep them completely clean. Clean the spark plugs using a small brush, remembering that the plugs must not receive any kind of violent impact.
If your hob is equipped with burners with safety valves which prevent gas from being released should the burners accidentally go out, proceed to light as described above, but keep the control knob pressed in until the burners light and then for a few more seconds once alight. If complete ignition does not occur, repeat the operation keeping the knob pressed in for approx. 10 seconds.
To turn the burners off, turn the control knob in a clockwise direction to the 0 setting.
Your modern functional hob is equipped with progressive valves which permit you to find the perfect flame setting between maximum and minimum.
Depending on the model you have purchased, your hob may come with a triple-flame burner, the perfect system for cooking paellas, using woks, etc.
Gas appliances create both heat and humidity in the room they are used in. Make sure that your kitchen is properly ventilated: keep natural ventilation outlets open or install a mechanical ventilation system (extractor fan). When using your appliance for a prolonged period of time, it may be necessary to provide additional ventilation, e.g., by opening a window (without creating a draught) or turning up the setting on your mechanical ventilation system.
Recommended receptacle diameters (cm.)
Depending on model:
| BURNER MINIMUM ∅ RECEPTACLE MAXIMUM ∅ RECEPTACLE | |
| Triple flame: 22 cm | |
| Rapid: 22 cm 26 cm | |
| Semi-rapid: 12 cm 20 cm | |
| Auxiliary: 10 cm 12 cm | |
| Electric plates: 14 cm | |
Additional pan support:
fig 2.
Depending on the model you have purchased, your hob may come equipped with an additional pan support. This pan support is essential when using the triple-flame burner for receptacles with diameters of more than 26 cm, griddles, terracotta casseroles, and all kinds of concave receptacles (woks, etc.) (fig 2). If you do not have a pan support, these are available from your Service Centre, code 363300.
Coffee pot support: Depending on the model you have purchased, your hob may come equipped with an additional coffee pot support. This pan support is only for use on the auxiliary burner for receptacles with diameters of less than 10 cm. If you do not have a pan support, these are available from your Service Centre, code 184200.
The manufacturer cannot be held responsible for the non-use or misuse of these additional pan supports.
Cooking recommendations
These recommendations are only intended as a guide.
| Very strong Strong Medium Slow | |||
| Triple flame Boiling, stewing, grilling, Re-heating and keeping foodbrowning off, paellas, oriental warm: prepared food,food (Wok) pre-cooked food | |||
| Rapid Escalope, steak, omelette, Rice, white Steaming:fried food sauce, ragout. fish, | vegetables. | ||
| Semi-rapid Steamed potatoes, fresh Re-heating and keeping foodvegetables, pasta | |||
| Auxiliary Stews, rice pudding, caramel. | Thawing andslow boiling:pulses, fruit,frozen food | Making/melting:Butter,chocolate,jelly | |
Electric plates
Before using it for the first time, heat the electric plate at maximum power with no receptacle for a period of five minutes. Smoke and smells are normally given off during this time. These will disappear with use. With the exception of this first time, do not use your plates without receptacles.
When you start the cooking process, you are recommended to set the control knob to the maximum position and then lower it to a mid position for the rest of the process, depending on the quantity and quality of the food you are using.
You can turn the cooking plate off a little before the end of the cooking process and make use of the heat inertia created. This will help you save on energy bills and will not affect the cooking process, which will continue thanks to the heat accumulated on the plate.
Use receptacles with perfectly flat, thick bases similar in size to the plate in use, never smaller.
Avoid liquids boiling over onto the plate surface and do not use wet receptacles.
Depending on the model that you have purchased, your electric plates may be controlled by either continuous control or a six-position knob.
Electric plates with continuous energy setting.
fig.3
These plates are controlled by an energy regulator which allows you to choose the right power for the food you wish to cook, (fig. 3).
Turn the knob in an anti-clockwise direction to the setting for the food you wish to cook according to the desired cooking method, the amount of food and the following table. The "in use" control light will come on. To turn the plate off, set the control knob to the 0. The light will go out.
Recommendations:
SETTING
Melting: chocolate, butter, jelly 1-2
Boiling/cooking: rice, white sauce, ragout 2-3
Boiling: potatoes, pasta, vegetables 4-5
Stewing: meat stews, rolled meat 4-5
Steaming: fish 5
Heating, keeping cooked food warm 2-3-4-5
Grilling/frying: escalopes, steaks, omelette 6-7-8
Cooking and browning off 9
Higher settings are needed when:
☐ Large amounts of liquid are involved.
☐ Large amounts of food are being cooked.
☐ Uncovered receptacles are being used.
Electric plates with conventional knobs
fig.4
These plates are controlled by a six-position knob, (fig 4):
Setting 6: Maximum heat. Setting 1: Minimum heat
Recommendations:
☐ Settings 1 & 2: warming ☐ Settings 3 & 4: heating and boiling. ☐ Settings 5 & 6: frying.
Warnings concerning cooking:
DON'Ts
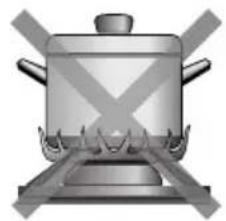
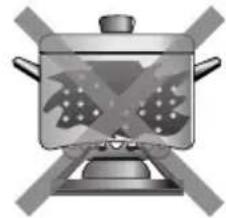
Do not use small receptacles on large burners. The flame should not touch the sides of receptacles.
DOs
Always use suitably sized receptacles on each burner. This helps avoid excessive gas consumption and prevents receptacles from getting tarnished.
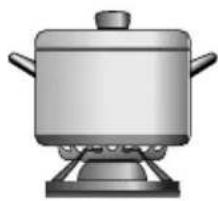

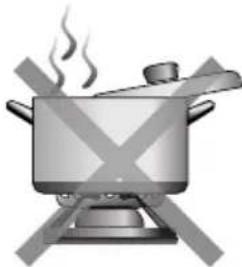
Do not cook without lids or with lids only partially covering receptacles. You are wasting energy.
Always use lids.

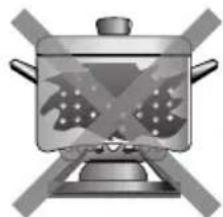
Do not use receptacles with uneven bases. They lengthen cooking times and increase energy consumption.
Only use thick, flat-based saucepans, frying pans, and casseroles.

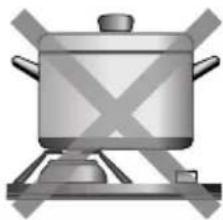
Do not place receptacles on burners off center. They could tip over. Do not use wide-based receptacles on the burners nearest to the controls. When centered on the burner, they could touch the controls or raise the temperature in the area. This may damage the hob.
Always place receptacles in the middle of burners. Always place receptacles on the pan support.


Do not place receptacles directly on top of burners.

Do not use excessive weights or strike the hob with heavy objects.
Handle receptacles on the hob with care.

Cleaning and maintenance:
DON'Ts

Never use abrasive products, sharp objects, steel scouring pads, knives, etc., to remove stubborn food remains from the hob surface, pan support, burners, or electric plates.
If your hob comes with a glass or aluminum panel, do not use knives, scrapers, or similar utensils to clean the join with the metal.
Do not use steam appliances to clean the hob with. They could damage it.
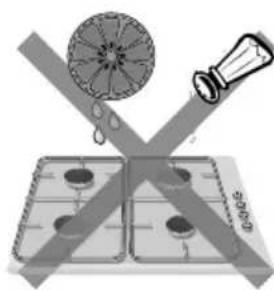
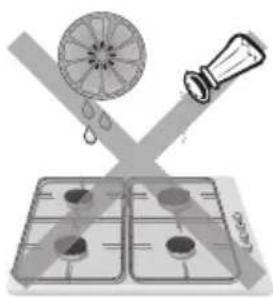
Do not allow acid products (vinegar, lemon juice, etc.) to come into contact with the hob.
Try to prevent salt from coming into contact with the surface of the electric plate.
DOs
Once the appliance is cold, clean it with a sponge and soapy water.
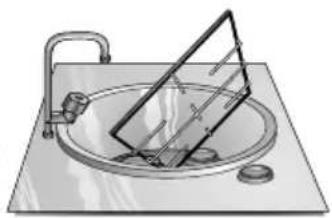
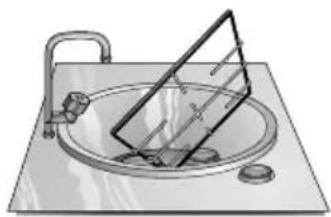
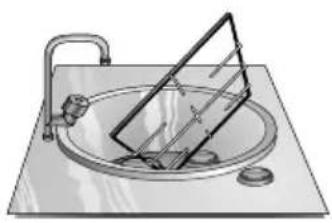
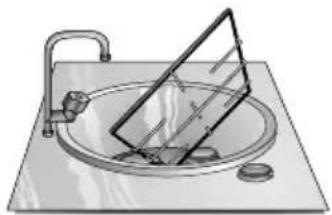
Remove all excess liquid immediately. This will help you avoid unnecessary effort later. The burners and pans support must be cleaned regularly to keep them clean. This is done by submerging them in soapy water and scrubbing them with a non-metal brush to keep the holes and slits free from obstruction so they can give a perfect flame.
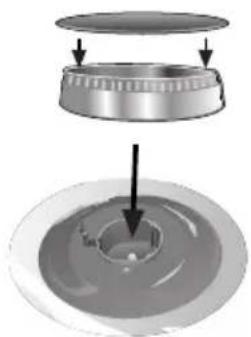
Dry the burner covers whenever wet or damp. Remove all excess liquid immediately. This will help you avoid unnecessary effort later.
After cleaning and drying the burners, make sure that the covers are properly in position on the flame diffuser.


If the coating on the electric plates has worn off through use, smear them with a few drops of oil or one of the maintenance products available on the market.
The high temperatures suffered by the cover on the triple-flame burner ring and the stainless steel parts on your hob (plate rings, grease trays, area around burners, etc) may become discoloured over time. This is NORMAL. Clean them after use with a product suitable for stainless steel.
After washing the pans support, dry them thoroughly before cooking with them again. The presence of droplets of water or dampness at the beginning of the cooking process may damage the enamel surface.
If the pans support on your hob are supplied with rubber feet, be careful when cleaning as they may come off, leaving the pan support unprotected and scratching the hob surface.
The cleaning product suitable for stainless steel must not be used in the area surrounding the control knobs. The indications (serigraphy) may get deleted.
Troubleshooting
It is not always necessary to call the Service Centre. In some cases, you may be able to solve the problem yourself. This table contains some useful information.
Important information:
Only authorised personnel from our Service Centre are qualified to work on the main gas and electric systems.
| What's wrong | Possible cause Solution | |
| ...if none of the electrical system works? | -Faulty fuse. -Check the fuse in- The automatic circuit breaker or mains differential has been triggered. | the main fuse box and replace it if it is faulty.-Check to see if the circuit breaker or a differential has been triggered in the mains supply box. |
| ...if the electric ignition system does not work? | -There may be food or cleaning product particles between the spark plugs and the burners.-The burners are wet. -Dry the- The covers on the burners are not in the right position. | -The gap between the spark plug and the burner needs to be cleaned carefully.burner covers and spark plugs carefully.-Check that the covers have been put in the proper position. |
| ...if the flame on the burners is not evenly distributed? | -The burner components have not been assembled properly.-The gas outlets on the burners are dirty. | -Put the components in their correct positions.-Clean the gas outlets on the burners. |
| ...if the gas flow does not seem normal or there is no gas flow at all? | -The gas flow has been cut at an intermediate stopcock.-If the gas is supplied from a gas bottle, it may be empty. | - Open any intermediate stopcocks.-Replace the gas bottle with a full one. |
| ...if the kitchen smells of gas? | -One of the valves has been left open.-Possible leak on the gas bottle coupling. | -Check to see if a valve has been left open.-Check that the coupling on the gas bottle is in order. |
| ...if the safety devices on the different burners do not work? | -The control knob has not been kept pressed in for long enough.-The outlets on the burners are dirty. | -Once ignited, keep the control knob pressed in for a few seconds.-Clean the gas outlets on the burners. |
Should you need to contact our Service Centre, please quote the following information:
E - NR FD
These indications appear on your appliance's characteristics plate on the bottom of your appliance.
Conditions of warranty
The conditions of warranty are those set out by our company's representatives in the country where you purchased your appliance. The salesperson that sold you the appliance will be only too pleased to inform you as to the details of these conditions. Proof of purchase must be produced when making any kind of claim against the warranty.
The manufacturer reserves the right to modify these conditions.


NO



NO YES







Abnormal situations 97



Cleaning and maintenance
NO


- PACKAGING AND OLD APPLIANCES
- CONTENTS
- SAFETY WARNINGS
- YOUR NEW HOB
- GAS BURNERS
- ELECTRIC PLATES
- WARNINGS OF USE
- TROUBLESHOOTING
- CONDITIONS OF WARRANTY
- RECOMMENDED RECEPTACLE DIAMETERS (CM.)
- ADDITIONAL PAN SUPPORT
- COOKING RECOMMENDATIONS
- ELECTRIC PLATES WITH CONTINUOUS ENERGY SETTING
- RECOMMENDATIONS
- SETTING
- ELECTRIC PLATES WITH CONVENTIONAL KNOBS
- WARNINGS CONCERNING COOKING
- DON'TS
- DOS
- CLEANING AND MAINTENANCE
- IMPORTANT INFORMATION
- NO
- NO YES
Brand : BOSCH
Model : PCD615DEU
Category : Cooker