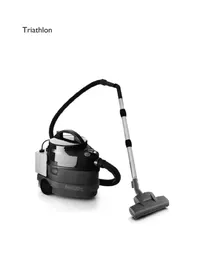
Triathlon HR6839 - Vacuum Cleaner PHILIPS - Free user manual and instructions
Find the device manual for free Triathlon HR6839 PHILIPS in PDF.


| Product Type | Cordless Stick Vacuum Cleaner |
| Model | Triathlon HR6839 |
| Brand | Philips |
| Dimensions (L x W x H) | 260 x 180 x 1150 mm |
| Weight | 3.2 kg |
| Power Supply | Rechargeable Li-Ion battery, 18V, 2200 mAh |
| Charging Time | Approximately 4 hours |
| Runtime | Up to 40 minutes (normal mode), 20 minutes (turbo mode) |
| Dust Capacity | 0.6 L |
| Filtration System | Washable HEPA filter, pre-motor filter |
| Suction Power | Up to 25 air watts |
| Noise Level | 80 dB(A) |
| Main Functions | Vacuuming hard floors and carpets, 2-in-1 stick/handheld, crevice tool, upholstery brush |
| Maintenance | Washable dust container and filters, removable brush roll for cleaning |
| Safety Features | Automatic shut-off when overheating, battery overcharge protection |
| Spare Parts | Replacement filters, battery pack, brush rolls, charger available |
| General Info | Bagless, cordless, wall-mountable charging dock |
Frequently Asked Questions - Triathlon HR6839 PHILIPS
User questions about Triathlon HR6839 PHILIPS
0 question about this device. Answer the ones you know or ask your own.
Ask a new question about this device
Download the instructions for your Vacuum Cleaner in PDF format for free! Find your manual Triathlon HR6839 - PHILIPS and take your electronic device back in hand. On this page are published all the documents necessary for the use of your device. Triathlon HR6839 by PHILIPS.
USER MANUAL Triathlon HR6839 PHILIPS
![graph TD A["Grid with 4x4 squares"] --> B["Open with 4x4 squares"] B --> C["Arrow 1 to right"] B --> D["Arrow 2 to right"]](/content/2026/06/1296787/images/c7f2d984c577a7911aaf49ba9dea040a1d2e78a4e26009925a66dc3e1a6d3c56.jpg)
A
B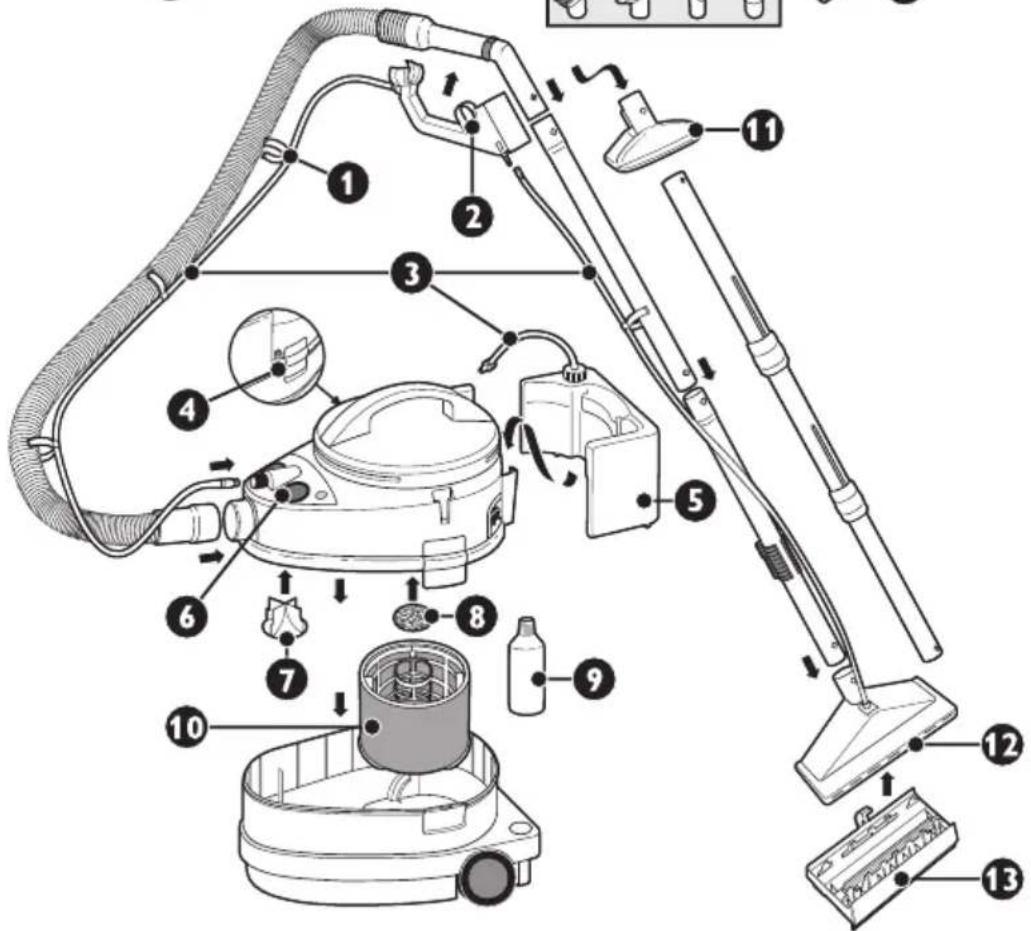







ENGLISH 8
BULGARIAN 17
CZECH 27
ESTONIAN 36
CROATIAN 45
HUNGARIAN 54
KAZAKH 64
LITHUANIAN 74
LATVIAN 83
POLISH 92
ROMANIAN 102
RUSSIAN 111
SLOVAK 121
SLOVENŠČINA 130
SRPSKI 139
УКРАЇНСЬКА 148
165 العربية
173 فارسی
General description (Fig. 1)
A Dry use
1 Hose connector 2 Suction hose 3 Mechanical suction power control 4 Suction tube 5 Tri-Scopic tube (specific types only) 6 Parking clip (specific types only) 7 Nozzle 8 Motor on/off button 9 Handle 10 Cord rewind button 11 Micro Filter (specific types only) 12 Mains cord 13 Parking slot 14 Clamps 15 Motor unit 16 Type plate 17 Dustbag holder 18 Dustbag 19 Container 20 Storage facility for 2 small accessories (small brush, small nozzle, crevice nozzle or flexible crevice nozzle)
B Wet use
1 Shampoo hose clips 2 Shampoo trigger 3 Shampoo hoses 4 Shampoo hose connectors 5 Shampoo reservoir 6 Shampoo pump on/off button with light 7 Diffuser 8 Motor Protection Filter 9 Philips cleaning liquid HR6965 10 Float unit with foam filter 11 Upholstery nozzle 12 Double-injection shampoo nozzle 13 Hard floor adapter
Important
Read these instructions for use carefully before you use the appliance and save them for future reference.
Check if the voltage indicated on the type plate corresponds to the local mains voltage before you connect the appliance. You can find the type plate on the bottom of the motor unit. Do not use the appliance if the plug, the cord or the appliance itself is damaged. If the mains cord is damaged, it must be replaced by Philips, a service centre authorised by Philips or similarly qualified persons in order to avoid a hazard. Always remove the Micro Filter and the paper or reusable dustbag before wet use. Always install the diffuser and the float unit before you use the appliance to vacuum liquids. Do not insert the mains plug into the wall socket until the appliance is completely ready for use. Make sure that your hands and the mains plug are dry when you connect or disconnect the appliance.
Always remove the mains plug from the wall socket if the appliance does not function properly, before you clean the appliance and before you open the container. Only vacuum dry materials and dust if you have inserted the paper or reusable dustbag into the appliance. Never vacuum ashes (from ashtrays and fireplaces) until they are completely cold. Never vacuum petrol, white spirit, gas oil, paraffin oil or other flammable or explosive liquids. Do not use the appliance in rooms with explosive vapours (petrol, thinners, solvents). When you use the appliance to vacuum ashes, fine sand, lime, cement dust and similar substances, the pores of the paper dustbag become clogged. In that case, replace the paper dustbag, even if it is not full yet. Only use Athena paper dustbags or the reusable dustbag. You can obtain dustbags from your dealer. For type numbers, see chapter 'Ordering accessories and filters'. Do not use the vacuum cleaner without the Motor Protection Filter. Never immerse the motor unit in water. Never direct the jet of shampoo at plugs, sockets or electrical appliances. Only switch on the pump when you have filled the shampoo reservoir, placed it into the appliance and connected it with the two shampoo hoses. Switch off the pump as soon as the shampoo reservoir is empty. The pump may get damaged if it runs dry. Keep the appliance and the cleaning liquid out of the reach of children. Always switch off the appliance after use and remove the mains plug from the wall socket. Always empty, clean and dry the container after wet use. Let the appliance suck in dry air for a few minutes to dry the inside of the tube and hose. This prevents an unpleasant smell the next time you use the vacuum cleaner. It also prevents the paper dustbag from becoming wet. To extend the life of the shampoo pump, clean it with a mixture of water and white vinegar once a year. Follow the instructions in chapter 'Cleaning and maintenance'. Do not store the appliance at temperatures below 0°C to prevent it from freezing. Do not point the hose at the eyes or ears nor put it in your mouth when the vacuum cleaner is switched on and the hose is connected to the vacuum cleaner. Noise level: Lc= 82 dB[A]
Electromagnetic fields (EMF)
This Philips appliance complies with all standards regarding electromagnetic fields (EMF). If handled properly and in accordance with the instructions in this instruction manual, the appliance is safe to use according to scientific evidence available today.
Preparing for use
Connecting and disconnecting accessories
Hose
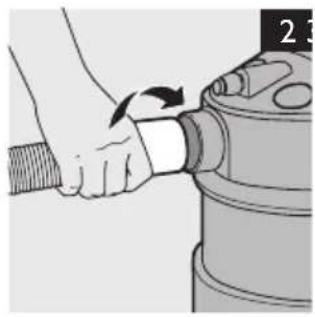
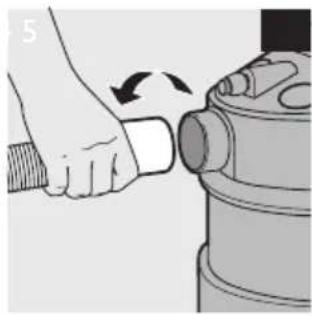
1 To connect the hose, insert it into the hose connector while turning it clockwise a little. (Fig. 2) 2 To disconnect the hose, pull it out of the hose connector while turning it anticlockwise a little. (Fig. 3)
Tube
1 To connect the tube, press the spring-loaded button and insert the narrow section into the wider section. (Fig. 4) The button pops up when it is inserted properly into the opening.
2 To disconnect the tube, press the spring-loaded button and pull the sections away from each other.
Tri-Scopic tube (specific types only)
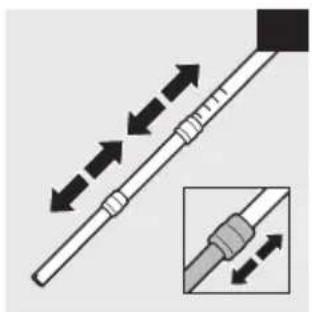
1 Adjust the tube to the length you find most comfortable during vacuum cleaning. Press one of the two collars downwards and pull the tube part above the collar upwards or push it downwards (Fig. 5)
Nozzle
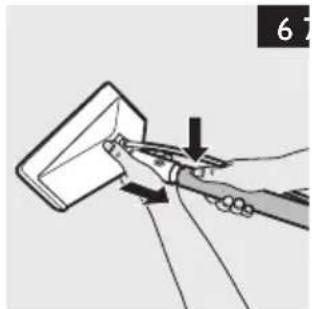
1 Connect the nozzle to the tube. (Fig. 6) 2 If you want the nozzle close at hand (e.g. to clean stairs, upholstery or tapestries), connect the nozzle directly to the handgrip. (Fig. 7)
Prepare the vacuum cleaner for either dry or wet use.
Note: When you unpack the appliance, it is ready for wet use.
Preparing for dry use
Always remove the float unit and the diffuser and insert the Micro Filter (specific types only) and the paper or reusable dustbag before you vacuum dry substances.
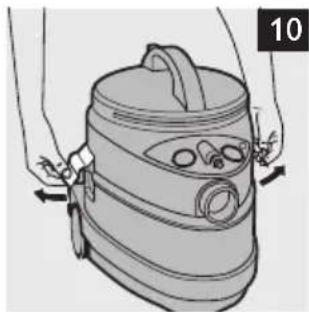
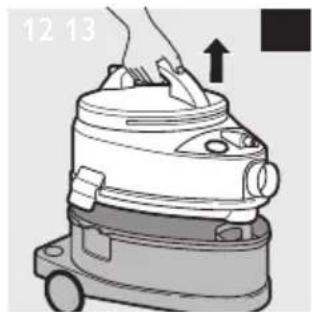
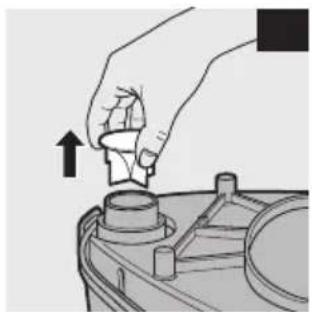
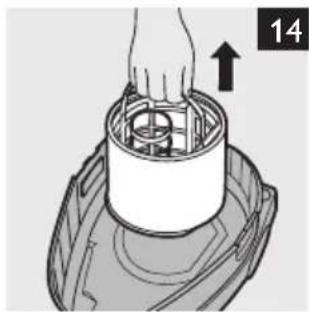
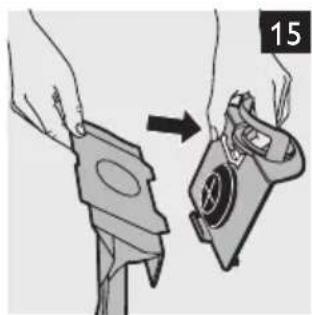
1 Make sure the appliance is unplugged. 2 Turn the shampoo hose clockwise (1) and pull it out of the motor unit (2). (Fig. 8) 3 Remove the shampoo reservoir (Fig. 9) 4 Undo the clamps. (Fig. 10) 5 Lift the motor unit from the container by the handle. (Fig. 11) 6 Turn the motor unit upside down. (Fig. 12) 7 Remove the diffuser from the motor unit. (Fig. 13) 8 Remove the float unit from the container. (Fig. 14) 9 Insert a paper dustbag or the reusable dustbag. Press and hold the red lever while you place the front of the dustbag into the holder. (Fig. 15) 10 First insert the bottom edge (1). Then press the top edge into place (2). (Fig. 16)
Make sure that the two projections of the front point downwards and that the centre of the bottom edge rests on the ridge of the holder.
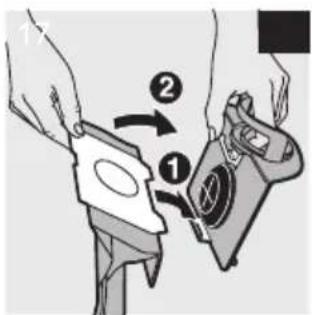
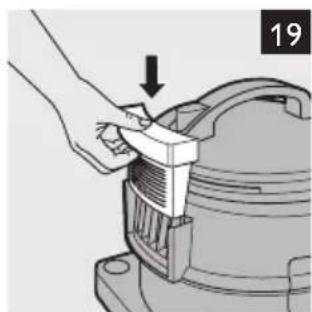
11 Slide the holder with dustbag into the appliance in such a way that the holder is kept in place by the two ridges in the container. (Fig. 17) 12 Put the motor unit back onto the appliance and close the clamps ('click'). (Fig. 18) 13 Put the Micro Filter into place (specific types only). (Fig. 19) See chapter ‘Replacement’ for replacing the paper dustbag or chapter ‘Cleaning’ for emptying the reusable dustbag.
Preparing for wet use
Always remove the paper or reusable dustbag and the Micro Filter (specific types only) before wet use.
Preparing for vacuuming liquids
To vacuum liquids, you need the float unit and the diffuser.
1 Make sure the appliance is unplugged. 2 Undo the clamps. (Fig. 10) 3 Lift the motor unit from the container by the handle. (Fig. 11)
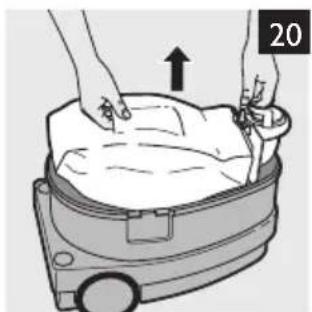
4 Remove the reusable or paper dustbag (see chapter 'Replacement'). (Fig. 20) 5 Insert the float unit into the container by its handle. (Fig. 21)
Note: The float unit only fits into the appliance in one way.
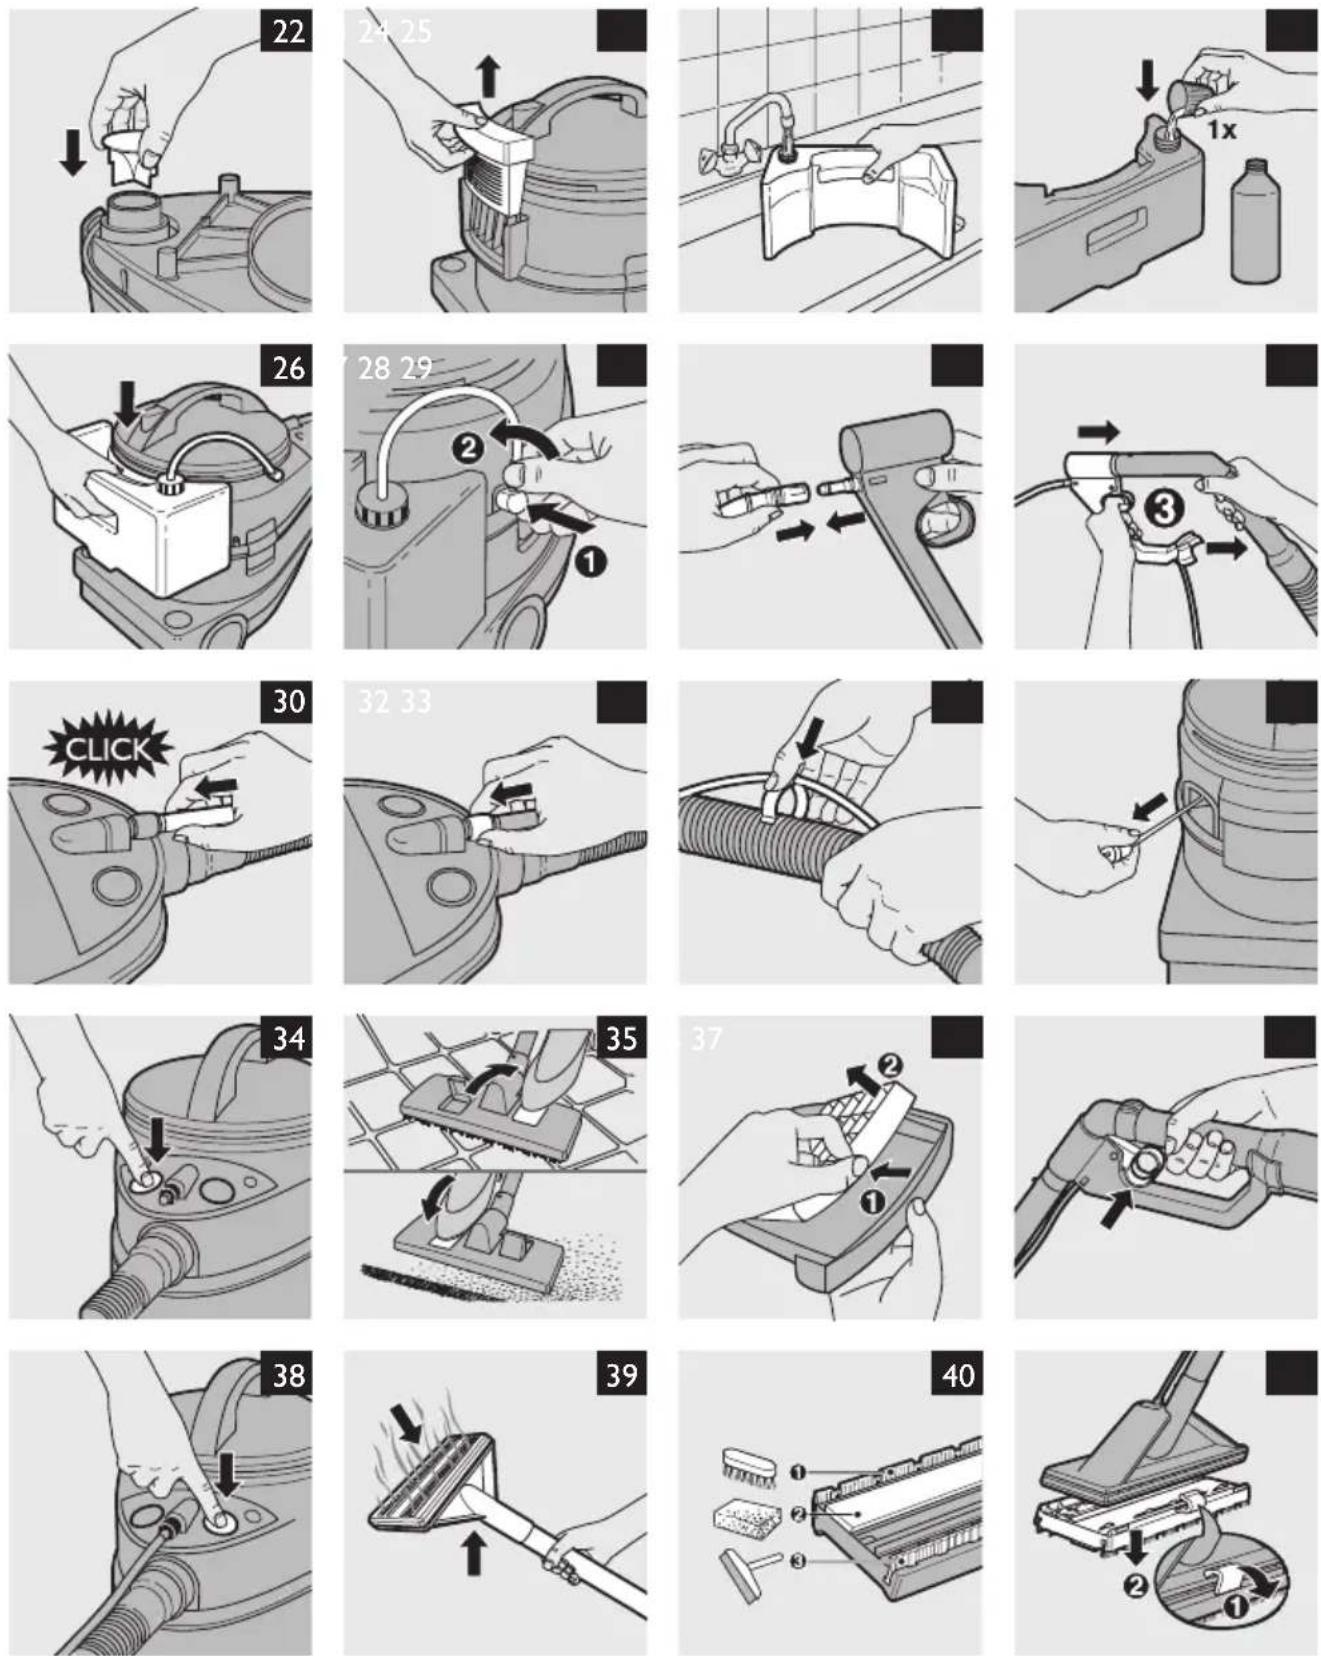
6 Turn the motor unit upside down. (Fig. 12) 7 Insert the diffuser into the motor unit. (Fig. 22) 8 Put the motor unit back onto the appliance and close the clamps ('click'). (Fig. 18) 9 Remove the Micro Filter (specific types only). (Fig. 23)
Note: If the Micro Filter is exposed to excessive air humidity, it loses its electrostatic properties. Now the appliance is ready for vacuuming liquids.
Preparing for shampooing
To shampoo floors, you need the float unit, the diffuser, the shampoo reservoir (filled with shampoo and water), the double-injection nozzle and the shampoo trigger.
1 Follow steps 1 to 9 in 'Preparing for vacuuming liquids'. 2 Fill the shampoo reservoir with cold water. (Fig. 24) 3 Add one measuring cup of cleaning liquid to the full reservoir. (Fig. 25) 4 Attach the shampoo reservoir to the appliance. (Fig. 26) 5 Insert the short shampoo hose to the connector on the vacuum cleaner (1) and turn it anticlockwise (2). (Fig. 27) 6 Connect the long shampoo hose to the shampoo trigger. (Fig. 28) 7 Fasten the shampoo trigger to the handgrip of the suction hose. (Fig. 29) 8 Firmly insert the end of the long shampoo hose into the connector on the vacuum cleaner ('click'). (Fig. 30) To release the shampoo hose, push the ring towards the appliance. (Fig. 31) 9 Fasten the long shampoo hose to the suction hose and suction tube with the shampoo hose clips. (Fig. 32) 10 Attach the double-injection nozzle. (Fig. 6)
The appliance is now ready for shampooing soft floors, such as carpets and rugs.
Using the appliance
1 Pull the mains cord out of the appliance and insert the mains plug into the wall socket. (Fig. 33) 2 Switch on the appliance. (Fig. 34)
Dry use
Convertible nozzle
- You can use the convertible nozzle to vacuum hard and soft floors: (Fig. 35)
- With the brush strip folded out, you can use the nozzle to clean hard floors (wooden, ceramic, stone and synthetic floors).
- With the brush strip folded in, you can use the nozzle to clean soft floors (carpets and rugs).
Vacuuming liquids
When you vacuum water from a place that is located higher than the appliance itself (e.g. a roof gutter or roof water tank), the appliance inevitably functions as a syphon. As a result, the container fills up more quickly than usual and may overflow. Make sure you never exceed the maximum capacity of the container (9 litres/2 gallons). At regular intervals, lift the nozzle out of the water, switch off the appliance, remove the mains plug from the wall socket and empty the container. (Fig. 36)
Shampooing carpets
1. Start as far away from the door as possible and then work your way towards the door. 2. Apply shampoo by squeezing the trigger on the handgrip of the tube. (Fig. 37) 3. Make overlapping strokes to cover the entire area to be cleaned.
Note: If there are still traces of liquid on the area you have just cleaned, pass the vacuum cleaner over this area once more without applying shampoo.
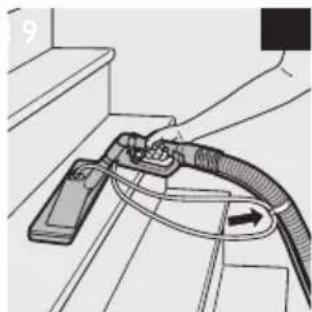
4. After shampooing, release the trigger and switch off the pump. Keep the appliance switched on. (Fig. 38) 5. Lift the nozzle off the floor. Then simply let the appliance suck in dry air for some time to dry the inside of the suction hose and tube. (Fig. 39) 6. Switch off the appliance.
Depending on the degree of soiling, you can use (and combine!) the following three carpet shampooing techniques.
▶ Freshening up
- If the carpet (or part of it) merely requires freshening up, you do not need to apply a lot of shampoo.
- It is probably sufficient to only apply shampoo when you make the first stroke towards you.
- Then release the trigger and move the nozzle over the cleaned area a few times without applying shampoo.
▶ Deep cleaning
- For thorough cleaning of a very dirty carpet or part of a carpet, move the nozzle over the area to be cleaned a few times while you apply shampoo. ▶ Extra thorough cleaning
- For extra thorough cleaning of badly soiled areas or stubborn stains, switch off the motor but keep the pump running.
- Squeeze the trigger to apply shampoo.
- Allow the shampoo to act on the area for several minutes before you switch on the motor again to suck up the shampoo.
- Be careful not to apply too much shampoo, as this may damage the carpet.
Carpet shampooing tips:
- Never shampoo floors that are not water-resistant. If you are in doubt, contact the supplier of the carpet.
- Do not shampoo delicate fabrics and handwoven or non-colourfast carpets.
- Test the colourfastness of your carpet by pouring some shampoo dissolved in water onto a white cloth. Then rub the cloth onto a normally hidden part of the carpet. If there are no traces of dye on the cloth, the carpet is probably colourfast.
- However, if dye comes off onto the cloth, do not shampoo the carpet. If you are in doubt, contact a specialist.
- Vacuum the whole area thoroughly before you start shampooing.
- Make sure that the room is well-aired during and after shampooing to allow better and quicker drying.
- Allow the carpet to dry well before walking on it again: freshened-up areas normally require 30 minutes to dry, whereas deep-cleaned sections require approximately 2 hours to dry. Of course, the drying times also depend upon the amount of shampoo applied, temperature, air humidity and ventilation.
- The transparent nozzles (the double-injection nozzle and the upholstery nozzle) let you determine if the carpet or hard floor is clean. Simply look at the colour of the extracted solution.
Shampooing hard floors
The 3-purpose click-on hard floor adapter for the double-injection nozzle consists of three familiar cleaning tools: (Fig. 40)
1 a brush to release sticky dirt from the floor; 2 a sponge to release, distribute and rub in the shampoo; 3 a squeegee to collect the shampoo from the floor so that it can be vacuumed.
1 Snap the hard floor adapter onto the double-injection shampoo nozzle. (Fig. 41) 2 Start as far away from the door as possible and then work your way towards the door. 3 Apply shampoo by squeezing the trigger on the handgrip of the tube. For scrub effectively, just make back-and-forth strokes as you do with a regular vacuum cleaner. Normally it is sufficient to only apply shampoo while you move the nozzle forwards. (Fig. 42)
Note: Do not make very long strokes.
4 To dry the floor, just move the nozzle backwards slowly. Make sure that only the squeegee touches the floor and do not apply shampoo. (Fig. 43) 5 To remove shampoo effectively, make overlapping strokes and finish off with one stroke across as shown in the figure. (Fig. 44) 6 After shampooing, release the trigger and switch off the pump. Keep the appliance itself switched on. (Fig. 38) 7 Lift the nozzle off the floor. Then simply let the appliance suck in dry air for some time to dry the inside of the suction hose and tube. (Fig. 39) 8 Switch off the appliance.
Shampooing furniture
The upholstery nozzle allows you to shampoo furniture, tapestries, curtains etc.
1 Attach the upholstery nozzle directly to the handgrip. (Fig. 45) 2 Shampoo the fabric in the same way as described for floors. (Fig. 46)
Cleaning and maintenance
Always switch off the appliance and remove the mains plug from the wall socket before you clean the appliance.
You can clean all parts of the appliance, including the container, with a damp cloth.
Make sure no water enters the motor unit!
After wet vacuum cleaning
1. Empty, clean and dry the container. 2. Let the appliance suck in dry air for a few minutes to dry the inside of the tube and hose.
Reusable dustbag (specific types only)
If you use the reusable dustbag, clean the Motor Protection Filter once a year in lukewarm water.
Make sure the filter is completely dry before you reinsert it into the vacuum cleaner.
Float unit and foam filter
1. Rinse the float unit and the foam filter. (Fig. 47)
To guarantee an optimal lifetime for the foam filter, carefully remove it from the float unit. (Fig. 48) ▶ Clean the filter separately. (Fig. 49)
Squeeze the foam filter to remove excess water. Do not wring it!
Motor Protection Filter
1. The Motor Protection Filter can also be removed for cleaning. (Fig. 50) 2. Rinse the Motor Protection Filter under the tap. (Fig. 51)
Do not forget to put the Motor Protection Filter back into place.
Double-injection nozzle
1 Rinse the double-injection nozzle under the tap. (Fig. 52) 2 Remove the hard floor adapter and clean it separately. (Fig. 41) 3 Fill the container with lukewarm fresh water. Pump out the water through the two shampoo hoses into a sink or toilet. This prevents shampoo residues from caking the inside of the hoses and clogging them up.
Shampoo pump
To extend the lifetime of the shampoo pump, clean it with a mixture of water and white vinegar once a year.
1 Pour 1 litre of white vinegar into the shampoo reservoir and top it up with lukewarm fresh water. 2 Let the appliance run in shampooing mode until the shampoo reservoir is empty. Collect the vinegar solution in a bucket. 3 Repeat this procedure with 1 litre of fresh water to rinse out any vinegar residues.
Storage
1 Switch off the appliance and remove the mains plug from the wall socket.
2 Press the cord rewind button. (Fig. 53)
The mains cord is wound up automatically inside the appliance.
Note: When the shampoo reservoir is attached to the appliance, the mains cord does not disappear completely into the appliance when the cord rewind button is pressed.
3 Store the small nozzles in the way that is shown in the figure. (Fig. 54) 4 Specific types only: to park the tube, insert the parking clip into the parking slot on the side of the appliance. (Fig. 55)
Note: To avoid accidental damage to the appliance, the parking clip comes off the tube or the appliance when the tube is pulled or knocked fiercely. You can simply snap the parking clip back onto the tube when this happens.
Replacement
Dustbag
Paper dustbag (specific types only)
1 To remove a full dustbag, lift the holder with the dustbag out of the appliance by the grips. (Fig. 20) 2 Press and hold the red lever to release the cardboard front of the dustbag. (Fig. 56) 3 Throw away the full dustbag and insert a new one (see chapter 'Preparing for use').
Note: A new Motor Protection Filter and a new Micro Filter are provided with each set of original Philips Athena paper dustbags.
Reusable dustbag (specific types only)
Instead of paper dustbags, you can use the reusable dustbag (provided standard in some countries). You can empty and use the reusable dustbag repeatedly.
1 To remove the reusable dustbag, follow the instructions for removing paper dustbags. 2 Hold the reusable dustbag over a dustbin. (Fig. 57) 3 Remove the sealing clip by sliding it off the dustbag sideways. (Fig. 58) 4 Empty the dustbag into the dustbin. (Fig. 59) 5 Close the dustbag by sliding the sealing clip back onto the bottom edge of the dustbag. (Fig. 60) 6 Put the reusable dustbag back into the appliance. Follow the instructions for inserting paper dustbags in chapter 'Preparing for use'.
Filter
Motor Protection Filter
Never use the appliance without the Motor Protection Filter.
- Replace the Motor Protection Filter when you insert the first of a new set of paper dustbags. (Fig. 50)
Micro Filter (specific types only)
When you vacuum dry substances, the electrostatic Micro Filter purifies the exhaust air by removing minuscule dust particles. The effectiveness of the filter decreases gradually during use.
Normally it suffices to replace the Micro Filter when you insert the first of a new set of paper dustbags. The indicator of the Micro Filter holder has to stay white. If the filter has turned noticeably grey, we advise you to replace the filter. (Fig. 61)
Replace the filter more frequently if you suffer from a respiratory tract disease (e.g. asthma) or if you have an allergy (e.g. for pollen, dust, etc).
1 Pull the Micro Filter holder upwards. (Fig. 23) 2 Pull the old Micro Filter out of the holder. 3 Put the new Micro Filter in the holder and slide the holder back into the appliance.
Foam filter
Replace the foam filter if it is damaged or very dirty.
Ordering accessories and filters
Accessories, dustbags and filters are available from your dealer. Please mention the appropriate type or service number that is listed in the table below.
| Accessory, filter or dustbag | Application Description Type number | (service no.) | |
| Dustbags, type Athena | 2-layer paper dustbags for normal house dust. Dry use. | Set: 4 dustbags + 1 Motor Protection Filter + 1 Micro Filter. | HR6947 |
| Micro Filter Filters the exhaust air. Dry use. Set: 2 pcs | FC8032 | ||
| Cleaning liquid For shampooing floors. Add to water. Wet use. | 1 bottle | HR6965 | |
| Foam filter To be placed on float unit. Wet use. 1 filter (4822480) | 40242) | ||
| 3-purpose hard floor adapter | For cleaning hard floors. Wet use. 1 adapter (4322 004) | 22790) | |
| Upholstery nozzle For shampooing furniture, tapestries, etc. Wet use. | 1 nozzle (4822 479) | 20234) | |
| Diffuser | Shampooing, vacuuming liquids. Wet use. | 1 diffuser | (4822 466 62588) |
| Reusable dustbag | For normal house dust. Dry use. | 1 dustbag | (4322 480 10215) |
Environment
Do not throw away the appliance with the normal household waste at the end of its life, but hand it in at an official collection point for recycling. By doing this, you help to preserve the environment.
Guarantee & service
If you need information or if you have a problem, please visit the Philips website at www.philips.com or contact the Philips Customer Care Centre in your country (you find its phone number in the worldwide guarantee leaflet). If there is no Customer Care Centre in your country, turn to your local Philips dealer or contact the Service Department of Philips Domestic Appliances and Personal Care BV.

- GENERAL DESCRIPTION (FIG. 1)
- A DRY USE
- B WET USE
- IMPORTANT
- ELECTROMAGNETIC FIELDS (EMF)
- PREPARING FOR USE
- CONNECTING AND DISCONNECTING ACCESSORIES
- HOSE
- TUBE
- TRI-SCOPIC TUBE (SPECIFIC TYPES ONLY)
- NOZZLE
- PREPARING FOR DRY USE
- PREPARING FOR WET USE
- PREPARING FOR VACUUMING LIQUIDS
- PREPARING FOR SHAMPOOING
- USING THE APPLIANCE
- DRY USE
- CONVERTIBLE NOZZLE
- VACUUMING LIQUIDS
- SHAMPOOING CARPETS
- SHAMPOOING HARD FLOORS
- SHAMPOOING FURNITURE
- CLEANING AND MAINTENANCE
- AFTER WET VACUUM CLEANING
- REUSABLE DUSTBAG (SPECIFIC TYPES ONLY)
- FLOAT UNIT AND FOAM FILTER
- MOTOR PROTECTION FILTER
- DOUBLE-INJECTION NOZZLE
- SHAMPOO PUMP
- STORAGE
- REPLACEMENT
- DUSTBAG
- PAPER DUSTBAG (SPECIFIC TYPES ONLY)
- FILTER
- MICRO FILTER (SPECIFIC TYPES ONLY)
- FOAM FILTER
- ORDERING ACCESSORIES AND FILTERS
- ENVIRONMENT
- GUARANTEE & SERVICE
Brand : PHILIPS
Model : Triathlon HR6839
Category : Vacuum Cleaner