
TM9158 - Cd player/recorder THOMSON - Free user manual and instructions
Find the device manual for free TM9158 THOMSON in PDF.
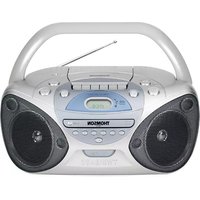


| Product Type | CD Player/Recorder |
| Brand | Thomson |
| Model | TM9158 |
| Disc Compatibility | CD, CD-R, CD-RW |
| Playback Functions | Play, Pause, Stop, Skip, Repeat, Random |
| Recording Functions | Record from CD to CD-R/RW, Finalize |
| Dimensions (W x H x D) | 430 x 95 x 300 mm |
| Weight | 2.5 kg |
| Power Supply | AC 220-240 V, 50/60 Hz |
| Power Consumption | 15 W (standby: <1 W) |
| Audio Output | Analog RCA, Digital Optical |
| Audio Input | Analog RCA (for recording) |
| Headphone Output | 3.5mm jack with volume control |
| Display | Backlit LCD, track/time info |
| Remote Control | Included (IR) |
| Maintenance | Clean lens with soft cloth; avoid moisture and dust |
| Safety | Do not expose to water; do not open the casing |
| Spare Parts & Repairability | Contact authorized service centers for spare parts |
| Accessories Included | Remote control, RCA cable, user manual |
Frequently Asked Questions - TM9158 THOMSON
User questions about TM9158 THOMSON
0 question about this device. Answer the ones you know or ask your own.
Ask a new question about this device
Download the instructions for your Cd player/recorder in PDF format for free! Find your manual TM9158 - THOMSON and take your electronic device back in hand. On this page are published all the documents necessary for the use of your device. TM9158 by THOMSON.
USER MANUAL TM9158 THOMSON
TM9158
TM9159
It is important to read this instruction book prior to using your new product for the first time.
Safety Information
EN
UK Plug Information
CONNECT THE MAIN LEAD INTO A MAINS POWER SOCKET
POWER SUPPLY 230V. It must not be connected to D.C. mains.
Note: The mains lead of the set is fitted with a moulded plug. If the mains socket are not compatible or if for any reason the plug is removed please follow the directions below. The moulded plug cannot be rewired and if removed must be disposed of safely.
DO NOT under any circumstances plug the severed plug into any mains socket as this could result in electric shock.
Important: If the plug is removed, rewire the new plug as follow:
The wires in the mains plug are coloured in accordance to the following code:
BLUE = NEUTRAL/BROWN = LIVE
If the colours of the wires in the mains lead of this apparatus may not correspond with the coloured markings identifying the terminals in your plug, proceed as follows:
BLUE wire to the terminal coded N (Neutral) or coloured black.
BROWN wire to the terminal coded L (Live) or
coloured red.
DO NOT make any connection to the terminal in the plug which is marked
by the letter E or by the earth symbol or coloured green or


green and yellow.
A fused plug must be fitted with a 3A fuse approved by ASTA or BS1362 and fuse covers must be always be securely replaced. If your set does not work, the fuse may be blown.

THE LIGHTNING FLASH AND ARROWHEAD WITHIN THE TRIANGLE IS A WARNING SIGN ALERTING YOU OF "DANGEROUS VOLTAGE" INSIDE THE PRODUCT.
CAUTION RISK OF ELECTRIC SHOCK DO NOT OPEN
CAUTION: TO REDUCE THE RISK OF ELECTRIC SHOCK, DO NOT REMOVE COVER (OR BACK). NO USER-SERVICEABLE PARTS INSIDE. REFER SERVICING TO QUALIFIED SERVICE PERSONNEL.

THE EXCLAMATION POINT WITHIN THE TRIANGLE IS A WARNING SIGN ALERTING YOU OF IMPORTANT INSTRUCTIONS ACCOMPANYING THE PRODUCT.
SEE MARKING ON BOTTOM / BACK OF PRODUCT
WARNING: TO PREVENT FIRE OR ELECTRICAL SHOCK HAZARD, DO NOT EXPOSE THIS PRODUCT TO RAIN OR MOISTURE.
Safety Information
CAUTION!
Invisible laser radiation when open. Avoid exposure to beam. Class 1 laser product. This system must be opened only by qualified technicians to prevent accidents caused by the laser beam.
LASER λ = 780 nm, P max = 5 mW
Rating Information: At bottom/rear of the unit.
This unit complies with the existing requirements.

In accordance with the rating plate of the unit, this unit complies with current standards concerning electrical safety and electromagnetic compatibility.

Please respect the environment. Before throwing any batteries away, consult your distributor who may be able to take them back for specific recycling.

Have a Blast - Just Not in Your Eardrums!
Make sure you turn down the volume on the unit before you put on headphones. Increase the volume to the desired level only after headphones are in place.
CAUTION - INVISIBLE LASER RADIATION WHEN OPEN AND INTERLOCKS FAILED OR DEFEATED. AVOID EXPOSURE TO BEAM.
ATTENTION - INVISIBLE LASER RADIATION DANGEROUS WHEN OPEN AND WHEN SAFETY IS NEUTRALIZED. DANGEROUS EXPOSURE TO BEAM.
ADVARSEL!
INVISIBLE LASER RADIATION WHEN OPEN AND SAFETY INTERLOCKS ARE OUT OF FUNCTION OR BYPASSED. AVOID EXPOSURE TO BEAM.
VORSICHT!
CLASS I LASER PRODUCT
LASER KLASSE I
LASERAPPARAT AV KLASS I
CLASS I LASER DEVICE
CLASS 1 LASER PRODUCT
LASER PRODUCT CLASS I
WARNING!
INVISIBLE LASER RADIATION WHEN THIS PART IS OPEN AND INTERLOCKS ARE DEFEATED. DO NOT STARE INTO THE BEAM.
CAUTION
WHEN OPEN AND INTERLOCKS DEFEATED, YOU ARE EXPOSED TO INVISIBLE LASER RADIATION. DO NOT STARE INTO THE BEAM.
The descriptions and characteristics in this owner's manual are for the purpose of general reference only and not as a guarantee. In order to provide you with the highest quality product, we may make changes or modifications without prior notice. The English version serves as the final reference on all product and operational details should any discrepancies arise in other languages.
Table of Contents
EN
Safety Information
Before You Begin 2
Useful advice 2
AC Power 2
Battery Power 2
Important Battery Information ...... 2
General Controls...... 3
Main Unit 3
Remote Control (For TM9159 Only) 4
Remote Control Battery Installation (For TM9159 Only) 4
Display 5
Sound Features .... 5
Volume Control 5
Bass Boost System 5
Preset Equalizer Curves 5
Radio 6
Select Radio Mode 6
Select Radio Band 6
Tuning to a Station 6
Setting Preset Stations Manually 6
Auto Preset 6
Using Presets 6
Tape Player 7
Playing a Tape 7
Recording to Tape 7
From Radio 7
From CD 7
CD player 8
Notes on CD-R/CD-RW Discs 8
Selecting CD Mode 8
Loading Disc 8
Play and pause 8
Skip and Search 8
Stop Playback 8
CD Remain 8
Programming 9
Displaying the Program List 9
Exit Program List 9
Clearing Program List 9
Play Mode 9
Play Mode for Program List 9
Troubleshooting Tips ...... 10
Maintenance 11
Cleaning the Exterior 11
Handling CDs 11
Cleaning CDs 11
CD Lens Care 11
Cassettes 11
More Information 12
Safety Precautions 12
Headset Safety 12
Don't Infringe 12
Technical Specification 12
Before You Begin
Useful Advice
- Do not use your system immediately after transporting it from a cold place to a warm place, as condensation may cause the system to malfunction. If moisture forms inside this system, it may not operate properly. To correct the problem, turn off the power and wait about 30 minutes for moisture to evaporate.
- This system is fitted with a laser. To avoid accidents, it is to be dismantled by qualified technicians only.
- Never leave the tray open as dust could cover the laser lens and/or the tray could be bumped into accidentally.
- Do not place the system near wet areas such as bathrooms and pool side. Avoid storing the system at humid places or near abnormally heated areas.
- Power is continuously supplied to the system. To disconnect power completely, unplug the power cord from the power outlet.
- Ensure minimum distance around the apparatus for sufficient ventilation. The ventilation should not be impeded by covering the ventilation openings with items, such as newspaper, etc.
- No naked flame source, such as lighted candles, should be placed on the apparatus.
- Attention should be paid to environmental aspects of battery disposal.
AC Power
Plug the power supply cord into the AC power jack on the back of the unit, and into an AC power supply outlet that accepts the plug supplied with your unit.

Note:
Look in the battery compartment to find the AC power cord.
Battery Power
You can insert 6 D-sized alkaline batteries (not supplied) and you can take your stereo just about anywhere. Open the battery compartment door on the back of the unit by pressing down on the arrow and pulling out the cover. Insert batteries in the battery compartment. 3 AA-sized batteries (not supplied) are needed to keep radio station memory.
Note that the AC line cord must be unplugged from the jack on the back of the unit to operate on batteries.
Important Battery Information
- Remove the batteries to avoid leakage if you do not use your system for more than one month.
- Discard leaky batteries immediately as leaking batteries may cause skin burns or other personal injuries. Dispose of batteries in the proper manner, according to provincial and local regulations.
- Any battery may leak electrolyte under the following circumstances:
- if mixed with a different battery type,
- if inserted incorrectly,
- if all batteries are not replaced at the same time,
- if disposed of in fire, or
- if an attempt is made to charge a battery not intended to be recharged

Attention: Attention:
Be sure to remove batteries when storing the set for more than 30 days. Leaky batteries can badly damage the system. Always return tape operation buttons to their off position before storing. This will relieve pressure on certain parts in the tape recorder that might deform after long periods of time. Be sure to dispose of leaky, weak or dead batteries properly according to federal, state, and local regulations. To prevent injury or damage, do not reverse batteries and do not mix battery type.
General Controls

Main Unit

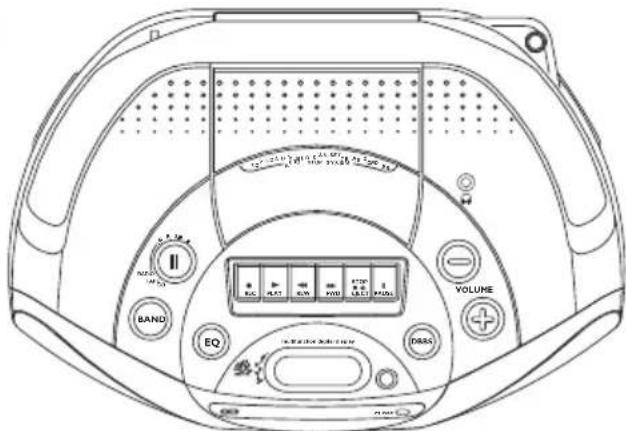
STANDBY / ON - RADIO / TAPE / CD - Turns the unit on/off; Selects among radio, tape and CD mode.
STANDBY -> RADIO -> TAPE -> CD
BAND - Selects radio band. Set preset stations automatically.
EQ - Selects among sound effects (Flat / Rock / Jazz / Pop / Classic).
DBBS - Turns digital bass boost system on and off.
VOLUME + / - Increases or decreases output volume.
PHONE - connects headphone.
PLAY MODE / P ▲ - In radio mode - Accesses preset radio channels.
In CD mode - Selects among playback modes (repeat CD / repeat 1 track / random playback / repeat random).
SET - In radio mode - Sets radio preset channels; In CD mode - Enters program mode.

TRACK / TUNE 🎨 / 🎨 - In radio mode - Tunes up or down radio frequency.
In CD mode - Searches/ skips CD track backward or forward.
STOP ■ - stops CD playback.
REMAIN - In CD mode - Selects between displaying track elapse time and CD remain time.
PLAY / PAUSE ▶▶▶ - Starts or pauses CD play.
CD OPEN - Opens CD door.
CLOSE - Push to close the CD door.
Cassette Player
REC - Starts tape recording.
PLAY - Starts tape playback.
REW - Rewinds tape.
FWD - Fast forwards tape.
STOP/EJECT - Stops tape playback, winding or recording, opens cassette door.
PAUSE - Pauses tape playback.
General Controls
Remote Control (For TM9159 Only)


Note:
Cassette functions cannot be operated with the remote control.
FUNCTION / STANDBY - Turns the unit on/off; selects among radio, tape, and CD mode.
CD TRACK / TUNE BACK / FWD - In radio mode: tunes up or down the radio frequency.
In CD mode: searches/skips CD tracks backward or forward.
PLAY / PAUSE - Starts or pauses CD play.
CD STOP - Stops CD playback.
REMAIN - In CD mode: selects between displaying track elapsed time and CD remaining time.
SET - In radio mode: sets radio preset channels.
VOL + / - - Increases or decreases output volume.
MUTE - Mutes audio output.
BAND - Selects radio band. Sets preset stations automatically.
DBBS - Turns digital bass boost system on and off.
EQUALIZER SOUND - Selects among sound effects (Flat / Rock / Jazz / Pop / Classic).
PLAY MODE / PRESET UP 📋 - In radio mode - Accesses preset radio channels.
In CD mode - Selects among playback modes (repeat CD / repeat 1 track / random playback / repeat random).
In CD mode - Enters program mode.
Remote Control Battery Installation (For TM9159 only)
The remote control must be inserted with 2 "AAA" or "UM-4" or "R03" batteries prior to use. Follow the steps below to ensure correct installation.
- Remove the battery compartment door (located at the back of the remote control) by pushing the door in the direction of the arrow and lifting it off the cabinet.
- Before inserting the batteries, observe the polarities (that is, + and -) of the battery, then relate the polarities to the engraved diagram. Now insert the batteries.
- After installation of the batteries, replace and fit the battery compartment door to cover the batteries. Lightly push it close with a snap.
Display
EN

Sound Features
Volume Control
Press VOLUME + or - to adjust the volume to the desired listening level.

Tips:
You may listen through headphones by inserting one pair into the headphones jack.
Bass Boost System
Press DBBS to turn on and off the digital bass boost system function.
Preset Equalizer Curves
Press the EQ button to toggle among the different sound effects.
Flat (no EQ icon is displayed)
Rock

Jazz
Pop
Classic
Radio
Select Radio Mode
When the unit is turned off, press STANDBY / ON - RADIO / TAPE / CD once to select radio mode.
- RADIO / TAPE / CD once to select radio mode.
Select Radio Band
Press BAND to select FM, MW and LW band.

Tips:
Extend or reposition the antenna for better FM reception. Rotate the unit for better MW/LW reception.
Tuning to a station
- Press TRACK/TUNE to tune down the radio frequency.
- Press TRACK/TUNE to tune up the radio frequency.
Tips:
Press and hold TRACK/TUNE to automatically tune to the next station.

Setting Preset Stations Manually
Press and hold TRACK/TUNE to automatically tune to the next station.
Press TRACK/TUNE to select the station to save as a preset station.
- Press SET.
- Press TRACK/TUNE or to select the station to save as a preset station.
- Press SET.
- Press P ▲ repeatedly to assign the preset station number.
- Press SET to confirm.
- Repeat steps 2 to 5 to set additional preset stations.

Tips:
There are 10 preset locations for each band on this unit.
Auto Preset
Press and hold BAND to set presets automatically. Once a station is found the search stops briefly to allow you to listen to the station.
- Press TRACK/TUNE Or at this time if you decide not to store the selected station.
- If you decide to store the station in preset memory, wait a few seconds and the search will resume.
Using Presets
- Press BAND to select radio band.
- Press P ▲ to enter preset mode and PRESET 1 shows on the display.
- Press P ▲ repeatedly to access the desired preset stations.
Tape Player
EN
Playing a tape
- When the unit is off, press STANDBY / ON - RADIO / TAPE / CD twice until TAPE mode is selected. The tape indicator "CR" lights on the display.
- Press STOP/EJECT to open the tape deck door.
- Insert a tape into the door and push the door closed.

Attention: Attention:
Be sure to slide the cassette into the tape slot on the door. Do not place the tape directly onto the tape mechanism.
- Press REW or FWD to wind the tape to the desired starting position. Press STOP/EJECT to stop winding.
- Press PLAY to start playback. Press PAUSE to pause playback (press again to release the button to resume playback). Press STOP/EJECT to stop playback.
- Press REW or FWD to wind the tape to the desired starting position. Press STOP/EJECT to stop winding.
Recording to tape
From radio
- Insert a tape into the deck.
- Press STANDBY / ON - RADIO / TAPE / CD until RADIO mode is selected.
- Press BAND to access the desired radio band.
- Press TRACK/TUNE or to tune to the station to be recorded.
- Press REC and PLAY together to begin recording.
- Press PAUSE or STOP to pause or stop the recording respectively.
From CD
- Insert a tape into the deck.
- Press STANDBY / ON - RADIO / TAPE / CD until CD mode is selected.
- Insert the disc to be recorded.
- Select the track or program to be recorded.
- Press REC and PLAY together to begin recording.
- Play the track or program to be recorded.
- Press PAUSE or STOP to pause or stop recording respectively.

Note:
For better recording quality, use normal bias tape (Type I) only.
CD Player

This unit is compatible with audio CD-R/RW discs.

Notes on CD-R/RW
- Do not affix any type of labels to either side (recordable or labeled side) of a CD-R/RW disc as this may result in the unit malfunctioning.
- To avoid damages to the CD-R/RW disc, do not open the disc compartment door while the disc is being read.
- Do not load an unrecorded CD-R/RW disc into the unit. This may take a longer time to read the disc.
- Playback capability for CD-RW discs may vary due to variations in the quality of the CD-RW disc and the recorder used to create the disc.
Play and Pause
- In stop mode, press PLAY/PAUSE ▶ to begin CD playback.
- During CD playback, press PLAY/PAUSE ▶ to pause playback. Press again to resume.
Skip and Search
- Press TRACK/TUNE ◀ or ▶ to skip to the previous or next track respectively.
- Press and hold TRACK/TUNE ◀ or ▶ to search quickly current track backward or forward respectively.
Stop Playback
Press REMAIN to select between showing Disc remain time and track elapse time.
Selecting CD Mode
When the unit is turned off, press STANDBY / ON
- Press RADIO / TAPE / CD three times to enter CD mode.
Loading Disc
- Press the CD OPEN button to slide the disc tray out.
- Place a disc on the disc tray with the label side facing up.
- Push the disc tray back in. The total number of tracks on the disc can be read from the display.
CD Player
EN
Programming
- In stop mode, press SET to enter program setting mode.
The program location and the track show on the display with the PROG. and TRACK icons flashing.

- Press TRACK/TUNE 🎨 or 🎨 to select the track you want to program.
- Press SET again to confirm your selection and access the next program location.
- Repeat steps 2 to 3 to program up to a maximum of 20 tracks.
- Press PLAY/PAUSE ▶ in program mode to start program playback (PROG. indicator lights on the display).
Press STOP ■ to return to normal playback mode.
Displaying the Program List
Press SET repeatedly to show the program list.
Exit Program Mode
Program mode will be deactivated once you press STOP ■ to end program playback.

Tips:
If you are in normal playback mode but want to play the saved program, press STOP, STOP, then SET, then PLAY/PAUSE.
Clearing Program List
Your program will be erased once you open the disc compartment door or change to another source mode (e.g., radio).
Play Mode
Press PLAY MODE/P ▲ once to repeat the entire disc, and the [REPEAT] icon shows on the display.
Press PLAY MODE/P ▲ twice to repeat the current track, and a flashing [REPEAT] icon shows on the display.
Press PLAY MODE/P ▲ a third time to select random playback. The random playback icon will be displayed.
Press PLAY MODE/P ▲ a fourth time to select repeat random playback. REPEAT and 📋 will be displayed.
Play Mode for Program List
When Program playback mode is selected, press PLAY MODE/P ▲ for repeat program options.
Press PLAY MODE/P ▲ once in program mode to repeat the entire program. The REPEAT and PROG. icons are displayed.
Press PLAY MODE/P ▲ twice in program mode to repeat the current track in the program. The PROG. icon is displayed and the REPEAT icon flashes.
Press PLAY MODE/P ▲ the third time in program mode to play the programmed tracks randomly. The PROG. and 🎨 icons are displayed.
Press PLAY MODE/P ▲ the fourth time to select repeat random playback for programmed tracks. REPEAT, PROG. and 📋 will be displayed.
Press PLAY MODE/P ▲ again to return to normal program playback.
Troubleshooting Tips
| Problem | Solution |
| System doesn’t turn on | Unplug the unit for a moment, and then plug it back in.Check the outlet by plugging in another device. |
| No sound | Adjust volume setting.Make sure you’ve selected the correct function. |
| Poor radio reception | Adjust the antenna for better reception.T ry turning off electrical appliances near the unit, such as hair dryers, vacuum cleaners, or fluorescent lights. |
| CD doesn’t play | Make sure you’ve put a CD in the tray.Make sure the CD’s label is facing up.T ry another CD.Make sure that Pause mode is not activated.Make sure CD function is selected. |
| CD sound skips | Clean the CD (as explained in “Maintenance”).Check CD for warping, scratches, or other damage.Check for vibration or shock that may affect the unit; move the set if necessary. |
EN
Maintenance
EN
Cleaning the exterior
- Disconnect the system from AC power before cleaning the exterior of the unit with a soft dust cloth.
- Clean the exterior with a soft clean cloth or slightly moistened chamois leather. DO NOT use solvents as they may cause damage to the unit.
Handling CDs
- Do not touch the signal surfaces. Hold CDs by the edges, or by one edge and the hole.
- Do not affix labels or adhesive tapes to the label surfaces. Do not scratch or damage the label.
- CDs rotate at high speeds inside the player. Do not use damaged (cracked or warped) CDs.
- Make sure CDs are stored in their original case after use. Keep them away from damp, humid, or abnormally heated places.
Cleaning CDs
- Dirty CDs can cause poor sound quality. Always keep CDs clean by wiping them gently with a soft cloth from the inner edge toward the outer perimeter.
- If a CD becomes dirty, wet a soft cloth in water, wring it out well, wipe the dirt away gently, and then remove any water drops with a dry cloth.
- Do not use record cleaning sprays or antistatic agents on CDs. Also, never clean CDs with benzene, thinner, or other volatile solvents which may cause damage to the disc surface.
CD Lens Care
- When your CD lens gets dirty, it can also cause the system to output poor sound quality. To clean the lens, you will need to purchase a CD lens cleaner which can maintain the output sound quality of your system. For instructions on cleaning the CD lens, refer to the ones accompanying the lens cleaner.
Cassettes
- To protect your recordings from accidental erasure on one or both sides of your cassette, snap out the tab at the top of the cassette. If you decide later to record on the tape, seal the hole with a piece of adhesive tape. (Refer to diagram)

- Quit Slacking - A little bit of slack in your tapes can cause scratches on the tape, or worse yet, the tape could break. If you notice some slack in the tape, use a pencil to tighten it up before you insert it.

More Information
Safety Precautions
- Never open the cabinet under any circumstances. Any repairs or internal adjustments should be made only by a trained technician.
- Never operate this product with the cabinet removed.
- Do not use your System immediately after transporting it from a cold place to a warm place, as condensation may cause the system to malfunction.
- Keep your unit away from humid areas and abnormally hot places.
- Do not touch the player with wet hands. If any liquid enters the player cabinet, take the player to a trained technician for inspection.
- This compact disc player uses a laser to read the music on the disc. The laser mechanism corresponds to the cartridge and stylus of a record player. Although this product incorporates a laser pick-up lens, it is completely safe when operated according to directions.
- Discs rotate at high speed inside the player. Do not use damaged, warped, or cracked discs.
- Do not touch the pick-up lens which is located inside the disc compartment. To keep dust from collecting on the pick-up lens, do not leave the compartment door open for an extended period of time. If the lens becomes dirty, clean it with a soft brush, or use an air blower brush designed for camera lenses.
- The apparatus shall not be exposed to dripping or splashing and that no objects filled with liquids, such as vases, shall be placed on the apparatus.
- Minimum distances around the apparatus for sufficient ventilation.
- The ventilation should not be impeded by covering the ventilation opening with items, such as newspaper, table-cloths, curtains, etc.
- No naked flame sources, such as lighted candles, should be placed on the apparatus.
- Attention should be drawn to the environmental aspects of battery disposal.
Headset Safety
- Do not play your headset at high volume. Hearing experts warn against extended high-volume play.
- If you experience ringing in your ears, reduce volume or discontinue use.
- You should use with extreme caution or temporarily discontinue use in potentially hazardous situations.
- Even if your headset is an open-air design that lets you hear outside sounds, do not turn up the volume so high that you are unable to hear what is around you.
Don't Infringe
This product should only be used for the purposes for which it is sold, that is, entertainment, violating no copyright law. Any attempts to use this product for unintended purposes are unlawful and therefore not condoned by Thomson.
Technical Specification
Power supply: 230V~50Hz
Dimensions (H x W x D mm):
Unit size - 173 x 382 x 260
CD player: Response curve (+/- 2dB):
60Hz to 20 kHz
Rating Plate: Look for it at the bottom / rear of the set.
THOMSON
46, quai Alphonse Le Gallo
92648 Boulogne
Cedex FRANCE
55900130





- SAFETY INFORMATION
- EN
- UK PLUG INFORMATION
- CONNECT THE MAIN LEAD INTO A MAINS POWER SOCKET
- BLUE = NEUTRAL/BROWN = LIVE
- CAUTION RISK OF ELECTRIC SHOCK DO NOT OPEN
- CAUTION
- ADVARSEL
- VORSICHT
- WARNING
- TABLE OF CONTENTS
- BEFORE YOU BEGIN
- GENERAL CONTROLS
- DISPLAY
- SOUND FEATURES
- RADIO
- TAPE PLAYER
- CD PLAYER
- TROUBLESHOOTING TIPS
- MAINTENANCE
- MORE INFORMATION
- USEFUL ADVICE
- AC POWER
- NOTE
- BATTERY POWER
- IMPORTANT BATTERY INFORMATION
- ATTENTION: ATTENTION
- MAIN UNIT
- CASSETTE PLAYER
- REMOTE CONTROL (FOR TM9159 ONLY)
- REMOTE CONTROL BATTERY INSTALLATION (FOR TM9159 ONLY)
- VOLUME CONTROL
- TIPS
- BASS BOOST SYSTEM
- PRESET EQUALIZER CURVES
- SELECT RADIO MODE
- SELECT RADIO BAND
- TUNING TO A STATION
- SETTING PRESET STATIONS MANUALLY
- PRESS TRACK/TUNE TO SELECT THE STATION TO SAVE AS A PRESET STATION
- AUTO PRESET
- USING PRESETS
- PLAYING A TAPE
- RECORDING TO TAPE
- FROM RADIO
- FROM CD
- NOTES ON CD-R/RW
- PLAY AND PAUSE
- SKIP AND SEARCH
- STOP PLAYBACK
- SELECTING CD MODE
- LOADING DISC
- PROGRAMMING
- DISPLAYING THE PROGRAM LIST
- EXIT PROGRAM MODE
- CLEARING PROGRAM LIST
- PLAY MODE
- PLAY MODE FOR PROGRAM LIST
- CLEANING THE EXTERIOR
- HANDLING CDS
- CLEANING CDS
- CD LENS CARE
- CASSETTES
- SAFETY PRECAUTIONS
- HEADSET SAFETY
- DON'T INFRINGE
- TECHNICAL SPECIFICATION
Brand : THOMSON
Model : TM9158
Category : Cd player/recorder