
AC4086 - Air purifier PHILIPS - Free user manual and instructions
Find the device manual for free AC4086 PHILIPS in PDF.


| Product type | Air purifier |
| Brand | Philips |
| Model | AC4086 |
| Dimensions (L × D × H) | 34,0 × 20,0 × 50,0 cm |
| Weight | 6,5 kg |
| Power supply | 220-240 V, 50/60 Hz |
| Power consumption | 55 W (max) |
| Noise level | 20-65 dB(A) |
| Coverage area | Up to 80 m² |
| Filtration technology | NanoProtect HEPA + activated carbon |
| HEPA filter | Class H13, stops 99,97% of particles |
| Activated carbon filter | Absorbs odors and VOCs |
| Pre-filter | Washable, stops large particles |
| Filter life | Approximately 12 months |
| Operating modes | Auto, Turbo, Sleep, Manual |
| Air quality sensor | PM2.5 and gas sensor |
| Air quality indicator | Light ring (blue, green, orange, red) |
| Timer | 1, 2, 4, 8 hours |
| Ionizer function | No |
| Wi-Fi / Connectivity | No |
| Pre-filter cleaning | Every month with a vacuum cleaner |
| Filter replacement | Change indicator light |
| Use type | Indoor |
| Manufacturer warranty | 2 years |
| Certifications | ECARF, AHAM, Energy Star |
Frequently Asked Questions - AC4086 PHILIPS
User questions about AC4086 PHILIPS
0 question about this device. Answer the ones you know or ask your own.
Ask a new question about this device
Download the instructions for your Air purifier in PDF format for free! Find your manual AC4086 - PHILIPS and take your electronic device back in hand. On this page are published all the documents necessary for the use of your device. AC4086 by PHILIPS.
USER MANUAL AC4086 PHILIPS
Always there to help you
Register your product and get support at www.philips.com/welcome

AC4086
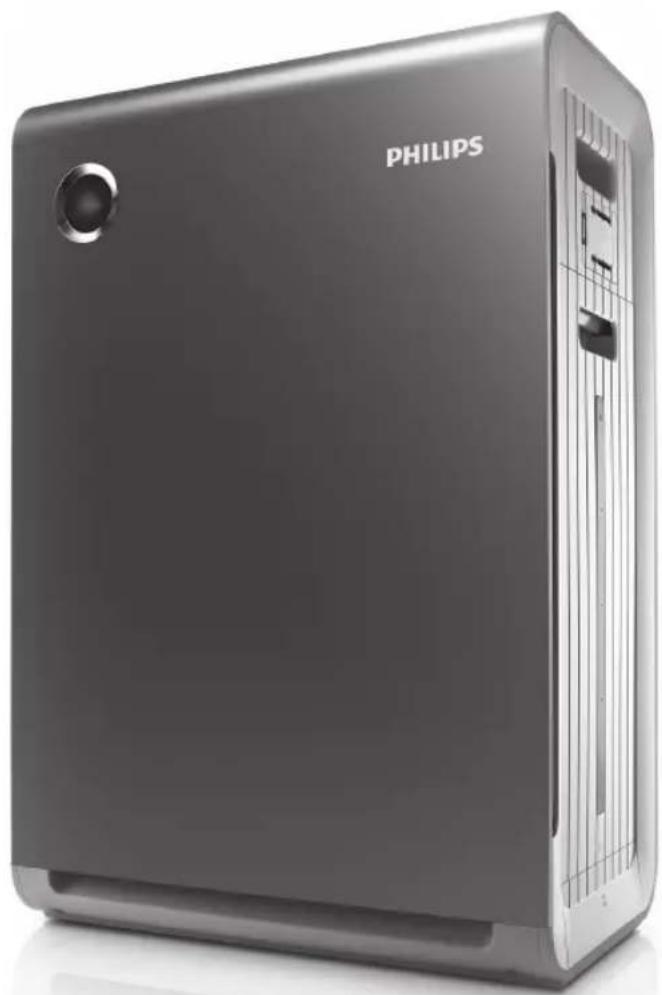
User manual 3
Benutzerhandbuch 37
Mode d'emploi 75
Prepare for humidification 9
4 Using the appliance 11
Understand the air quality light 11
Understand the humidity light indicator 11
Understand the auto mode 11
Understand the healthy air protect alert 11
Understand the healthy air protect lock 11
Switch on and off the appliance 12
Set the sensitivity of the air quality sensor 13
5 Cleaning your appliance 17
Clean the body of the appliance 17
Clean the air quality sensor and humidity sensor 17
Clean the water bucket 18
Clean the humidification filter tray 19
6 Cleaning the pre-filter and humidification filter 20
Clean the pre-filter 20
Clean the humidification filter 22
Rinse the humidification filter 22
Descale the humidification filter 23
Cleaning schedule 24
7 Replacing the filters 25
Replace the Multi-care filter 25
Replace the activated carbon filter and the HEPA filter 27
Replace the humidification filter and water softener 29
Replace the humidification filter 29
Replace the water softener 30
8 Reset the filter lifetime counter 31
9 Troubleshooting 32
10 Guarantee and service 35
Order parts or accessories 35
11 Notices 36
Electomagnetic fields (EMF) 36
Compliance with EMF 36
Recycling 36
1 Important
Safety
Read this user manual carefully before you use the appliance, and save it for future reference.
Danger
- Do not let water or any other liquid or flammable detergent enter the appliance to avoid electric shock and/or a fire hazard.
- Do not clean the appliance with water, any other liquid, or a (flammable) detergent to avoid electric shock and/or a fire hazard.
- Do not spray any flammable materials such as insecticides or fragrance around the appliance.
• The water in the water bucket is not suitable for drinking. Do not drink this water and do not use it to feed animals or to water plants. When you empty the water bucket, pour the water down the drain.
Warning
- Check if the voltage indicated on the bottom indicated at the rear of the appliance corresponds to the local power voltage before you connect the appliance.
- If the power cord is damaged, you must have it replaced by Philips, a service center authorized by Philips, or similarly qualified persons in order to avoid a hazard.
- Do not use the appliance if the plug, the power cord, or the appliance itself is damaged.
- This appliance can be used by children aged from 8 years and above and persons with reduced physical, sensory or mental capabilities or lack of experience and knowledge if they have been given supervision or instruction concerning use of the appliance in a safe way and understand the hazards involved. Children shall not play with the appliance. Cleaning and maintenance shall not be made by children without supervision.
• This appliance is not a toy. Children should be supervised to ensure that they do not play with the appliance.
- Do not block the air inlet and outlet, e.g. by placing items on the air outlet or in front of the air inlet.
Caution
- This appliance is not a substitute for proper ventilation, regular vacuum cleaning, or use of an extractor hood or fan while cooking.
- If the power socket used to power the appliance has poor connections, the plug of the appliance becomes hot. Make sure that you plug the appliance into a properly connected power socket.
• Always place and use the appliance on a dry, stable, level, and horizontal surface. - Leave at least 20cm free space behind and on both sides of the appliance and leave at least 30cm free space above the appliance.
- Do not place anything on top of the appliance and do not sit on the appliance.
- Do not place the appliance directly below an air conditioner to prevent condensation from dripping onto the appliance.
• Make sure all filters are properly installed before you switch on the appliance.
- Only use the original Philips filters specially intended for this appliance. Do not use any other filters.
- Avoid knocking against the appliance (the air inlet and outlet in particular) with hard objects.
• Always lift or move the appliance by both handles at the sides of the appliance.
- Do not insert your fingers or objects into the air outlet or the air inlet to prevent physical injury or malfunctioning of the appliance.
- Do not use this appliance when you have used indoor smoke-type insect repellents or in places with oily residues, burning incense, or chemical fumes.
- Do not use the appliance near gas appliances, heating devices or fireplaces.
• Always unplug the appliance after use and before you clean it.
- Do not use the appliance in a room with major temperature changes, as this may cause condensation inside the appliance.
• To prevent interference, place the appliance at least 2m away from electrical appliances that use airborne radio waves such as TVs, radios, and radio-controlled clocks.
- When the appliance is not used for a long time, bacteria may grow on the filters. Check the filters after a long period of disuse. If the filters are very dirty, replace them (see the chapter 'Replace the filters').
- The appliance is only intended for household use under normal operating conditions.
- Do not use the appliance in wet surroundings or in surroundings with high ambient temperatures, such as the bathroom, toilet, or kitchen.
• The appliance does not remove carbon monoxide (CO) or radon (Rn). It cannot be used a safety device in case of accidents with combustion processes and hazardous chemicals.
- Clean the water bucket every day to keep it clean.
- Only fill the water bucket with cold tap water. Do not use ground water or hot water.
- Do not put any substance other than water in the water bucket.
Do not put fragrance in the water bucket.
- If you do not use the humidification function for a long time, clean the water bucket and humidification filter tray. Dry the humidification filter and store away the water softener.
- If you need to move the appliance, disconnect the appliance from the power supply first. Then empty the water bucket. Carry the appliance horizontally by both handles on the sides of the appliance.
2 Your combi air purifier and humidifier
Congratulations on your purchase, and welcome to Philips!
To fully benefit from the support that Philips offers, register your product at www.philips.com/welcome.
Read this user manual carefully before you install and use the unit. Save it for future reference.
What's in the box
Check and identify the contents of your package:
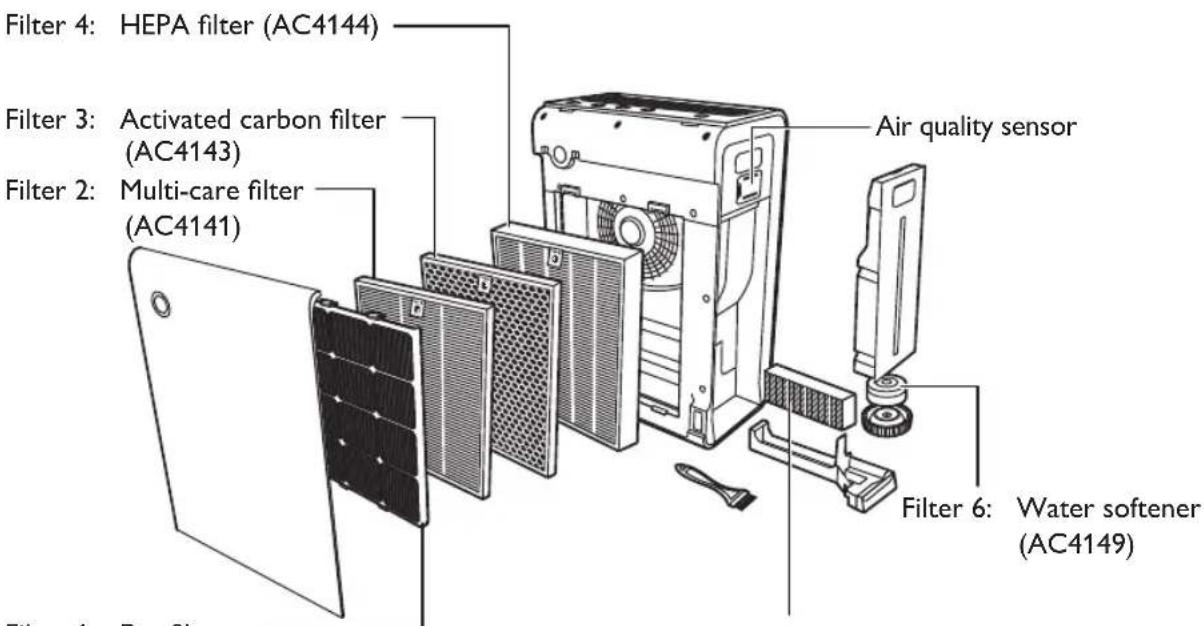
Filter 1: Pre-filter
Filter 5: Humidification filter (AC4148)
User manual
Quick start guide

Warranty
3 Getting started
Install filters
The appliance comes with all filters fitted inside. Remove the packaging of the filters before you can use the appliance. Remove all filters, unpack them, and place them back into the appliance described as follows:

Tip
- When you remove or insert filters, place the appliance against a wall for more stability.

Note
- Insert the filters in the correct position.
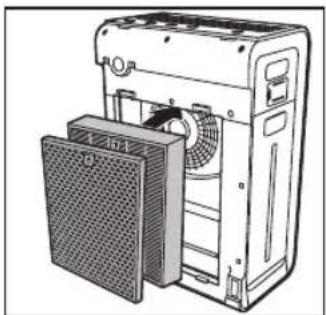
• Make sure that you place the filters in the order of HEPA filter, activated carbon filter, Multi-care filter, and finally the pre-filter.
• Make sure that the side with the tag is pointing towards you.
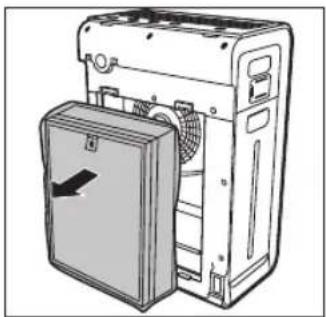
1 Place your fingers in the recesses of the side panels.
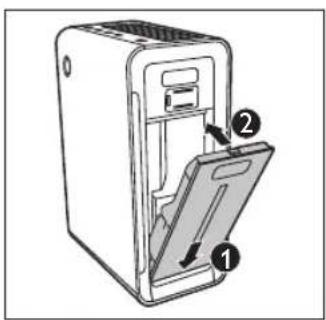
2 Gently pull the bottom part of the front panel out (1), then lift the top part of the front panel towards you (2).

3 Remove all the filters from the appliance.
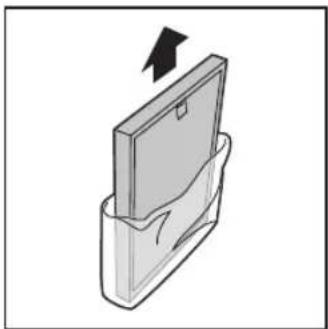
4 Remove all packaging material from the filters.
5 Put the filters back into the appliance.
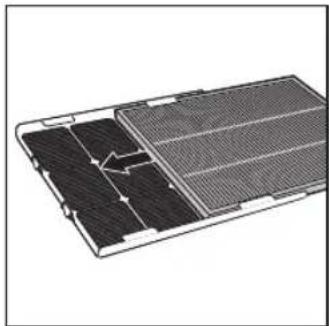
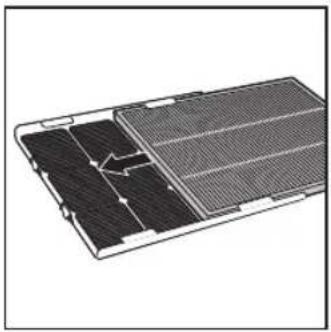
6 Silde the Multi-care filter into the pre-filter.
7 Place the pre-filter in the appliance.
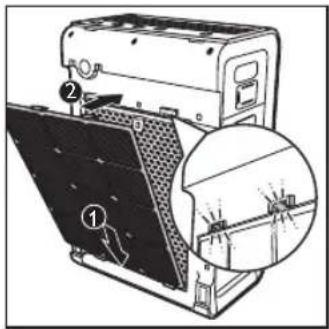

Note
• Make sure that the side with the two clips is pointing towards you, and that all hooks of the pre-filter are properly attached to the purifier.
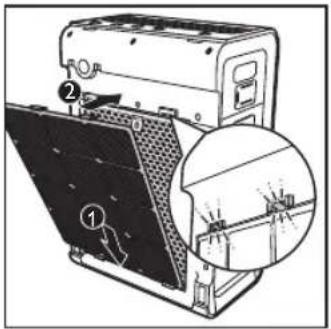
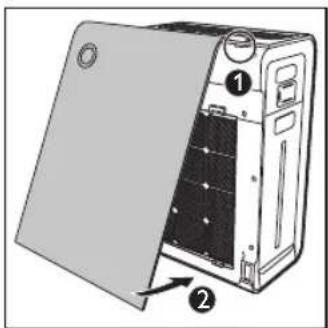
8 To reattach the front panel, mount the panel onto the top of the appliance first (1). Then, gently place the panel against the body of the appliance (2).

Prepare for humidification
1 Pull the water bucket from the side of the appliance.
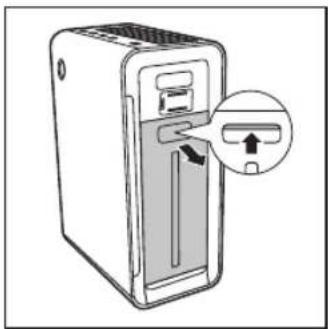
2 Pull the humidification filter tray from the appliance.

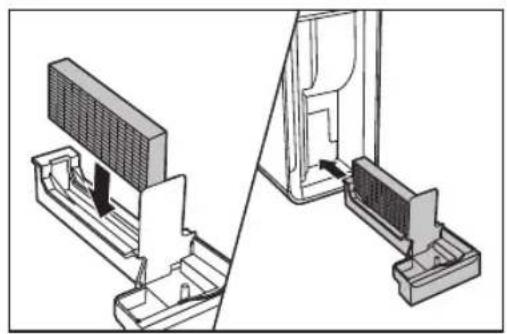
3 Remove the packaging material from the humidification filter.

4 Put the humidification filter back and slide the humidification filter tray back to the appliance.
5 Unscrew the top cap of the water bucket.

6 Fill the water bucket with cold tap water.
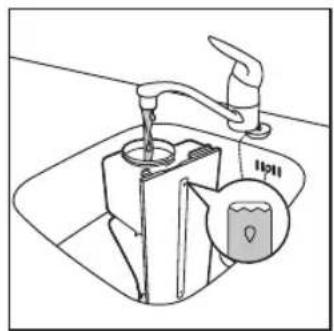
7 Screw the top cap tightly back onto the water bucket until you feel and hear a rattling sound.
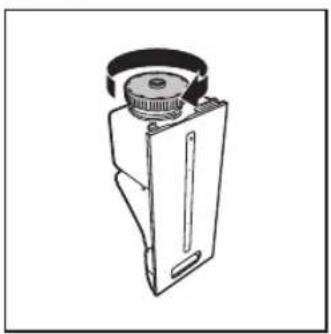
8 Place the water bucket back into the appliance.
4 Using the appliance
Understand the air quality light
| Color of the air quality light Air quality level |
| Blue Excellent |
| Deep purple Good |
| Purple Fair |
| Red Bad |
The air quality light automatically goes on when the appliance is switched on.

Note
• The built-in air quality sensor measures the air quality and automatically selects the appropriate color of the air quality light. When the air is clean, the color of the air quality light is in blue or deep purple. When the air quality deteriorates, the color of the air quality light changes to purple or red.
Understand the humidity light indicator
The appliance is equipped with a built-in humidity sensor. The CURRENT HUMIDITY lights (30%, 40%, 50% or 60%) show the current humidity.

Note
• The accuracy of the humidity indication is approximately plus or minus 5%.
- It takes some time to measure the humidity level in the room..
Understand the auto mode
The built-in air quality sensor automatically measures the ambient air quality, and selects the most appropriate fan speed.
Understand the healthy air protect alert
The filter lights indicate that the filter has to be cleaned or be replaced.
| Different healthy air protect alert lights | Follow this |
| Filter light 1 / 5 flashes. | Clean the pre-filter and descale the humidification filter. |
| Filter light 2 flashes. | Replace the Multi-care filter. |
| Filter light 3/4 flashes. | Replace the activated carbon filter and the HEPA filter. |
| Filter light 5 / 6 flashes. | Replace the humidification filter and water softener. |
Understand the healthy air protect lock
This appliance is equipped with the Healthy air protect lock to make sure that the filters are in optimal condition when the appliance is operating. When the filter is almost full and has to be replaced, the specific filter light (2 / 3/4 5 / 6) start to flash.
When you do not replace the filter in time:
→The appliance stops operating and it is locked.
→The specific filter light 2 / 3/4 / 5
6) illuminate continuously.

Note
• The appliance is locked after the filter light flashing for approximately 2 weeks.
• Approximately one day before the appliance locks, it beeps every 30 minutes to inform you that the filter needs to be replaced.
Switch on and off the appliance
The appliance always operates under air purification combined with humidification. If you want to operate the appliance only as an air purifier, you need to empty the water in the water bucket.
1 Plug the appliance into the power supply.

→All lights go on twice and you hear a beep. Then, the lights go out again.
2 Press the button to switch on the appliance.
→ The PURIFIER and HUMIDIFIER lights are on.

→The air quality light shows the current air quality.
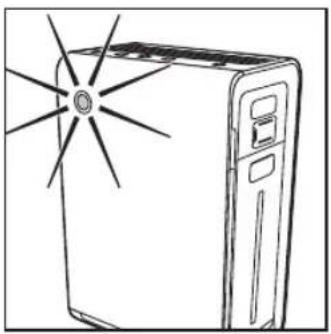
→ The CURRENT HUMIDITY light shows the current humidity level.
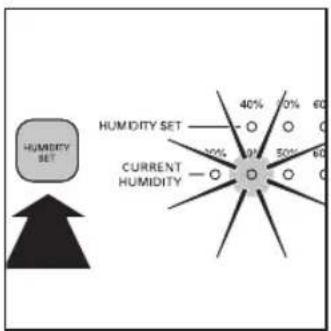
3 Press the button to switch off the appliance.

Note
- Humidifier cannot be used alone without air purifier operating.
- If the water bucket is empty, the humidifier is switched off, but the air purifier still operates. In this way the appliance operates as an air purifier only (PURIFIER light and REFILL WATER light are on).
Set the sensitivity of the air quality sensor
People with certain health problems (for example: allergies or asthma) have a greater need for healthy air. For this reason, the appliance allows you to adjust the sensitivity of the air quality sensor. If you set it to higher sensitivity level, the appliance starts cleaning the air at lower pollution level.
There are 3 sensitivity levels:
- standard
- sensitive
- extra sensitive
The pollution sensor is set to standard sensitivity. You can adjust the sensitivity of the air quality sensor in the following way:

Note
- When it is set to a higher sensitivity, the appliance starts cleaning the air at lower pollution levels to make the air even cleaner.
1 Make sure the purifier is on.
2 Press the SPEED and the HUMIDITY SET buttons simultaneously.
![graph TD A["SPEED"] --> B["AUTO"] A --> C["SILENT"] A --> D["~"] A --> E["BOOST POWER"] F["HUMIDITY SET"] --> G["HUMIDITY SET"] G --> H["CURRENT HUMIDITY"] H --> I["30%"]](/content/2026/06/1293785/images/00bf926b1d58c2628577bc2d5121bad02a83fc11293fbf8f60cc9407b06c646a.jpg)
→The purifier beeps twice and the fan speed light (≈) flashes to show the current sensitivity level of the air quality sensor.
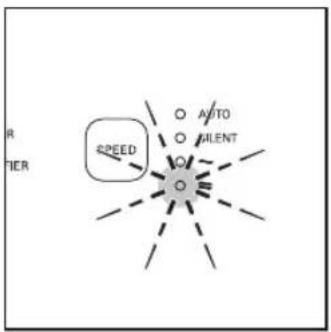
Fan speed light Sensitivity level
SILENT extra sensitive
| ~ | sensitive |
| ≈ | standard |
3 Press the SPEED button to adjust the sensitivity level of the air quality sensor.
→ One of the SPEED lights ( SILENT, \~ , or ≈ ) goes on to show the preferred sensitivity level of the air quality sensor.
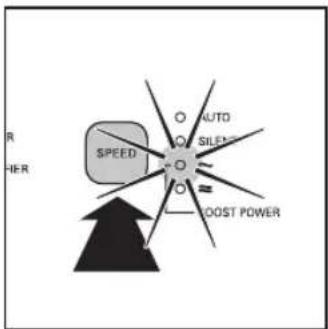
4 Press and hold the SPEED and HUMIDITY SET buttons again to confirm the setting.

Note
- When you change the sensitivity, the appliance automatically starts operating at the set sensitivity level whenever you switch on the appliance.
- In auto mode, you can set the desired humidity level (40%, 50%, 60% in your room (see chapter 'Set the humidity level').
Manual
You can manually select the desired fan speed, which overrides the auto mode.
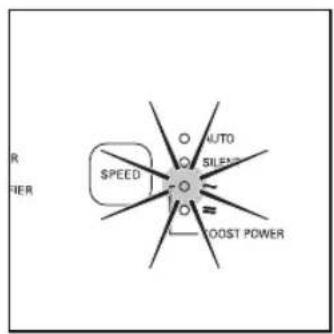
1 Press the SPEED button once or more times to select the desired fan speed (AUTO, SILENT, \~, ≈or BOOST POWER).

Tip
- If the air quality light is in blue or in deep purple color, this means the air quality is good or excellent, and you can select a lower fan speed.
Silent mode
In silent mode, the air filter operates very quietly.
1 Press the SPEED button to select the silent mode. → The SILENT light goes on.

To change to another fan speed, press the SPEED button.
Boost power mode
If the air quality light is in red or purple color, this means the air quality is bad or fair. You can select boost power mode to clean the air quickly.
1 Press the SPEED button to select the boost power mode. →The\~ and lights are on.
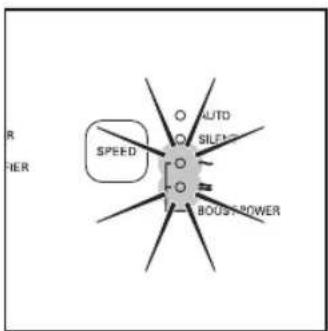
To change to another fan speed, press the SPEED button.
Set the timer
With the timer function, you can let the appliance operate for a set number of hours. When the set time has elapsed, the appliance automatically switches off. You can use the timer function in the following situations:
Situations You will see
| Choose a fan speed manually (see ‘Manual’). | One of the SPEED lights ( , ≈ or BOOST POWER) and one of the TIMER lights (1,4 or 8 ) are on. |
| The appliance is in auto mode (see ‘Auto’). | The AUTO light is on.One of the SPEED lights (SILENT, , ≈ or BOOST POWER), and one of the TIMER lights (1,4 or 8) are on. |
The appliance is in silent mode (see 'Silent mode'). The SILENT light and one of the TIMER lights (1,4 or 8) are on.
1 Press the TIMER button to activate the timer.
→ The TIMER light (1,4 or 8) goes on.
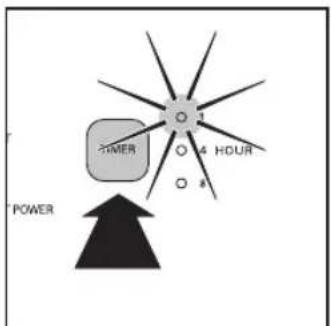
2 Press the TIMER button repeatedly to choose the number of hours you want the appliance to operate. The corresponding TIMER light goes on.
To deactivate the timer function, press the TIMER button repeatedly until the TIMER light (1.4 or 8) is out.
Set the humidity level

Note
- Make sure that the water bucket is filled with water when you want to use the humidification function (see the chapter 'Get started', section 'Prepare for humidification').
You can set the desired humidity level only in AUTO mode. When the humidity of the room reaches the desired level, the humidity stays at this level constantly.
- Press the HUMIDITY SET button once or more times to set the desired air humidity to 40%, 50% or 60%.
→ The corresponding HUMIDITY SET light (40%, 50% or 60%) goes on.

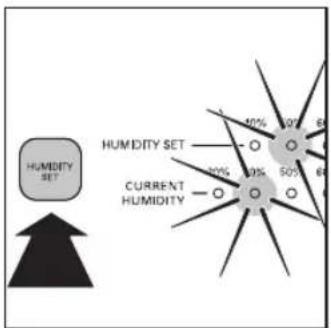

Note
• If you do not set the humidity level, the HUMIDITY SET light goes off. The humidifier humidifies the air under AUTO mode and the preset humidity level is 50%.
- If you change the fan speed (SILENT, , ≈ or BOOST POWER), the humidifier automatically operates according to the fan speed level and the AUTO mode deactivates.
- If you want to increase the humidity level in shorter time, you can select higher fan speed.
- The appliance comes with a smart memory function, it can memorize the settings when the appliance is switched off (e.g. electricity shortage). When the appliance is plugged in/switched on again, it automatically starts at the previous setting.
Water level
The water level in the water bucket is visible through the water level window on the side of the appliance. When there is not enough water in the water bucket, the REFILL WATER light flashes to indicate that you have to refill the water bucket.
![graph TD A["40%"] --> B["50%"] C["40%"] --> D["50%"] E["60%"] --> F["REFILL MATE"] G["60%"] --> F F --> H["RESET"]](/content/2026/06/1293785/images/24fc79a4675c2ae2a20287f1bc00211f668ace4751a92d61eb3329fdb86b00bf.jpg)

Note
• Appliance can operate under air purification only when the water in the bucket is out and the REFILL WATER light flashes. Humidification function can only be activated when the bucket is filled with water.
5 Cleaning your appliance

Note
• Always unplug the appliance before you clean it.
- Never immerse the appliance in water or any other liquid.
- Never use abrasive, aggressive, or flammable cleaning agents such as bleach or alcohol to clean any part of the appliance.
- Only the pre-filter and humidification filter are washable. Other air purifier filters are NOT washable nor vacuum cleanable.
Clean the body of the appliance
Regularly clean the inside and outside of the appliance to prevent dust from collecting.
1 Wipe away dust with a soft dry cloth from the body of the appliance.
2 Clean the air inlet and the air outlet with a soft dry cloth.
Clean the air quality sensor and humidity sensor
Clean the air quality and humidity sensors every month for optimal functioning of the appliance. Clean it more frequently if you use the appliance in a dusty environment.

Note
- When the humidity level in the room is very high, it is possible that condensation develops on the air quality sensor. As a result, the air quality light may indicate that the air quality is bad even though the air quality is good. In this case you have to clean the air quality sensor or use one of the manual speed settings.
1 Clean the inlet and outlet of the air quality and air humidity sensors with a soft brush.
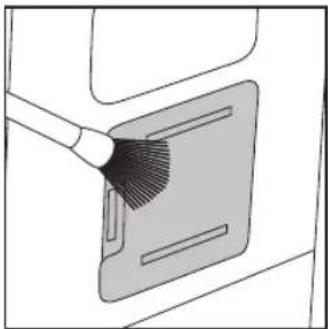
2 Remove the cover of the air quality and air humidity sensors.
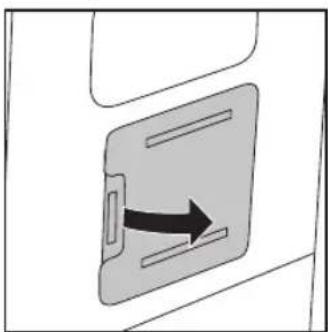
3 Clean the sensors, the dust inlet and the dust outlet with a lightly moistened cotton swab.
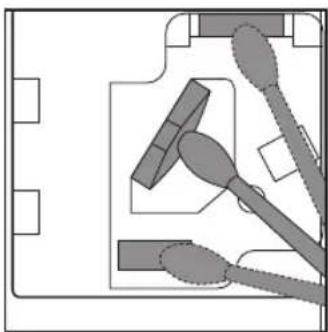
4 Dry them with a dry cotton swab.
5 Reattach the sensor cover.
Clean the water bucket
Clean the water bucket every day to keep it hygienic.
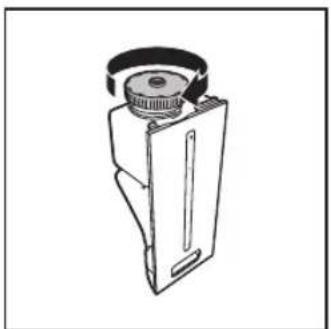
1 Unscrew the top cap of the water bucket.

2 Fill the water bucket for 1/3 with water.

3 Add some mild washing-up liquid to the water in the water bucket.
4 Screw the top cap tightly back onto the water bucket.

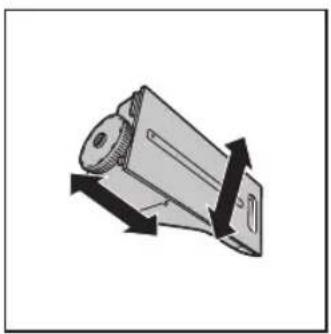
5 Shake the bucket to and fro with both hands to clean the inside of the water bucket.
6 Unscrew the top cap of the water bucket.

7 Empty the water bucket into a sink.
8 Rinse the inside of the water bucket with fresh water several times.
9 Screw the top cap tightly back onto the water bucket.
Clean the humidification filter tray
Clean the humidification filter tray every week to keep them hygienic.
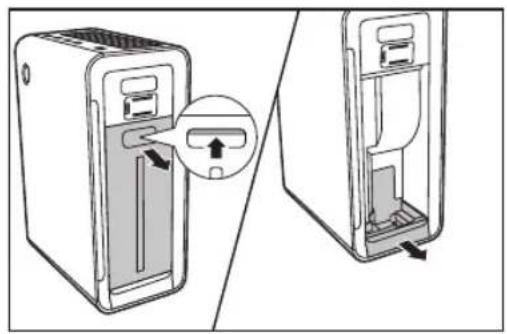
1 Remove the water bucket out of the appliance. Then remove the humidification filter tray from the appliance.

Note
- Remove the water bucket first before you can remove the humidification filter tray.
2 Take the humidification filter out of the humidification filter tray.

3 Rinse the humidification filter tray under a running tap.
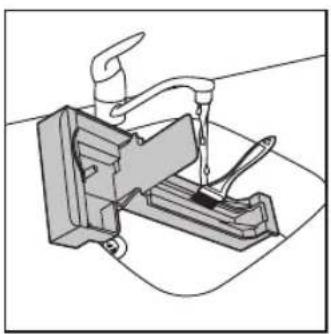

Note
- If necessary, use a mild detergent to clean the humidification filter tray. In this case, rinse the humidification filter tray thoroughly.
4 Dry the humidification filter tray with a soft, dry cloth.
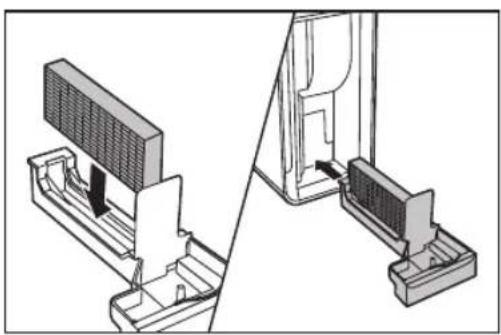
5 Place the humidification filter back and slide the humidification filter tray back to the appliance.
6 Cleaning the pre-filter and humidification filter

Note
- Only the pre-filter and humidification filter are washable. All other filters are not washable.
- Rinse the humidification filter every week to keep it hygienic.
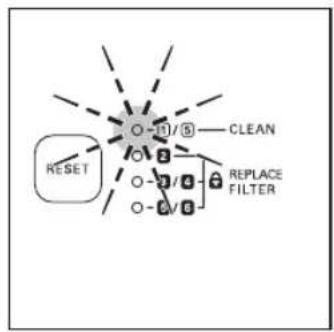
- When the filter light ① / ⑤flashes, you have to clean the pre-filter and descale the humidification filter.
• The light flashes approximately for every two weeks.

Note
• The filter light / keeps flashing for 24 hours.
• After you have cleaned the pre-filter and descale the humidification filter, the light stops flashing and the filter lifetime is reset automatically.
- When you turn off the appliance, the light stops flashing.
Clean the pre-filter

Note
- Clean the pre-filter for every two weeks to ensure optimal functioning of the appliance.
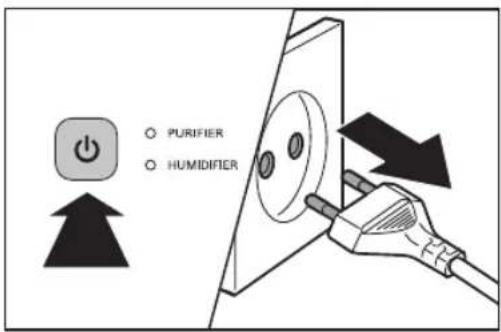
1 Switch off the appliance and unplug it.
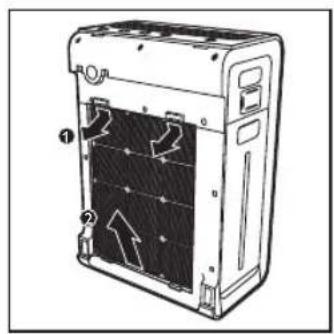
2 Place your fingers in the recesses of the side panels, then lift and detach the bottom of the font panel towards you (1). Gently lift the top part of the front panel out of the appliance (2).

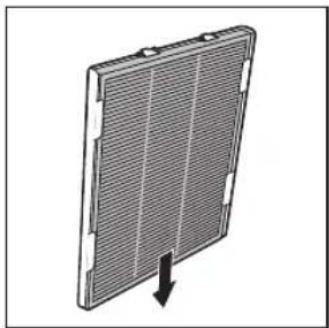
3 To remove the pre-filter, press the two clips down (1) and pull the filter towards you (2).
4 Remove the Multi-care filter from the prefilter.
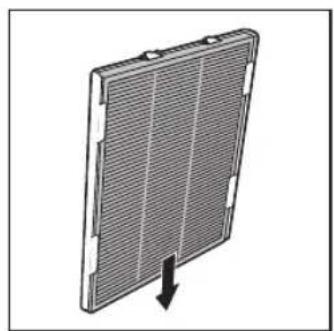
5 Wash the pre-filter under a running tap. If the pre-filter is very dirty, use a soft brush to brush away the dust.
6 Air dry the pre-filter.
7 Slide the Multi-care filter into the pre-filter.
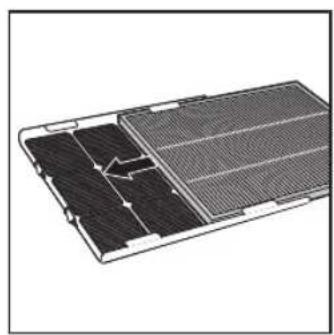
8 Put the pre-filter back into the appliance. Attach all hooks properly to the appliance.

9 To reattach the front panel, insert the top hooks into the top of the air appliance first (1). Then, push the panel against the body of the appliance (2).


Note
• Alternatively, you can clean the pre-filter by removing the dust with a vacuum cleaner.
• Make sure that the pre-filter is completely dry. If it is still wet, bacteria may multiply in it and shorten the lifetime of the pre-filter.
• Make sure that the side with two clips is pointing towards you, and that all hooks of the pre-filter are properly attached to the appliance.
Clean the humidification filter
Rinse the humidification filter every week to keep it hygienic. In addition, descale the humidification filter when the filter light ① / ⑤ flash.
Rinse the humidification filter
1 Switch off the appliance and unplug it.
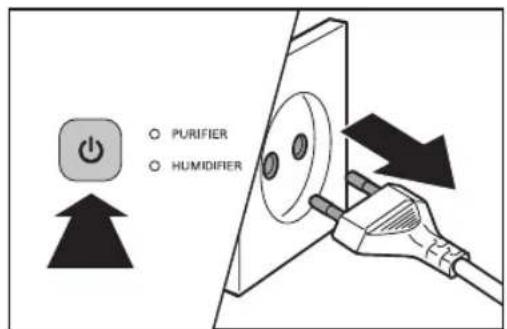
2 Remove the water bucket from the appliance.
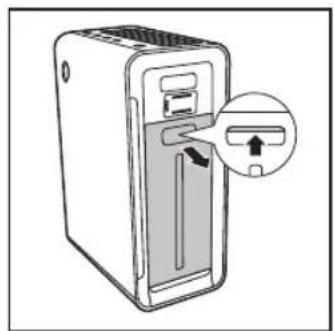
3 Remove the humidification filter tray from the appliance.

4 Remove the humidification filter from the humidification filter tray.


Note
- You have to remove the water bucket first before you can remove the humidification filter tray (see the chapter 'Prepare for humidification').
5 Clean the humidification filter gently with the cleaning brush supplied under a slowly running tap.

6 Put the humidification filter back into the humidification filter tray.
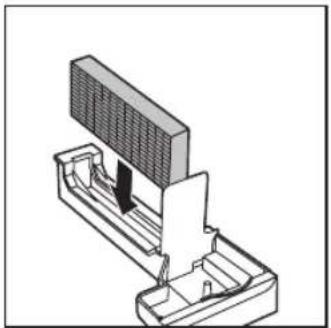
Descale the humidification filter

Note
- It is important to descale the humidifying filter to avoid scale build-up, which seriously affects the humidifying performance.
1 Switch off the appliance and unplug it.
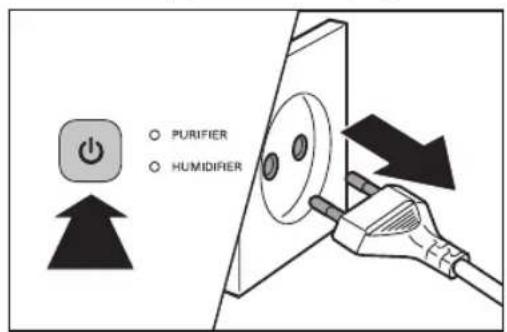
2 Remove the water bucket from the appliance.

3 Remove the humidification filter tray from the appliance.

4 Remove the humidification filter from the humidification filter tray.

English

Note
- You have to remove the water bucket first before you can remove the humidification filter tray.
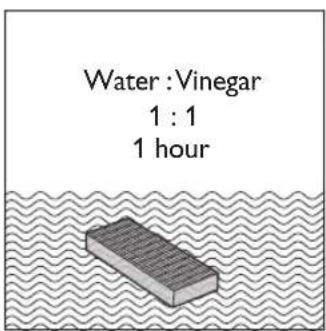
5 Mix the white vinegar (5ml/100 ml acetic acid) with an equal amount of tap water in a container that is large enough to soak the humidification filter in.


Note
- If there are white deposits (scale) on the filter, make sure that the side with the white deposits is immersed in the water.
6 Let the humidification filter soak in the solution for one hour.
7 Discard the water-vinegar solution.
8 Rinse the humidification filter under the tap to rinse away vinegar residues. During rinsing, turn the humidification filter so that both the front and back sides are rinsed.

9 Let excess water drip off the humidification filter.
10 Put the humidification filter back into the humidification filter tray.

Cleaning schedule
| Frequency Cleaning method | |
| Every day Rinse the water bucket. | |
| Rinse the water softener. | |
| Every week Rinse the humidification filter. | |
| Clean the humidification filter tray. | |
| When the filter light 1 / 5 flashes | Clean the pre-filter. |
| Descale the humidification filter with the vinegar-water mixture. | |
| Every two months | Clean the air quality sensor and air humidity sensor with a dry cotton swab. |
| When necessary | Wipe the surface of the appliance with a soft dry cloth. |
7 Replacing the filters
The filter lights (2/3/4) indicate which filter has to be replaced.

Note
- If you remove the front panel for filter changing while the appliance is switched on, all lights on the control panel are off and the appliance stops operating.
- Once the front panel is placed back to the appliance, all lights flash twice. Then, the appliance returns to its operating state.
Replace the Multi-care filter

Note
- The Multi-care filter is not washable nor vacuum cleanable.
Replace the Multi-care filter when the filter light 2 flashes.


Tip
- When you remove or insert filters, place the appliance against a wall for more stability.

Note
- Insert the filters in the correct position.
- Make sure that you place the filters in the order of HEPA filter, activated carbon filter, Multi-care filter, and finally the pre-filter.
• Make sure that the side with the tag is pointing towards you.
1 Switch off the appliance and unplug it.
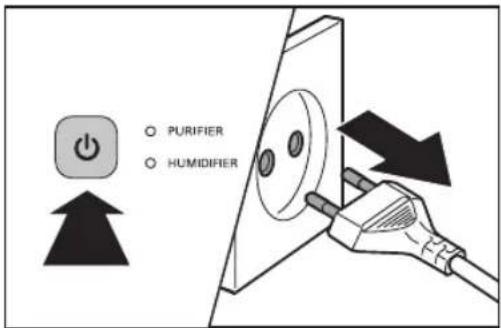
2 Place your fingers in the recesses of the side panels.
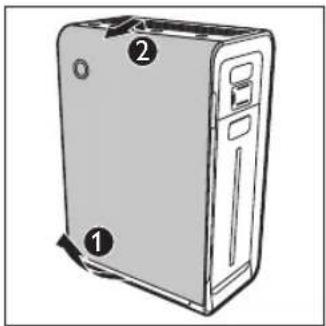
3 Gently pull the bottom of the panel out (1), then lift the top part of the front panel towards you (2).
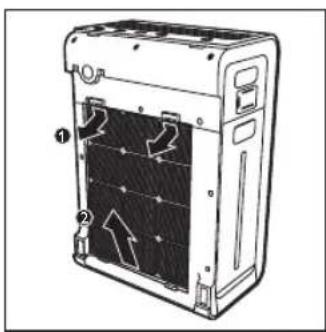
4 Remove the pre-filter from the appliance.
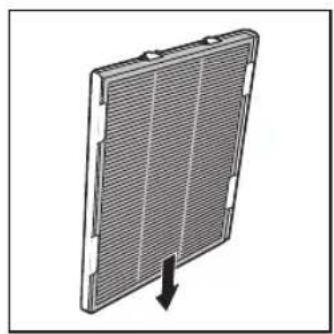
5 Remove the Multi-care filter from the prefilter.
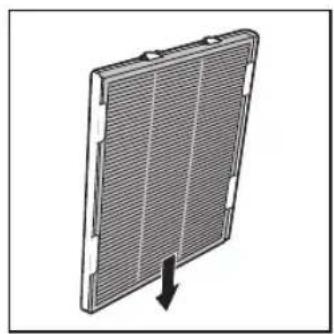
6 Take the used filter by both sides and gently deposit them into the house hold trash bin.

Note
- Do not touch the pleated filter surface, or smell the filter as it has collected pollutants from the air:
- Wash your hands after disposing of the used filters.
7 Remove all packaging material from the new Multi-care filter.

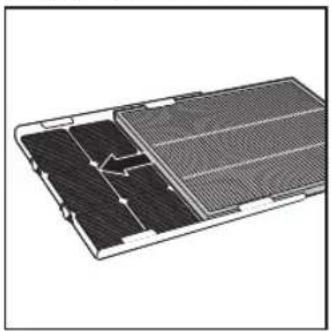
8 Slide the new Multi-care filter into the prefilter.
9 Place the filer back in the appliance.

Note
• Make sure that the side with two clips is pointing towards you, and that all hooks of the pre-filter are properly attached to the appliance.
10 To reattach the front panel, mount the panel onto the top of the appliance first (1). Then, gently place the panel against the body of the appliance (2).

11 Reset the Multi-care filter lifetime (see the chapter 'Reset the filter lifetime counter').
Replace the activated carbon filter and the HEPA filter

Note
- The activated carbon and the HEPA filters are not washable nor vacuum cleanable.
Replace both the activated carbon filter and the HEPA filter when the filter light 3/4 flashes.
![graph TD A["RESET"] --> B["1/8"] B --> C["CLEAN"] B --> D["REPLACE FILTER"] B --> E["Valve 1"] B --> F["Valve 2"] B --> G["Valve 3"] B --> H["Valve 4"]](/content/2026/06/1293785/images/7fd2f22d5a939f9338fb798f3112949b1bd649059d7b2da7ac7a1913a3944e1a.jpg)

Tip
- When you remove or insert filters, place the appliance against a wall for more stability.

Note
- Insert the filters in the correct position.
• Make sure that you place the filters in the order of HEPA filter, activated carbon filter, Multi-care filter, and finally the pre-filter.
• Make sure that the side with the tag is pointing towards you.
1 Switch off the appliance and unplug it.

English
2 Place your fingers in the recesses of the side panels.
3 Gently pull the bottom of the panel out (1), then lift the top part of the front panel towards you (2).

4 Remove all filters from the appliance.
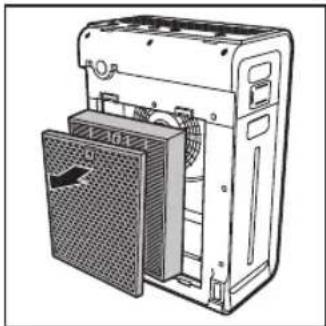
5 Take the used filters by both sides and gently deposit them into the house hold trash bin.

Note
- Do not touch the pleated filter surface, or smell the filter as it has collected pollutants from the air.
- Wash your hands after disposing of the used filters.
6 Remove all packaging material from the new filters.

7 Place the new HEPA filter in the appliance first.

8 Then, place the new activated carbon filter in the appliance.

9 Place the pre-filter in the appliance.

Note
• Make sure that the side with two clips is pointing towards you, and that all hooks of the pre-filter are properly attached to the appliance.
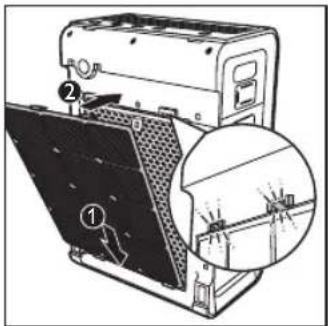
10 To reattach the front panel, mount the panel onto the top of the appliance first (1). Then, gently place the panel against the body of the appliance (2).
11 Reset the activated carbon filter and the HEPA filter lifetime (see the chapter 'Reset the filter lifetime counter').
Replace the humidification filter and water softener
Replace the humidification filter and water softener when the filter light 5 / 6 flashes.

Replace the humidification filter
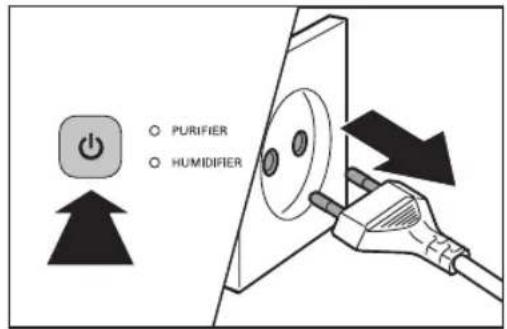
1 Switch off the appliance and unplug it.
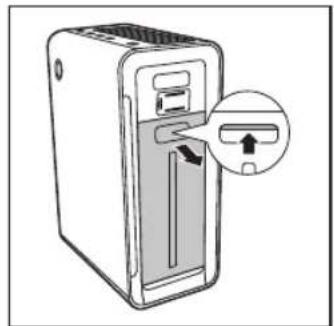
2 Remove the water bucket from the appliance.
3 Remove the humidification filter tray from the appliance.
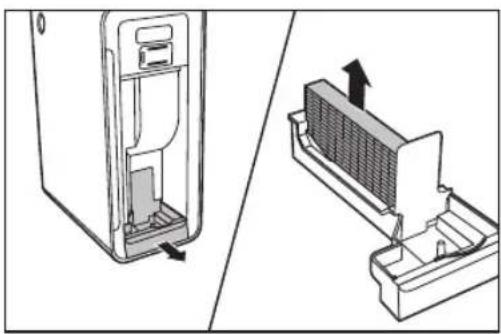
4 Remove the packaging material from the humidification filter.
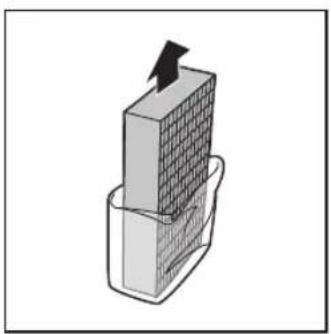
5 Put the new humidification filter back and slide the humidification filter tray back to the appliance.

Replace the water softener
1 Unscrew the cap of the water bucket and remove the water softener.
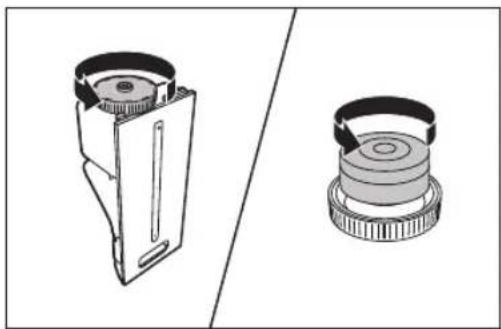
2 Remove the packaging material from the water softener.
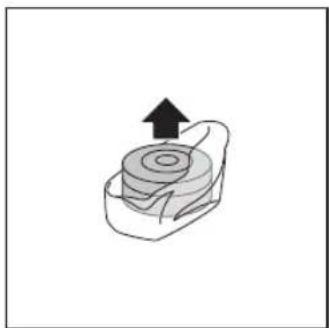
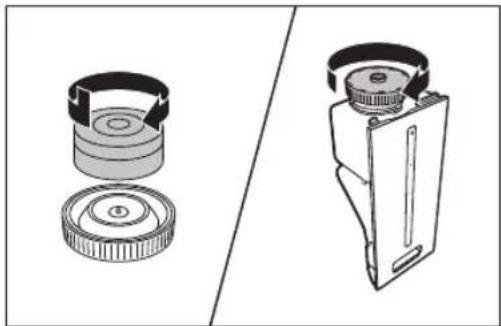
3 Put the new water softener back and screw the cap back on the water bucket.
8 Reset the filter lifetime counter
When you replace the filters, it is important that you also reset the filter lifetime counter afterwards. This allows the appliance to be in sync with the filter lifetime.

Note
- Reset the appliance when it is plugged in and switched on.
- Only replace the respective filters when you see the respective filter lights flash.
• After replacing the filters, the respective filter light still flashes or continuous on until you reset the filter lifetime counter.
After you have replaced the filter, reset the filter time:
1 Switch off the appliance and unplug it.
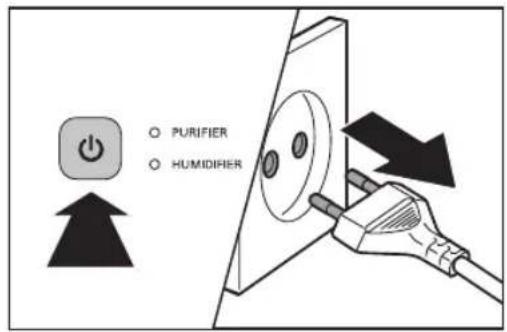
2 Replace the filter (see the chapter 'Replacing the filters').
3 Put the plug in the power socket and switch on the appliance again.

English
4 Press and hold the RESET button for two seconds.

9 Troubleshooting
This chapter summarizes the most common problems you could encounter with the appliance. If you are unable to solve the problem with the information below, contact the Consumer Care Center in your country.
| Problem Possible solution | |
| The appliance does not work. | · The filter replacement light has been on continuously but you did not replace the corresponding filter, it is now locked. In this case, replace the filter and reset the filter time.· Make sure that the front panel is closed properly. |
| The appliance does not work even though it is switched on. | The humidification filter tray is not placed properly. In this case the appliance does not work and the CURRENT HUMIDITY lights (30%, 40%, 50% or 60%) flash. Switch off the appliance. Remove the water bucket and then remove and slide the humidification filter tray back to the appliance. Then switch on the appliance and try again. |
| The water bucket leaks. It is normal that the cap of the water bucket is slightly wet when you remove it from the appliance. However, if water drops keep dripping from the bottom of the water bucket, check if the cap has been screwed onto the water bucket tightly. If the problem persists, contact the Consumer Care Center in your country. | |
| The water level in the water bucket drops very quickly after I empty the humidification filter tray. | This is normal. The water in the water bucket is used to fill the humidification filter tray the humidification filter also absorbs some of the water. |
| I do not see the current humidity indication change. | · Make sure that you have put the humidification filter in the humidification filter tray.· The humidification filter is dirty. Rinse and/or descale the humidification filter (see the chapter 'Clean the pre-filter and humidification filter', section 'Clean the humidification filter').· Make sure that both the PURIFIER and HUMIDIFIER lights are on. |
| There are some white deposits on the humidification filter. | The white deposits are called scale and they consist of minerals from the water. Scale on the humidification filter affects the humidifying performance. Therefore you have to descale the humidification filter when the filter light 1 / 5 flashes (See the chapter 'Clean the pre-filter and humidification', section "Clean the humidification filter"). |
| No air comes out of the air outlet. | Put the plug of the appliance into the power supply and switch on. |
| The fan speed does not change when the silent mode is activated. | In silent mode, the fan speed is set to a very low level. If you want to change the fan speed and leave the silent mode, press the SPEED button once or more times to set the desired fan speed. |
| The airflow that comes out of the air outlet is significantly weaker than before. | The pre-filter is dirty. Clean the pre-filter (see the chapter ‘Clean your appliance’, section “Clean the pre-filter and humidification filter”).Make sure that you have removed all packaging material from the filters. |
| The air quality does not improve, even though the appliance has been operating for a long time. | One of the filters has not been placed in the appliance. Make sure that all filters are properly installed in the following order, starting with the innermost filter: 1) HEPA filter, 2) activated carbon filter, 3) Multi-care filter, and 4) pre-filter.The air quality sensor is wet. The humidity level in your room is high and causes condensation. Make sure that the air quality sensor is clean and dry (see the chapter ‘Clean your appliance’, section “Clean the air quality sensor and air humidity sensor”). |
| The color of the air quality light always stays the same. | The air quality sensor is dirty. Clean the air quality sensor (see the chapter “Clean your appliance”, section ‘Clean the air quality sensor and air humidity sensor’ under).There is not enough ventilation in the room. Open a window, to improve the air circulation. |
| I do not see water vapor coming out of the appliance. Is it working? | When water vapor is very fine, it is invisible. This appliance has a specially designed humidification filter that produces very fine water vapor. Therefore, you cannot see the water vapor. |
| I want to check whether the air humidity sensor works or not. | Remove the cover of the air quality/humidity sensors and then gently blow moist air into the opening. After a while, the CURRENT HUMIDITY indication changes. Note that if the initial CURRENT HUMIDITY indication is already 60%, the indication cannot show an even higher humidity when you blow moist air towards the sensor. |
| The appliance produces a strange smell. | The first few times you use the appliance, it may produce a plastic smell. This is normal. However, if the appliance produces a burnt smell, contact your Philips dealer or an authorized Philips service centre. The appliance may also produce an unpleasant smell when one of the filters is dirty. In this case, clean or replace the filter concerned. |
| I need cleaner air because I have an allergy. | You can change the air quality sensor sensitivity (see the chapter ‘Use the appliance, section ‘Set the sensitivity of the air quality sensor’) to make the appliance clean the air even better. |
| The appliance is extra loud. | Please check if you have removed all the packaging material from the filters.If the appliance is still too loud, you can change the fan speed to a lower fan speed level. |
| The appliance still indicates that I need to replace a filter, but I already did. | Perhaps you did not press the RESET button properly. Plug in the appliance, press the (1) button to switch on and press the RESET button for two seconds. |
10 Guarantee and service
If you need information or if you have a problem, please visit the Philips website at www.philips.com or contact the Philips Consumer Care Center in your country (you will find its phone number in the worldwide guarantee leaflet). If there is no Consumer Care Centre in your country, go to your local Philips dealer.
Order parts or accessories
If you have to replace a part or want to purchase an additional part, go to your Philips dealer or visit www.philips.com/support. If you have problems obtaining the parts, please contact the Philips Consumer Care Center in your country (you find its phone number in the worldwide guarantee leaflet).
11 Notices
Electomagnetic fields (EMF)
This Philips appliance complies with all applicable standards and regulations regarding exposure to electromagnetic fields.
Compliance with EMF
Koninklijke Philips N.V. manufactures and sells many products targeted at consumers, which, like any electronic apparatus, in general have the ability to emit and receive electromagnetic signals.
One of Philips' leading Business Principles is to take all necessary health and safety measures for our products, to comply with all applicable legal requirements and to stay well within the EMF standards applicable at the time of producing the products.
Philips is committed to develop, produce and market products that cause no adverse health effects. Philips confirms that if its products are handled properly for their intended use, they are safe to use according to scientific evidence available today.
Philips plays an active role in the development of international EMF and safety standards, enabling Philips to anticipate further developments in standardization for early integration in its products.
Recycling

Never dispose of your product with other household waste. Please inform yourself about the local rules on the separate collection of electrical and electronic products. The correct disposal of your old product helps prevent potentially negative consequences on the environment and human health.
Inhalt

Anmerkung

Anmerkung

Anmerkung

Anmerkung

Anmerkung

Anmerkung

Anmerkung
Deutsch

Reinigungszeitplan

Tipp

Anmerkung

Anmerkung

Remarque
Financials
| ~ | sensitive |
| ≈ | standard |

Remarque

Remarque

Remarque
Remarque
Remarque

Remarque

Conseil

Remarque

Remarque

Есте сактаңыз
Су деңгейі
4 Оларды кургак макта тампоньмен курфатыңыз.
5 Сенсор какпағын кайта салыңыз.
Су ыдысын тазалау

Есте сактаңыз

Есте сактаңыз
4 Алдын ала тазалау сүзгісінен Көп күтімді сүзгін алыңыз.

Есте сактаңыз
Есте сактаныз

Есте сактаңыз
Тазалау кестесі

Кенес
5 Алдын ала тазалау сүзгісінен Көп күтімді сүзгін алыңыз.
8 Жаңа Көп күтімді сүзгін алдын ала тазалау сүзгісіне салыңыз.

Есте сактаңыз

Кенес

Есте сактаңыз
9 Акауларды жою

Примечание
Примечание

Примечание

Примечание

Примечание

Примечание
©
7 Замена фильтров

Совет

Примечание

Совет

Примечание
Specifications are subject to change without notice
All rights reserved.
4241 210 70154

- ALWAYS THERE TO HELP YOU
- 4 USING THE APPLIANCE 11
- 5 CLEANING YOUR APPLIANCE 17
- 6 CLEANING THE PRE-FILTER AND HUMIDIFICATION FILTER 20
- 7 REPLACING THE FILTERS 25
- 8 RESET THE FILTER LIFETIME COUNTER 31
- 9 TROUBLESHOOTING 32
- 10 GUARANTEE AND SERVICE 35
- 11 NOTICES 36
- 1 IMPORTANT
- SAFETY
- DANGER
- WARNING
- CAUTION
- 2 YOUR COMBI AIR PURIFIER AND HUMIDIFIER
- WHAT'S IN THE BOX
- 3 GETTING STARTED
- INSTALL FILTERS
- TIP
- NOTE
- PREPARE FOR HUMIDIFICATION
- 4 USING THE APPLIANCE
- UNDERSTAND THE AIR QUALITY LIGHT
- UNDERSTAND THE HUMIDITY LIGHT INDICATOR
- UNDERSTAND THE AUTO MODE
- UNDERSTAND THE HEALTHY AIR PROTECT ALERT
- UNDERSTAND THE HEALTHY AIR PROTECT LOCK
- SWITCH ON AND OFF THE APPLIANCE
- SET THE SENSITIVITY OF THE AIR QUALITY SENSOR
- FAN SPEED LIGHT SENSITIVITY LEVEL
- MANUAL
- SILENT MODE
- BOOST POWER MODE
- SET THE TIMER
- SET THE HUMIDITY LEVEL
- WATER LEVEL
- 5 CLEANING YOUR APPLIANCE
- CLEAN THE BODY OF THE APPLIANCE
- CLEAN THE AIR QUALITY SENSOR AND HUMIDITY SENSOR
- CLEAN THE WATER BUCKET
- CLEAN THE HUMIDIFICATION FILTER TRAY
- 6 CLEANING THE PRE-FILTER AND HUMIDIFICATION FILTER
- CLEAN THE PRE-FILTER
- 1 SWITCH OFF THE APPLIANCE AND UNPLUG IT
- 2 PLACE YOUR FINGERS IN THE RECESSES OF THE SIDE PANELS, THEN LIFT AND DETACH THE BOTTOM OF THE FONT PANEL TOWARDS YOU (1). GENTLY LIFT THE TOP PART OF THE FRONT PANEL OUT OF THE APPLIANCE (2)
- CLEAN THE HUMIDIFICATION FILTER
- RINSE THE HUMIDIFICATION FILTER
- DESCALE THE HUMIDIFICATION FILTER
- CLEANING SCHEDULE
- 7 REPLACING THE FILTERS
- REPLACE THE MULTI-CARE FILTER
- REPLACE THE ACTIVATED CARBON FILTER AND THE HEPA FILTER
- REPLACE THE HUMIDIFICATION FILTER AND WATER SOFTENER
- REPLACE THE HUMIDIFICATION FILTER
- REPLACE THE WATER SOFTENER
- 8 RESET THE FILTER LIFETIME COUNTER
- 9 TROUBLESHOOTING
- 10 GUARANTEE AND SERVICE
- ORDER PARTS OR ACCESSORIES
- 11 NOTICES
- ELECTOMAGNETIC FIELDS (EMF)
- COMPLIANCE WITH EMF
- RECYCLING
- INHALT
- ANMERKUNG
- TIPP
- REMARQUE
- CONSEIL
- ЕСТЕ САКТАҢЫЗ
- СУ ДЕҢГЕЙІ
- СУ ЫДЫСЫН ТАЗАЛАУ
- ЕСТЕ САКТАНЫЗ
- КЕНЕС
- 9 АКАУЛАРДЫ ЖОЮ
- ПРИМЕЧАНИЕ
- 7 ЗАМЕНА ФИЛЬТРОВ
- СОВЕТ
Brand : PHILIPS
Model : AC4086
Category : Air purifier