
PRO-870 - Surveillance Camera SWANN - Free user manual and instructions
Find the device manual for free PRO-870 SWANN in PDF.


| Product Type | Surveillance Camera |
| Brand | Swann |
| Model | PRO-870 |
| Video Resolution | 1080p Full HD |
| Viewing Angle | 90° |
| Night Vision | Yes, up to 10 meters |
| Motion Detection | Yes |
| Audio | Built-in Microphone |
| Connection | Ethernet RJ45 |
| Power Supply | Power adapter 12V / 1A |
| Dimensions | 7 x 7 x 12 cm (approx.) |
| Weight | 300 g (approx.) |
| Weather Resistance | IP66 |
| Storage | Recording on DVR/NVR |
| Key Features | Motion detection, night vision, email alerts |
| Maintenance and Cleaning | Clean the lens with a soft, dry cloth |
| Security | Use a strong password for access |
| Spare Parts and Repairability | Power adapter available as spare part |
| General Information | 1-year warranty, indoor and outdoor use |
Frequently Asked Questions - PRO-870 SWANN
User questions about PRO-870 SWANN
0 question about this device. Answer the ones you know or ask your own.
Ask a new question about this device
Download the instructions for your Surveillance Camera in PDF format for free! Find your manual PRO-870 - SWANN and take your electronic device back in hand. On this page are published all the documents necessary for the use of your device. PRO-870 by SWANN.
USER MANUAL PRO-870 SWANN
Professional All-Purpose Security Camera

About the Camera
Congratulations on your purchase of this PRO-CAM from Swann! You've chosen well: we think this is one of the finest CCTV video cameras available. The PRO-CAM is great for monitoring a specific area and is able to provide a high level of detail, even at night - it can see up to 35m/115ft in the dark.
Placement Guide
The PRO-CAM has a 6mm, 45° lens built-in which allows it to focus its attention onto one specific area. What does this mean for you when placing it?
- The camera will focus on the one particular area in front of the lens, but won't see much happening to the sides of it. You'll need to aim the camera specifically at what you want to see.
- Objects and people will look like they are slightly closer to the camera than they really are. You'll be able to monitor a space which is as long (or longer) than it is wide.
The PRO-CAM is great for monitoring long, narrow spaces such as hallways or corridors. It's also great for monitoring a specific space, such as a doorway, smaller room or staircase.

Typically, it is best mounted in a corner looking across and down into the room, so that it can look over intervening obstacles. The higher the ceiling the camera is mounted on, the more it will be able to see and the harder it'll be for an intruder to access the camera or interfere with it.
Tips: Positioning and Orienting
- Try to aim the camera at an area which is evenly lit, as objects or people in shadows near brightly lit objects are very hard to see.
- It's better to have the camera in the shade looking into the light than vice-versa.
- Avoid having bright light sources in your image. This includes the obvious (such as the sun or an artificial light source) but also things such as reflections. Cars are notorious for reflected light sources, as are buildings with a lot of windows, mirrors and so forth.
Mounting the Camera
The camera mounts onto a flat surface using screws. The surface must have sufficient strength to hold the camera. Materials such as hardwood, brick or masonry are good options, and we've included all the gear you'll need to mount it there (except the tools - sorry, you'll still need your own drill). You can mount the camera onto a metal surface, but you'll need to supply your own mounting hardware.
To mount the camera:
- Using the holes on the camera stand as a guide, mark the locations on your wall to drill. Make sure the wall is thick and strong enough that you won't drill through it.
- If the wall is masonry, brickwork or similar, use the provided wall plugs. If the wall is made of wood, then the camera can be screwed directly onto the wall.
- Ensure that the cable is protected from the weather. The camera is weatherproof, but the cable (particularly the power and video-out plugs) is not.
- Once the camera has been mounted, ensure that it is securely fixed in place. The camera is vandal resistant, but that won't help if an intruder can remove the whole camera!
Tips: Positioning your Cables
- When running your cable, try to avoid bending it at sharp angles.
- Don't put your cable near live electrical wiring. AC electricity generates radio "noise" which can interfere with the signal from your camera.
Tips: Weather Resistance
- The PRO-CAM is built to be weather resistant. It'll stand up to getting wet occasionally, but it's not intended to be underwater all the time. When mounting the camera, ensure that it's not in a location where water is likely to pool or build up over time.
- Long term exposure to direct sunlight will adversely affect the camera. Over time, the infrared and ultraviolet radiation will eventually begin to degrade the integrity of the plastic and rubber components of the camera (particularly the seals, cable, protectors and so on). Basically, put it in the shade!
- The camera itself is weather resistant, but the cables (most importantly the plugs) are not. Ensure that all wiring and the connectors are suitably insulated and protected from moisture and sunlight.
Tips: Night Vision
- Don't place the camera so that there are any objects near the lens. Even transparent or seemingly inconsequential objects (such as glass or spider's webs) will reflect infrared light, and effectively blind the camera at night.
Connection Guide
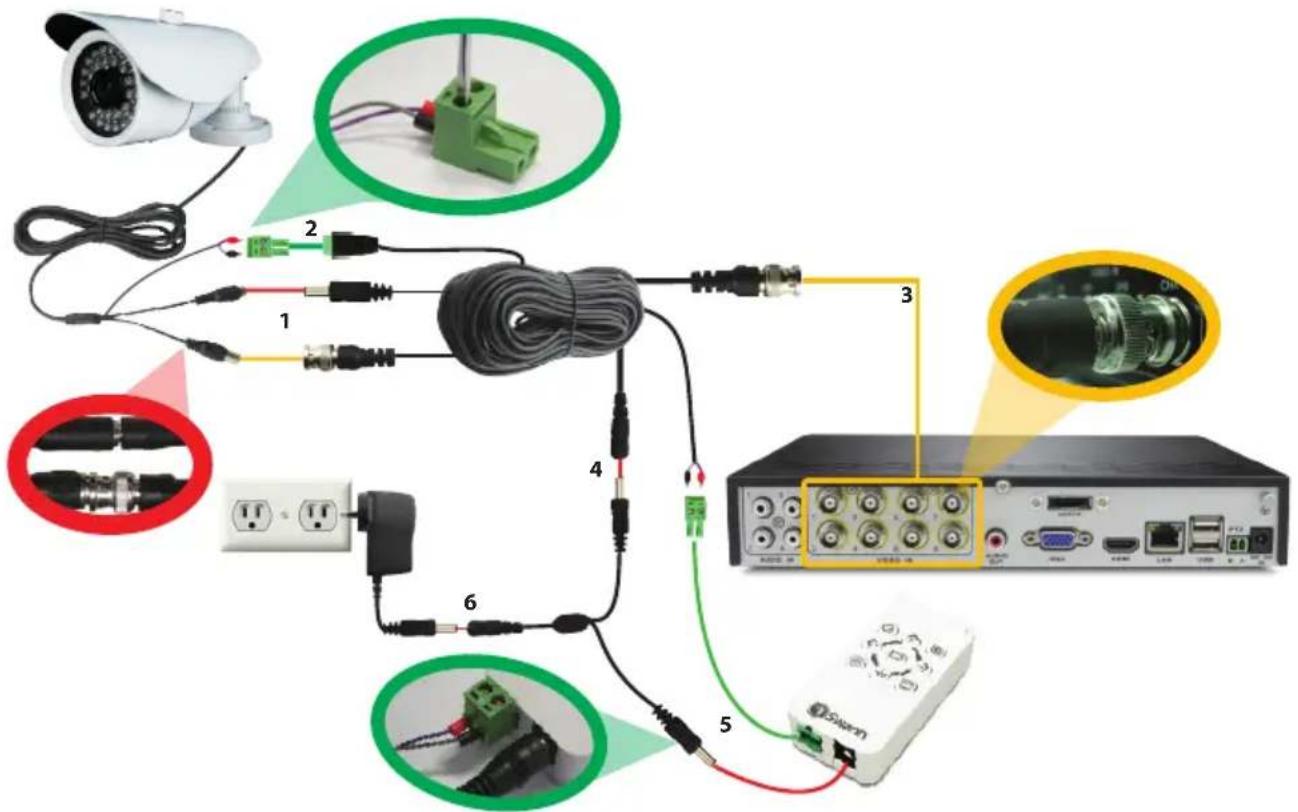
- Connect the camera's DC and BNC cables to the extension cable, twist the BNC connector to lock it together securely.
- (Optional) If you intend to use the OSD controller, connect the camera's green RS485 plug to the extension cable. You may first need to attach the RS485 plug to the wires on the cables as shown in the diagram above.
- Connect the other end of the BNC extension cable to an unused channel on the back of your DVR and twist the connector to lock it on securely.
- Connect the extension cable's DC socket to one end of the power splitter cable.
- (Optional) To use the OSD controller, plug the extension cable's RS485 plug (note red connector to A/+ and black connector to B/- on the controller socket) and the other end of the power splitter to the OSD controller's RS485 port and DC in power jack.
- Connect the power splitter cable to the power adapter, and plug the power adapter into a wall outlet.
Note: Once the camera is set up and working well it is a good idea to wrap some electrical tape around the connections between the camera cable and the BNC extension cable to keep moisture out and preserve the electrical integrity of the connection.
Troubleshooting
Problem: At night, all I see is white.
Solution: The camera is most likely looking through a window. At night, the infrared light the camera uses to see in the dark can 'bounce back' off a reflective surface (such as glass, water, spider webs, some ceramics and so on) and effectively blind the camera. If you want to see outside, mount the camera outside - we made it weatherproof for a reason!
Problem: I see only a blank screen where my image should be.
Solution: Check the wiring to the camera, and ensure the camera is being supplied power from the included power adapter. Try using a different video lead, or connecting the camera to a different television or monitor. Be sure there are no devices interrupting your signal, such as a DVR or VCR that isn't outputting the signal correctly.
Problem: I can't see anything at night.
Solution: The maximum range of the night vision is just that, the maximum range. If there's nothing in this range, you won't see anything. Also, some dark objects (like the proverbial black cat) may not reflect enough light to be seen except as a silhouette if the background is brighter. Some objects which can easily be seen in visible light don't reflect much infrared light.
Advanced Feature: On Screen Display (OSD)
The OSD is an optional use, advanced feature that allows you to change settings for:
Wide Dynamic Range (reduces the difference between light and dark areas of a scene)
3D Noise Reduction (reduces digital image "noise" in low light images)
Back Light Compensation (adjusts the image if strong light source is in the scene background)
Auto White Balance (another way of adjusting the image to compensate for different lighting and colour conditions in a camera scene)
Numerous other image tuning and camera setting options.
The camera will work perfectly well if you never attach the OSD controller - it will regulate all its settings automatically and will suit most applications.
The OSD controls are many and varied so if you would like to make some changes or have a particular need for your camera that requires some fine tuning, simply read the OSD guide included in your pack or you can download the guide to the OSD from our website:
www.swann.com/osdpro
Helpdesk / Technical Support Details
Swann Technical Support
All Countries E-mail: tech@swann.com
Telephone Helpdesk
USA toll free
1-800-627-2799
AUSTRALIA toll free
1300 138 324
USA Exchange & Repairs
1-800-627-2799 (Option 1)
(M-F, 9am-5pm US PT)
NEW ZEALAND toll free
0800 479 266
UK
0203 027 0979

Swann
Limited Warranty Terms & Conditions
Swann Communications warrants this product against defects in workmanship and material for a period of one (1) year from it's original purchase date. You must present your receipt as proof of date of purchase for warranty validation. Any unit which proves defective during the stated period will be repaired without charge for parts or labour or replaced at the sole discretion of Swann. The end user is responsible for all freight charges incurred to send the product to Swann's repair centres. The end user is responsible for all shipping costs incurred when shipping from and to any country other than the country of origin.
The warranty does not cover any incidental, accidental or consequential damages arising from the use of or the inability to use this product. Any costs associated with the fitting or removal of this product by a tradesman or other person or any other costs associated with its use are the responsibility of the end user. This warranty applies to the original purchaser of the product only and is not transferable to any third party. Unauthorized end user or third party modifications to any component or evidence of misuse or abuse of the device will render all warranties void.
By law some countries do not allow limitations on certain exclusions in this warranty. Where applicable by local laws, regulations and legal rights will take precedence.
For Australia: Our goods come with guarantees which cannot be excluded under Australian Consumer Law. You are entitled to a replacement or refund for a major failure and for compensation for any other reasonably foreseeable loss or damage. You are also entitled to have the goods repaired or replaced if the goods fail to be of acceptable quality and the failure does not amount to major failure.
FCC Verification
This equipment has been tested and found to comply with the limits for Class B digital device, pursuant to part 15 of the FCC Rules. These limits are designed to provide reasonable protection against harmful interference in a residential installation. This equipment generates, uses and can radiate radio frequency energy and, if not installed and used in accordance with the instructions, may cause harmful interference to radio or television reception, which can be determined by turning the equipment off and on, the user is encouraged to try to correct the interference by one or more of the following measures:
Reorient or relocate the receiving antenna
Increase the separation between the equipment and the receiver
- Connect the equipment into an outlet on a circuit different from that to which the receiver is connected
- Consult the dealer or an experienced radio/TV technician for help
WARNING: Modifications not approved by the party responsible for compliance could void user's authority to operate the equipment.
Acerca de la cámara
- PROFESSIONAL ALL-PURPOSE SECURITY CAMERA
- ABOUT THE CAMERA
- PLACEMENT GUIDE
- TIPS: POSITIONING AND ORIENTING
- MOUNTING THE CAMERA
- TO MOUNT THE CAMERA
- TIPS: POSITIONING YOUR CABLES
- TIPS: WEATHER RESISTANCE
- TIPS: NIGHT VISION
- CONNECTION GUIDE
- TROUBLESHOOTING
- ADVANCED FEATURE: ON SCREEN DISPLAY (OSD)
- HELPDESK / TECHNICAL SUPPORT DETAILS
- TELEPHONE HELPDESK
- USA EXCHANGE & REPAIRS
- NEW ZEALAND TOLL FREE
- SWANN
- LIMITED WARRANTY TERMS & CONDITIONS
- FCC VERIFICATION
- ACERCA DE LA CÁMARA
Brand : SWANN
Model : PRO-870
Category : Surveillance Camera