
EPH-RS01 - Earphones YAMAHA - Free user manual and instructions
Find the device manual for free EPH-RS01 YAMAHA in PDF.


| Product type | Wired in-ear headphone |
| Brand | YAMAHA |
| Model | EPH-RS01 |
| Weight | Approx. 16 g (with cable) |
| Cable length | 1.2 m |
| Connector | 3.5 mm jack compatible with smartphone / PC |
| Impedance | 32 ohms |
| Frequency response | 20 Hz – 20 kHz |
| Sensitivity | 100 dB |
| Transducer | 8.5 mm dynamic |
| Compatibility | All devices with a 3.5 mm jack |
| Features | Built-in microphone and one-button remote (iOS/Android) |
| Included accessories | Silicone ear tips (S/M/L), cable clip |
| Care and cleaning | Clean with a soft dry cloth, avoid liquids |
| Safety | Do not use at high volume for extended periods |
| Spare parts and repairability | Replacement ear tips available, cable not replaceable |
| Warranty | 2 years (according to local legislation) |
Frequently Asked Questions - EPH-RS01 YAMAHA
User questions about EPH-RS01 YAMAHA
0 question about this device. Answer the ones you know or ask your own.
Ask a new question about this device
Download the instructions for your Earphones in PDF format for free! Find your manual EPH-RS01 - YAMAHA and take your electronic device back in hand. On this page are published all the documents necessary for the use of your device. EPH-RS01 by YAMAHA.
USER MANUAL EPH-RS01 YAMAHA
MANUAL DE INSTRUÇÕES
Refer to “Part names / how to use” on P. 3.
Thank you for selecting this Yamaha product.
To assure the finest performance, please read this owner's manual carefully. Keep it in a safe place for future reference.
WARNING
Do not listen with the earphones while driving or cycling. Also avoid using them where hearing must not be impaired, like at a railroad crossing and a site of construction. Reduced ability to hear surrounding sound increases the risk of an accident.
CAUTION
■Cautions against hearing damage
- Avoid continuous earphones-use at high volume. It may cause hearing loss. Using the earphones for a long time with the device at a high volume, may result in hearing loss. Do not exceed 40 hours/week at 80 dB(A) or 5 hours/week at 89 dB(A).
- Minimize the volume from the device to be connected before connecting the plug.
For your safety
• In case the earphones irritate your skin, stop use immediately.
- Keep the product out of reach of children to avoid them swallowing small parts.
- Do not use the earphones with the ear pieces detached or broken. Otherwise, they may cause injury or illness.
- Securely attach the ear pieces to the earphones. If the ear pieces are detached from the earphones and stuck in your ears, they may cause injury or illness.
- Do not place or hold the earphones in the vicinity of a clock, magnetic card, or other object that can be affected by the magnetic field of the product. Otherwise, the data on the affected device may be destroyed.
Notes on use
• Refer also to the manuals supplied with the devices to be connected.
- When removing the plug from the connected device, be sure to pull out by the plug itself, not the cable. Bending or pulling the cable forcefully may damage it.
- Do not disassemble the earphones. Do not use earphones that are malfunctioning.
- Your ears may tingle in geographical locations where the air is very dry. This is not a malfunction of the earphones, but is caused by static electricity on your body or a connected device.
- If the ear pieces are not securely positioned in your ears, you may not hear the bass range clearly. To enjoy better sound quality, adjust the ear pieces so they will fit your ears perfectly. For example, you might replace poor-fitting ear pieces with ear pieces of an appropriate size.
- Clean the earphones with a soft dry cloth. Do not leave the plug dirty otherwise the sound may be distorted.
- Do not expose the earphones to direct sunlight, dirt, heat or moisture.
Etiquette
Do not use the earphones at high volume in a public place. Sound leakage from the earphones will be a nuisance to people around you.
Part names / how to use
Wear the earphones with the L mark in your left ear, and the one with the R mark in your right ear.
Also refer to the illustration on P. ii at the beginning of this manual.
A Ear Pieces
Replacing the Ear Pieces
Using the ear pieces is recommended. Ear pieces are supplied in four sizes (L, M, S, XS). The S size ear pieces are attached to the earphones on purchase. Use the most suitable size.

natural_image
Diagram showing a device being inserted into a container, with no visible text or symbolsB Smart Cable Holder
Using the Smart Cable Holder
When not using the earphones, slide the Smart Cable Holder for tangle-prevention fully upward. Furthermore, insert the plug in the Smart Cable Holder to avoid the whole cable becoming tangled.

natural_image
Illustration of two hands holding test probes with arrows indicating movement (no text or symbols)C Remote Control (P. 4)
D L-shaped Plug
Ear Cuffs (P. 5)
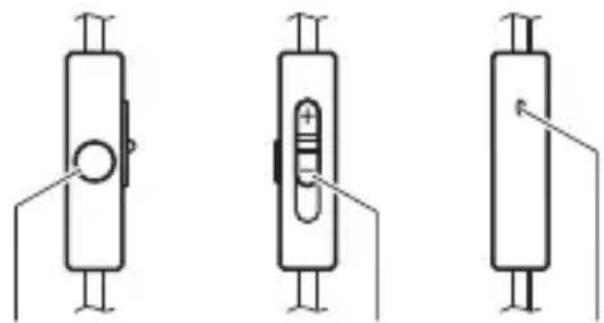
■Using the remote control
This product uses a remote control cable with a built-in microphone. You can easily receive an incoming call, talk over the phone, play back music, etc.
Front view Side view Rear view
natural_image
Three schematic diagrams of electrical components with no text or symbolsVolume button MicrophoneCenter button
| Function Operation | |
| Play music or videoPause music or videoReceive a phone callEnd a phone call | Press the center button once. |
| Adjust the volume Slide the volume button. | |
* Pausing music or video playback might not work for some smartphones.
* The volume of the connected device itself cannot be adjusted.
* Minimizing the volume with the remote control does not completely mute the sound.
* During a call, the conversation is possible without moving the microphone close to the mouth.
■ Using the ear cuffs
There is one ear cuff each for the left and right ears.
1 Pass the cable through the ear cuff's cable retainer.
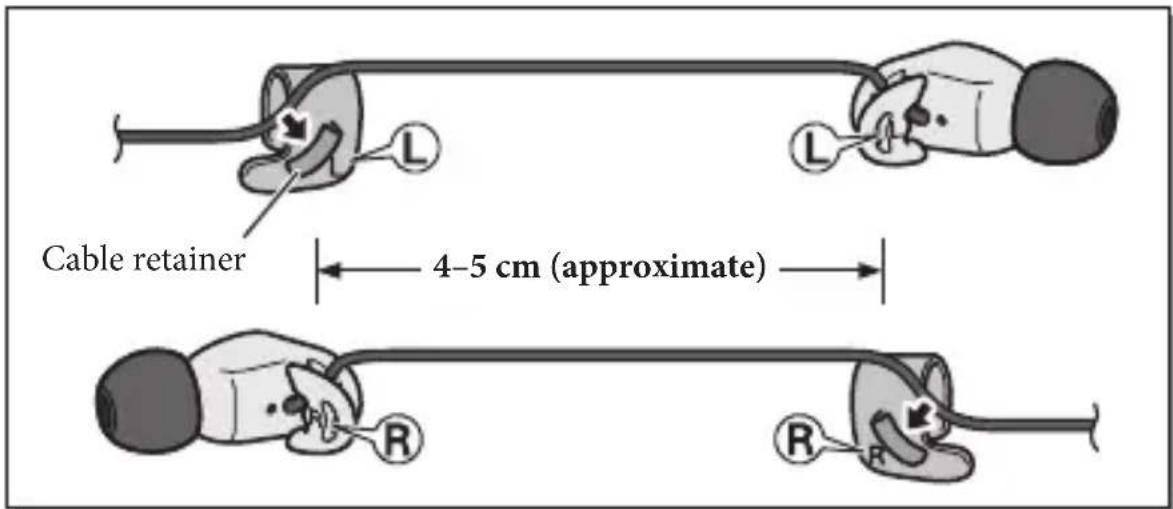
2 Place the ear cuff on your ear so that the protruding tab of the ear cuff is behind your ear.
The cable should pass through the cable retainer and hang down behind your ear.

3 Adjust the length of the cable, and insert the earphones into your ear.
5 En
Troubleshooting
If the situation does not improve even after trying the following actions, or if any abnormalities not listed below are observed, contact the nearest authorized Yamaha dealer or service center.
| SymptomAction | |
| No sound • Make | sure the plug is fully inserted in the jack on the playback device.• Make sure the playback device is not paused.• Make sure the playback device is turned on.• Make sure the volume is not set low on the remote control and/or the playback device. |
| Sound is heard only from one channel | Make sure the plug is fully inserted in the jack on the playback device. |
| Earphones volume is too high/low | Adjust the volume on the remote control and/or the playback device. |
| Remote control does not work | • Make sure the plug is fully inserted in the jack on the playback device.• Remote control might not work for some playback devices. |
Caution Regarding the Waterproofing
The earphones of this product feature a water-resistant design that allows them be used even if they are exposed to a certain amount of rain or sweat, but please be aware of the following precautions.
- Do not allow large amounts of water to contact the earphones.
If the earphones are exposed to a large amount of water, let them dry out in a dry location for at least one day before using them. When letting them dry, do not use a hair drier or similar device, since this may cause the earphones to malfunction or to become deformed.
• Do not place the earphones in water.
They may malfunction if they fall into water. - If a large amount of sweat or water droplets should adhere to this product, wipe it off with a dry cloth as soon as possible.
- Do not allow the cable or remote control to become wet.
Since the cable and the remote control are not water-resistant, allowing them to become wet may cause a malfunction.
Malfunctions caused by water entering the earphones due to incorrect handling will not be covered by the warranty even if the warranty period is still in effect.
Warranty policy for European Economic Area (EEA) and Switzerland, Australia customer
In the unlikely event that your Yamaha product needs guarantee service, please contact the dealer from whom it was purchased. If you experience any difficulty, please contact Yamaha representative office in your country. You can find full details on our website. EEA and Switzerland: (http://europe.yamaha.com/warranty/) Australia: (http://au.yamaha.com/)
Warranty policy for U.S. and Canada customer
Your Yamaha product is covered by a limited warranty for one year from the date of purchase. In the unlikely event of failure due to defective materials or workmanship, Yamaha will repair or replace them at no charge.
Please visit our website for full details.
U.S.: (http://usa.yamaha.com/), Canada: (http://ca.yamaha.com/)
Information for Users on Collection and Disposal of Old Equipment

natural_image
Symbol of a trash bin with crossed lines indicating no waste or restriction, and a solid black rectangle below (no text or symbols)This symbol specified in the Directives 2002/96/EC indicates that used electrical and electronic products should not be mixed with general household waste. For proper treatment to avoid harmful effect on human health and environment, please contact your local municipality, your waste disposal service or the point of sale where you purchased the items.
natural_image
Diagram showing a hand holding a device with an arrow pointing to a component (no text or symbols present)B Support de câble intelligent
natural_image
Illustration of two hands holding test probes with arrows indicating movement (no text or symbols)natural_image
Three schematic diagrams of cylindrical electronic components with pins and connectors, no text or symbols present.(http://europe.yamaha.com/warranty/).
Garantie Canadienne
natural_image
Symbol of a trash bin with no text or numbers, crossed by two crossed lines and a solid black rectangle below (no text or symbols present)natural_image
Illustration of a hand holding a device with a magnified inset showing a component (no text or symbols)natural_image
Illustration of two hands holding a small electronic device with earphones, showing the change from left to right (no text or symbols present)natural_image
Three schematic diagrams of cylindrical electronic components with pins and connectors, no text or symbols present.Lautstärkeregler MikrofonMittlere Taste
natural_image
Symbol of a trash bin with crossed lines indicating no waste or restriction, and a solid black rectangle below (no text or symbols)natural_image
Diagram showing a hand holding a device with a magnified inset highlighting a component (no text or symbols present)C Fjärrkontroll (S. 4)
D L-formad kontakt
natural_image
Three schematic diagrams of cylindrical electronic components with pins and connectors, no text or symbols present.Volymknappen MikrofonMittknapp
natural_image
Symbol of a trash bin crossed with no text or numbers, representing waste sorting or disposal (no text present)natural_image
Diagram showing a hand holding a device with a magnified inset highlighting a component (no text or symbols present)B Fissacavi intelligente
natural_image
Illustration of two hands holding test probes with arrows indicating movement (no text or symbols)natural_image
Three schematic diagrams of cylindrical electronic components with labeled pins and connection points (no text or symbols)Pulsante del
volume
MicrofonoPulsante cen
natural_image
Symbol of a trash bin with crossed lines indicating no waste or restriction, and a solid black rectangle below (no text or symbols)natural_image
Illustration of a hand holding a device with a magnified inset showing a component (no text or symbols)natural_image
Illustration of two hands holding test probes with arrows indicating movement (no text or symbols)© Mando a distancia (P. 4)
D Conector en L
natural_image
Three schematic diagrams of cylindrical electronic components with pins and connectors, no text or symbols present.natural_image
Symbol of a trash bin with crossed lines indicating no waste, and a solid black rectangle below (no text or labels)natural_image
Diagram showing a device being inserted into a device (no text or symbols present)natural_image
Illustration of two hands holding test probes with arrows indicating movement (no text or symbols)C Afstandsbediening (P. 4)
D L-vormige stekker
E Oorklemmen (P. 5)
natural_image
Three schematic diagrams of cylindrical electronic components with no text or symbolsVolumeknop MicrophoneMiddelste knop
natural_image
Symbol of a trash bin with crossed lines indicating no waste or restriction, plus a solid black rectangle below (no text or symbols)natural_image
Diagram showing a hand holding a device with an arrow pointing to a component (no text or symbols present)B Retentor inteligente do cabo
natural_image
Illustration of two hands holding test probes with arrows indicating movement (no text or symbols)C Controle remoto (P. 4)
natural_image
Three schematic diagrams of cylindrical electronic components with pins and connectors, no text or symbols present.natural_image
Symbol of a trash bin with no text or numbers, crossed by two diagonal lines and a solid black rectangle below (no text or symbols present)natural_image
Diagram of a hand holding a device with an arrow pointing to a component (no text or symbols present)natural_image
Illustration of two hands holding test probes with arrows indicating movement (no text or symbols)natural_image
Pure electrical circuit lines without any symbolsКНОПКА

natural_image
Pure electrical circuit lines without any symbolsРегулятор громкости

natural_image
Pure electrical circuit lines without any symbolsМикрофонЦентральная
natural_image
Symbol of a trash bin with no text or numbers presentnatural_image
Diagram of a hand holding a device with an arrow pointing to a component (no text or symbols present)B 迷你线夹
使用迷你线夹
natural_image
Illustration of two hands holding a small electronic device with connectors and arrows indicating movement (no text or symbols)C 遥控 (第4页)
D L型插头
E 耳骨夹 (第5页)
■使用遥控器
natural_image
Three schematic diagrams of cylindrical electronic components with no text or symbols音量按钮 麦克风中央按钮
natural_image
Diagram showing a device interacting with a device, with an arrow indicating direction (no text or symbols present)B 스마트 케이블 홀더
스마트 케이블 홀더 사용하기
C 리모컨 (P.4)
DL자형 플러그
E 이어 커프 (P.5)
■리모컨 사용하기
natural_image
Three schematic diagrams of cylindrical electronic components with no text or symbols볼륨 버튼 마이크가운데 버튼
B スマートケーブルホルダー
スマートケーブルホルダーを使用する
natural_image
Illustration of two hand-painted diagrams showing a device being adjusted, with no visible text or symbols.C リモコン (P.4)
D L型プラグ
E イヤカフ (P.5)
■リモコンの使いかた
■イヤカフの使いかた


- Thank you for selecting this Yamaha product.
- WARNING
- CAUTION
- ■Cautions against hearing damage
- For your safety
- Notes on use
- Etiquette
- Part names / how to use
- A Ear Pieces
- Replacing the Ear Pieces
- B Smart Cable Holder
- Using the Smart Cable Holder
- C Remote Control (P. 4)
- D L-shaped Plug
- Ear Cuffs (P. 5)
- ■Using the remote control
- ■ Using the ear cuffs
- Pass the cable through the ear cuff's cable retainer.
- Place the ear cuff on your ear so that the protruding tab of the ear cuff is behind your ear.
- Adjust the length of the cable, and insert the earphones into your ear.
- Troubleshooting
- Caution Regarding the Waterproofing
- Warranty policy for European Economic Area (EEA) and Switzerland, Australia customer
- Warranty policy for U.S. and Canada customer
- Information for Users on Collection and Disposal of Old Equipment
- B Support de câble intelligent
- Garantie Canadienne
- C Fjärrkontroll (S. 4)
- D L-formad kontakt
- B Fissacavi intelligente
- © Mando a distancia (P. 4)
- D Conector en L
- C Afstandsbediening (P. 4)
- D L-vormige stekker
- E Oorklemmen (P. 5)
- B Retentor inteligente do cabo
- C Controle remoto (P. 4)
- B 迷你线夹
- 使用迷你线夹
- C 遥控 (第4页)
- D L型插头
- E 耳骨夹 (第5页)
- ■使用遥控器
- B 스마트 케이블 홀더
- 스마트 케이블 홀더 사용하기
- C 리모컨 (P.4)
- DL자형 플러그
- E 이어 커프 (P.5)
- ■리모컨 사용하기
- B スマートケーブルホルダー
- スマートケーブルホルダーを使用する
- C リモコン (P.4)
- D L型プラグ
- E イヤカフ (P.5)
- ■リモコンの使いかた
- ■イヤカフの使いかた
Brand : YAMAHA
Model : EPH-RS01
Category : Earphones