
VA-0010 - Vacuum packaging machines Concept - Free user manual and instructions
Find the device manual for free VA-0010 Concept in PDF.


| Product type | Vacuum sealer device |
| Brand | Concept |
| Model | VA-0010 |
| Dimensions (L × W × H) | 40 × 20 × 10 cm |
| Weight | 2.5 kg |
| Power supply | 220-240 V, 50-60 Hz, 120 W |
| Main functions | Vacuum sealing, sealing, automatic stop, suction power adjustment |
| Bag capacity (max width) | 30 cm |
| Material | ABS plastic and stainless steel |
| Maintenance and cleaning | Clean exterior with a damp cloth; do not immerse; empty the liquid collection tray |
| Safety | Safety lock, automatic shut-off in case of overheating |
| Spare parts and repairability | Replacement bags, sealing gasket, fuse |
| General information | 2-year warranty, made in China |
| Included accessories | 10 bags, film roll, jar adapter |
| Noise level | < 70 dB(A) |
| Color | Black / Silver |
| Energy consumption | 0.12 kWh per cycle |
| Closure type | Teflon sealing bar |
Frequently Asked Questions - VA-0010 Concept
User questions about VA-0010 Concept
0 question about this device. Answer the ones you know or ask your own.
Ask a new question about this device
Download the instructions for your Vacuum packaging machines in PDF format for free! Find your manual VA-0010 - Concept and take your electronic device back in hand. On this page are published all the documents necessary for the use of your device. VA-0010 by Concept.
USER MANUAL VA-0010 Concept
natural_image
Close-up of hands using a tool to cut a textured surface, no visible text or symbols
natural_image
Close-up of hands handling a large rectangular object with textured surface (no visible text or symbols)
natural_image
Person handling a white rectangular object on textured ground (no visible text or symbols)
natural_image
Close-up of a hand holding an open book (no visible text or symbols)Obr. 1 Obr. 2 Obr. 3 Obr. 4
concept
CZ

natural_image
Person holding an open book with visible text on the cover (no legible signage or symbols)
natural_image
Close-up of a white circular object with a curved line extending from it, next to a dark surface (no visible text or symbols)
natural_image
Close-up of a hand pressing down on a mechanical component (no visible text or symbols)natural_image
Close-up of a mechanical component with two curved grooves (no visible text or symbols)Obr. 9
Tip:
natural_image
Close-up of hands using a tool to cut a textured surface, no visible text or symbols
natural_image
Close-up of hands handling a small electronic device with a grid-patterned surface (no visible text or symbols)
natural_image
Person handling a white rectangular object on textured ground (no visible text or symbols)
natural_image
Close-up of a hand holding an open book (no visible text or symbols)Obr. 1 Obr. 2 Obr. 3 Obr. 4
concept
SK

natural_image
Person holding an open book, no visible text or symbols on the book or surroundings
natural_image
Close-up of a white circular object with a curved line attached, possibly a device or component (no visible text or symbols)
natural_image
Close-up of a hand inserting a small object into a wall, no visible text or symbolsTIPY NA NAJLEPŠÍ VÝKON PRÍSTROJA
natural_image
Close-up of hands using a tool to cut a textured material (no visible text or symbols)natural_image
Close-up of hands handling a small object with visible texture and surface (no text or symbols)
natural_image
Person handling a white rectangular object on a textured surface (no visible text or symbols)
natural_image
Close-up of a hand holding an open book (no visible text or symbols)concept
PL
natural_image
Person holding an open book with visible text on the cover (no legible signage or symbols)
natural_image
Close-up of a white circular object with a curved line extending from it, against a dark background (no visible text or symbols)
natural_image
Close-up of a hand inserting a small object into a wall, no visible text or symbolsnatural_image
Close-up of a white mechanical component with two black oval grooves (no visible text or symbols)Rys. 9
PL
concept
JAK UZYSKAĆ NAJLEPSZE EFEKTY
4LPOUSPMPXBr D[Z KFTU QSBXJE PXP QPE rD[POZ LBCFM [BTJMBKfDZ J D[Z OJF KFTU VT 4LPOUSPMPXBr D[Z UPSFCLB KFTU OBMFfZDJF VNJFT[D[POB J OJF KFTU QP[B LPNPSf PETZ 6QFXOJr TJT fF XJFLP KFTU [BNLOJTUF QSBXJE PXP
4LPOUSPMPXBr VT[D[FMOJFOJF UPSFCLJ QBUS[ QPQS[FEOJ VTUTQ
WYPOSAŻENIE DODATKOWE
7# LPNQMFU GPMJJ EP QBLPXBOJB QS∅fOJPXFHP T[U
7# LPNQMFU GPMJJ EP QBLPXBOJB QS∅fOJPXFHP T[U
7% LPNQMFU QPKFNOJL∅X EP QS[FDIPXZXBOJB X QS∅fOJ T[U
7% LPNQMFU D[XPSPLfUOZDI QPKFNOJL∅X EP QS[FDIPXZXBOJB X QS∅fOJ T[U
7% LPNQMFU LPSL∅X EP PETZTBOJB CVUFMFL T[U
INSTRUKCJE I INFORMACJE O PRAWIDŁOWYM UŻYTKOWANIU URZĄDZENIA
natural_image
Close-up of hands using scissors to cut a piece of paper or plastic (no visible text or symbols)- ábra

natural_image
Close-up of hands handling a flatbed object with a ruler partially visible (no text or symbols)- ábra

natural_image
Person holding a white rectangular object, possibly a container or tool, with no visible text or symbols.- ábra

natural_image
Close-up of a hand holding an open book (no visible text or symbols)- ábra
concept
HU
natural_image
Close-up of hands holding a tablet device (no visible text or symbols)- ábra 6. ábra 7. ábra 8. ábra

natural_image
Person holding a book, no visible text or symbols on the object
natural_image
Close-up of a medical device with a circular component and attached tubing (no visible text or symbols)
natural_image
Close-up of a hand inserting a small electronic component into a device (no visible text or symbols)FONTOS FIGYELMEZTETÉS:
natural_image
Close-up of hands using a tool to cut a textured, irregularly shaped object (no visible text or symbols)Att. 1

natural_image
Close-up of hands handling a printed document or card with a ruler partially visible (no text or symbols)Att. 2

natural_image
Person handling a white rectangular object on a textured surface (no visible text or symbols)Att. 3

natural_image
Close-up of a hand holding a white book with visible pages (no legible text)Att. 4
concept
LV
Maisinu, kas izgatavoti no rulliem Concept Fresh VB2203, VB2806, vakuuma aizkausēšana

natural_image
Close-up of a white circular object with a coiled cable and a rectangular component attached (no visible text or symbols)
natural_image
Close-up of a hand using a tool to press or install a piece of paper (no visible text or symbols)natural_image
Close-up of a mechanical component with two curved grooves (no visible text or symbols)Att. 9
LV
concept
IETEIKUMI LABÄKAI IERİCES JAUDAI
Thank you for purchasing a Concept product. We hope you will be satisfied with our product throughout its service life.
Please study the entire Operating Manual carefully before you start using the product. Keep the manual in a safe place for future reference. Make sure other people using the product are familiar with these instructions.
| Technical parameters | |
| Voltage 230 V ~ 50 Hz | |
| Input 90 W | |
PACKAGE CONTENTS:
VA0010 - Vacuum foil sealer
5 pcs of bags of 22 x 30 cm
5 pcs of bags of 28 x 40 cm
IMPORTANT SAFETY INSTRUCTIONS:
- Use the unit only as described in this operating manual.
- Remove all the packaging and marketing materials from the unit before the first use.
- Make sure the mains voltage corresponds to the values on the rating plate. Use grounded wall outlets only.
- Place the appliance on a firm and heat resistant surface, away from heat sources.
- Before use, check the appliance and its parts for any signs of damage.
- Do not use the appliance if not working properly.
- Do not expose the AC adapter cord to excessive bending.
- When disconnecting the device from electrical outlet, grasp and pull the AC adapter only.
- Never attempt to disassemble the device!
- If the device is not used, remove the AC adapter from the electrical outlet.
- Never put the device in a microwave oven and do not wash it in a dishwasher!
- Do not immerse the AC adapter or appliance in water or other liquids.
- Switch off and unplug the appliance from the power outlet before cleaning it and when not in use.
•The unit is suitable for domestic use only. It is not designed for commercial operation. - Check the appliance and power cord for damage regularly. Do not switch on a damaged unit.
- Do not repair the appliance yourself. Contact an authorized service center.
- This appliance may be used by children 8 years of age and older and by persons with physical or mental impairments or by inexperienced persons if they are properly supervised or have been informed about how to use of the product in a safe manner and understand the potential dangers. Children must not play with the appliance. This appliance may be cleaned by children 8 years of age and older if they are properly supervised. Keep this appliance and the power cord out of reach of children younger than 8 years of age.
Failu actu lead prepare to follow the manuf rer's instructions may to refusal of warranty ir.
EN
concept
DESCRIPTION OF THE DEVICE
- Safety switch
- Lid buttons
- Suction opening
- Sealing strip
- Vacuum chamber
- Bottom gasket
- Top gasket
- Sealing element

OPERATING INSTRUCTIONS
The process of production of bags from Concept Fresh rolls - VB2203, VB2806
- Connect the unit to the mains.
- Unwind a section of the foil you will need for storing of your food and cut it off with scissors, adding approx. 10 cm in length to allow for sealing and bag shrinkage (Fig. 1). If you wish to reuse the bags, add about 1.5 cm for each use so that the bag can be resealed after cutting off the seal. Both ends are to be cut perpendicular to the longitudinal edge of the roll.
- Open the lid of the unit and insert one of the cut edges into the unit, so that the edge of the foil touches the gasket of the seal vacuum chamber (6). The bag must not overlap into the vacuum chamber (5) (Fig. 2).
- Close the lid and press it down firmly on both sides (Fig. 3). The unit turns on when snapped shut. Once the bag is sealed, the unit automatically turns off. Open the lid by pressing the grey buttons on the sides of the appliance (Fig. 4).

natural_image
Close-up of hands holding a tool near a textured surface (no visible text or symbols)Fig. 1

natural_image
Close-up of hands handling a large, textured object with no visible text or symbolsFig. 2

natural_image
Person handling a white rectangular object on a textured surface (no visible text or symbols)Fig. 3

natural_image
Close-up of a hand holding an open book (no visible text or symbols)Fig. 4
concept
EN
Vacuum sealing of prepared bags from Concept Fresh rolls - VB2203, VB2806
- Fill the bag so that the content is approx. 7.5 cm from the open end of the bag. Make sure that neither the outside nor the inside of this part of the bag is contaminated with the stored food.
- Insert the open end of the bag into the vacuum chamber (6), between the gaskets (5). The end of the bag must be free of ripples and wrinkles (Fig. 5).
- Close the lid and by pressing the lid switch on the unit (Fig. 6). After the air is completely removed out of the bag, the vacuuming process is automatically terminated and the bag is sealed.
- Before reuse, wait for about 1 minute until the unit cools down.
Important:
Use only original bags made from Concept Fresh rolls VB2203 and VB2806.
Remove excess moisture before the vacuuming process!
Never vacuum seal bags filled with a liquid!

natural_image
Close-up of hands holding a rolled-up document or scroll (no visible text or symbols)natural_image
Person holding an open book with visible text on the cover (no legible signage)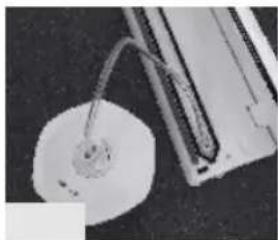
natural_image
Close-up of a white circular object with a coiled cable and a small hole, next to a dark rectangular device (no visible text or symbols)
natural_image
Close-up of a hand pressing down on a small electronic device (no visible text or symbols)Vacuum packaging of food in Concept Fresh canisters VD8100, VD8200 and wine stopper VD8300
- Fill the canister up to 2.5 cm below the edge.
- Wipe off any food residues or moisture on the edge of the canister.
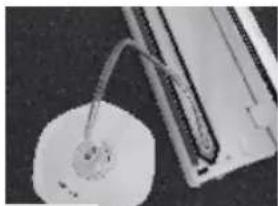
- Insert one end of the tube (supplied as part of each set of canisters/wine stoppers) into the vacuum opening (3) in the vacuum chamber and the other end into the opening in the lid of the canister/stopper (Fig.7).
- Move the button on the lid of VD8100 canisters to the „SEAL" position. Turn the unit on by pressing the safety switch (1) and hold it for about 1 minute until the process is completed (Fig. 8). After the vacuuming process is completed, the unit automatically turns off. Remove the tube from the lid and store the canister as required.
- The vacuuming process should take at least 1 minute depending on the size of the canister and its content. The characteristic sound will tell you when the process is finished (for VD8200 canisters check the red button on the lid, which is sucked inside during the vacuuming process).
Important:
The sealing element is hot throughout the entire vacuuming process. Do not touch it!
- To open the canister:
VD8100 canister set - turn the button on the cover to the „OPEN” position VD8200 canister set - press the blue button and hold until the lid cannot be reopened VD8300 wine stopper set - pull the stopper out the neck of the bottle
Tip:
To prevent loss of the tube, store the tube in the opening inside the lid of the unit (Fig. 9).
The unit is equipped with an opening in the bottom for the storage of the power cord. Do not wrap the cord around the appliance!

natural_image
Close-up of a white mechanical component with two dark oval grooves (no visible text or symbols)Fig. 9
EN
concept
BEST PERFORMANCE TIPS
- Do not overfill the bags or the canisters. Always leave enough space, see the instructions above.
- Do not use the unit to seal bags if the area to be sealed is contaminated or wet. Always wipe and dry ends of the bag before sealing.
- Do not leave too much air in the bag. Always remove as much excess air as possible before sealing the bag.
- Do not vacuum items with sharp edges that could tear the bag. Use suitable canisters for items with sharp edges.
- Allow about 1 minute for the unit to cool down before reuse.
- If the unit is unable to complete the vacuum packaging process, it switches off automatically after 45 seconds. Check the seal on the bag and the position of the bag in the vacuum chamber.
- Prevent liquids from entering the vacuum chamber or the opening as it would cause subsequent damage to the unit. If you want to package moist food, froze the food first and wipe the bag with a paper towel.
- Liquids can only be vacuum packed in canisters that are available for purchase as additional accessories. Wait until the liquids are cold!
- Any vacuum packed perishable food is to be stored in the refrigerator or freezer. Vacuum packaging only makes the food stay fresh longer, but it does not protect the food from spoiling.
- The vacuum packing system can be used not only to store food but also to protect valuables (e.g. documents, electronics, medication, etc.)
11 Before each use, make sure that the vacuum chamber and opening are clean and free from any impurities. - Any damage caused to the unit due to the entry of food residues sucked in from the vacuum chamber is not covered by the warranty!
CLEANING AND MAINTENANCE
- Always unplug the unit before cleaning.
- Do not immerse the unit or any of its parts in water and do not wash in the dishwasher.
- Avoid using abrasive products, solvents or hot water to clean the unit or any of its parts.
- Wipe the surface of the unit with a damp cloth and a mild detergent.
Wipe out the inside of the unit with a paper towel to remove any food and liquid residues. - Dry thoroughly before reuse.
Cleaning of bags and canisters for reuse
Before reuse, wash the bags in warm soapy water and rinse thoroughly.
Important:
Do not clean in the dishwasher; high temperature would damage the bags and canisters.
Do not immerse the lids in water, clean them with a damp cloth and a mild detergent.
canisters are not intended for heating food in the microwave or storing food in the freezer.
Warning:
Do not reuse bags, which were previously used to store raw meat, or heated in boiling water or the microwave.
TROUBLESHOOTING
1. The device does not work
- Check if the supply cord is properly connected and not damaged.
- Check whether the bag is in the correct position and not outside the vacuum chamber.
- Make sure the lid is closed properly.
2. Air is not removed from the bag completely
- Make sure the open end of the bag is properly inserted in the vacuum chamber. If the edge of the bag overlaps the gasket of the vacuum groove, the air will not be sucked out, although the seal is tight.
- Check for leaks by immersing the bag in a canister filled with water. Any escaping bubbles indicate a leak. In this case, use another bag or cut off the leaking seal and re-seal the bag.
- Do not make additional seals on the sealed sides of the bag. The bags are provided with special seals on the sides that are tight along the entire length of the outer edge. Attempts to make a new side seal could cause leakage and entry of air.
3. Air has re-entered the bag after being sealed
- Check the sealing of the bag (see previous paragraph).
- If a leak is discovered, cut off the seal and reseal the bag.
- Moisture contained in food or the food itself (juices, grease, crumbs, etc.) prevents proper sealing of the bag. Reopen the bag, dry and clean the area around the seal and re-seal.
- Items with sharp edges or points may puncture the bag. Wrap food and items with sharp edges or points with soft material (e.g. a paper towel) and seal the bag.
4. The bag melts
The sealing element may be overheated after repeated use. After each use, allow the unit to cool down for about 1 minute.
ADDITIONAL ACCESSORIES
The following additional accessories for the unit are available for purchase:
Code:
VB-2203 set of foils for vacuum packaging - 2 pcs 8594049740314
VB-2806 set of foils for vacuum packaging - 2 pcs 8594049740321
VD-8100 set of vacuum storage canisters - 3 pcs 8594049740352
VD-8200 set of rectangular vacuum storage canisters - 2 pcs 8594049740369
VD-8300 set of bottle vacuum packaging wine stoppers - 2 pcs 8594049740376
INSTRUCTIONS AND INFORMATION FOR CORRECT USE OF THE unit
Chemical reactions in food exposed to air, temperature, moisture, and enzyme action, growth of microorganisms or contamination from insects will cause food spoilage. They also cause freezer burn to improperly packed food due to water evaporation. Vacuum packaging can slow down this process. Vacuum packaging is a scientifically tested food storing method of storing, which keeps food fresh up to five times longer than other used methods.
EN
concept
- Vacuum packaging does not replace thermal processes during food preservation. Perishable food should always be stored in the refrigerator or freezer.
- During the suction of the air a small amounts of liquids, crumbs or food particles may be released into the vacuum chamber and cause damage. Therefore, always check that it is free of any food residues.
- Always make sure that the bags are not overfilled or contaminated up to about 7 cm from the seal (both on the outside and the inside).
- Freeze any moist and juicy food such as raw meat before inserting into the bag. You can also place a folded paper towel inside the upper part of the bag (away from the sealed part) before vacuum packaging to catch excess moisture.
- Deep freeze soups, sauces and other liquids first, for example, in a suitable container.
- Do not put powdered and fine grained food in the bag loosely as it could be sucked out. This type of food can be placed in the bag or the canister in a paper towel or another suitable package.
- Do not make your own seals on the side of the bags. The foil is provided with a special side seal which is tight along its entire length.
- In order to prevent creasing or rippling, gently stretch the foil along the length of the vacuum chamber before closing the lid of the unit.
- Make sure that the edge of the bag does not slip out of the vacuum chamber when closing the lid.
- If you store food with sharp edges, protect the bag from tearing by wrapping the food item in a paper napkin or a towel. You can also use a suitable canister.
- Never reuse bags that have been used to store raw meat or that have been used for cooking or placed in the microwave.
- Never defrost or re-heat food in canisters in the microwave!
TIME AND MONEY SAVING TIPS
Easy marinating - vacuum packaging opens up food pores. It will only take a few minutes to marinate your food, instead of long hours of marinating overnight.
Preparing meals in advance - prepare all everyday and special occasion meals in advance.
Seasonal and specialty dishes anytime - perishable food or food that you eat occasionally will stay fresh for a long time.
Helps during diets - you can only pack prepared food portions. Write the calories and nutritional values of the individual portions on each bag.
Outside the kitchen - you can use this system to protect your supplies and equipment from the effects of air, moisture or oxidation during camping, holidays and trips.
FOOD SAFETY
The vacuum packaging process extends the shelf-life of food by removing most of the air from a sealed storage container or a bag, thus reducing food oxidation which affects the nutritional value, taste and overall quality of food. The removal of air also slows down the growth of microorganisms that may, under certain conditions, reduce the quality of food. These microorganisms include mainly:
Mould - mould cannot grow in an environment with low oxygen content and thus the vacuum packaging method is very efficient in reducing its growth.
concept
EN
Yeast - yeast cells need water, sugar and an appropriate temperature to proliferate. They can survive in air as well as without air. Refrigeration is required to slow down the growth of yeast cells. Freezing inhibits their growth completely.
Bacteria - the growth of bacteria can be significantly reduced at temperatures of 4^ or less. Freezing to -17^ does not kill microorganisms, but inhibits their growth and proliferation. In the case of long term storage of perishable food always freeze the food while using the vacuum packaging technology. Once defrosted, keep the food refrigerated at low temperatures.
CAUTION:
Vacuum packaging is not intended as a substitute to canning. Vacuum packaging is able to slow down the processes causing deterioration of food. Perishable food that needs to be frozen or stored in the refrigerator must be kept at the same temperature after vacuum packaging.
TIPS FOR VACUUM PACKAGING AND RE-HEATING OF FOOD
Defrosting and re-heating of vacuum packed food
Always defrost food in the refrigerator or in the microwave. Do not defrost perishable food at room temperature.
Never defrost food in canisters in the microwave.
When re-heating food packed in bags always cut off one corner of the bag before placing the bag in the microwave.
Do not re-heat bones and fatty food in bags in the microwave, as this will prevent the possibility of overheating. It is recommended to heat these types of food by placing the food in water and gently heating through at a temperature of about 75 °C.
Vacuum packaging of meat and fish:
For best results, put the meat or fish in the freezer for 1 or 2 hours before vacuum packaging. Afterwards, use a bag from a foil roll designed for vacuum packaging of food. This will help the food keep its juice and shape.
If you cannot pre-freeze the food, place a folded towel between the meat and the top part of the bag. Keep this paper towel in the bag to absorb excess moisture and juices escaping during the process of vacuum packaging. Make sure the towel does not overlap to the sealing area.
Note: Beef may become dark after vacuum packaging. This occurs due to the removal of oxygen and it does not indicate deterioration of the food.
Vacuum packaging of hard cheeses:
To keep cheese fresh as long as possible, vacuum pack after each opening and use. Prepare a long bag from the foil roll so that you always have 2.5 cm of the bag for each reopening and repacking of the bag. In addition, leave a standard space of 7.5 cm between the contents of the bag and the seal. You can also pack the cheese in a canister.
IMPORTANT: Never use vacuum packaging for soft cheeses.
EN
concept
Vacuum packaging of vegetables:
We recommend cleaning and blanching (i.e. by brief immersion in hot water) the vegetables before vacuum packaging. This process inhibits enzyme activity that could cause the loss of taste, colour and texture.
Note: Blanch the vegetables by cooking briefly in boiling water or placing them in the microwave: 1 to 2 minutes for leafy vegetables, 3 to 4 minutes for peas in pods, sliced zucchini or broccoli, 5 minutes for carrots and 7 to 11 minutes for corncobs. Vegetables should stay crispy. After blanching, immerse immediately in cold water to stop the cooking process. Finally, dry thoroughly and pack.
To freeze the vegetables, it is recommended to pre-freeze them first for 1 to 2 hours until stiff. Before freezing, divide the vegetables into individual portions and spread them on a baking pan so that the pieces do not touch each other. This will prevent the vegetables from sticking together. Immediately after freezing, wrap the vegetables and put them in the freezer.
Note: All kinds of vegetables (including broccoli, Brussels sprouts, cabbage, cauliflower, kale, turnips, etc.) release gases during storage (it is a natural process). Therefore, blanched vegetables must always be stored in the freezer.
IMPORTANT: Never use vacuum packaging to store mushrooms.
More tips for vacuum packaging of leafy vegetables:
For best results, store leafy vegetables in Concept Fresh VD8100 and VD8200 canisters. First, wash the vegetables properly and dry them with a paper towel or in a centrifuge. Place the dried leaves in a canister and remove the air. Store the canister in the refrigerator.
Vacuum packaging of fruit:
Follow the same steps as in the case of vegetables, only without blanching.
You can freeze individual portions for future use or store a small quantity in the refrigerator for quick consumption. We recommend storing fruit in Concept Fresh canisters.
Vacuum packaging of bread:
It is recommended to vacuum pack bread in Concept Fresh canisters, as they are able to retain its original shape. When using bags, pre-freeze the bread for 1 to 2 hours or until completely frozen.
Vacuum packaging of coffee and powdered food:
To prevent the penetration of small particles of food into the vacuum pump, insert a coffee filter or a paper towel into the top part of the bag or canister to prevent the fine material from being sucked up. You can also place food in the bag or canister in its original packaging.
Vacuum packaging of liquids:
For vacuum packaging of liquids in original bottles (wine, oil, etc.) it is recommended to use the original Set of wine stoppers - VD8300. If these stoppers cannot be used, pre-freeze the liquid food in a canister of a suitable shape and size before packing.
Before use, cut off one corner of the bag and defrost in the microwave or in water at 75 °C.
Vacuum packaging of non-food items:
The Concept Fresh vacuum packaging system can also be used to protect non-food materials and items from oxidation, corrosion and moisture. When vacuum packaging these items, follow the steps used for food packaging and use the original Concept Fresh bags or canisters.
concept
EN
When vacuum packaging items with sharp points, wrap the points with a soft material to prevent puncturing of the bag.
Vacuum packaging is an ideal solution for trips to the nature, camping and hiking to pack equipment such as clothing, matches, electronics, maps and food that needs to be kept dry. You can also pack ice, which turns into drinking water after melting.
FOOD STORAGE MANUAL
storage time vacuum pack storage time
Refrigerated food 5-2 °C
Red meat 3-4 days 8-9 days
White meat 2-3 days 6-9 days
Whole fish 1-3 days 4-5 days
Venison 1-3 days 5-7 days
Smoked meat 7-15 days 25-40 days
Sliced smoked meat 4-6 days 20-25 days
Soft cheese 5-7 days 14-20 days
Hard cheese 15-20 days 25-60 days
Vegetable products 1-3 days 7-10 days
Fruit 5-7 days 14-20 days
Cooked, processed food
Vegetable purees, soups 2-3 days 6-10 days
Pasta, rice 2-3 days 6-8 days
Cooked, roasted meat 3-5 days 10-15 days
Soft bread 2-3 days 6-8 days
Deep-frying oil 10-15 days 25-40 days
Frozen Food -18-2 °C
Meat 4-6 months 15-20 months
Fish 3-4 months 10-12 months
Vegetables 8-10 months 18-24 months
Food at room temperature 25-2 °C
Bread 1-2 days 6-8 days
Packed biscuits 4-6 months 12 months
Pasta 5-6 months 12 months
Rice 5-6 months 12 months
Flour 4-5 months 12 months
Dried fruit 3-4 months 12 months
Ground coffee 2-3 months 12 months
12 months
Powdered milk 1-2 months 12 months
Powdered food 1-2 months 12 months
EN
concept
REPAIR & MAINTENANCE
Any extensive maintenance or repair that requires access to the inner parts of the product must be performed by an expert service centre.
ENVIRONMENTAL PROTECTION
• Packaging materials and obsolete appliances should be recycled.
• The transport box may be disposed of as sorted waste.
• Polyethylene bags shall be handed over for recycling.
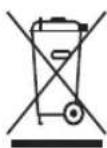
Appliance recycling at the end of its service life:
A symbol on the product or its packaging indicates that this product should not go into household waste. It must be taken to the collection point of an electric and electronic equipment recycling facility. By making sure this product is disposed of properly, you will help prevent the negative effects on the environment and human health that would otherwise result from inappropriate disposal of this product. You can learn more about recycling this product from your local authorities, a household waste disposal service or in the shop where you bought this product.

This product meets all the basic EU regulation requirements that relate to it.
Changes to the text, design and technical specifications may occur without prior notice and we reserve the right to make these changes.
natural_image
Close-up of hands using a power tool to cut a textured material (no visible text or symbols)
natural_image
Close-up of hands handling a small object with a textured surface, possibly a container or board (no visible text or symbols)
natural_image
Close-up of hands holding a white rectangular object on a textured surface (no visible text or symbols)
natural_image
Close-up of a hand holding an open book with visible pages (no legible text or symbols)natural_image
Close-up of hands handling a rectangular object on a textured surface (no visible text or symbols)The image is too blurry to recognize any text content.
natural_image
Close-up of a white circular object with a curved line extending from it, next to a rectangular device (no visible text or symbols)m = 311

natural_image
Close-up of a hand pressing down on a mechanical component (no visible text or symbols)m = 311
natural_image
Close-up of a white electronic component with two black rectangular cutouts (no visible text or symbols)Abb. 9
DE
concept
natural_image
Close-up of hands using a power tool to cut a textured material (no visible text or symbols)Fig. 1

natural_image
Close-up of hands holding a rectangular object with textured surface, possibly a patterned material or fabric (no visible text or symbols)Fig. 2

natural_image
Close-up of hands holding a white rectangular object on a textured surface (no visible text or symbols)Fig. 3

natural_image
Close-up of a hand holding an open book (no visible text or symbols)Fig. 4
concept
FR
natural_image
Close-up of hands cleaning a textured surface with a white plastic sheet (no text or symbols visible)
natural_image
Person holding an open book with visible text, no legible signage or symbols in the image
natural_image
Close-up of a mechanical component with a circular base and curved wire, labeled 'Fig. 7' (no readable text or symbols)
natural_image
Close-up of a hand pressing down on a mechanical component, labeled 'Fig. 8' (no other text or symbols visible)natural_image
Close-up of a white plastic sheet with two black oval cutouts (no text or symbols visible)Fig. 9
VA0010
FR
concept
CONSEILS UTILES POUR LA MEILLEURE EFFICACITÉ DE L'APPAREIL
natural_image
Close-up of hands cutting a piece of paper with scissors (no visible text or symbols)Fig. 1

natural_image
Close-up of hands handling a rectangular object with textured surface, possibly a container or tray (no visible text or symbols)Fig. 2

natural_image
Person handling a white rectangular object on a textured surface (no visible text or symbols)Fig. 3

natural_image
Close-up of a hand holding an open book (no visible text or symbols)Fig. 4
concept
IT
natural_image
Close-up of hands handling a rectangular object on a surface, labeled 'Fig. 5' (no other text or symbols visible)
natural_image
Person holding an open book, no visible text or symbols on the book or surroundings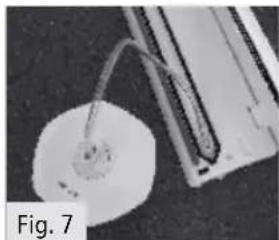
natural_image
Close-up of a white circular object with a curved line extending from it, next to a metallic cylindrical component (no visible text or symbols)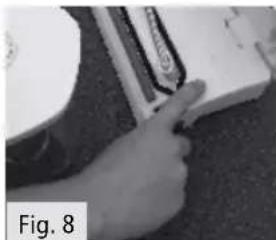
natural_image
Close-up of a hand using a tool to interact with a device (no visible text or symbols)natural_image
Close-up of a mechanical component with two curved black bands on a white base (no visible text or symbols)Fig. 9
Consiglio:
natural_image
Close-up of hands using a tool to cut a textured material (no visible text or symbols)Fig. 1

natural_image
Close-up of hands handling a large, textured object with no visible text or symbolsFig. 2

natural_image
Close-up of hands holding a white rectangular object on a textured surface (no visible text or symbols)Fig. 3

natural_image
Close-up of a hand holding an open book (no visible text or symbols)Fig. 4
natural_image
Close-up of hands holding a small object on a textured surface, possibly a tool or device (no visible text or symbols)
natural_image
Person holding an open book, no visible text or symbols on the book or surroundings
natural_image
Close-up of a medical device with a curved arm and circular component, labeled 'Fig. 7' (no readable text or symbols on the device itself)
natural_image
Close-up of a hand inserting a cable into a device (no visible text or symbols)natural_image
Close-up of a white electronic component with two black curved bands, no visible text or symbols.Fig. 9
The manufacturer (or importer) is responsible for ensuring the product complies with the requirements of applicable legal regulations as well as those of the relevant technical standards. Moreover, they are responsible for ensuring the product has the properties the manufacturer described in documents related to the goods or those reasonably expected by the customer with regard to the nature of the goods or based on advertising produced by the manufacturer, and further they are responsible for ensuring the product is fit for the purpose proposed by the manufacturer or that a product of the same type is normally used for.
The quality warranty term is 24 months from product takeover by the customer.
The warranty does not apply to wear and tear caused by regular use. The customer shall not be entitled to any warranty claims if, prior to taking the product over, they knew the product contained a defect or if the defect is attributable to the customer.
The warranty specifically does not apply:
- if the product installation, operation and service conditions stipulated in the product operating manual have not been adhered to,
• to malfunctions caused due to mechanical, heat or chemical damage, short circuit, over voltage or incorrect installation,
• to malfunctions caused by an inexpert third-party intervention,
• to malfunctions caused by natural disaster, - to malfunctions caused by insufficient or inappropriate maintenance in violation of the operating manual, including malfunctions caused by water and other sediments,
• to changes in colour of the heating surface or to scratching of the surface caused as a result of using the products in an unusual manner,
• to appearance and functional changes caused by exposure to sunlight, thermal radiation of water and other sediments, - if the service life of certain product parts expires, e.g. for accumulators, bulbs, etc.
The warranty does not apply to any products and services provided along with the product (gifts, promotional articles, etc.).
Filing a complaint
A complaint against a product defect must be filed as soon as identified, yet no later than before the end of the warranty term.
The customer must file a product complaint with the dealer from which they have purchased the product, or with any authorised service centre, a list of which is included in the product package, or available at www.my-concept.com.
While filing a product complaint, the product must be duly cleaned and securely packed so as to prevent any damage during its transport to an authorised service centre, where relevant, unless the product is delivered in person.
The customer must submit proof of having concluded a purchase contract for the product by producing the receipt.
While filing their complaint, the customer must indicate the noted defect and identify the preferred complaint application method.
Complaints processing
As long as the noted defect may be removed, the user has the right to have the defect duly removed free of charge on a timely basis.
Where such a procedure is not reasonable with regard to the nature of the defect, the user may require to be supplied a new defect-free product (replacement), or, where the defect applies to a part of the product only, replacement of the part concerned. However, if replacement of the product or any part thereof is not proportionate with regard to the nature of the defect, especially if the defect can be removed without undue delay, the customer has the right to have the defect removed free of charge.
concept
If the noted defect is not removable, or if the customer becomes entitled to replacement of the product or a part thereof, yet the replacement is not possible, for example due to the product having been sold out, the customer has the right to return the product (withdrawal from the contract).
The customer shall have the right to a new product (replacement) or to replacement of a part of the product even if the defect can be removed, provided they cannot properly use the product due to repeated occurrence of the defect or due to a high number of such defects. In such a case, the customer also has the right to return the product (by withdrawing from the contract).
If the product is not returned (the customer does not withdraw from the contract), or if the customer does not apply the right to a new defect-free product (replacement), to replacement of a part thereof or to repair of the product, they may request a reasonable discount. The customer also has a right to a reasonable discount if a new defect-free product cannot be supplied to them, or if a product part cannot be replaced or the product repaired unless the situation is remedied within a reasonable time limit, or if remedying the situation would create major discomfort on the part of the customer.
The seller, authorised service centre or a staff member authorised by them must decide about each complaint immediately or within three business days in complicated cases. This term does not include reasonable period of time, depending on the type of product concerned, required for the defect to be assessed by an expert. A complaint, including defect removal, must be dealt with without any undue delay, yet no later than within 30 calendar days of the complaint filing date, unless the seller and the customer agree on a later deadline.
On returning the product (withdrawing from the contract) the customer must return any accessories and documents supplied along with the product.
The customer does not have the right to keep the defective parts and components of the product replaced as part of a repair of the product.
This shall be without prejudice to any other rights the customer may have in relation to the purchase of the product.
Remark: Complaints against products damaged in transport are governed by the carrier's complaints procedure.
Manufacturer
Jindřich Valenta - ELKO Valenta
Vysokomýtská 1800, 565 01 Choceň
Czech Republic
tel.: +420 465 471 400
fax +420 465 473 304
Company ID No. 13216660
email: servis@my-concept.cz www:
www.my-concept.com
Product data
| Model: | |
| Production number: | |
| Date of purchase: Seal and signature of vendor: | |
VA0010
115
DE
GARANTIEBEDINGUNGEN
Garantie
CONDITIONS DE GARANTIE
Garantie
- concept
- Tip:
- TIPY NA NAJLEPŠÍ VÝKON PRÍSTROJA
- PL
- JAK UZYSKAĆ NAJLEPSZE EFEKTY
- WYPOSAŻENIE DODATKOWE
- INSTRUKCJE I INFORMACJE O PRAWIDŁOWYM UŻYTKOWANIU URZĄDZENIA
- FONTOS FIGYELMEZTETÉS:
- Maisinu, kas izgatavoti no rulliem Concept Fresh VB2203, VB2806, vakuuma aizkausēšana
- LV
- IETEIKUMI LABÄKAI IERİCES JAUDAI
- PACKAGE CONTENTS:
- IMPORTANT SAFETY INSTRUCTIONS:
- EN
- DESCRIPTION OF THE DEVICE
- OPERATING INSTRUCTIONS
- Vacuum sealing of prepared bags from Concept Fresh rolls - VB2203, VB2806
- Important:
- Vacuum packaging of food in Concept Fresh canisters VD8100, VD8200 and wine stopper VD8300
- BEST PERFORMANCE TIPS
- CLEANING AND MAINTENANCE
- Cleaning of bags and canisters for reuse
- Warning:
- TROUBLESHOOTING
- The device does not work
- Air is not removed from the bag completely
- Air has re-entered the bag after being sealed
- The bag melts
- ADDITIONAL ACCESSORIES
- INSTRUCTIONS AND INFORMATION FOR CORRECT USE OF THE unit
- TIME AND MONEY SAVING TIPS
- FOOD SAFETY
- CAUTION:
- TIPS FOR VACUUM PACKAGING AND RE-HEATING OF FOOD
- Vacuum packaging of meat and fish:
- Vacuum packaging of hard cheeses:
- Vacuum packaging of vegetables:
- Vacuum packaging of bread:
- Vacuum packaging of coffee and powdered food:
- Vacuum packaging of liquids:
- Vacuum packaging of non-food items:
- FOOD STORAGE MANUAL
- Refrigerated food 5-2 °C
- Cooked, processed food
- Frozen Food -18-2 °C
- Food at room temperature 25-2 °C
- REPAIR & MAINTENANCE
- ENVIRONMENTAL PROTECTION
- Appliance recycling at the end of its service life:
- DE
- FR
- CONSEILS UTILES POUR LA MEILLEURE EFFICACITÉ DE L'APPAREIL
- Consiglio:
- Filing a complaint
- Complaints processing
- Manufacturer
- GARANTIEBEDINGUNGEN
- Garantie
- CONDITIONS DE GARANTIE
Brand : Concept
Model : VA-0010
Category : Vacuum packaging machines