
C6640 - Oven BARTSCHER - Free user manual and instructions
Find the device manual for free C6640 BARTSCHER in PDF.


| Product type | Professional oven |
| Brand | Bartscher |
| Model | C6640 |
| Dimensions (W x D x H) | Approximately 800 x 700 x 600 mm |
| Net weight | Approximately 50 kg |
| Power supply | 230 V / 50 Hz, single-phase |
| Total power | 3.5 kW |
| Heating type | Fan-assisted and natural convection |
| Number of cooking levels | 6 levels |
| Temperature range | 50 °C to 300 °C |
| Cavity capacity | Approximately 60 liters |
| Cavity material | Stainless steel |
| Door | Double glazing, spring hinge |
| Main functions | Baking, roasting, grilling, reheating, defrosting |
| Maintenance and cleaning | Regular cleaning with soapy water, avoid abrasive products |
| Safety | Automatic shutdown in case of overheating, door locked during operation |
| Spare parts and repairability | Heating elements, thermostats, door gaskets available |
| Repairability index | 7.5 / 10 |
| Included accessories | 1 grid, 1 baking tray, 1 drip pan |
| Warranty | 2 years |
Frequently Asked Questions - C6640 BARTSCHER
User questions about C6640 BARTSCHER
0 question about this device. Answer the ones you know or ask your own.
Ask a new question about this device
Download the instructions for your Oven in PDF format for free! Find your manual C6640 - BARTSCHER and take your electronic device back in hand. On this page are published all the documents necessary for the use of your device. C6640 by BARTSCHER.
USER MANUAL C6640 BARTSCHER
natural_image
Exterior view of a standard electric stove oven with control knobs and a visible internal grid pattern (no text or symbols)C5230 / 206782

natural_image
Exterior view of a Barbisher electric oven with control knobs and a ventilation grille (no text or symbols on the appliance itself)C4430 / 206873

natural_image
Exterior view of a standard 3-wheeled baking oven with two circular filter designs (no visible text or labels)C6640 / 206797
Bedienungsanleitung
Electric convection ovens
from page 29 to 56
GB/UK
Mode d'emploi
natural_image
Isometric line drawing of a 3D cabinet or enclosure with internal structural elements and directional arrows (no text or symbols)
natural_image
Technical line drawing of a mechanical assembly with mounting brackets and support fixtures (no text or symbols)natural_image
Technical line drawing of a rectangular oven or enclosure with internal shelves and mounting feet, showing internal structure and a magnified inset (no text or symbols)natural_image
Technical line drawing of a mechanical assembly with a magnified inset showing a pipe connection detail (no text or symbols)natural_image
Interior view of a laboratory oven with glass doors and control panel (no visible text or symbols)natural_image
Isometric line drawing of a multi-panel assembly with internal compartments and mounting holes (no text or symbols)natural_image
Close-up of a black circular dial with numbered segments (1–10) and a white pointer, no readable text or symbols beyond the dial markings.Keep this instruction manual ready to hand at the product!
1. General information .... 30
1.1 Information about the instruction manual 30
1.2 Key to symbols.... 30
1.3 Liability and Warrantees 31
1.4 Copyright protection 31
1.5 Declaration of conformity.... 32
2.Safety 32
2.1 General information.... 32
2.2 Safety instructions for use of the device 32
2.3 Intended use 33
3. Transport, packaging and storage.... 34
3.1 Delivery check.... 34
3.2 Packaging 34
3.3 Storage.... 34
4. Technical data 35
4.1 Overview of parts 35
4.2 Technical specification 36
5. Installation and operation.... 37
5.1 Instructions for the installer 37
5.1.1 Preparation 37
5.1.2 Place of installation 38
5.1.3 Preparing to Install 39
5.1.4 Power supply connection.... 40
5.1.5 Water connection 42
5.1.6 Water outlet (206782, 206797)....43
5.1.7 Steam outlet vent 43
5.2 User's instruction.... 44
5.2.1 Safety precautions.... 44
5.2.2 First use 45
5.2.3 Standard maintenance 46
5.2.4 Special maintenance 48
5.3 Control panels 51
6. Waste disposal 56
Bartscher GmbH
1.1 Information about the instruction manual
This instruction manual contains information about the installation, operation and maintenance of the device and should be consulted as an important source of information and reference guide.
Awareness of the safety instructions and instructions for use in this manual will ensure the safe and correct use of the device.
In addition to the information given here, you should comply with any local Health and safety Controls and generally applicable safety regulations.
The instruction manual forms part of the product and should be kept near the device and easily accessible for anyone carrying out the installation, servicing, maintenance or cleaning.
1.2 Key to symbols
In this manual, symbols are used to highlight important safety instructions and any advice relating to the device. The instructions should be followed very carefully to avoid any risk of accident, personal injury or material damage.

WARNING!
This symbol highlights hazards, which could lead to injury.
Please follow the instructions very carefully and proceed with particular attention in these cases.
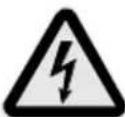
WARNING! Electrical hazard!
This symbol draws attention to potential electrical hazards. If you do not follow the safety instructions, you may risk injury or death.

CAUTION!
This symbol highlights instructions, which should be followed to avoid any risk of damage, malfunctioning and/or breakdown of the device.

NOTE!
This symbol highlights tips and information, which have to be followed for an efficient and trouble-free operation of the device.

WARNING! Hot external surface!
This symbol is a warning that the device surface is hot when in use. Ignoring this warning may result in burns!
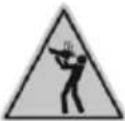
WARNING! The container holds hot liquid!
When containers hold liquid or products that turn liquid during cooking, do not higher shelves to place the containers so that the operator can always look into the container inside.
1.3 Liability and Warrantees
All the information and instructions in this manual take into account standard safety regulations, current levels of technical engineering as well as the expertise and experience we have developed over the years.
The instruction manual was translated with all due care and attention. However, we do not accept liability for any translation errors. The German version of this instruction manual is definitive.
If the delivery consists of a special model, the actual scope of delivery may differ from the descriptions and illustrations in this manual. This is also the case for special orders or when the device has been modified in line with new technology. If you have any questions, you should contact the manufacturer.

NOTE!
Read the instruction manual carefully before using the device. The manufacturer does not accept liability for any damage or malfunction resulting from not following the instructions for use.
The instruction manual should be kept near the device, easily accessible for anyone wishing to work with or using it. We reserve the right to make technical changes for purposes of developing and improving the useful properties.
1.4 Copyright protection
The instruction manual including any texts, drawings, images or other illustrations is copyright. No part of this publication may be reproduced, transmitted or used in any form or by any means without permission in writing from the manufacturer. Any person who commits any unauthorized act in relation to this publication shall be liable to claims for damages. All rights reserved.

NOTE!
The contents, texts, drawings, pictures and any other illustrations are copyright and subject to other protection rights. Any person unlawfully using this publication is liable to criminal prosecution.
1.5 Declaration of conformity
The device complies with the current standards and directives of the EU.
We certify this in the EC declaration of conformity.
If required we will be glad to send you the according declaration of conformity.
2.Safety
This section provides an overview of all important safety aspects.
In addition every chapter provides precise safety advice for the prevention of dangers which are highlighted by the use of the above mentioned symbols.
Furthermore, attention should be paid to all pictograms, markers and labels on the device, which must be kept in a permanent state of legibility.
By following all the important safety advice you gain an optimal protection against all hazards as well as the assurance of a safe and trouble-free operation.
2.1 General information
This device is designed in accordance with the presently applicable technological standards. However, the device can pose a danger if handled improperly and inappropriately.
Knowing the contents of the instruction manual as well as avoiding mistakes and thus operating this device safely and in a fault-free manner is very essential to protect yourselves from the hazards.
To prevent hazards and to ensure optimum efficiency, no modifications or alterations to the device that are not explicitly approved by the manufacturer may be undertaken.
This device may only be operated in technically proper and safe condition.
2.2 Safety instructions for use of the device
The specifications regarding the industrial safety are based on the Regulations of the European Union applicable at the time of manufacturing the device.
If the device is used commercially, the user is obliged to ensure that the said industrial safety measures concur with the state of the rules and regulations applicable at the time in question for the entire period of use of the device and to comply with the new specifications.
Outside the European Union, the industrial safety laws applicable at the place of installation of the device and the regional territorial provisions must be complied with.
Besides the industrial safety instructions in the instruction manual, the general safety and accident prevention regulations as well as environment protection regulations applicable for area of application of the device must be followed and complied with.

CAUTION!
- The device is not intended for use by individuals (including children) with physical or mental disabilities, insufficient experience, and/or insufficient knowledge unless such persons are under the care of a person responsible for their safety or have received instructions regarding appropriate use of the device.
○ Children should be observed to ensure that they are not playing with the device.
o Preserve this manual safely. When passing on/selling the device to a third party, the manuals must be handed over along with the device. - Every person using the device must act in accordance to the manuals and under consideration of the safety advice.
- The device is to be used indoors only.
2.3 Intended use

CAUTION!
This device has been designed and built for commercial use only and should be operated by qualified personnel only.
Safe operation is only guaranteed when using the device for its intended purpose.
Any technical interventions, as well as assembly and maintenance are to be made by a qualified customer service only.
This convection oven is intended only for the following purposes:
- baking fresh and frozen confectionery products and bread;
- heating fresh and frozen food products;
- steam cooking of vegetables, meat and fish;
- the option of sous-vide cooking may be used only with an adequate plastic bag;
- maintaining the temperature of chilled and frozen meals.

CAUTION!
Any use going beyond the intended purpose and/or any different use of the device is forbidden and is not considered as conventional.
Any claims against the manufacturer or his authorized representative as a consequence of experiencing damages resulting from unconventional use are impossible.
The operator is liable for all damages resulting from inappropriate use.
3. Transport, packaging and storage
3.1 Delivery check
Please check the delivery upon completeness and transport damage immediately after receipt. In case of visible damage do not accept or accept the delivery with reservation only.
Note the extent of damage on the carrier's bill of delivery. Trigger off the complaint. Hidden damages should be reclaimed immediately after notice, as claims for damages can only be asserted within the effective period for complaints.
3.2 Packaging
Please do not throw away the covering carton of your device as it might be useful for storage purposes, when moving or, in case of damages, when the device must be sent back to a repair center. The outer and inner packing material should be removed completely from the device before installation.
NOTE!
If you liked to dispose the packing, consider the regulations applicable in your country. Supply re-usable packing materials to the recycling.
Please inspect the device upon completeness. In case any part is missing please contact our customer service center immediately.
3.3 Storage
Keep the package closed until installation and under consideration of the outside indicated positioning- and storage markings.
Packages should be stored under consideration of the following:
- Do not store outdoors.
- Keep it dry and dust-free.
- Do not expose it to aggressive media.
- Do not expose it to direct sunlight.
- Avoid mechanical shocks and vibration.
- In case of longer storage (> 3 months) make sure you check the state of the packaging and the parts regularly. If required refresh or renew.
Bartscher
4. Technical data
4.1 Overview of parts

4.2 Technical specification
| Name | Electric convection ovens | ||
| Model: | C 4430 | Model: | C 4430 |
| Article No. | 206873 | Article No. | 206873 |
| Version | with grill and direct steam injection | Version | with grill and direct steam injection |
| Capacity: | 4 (442 x 325 mm) | Capacity: | 4 (442 x 325 mm) |
| The distance between the trays: | 75 mm | 70 mm | 75 mm |
| Temperature range: | 0 °C - 280 °C | ||
| Timer range: | 0 - 120 minutes | ||
| Dimensions(W x D x. X H mm): | 550 x 620 x 520 | Dimensions(W x D x. X H mm): | 550 x 620 x 520 |
| Power supply | 3.1 kW / 230 V50-60 Hzready to connect | Power supply | 3.1 kW / 230 V50-60 Hzready to connect |
| Water connection: | G3 /4 " | ||
| Water pressure: | up to 2 bar | ||
| Weight | 29.6 kg | Weight | 29.6 kg |
| Accessories: | 1 hydraulic hose | ||
| 4 GN containers442 x 325 mm | 4 GN containers442 x 325 mm | ||
We reserve the right to make technical changes!
Properties of the convection oven
- Design: stainless steel inside and outside
- Interior lighting
• Double glass door, easy to open internal door - Rounded baking chamber walls ensure simple, fast and effective cleaning
- Direct steam injection
5. Installation and operation
5.1 Instructions for the installer

CAUTION!
Any works related to the installation, connection and maintenance of the device may only be carried out by a qualified and licensed technician in accordance with the applicable international, national and local regulations.
Instructions
- Read this instruction manual carefully before installing and starting the device.
- At all stages of the installation, assembly, operation and maintenance, the works should be performed by qualified personnel who meet the requirements for professional training (approved by the manufacturer or vendor), and taking into account the applicable legislation of the country of installation and regulations on product safety and safety at work.
- Do not use any accessories or spare parts that are not recommended by the manufacturer. They may result dangerous to the user, cause damage to the oven or lead to personal injuries; moreover, the use of such accessories and spare parts will void the warranty.
- Periodically, check that the power cord is not damaged. Do not use the appliance if the power cord is damaged. If the power cord is damaged it must be replaced by a serviceman or a qualified electrician in order to avoid any hazards.
- Improper installation, operation, maintenance or cleaning, and any changes or modifications may lead to malfunction, damage or injuries.
- The manufacturer disclaims any liability for damage to persons or property caused by the failure to comply with these rules or due to the user's tampering of any components of your appliance and failure to use the original spare parts.
5.1.1 Preparation
- Immediately after receiving the appliance, make sure that it has not been damaged in transit, and that the packaging is not damaged. In the case of damage or missing components, immediately notify the shipper or vendor/manufacturer providing the article and serial numbers (nameplate is on the back of the unit) and attaching photo evidence.
- Make sure that you will have access to the installation site and will not have problems to pass through doors, corridors, or other passages.
- NOTE: During its shipment the unit may get overturned which may cause damage to property or people as well as pose some difficulties. Please use a means of transport appropriate to the weight of the device. Never pull or tilt the device; it should be raised vertically from the ground and moved horizontally.
5.1.2 Place of installation
- The device should be placed indoors (never outdoors!) In a well ventilated room.
- Prior to positioning the convection oven, check its dimensions and exact location of the power and water connections, and of the exhaust duct.
- It is recommended to place the oven under a kitchen hood outlet or provide the outflow of hot vapours and fuses from the cooking chamber outside of the building
- The convection oven must be placed on an even surface to prevent its slipping or tipping.
- The place of installation of the convection oven must support the weight of the unit at full load. Its gross weight can be found on the nameplate at the back of the convection oven.
- If the ovens are placed above proofers, stainless steel tables or other ovens it is not advisable to use the upper surface to insert the GN containers so that the user could look into the containers.
- For safety reasons, once you place your
oven, attach this sticker to the device "Danger of burns", which is provided in the package, on the convection oven at a height of 1600 mm from the floor (see Figure on the right).

- Make sure that the oven position allows for complete opening of its door (180°)
- Position the oven so that its back is easily accessible to enable the connection of water and power supplies and its maintenance.
- The device is not suitable for external housing; it is necessary to keep a minimum distance of 5 cm from all sides.
- The oven shall never be placed near heat sources, fryers or other sources of hot liquids; in case it is not possible to meet this requirement, the safe distance is 50 cm from the sides and top of the oven, and 70 cm at its rear.
- Never place the oven near combustible materials or containers made of flammable materials (such as walls, furniture, partitions, gas cylinders) since it could lead to a fire hazard. In case it is not possible to meet this requirement, cover the flammable components with non-flammable thermo-insulating material, and follow the fire regulations strictly.
5.1.3 Preparing to Install
- Remove the outer packaging (wooden box and/or cardboard) and dispose of them in accordance with the regulations in force in the country of installation.
Remove the protective film
- Remove the protective film completely from the external and internal walls.
- Remove any accessories, informational materials and plastic bags from the oven.

natural_image
Technical line drawing of a cabinet or enclosure with internal components and directional arrows (no text or symbols)Adjusting the feet

CAUTION!
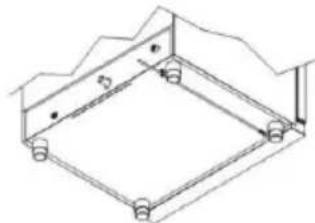
Do not use the oven without the feet.
- When the oven is used without the feet, the air flow needed to cool digital components and external walls is not provided, and this can cause overheating and damage to the oven.
- The adjustable feet are attached with the packed unit and must be screwed to the oven.

natural_image
Technical line drawing of a structural frame with mounting fixtures and support columns (no text or symbols)- The correct flat position of the oven ensures its trouble-free operation. Such position is achieved by adjusting the feet and checking it with a spirit level. To adjust the feet, simply tighten or loosen them.
Attaching the drip tray
- The drip tray is used to collect liquids which may flow out through the front door of the oven. Place the tray in front of the oven and fasten it with screws found in a bag provided in the package. The screws are screwed into the threaded inserts in the lower front part of the oven (Figure on the right).

natural_image
Technical line drawing of a laboratory oven with internal compartments and a close-up inset showing internal structure (no text or symbols)Attaching the drip tray drain
- Fit a plastic closure and a white water drain hose which is found in the package. Make sure that the hose is installed and fixed in such a way as to allow the water to properly drain from the drip tray to the sewage network (Figure on the right).

natural_image
Technical line drawing of a mechanical frame assembly with two views (top and bottom) showing internal components and connection details (no text or symbols present)5.1.4 Power supply connection

WARNING! Danger of electric shock!
In the case of improper installation the device may cause injuries!
Before the installation compare the local power grid parameters with the parameters of the oven power supply (see the nameplate). The oven can be powered only when these data are consistent!
- Before connecting to the power grid, make sure that the voltage and frequency indicated on the nameplate correspond with those of the local power grid. The allowable deviation in voltage is ± 10% .
- When the device does not have wheels to facilitate its movement we recommend to connect the device to the power supply first, and then position it in its workplace.
- Make sure the power cord does not get damaged when moving the oven. This way the oven will be connected to the power supply without difficulty and in a more safety manner. The power cord shall be placed so that it does not reach the ambient temperature higher than 50^ C at no point.
Convection oven with a single-phase power cord and plug (206873)
- For units equipped with a cord and plug (single phase, 230 V), simply insert the plug into the appropriate socket (the socket must match the provided plug and withstand the load required for the oven and specified on the nameplate). The device must be positioned so that the plug is easily accessible at all times.
- The oven is supplied with a certified cord and plug: do not tamper them or change anything in them.
Convection oven with a three-phase power cord and no plug (206782, 206797)
- CAUTION: in the connecting power cord, the yellow/green wire should be at least 3 cm longer than the other wires.
- The convection oven should be connected directly to the power grid and provided with a previously connected and easily accessible switch installed in accordance with the applicable international, national and local regulations. This switch should have a contact opening for all poles in order to ensure a complete shutdown in case of over-voltage of category III
- It is essential to properly connect the earth wire which cannot be disconnected under any circumstances by the protective switch.
- Make sure, before connecting the oven to the power grid, that all the power cords are securely connected.
- Also take into account connections prepared for individual devices; they can be found on the back of the oven
Yellow/green: The protective wire "EARTH".
Blue: Neutral wire
Brown, gray, black: live wires
Connection to the equipotential bonding system
- This connection should be made between different devices with the use of a plug-in terminal marked with this symbol. The connection terminals are found at the back of the device.
- The terminals allow connecting a yellow/green connection cord with a cross section between 2.5 and 10 ~mm^2
- The unit must be connected to the equipotential bonding system whose efficiency should be checked in accordance with the guidelines of the applicable provisions.
5.1.5 Water connection
- Make sure the device is placed near a drinking water connection.
- Before connecting the device, allow enough water through to remove any remnants in the piping so that they did not get into the magnetic valves.
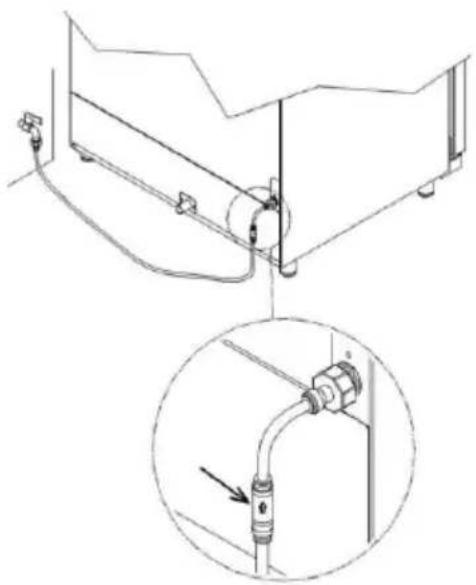
- It is necessary to install a shut-off valve and mechanical filter between the plumbing and the device (Figure on the right).
- On the back of the device, in the area marked with a label, the convection oven has an input G3/4" with a filter
- The device is provided with a water hose with 2 meters in length fitted with connectors G3/4" and return valve for liquids as required by applicable regulations.

CAUTION!
The convection oven can be connected to the water piping using the supplied water hose only! Do not use other hoses or re-cycled hose.
- The water must be supplied at a pressure between 150 kPa (1.5 bars) to 200 kPa (2 bars) and a maximum temperature of 30°C. If the value of the inlet pressure is higher than 200 kPa (2 bars), you must install a pressure adapter set at 200 kPa (2 bar).

natural_image
Technical line drawing of a mechanical device with an inset showing a pipe fitting and a magnified detail (no text or symbols)- In order to ensure trouble-free operation of the device, the water should have a hardness of maximum 5°dH to prevent lime deposits. For higher values a water softening station should be installed first.
5.1.6 Water outlet (206782, 206797)
- The water at the outlet of the convection oven may reach high temperatures (90°C). The hoses used to drain this water out should be resistant to such temperatures.
- The water outlet is placed in lower part of the back of the convection oven and it should be connected to a rigid pipe or flexible hose discharging into an open drain. The diameter of the latter cannot be smaller than the diameter of the convection oven connection to the sewage piping.
- Install a suitable trap between the convection oven and the sewage system to prevent the escape of any vapours from the oven and penetration of odours from the sewage system.

- Avoid strictures in flexible hoses and bents in rigid pipes. Along the entire course of the hose, there should be a slope of at least 5% to ensure adequate drainage. Nearly horizontal sections should be no longer than one meter.
- The convection oven should have its own connection to the sanitary sewer system. If more than one device or systems are connected to the same pipe, make sure that pipe dimensions allow for regular and unobstructed drainage.
- Observe local regulations and standards.
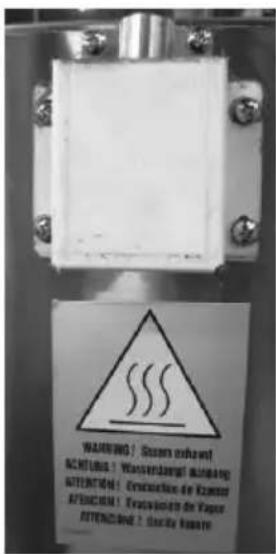
5.1.7 Steam outlet vent
During cooking hot vapours and other fuses are formed; they are let out through an outlet pipe from the cooking chamber which in the upper area of the back of the convection oven. Do not put or place any things above the outlet so as not to hinder the smoke collection and not to damage these things.
- We recommended to place the convection oven under a kitchen hood or to provide a pipe to collect hot steam and odours whose dimensions shall not be smaller than those of the steam outlet vent in the convection oven.
5.2 User's instruction

CAUTION!
Please read this manual carefully as it contains safety instructions and instructions for the use of the convection oven.
Please keep this manual for future use.
Improper installation, operation, maintenance or cleaning, and any changes or modifications may lead to malfunction, damage or injuries.
5.2.1 Safety precautions

CAUTION!
The device is designed for commercial use and may be used by qualified personnel only.
- Never place the unit near heat sources.
- Do not put or place flammable materials near the unit. Risk of fire!
- The temperatures food containers or other objects during and after cooking can be very high; be particularly careful when handling them to avoid burns. You may only grasp them wearing protective gloves. Risk of burns!
- Open the convection oven door with particular caution: Risk of burns by escaping high temperature steam.
- Do not put any flammable objects and spirit-based food: they may cause spontaneous combustion and fire which in turn can lead to explosions.
- Avoid salting dishes in the oven cooking chamber. If you cannot avoid this, make sure to clean it as soon as possible to take care of cleaning since salt may damage the heating chamber.

The outside surfaces of convection oven may reach a temperature exceeding 60^ C. To avoid burns, do not touch the areas and items marked with this symbol.
- When the glass components of the door get damage or broken, the door needs to be replaced immediately (please contact customer service).
- When the convection oven is not in use for a short time (e.g. 12h), leave the door slightly open.
- When it is not in use for a longer time (e.g. many days), shut off the water and power supply to the unit.
5.2.2 First use
- Make sure there are no items (accessories, packaging film, manuals, etc.) in the cooking chamber.
- Prior to the first use, make sure the installation was properly completed in terms of the stability and levelling of the device, and power and cold water supply connection.
- The air vents must left be open and shall not be covered with anything.
- The device components that might have been dismantled for the time of installation should be fitted again.
- Make sure that the shelf rails supporting the trays or GN containers are properly fixed to the inner side walls; otherwise the containers with warm or hot food may fall or slip down and cause burns.
- Heat the empty convection oven at 200^ C ( 392^ F) for about 30 minutes to remove any smell of thermo-insulation.
- Clean the device from the inside and the outside with water and neutral cleaning, and then wipe off with clean water.
- Never use corrosive or acid products for cleaning.

CAUTION!
Never clean the oven with a water jet or steam under pressure!!
- For acceptance purposes, run a test cycle which will allow checking the operation of the device and identify any potential defects/problems.
- Turn the convection oven on set the heating cycle with a temperature of 150^ C for 10 minutes with medium humidity.
- Carefully check the following points:
√ The light turns on in the cooking chamber.
√ The convection oven turns off (heating, steam injection, motors/fans) when the door opens and resumes the operation when the door closes again.
√ The thermostat controlling the heating temperature responds upon reaching the set heating temperature and the heating unit turn off.
√ The fan motor(s) automatically reverse(s) the direction of rotation. The rotation must be reversed every two minutes.
√ The heating chamber fans rotate in the same direction of rotation.
√ Check if the water from the hose in the moisture exhaust system in the cooking chamber flows towards the fans.
5.2.3 Standard maintenance

CAUTION!
Before carrying out any cleaning disconnect the device and wait until the convection oven cools down completely.
The user may perform standard maintenance. For emergency maintenance, please contact customer service and request assistance of a qualified licensed technician.
Regular cleaning of the heating chamber
To ensure trouble-free operation, hygiene and efficiency of the device, it should be cleaned at the end of every working day.
o Do not use cleaning acids, scouring, caustic agents containing sand or soda lye.
○ Make sure that water does not penetrate inside the device.
- To protect against an electric shock never immerse the device, cords or plug in water or other liquid.

CAUTION!
The device shall not be directly sprayed with water. Do not use water jets to clean the device (either inside or outside)!
○ When cleaning take the following steps:
➢ turn the device and set the temperature dial at 80°C:
➢ run the convection oven for 10 minutes and generate steam:
➢ turn off the and allow it to cool down;
clean the heating chamber with warm water and a mild cleaner, and then wipe with clean water.

WARNING! Risk of burn!
Never clean the heating chamber at a temperature exceeding 70 °C.
Daily cleaning of the seal of the heating chamber of the convection oven shall be carried out using a mild cleaner to ensure its unaffected status and efficient performance.
To clean dirt deposits use a plastic spatula or sponge soaked in vinegar or warm water only.
- Note: if there is grease or food residue in the cooking chamber, it should be removed immediately since it may catch fire during the oven operation.
Cleaning the external surfaces
- To clean external surfaces of the device, use a cloth dampened in warm water only.
With the exception of special cleaning agents for stainless steel, the use improper cleaning agents to clean external surfaces may cause corrosion of the device. - Do not use products containing chlorine (bleach hydrochloric acid, etc.).
○ After cleaning, use a soft, dry cloth to wipe and polish the surface.
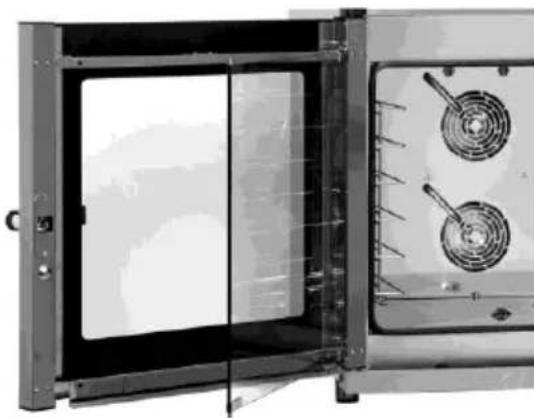
Cleaning the oven door
natural_image
Exterior view of a stainless steel oven with two circular vent vats and a door open (no text or symbols visible)To clean the glass door inside allow the convection oven to cool down completely.
- The double glass door allows easy cleaning.
- You can pull out the inner pane.
○ Loosen the upper and lower steel plate that hold the internal glass, turning them clockwise.
o Pull the inner pane out (Figure on the left).
- Clean the inner glass on both sides using a proper cleaner.
- Do not use any scouring agents or cleaners that might scratch the elements.
- Close the inner glass mounting the steel plates in original position.

CAUTION!
When closing the door make sure that the inner pane is re-attached with steel plates, otherwise the oven door will not close tightly.
Replacing the lamp
NOTE: Strictly follow the instructions below to avoid electric shock or injury:
➢ Cut off the power supply and allow the convection oven to cool down.
Unscrew the bolts with which the side container rails are secured to the walls. Remove them from the cooking chamber.
Remove glass cover A. Make sure not to damage seal C. Replace lamp B by a lamp of the same parameters.
Screw glass cover A back. Make sure not to damage seal C.
- Re-attach the container rails to the side walls and make sure that they are securely fastened.
○ If the glass cover turns out to be faulty or damaged, do not use the convection oven until it is replaced (please contact your customer service).

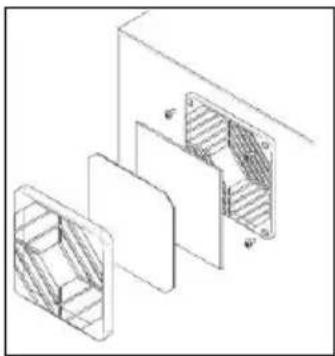
Replacing and cleaning the cooling filter (the back)
NOTE: Strictly follow the instructions below to avoid electric shock or injury:
cut off the power supply and allow the convection oven to cool down.
- unscrew the bolts fastening the cooling filter and replace or clean it;
- when finished assembler All these parts together.
natural_image
Isometric line drawing of three stacked rectangular panels with internal hatching (no text or symbols)5.2.4 Special maintenance
○ On a regular basis (at least one a year), have the device checked by a qualified licensed technician. Please contact the customer service department for that matter.
Before performing any operation, disconnect the power supply, closing off the water taps and wait until the oven cools down.
Before moving the unit from its normal position, check if the wiring and piping are cut off in the right way.
- If the device has wheels make sure that electrical wires, tubes or other attachments are not damaged in the process.
- Avoid placing the unit near heat sources (such as fryers, etc.).
○ After the operation and position the device in its place of normal installation, and make sure that all the electrical and water connections are made in accordance with the standards before starting the unit.
Troubleshooting
In the event of a fault, disconnect the device from the power supply and close the water supply. Before contacting the customer service department check the nature of malfunction described in the table below.
| Fault | Reason | Solution |
| The convection oven will not start when turned on | · The oven door is not closed.· The microchip does not signal the oven door is closed. | · Close the oven door.· Contact the Customer Service. |
| The convection oven is completely turned off | · No power supply.· The power supply connection has not been made properly.· Motor protection thermostat kicked in | · Restore power supply.· Check the power connection.· Contact the Customer Service. |
| The light is turned off | · The lamp got loose.· The lamp is blown. | · Place the lamp in the holder correctly.· Replace the lamp as described in the section "Replacing the lamp" (6.2 "Cleaning"). |
| The food cooks/bakes unevenly | · Fans do not change the direction of rotation.· One of the fans is not working.· One of the resistors is broken. | · Contact the Customer Service.· Contact the Customer Service.· Contact the Customer Service. |
| When steam injection is water leaks from the tube | Water supply is closed.The water supply connection has not been made properly.The inlet water filter is clogged with dirt. | Open water supply.Check water supply.Clean the inlet water filter. |
| When the oven door is closed the water leaks through the seal | Dirty seal.Damaged seal.There is a problem with closing the oven door. | Clean the seal with a damp cloth.Contact the Customer Service.Contact the Customer Service. |
| The fan stops during operation | Motor protection thermostat kicked in.The condenser motor is damaged. | Turn off the convection oven and allow the system protecting the motor from overheating to start up again. If the fault repeats, contact the Customer Service.Contact the Customer. |

CAUTION!
The above cases the troubles are just examples for your orientation. If such or similar problems occur you should immediately turn off the device and stop using it. If the defects are not removed, you must contact directly the customer service department or your dealer for inspection and repair. Please quote the article and serial number of the device; this data can be found on the nameplate on the back of the oven. Never attempt to make any repairs on your own.
5.3 Control panels
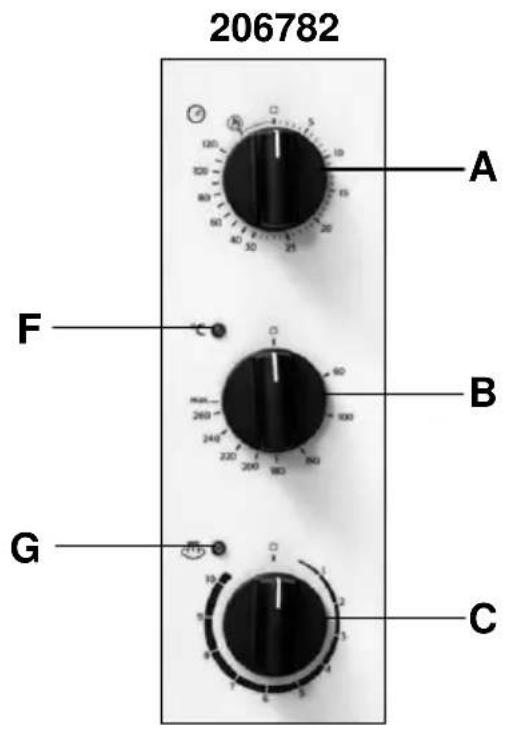
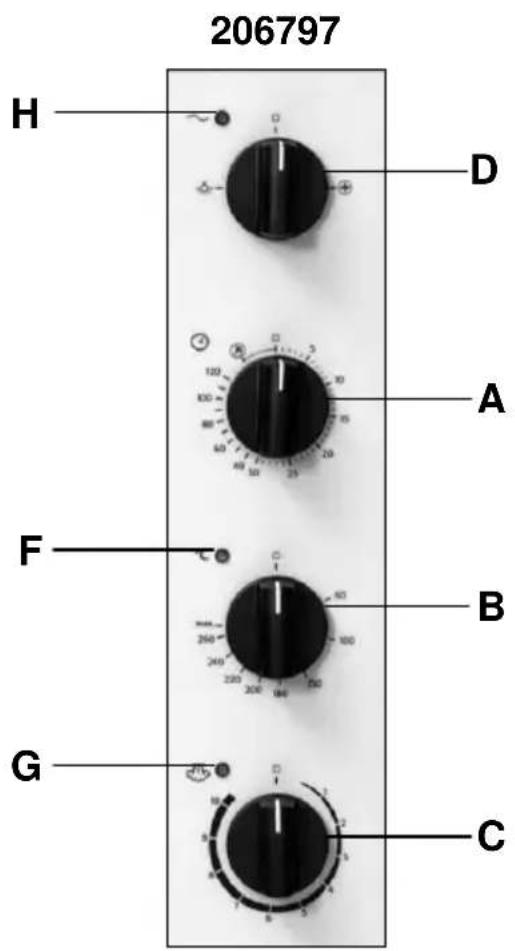
206873

A Timer dial
B Temperature control dial
C Humidity control dial
D Function selection dial
E Steam injection button
F Heating sensor (orange)
G Humidity sensor (orange)
H In use indicator (green)
Setting
Function dial
200873

200797

Use the dial to select the function; you may (depending on model) select the following functions:
- Turn off the device;
- Switch the light on;
- Fan only
- Circulation fan
-
Grill
-
When the function dial is set to the OFF position, the convection oven is completely off.
- When the function dial is set to FAN ONLY, the lights and fan work. The convection oven heating system is turned off in this setting.
- When the function dial is set to CIRCULATION FAN, the lights and fan work. The convection oven heating system is enabled in this setting and can be controlled by turning the temperature dial. The heater in form of a circle around the fans. However, the grill heating element is turned off.
- When the function dial is set to GRILL, the light is on. The convection oven heating system is ready for operation in this setting and can be controlled by turning the temperature dial. The grill heating element is turned on. However, the heating element around the fan is turned off.
ON/OFF LED
When it is on, it indicates that the cooking compartment lighting is switched on and the heating elements are ready to use, depending on the selected function.
Timer dial

If you set the dial to constant mode the convection oven will remain on until the user does not intervene.
If a specific value is selected in the range up to 120 minutes, the convection oven is constantly switched on for this time period. After the set time, the device turns off..
Temperature control dial

Temperature adjustment knob allows you to select the desired heating temperature in the range from 0 °C to max.(280 °C).
Thermostat LED
This light is on when the convection oven heating elements are turned on, and the cooking temperature is lower than the set temperature by turning the temperature setting.
When the light goes off, it means that the heating elements turn off and reached the set temperature.
Humidification control dial
Humidification is used for more delicate cooking all kinds of food. Moreover, this option is suitable for rapid defrosting, heating of food without drying them, and natural food placed desalination of salt.
The combination of wetting and traditional function allows the flexibility and at the same time saving energy and time. At the same time are stored nutritional and taste of food. Injected water is sprayed on the fan, and - thanks to the high temperature in the cooking compartment - changed into steam.
NOTE: To humidify work in a satisfactory manner, it is necessary that the temperature was set to at least 80 - 100^ C .
For lower temperatures arises only serious couple, and a large part of the water flows to the bottom of the convection oven or drain.
In addition, the required proper cooking convection oven pre-heated to the desired temperature before it is activated humidification.

natural_image
Close-up of a black circular dial with numbered segments (1–10) and a small icon on the left (no readable text or symbols)Dial setting allows you to activate humidification. It can be adjusted in the range from 1 to 10 by turning the dial in a clockwise direction.
Humidification indicator
If it is enabled it means that the water enters the chamber in order to produce steam. This is done regardless of the temperature (the operator must ensure a sufficiently high temperature to cook properly).
Steam injection button
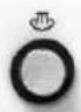
This button activates steam injection when pressed.
Thawing
- convection oven can be used to accelerate the defrosting process for cooking meals, with the fan at room temperature or below (depending on the size and type of product for thawing). In this way, you can quickly thaw the products without losing their flavour or changes in their appearance.
Preheating
- In order to compensate for the effects of heat loss through the opening of the oven door for inserting food into convection oven, it is recommended that pre-heating at a temperature of at least 30^ C above cooking temperature provided.
Hints and Tips
- Cooking extremely fat foods with the use of the grill, such as roasts or poultry, we recommend placing a container on the bottom of the cooking chamber in order to catch the dripping fat.
- Cooking in containers filled with liquids be particularly careful to avoid spilling the liquids out of the containers both during cooking and removing containers from the oven convection. Risk of burns!
- If the ovens are placed above proofers, stainless steel tables or other ovens it is not advisable to use the upper surface to insert the GN containers so that the user could look into the containers. Risk of burns!
- For perfect and even cooking of meals we recommend using not too tall containers to ensure good and sufficient air circulation. A minimum distance between the upper container and the meal shall be at least 2 cm.
- Do not overload the convection oven in order to obtain a uniform effect when baking cakes or bread; try to arrange the products following the direction of air circulation in the cooking chamber.
- Proper use of the internal temperature probe: insert in the thickest point of the food product from the top to the bottom until you the tip of the probe reaches the product centre.
- If during cooking you need to handle the food product, open the convection oven door for as short time as possible to prevent a too large drop in temperature inside the convection oven because that could adversely affect the outcome of your cooking.
NOTE!
We recommend opening the door gradually: keep it mid open (3-4 cm) for 4-5 seconds, and then fully open. This way you can avoid the defects and burns caused by fumes and high temperature in the convection oven.
6. Waste disposal
Discarding old devices
At the end of its service life the discarded device has to be disposed in accordance with the national regulations. It is advisable to contact a company which is specialized in waste disposal, or just contact the local disposal service in your community.

WARNING!
To exclude any abuse and the dangers involved make the waste device unfit for use before disposal. For that purpose disconnect device from mains supply and remove mains connection cable from the device.

NOTE!

For the disposal of the device please consider and act according to the national and local rules and regulations.
Bartscher GmbH
4.2 Indications techniques
natural_image
Technical line drawing of a mechanical cabinet or enclosure with internal components and directional arrows (no text or symbols)
natural_image
Technical line drawing of a structural support frame with multiple cylindrical components and mounting brackets (no text or symbols)natural_image
Technical line drawing of a laboratory oven with internal structure and a magnified inset showing internal components (no text or symbols)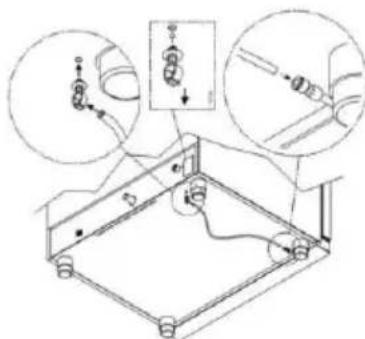
natural_image
Technical line drawing of a structural frame with mounting holes and supports (no text or symbols)natural_image
Technical line drawing of a mechanical device with an inset showing a pipe fitting and a magnified detail (no text or symbols)natural_image
Interior view of a stainless steel oven with open door and side outlets (no visible text or symbols)natural_image
Technical line drawing of a mechanical assembly with three views (front, side, and internal hatched section) showing no text or symbols.5.2.4 Entretien extraordinaire
natural_image
Close-up of a black rotary dial with numbered segments (1–10) and a small cloud icon, no readable text or symbols beyond the dial markings.natural_image
Technical line drawing of a cabinet or enclosure with internal components and directional arrows (no text or symbols)natural_image
Technical line drawing of a structural frame with mounting fixtures and support columns (no text or symbols)natural_image
Technical line drawing of a portable oven with internal shelves and a close-up inset showing internal components (no text or symbols)natural_image
Technical line drawing of a mechanical assembly with two views (top and bottom) showing internal components and connection details (no text or symbols)natural_image
Technical line drawing of a mechanical device with an inset showing a pipe fitting and a magnified detail (no text or symbols)natural_image
Interior view of a stainless steel oven with open door and side-mounted fans (no visible text or symbols)natural_image
Isometric line drawing of three stacked rectangular panels with internal hatching, no text or symbols presentnatural_image
Close-up of a black rotary dial with numbered segments (1–10) and a small icon on the left (no readable text or symbols)natural_image
Technical line drawing of a door with internal components and directional arrows (no text or symbols)
natural_image
Technical line drawing of a mechanical assembly with four cylindrical components and mounting brackets (no text or symbols)natural_image
Technical line drawing of a rectangular oven or enclosure with internal shelves and mounting feet, showing internal structure and a magnified inset (no text or symbols)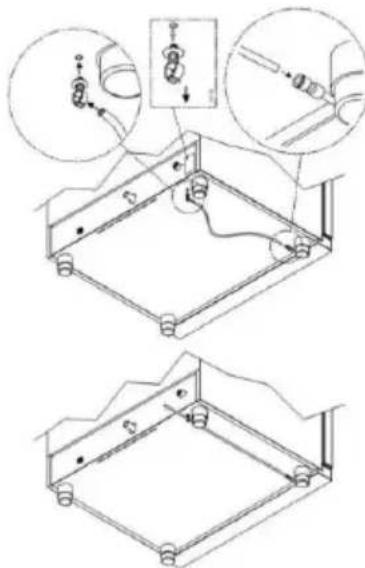
natural_image
Technical line drawing of a mechanical assembly with an inset showing a pipe fitting and a magnified detail (no text or symbols)natural_image
Exterior view of a laboratory oven with two circular vent vials and a glass door (no text or symbols visible)natural_image
Isometric line drawing of three stacked rectangular panels with internal hatching (no text or symbols)natural_image
Close-up of a black circular dial with numbered segments and a small icon (no readable text or symbols)natural_image
Isometric line drawing of a mechanical or architectural component with no visible text, numbers, or symbols.
natural_image
Technical line drawing of a mechanical assembly with four cylindrical components and mounting brackets (no text or symbols)natural_image
Technical line drawing of a rectangular oven or oven with internal shelves and mounting feet, showing internal structure and wiring details (no text or symbols)natural_image
Technical line drawing of a mechanical device with an inset showing a pipe fitting and a close-up detail (no text or symbols)natural_image
Interior view of an open industrial oven with cooling fans and a vent, no visible text or symbolsnatural_image
Isometric line drawing of three stacked rectangular panels with internal hatching, no text or symbols presentnatural_image
Close-up of a rotary dial with numbered segments and a small icon (no readable text or symbols)natural_image
Isometric line drawing of a cabinet with internal compartments and directional arrows (no text or symbols)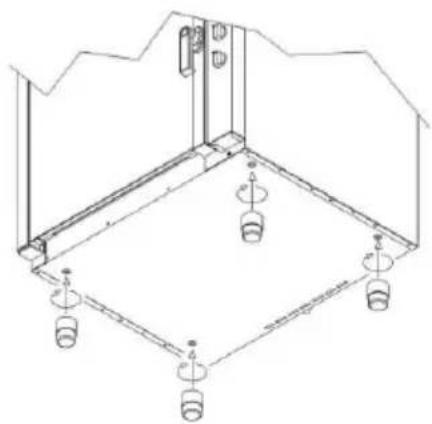
natural_image
Technical line drawing of a structural support frame with mounting fixtures and mounting joints (no text or symbols)natural_image
Technical line drawing of a laboratory oven with internal compartments and a close-up inset showing internal wiring (no text or symbols)natural_image
Technical line drawing of a mechanical device with a magnified inset showing a pipe fitting and a valve (no text or symbols)natural_image
Interior view of a stainless steel oven with open door and side-mounted fans (no visible text or symbols)natural_image
Technical line drawing of a mechanical assembly with three views (front, side, and internal layers) showing internal structure without any text or symbols.natural_image
Close-up of a rotary dial with numbered segments and a small icon (no readable text or symbols)natural_image
Isometric line drawing of a cabinet or enclosure with internal structural elements and directional arrows (no text or symbols)다리 받침대 설정
! 주의!
natural_image
Isometric line drawing of a structural frame with multiple cylindrical components and mounting brackets (no text or symbols)natural_image
Technical line drawing of a mechanical oven or oven unit with internal compartments and mounting feet, shown with an inset magnified view (no text or symbols)물받이 배수구 고정
5.1.4 전원 플러그 연결

경고! 전기 위험!
natural_image
Technical line drawing of a mechanical device with an inset showing a pipe connection detail (no text or symbols)natural_image
Interior view of an open industrial furnace or oven with cooling fans and a vertical glass panel (no visible text or symbols)natural_image
Isometric line drawing of a mechanical assembly with three views of a housing (no text or symbols)5.2.4 특별 점검
natural_image
Close-up of a black rotary dial with numbered segments (1–10) and a small icon at the top left (no readable text or symbols)


- Bedienungsanleitung
- Electric convection ovens
- Mode d'emploi
- Keep this instruction manual ready to hand at the product!
- General information .... 30
- 2.Safety 32
- Transport, packaging and storage.... 34
- Technical data 35
- Installation and operation.... 37
- Waste disposal 56
- Information about the instruction manual
- Key to symbols
- WARNING!
- WARNING! Electrical hazard!
- CAUTION!
- NOTE!
- WARNING! Hot external surface!
- WARNING! The container holds hot liquid!
- Liability and Warrantees
- Copyright protection
- Declaration of conformity
- 2.Safety
- General information
- Safety instructions for use of the device
- Intended use
- Transport, packaging and storage
- Delivery check
- Packaging
- Storage
- Bartscher
- Technical data
- Overview of parts
- Technical specification
- Properties of the convection oven
- Installation and operation
- Instructions for the installer
- Instructions
- Preparation
- Place of installation
- Preparing to Install
- Remove the protective film
- Adjusting the feet
- Do not use the oven without the feet.
- Attaching the drip tray
- Attaching the drip tray drain
- Power supply connection
- WARNING! Danger of electric shock!
- Convection oven with a single-phase power cord and plug (206873)
- Convection oven with a three-phase power cord and no plug (206782, 206797)
- Connection to the equipotential bonding system
- Water connection
- Water outlet (206782, 206797)
- Steam outlet vent
- User's instruction
- Safety precautions
- First use
- Standard maintenance
- Regular cleaning of the heating chamber
- WARNING! Risk of burn!
- Cleaning the external surfaces
- Cleaning the oven door
- Replacing the lamp
- Replacing and cleaning the cooling filter (the back)
- Special maintenance
- Troubleshooting
- Control panels
- Setting
- Function dial
- 200873
- 200797
- ON/OFF LED
- Timer dial
- Temperature control dial
- Thermostat LED
- Humidification control dial
- Humidification indicator
- Steam injection button
- Thawing
- Preheating
- Hints and Tips
- Waste disposal
- Discarding old devices
- Indications techniques
- Entretien extraordinaire
- 다리 받침대 설정
- 물받이 배수구 고정
- 전원 플러그 연결
- 특별 점검
Brand : BARTSCHER
Model : C6640
Category : Oven