
MS3607 - Safe SentrySafe - Free user manual and instructions
Find the device manual for free MS3607 SentrySafe in PDF.


| Product Type | Safe |
| Brand | SentrySafe |
| Model | MS3607 |
| External dimensions (W x H x D) | 30 cm x 20 cm x 20 cm |
| Weight | 8 kg |
| Material | Steel |
| Lock type | Electronic numeric keypad |
| Power supply | 4 AA batteries |
| Fire resistance | Up to 30 minutes |
| Capacity | 0.5 cubic feet |
| Main functions | Code programming, auto-locking, anti-tamper alarm |
| Maintenance and cleaning | Clean with a soft dry cloth |
| Security | Electronic lock with user code, locking system in case of tampering |
| Spare parts and repairability | Spare parts available from the manufacturer |
| Recommended use | Home, office |
| Warranty | 1 year |
Frequently Asked Questions - MS3607 SentrySafe
User questions about MS3607 SentrySafe
0 question about this device. Answer the ones you know or ask your own.
Ask a new question about this device
Download the instructions for your Safe in PDF format for free! Find your manual MS3607 - SentrySafe and take your electronic device back in hand. On this page are published all the documents necessary for the use of your device. MS3607 by SentrySafe.
USER MANUAL MS3607 SentrySafe
OWNERS MANUAL Fire-Safe® Safes
TABLE OF CONTENTS
Combination lock 1
Basic electronic lock 1-2
Advanced electronic lock 2
Floor mount 3
First class customer care .... 3
Testing....4
MANUEL DU PROPRIÉTAIRE Coffres-forts Fire-Safe® TABLE DES MATIÈRES
If you experience any problems or challenges with your safe, please contact us. Many issues can be resolved quickly without the product being returned.
...IMPORTANT...
Congratulations on your purchase of a SentrySafe product. SentrySafe is the world's leader in fire/water-resistant and security storage. This guide describes how to easily set up your safe.
2 Gain entry with the basic electronic lock
1 Gain entry with the combination lock Opening your safe for the first time (keep door open during setup):
The handle should be all of the way UP, in the horizontal position before attempting to dial out safe.
Testing your combination: Your safe's combination is printed on the front of this owner's manual. You will have a 3-number or 4-number combination depending upon the model purchased.
3-NUMBER COMBINATION (Cannot be changed)
1. To unlock and open
Before dialing your combination, simply insert the key (if equipped) in the lock and turn until the plunger pops out. Remove key.
NOTE: The safe will lock if key lock cylinder is pressed in with or without key.
A. Start the dial at zero.


urn the dial to the left. Make sure ZERO e pointer at least THREE times. Then stop t number of your combination.

Turn the dial to the right. Stop the D time you reach the second number of combination.

Turn the dial to the left. Stop the FIRST the pointer reaches the third number of your ation.
2. To close and lock
You can relock the safe in two ways. With the door closed, depress the key lock (if equipped) with your finger, or spin the combination dial one full turn. For greatest security, do both. (Make sure the door handle is in the horizontal position.)
4-NUMBER COMBINATION (Cannot be changed)
1. To unlock and open
Before dialing your combination, simply insert the key (if equipped) in the lock and turn until the plunger pops out. Remove key.
A. Point the dial to zero.

Turn the dial to the left. Make sure ZERO the pointer at least FOUR times. Then stop first number of your combination.

Turn the dial to the right. Stop the THIRD you reach the second number of your nation.

Turn the dial to the left. Stop the SECOND you reach the combination's third number.

Turn the dial to the right. Stop the FIRST you reach the last number of your nation.
2. To close and lock
You can relock the safe in two ways. With the door closed, depress the key lock (if equipped) with your finger, or spin the combination dial one full turn. For greatest security, do both. (Make sure the door handle is in the horizontal position.)

natural_image
Close-up of a rotary dial with numeric keypad (no visible text or symbols)The handle should be all of the way UP, in the horizontal position before attempting to open safe.
Opening your safe for the first time (keep door open during setup):

- Remove and discard the screw (if equipped) at the base of the lock case.
-
Turn the electronic lock case to the right (clockwise), from 12 o'clock to 2 o'clock, and remove.
-
Insert 4 new AA batteries (not included) to power this lock.
- Replace the electronic lock case and turn to the left (to 12 o'clock) to reassemble.
NOTE: The yellow LED will light when the batteries need to be replaced.
- Turn the key (if your safe is equipped with a key lock) to the right so the lock cylinder pops out.
- Enter the factory code (printed on the first page of this guide). When the green light appears, you have four seconds to turn the handle down to open. Try this several times before proceeding to the next step.
To unlock safe:
Enter the 5-digit factory code, a pre-programmed user code, or a pre-programmed user pin (programming instructions to follow). When the green LED lights you have 4 seconds to turn the handle and open the safe.
To lock safe:
Close the door and return the handle to the horizontal position. For greatest security, depress the key lock (if equipped) with your finger.
NOTE: If your unit is equipped with a water-resistant gasket additional pressure to the left corner of the door may be required before the handle can be returned to the horizontal position.
Access codes
There are 3 possible ways to unlock and access the safe:
1. Factory code
(Found on the first page of this guide) You can always open the safe by entering the pre-set 5-digit factory code. This code cannot be deleted.
2. User code
If you prefer to employ your own code, you can program the safe to open using a 5-digit user code of your choice.
3. User pin
If you wish to give someone else temporary access to the safe, you can program a 5-digit user pin that can later be erased.
Programming the user code
NOTE: One (1) user code is allowed.
To add:
- Press the Prog key, then enter the 5-digit factory code.
- Enter the 5-digit user code of your choice.
To delete:
- Press the Prog key.
- Enter the 5-digit factory code twice.
Programming user pin
NOTE: One (1) user pin is allowed.
To add:
- Press the Prog key 2 times
-
Enter your 5-digit user code.
-
Enter the 5-digit user pin of your choice.
To delete:
- Press the Prog key 2 times.
-
Enter your 5-digit user code.
-
Enter 0, 0, 0, 0, 0
NOTE: If your safe does not appear to be working, please check batteries before calling Sentry Customer Care.

Gain entry with basic electronic lock cont.

Gain entry with advanced electronic lock cont.
Signals
Your electronic-lock safe communicates by means of several audio/visual signals.
Red (Error) LED + three beeps indicates one of the following:
- You have pressed Program key out of sequence.
- You have entered an invalid code or user pin.
- You have let 5 seconds or more elapse between key presses.
- Lights after three consecutive invalid codes are input (2-minute delay mode).
Green LED only:
- Comes ON after you enter a valid code and remains lit during the 4-second period in which the safe can be opened.
- Comes ON in the Programming mode and remains lit until you have finished entering a 5-digit code.
Yellow LED only:
- Comes ON when the batteries need to be replaced.
Icon identifi cation
ERR (Error) indicates one of the following:
- You have pressed Program key out of sequence.
- You have entered an invalid code.
- You have let 5 seconds or more elapse between key presses.
- You have pressed a key while in delay mode.
PRO (Program) Lights after pressing the Program key and stays lit while programming a manager or user code.
- Enter a 4 to 8 digit code and press the Progi/Enter key to finish programming the code into the unit.
To delete:
- Press the Prog/Enter key, then enter the 5-digit factory code and then press the Prog/Enter key.
- A boxed lighted * icon (*) indicates there is a code programmed and can be deleted.
- Press 0, 0, 0, 0, then the Prog/Enter key to delete the manager code. (0, 0, 0, 0, Prog/Enter).
NOTE: To return to the beginning when programming a manager or user code, wait 5 seconds and the lock will time-out. You may then start over.

Gain entry with advanced electronic lock

Opening your safe for the first time (keep door open during setup):
- Remove and discard the screw (if equipped) at the base of the lock case.

①
- Turn the electronic lock case to the right (clockwise), from 12 o'clock to 2 o'clock, and remove.
- Insert 4 new AA batteries (not included) to power this lock.
-
Replace the electronic lock case and the left (to 12 o'clock) to reassemble.
-
Tum the key (if your safe is equipped with a key lock) to the right so that the lock cylinder pops out.
-
Enter the factory code (printed on the first page of this guide), then press the Prog/Enter key. When the unlocked padlock icon (☐) appears, you have four seconds to turn the handle down to open. Try this several times before proceeding to the next step.
To unlock safe:
Enter the 5-digit factory code, a pre-programmed manager code, or a pre-programmed user code (programming instructions to follow), then press the Prog/Enter key. When the unlocked padlock icon (☐) appears, you have four seconds to turn the handle down to open.
To lock safe:
Close the door and return the handle to the horizontal position. For greatest security, depress the key lock (if equipped) with your finger.
NOTE: If your unit is equipped with a water-resistant gasket. Additional pressure to the left corner of the door may be required before the handle can be returned to the horizontal position.
Battery replacement
The battery icon (☐) will light when the batteries need to be replaced. No codes are erased when old batteries are removed for replacement. See "Opening your safe for the first time".
NOTE: If your safe does not appear to be working, please check batteries before calling Sentry Customer Care.
(Delay Mode) Lights after three consecutive invalid codes are input and stays lit during the 2-minute delay mode.
Access codes
There are 3 possible ways to unlock and access the safe:
NOTE: Maintain a record of the factory code, user, and manager codes, and store them in a secure location other than in this safe.
1. Factory code
(Found on the first page of this guide) You can always open the safe by entering the pre-set 5-digit factory code. This code cannot be deleted.
2. Manager code
If you prefer to employ your own code, you can program the safe to open to a 4-8 digit manager code of your choice.
3. User code
If you wish to give someone else temporary access to the safe, you can program a 4-8 digit user code that can later be erased.
NOTE: Remember, once you have decided on your access codes, open the unit first then test it with the door open. All zeros is an invalid code.
Programming the manager code
NOTE: One (1) manager code is allowed.
To add:
- Press the Prog/Enter key, then enter the 5-digit factory code and then press the Prog/Enter key.
- An empty lit box icon (☐) means no manager code is programmed. A boxed lighted * icon (☑) means a manager code is programmed.
Programming user code
NOTE: Six (6) user codes are allowed.
To add:
- Press the Prog/Enter key 2 times, enter the manager code and then press the Prog/Enter key.
- Use the << or >> to scroll between the lighted boxes. An empty box icon (☐) means it is available for a code entry; a boxed lighted * icon (☑) means it is being used.
- Enter a 4 to 8 digit code in the selected position and press the Prog/Enter key to finish.
To delete:
- Press the Prog/Enter key 2 times, enter the manager code and then press the Prog/Enter key.
- Use the << or >> to scroll to the boxed lighted * icon (★) to be removed.
- Press 0, 0, 0, 0, then the Prog/Enter key to delete the selected user. (0, 0, 0, 0, Prog/Enter). NOTE: To turn the beeper on or off, press the 0 key and then the Prog/Enter key. (0, Prog/Enter).
4 Floor Mount (optional)
Sentry Safe First-Class Customer Care


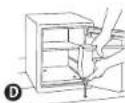
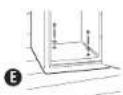
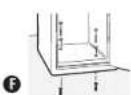
Optional kit (Fig. A) contains (included on select models only):
• (2) Lag screws
• (2) Washers
• (2) Masonary anchors
Tools needed for floor mounting:
- Drill
• Wrench
• 7/16" (11.0 mm) drill bit
Wood anchoring:
9/32" (7.2 mm) drill bit
Masonry anchoring:
3/8"(9.50 mm) drill bit
Instructions:
-
Tip the safe onto its right side. (Door hinges horizontal with the floor.)
-
Unlock the safe and open the door.
-
Look on the bottom of the safe for two indentations on the feet in opposite corners. Using the 7/16" (11.0 mm) bit, drill a hole through each indentation perpendicular to the bottom of the safe (Fig. 8). Do not drill from any location inside the safe.
-
Close the door and tip the safe upright. Place it where desired and reopen the door.
-
Use a screw or drill bit to mark the floor through both holes. (Fig. C)
-
Move the safe aside to clear both marked spots for drilling.
-
Drill into the floor: A. For wood: Using the wood drill bit, drill a hole 2-1/2" (64 mm) deep in each marked spot. (Fig. D)
B. For masonry: Using the masonry bit, drill a hole 2-1/2" (64 mm) deep in each marked spot. (Fig. D) Install a masonry anchor in each hole.
- Replace the safe in the desired position, with the holes in the safe aligned with
those in the floor.
9. Securing the safe:
A. For wood: Pass each lag screw through a washer, then through the safe and into a hole. Tighten with the wrench. (Fig. E)
B. For masonry: Pass each lag screw through a washer, then through the safe and into a masonry anchor. Tighten with the wrench. (Fig. F)
NOTE: Drill holes through feet only, not through the back or sides. Bolting/unbolting of the unit is at the consumers expense and discretion. Sentry Group is not responsible for any costs incurred if the unit is to be replaced.
If you lose your combination/keys or need accessories, we can help! Visit our website at www.sentrysafe.com
natural_image
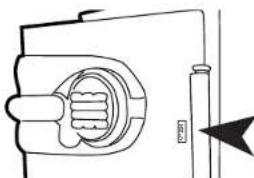
Pure technical line drawing of a mechanical component without any text, numbers, or symbolsPlease note: Your safe's serial number is required to obtain replacement combination/keys. The serial number can be found near the door hinge as shown or at the beginning of this guide.
Troubleshooting
- If electronics are not functioning, replace batteries first (behind electronic lock case) as described in step one of this guide.
- If electronics are functioning and you cannot get into safe:
- Pull handle up
- Follow instructions for opening your lock type.
- You must use both the key (if equipped) and the electronic code to open the safe if the key lock cylinder is pushed in.
Delay mode
Enters a two-minute delay mode after an invalid code has been entered three consecutive times. In this mode, the lock can not be activated and any key entry will generate an ERROR signal.
Registration: To be eligible for warranty coverage, the original purchaser must register the product online at www.sentrysafe.com or complete and return to Sentry Group the enclosed registration card.

WARNING
This product is not intended for the secure storage of all materials. Items such as firearms, other weapons, combustible materials, or medication should not be stored in this unit.
WARNING
DO NOT store delicate
items directly in your safe. SentrySafe products which offer fire protection have a propensary insulation that has a high moisture content. In addition the SentrySafe advanced sales close alright to offer water resistance, which may also cause moisture to accumulate inside your safe. The cesiccant packet included in your safe during shipments, should be left in your safe. IDO NO1 DISCARD II. It is intended to help absorb moisture which may
accumulate inside your safe. Please open your unit periodically to avoid moisture accumulation.
If you choose to store delicate items such as jewelry with working parts, watches, stamps, or photos in your safe, we recommend putting them in an air-tight container, prior to placing them in the safe for storage.
NOTE: Sentry Group will not be responsible for any damage or loss of items placed in the unit due to moisture.
WARNING
DO NOT store pearls in this safe unit.
In the event of a fire, potential damage to delicate pearls occurs at temperatures much lower than the 350°F interior performance
measure which the UL classification performance standard indicated guarantees. Therefore, DO NOT stare pearls in your Sentry Sale product..

WARNING
No computer disks, audio-visual
media or photo negatives. This product is not intended to protect computer floppy or disketies, cartridges and tapes, audio or video cassettes or photo negatives. For fire-resistant storage of these materials, ask your retailer for the SentrySafe Fire-Sale Media storage products.
Rigorous testing ensures this product meets our specifications
| FIRE FEU FUEGO | Fire Endurance | Explosion Hazard | Fire Impact | Data Protection |
| 1-Hour Models | CULUS Subjected to temperatures up to 1700°F (927°C) for duration of 1-hour, the safe interior will remain below 350°F (177°C). This enables your safe to withstand even high temperature exposure, as the hottest part of a fire moves through a building. | CULUS Subjected to flash fire in a 2000°F (1093°C) furnace for 30 minutes, the unit will not explode or rupture. | ETV After being heated to 1550°F (843°C) the safe is dropped 15 feet onto rubble, then cooled, inverted and reheated to 1550°F (843°C) for 30 minutes. | ETV 1-hour fire protection of CD's, DVD's, memory sticks, and USB drives up to 1700°F (927°C). |
| 1-hour 2.0 Cu. Ft. Models | CULUS Subjected to temperatures up to 1700°F (927°C) for duration of 1-hour, the safe interior will remain below 350°F (177°C). This enables your safe to withstand even high temperature exposure, as the hottest part of a fire moves through a building. | CULUS Subjected to flash fire in a 2000°F (1093°C) furnace for 30minutes, the unit will not explode or rupture. | CULUS After being heated to 1550°F (843°C) the safe is dropped 30 feet onto rubble, then cooled, inverted and reheated to 1550°F (843°C) for 30 minutes. | ETV 1-hour fire protection of CD's, DVD's, memory sticks, and USB drives up to 1700°F (927°C). |
| 2-Hour Models | CULUS Subjected to temperatures up to 1850°F (1010°C) for duration of 2-hours, the safe interior will remain below 350°F (177°C). This enables your safe to withstand even high temperature exposure, as the hottest part of a fire moves through a building. | CULUS Subjected to flash fire in a 2000°F (1093°C) furnace for 30 minutes, the unit will not explode or rupture. | CULUS After being heated to 1638°F (892°C), the safe is dropped 30 feet onto rubble, then cooled, inverted and reheated to 1638°F (892°C) for 45 minutes. | ETV 2-hour fire protection of CD's, DVD's, memory sticks, and USB drives up to 1850°F (1010°C). |

ETL Verified Water-Resistance Protection (if equipped)
Tested up to 8 inches of water for up to 24 hours.
Note: Maximum allowable leakage is 170 grams.
NOTE: For the gasket to work effectively, the safe door must be closed with the handle fully horizontal. When you move the handle, the compression of the gasket will require slightly more force than you would use with a safe that does not have a gasket.
Pour commencer
natural_image
Close-up of a rotary dial with numeric keypad (no visible text or symbols)- OWNERS MANUAL Fire-Safe® Safes
- TABLE OF CONTENTS
- MANUEL DU PROPRIÉTAIRE Coffres-forts Fire-Safe® TABLE DES MATIÈRES
- ...IMPORTANT...
- Gain entry with the basic electronic lock
- Gain entry with the combination lock Opening your safe for the first time (keep door open during setup):
- 3-NUMBER COMBINATION (Cannot be changed)
- To unlock and open
- To close and lock
- 4-NUMBER COMBINATION (Cannot be changed)
- Opening your safe for the first time (keep door open during setup):
- To unlock safe:
- To lock safe:
- Access codes
- Factory code
- User code
- User pin
- Programming the user code
- To add:
- To delete:
- Programming user pin
- Gain entry with basic electronic lock cont.
- Gain entry with advanced electronic lock cont.
- Signals
- Red (Error) LED + three beeps indicates one of the following:
- Green LED only:
- Yellow LED only:
- Icon identifi cation
- Gain entry with advanced electronic lock
- Battery replacement
- Manager code
- User code
- Programming the manager code
- Programming user code
- Floor Mount (optional)
- Sentry Safe First-Class Customer Care
- Optional kit (Fig. A) contains (included on select models only):
- Wood anchoring:
- Instructions:
- Securing the safe:
- If you lose your combination/keys or need accessories, we can help! Visit our website at www.sentrysafe.com
- Troubleshooting
- Delay mode
- WARNING
- DO NOT store delicate
- DO NOT store pearls in this safe unit.
- No computer disks, audio-visual
- Rigorous testing ensures this product meets our specifications
- ETL Verified Water-Resistance Protection (if equipped)
- Pour commencer
Brand : SentrySafe
Model : MS3607
Category : Safe