
HG8471MBB - Cooker Atag - Free user manual and instructions
Find the device manual for free HG8471MBB Atag in PDF.


| Brand | Atag |
| Model | HG8471MBB |
| Product type | Gas hob with electric oven |
| Dimensions (W x H x D) | 90 x 85 x 60 cm |
| Net weight | 75 kg |
| Power supply | Gas (G20/G30) and electric 230 V / 50 Hz |
| Number of burners | 5 including 1 triple crown |
| Main burner | Power 4.2 kW |
| Oven type | Multifunction with fan |
| Oven capacity | 72 liters |
| Oven functions | Fan, grill, bottom heat, defrost |
| Oven cleaning | Pyrolytic |
| Oven door | Removable cool door glass |
| Gas safety | Safety device on all burners |
| Oven safety | Door lock during pyrolysis |
| Surface material | Vitreous enamel |
| Oven rack | 2 telescopic racks |
| Oven lighting | Halogen lamp |
| Repairability index | 7.8/10 |
| Spare parts available | Burners, glass, heating element, thermostat |
| Included accessories | Drip tray, rack, rotisserie |
| Oven energy class | A+ |
| Noise level | 48 dB(A) |
Frequently Asked Questions - HG8471MBB Atag
User questions about HG8471MBB Atag
0 question about this device. Answer the ones you know or ask your own.
Ask a new question about this device
Download the instructions for your Cooker in PDF format for free! Find your manual HG8471MBB - Atag and take your electronic device back in hand. On this page are published all the documents necessary for the use of your device. HG8471MBB by Atag.
USER MANUAL HG8471MBB Atag
The appliance identification card is located on the bottom of the appliance.
Stick the appliance identifi cation card here.
Fest apparatels ID kor her.
When contacting the service department, have the complete type number to hand.
Serg for at have hele typenummeret klar, när servicealdelingen kontaktes.
Ha hele typenummeret for hånden när du kontakter serviceavdelingen.
You will find the addresses and phone numbers of the service organisation on the guarantee card.
Instructions for use
Gas hob
Anvendelse
Gaskogeplade
Bruksanvisning
Gasskoketopp
Käyttöohjeet
Kaasutaso
Bruksanvisning
Gashäll
700004592100
HG8471MBA
HG8471MBB
HG8411MBA
HG8411MBB
NL

fout
Pannen
goed

wokring
Wokring en verkleinrooster
verkleinrooster
Brander
kelk plaatsen

ringen plaatsen
zijaanzicht
Onderhoud

incorrect
correct
anneau pour wok

Brûleur
montage des anneaux

vue de profil
Entretien
falsch
richtig

Wok-Ring

Verkleinerungsrost
Kochgeschirr
Brenner
Seitenansicht
Wartung
Ignition and adjustment
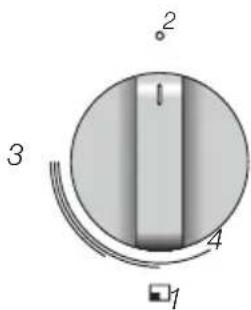

- zone indication
2.0 position - High setting
- Low setting
- Wok setting (wok burner)
- Roasting setting (wok burner)
Each burner is fully adjustable between high and low settings.
- Press the control knob and turn it anticlockwise. The burner will ignite.
- Keep the control knob fully depressed for at least 3 seconds between high and low settings. The thermocouple safety pilot has been activated.
- Turn the wok control knob until it stops, press it again and turn the knob further to the low setting (4).
- If desired, turn the wok selector ring to the roasting setting (6). The inner ring (wok setting) will switch off and the outer ring (roasting setting) will switch on.
- The wok burner will switch automatically to the wok setting if the control knob of the wok burner is set to 0.
It is possible to switch between wok setting and roasting setting and back during cooking.

Please note! If the control knob is in the off setting (0-setting) the selector ring cannot be changed to the roasting setting. Always turn this knob back completely to 0!
Use
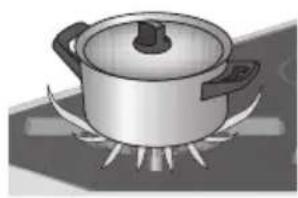
error
Pans
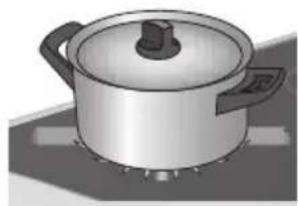
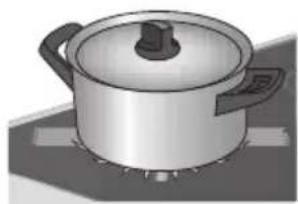
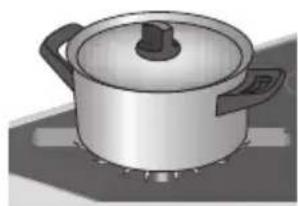
- Always ensure that the flames stay under the pan. A lot of energy is lost if flames burn around the pan. The handles may also become too hot.
- Do not use pans with a base diameter smaller than 12 cm. Smaller pans are not as stable.
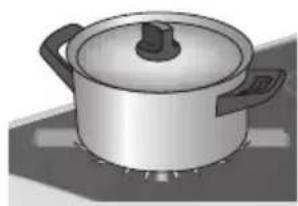
good
Wok ring and small pan grid
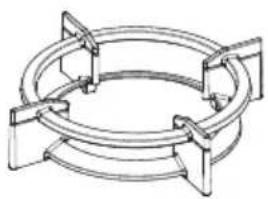
The wok ring for use with the wok burner supplied or obtainable as an accessory provides extra stability for woks with a round base. The small pan grid supplied or obtainable as an accessory makes it possible to use very small pans.

wok ring
Do not use the small pan grid on the wok burner. Do not use the wok ring on the wok roasting setting. This can result in discolouring.

small pan grid
Pan support
Place the pan supports vertically, without sliding over the drip tray. Use the leads to position the pan supports on the drip tray.
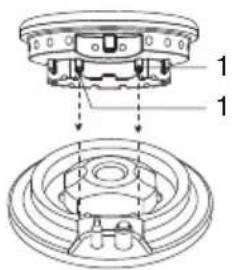
Burner
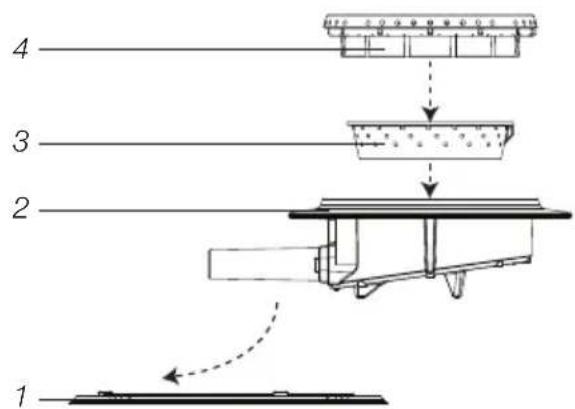
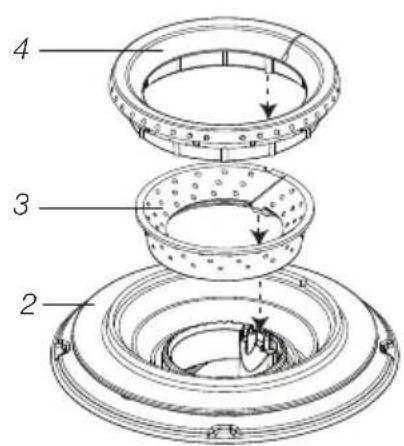
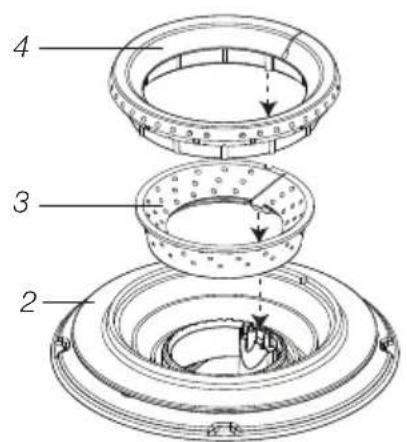
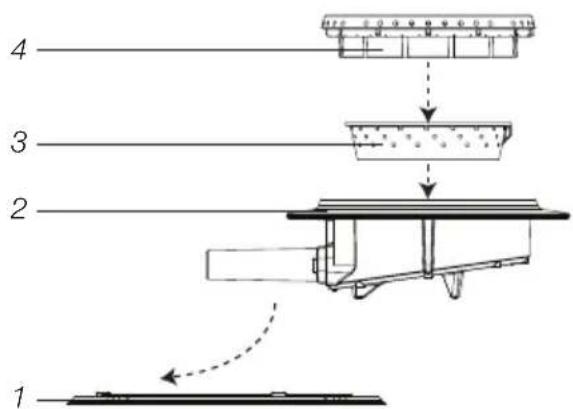
Use the leads (1) to put together the burner parts.
Wok burner
Place the wok burner correctly. Placing the wok burner parts incorrectly can result in a poorly functioning burner.
- Place the burner distributor (2) in the burner housing (1).
- Use the leads to place the inner ring (3) on the burner distributor (2).
- Use the leads to place the outer ring (4) on the burner distributor (2).
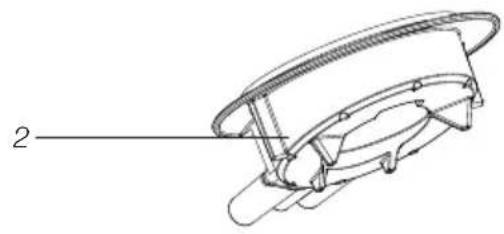


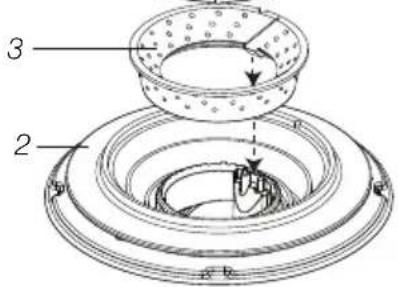
position rings
position distributor

side view
Maintenance

Regular maintenance after use prevents spilt food from setting too long and creating stubborn stains. Use a mild detergent for this. First clean the control knobs, burners and pan supports and only then the drip tray or glass cover. This prevents the drip tray or glass cover to becoming dirty again after cleaning.
Please note! Do not clean burner parts in the dishwasher. Dishwasher detergent can corrode burner parts!
Persistent stains on enamel (pan supports, burner caps)
Persistent stains can best be removed with a fluid detergent or a plastic scouring sponge. Never use scouring powder, scouring pads, sharp objects or aggressive cleaning products.
Persistent stains on the glass cover
Clean the glass cover with a special cleaning product for ceramic hobs. Water stains or limescale are best cleaned using cleaning vinegar.
Persistent stains on the stainless steel (drip trays)
Persistent stains on stainless steel are best removed with a special stainless steel cleaning product. Always wipe with the structure of the steel to prevent scraping away the protective layer (damage caused in this way does not fall under the guarantee!) The surface of stainless steel drip trays can discolour slightly over time.
Brass wok burner parts
Some wok burner parts are made from brass. It is normal for the brass colour to change as a result of the high temperatures involved in wok use.

Consult the www.atagservice.nl website for additional maintenance and cleaning instructions!
Fault list
If your gas hob does not work properly, this does not always mean that it is defective. Try to deal with the problem yourself first by checking the points below or check the 'www.atagservice.nl' website for more information.
| SYMPTOM POSSIBLE CAUSE SOLUTION | ||
| You smell gas near the appliance. | The appliance connection is leaking. | Close the main gas switch. Contact the your installer. |
A burner does not ignite.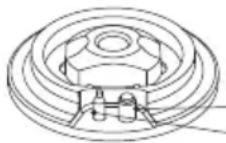 12 12 | Plug not in socket.Fuse defective/fuse switched off in fuse cupboard.Spark plug (1) dirty/damp.Burner parts not placed correctly.Burner parts dirty/damp.Main gas tap closed.Fault in gas mains.Gas bottle or tank is empty.Wrong type of gas used. | Put the plug into the socket.Put in a new fuse or switch on the fuse in the fuse box.Clean/dry the spark plug.Use the centring leads to put the burner parts together.Clean/dry the burner parts. Make sure that the outflow holes are open.Open the main gas tap.Consult you gas supplier.Connect a new gas bottle or have the tank refilled.Check whether the gas used is suitable for the appliance. Contact your installer if it is not correct. |
| The burner does not burn evenly. | Burner parts not placed correctly.Burner parts dirty/damp.Wrong type of gas used. | Use the centring leads to put the burner parts together.Clean/dry the burner parts. Make sure that the outflow holes are open.Check whether the gas used is suitable for the appliance. Contact your technician if it is not correct. |
| Burner extinguishes after igniting. | The control knob has not been depressed long or deep enough (at least 3 seconds).Thermocouple (2) is dirty. | Keep the control knob fully depressed for at least 3 seconds between high and low settings. This can take longer the first time because of the gas supply.Clean/dry thermocouple. |
| SYMPTOM POSSIBLE | LE CAUSE SOLUTION | |
| Timer indicates error code F0 – F6 (if present). | There is an object, water or dirt on the buttons. Button used for too long. | Ensure that there is nothing on the buttons.Ensure that the buttons are clean and there is no water on them.Contact the technician if the error code does not disappear. |
| Ceramic glass plate broken. | Object fallen onto it. Close the gas main switch and pull the plug out of the socket. Contact the your installer.Please note! Do not throw a broken ceramic glass plate in the glass recycling bin but take this to the Municipality's waste recycling centre. | |
Disposal of the appliance and packaging
Sustainable materials have been used during manufacture of this appliance.
The appliance packaging is recyclable. The following may have been used:
- cardboard;
- paper;
• polyethylene film (PE);
• CFC-free polystyrene (PS-rigid foam);
• polypropylene tape (PP).
Dispose of these materials in a responsible manner and in accordance with government regulations.

To designate the requirement for separate collection of household electrical appliances, the symbol of a crossed-out dustbin is applied to the product.
This means that at the end of its working life, the product must not be disposed of as urban waste. It must be taken to a special local authority differentiated waste collection centre or to a dealer providing this service. Disposing of a household appliance such as this hob separately avoids possible negative consequences for the environment and health and enables the constituent materials to be recovered, resulting in significant savings in energy and resources.

Please note! Do not throw a broken ceramic glass plate in the glass recycling bin but take this to the Municipality's waste recycling centre.

Declaration of conformity
We hereby declare that our products satisfy the applicable European directives, orders and regulations, as well as the requirements stated in the referenced standards.
Beskrivelse

fejl
god

wokring

rist til små gryder
Gryder
Brænder
placering af fordeler
placering af ringe

set fra siden
Vedligeholdelse

feil
Kjeler
bra
wokring
liten rist
Kasserollestøtte
Brenner

posisjonsringer

Vedlikehold

Messing wok-brennerdeler
fel
Kokkärl
rätt

wokring
Brännare
väärin
Astiat
oikein
pienen astian ritilä
Poltin

aseta tasoitin
aseta renkaat
näkymä sivulta
Ylläpito

incorrecto

correcto

anillo para woks

Fogón
- PANNEN
- WOKRING EN VERKLEINROOSTER
- BRANDER
- ONDERHOUD
- BRÛLEUR
- ENTRETIEN
- KOCHGESCHIRR
- BRENNER
- WARTUNG
- IGNITION AND ADJUSTMENT
- USE
- PANS
- WOK RING AND SMALL PAN GRID
- PAN SUPPORT
- BURNER
- WOK BURNER
- MAINTENANCE
- PERSISTENT STAINS ON ENAMEL (PAN SUPPORTS, BURNER CAPS)
- PERSISTENT STAINS ON THE GLASS COVER
- PERSISTENT STAINS ON THE STAINLESS STEEL (DRIP TRAYS)
- BRASS WOK BURNER PARTS
- FAULT LIST
- DISPOSAL OF THE APPLIANCE AND PACKAGING
- DECLARATION OF CONFORMITY
- BESKRIVELSE
- GRYDER
- BRÆNDER
- VEDLIGEHOLDELSE
- KJELER
- KASSEROLLESTØTTE
- VEDLIKEHOLD
- MESSING WOK-BRENNERDELER
- KOKKÄRL
- BRÄNNARE
- ASTIAT
- POLTIN
- YLLÄPITO
- FOGÓN
Brand : Atag
Model : HG8471MBB
Category : Cooker